Latest SeedProd News

WordPress Tutorials, Tips, and Resources to Help Grow Your Business

how to create a landing page in wordpress

How to Create a Landing Page in WordPress (in Under 30 Mins) 

Written By: author image Stacey Corrin
author image Stacey Corrin
Stacey has been writing about WordPress and digital marketing for over 10 years and on other topics for much longer. Alongside this, she's fascinated with web design, user experience, and SEO.
     Reviewed By: John Turner
reviewer image John Turner
John Turner is the co-founder of SeedProd. He has over 20+ years of business and development experience and his plugins have been downloaded over 25 million times.

Do you want to create a landing page for your WordPress website?

We use landing pages for many of our campaigns because they’re effective for accomplishing our goals and getting more conversions. In fact, one reader was so interested in how we did it that we decided to lay out all the steps so everyone could learn what we did.

In this guide, we’ll show you how to create a landing page in WordPress step-by-step.

Table of Contents

First, what exactly is a landing page?

What Is a WordPress Landing Page?

A landing page is a standalone web page created with a single objective – to lead visitors toward your desired action, be it signing up for a newsletter or making a purchase. Specifically, a WordPress landing page is one created on WordPress, leveraging its various themes and plugins to build a highly customizable and optimized page.

Your landing page is like a marketing tool, highlighting offers to potential leads or customers. Whether you’re launching a new product or promoting an event, a well-designed landing page can give visitors all the information they need in a neat, user-friendly package.

Expert Tip

It’s easy to confuse a landing page with a homepage, but they have different purposes:

• A homepage is what visitors see after typing your URL into their browser’s address bar. It’s like a shop window with lots of information and links, giving users many choices.

• However, a landing page focuses on conversions. It has fewer links, and the content aligns with a single goal or call to action (CTA).

Why Use WordPress to Create a Landing Page?

WordPress is an open-source content management system (CMS) powering over 43% of websites on the internet. It’s a powerful and versatile platform, that lets you create anything from a blog to an eCommerce store.

One of the reasons why WordPress is so popular is that it’s extremely flexible and user-friendly. It also has thousands of WordPress plugins, which are small pieces of software you can install on your website to extend its functionality or add new features.

Some of these plugins include page builders, which make creating high-converting landing pages effortless. They typically have a visual user interface that doesn’t require code or a complicated setup.

This means even beginners can make the best landing page for their business without hiring a developer. Some builders even allow you to create a landing page without a website.

How to Create a Landing Page in WordPress Using SeedProd

We’ve found that the easiest way to set up a landing page is with a WordPress landing page plugin like SeedProd.

SeedProd lets you create high-converting landing pages without manually writing PHP, HTML, and CSS code. It also has built-in coming soon and maintenance modes that allow you to hide your site while working on it.

SeedProd Drag and Drop WordPress website builder

It has a fuss-free drag-and-drop page builder that offers a live preview of your page as you make changes. Plus, it works seamlessly with your current WordPress theme or child theme.

Creating a professional landing page design is easy with SeedProd’s landing page templates. With WooCommerce integration, you can even make product pages to boost revenue.

You can also forget about pages that are slow to load and customize. Unlike other solutions, SeedProd is bloat-free, so everything loads lightning-fast no matter what you add to your page.

Follow these steps to create a landing page in WordPress with SeedProd’s page builder.

Video Tutorial

Step 1: Install SeedProd Landing Page Plugin

First, click here to get started with SeedProd and download the plugin to your computer. Then upload and activate the plugin on your WordPress website.

If you need help with this step, follow this guide for installing a WordPress plugin.

Note: There’s a free version of SeedProd available that lets you create a free landing page, but we’ll use the Pro version because it has more templates and blocks.

Enter your SeedProd Landing Page Pro license key

After activating the plugin, you’ll see a welcome screen in your WordPress dashboard. Enter your license key in the field provided and click the Verify Key button to activate any premium features.

Next, scroll further down the same screen and click the Create Your First Page button.

How to create your first landing page in wordpress

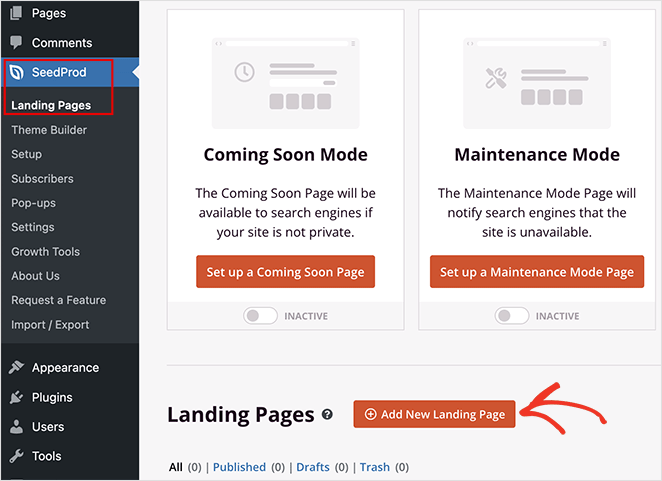
After clicking the button, you’ll head to the landing page dashboard, where you can follow the instructions on setting up a landing page. On this page, you can edit and activate a Coming Soon Mode, Maintenance Mode, Login page, and 404 Page.

Underneath, you’ll see a list of all the landing pages you’ve created with SeedProd.

SeedProd landing page modes

Since we don’t have any pages yet, go ahead and click the + Add New Landing Page button to create a new page.

How to add a landing page to WordPress

Step 2: Choose a Landing Page Template

The great thing about SeedProd is it comes with a wide variety of landing page templates. You can build stunning landing pages in WordPress without any coding experience.

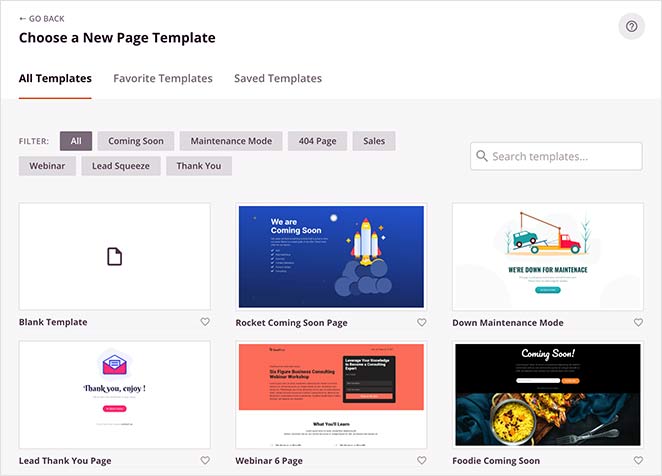
After clicking the Add New Landing Page button, you’ll see a page where you can choose a template.

Choose a WordPress landing page template

Alternatively, you can select the Blank Template to build and design your own page in the visual editor.

For this tutorial, let’s choose the Newsletter Squeeze Page Template. Just hover your mouse over the template and click the tick icon.
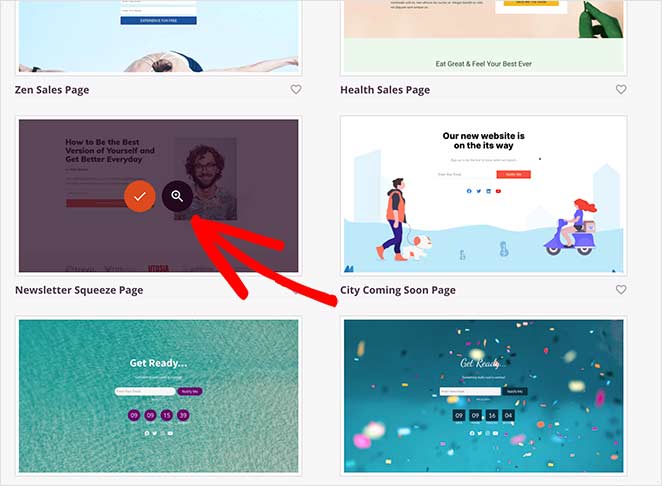
Choose and launch your landing page template

After that, a lightbox popup will appear where you can give your page a name and a custom URL. Then click the Save and Start Editing the Page button to load your template in the drag-and-drop builder.
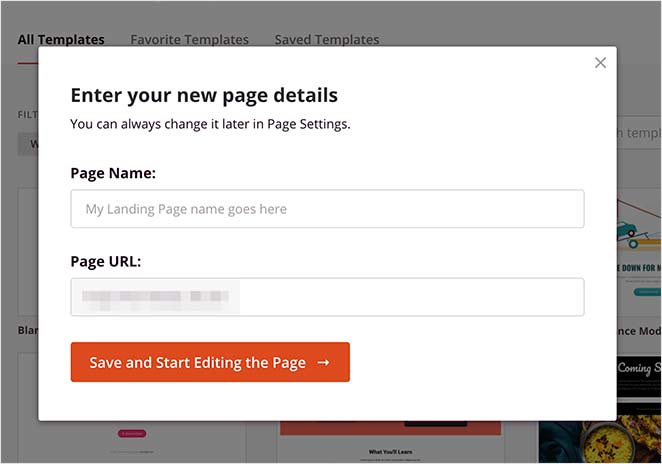
give your wordpress anding page a name and custom URL

Step 3: Customization: Design a Landing Page That Converts

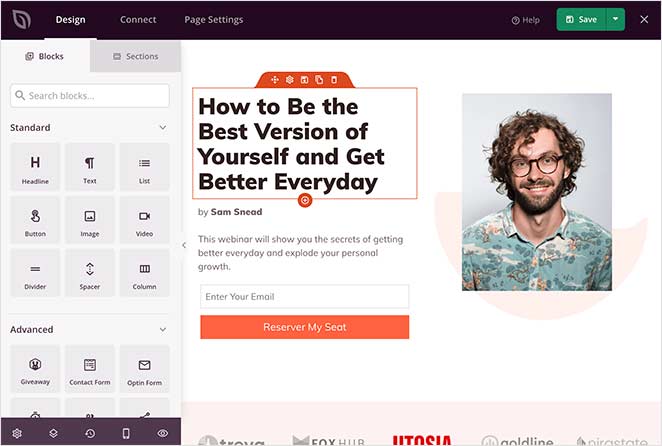
After creating your new page, you’ll see the visual drag-and-drop page builder. That is where you can choose the layout for your page and add your landing page content. These elements include Blocks and Sections.

Customize your wordpress anding page in the visual drag and drop page builder

Landing Page Blocks

Blocks are elements that contain the content of your page, including:

  • Headlines
  • Text
  • Bullet Point Lists
  • Images
  • Buttons
  • Dividers
  • Videos
  • Spacers
  • Columns

To add them to your page, drag them from the left-hand panel onto the live page preview on the right. You can also click any element to see several customization options.

For instance, if you click the Button block to open the settings, you’ll see several template styles, colors, gradients, and outlines.
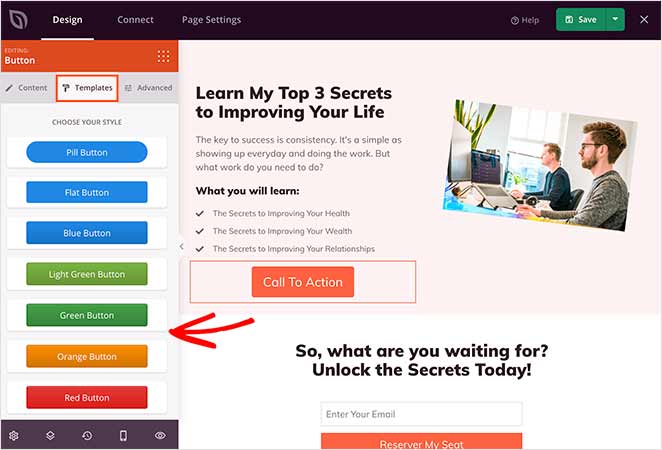
Choose templates for the content elements on your landing page in WordPress

You can also change the block’s content, size, alignment, color, and typography in the Advanced tab.

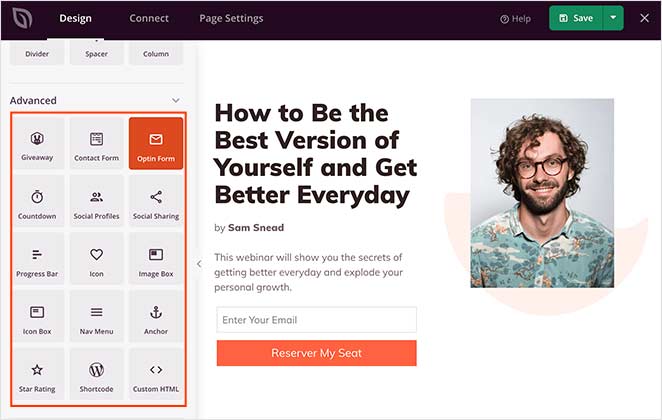
Additionally, there are Advanced blocks that are ideal for generating leads.

Add conversion-focused landing page blocks in WordPress

They include signup forms, contact forms, login forms, anchor links, WooCommerce blocks, and more.

You can also show social proof and create urgency on your page with:

  • Countdown timers
  • Star ratings
  • Testimonials
  • Progress bars
  • Social blocks
  • Sharing buttons

Landing Page Sections

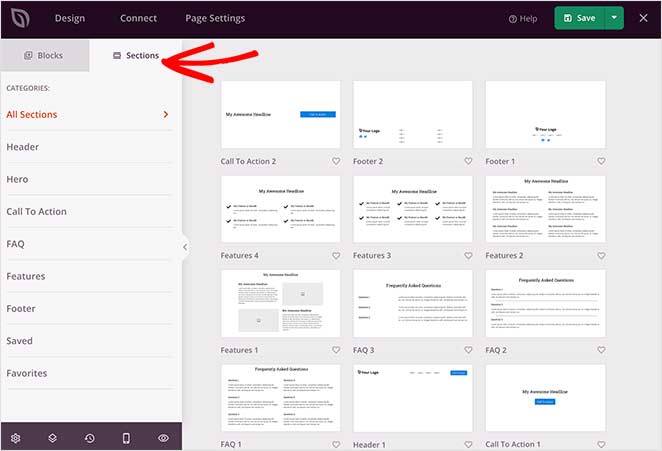
The sections tab shows a selection of pre-made layouts you can click and add to your landing page.

SeedProd WordPress landing page sections

That includes sections for headers, hero areas, calls to action, FAQs, features, and footers.

To add a section to your landing page, hover over an example with your mouse and click the plus + icon.
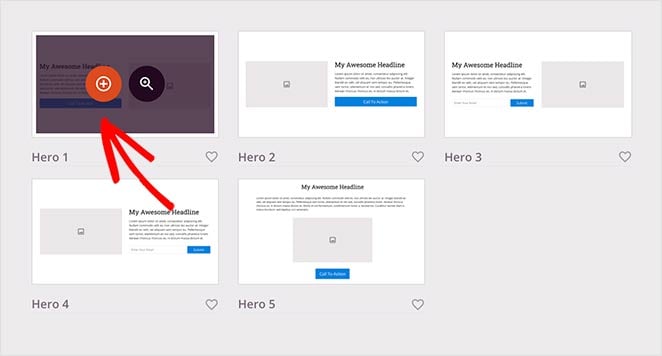
add a new landing page section

SeedProd then inserts the section into your page. You can then click and edit the elements as you would with the blocks.
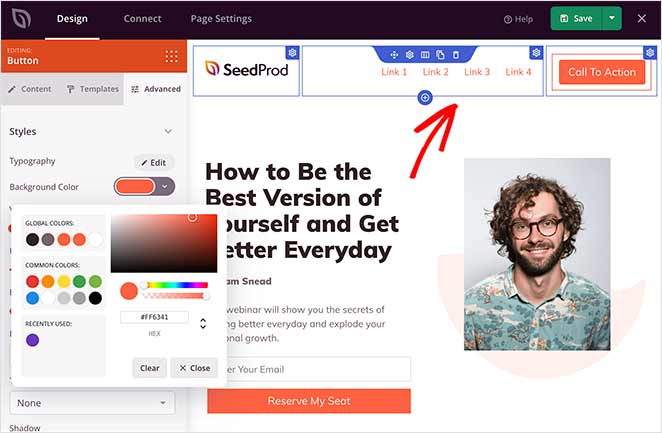
Customize your wordpress landing page sections

Global Settings

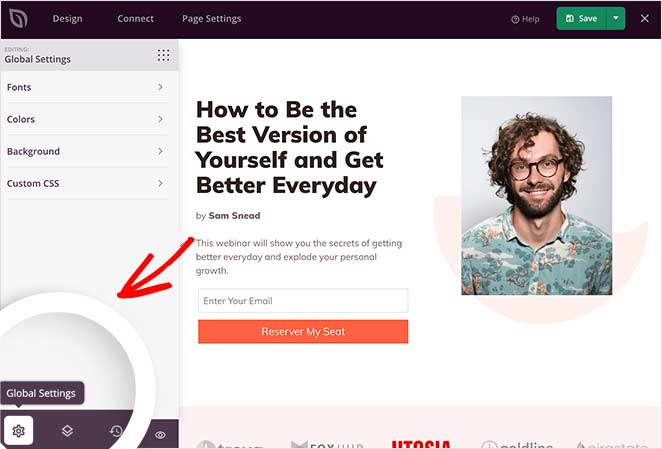
To further customize your page, you can edit your global landing page settings. Just click the gear icon in the builder’s bottom-left corner to reveal global color, font, background image, and custom CSS settings.

Global WordPress landing page settings

For example, you can add a video background or background slideshow to your page. Or you can change the background color and give your landing page a consistent color palette.
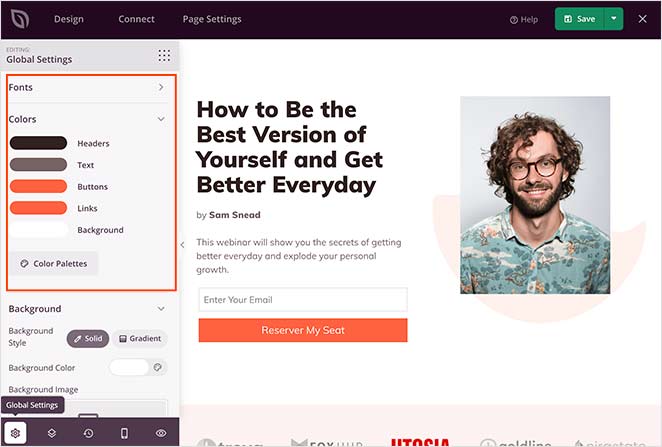
global landing page color settings

Don’t forget to save your changes during the design process by clicking the Save button in the top-right corner.

Sometimes you might need to go back to a previous landing page version.

Click the clock icon at the bottom left of your screen to do that. Then you can view your revision history and switch to a different version.
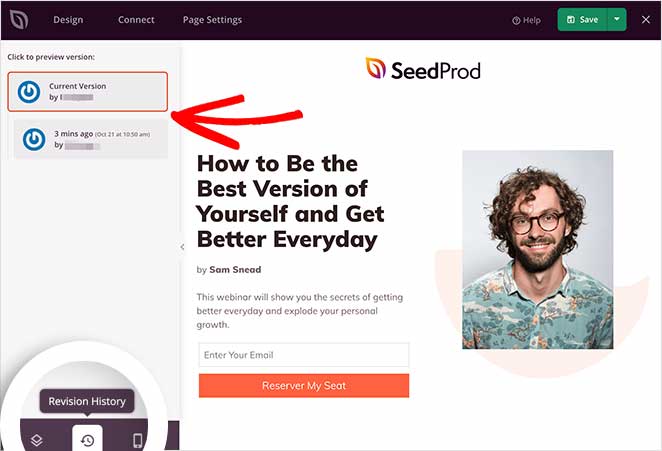
wordpress landing page revision history

Optional: Add a Push Notification Subscribe Button

SeedProd also allows you to add custom code to your page. This is helpful if you’re an advanced user and want to add features like a click-to-subscribe button for push notifications.

To do this, drag the Custom HTML block onto your sales page design, and enter the following code to display a simple click-to-subscribe button:

<button onclick="subscribeOnClickButton()" style="border: none; padding-left: 5%; padding-right:5%; text-align: center; display: inline-block; color: blue;">Get Updates via Push Notifications</button>

You can customize this code to match your page styling and brand.

Push notification subscribe button code

Next, go to the PushEngage website and create an account for the best push notification software.

Then, from your PushEngage dashboard, head to Site Settings » Site Details and click the Click Here for Setup Instructions button.

PushEngage setup instructions

Now, click on the Under Any Site option, and you’ll see your installation code.

PushEngage installation code

You’ll now need to add the following code to the bottom of the PushEngage snippet:

<script> window._peq = window._peq || [];</script> <script>
function subscribeOnClickButton(){
window._peq.push(['subscribe',{}.pe,function(res){
if(res.statuscode==1)
{
// Code to return response
console.log(res);
}
}]);
}
</script>

With your final code, return to your landing page and paste the snippet into your Custom HTML block after the button code.

custom push notification subscribe button for landing page

When you publish the page, users will be able to click this button to subscribe to push notifications.

Step 4: Integrate Your Email Marketing Service

Connecting your email marketing service to your page will help you gather leads.

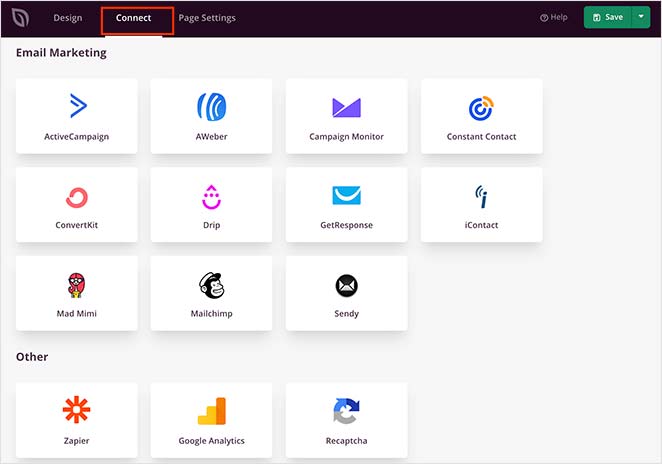
SeedProd makes this easy by integrating with popular email marketing tools, automation tools, and CRM. For instance, you can connect to Constant Contact, GetResponse, Mailchimp, ActiveCampaign, and more.

landing page integrations

You can also set up Google Analytics tracking, spam protection, and other apps with Zapier.

Find it in the integration list and click Connect to link your email service.
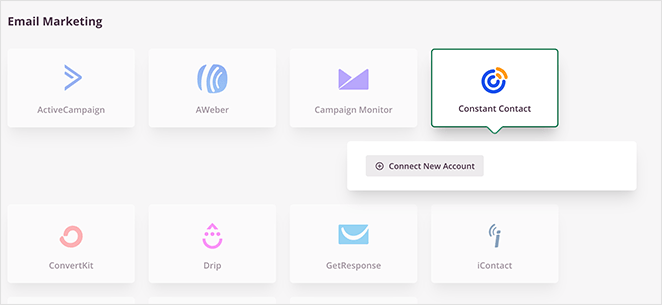
Integrate your email marketing service to your landing page.

Then, follow the instructions to connect and verify your account. After that, you can link all your opt-in forms to your email list.

Step 5: Configure Your Landing Page Settings

For the next step, click the Page Settings tab at the top of your screen. Here you can control your general page settings and edit your SEO and analytics settings.

You can also enter custom header, body, and footer scripts and add a custom domain.

configure your landing page settings

Remember to click Save to preserve your changes.

Step 6: Publish Your Landing Page in WordPress

Before publishing your landing page, you should preview it. That way, you can see if it looks good on both desktop and mobile devices.

To preview your page, click the preview icon in the landing page builder. You’ll see a mobile page preview instantly, so you can scroll through and make any changes. Just click the icon again to switch back to the desktop preview.
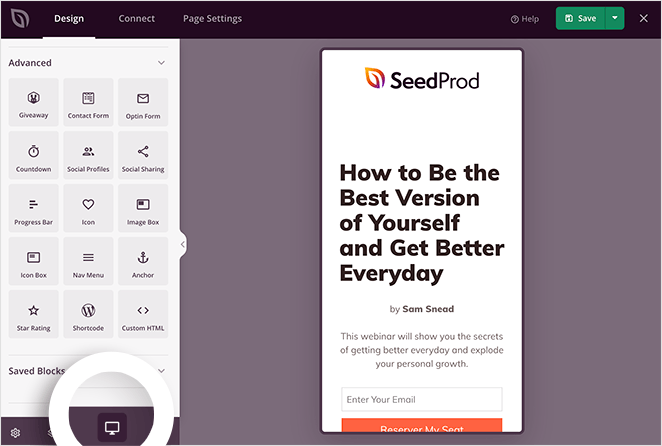
preview your landing page on mobile

If you’d like to see a live preview of your page, click the eye icon to open your landing page in a new tab.

When you’re happy with how everything looks, click the arrow under the Save button and click Publish.

SeedProd will show a success popup notifying you that your page is now live.

landing page published success message

Then, you can click the See Live Page button to see it.

Here’s an example of a landing page we created for this guide on our test website:

Example of how to create a landing page in WordPress using SeedProd

Expert Tip

This landing page took us around 15 minutes to create.

You can make that time even quicker by using SeedProd’s Import and Export feature. It lets you export your designs as a .zip file so you can quickly reuse them for other projects.

For example, design a stock template and use it as a framework for your client projects to make the design process faster.

How to Create a Landing Page Using the WordPress Block Editor

If you prefer a simpler way to create a landing page, you can use the built-in WordPress Block Editor. Also known as Gutenberg, it has a block-based approach to page building, allowing you to add, arrange, and customize blocks visually.

This method is best if you don’t want to install additional WordPress plugins or tools. However, its customization options are not as extensive.

Before diving into the Block Editor, sketch out a rough layout of your landing page. Map the key elements you need, such as a headline, images, a lead capture form, and call-to-action (CTA) buttons.

Next, open the Block Editor by creating a new page in WordPress.

New WordPress page with block editor

Begin adding blocks according to your layout plan. Use the ‘Paragraph’ block for text, the ‘Image’ block for visuals, and the ‘Button’ block for CTAs.

The ‘Columns’ block is also useful for creating multi-column layouts.

Using the columns block in the WordPress block editor

Take advantage of the customization options in each block. Adjust the size, color, and alignment to match your branding and design goals.

Paragraph Block customization options in WordPress Block Editor

For more dynamic elements, consider using the ‘Cover’ block for background images or the ‘Media & Text’ block to pair text with images.

Using the Media and Text block in WordPress

You can also use Patterns to create whole sections of your page. These vary depending on the WordPress theme you’re using.

Patterns in WordPress block editor

Focus on the goal of your landing page. Ensure your CTA is clear and compelling.

When you’re happy with your landing page, click the Publish button to make it live. Here’s a landing page we made with the block editor on our test website:

Example of creating a landing page using the WordPress block editor

How to Optimize Your Landing Page for Conversions

We’ve put together some landing page best practices and optimization tips, tried and tested by expert marketers so that you can improve landing page conversion rates from day 1.

1. Plan Essential Landing Page Elements

Plan the essential elements of your landing page

After planning the goal, message, and keywords for your landing page, it’s time to start thinking about the different elements you’ll use to lead the reader to take action.

Here are some essential design elements every landing page should have:

  • Headline – This is the first thing users will see, so it should clearly state what the users will get from your page.
  • Subheadings – Use subheadings to support the statement in your headline, draw the reader’s eye down the page, and keep them engaged.
  • Pictures – Our brains process images faster than landing page copy, so pictures are a must-have. Keep your landing page pictures relevant to your product, eye-catching, and high-quality. Hero images and product photos are a great choice.
  • Pain Points – As we mentioned earlier, you need to speak to your reader’s fears so you can offer a solution. Illustrate a pain point your reader might be experiencing, then explain how your product or service provides the answer to that pain in short, helpful bullet points.
  • Contact Methods – To show that your company is legit, provide a way for readers to get in touch with questions and concerns. For this, you could use a simple contact form, offer a live chat service, or display contact information such as your phone number.
  • Guarantee – No matter what type of guarantee you offer, it helps people feel safe and reassured. Choose a guarantee relevant to your business and position it close to your call to action (CTA).
  • Clear Call to Action (CTA) – Your CTA is the most powerful element on your page. Choose a big button in a contrasting color to draw attention and use persuasive copy to spur readers into action. 

2. Keep Your Landing Page Simple

Some businesses make the mistake of packing their landing page with as much information as possible. While this may get tons of products in front of visitors, it creates an overwhelming and confusing user experience. 

Instead of showing users everything, optimize your landing page to be simple, clutter-free, and focused on a single offer.

Here’s a good example of a clean, well-designed landing page:

For a landing page that converts keep the design simple and distraction free

By removing unnecessary fluff, you focus people’s attention on how you can solve their problems. This makes it easier for them to navigate your page and convert.

3. Display Powerful Social Proof

Recommendations and endorsements by trusted peers play a huge role in purchase decisions. You can convert visitors into leads with landing pages by showing potential customers you have an active fan base. 

Display powerful social proof for landing page that converts

You can do this by displaying testimonials on your landing page from users most relevant to your target audience. Try to include a picture of the customer in question to improve trust, and if real data backs the testimonials, they’ll be much more compelling.

This is the perfect place to use user-generated content (UGC) on your landing page. Authentic testimonials and photos from real reviewers make them seem more relatable to readers. 

4. Use Video for Your Sales Pitch

Videos have quickly become the top way that users consume information online. And YouTube is the second most popular search engine next to Google.

With this in mind, using video on your landing page is an excellent way to capture visitors’ attention while increasing the chances of your page being found on YouTube.

Using video in your landing page can increase conversions

Your video doesn’t have to be long and in-depth. The best-performing videos are between 30 seconds and 2 minutes long, which is long enough to get your readers’ attention and short enough that they won’t lose interest.

The video should get people’s attention right away, describe your message clearly and in a logical order, and include elements similar to your landing page, finishing with a guarantee and powerful CTA.

5. Create Urgency With a Countdown Timer

Countdown timers instill visitors with a sense of urgency that motivates them to take action. If they don’t act now, they could miss out on your awesome offer.

seedprod landing page with countdown timer

You can increase website conversions using landing pages by adding a countdown timer to limit the time a promotion is available. This is called FOMO, the fear of missing out, and it solves potential customers taking too long thinking about an offer and changing their minds.

Instead, their time for considering your campaign is limited, so they’ll have to take action now or miss out.

You can easily add a countdown timer to your landing page with SeedProd. Simply drag the pre-build countdown timer block into your landing page. Then, click on the block to set the date and time, choose the style, and more.

drag and drop countdown timer seedprod

6. Recover Abandoning Visitors With Exit Intent

Another way to help your landing page convert more is to recover visitors when they’re about to leave. That way, you can redirect their attention back to your offer with an even more convincing message to convert them.

Use exit intent popups to recover abandoning visitors

You can do this by adding an exit-intent popup to your landing page with OptinMonster

OptinMonster is the most powerful lead generation software for marketers. Its Exit-Intent Technology lets you track when users are about to leave your page and show them a tailored message in a beautiful lightbox popup.

It comes with tons of professionally designed templates for building your campaigns with ease. The drag-and-drop builder makes it easy to customize any element without having any technical knowledge.

Check out these exit popup hacks for inspiration on how best to use them on your landing page. Or you can read our OptinMonster review for more details.

7. Remove Page Navigation

Remove the navigation from your landing page to convert more visitors

Landing pages that succeed in converting visitors have all their elements on one page and remove elements like navigation links from the equation. 

If your landing page is littered with links that take users away from your page, you could lose them altogether. So, it’s best to remove that option and give people a simple, logical layout that leads to signing up for your offer.

See our guide on creating a landing page without navigation for more tips.

8. Add a Sales Notification Popup

Sales notification popups are a great way to boost sales and build brand trust with social proof. And as we mentioned earlier, a well-designed popup can add many benefits to your landing page.

add a recent sales notification for a landing page that comverts

With a sales notification popup from tools like TrustPulse, we’re talking about a small unobtrusive popup at your screen’s bottom. The popup usually notifies readers that someone has just bought a product or service.

Instead of being an aggressive marketing tactic, sales notification popups show social proof to help users decide to take action on your landing page.

You can learn more in this TrustPulse review.

9. Use Trust Elements

Another way to improve your landing page’s trust is to include trust indicators like statistics, authority badges, and third-party seals.

Use trust indicators to add credibility to you landing page

Trust elements give your brand more credibility and show that your site is safe to use. Indicators like this are reassuring for customers concerned about their online security because it shows you take their worries seriously.

And ultimately, more trust translates into landing pages that convert.

10. Keep Your Forms Short

Your landing page lead capture forms are how you’ll collect users’ information when they take action. However, forms only work well when they’re designed properly.

If your form is too long, users will lose interest and abandon your landing page. And if it’s too complicated or asks for too much information, that can put them off too.

keep your forms short to create a landing page that converts

You can solve this by keeping your forms short and only asking for the information you need. The form should also be properly organized so it’s clear what you want users to do.

Lastly, you should place the form in a strategic place on your page where it’s easy for users to notice and act.

If you do need a longer form to collect detailed information and qualify leads, create a multi-page form with WPForms. By splitting long forms into multiple pages, you can reduce form fatigue and boost conversions.

11. Improve Your Landing Page Load Speed

Did you know that it takes users a mere 3 seconds to decide to stay or leave your landing page?

If they can’t see the content they’re looking for because the page won’t even load, they’ll leave and probably won’t ever return.

To stop that from happening, and for landing pages that convert, you can:

  • Ensure your landing page has a minimum amount of heavy page elements.
  • Analyze the loading time of your page with a website speed test tool and make changes to improve it.
  • Compress images before uploading them to your landing page.
Improve your landing page speeds with a free website speed test tool

You can also look at these tips to improve your website speed for more ideas.

12. Integrate Your Landing Page with Social Media

In a world that seems to thrive on social media, it’s easy to agree that having a social media presence is a pretty good idea for all brands. 

With that in mind, integrating social media on your landing page is an effective way to empower your business and give it some vital credibility.

social media integration landing page

Landing page builders like SeedProd include easy social media integration to add social profile buttons to direct users to your social networks. They also include social share buttons to increase brand awareness on Facebook, Twitter, YouTube, Pinterest, etc.

13. Use Clear Typography

Some fonts are easy to read, while others are more decorative and harder to make out, making your reading experience frustrating.

Since your landing page is designed to provide clear information, your typography should be straightforward too. If your font is frustrating to read, users won’t spend more than a few seconds trying to learn about your offer and won’t convert.

use clear typography to create a landing page that converts

A good rule of thumb is to choose commonly used font pairings like:

  • Verdana, Geneva, sans-serif
  • Georgia, Times New Roman, Times, serif
  • Courier New, Courier, monospace
  • Arial, Helvetica, sans-serif
  • Tahoma, Geneva, sans-serif
  • Trebuchet MS, Arial, Helvetica, sans-serif
  • Arial Black, Gadget, sans-serif
  • Times New Roman, Times, serif

You can find many of these for free on Google Web Fonts, so you can experiment with different combinations before adding them to your landing page.

It’s also essential to make sure your CTA button typography is clear and easy to read. This is the one landing page element you really need people to notice.

14. Optimize for Search Engines

Search Engine Optimization (SEO) is crucial for landing pages. When they’re optimized for search engines, it increases the chances of them appearing in search engine results, thereby driving organic traffic to your page.

Here are some key steps to optimize your landing page for SEO:

  • Keyword Research: Identify keywords your target audience is using to search for the products, services, or information you offer. Tools like SEMrush, or WPBeginners free keyword research tool can help.
  • Use Keywords Strategically: Add keywords to the title, headings, meta description, URL, and throughout the landing page content naturally.
  • Optimize Images: Use descriptive file names, add alt text describing the image, include your keywords, and compress images to improve page load speed.
  • Meta Description: The meta description is a brief summary of your page that appears in search engine results. It should be compelling, include your primary keyword, and be no longer than 160 characters.
  • URL Structure: Your URL should be concise, easy to read, and include your primary keyword.
  • Internal and External Links: Include links to other relevant pages on your website (internal links) as well as to high-quality external sites to help search engines understand the page content.
  • Page Load Speed: Improve your page load speed by optimizing images, minifying CSS and JavaScript, and using a reliable web host.
  • Use Schema Markup: Schema markup is a form of microdata that helps search engines better understand your content. It can help improve the way your page is represented in SERPs, potentially increasing click-through rates.

FAQs on Creating a Landing Page in WordPress

What are the 5 Essential Elements of a Landing Page?

The 5 essentials of a great landing page are:

  1. Attention-grabbing headlines. The best headlines draw the reader in and convince them of your offer.
  2. Eye-catching images. Use high-quality photos and hero images to illustrate your offer. Pictures of happy, smiling faces can help people imagine themselves as customers.
  3. Compelling copy. Ensure your copy is easy to read with a clear font and write in a way that addresses your visitors’ pain points.
  4. Urgency. Including limited offers and countdown timers on your custom landing page creates urgency. This compels visitors to take action for fear of missing out.
  5. Calls-to-action (CTAs). Always include a bold CTA button to encourage visitors to act on your provided information.

For more landing page design tips, see our anatomy of a landing page guide.

Can I use a landing page in WordPress for my online store?

Yes, you can use a landing page in WordPress for your online store. In fact, landing pages can be an effective way to promote specific products or offers and can help to increase conversions and sales. In fact, SeedProd integrates with WooCommerce to make selling products easier.

Do I need a landing page if I have a website?

Even if you have a website, you should still use landing pages for marketing campaigns because they convert targeted traffic better than normal web pages.

How many CTAs should be on a landing page?

The number of CTAs on your landing page depends on their length. You might have only a single call-to-action button if you have a short landing page.

But if your landing page is long, you can include several CTAs to motivate users as they read through your content and are more ready to buy.

Next, Optimize Your Landing Page

We hope this guide helped you learn how to create a landing page in WordPress. Once your page is up and running, don’t forget to test and optimize for the very best results.

To help you with this, you may find the following guides useful:

Thanks for reading! We’d love to hear your thoughts, so please feel free to leave a comment with any questions and feedback.

You can also follow us on YouTubeX (formerly Twitter), and Facebook for more helpful content to grow your business.

author avatar
Stacey Corrin Writer
Stacey has been writing about WordPress and digital marketing for over 10 years and on other topics for much longer. Alongside this, she's fascinated with web design, user experience, and SEO.

Disclosure: Our content is reader-supported. This means if you click on some of our links, then we may earn a commission. We only recommend products that we believe will add value to our readers.

Add A Comment

We're glad you have chosen to leave a comment. Please keep in mind that all comments are moderated according to our privacy policy, and all links are nofollow. Do NOT use keywords in the name field. Let's have a personal and meaningful conversation.