Do you want to know how to make a sales page with WordPress?
Creating a sales page is a great skill for any business owner because it can boost your sales and conversions. Yet designing and building one isn’t easy if you have no web design experience.
So, in today’s article, I’ll show you how to make a sales page in WordPress, step-by-step, without coding.
🧠 Quick Summary: How to Make a Sales Page in WordPress
Why Make a Sales Page with WordPress?
Use a sales page in WordPress to connect essential tools like email marketing services, payment gateways, and CRMs. WordPress offers customizable themes and SEO optimization, helping your sales page rank higher. It’s cost-effective, scalable, and secure, making it ideal for growing businesses looking to maximize sales conversions.
Key Elements of a Sales Page
Before diving into the how of building a sales page, let’s first understand what makes it tick. A high-converting sales page isn’t built on hope and dreams. It has key elements designed to turn visitors into customers.
1. Attention-Grabbing Headline
Your headline is the first impression, the digital handshake. It needs to be compelling enough to stop scrollers in their tracks and make them eager to learn more.
Instead of a generic headline like “Pet Supplies Online,” try something like this: “Spoil Your Furry Friend with Premium Pet Supplies – Delivered to Your Door!”

See the difference? It highlights the benefits (premium products, convenient delivery) and speaks directly to the reader’s love for their pet.
2. Crystal Clear Value Proposition
Your value proposition quickly tells visitors why they should care. What problems do you solve? What makes your product or service the best?
Don’t just list products; showcase the benefits. Instead of “We sell pet food,” try “Give Your Pet the Gift of Health & Happiness with Our All-Natural, Nutritious Pet Food.”
Notice how it connects products (pet food) to tangible results (a healthier, happier pet)?
3. Engaging Storytelling and Benefits
People connect with stories and emotions. Don’t just state products – weave a narrative. Show how your goods or services make a difference in the lives of people buying them.
Instead of saying “Our toys are durable,” try this: “Watch Your Pup Jump for Joy with Our Indestructible, Fun-Filled Dog Toys!”

See how much more engaging that is? You’re painting a picture of a happy pup and making them crave that joy for their own furry friend.
4. Irresistible Offer
This is where you present your products, services, and any irresistible deals.
Instead of simply mentioning your product, say something like “Pamper Your Pooch with Our Deluxe Bath Kit – Includes Shampoo, Conditioner, and a Free Grooming Brush!”
Adding bonuses and highlighting the value makes your offer irresistible.
5. Powerful Social Proof
People trust what others say, especially when it comes to their furry family members. Testimonials, reviews, and photos build credibility.
Ditch the generic “Pet owners love us!” Instead, showcase real experiences: “My picky eater actually loves this food! Plus, the delivery is super convenient.” – Sarah M., Happy Pet Parent”
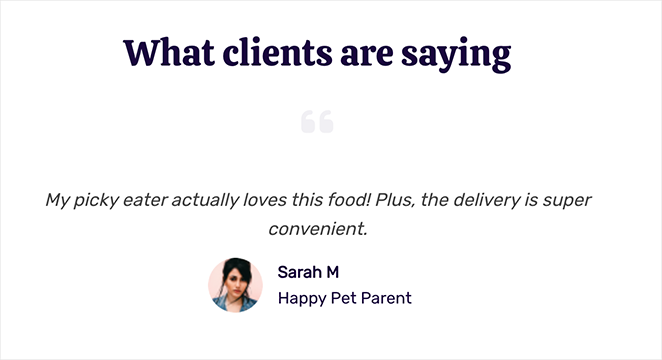
Specific testimonials from real people are way more convincing.
6. Visually Appealing Design
A cluttered, confusing layout is a conversion killer. Utilize high-quality images, videos, clear typography, and whitespace to create a visually appealing and easy-to-navigate page.
7. Clear Call to Action
Don’t leave potential customers guessing! Tell them exactly what you want them to do next.
Instead of a vague “Learn More,” use strong, action-oriented CTAs: “Start Your Free Trial Today!” or “Claim Your Exclusive Discount Now!”
Clear, concise CTAs leave no room for ambiguity and encourage immediate action.
8. Injecting Urgency & Scarcity
Limited-time offers, countdown timers, and low-stock warnings tap into the fear of missing out (FOMO) and encourage immediate action.
Instead of a generic “Buy Now,” create a sense of urgency: “This offer expires in 24 hours! Don’t miss out on this incredible deal.”

By highlighting scarcity, you create a sense of urgency and encourage visitors to convert before it’s too late.
How to Make a Sales Page with WordPress
One method to create a sales page is to use a sales page theme. This is a WordPress theme specifically designed to function as a sales page.
The problem with this approach is it changes the design of all your pages. Most businesses only need to create a single WordPress sales page, so there’s no need to change your entire WordPress theme.
A more straightforward approach is to use a WordPress landing page builder like SeedProd to create a standalone sales landing page.

SeedProd is one of the best landing page builders for WordPress. It makes it easy to create any type of landing page, from sales and squeeze pages to thank you and webinar landing pages.
It’s also a powerful WordPress theme builder, allowing you to create custom WordPress themes without writing code or touching your theme files.
The visual drag-and-drop landing page builder lets you customize any element of your page with a few clicks. Plus, you won’t need help from a developer to get things looking how you want.
Step 1. Install and Activate SeedProd
First, click here to get started with SeedProd and download the plugin. Then, you can follow this step-by-step guide to install a WordPress plugin.
After installing and activating the plugin, click the SeedProd icon in your WordPress dashboard to view the SeedProd landing page area.
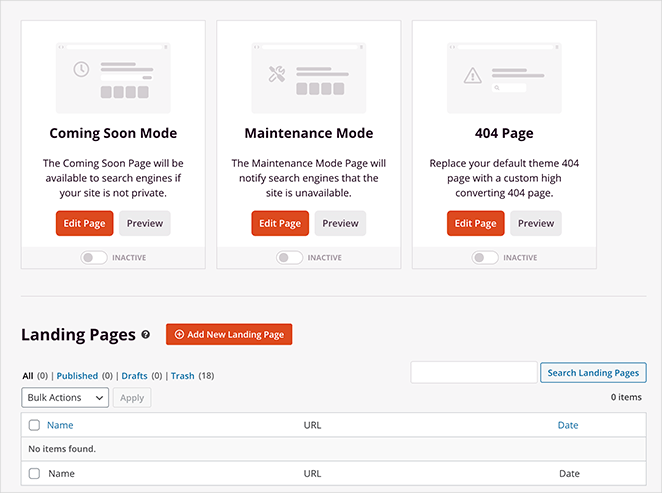
On this page, you can activate a coming soon page, 404 pages, a WordPress login page, and put WordPress in maintenance mode.
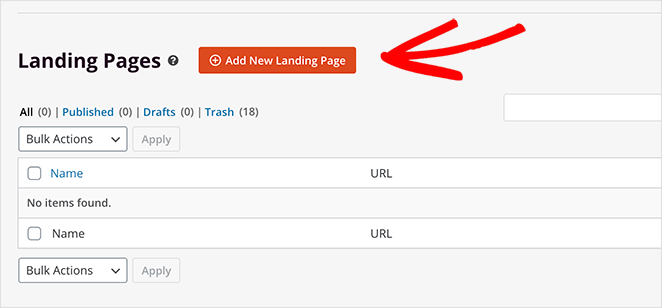
However, for this tutorial, we want to create a sales page. So go ahead and click the + Add New Landing Page Button to get started.
Step 2. Choose a Sales Page Template
After clicking to add a new landing page, SeedProd presents you with a growing library of landing page templates. You can filter the templates by clicking any options along the top or typing in the search box.
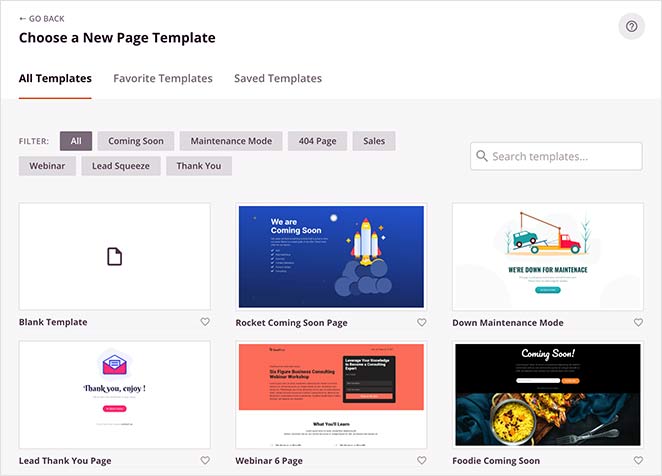
The available templates include:
- Coming Soon
- Maintenance Mode
- 404 Page
- Sales
- Webinar
- Lead Squeeze
- Thank You
- Login
There’s also the option to choose a blank template to start from scratch.
Since you want a WordPress sales page template, click the Sales option to view them.
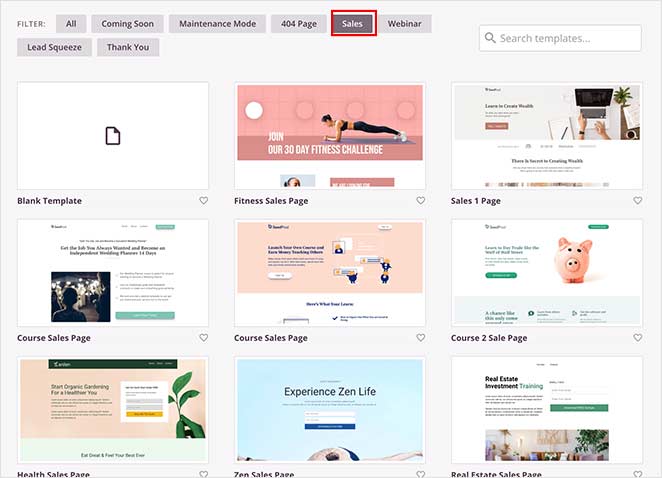
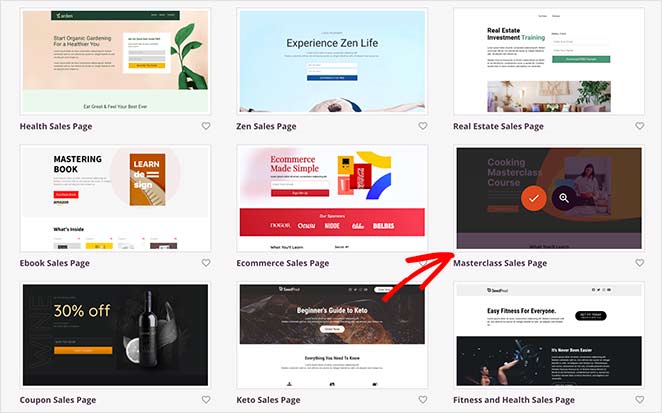
Choose a template that is closest to the design you want. Then, to launch it, hover your mouse over the thumbnail image and click the tick icon. For this guide, we’ll select the Masterclass Sales Page.
Once you select your sales page template, a lightbox popup appears asking you to enter your page details, including your Page Name and Page URL. You can change these details later if you like.
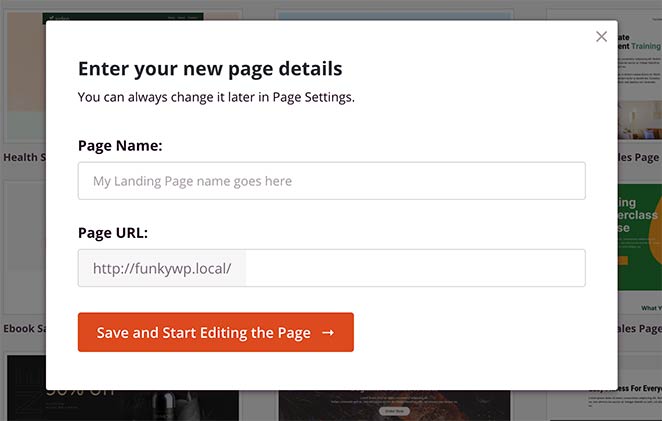
Click the Save and Start Editing button to launch your template in SeedProds’ visual page builder.

Step 3. Add Your Headline & Value Proposition
The SeedProd drag-and-drop page builder provides various easy ways to customize a sales page for your WordPress site.
You can click any element on your page preview and edit the contents in real time. First, let’s add your headline and value proposition.
Your headline is like the bait on a hook to grab attention and entice visitors to stay. The value proposition is your line and sinker, reeling them in by explaining why your product or service is their perfect catch.
To add your headline, click the demo headline to open the settings on the left. Then, enter your own text.
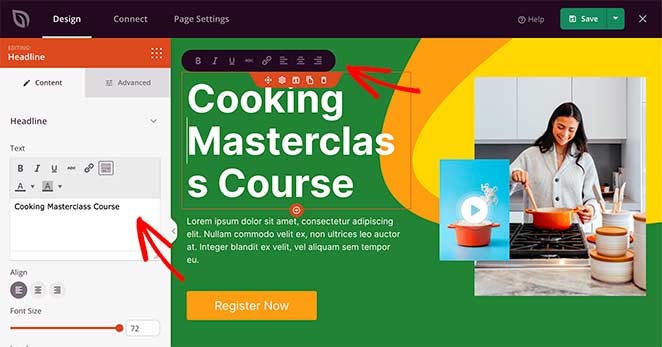
Here are some tips to make your headline stand out:
- Keep it short and sweet: Aim for 5-8 words that are clear, concise, and impactful.
- Focus on benefits, not features: Highlight the transformation your product/service offers, not just its technical aspects.
- Spark curiosity and intrigue: Use questions, power words, or unexpected statements to pique interest.
- Optimize for search engines: Include relevant keywords naturally within the headline.
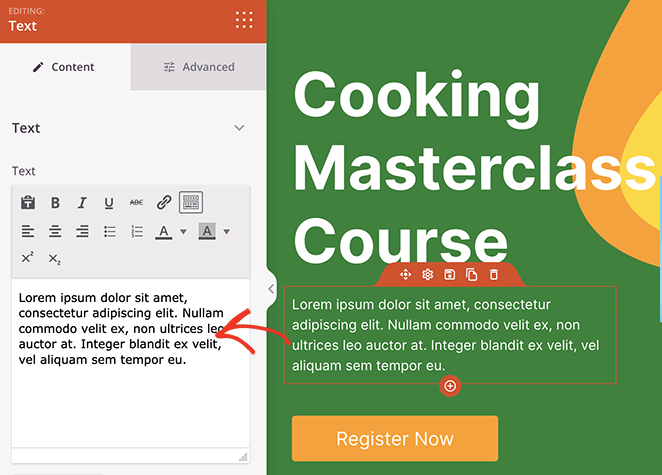
Repeat this step with the text block beneath and add your value proposition. Explain the problem your product or service solves and highlight what makes it different.
Step 4. Build Trust with Social Proof
Building trust and credibility is essential for a successful sale. Potential customers need to believe you can deliver on your promise before they open their wallets.
Social proof builds trust fast, especially for first-time visitors, and testimonials are a great way to add it to your sales page. When potential customers see genuine praise and success stories, their trust and confidence increase, ultimately leading to more conversions.
SeedProd’s Testimonial block makes adding testimonials to your sales page easy. Simply drag the block from the left-hand panel and drop it onto your live page preview on the right.
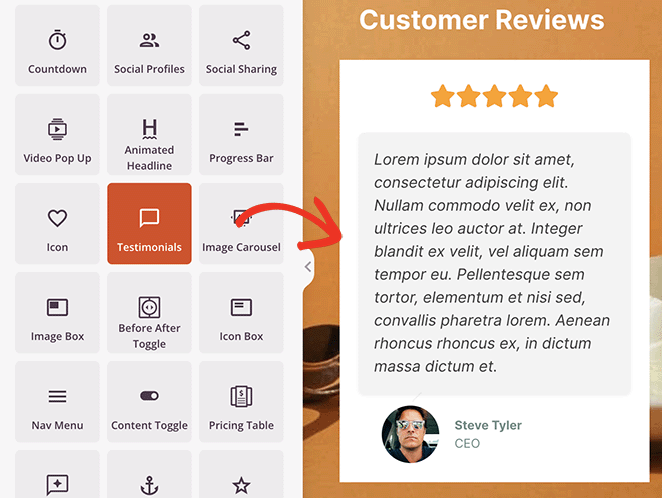
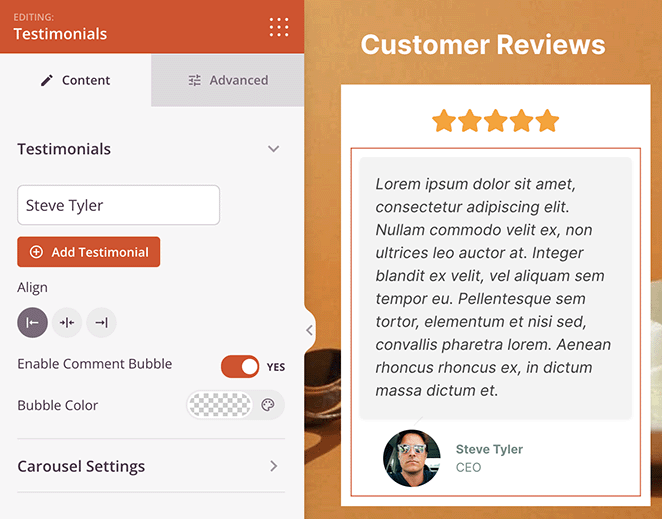
After adding the block, you customize the testimonials with reviewer photos, custom text bubbles, carousels and more.
Step 5. Address Common Objections
Even the most enticing sales page can face roadblocks in the form of common objections. Anticipating and addressing these can be the difference between a frustrated visitor and a happy customer.
Here are some of the most frequent objections you might face, with tips to address them:
► 1. “It’s too expensive.”
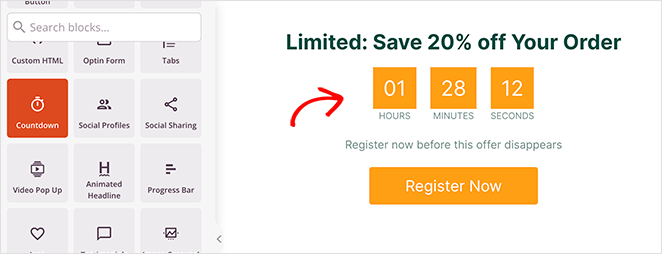
Focus on value, not just price. Highlight the long-term benefits and cost savings your product/service offers compared to alternatives. Consider offering flexible payment options or limited-time discounts to sweeten the deal.
The countdown timer block is a great way to do this. It visually shows how long it takes users to get a deal, encouraging them to act now.
► 2. “I’m not sure if it’s right for me.”
Offer clear use cases and testimonials from customers with similar challenges. Provide a free trial or demo to let them experience the product firsthand.
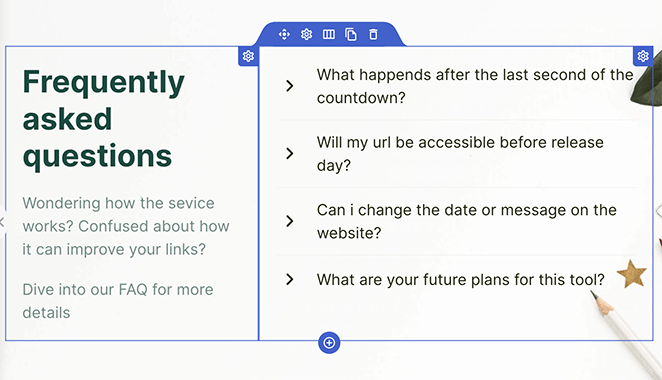
You can also address specific concerns with FAQs or detailed product information. SeedProd’s sections are ideal for this. You can find them by clicking the Sections tab in the blocks sidebar.
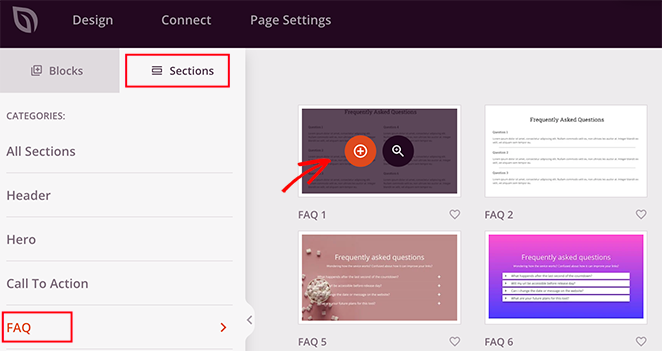
Each section has all the elements you need for a professional-looking header, call-to-action, service area, and even a FAQ section.
► 3. “I’m already happy with my current solution.”
Highlight your unique selling proposition. Show how you can solve specific problems their current solution doesn’t address. Offer incentives to switch, like exclusive features or better value.
► 4. “Can I trust you?”
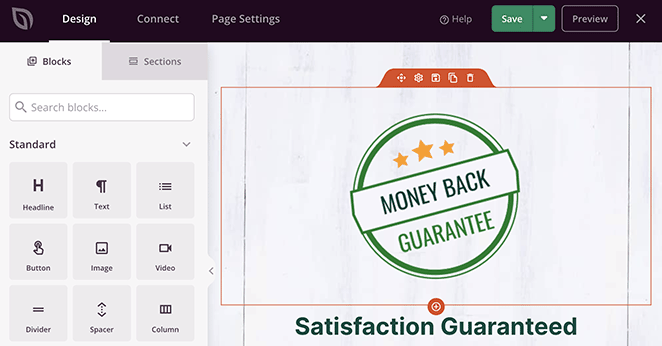
Show social proof through testimonials, case studies, and positive reviews. Display trust signals like security badges and guarantees. Be transparent about your company and its background.
► 5. “I’m not ready to buy now.”
Offer valuable free resources like ebooks, webinars, or consultations to nurture leads and stay top-of-mind. Create a sense of urgency with limited-time offers or scarcity.
Make it easy for them to subscribe to your newsletter or follow you on social media for future updates.

After addressing any objections, continue customizing your sales page until you’re happy with how it looks.
We completely changed the color scheme and background images for our example sales page, and it only took a few minutes.

When you’re happy with your changes, click the Save button in the top-right corner of your screen.
Step 6. Connect Your Email Marketing Service to WordPress
To keep track of your leads and sales and make it easier to grow your email list, you’ll need to connect your preferred email marketing service.
SeedProd integrates with a variety of email services, including:
- ActiveCampaign
- AWeber
- Campaign Monitor
- Constant Contact
- ConvertKit
- Drip
- GetResponse
- iContact
- Mad Mimi
- Mailchimp
- Sendy
You can also set up Google Analytics tracking and Recaptcha spam protection and connect with thousands of other apps via Zapier.
First, click the Connect tab at the top of your screen. Then, choose your preferred integration and follow the instructions to connect your account.
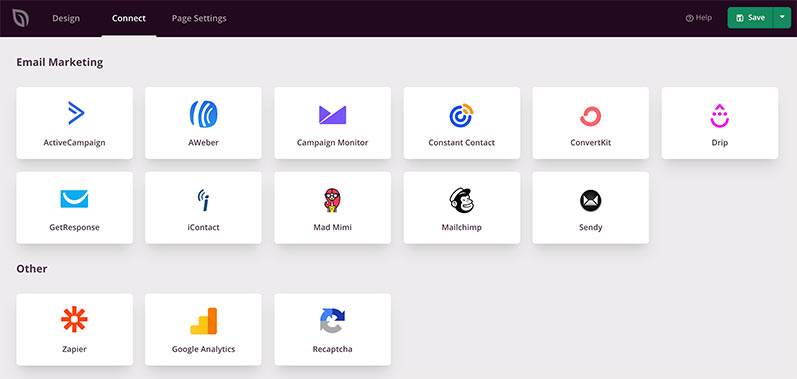
After that, you can link your email list with any signup form you use on your page.
Check out the SeedProd integration documentation to learn how to connect with specific email providers.
Step 7. Configure Your Sales Page Settings
You’ll need to configure your page settings for the next step, so click the Page Settings tab at the top of your screen.

You can configure your General, SEO, and Analytics settings on this page. You can also add custom scripts in your header, body, and footer areas, including your Facebook tracking pixel.
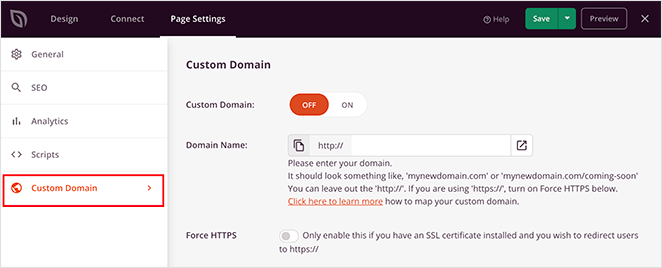
If you’d like to give your page a custom domain name, you can do that in the Custom Domain section (paid plans only). With this feature, you can make your landing page look like a completely separate micro-site from your existing website.
When you’re happy with your settings, click Save.
Step 8. Preview and Publish Your Sales Page in WordPress
SeedProd makes it super-easy to publish your sales page with WordPress. Just click the downwards arrow next to the Save button and click Publish.
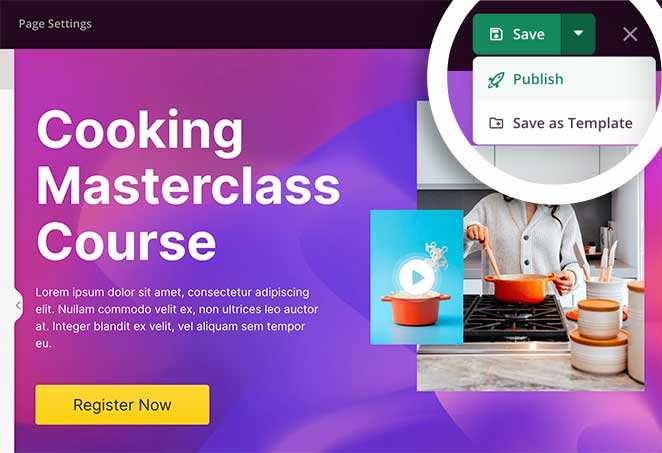
You’ll then see a message notifying you that your page has been published. You can then click the See Live Page button to see how everything looks.
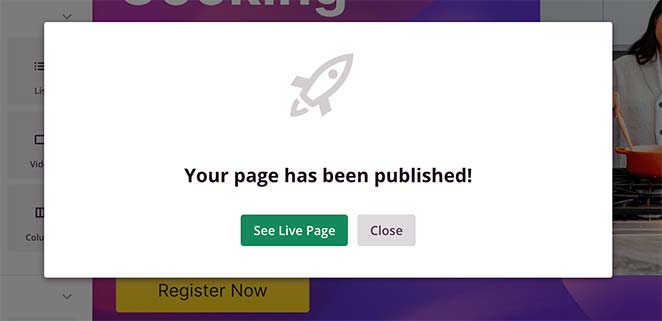
Congratulations! You’ve just created a new sales landing page for your WordPress website. And that’s all it takes , your sales page is live and ready.

► 📋 Best Practices for WordPress Sales Pages
- Start with a clear headline
- Use high-quality visuals
- Write simple, benefit-focused copy
- Include testimonials and trust signals
- Make your CTA easy to spot
Sales Page Promotion Strategies
After following this WordPress sales page tutorial, you can use promotional strategies to attract potential customers. Let’s examine these strategies next.
Social Media Use
Social media can be an effective tool for promoting a sales page. Here are some methods you can try:
- Regular Updates: Post your sales page links with engaging captions.
- Paid Ads: Use targeted advertising to reach potential buyers.
- Interaction: Respond and interact with your followers to build trust.
SEO for Sales Page
Optimizing your sales page for SEO can attract organic traffic. Use relevant keywords, optimize images, and use meta descriptions to help search engines find and index your content.

However, it’s important to maintain a balance between readability and SEO.
Email Marketing
Email marketing can drive a lot of traffic to your sales page. Here’s how:
- Newsletters: Regularly update your subscribers with newsletters with a call-to-action.
- Exclusive Deals: Offer deals or discounts to incentivize purchases.
- Segmentation: Personalize messages through segmentation based on customer behavior and preferences.
Influencer Collaboration
Work with influencers in your industry. Choosing those whose followers align with your target demographic will help you reach an audience of relevant potential customers who are already interested in your product niche.

FAQs on How to Create a Sales Page
What Is a Sales Page?
A sales page is a standalone web page with a specific purpose. That purpose is to generate sales for your small business’s products or services.
What you sell on your sales page can differ depending on your industry. Yet, the goal always remains the same: to get website visitors to convert into paying customers.
What is the difference between a homepage and a sales page?
Your homepage greets visitors and shows them your whole shop, while your sales page spotlights a single item and convinces them to take it home. Both are important but focus on different parts of the buying journey.
How do I write a sales page?
To write a sales page, hook visitors with a pain point they know, and then unveil your product as the cure. Show its benefits with stories and proof, highlight the urgency with limited offers, and make that “Buy Now” button irresistible. Keep it focused, scannable, and trust-building, and watch conversions soar.
How to create a sales page without a website?
If you don’t have a website, you can build a standalone sales page with platform builders or directly on social media like Facebook. However, we strongly recommend creating a website to build your online presence.
Final Thoughts on How to Create a Sales Page
In conclusion, use a combination of strategies to promote your sales page. Use social media, SEO, email marketing, and influencers to create a comprehensive approach.
We hope this article helped you learn how to make a sales page with WordPress.
Creating any type of landing page with SeedProd is so easy you won’t need to touch a single line of code. It takes a few minutes to create a stunning sales page ready to turn your site visitors into paying customers.
So what are you waiting for?
You might also find the following guides helpful:
- 15 Best Sales Page Examples to Boost Conversions
- Landing Page vs Sales Page: Which One Is Right for You?
- 12+ Best Sales Funnel Builders and Plugins for WooCommerce
- 31 Landing Page Best Practices for Incredible Conversion Rates
Thanks for reading! We’d love to hear your thoughts, so please feel free to leave a comment with any questions and feedback.
You can also follow us on YouTube, X (formerly Twitter), and Facebook for more helpful content to grow your business.

