If you’re ready to create a custom WordPress theme without writing a single line of code, this is the guide you need.
When I built my first WordPress site, I started with a premade theme because it seemed like the easiest option. But pretty quickly, I ran into limits. I couldn’t change the layout the way I wanted, the colors didn’t match my brand, and every tweak felt like a hassle.
That’s when I realized I needed a WordPress theme designed specifically for my site, not just a generic template. So I decided to create a custom WordPress theme from scratch using a drag-and-drop visual builder.
In this tutorial, I’ll show you exactly how I built a custom WordPress theme without touching code. If you want a site that matches your vision and works exactly the way you want, this walkthrough will help you get there, even if you’re brand new to WordPress.
The Easiest Way to Build a Custom WordPress Theme:
- Step 1. Install SeedProd and Choose a Template
- Step 2. Customize the WordPress Header and Footer
- Step 3. Create a Custom WordPress Home Page
- Step 4. Create Blog Page & Single Post Templates
- Step 5. Create an About Page
- Step 6. Set Up A Contact Page
- Step 7. Adjust Global Theme Settings
- Step 8. Publish the Custom WordPress Theme
- More Ways to Build a Custom Theme
Why Build a Custom WordPress Theme (Instead of Using a Premade One)?
When I first started out, I assumed a premade WordPress theme would be good enough. But most of the time, they’re built to work for everyone, not just for you.
Here’s why I recommend building a custom WordPress theme instead:
- It matches your brand perfectly. You control the layout, colors, fonts, and every little detail—so it actually looks like your site, not someone else’s. When you take control of your WordPress theme design, your website feels more professional, trustworthy, and aligned with your brand from the start.
- It’s easier to use than you’d think. With a drag-and-drop theme builder like SeedProd, you don’t need to touch code or hire a designer.
- It loads faster. Many premade themes are bloated with features you’ll never use. A custom theme is cleaner and faster out of the box.
- You get full control. No more forcing a template to do what you want. You can structure your site the way it makes sense for your visitors.
That all sounded great in theory… but I still had one big problem:
I had no idea how to actually build a custom WordPress theme without writing code.
At first, I thought I’d need to hire a developer or learn how to code it myself, which felt completely overwhelming. But then I found SeedProd, and everything changed.

SeedProd is a WordPress custom theme builder that lets you visually create themes for your website, no coding needed. It works like a drag and drop WordPress theme builder, so you can customize everything without touching your theme files.
You can choose from pre-designed templates and then easily customize everything, colors, fonts, layouts, you name it. This gives you the flexibility to customize your theme layout exactly how you want it.
With this in mind, I decided to use SeedProd to build and customize a WordPress theme for my personal website. I even documented it in this step-by-step guide, so you can learn how to create a custom WordPress theme yourself.
Why This Guide Is Different
Most tutorials on WordPress theme building either assume you know how to code or skip the real-life details.
This one’s different. I used SeedProd to build a real website from scratch — no shortcuts, no fluff. I designed every part visually, from the global header to the single post template.
You’ll see exactly how I customized the homepage, added a testimonial carousel, built a client logo section, styled a contact form, and reused a custom awards section on my About page, all with drag-and-drop blocks.
What Should You Do Before Creating a Custom WordPress Theme?
Before creating a WordPress theme with SeedProd, you’ll want to make sure you have a safety net. If you already have an existing website with content you want to keep, you should make a backup of your WordPress installation, just in case.
To avoid any theme development mishaps on your live site, you should also create a staging site. This gives you a separate, private environment to experiment with SeedProd and build out your theme without affecting your live website.
How Can You Build a WordPress Theme Without Code?
Remember how I said I didn’t know how to code? Well, that wasn’t a problem at all. SeedProd made it incredibly easy to build a custom theme, step by visual step. Here’s how I did it.
Step 1. Install SeedProd and Choose a Template
First, get yourself the SeedProd Pro plan. It provides all the features you need (including the theme builder) at an affordable price.
Once it’s installed, you’ll be ready to create a custom WordPress theme from a starter kit and tailor it to your site.
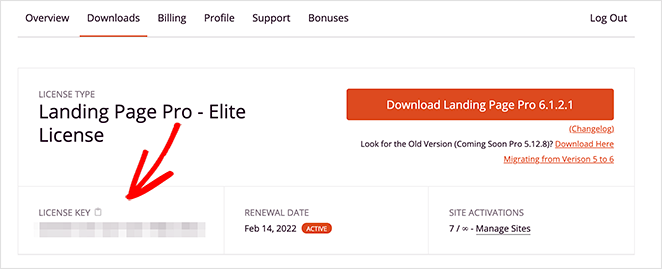
Once you have your license key, go to your staging site and install the plugin. Installing SeedProd is as simple as uploading the plugin file and clicking “Activate.”
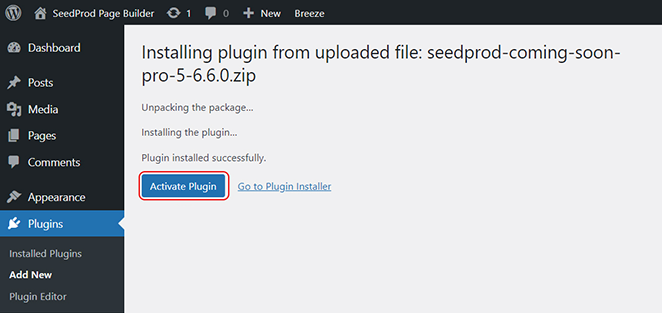
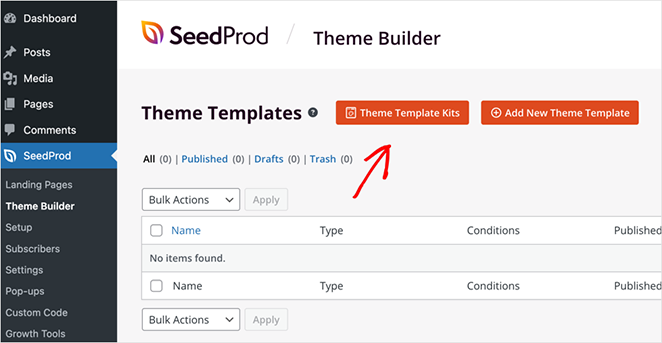
With the plugin active, go to the SeedProd menu in your WordPress dashboard and click on “Theme Builder.” Then, click the “Theme Template Kits” button to choose your starter theme.
SeedProd has so many professionally designed block theme templates that I have to admit; even I was a little spoiled for choice.
You can filter SeedProd’s templates by category and sort by popularity or recency. Just pick the one that’s closest to your style, since you’ll customize everything later.
Don’t worry if it isn’t perfect. You can customize every inch of it in the next step.
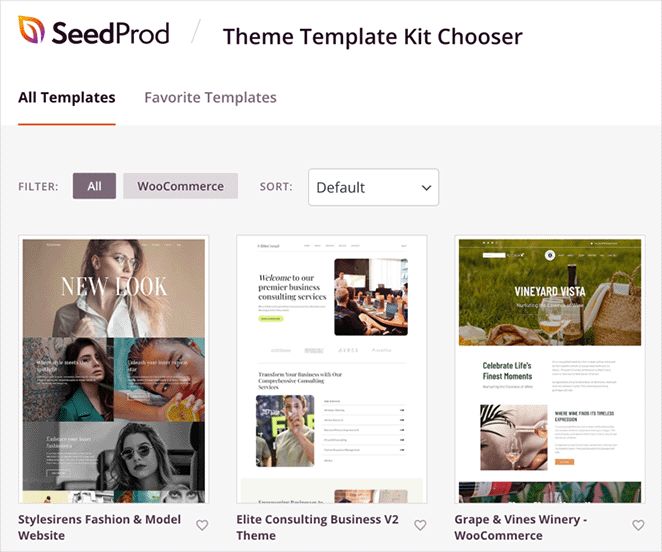
I finally settled on the Elite Consulting Business Theme. Its clean, modern look matched perfectly the vibe I was going for.
To import your theme file, hover your mouse cursor over the theme kit and click the checkmark icon.
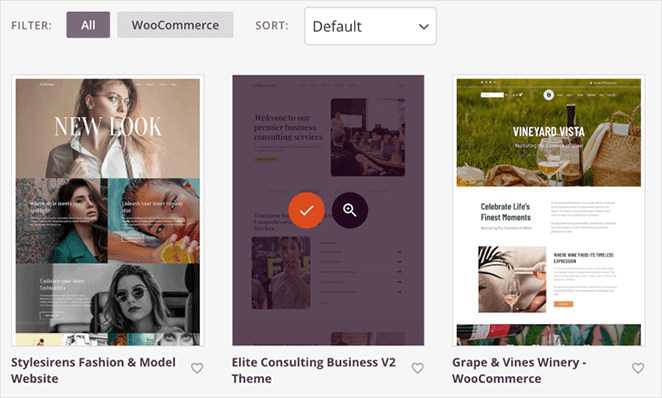
Click here to preview the template I selected for this design so you can compare it to the customized version.
After choosing a kit, you can see all the individual templates that make up the components of a WordPress theme. Mine included a homepage, header, footer, blog page, and sidebar for instance.
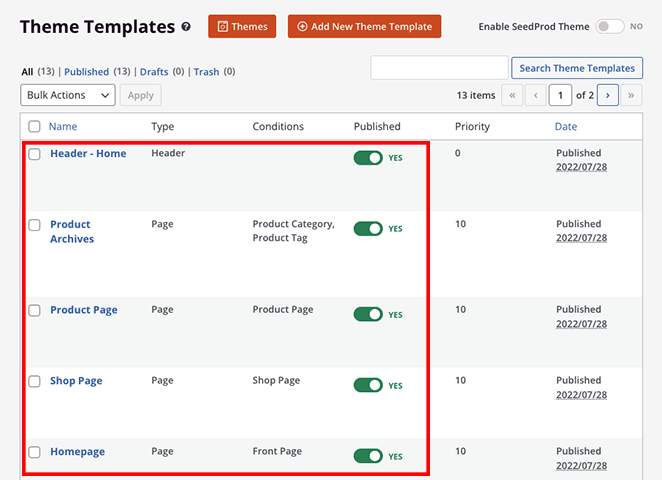
It also had custom templates for distinct theme sections, such as an awards section, a services page, a pricing table, a custom page template for products, and more.
Chances are you may not need all of these for your site. So, focus on what you need and delete the templates you don’t want by clicking “Trash.”
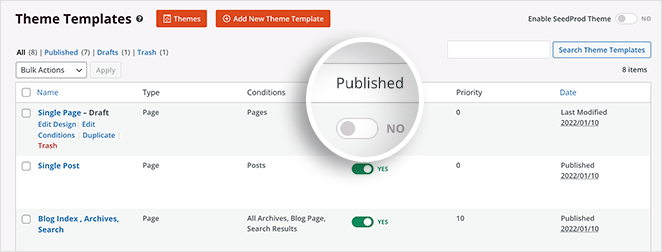
If you’re not comfortable with this, you can always turn off the “Published” toggle so that the template doesn’t appear on your website.
Step 2. Customize the WordPress Header and Footer
With your theme’s basic building blocks in place, you can start editing each theme section. For my site, I began with the header and footer sections.
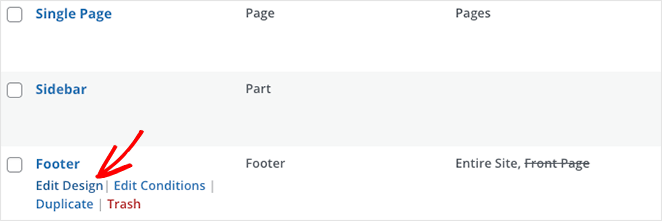
To edit any theme section, you just need to hover over it and click the Edit Design link.
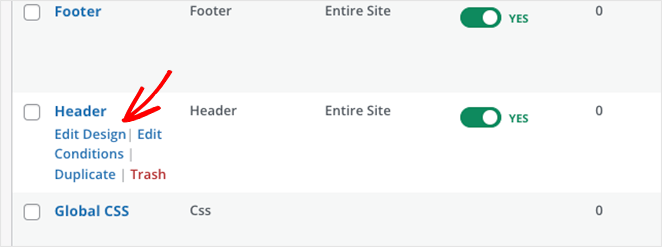
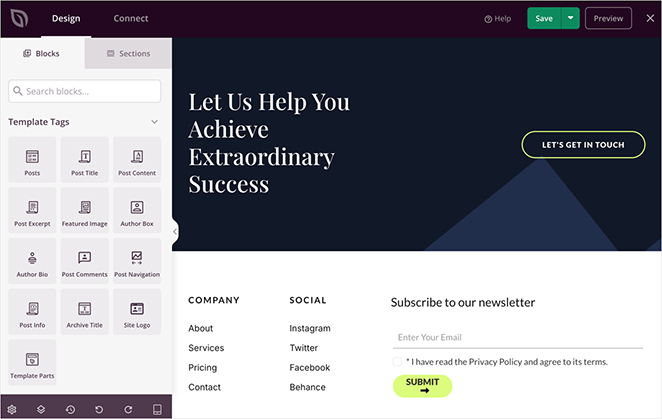
When you edit a theme section in SeedProd, you’ll go to its visual drag-and-drop builder. On this screen, you can customize your theme’s header by simply pointing and clicking.
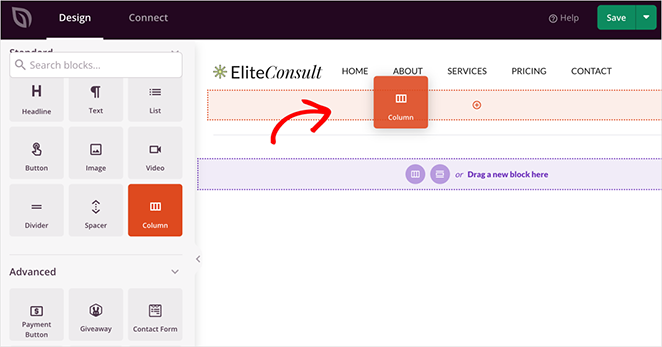
The original header template had a three-column layout, which was a bit too busy for my taste. In this case, you can simply delete it and drag in a two-column layout block from the left-hand panel.
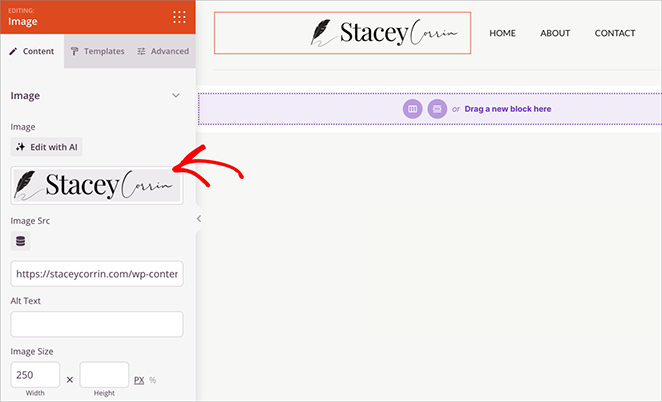
Adding a logo is also a breeze with the Image block – just select it from your media library and use the point-and-click controls to adjust its size and placement.
This is also a good time to double-check your design decisions. Here’s a list of common WordPress design mistakes I see beginners make when customizing their themes.
For the navigation menu, you can use SeedProd’s Nav Menu block and choose the “Simple Menu” setting. This allows you to easily create the exact menu structure you have in mind.
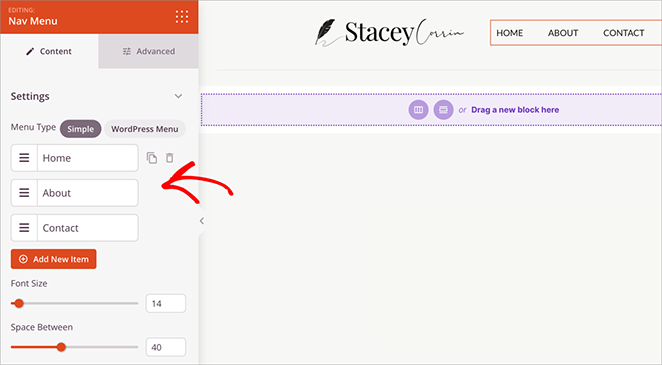
Once you’re happy with your header, go ahead and save your changes. Then, head back to the theme builder, and open the Footer template to customize the footer section.
The original footer in my template had a bit more information than I needed, so I simplified it by deleting unnecessary blocks.
I kept the company info and social media menu items but centered them for a more balanced look. Then, I just swapped out the placeholder content with my own.
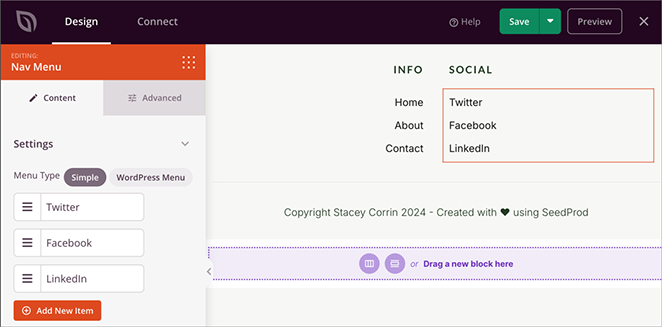
Make similar changes to your footer template to achieve the look you want for your custom theme.
Once your header and footer look sleek and stylish, it’s time to tackle the heart of your website: the homepage. Remember, you can find your template files under SeedProd » Theme Builder.
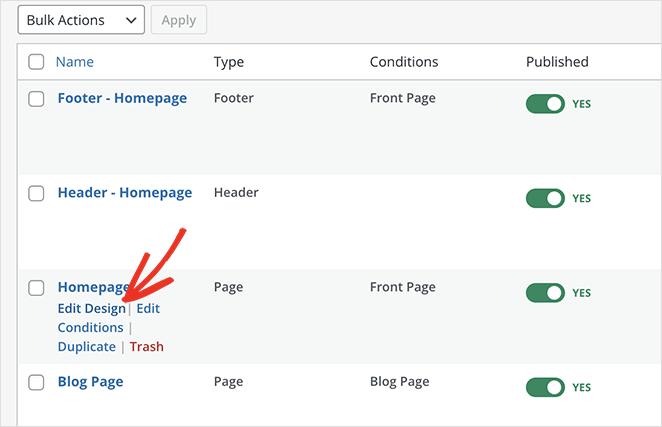
Step 3. Create a Custom WordPress Home Page
If you’ve ever wondered how to build a WordPress theme visually, this part shows just how simple it is.
Your main goal when customizing the homepage is likely to create a strong first impression, show your expertise, and provide potential clients or customers with compelling reasons to choose you or your business.
Personally, I liked the overall layout of the Elite Consulting Business theme’s homepage, but I wanted to simplify it further and add my personal touch.

I kept the hero section at the top, as it’s a great way to make a bold statement. I simply swapped out the default image for one that better reflected my brand, and updated the heading and description.
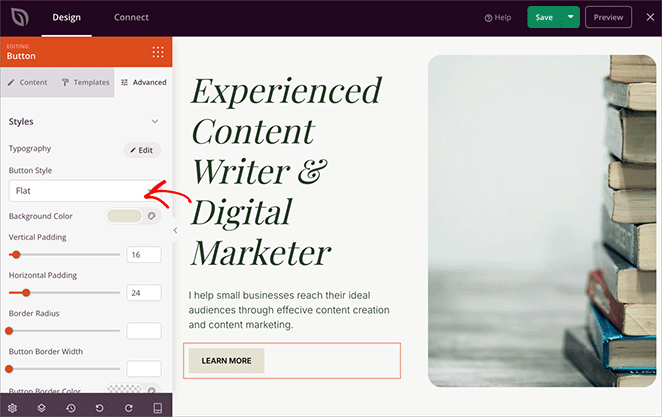
Likewise, I also tweaked the CTA button styling. You can do this by clicking on the block’s advanced settings. It provides you with access to a color picker, where you can select a new background color and round the button’s corners for a softer look.
To build trust and show off my experience, I:
- Added a logo strip of brands I’ve worked with,
- Updated number counters to highlight key stats
- Built a testimonial carousel with client quotes
- Included a mini writing portfolio using image and heading blocks
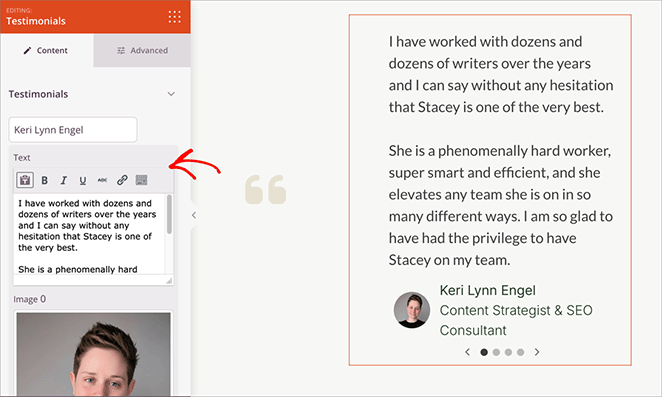
With a few clicks and drags, your homepage will start to look exactly how want it.
Step 4. Create Blog Page & Single Post Templates
Okay, so I didn’t actually need this step because I wasn’t planning on having a blog on my website. But I know many of you will want to share your thoughts and expertise with the world, so here’s a quick rundown of how SeedProd makes it easy to create stunning blog pages and single post templates.
Blog Page Template
Your blog page template can be found in the theme templates list under “Blog Index, Archives, Search” or, in my case, “Blog Page.” Like the previous custom page template, you can customize it by clicking the “Edit Design” link.
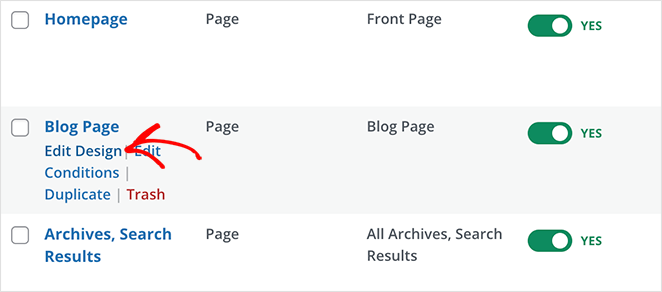
Here, you can customize how your blog posts are displayed – you can choose to show featured images, excerpts, author information, and more.

You can also add elements like a search bar, social media sharing buttons, or even a call to action to encourage visitors to explore further.
Single Post Template
Just like the blog custom page template, you can edit and customize the single blog post template.
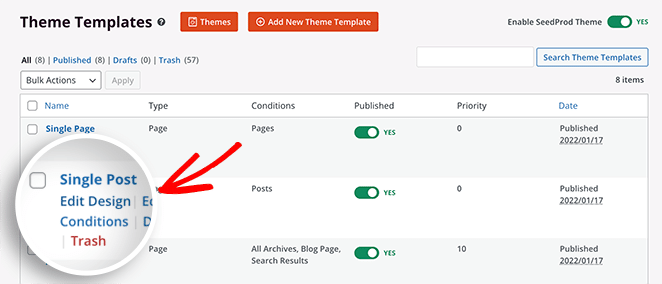
For a consistent look, SeedProd lets you style the display of elements like the post title, featured image, meta description, and even the author bio.
These are called template tags on WordPress. They automatically pull data from your site without you having to manually create them.

For example, with the Featured Image template tags, you can automatically display featured images on your single blog page.
Step 5. Create an About Page
After the homepage, the About page is arguably the most important part of any personal website. It’s where potential clients and collaborators get to know the person behind the services. I wanted mine to feel authentic and engaging and give a clear picture of who I am and what I offer.
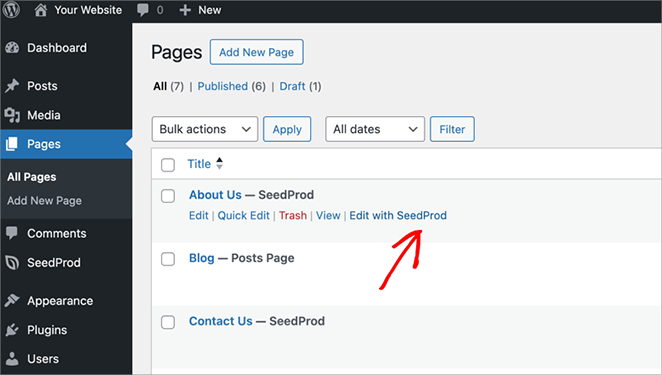
The Elite Consulting Business theme already included a basic custom WordPress page template for an about page, which I could access by going to Pages » All Pages in my WordPress dashboard and clicking “Edit with SeedProd.”
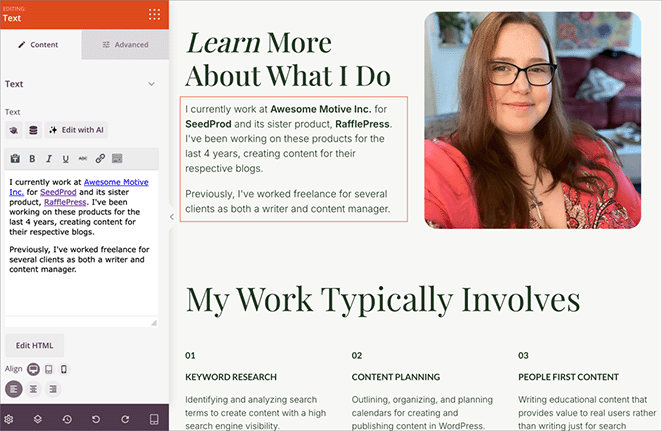
I decided to keep the first two sections of the original design, which focused on my work experience and the services I provide. I just swapped out the placeholder content and images for my own.
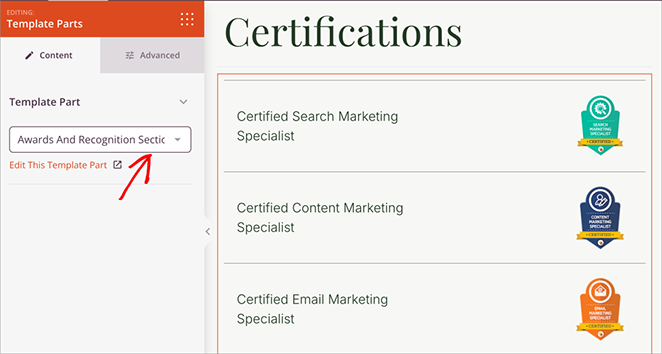
Next, I wanted to showcase my certifications to build credibility. This is where SeedProd’s Template Parts came in handy.
Think of template parts as pre-made sections that you can insert and reuse across different pages of your website – a huge time-saver. The theme came with a template part called “Awards and Recognition.”
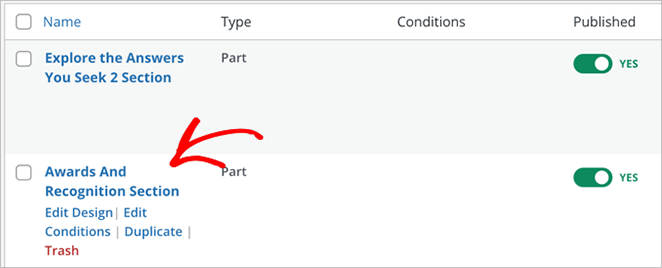
I simply edited this template to include my certifications, then easily inserted it into my “About” page.
To wrap it up, I created a final section with a more personal touch. I shared some of my hobbies, where I live, and other tidbits that would help visitors connect with me on a more personal level.
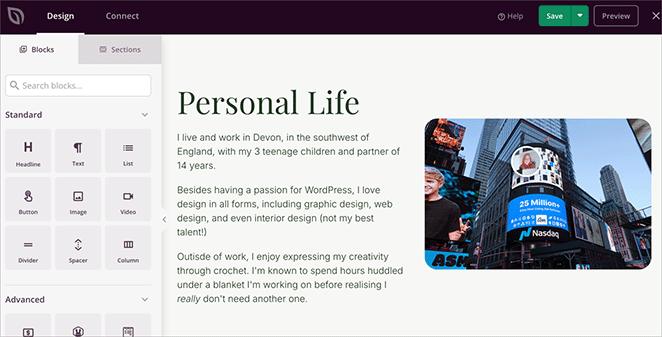
These customizations helped me design my own WordPress theme without needing a developer.
Step 6. Set Up A Contact Page
The last thing I wanted was a cluttered and confusing contact page. While the Elite Consulting Business theme came with a pre-built contact page, it felt a bit overwhelming.

I decided to simplify things drastically. I deleted most of the default content and replaced it with SeedProd’s Contact Form block. This block makes it super easy to integrate with WPForms, one of the most popular WordPress form builder plugins.
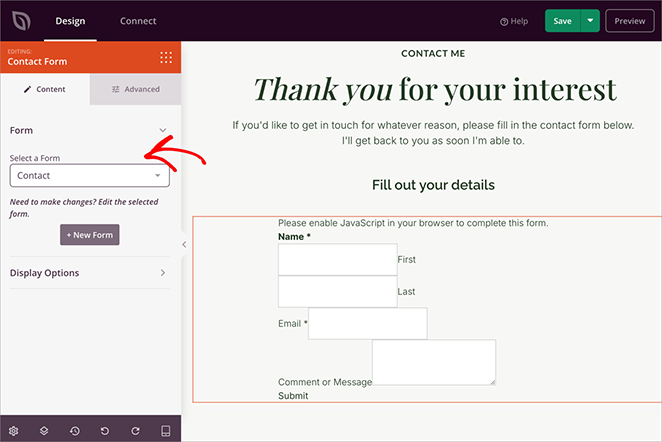
Quick note: WPForms doesn’t come bundled with SeedProd, but you can download the free version of WPForms from the WordPress plugin directory – it has everything you need for a basic contact form.
With WPForms installed, you can create a contact form directly within SeedProd – no need to fiddle with complicated settings or shortcodes.
Step 7. Adjust Global Theme Settings
My website was really starting to come together. Now, it was time to add those final touches that would make it look super polished and professional. Enter SeedProd’s global settings.
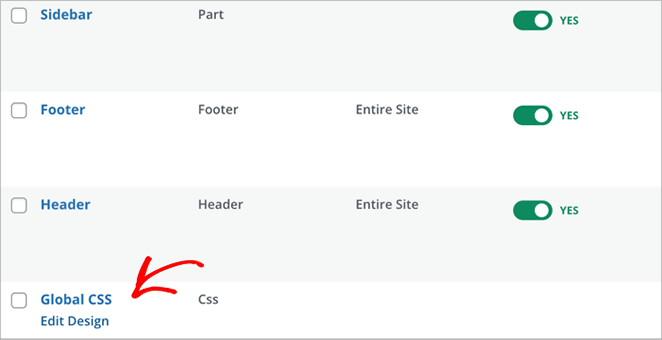
The Global CSS template is in the theme templates list—just click “Edit Design” to open it. This is your command center for controlling the overall look and feel of your website.
Colors
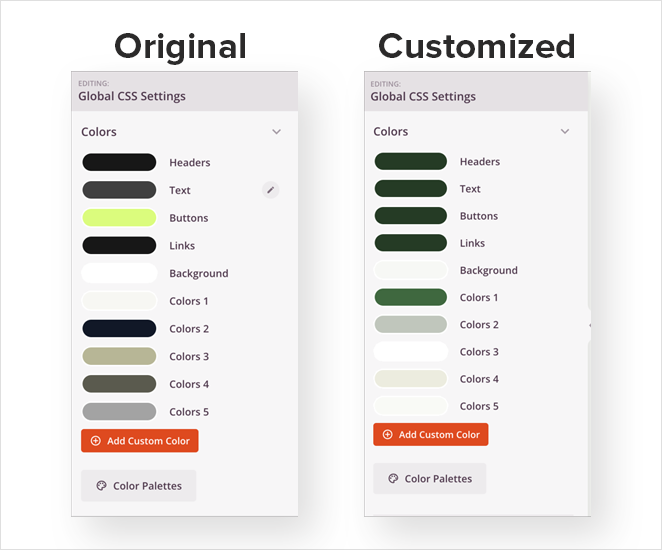
First, you’ll want to ensure color consistency across every page. SeedProd makes this easy by letting you define global colors for everything from headers and text to buttons, links, and backgrounds.
Fonts & Typography
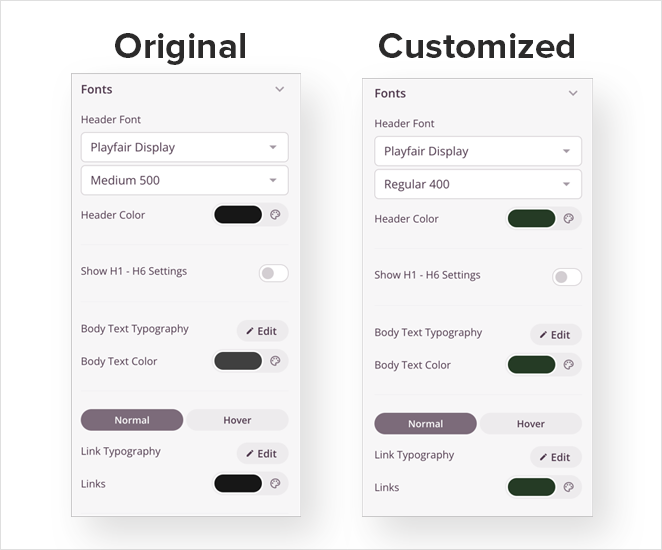
While I liked the default font of the Elite Consulting Business theme, I wanted to tweak the font weights and colors for headings and links to better match my brand aesthetic.
Background
To keep things consistent, I changed the overall page background color. SeedProd even lets you add a background image here if you want to get fancy.
Buttons
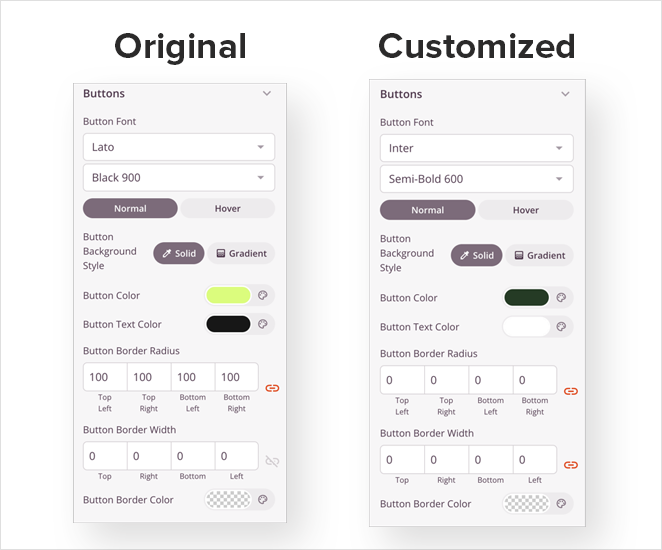
Buttons are crucial for calls to action, so make sure they stand out. Played around with different font styles, colors, and border radius until you find a look that feels right.
Custom CSS
SeedProd even gives you the option to add your own Custom CSS. This is where things get a tiny bit technical, but it gives you even more control over your design.
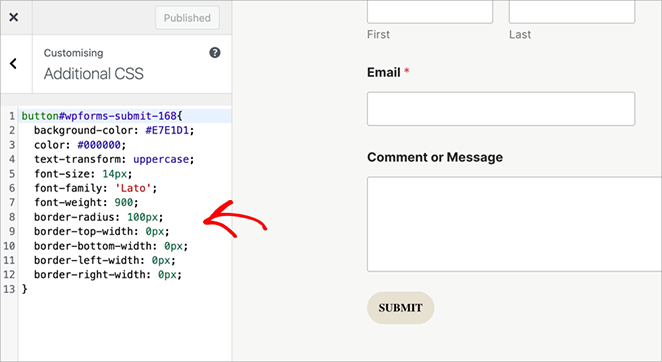
For example, I used a snippet of custom CSS to make the WPForms form submit button match the styling of my other buttons.
If you like, you can follow my guide on how to add custom CSS in WordPress.
Step 8. Publish the Custom WordPress Theme
After putting so much care into designing your custom WordPress theme, don’t skip the final checks. Use the built-in preview feature to double-check how everything looks on different screen sizes – from desktops to tablets to smartphones.

You’ll want to make sure your theme looks fantastic, no matter how people were viewing it.
Of course, you should also test your interactive elements. Submitted a test message through your contact form (and do a little victory dance when it lands in your inbox! 🎉)
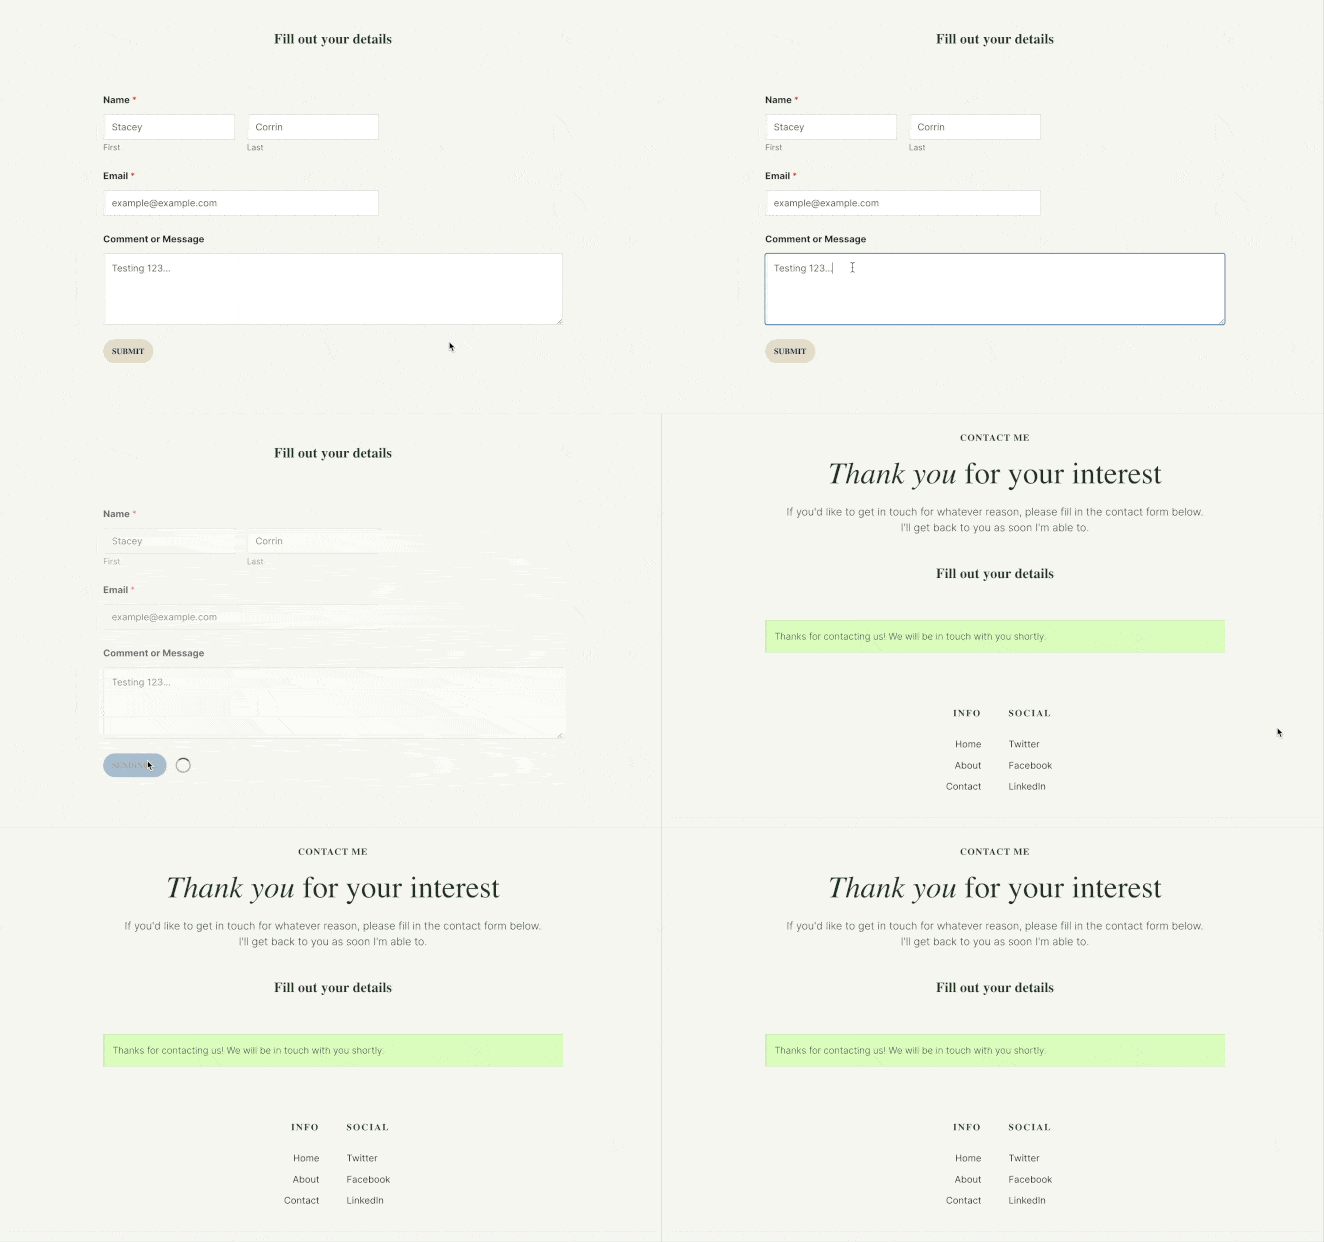
I clicked every button and menu link, just to be certain they led to the right places.
Finally, the moment of truth. Head back to the SeedProd Theme Builder, take a deep breath, and find the “Enable SeedProd Theme” toggle in the top-right corner. With one satisfying click, switch it to the “on” position.

Your custom WordPress theme is LIVE! You can now visit your site and see it in action.

More Ways to Build a Custom Theme
Now, I understand that not everyone reading this guide will want to follow my process for creating custom templates and themes. With this in mind, I’ve researched a few other ways to build a professional website design.
| Method | Difficulty | Coding? | Best For |
|---|---|---|---|
| Traditional Coding | Advanced | Yes (PHP, HTML, CSS, JS) | Developers, agencies |
| Underscores (_s) | Intermediate | Yes (PHP, CSS) | Developers learning theme development |
| Child Themes | Beginner/Intermediate | Some CSS | WordPress enthusiasts |
| Block Themes | Intermediate | No | Modern WordPress users |
Each of these has its place, but they can still feel limiting if you’re trying to build a WordPress theme without coding. Child themes require CSS tweaks, and Block Themes aren’t always beginner-friendly. SeedProd gives you a true no-code experience with full visual design control, so you can create a completely custom theme without touching code.
If you’re looking for a fast, flexible way to build a theme that looks exactly how you want, SeedProd is the option I always come back to.
Frequently Asked Questions
Create a Custom Theme for Any WordPress Website
With the right tools, anyone can design their own WordPress theme and build a professional-looking website that reflects their brand. If you want to make a specific type of website, you may like these WordPress theme tutorials:
- How to Create a Personal Trainer Website
- How to Build a Church Website in WordPress
- How to Design a Restaurant Website
- How to Set Up an Online Store in WordPress
- How to Create a Photography Website
- How to Create a Real Estate Website
- How to Create an Author Website in WordPress
- How to Make a Wedding Website
- Best Multipurpose WordPress Themes
Thanks for reading! I’d love to hear your thoughts, so please feel free to leave a comment with any questions and feedback.
You can also follow us on YouTube, X (formerly Twitter), and Facebook for more helpful content to grow your business.

