

TL;DR: How to Add a Contact Form in WordPress Here’s the fastest path from zero to a working contact form on your site.
- Install WPForms – Download and activate WPForms Lite (free) or WPForms Pro from your account dashboard.
- Create your form – Go to WPForms » Add New, name your form, and select the Simple Contact Form template.
- Configure settings – Set your form name, spam protection, and GDPR options under Settings » General.
- Set notifications – Choose who gets emailed when a form is submitted, and add smart tags for auto-replies.
- Add a confirmation message – Set a thank-you message or redirect visitors to a page after they submit.
- Publish the form – Add the WPForms block to any page or post, select your form, and publish.
Want to learn how to add a contact form in WordPress? A contact form is the easiest way to let visitors reach you without exposing your email address to spam.
In this tutorial, I’ll show you step-by-step how to add a contact form in WordPress using a beginner-friendly plugin. By the end, you’ll have a working form you can add to any page, post, or sidebar on your site.
- Why Create a Contact Form on WordPress?
- Can You Add a Contact Form in WordPress Without a Plugin?
- How to Add a Contact Form in WordPress
- Choosing a WordPress Contact Form Plugin
- Video Tutorial
- Step 1. Download the WPForms WordPress Contact Form Plugin
- Step 2. Add a Contact Form in WordPress
- Step 3. Define the General Settings of Your Form
- Step 4. Set the Notification Settings for Your Form
- Step 5. Configure Your Confirmation Messages
- Step 6. Add a Contact Form to a WordPress Page
- Build Your Contact Page with SeedProd
- How to Protect Your WordPress Contact Form from Spam
- FAQs on Adding a Contact Form in WordPress
Why Create a Contact Form on WordPress?
You might wonder if it’s better to just list your email address on your site. In reality, a WordPress contact form gives you more control, better security, and a smoother way for visitors to reach you.
Here are the main benefits of adding a contact form instead of showing an email address:
- Collect the right details: Choose which fields are required so you always get the info you need.
- Simplify communication: Make it easy for visitors to send questions, ideas, or feedback directly through your site.
- Stay organized: Use subject lines and structured fields to quickly sort and respond to messages.
- Protect against spam: Hide your email address and use built-in spam filters to cut down on unwanted messages.
- Meet compliance needs: Add consent checkboxes to help your site comply with GDPR and other privacy laws.
That’s why most WordPress sites, including this one, use a contact form. It’s safer, faster, and more professional than posting an email address.
Can You Add a Contact Form in WordPress Without a Plugin?
Yes, you can add a contact form in WordPress without a plugin by using third-party services. Most of these tools give you an embed code that you copy and paste into your site.
However, this approach has drawbacks. You’ll often need to handle HTML code, and customizing the form usually requires extra steps. For beginners, that can feel confusing and time-consuming.
One free option is Google Forms. You create a form at Google, grab the embed code, then paste it into a Custom HTML block in WordPress.
It’s simple to set up, but the form carries Google’s default styling. It won’t match your site design, and form entries go to Google Sheets rather than your WordPress dashboard.
The easiest option is to use a WordPress contact form plugin. Plugins let you create, customize, and publish forms directly inside your dashboard with no coding skills required.
So let’s look at how to create a contact form in WordPress step-by-step.
How to Add a Contact Form in WordPress

The easiest way to add a contact form in WordPress is with WPForms. It’s the most beginner-friendly form builder plugin, trusted by over 6 million websites, and comes with a library of pre-made templates so you can build any type of form in minutes.
Unlike plugins such as Jetpack or Contact Form 7, WPForms gives you a true drag-and-drop form builder. That means you can add custom fields, enable notifications, and even use smart tags without touching a single line of code.
WPForms has both a free and paid version. The free Lite version is perfect for simple forms. For advanced options like payments, surveys, and integrations, the Pro version unlocks everything you need to grow your site.
You can also browse our full WPForms review for even more details.
Choosing a WordPress Contact Form Plugin
Before you install anything, it helps to know which plugin fits your site. Here’s how the four most popular contact form plugins compare for WordPress beginners:
| Plugin | Ease of Use | Spam Protection | Free Version |
|---|---|---|---|
| WPForms | Drag-and-drop builder, no coding needed | Modern Anti-Spam (default), reCAPTCHA, hCaptcha, Cloudflare Turnstile | Yes (WPForms Lite) |
| Contact Form 7 | Shortcode-based, requires manual setup | reCAPTCHA, Akismet | Yes |
| Jetpack Forms | Built into Jetpack, minimal configuration | Akismet integration | Yes (with Jetpack free) |
| Gravity Forms | Advanced logic and custom workflows | reCAPTCHA, honeypot | No (paid only, from $59/yr) |
WPForms is the best choice for most beginners. The free Lite version covers simple contact forms, and the drag-and-drop builder means you don’t need to touch a single line of code. The rest of this guide walks you through the WPForms setup.
Video Tutorial
Step 1. Download the WPForms WordPress Contact Form Plugin
The first step is to grab a copy of WPForms and download the plugin to your computer.
Then once you’ve created your WPForms account, head to the WPForms login page. Here you can access your account dashboard and click View License Key, Details, and Downloads.

You’ll then head to the page with your license key details and the link to download the plugin.
Now click the Download WPForms button. Then save your license key to a notepad for use later.
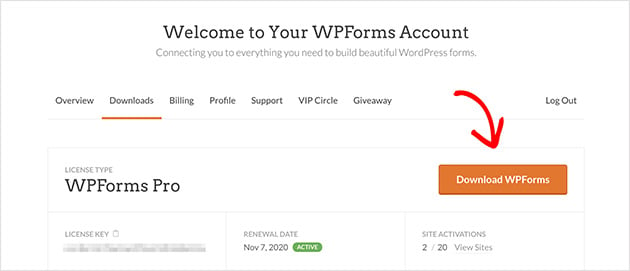
Now add and activate the plugin in your WordPress dashboard. For instructions on how to install WordPress plugins, see this handy guide for beginners.
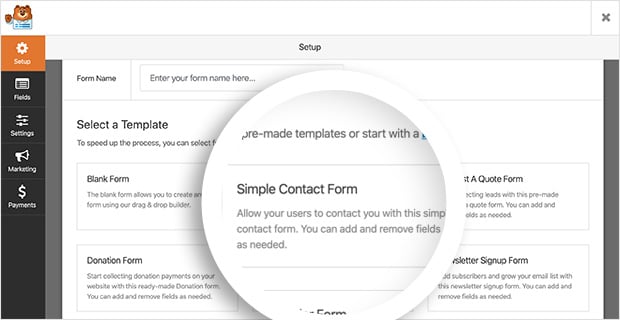
Step 2. Add a Contact Form in WordPress
With WPForms installed and activated on your site, it’s time to create a new contact form. To do this, go to WPForms Plugins » Add New to create a contact form in WordPress.
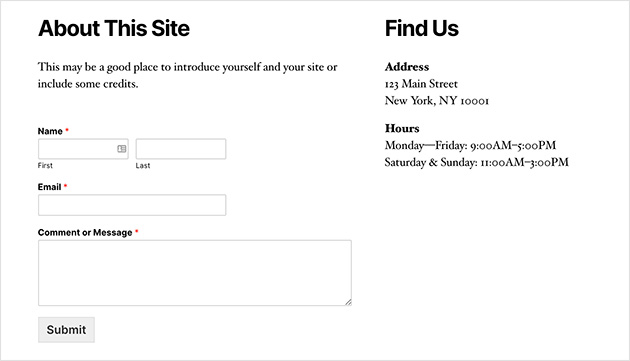
Enter your form name and click the Simple Contact Form template on the following screen.
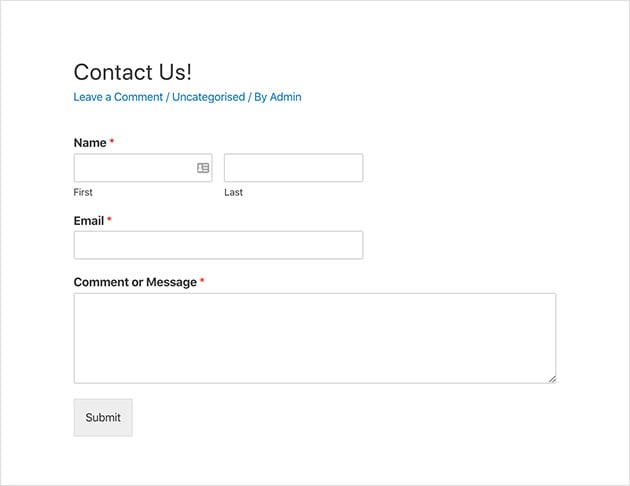
WPForms automatically creates a simple contact form for you. It includes the following default form fields:
- Name – The first and last names of visitors submitting the form.
- Email – Visitor email addresses are required by default.
- Comment or Message – A space for visitors to enter their queries.
- Form Button Text – The submit button that sends the message to you.
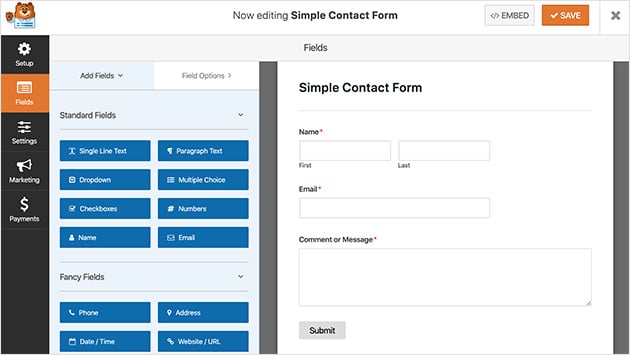
From here, it’s easy to add an extra form field type by dragging it from the left-hand panel to the right. For instance, if you want to give users the ability to submit a document, you can drag over the file-upload field and drop it on your form. You can also add an email subject field and make any text area a requirement for users to fill in.
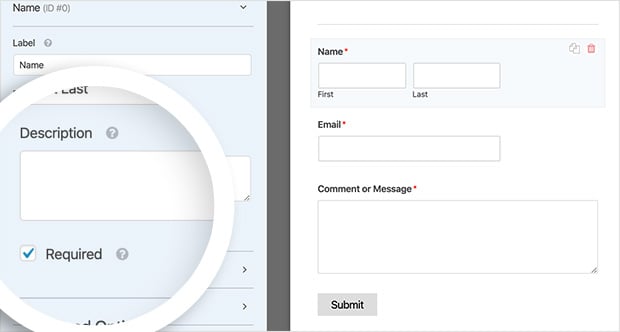
You can also click on any field to edit the name, include a description, and more. You can even click and drag fields to rearrange the order of your contact form.
Then under the Advanced Options heading, you can edit the following preferences:
- Field Size – Set the size of form fields to either small, medium, or large.
- Placeholder – Add placeholder text for the first and last name fields.
- Hide Label – Hide form field labels and sub-labels from the end-user.
- Layouts – Choose a custom layout for your form without using any code.

You can also include custom CSS classes if you want further customizations. When you’re happy with your customizations, click Save.
Now we’ll move on to defining your forms’ general settings.
Step 3. Define the General Settings of Your Form
To define the general settings of your form, go to Settings » General.

In this section, you can configure the following settings:
- Form Name – Rename your form if you’d like to call it something different.
- Form Description – Give the name a description to help you remember what it’s for.
- Submit Button Text – Change the label for the submit button.
- Spam Prevention – Prevent spam bot submissions by enabling the anti-spam honeypot feature.
- GDPR Compliance – You can disable storing entry information in WordPress, such as IP addresses and user agents, to help you comply with GDPR.
When you’re happy with these settings, click Save.
We’ll look at adding form notifications next.
Step 4. Set the Notification Settings for Your Form
Setting notifications for your contact form is an excellent way to get an alert when someone submits a form on your site. However, if you don’t disable this feature in the form settings dropdown menu, you’ll get notifications every time someone submits a form.
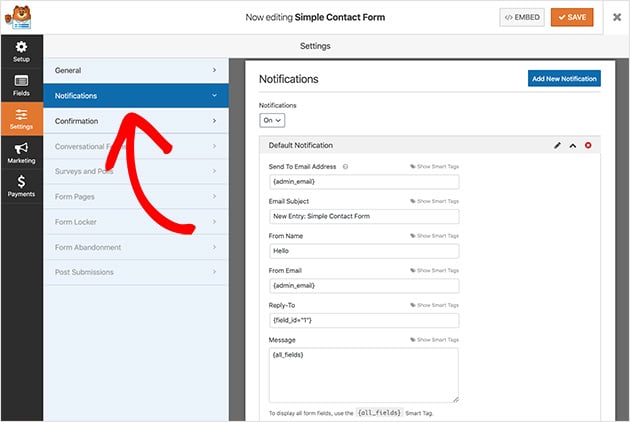
You can use smart tags in WPForms to alert site visitors when they complete a contact form. That lets them know you’ve received their form and assures them their message has gone through.
Please see the documentation to learn more about setting up notifications and confirmations in WordPress.
With your notifications all set, let’s look at configuring your form confirmations.
Step 5. Configure Your Confirmation Messages
A confirmation message is a short note displayed to site visitors after submitting a form on your contact page. It lets them know their message has gone through and gives you a chance to tell them what their next steps are.
In WPForms, there are 3 confirmation message types to choose from:
- Message – This confirmation type is the default option for showing a quick note letting visitors know they submitted their form.
- Show Page – The Show Page type takes visitors to a specific page on your website, like a thank you page, after submitting a form.
- Go to URL (Redirect) – This option is for if you want to send visitors to a different website.
To set your confirmation message, click on Settings » Confirmation. Then select the type of confirmation you’d like. For this guide, we’ll select Message.

Now enter the message you’d like your visitors to see and click Save.
The exciting part is next, which is publishing your form on your website!
Step 6. Add a Contact Form to a WordPress Page
With your contact form created, it’s time to add it to a new page in WordPress.
With WPForms, you can add forms anywhere on your website. That includes WordPress contact pages, blog posts, and even a widget in your sidebar or header.
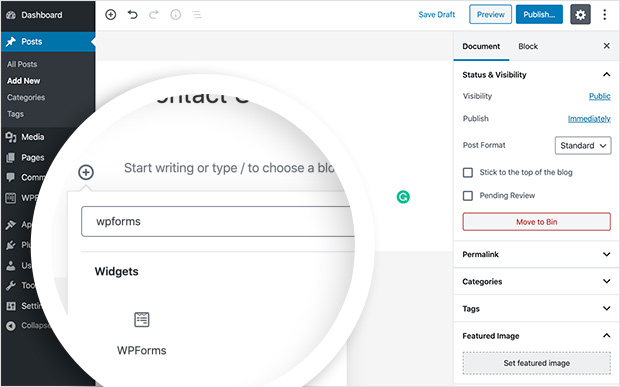
The most common choice is to embed the contact form in a post or page. You can use a shortcode or content block, which we’ll explain how to do now.
First, create a new page or blog post, and in the post or page editor, click the plus icon to add a new WordPress block.
Then type WPForms into the block search bar, and the WPForms block will appear. Click it to add it to your page.
Next, a block will pop up on your screen for you to choose your contact form from the dropdown menu. Then the form appears in your WordPress page.
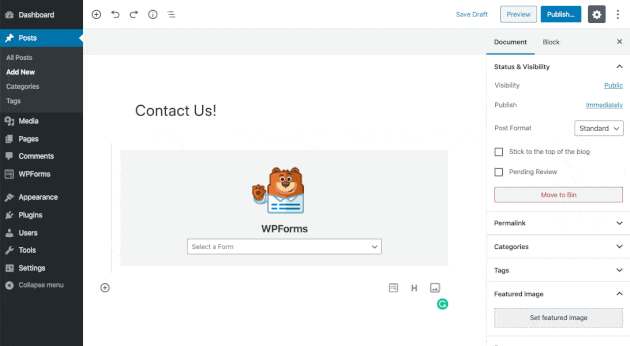
Now all you need to do is publish your page. Then you can see the form live on your website.
Bonus: Build Your Contact Page with SeedProd
If you don’t have a custom contact page yet, SeedProd makes it easy to build one from scratch without touching code.
SeedProd is a visual website builder for WordPress. I use it to build landing pages and full site layouts, including the contact page for this site. You can start with pre-made or a blank template, drag your layout blocks into place, and publish without writing any CSS.
For a step-by-step walkthrough, see our guide on how to create a custom page in WordPress.

Once your page is ready, add the WPForms widget to the layout, select your form from the dropdown, and publish.

Your contact page will be live and styled to match your site.
How to Protect Your WordPress Contact Form from Spam
Spam submissions are a real problem once your contact form starts getting traffic. The good news is WPForms includes several built-in options to block bots.
The first layer is WPForms’ Modern Anti-Spam Protection, which is enabled by default. It runs a multi-layer check in the background, including a honeypot trap that catches bots, without asking visitors to do anything.
For extra security, you can add a CAPTCHA challenge. WPForms supports Google reCAPTCHA v2 and v3, hCaptcha, and Cloudflare Turnstile. Set up your preferred option under WPForms » Settings » CAPTCHA.

If you already use Akismet on your site for comment spam, you can connect it to WPForms too. It routes form submissions through Akismet’s filters as an additional layer.
Most contact forms stay clean with just Modern Anti-Spam Protection enabled. Add a CAPTCHA if spam still gets through.
Adding a Contact Form to Your Sidebar
WPForms also makes it pretty easy to add a contact form to the sidebar of your website. The plugin comes with a built-in contact form widget, which you can drag and drop into any widget-ready area of WordPress.
Head to Appearance » Widgets from your WordPress admin area to do this yourself.
Here you’ll see the WPForms widget that you can drag and drop to your sidebar. Alternatively, click the widget and select a sidebar from the list of options. Then click Add Widget.

When you’ve done that, give the widget a title, choose your form from the dropdown list, and click Save.
Here’s how it will look using the default Twenty Twenty WordPress theme on your site.
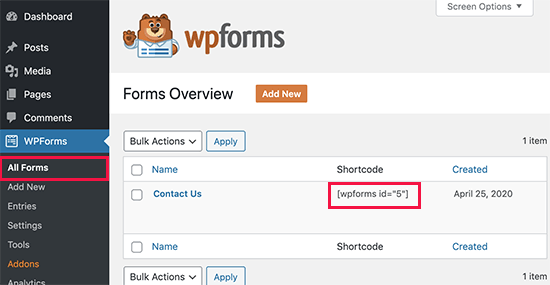
WPForms also gives you the option to add a contact form using a WordPress shortcode. You can find your contact form shortcode by visiting WPForms » All Forms and copying the shortcode from there.
Then it’s just a case of pasting the shortcode where you want to show your form in WordPress using a simple text widget.
Tracking Your WordPress Form Conversions
After you’ve created a form in WordPress, you must learn how well your forms are performing.
If you track your forms in WordPress, you can see how many views and conversions your forms get and your form conversion rates. You can also see which form is getting the most conversions and views.
The easiest way to track form conversions is with MonsterInsights, the best Google Analytics plugin for WordPress.

MonsterInsights has a powerful form tracking addon that automatically tracks your form conversions.
It’s easy to set up and takes only a few clicks. Just install MonsterInsights Forms, and it will start tracking right away. It’s also fully compatible with WPForms and other form plugins for WordPress.
Check out this guide to learn how to track WordPress form conversions.
FAQs on Adding a Contact Form in WordPress
How do you add a contact form in WordPress?
The easiest way is with WPForms. Install and activate the plugin, then go to WPForms » Add New and select the Simple Contact Form template. WPForms builds the form automatically with name, email, and message fields. Then open any page or post, add the WPForms block, choose your form from the dropdown, and publish. The whole process takes less than 15 minutes.
How do I add a contact form to a WordPress page without a plugin?
You can use Google Forms. Create your form at forms.google.com, click Send, copy the embed code, then paste it into a Custom HTML block on any WordPress page. The form displays on your page and routes submissions to a Google Sheet. The tradeoff is the form carries Google’s default styling, so it won’t match your site’s design.
How do I stop spam on my WordPress contact form?
WPForms includes Modern Anti-Spam Protection, which is enabled by default and works silently in the background using a honeypot and multi-layer token check. For more aggressive spam, add a CAPTCHA under WPForms » Settings » CAPTCHA. WPForms supports Google reCAPTCHA, hCaptcha, and Cloudflare Turnstile. If you already use Akismet for comment spam, you can connect it to WPForms as a third layer.
Where do contact form messages go in WordPress?
By default, contact form messages go to the email address configured in WPForms notification settings. Go to Settings » Notifications to update the recipient email. With WPForms Pro, submitted entries are also saved inside your WordPress dashboard under WPForms » Entries, so you can review them without checking email.
What is the best free contact form plugin for WordPress?
WPForms Lite is the best free contact form plugin for WordPress. It includes a drag-and-drop builder, pre-made templates, basic spam protection, and works with any WordPress theme. The free version handles simple contact forms well. For advanced features like file uploads, conditional logic, and payment integrations, WPForms Pro unlocks everything you need.
Adding a contact form in WordPress is one of the simplest ways to make your site more professional and user-friendly. With the right plugin, you can collect the details you need, reduce spam, and give visitors an easy way to reach you.
If you want a fast, code-free solution, WPForms is the best contact form plugin for beginners and small businesses. You can start with the free version or unlock advanced features with Pro to handle payments, surveys, and more.
Now that you know how to add a contact form in WordPress, you can connect with your audience, capture leads, and grow your website with confidence.
You might also find the following guides helpful:
- How to Make a Landing Page with a Form in WordPress
- How to Create a WordPress User Registration Form With Custom Fields
- How To Create a WordPress Event Registration Form
- How to Create a Multi-Step Form in WordPress
- How to Create a WordPress File Upload Form
- How To Create a Typeform-Style Form On WordPress
- How to Create an Online Order Form for Your WordPress Site
Thanks for reading! We’d love to hear your thoughts, so please feel free to join the conversation on YouTube, X and Facebook for more helpful advice and content to grow your business.


