Looking for a tutorial on how to add a contact form in WordPress?
Creating a contact form is a simple way to connect with your audience and get valuable feedback. Today, we’ll show you how to add a contact form in WordPress, and we’ll break it down into a step-by-step guide so even beginners can do it.
Why Create a Contact Form on WordPress?
When building your WordPress website, you might wonder if it’s better to use your email address instead of a contact form.
WordPress contact forms offer your visitors more flexibility in getting in touch. Plus, contact forms let you make certain information a requirement that you can’t do with a simple email address.
Let’s look at a few more things you can do by learning how to create a powerful contact form:
- Information control. With contact forms, you control the information collected through your website. This limits the number of emails sent back and forth.
- Easy communication. Adding contact forms to your WordPress site makes it easy for people to get in touch. It’s also easier for them to send ideas, comments, and questions.
- Message organization. Most contact forms include subject lines, which help you know who is sending you messages.
- Spam protection. Contact forms hide your email address, so spammers can’t send unwanted messages.
- Compliance. Many contact forms include a checkbox indicating users permit you to contact them. That will help you comply with GDPR.
As you can see, creating a contact form instead of displaying an email address is a smart choice.
Can You Add a Contact Form in WordPress Without a Plugin?
There are some 3rd party services that let you add a contact form to WordPress without using a plugin. However, these tools typically require you to copy and paste embed codes to display the form on your website.
If you’re new to using WordPress, you may find working with code snippets confusing. That’s why we recommend using a WordPress contact form plugin to make the entire process easier for non-techy users.
Here’s an example of a WordPress contact page and form we’ll create in this tutorial by using the most beginner-friendly contact form plugin on the market:
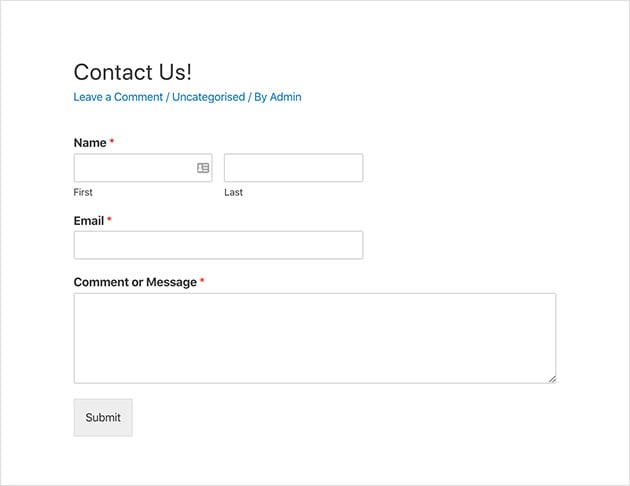
After following the instructions to create the contact form like the one above, we’ll go on to show you how to add your form to WordPress posts, WordPress pages, and sidebar.
So let’s look at how to create a contact form in WordPress step-by-step.
How to Add Contact Form in WordPress

For this guide, we’ll use the WPForms WordPress contact form plugin to make a contact form in WordPress. In fact, you can create any form in WordPress with this tool and its extensive template library.
The WPForms drag-and-drop form builder is the most beginner-friendly contact form plugin on the market, and it’s super easy to set up. Unlike similar plugins like Jetpack and Contact Form 7, it has many features to enhance forms in WordPress, with custom field options, notifications, smart tags, and more.
There’s also a free version and a paid version of WPForms. While WPForms Lite has everything you need to start, we’ll use the paid version for the extra functionality.
Here’s a look at the extra options you get when upgrading to the paid version:
- WPForms Pro lets you use the plugin on more than one website.
- Build multiple form types, including multi-page forms, payment forms, file upload forms, email subscription forms, etc.
- View form submissions in your WordPress admin with email notifications for new messages.
- Build surveys with real-time WordPress polls, star ratings, and Likert scales.
- Create distraction-free form pages in WordPress using the WPForms landing page solution.
- Integrate with popular email marketing services and payment platforms like MailChimp, Stripe, and PayPal to grow your email list and accept payments on your eCommerce site.
- It also works with WPMail SMTP for better email deliverability.
- Google Recaptcha helps prevent spam submissions.
What’s more, over 3 million websites use WPForms. Plus, they also have a loyal following in the WordPress community. So take a look at the WPForms user reviews from WordPress.org here.

Check out this WPForms review for even more details.
Follow these steps to learn how to add a contact form in WordPress:
- Step 1. Download the WPForms WordPress Contact Form Plugin
- Step 2. Add a Contact Form in WordPress
- Step 3. Define the General Settings of Your Form
- Step 4. Set the Notification Settings for Your Form
- Step 5. Configure Your Confirmation Messages
- Step 6. Add a Contact Form to a WordPress Page
- Adding a Contact Form to Your Sidebar
- Tracking Your WordPress Form Conversions
- よくある質問
ビデオ・チュートリアル
Step 1. Download the WPForms WordPress Contact Form Plugin
The first step is to grab a copy of WPForms and download the plugin to your computer.
Then once you’ve created your WPForms account, head to the WPForms login page. Here you can access your account dashboard and click View License Key, Details, and Downloads.

You’ll then head to the page with your license key details and the link to download the plugin.
Now click the Download WPForms button. Then save your license key to a notepad for use later.
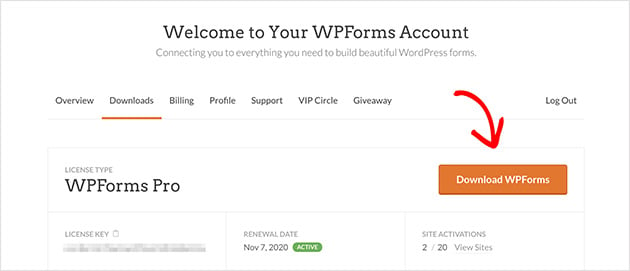
Now add and activate the plugin in your WordPress dashboard. For instructions on how to install WordPress plugins, see this handy guide for beginners.
Step 2. Add a Contact Form in WordPress
With WPForms installed and activated on your site, it’s time to create a new contact form. To do this, go to WPForms Plugins » Add New to create a contact form in WordPress.
Enter your form name and click the Simple Contact Form template on the following screen.
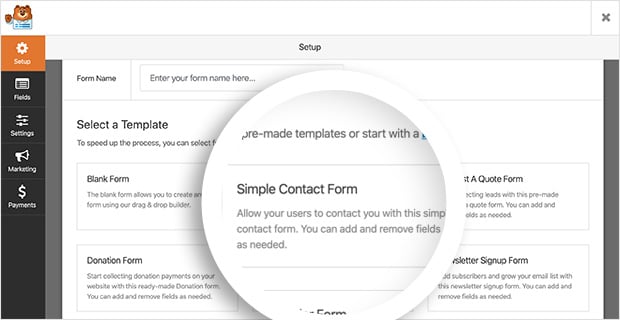
WPForms automatically creates a simple contact form for you. It includes the following default form fields:
- Name – The first and last names of visitors submitting the form.
- Email – Visitor email addresses are required by default.
- Comment or Message – A space for visitors to enter their queries.
- Form Button Text – The submit button that sends the message to you.
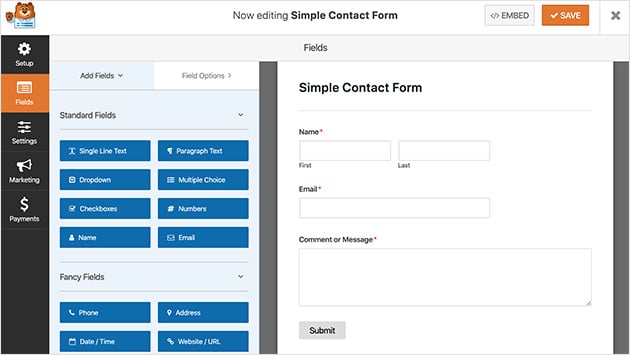
From here, it’s easy to add an extra form field type by dragging it from the left-hand panel to the right. For instance, if you want to give users the ability to submit a document, you can drag over the file-upload field and drop it on your form. You can also add an email subject field and make any text area a requirement for users to fill in.
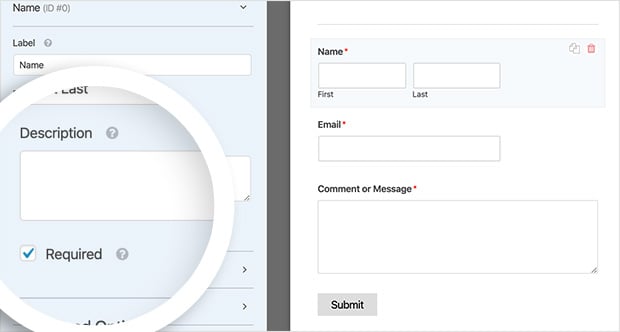
You can also click on any field to edit the name, include a description, and more. You can even click and drag fields to rearrange the order of your contact form.
Then under the Advanced Options heading, you can edit the following preferences:
- Field Size – Set the size of form fields to either small, medium, or large.
- Placeholder – Add placeholder text for the first and last name fields.
- Hide Label – Hide form field labels and sub-labels from the end-user.
- Layouts – Choose a custom layout for your form without using any code.
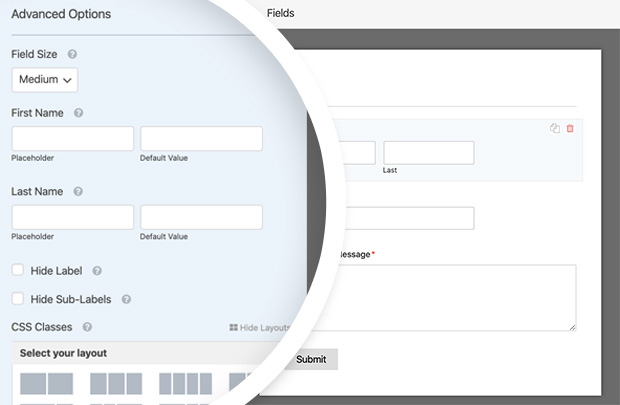
You can also include custom CSS classes if you want further customizations. When you’re happy with your customizations, click Save.
Now we’ll move on to defining your forms’ general settings.
Step 3. Define the General Settings of Your Form
To define the general settings of your form, go to Settings » General.
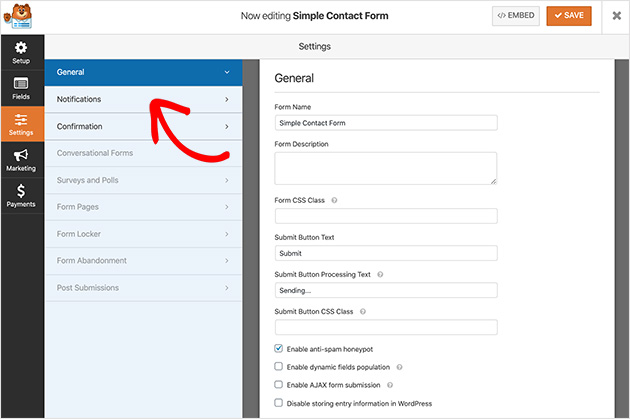
In this section, you can configure the following settings:
- Form Name – Rename your form if you’d like to call it something different.
- Form Description – Give the name a description to help you remember what it’s for.
- Submit Button Text – Change the label for the submit button.
- Spam Prevention – Prevent spam bot submissions by enabling the anti-spam honeypot feature.
- GDPR Compliance – You can disable storing entry information in WordPress, such as IP addresses and user agents, to help you comply with GDPR.
When you’re happy with these settings, click Save.
We’ll look at adding form notifications next.
Step 4. Set the Notification Settings for Your Form
Setting notifications for your contact form is an excellent way to get an alert when someone submits a form on your site. However, if you don’t disable this feature in the form settings dropdown menu, you’ll get notifications every time someone submits a form.
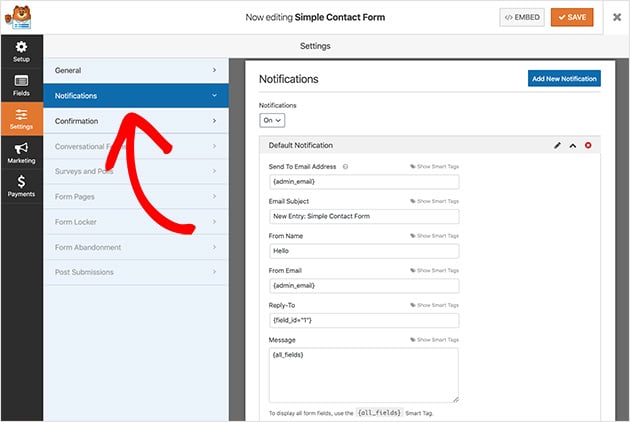
You can use smart tags in WPForms to alert site visitors when they complete a contact form. That lets them know you’ve received their form and assures them their message has gone through.
Please see the documentation to learn more about setting up notifications and confirmations in WordPress.
With your notifications all set, let’s look at configuring your form confirmations.
Step 5. Configure Your Confirmation Messages
A confirmation message is a short note displayed to site visitors after submitting a form on your contact page. It lets them know their message has gone through and gives you a chance to tell them what their next steps are.
In WPForms, there are 3 confirmation message types to choose from:
- Message – This confirmation type is the default option for showing a quick note letting visitors know they submitted their form.
- Show Page – The Show Page type takes visitors to a specific page on your website, like a thank you page, after submitting a form.
- Go to URL (Redirect) – This option is for if you want to send visitors to a different website.
To set your confirmation message, click on Settings » Confirmation. Then select the type of confirmation you’d like. For this guide, we’ll select Message.
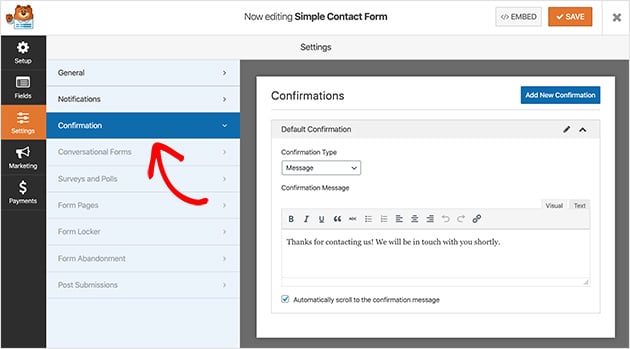
Now enter the message you’d like your visitors to see and click Save.
The exciting part is next, which is publishing your form on your website!
Step 6. Add a Contact Form to a WordPress Page
With your contact form created, it’s time to add it to a new page in WordPress.
With WPForms, you can add forms anywhere on your website. That includes WordPress contact pages, blog posts, and even a widget in your sidebar or header.
The most common choice is to embed the contact form in a post or page. You can use a shortcode or content block, which we’ll explain how to do now.
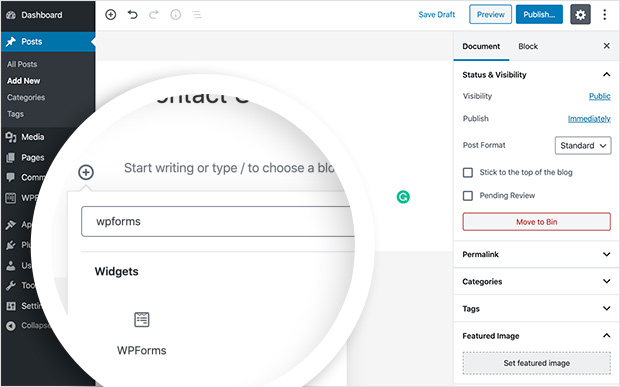
First, create a new page or blog post, and in the post or page editor, click the plus icon to add a new WordPress block.
Then type WPForms into the block search bar, and the WPForms block will appear. Click it to add it to your page.
Next, a block will pop up on your screen for you to choose your contact form from the dropdown menu. Then the form appears in your WordPress page.
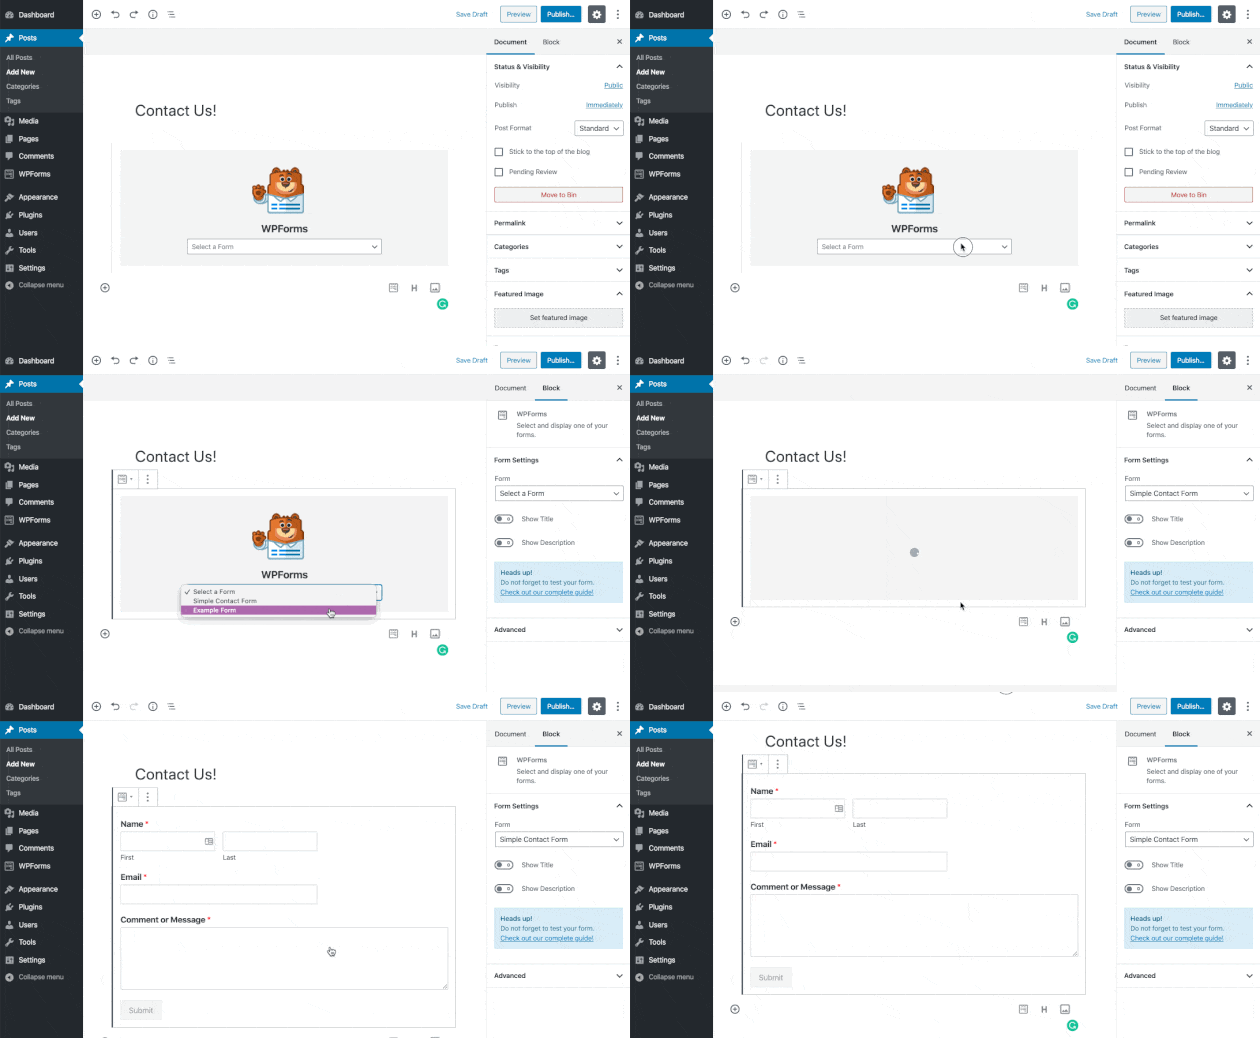
Now all you need to do is publish your page. Then you can see the form live on your website.

Adding a Contact Form to Your Sidebar
WPForms also makes it pretty easy to add a contact form to the sidebar of your website. The plugin comes with a built-in contact form widget, which you can drag and drop into any widget-ready area of WordPress.
Head to Appearance » Widgets from your WordPress admin area to do this yourself.
Here you’ll see the WPForms widget that you can drag and drop to your sidebar. Alternatively, click the widget and select a sidebar from the list of options. Then click Add Widget.

When you’ve done that, give the widget a title, choose your form from the dropdown list, and click Save.
Here’s how it will look using the default Twenty Twenty WordPress theme on your site.
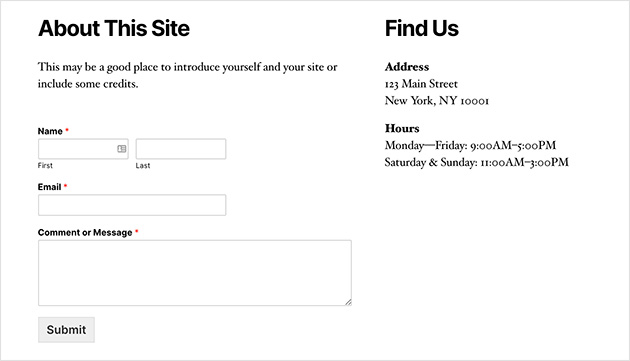
WPForms also gives you the option to add a contact form using a WordPress shortcode. You can find your contact form shortcode by visiting WPForms » All Forms and copying the shortcode from there.
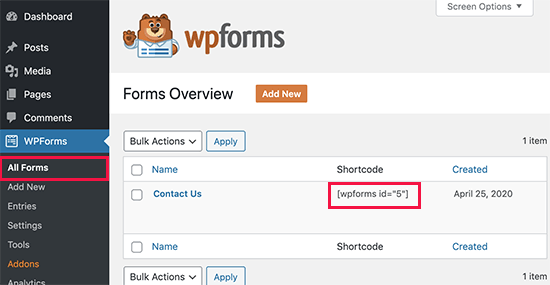
Then it’s just a case of pasting the shortcode where you want to show your form in WordPress using a simple text widget.
Tracking Your WordPress Form Conversions
After you’ve created a form in WordPress, you must learn how well your forms are performing.
If you track your forms in WordPress, you can see how many views and conversions your forms get and your form conversion rates. You can also see which form is getting the most conversions and views.
The easiest way to track form conversions is with MonsterInsights, the best Google Analytics plugin for WordPress.

MonsterInsights has a powerful form tracking addon that automatically tracks your form conversions.
It’s easy to set up and takes only a few clicks. Just install MonsterInsights Forms, and it will start tracking right away. It’s also fully compatible with WPForms and other form plugins for WordPress.
Check out this guide to learn how to track WordPress form conversions.
よくある質問
Do I need coding skills to add a contact form using WPForms?
No, you don’t need any coding skills to add a contact form using WPForms. The plugin features a drag-and-drop form builder that is beginner-friendly.
Will adding a contact form slow down my website?
Generally, WPForms is optimized for performance and should not significantly impact your website’s speed. However, it’s always a good idea to monitor your site’s performance after adding new features.
Is WPForms compatible with all WordPress themes?
WPForms is designed to be compatible with most WordPress themes. However, if you encounter any issues, their support team is available to assist you.
How secure is WPForms?
WPForms offers several security features like spam protection and CAPTCHA. However, it’s advisable to take additional security measures to protect your website.
What’s the difference between the free and paid versions of WPForms?
The free version, WPForms Lite, offers basic functionalities for creating simple contact forms. The paid version provides additional features like payment forms, email subscriptions, and advanced fields.
おめでとう!
You’ve now successfully learned how to create a user-friendly contact form in WordPress so your website visitors can easily contact you, and you’ll never miss a message. Wasn’t it easy?
Looking for more great ways to extend the functionality of your small business website? Our definitive guide to the best WordPress plugins will have some ideas for you.
We hope you found this article helpful. If you did, do follow us on Twitter and Facebook for more content WordPress tutorials and tips.

