Do you want to create a photography website to promote your business?
Whether you’re a professional photographer or want to start selling prints online, a professional photography website can help build your online presence while showing your skills to potential customers.
In this guide, we’ll show you how to create your own photography website step-by-step.
Is It Worth Having a Website for Photography?
It’s absolutely worth having a website for your photography business. With a website, you can showcase your photography portfolio, connect with new clients, and promote your services.
Here are some of the benefits of having a photography website:
- A well-designed portfolio website can make you look more professional and trustworthy to potential clients.
- Your website is a great place to show off your best photos. You can organize photo galleries by category, event, or client and add captions to give viewers more information.
- A website is a great way to connect with potential clients looking for a photographer. You can include a contact form so potential clients can get in touch easily.
- Your website can promote your services to potential clients. You can include information about your rates, packages, and availability so visitors can see them at-a-glance.
- A website makes it easier for clients to find you through search engines. By optimizing your site with relevant keywords, you’re more likely to show up in search results.
What Do Photographers Use for a Website?
Photographers can use several website builders to create a website or online portfolio. The most popular options include WordPress, Squarespace, Wix, SmugMug, and Adobe Portfolio.
The photography website builder you choose depends on how you’ll use it. For instance, if you’re a wedding photographer, you may need a simple portfolio with contact details. But if you plan to sell prints or other products, you’ll need a website builder with eCommerce functionality.
One of the best website builders that covers all scenarios is WordPress. It’s the most popular website builder powering over 43% of websites.
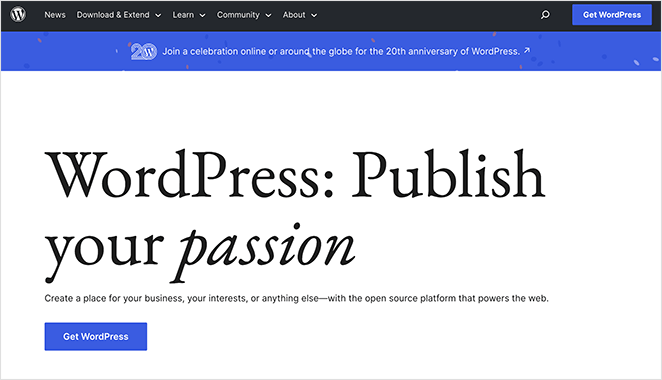
WordPress is known for its flexibility, ease of use, and wide range of features. You can use it to create any website, including:
- Blogs
- Membership sites
- Portfolios
- eCommerce stores
- Learning management systems
- And more
What’s more, WordPress is a free, open-source software with tons of features to help craft a professional photography site.
How to Create a Photography Website in WordPress
Below we’ll show you how to create a photography website using WordPress and some of its most user-friendly features and plugins.
To be clear, we’ll use the self-hosted version, WordPress.org, not the hosted free version, WordPress.com. To learn the difference, see this comparison of WordPress.org vs WordPress.com.
Step 1. Choose a Domain Name and Hosting
The first step in creating a photo website is purchasing your own domain name and web hosting. This is where your website files are stored, and the address users type into their browser to access it.
A domain name typically costs $14.99 per year, while website hosting is around $7.99 per month. If you’re looking for an officially recommended WordPress hosting provider, Bluehost is one of the best choices.

With Bluehost, you can get WordPress hosting, a free custom domain name, and other perks, such as a free SSL certificate, for as little as $2.75 per month. It also comes with WordPress pre-installed, so there’s no extra setup required.
Click here to claim your discount and get started with Bluehost.
Once you’ve signed up for a Bluehost account, you’ll get an email directing you to your web hosting dashboard. Because Bluehost automatically installs WordPress for you, you can log right into your WordPress site from your dashboard.
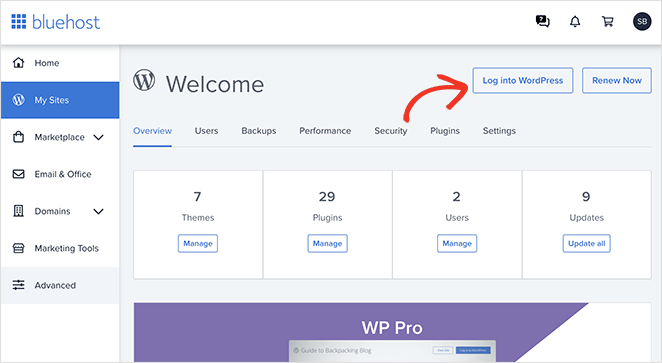
Note: if you use an alternative hosting provider, your dashboard may look slightly different. Please refer to your host’s documentation for details on navigating your hosting account and installing WordPress.
When you log into your WordPress website, you’ll see an admin area like this:
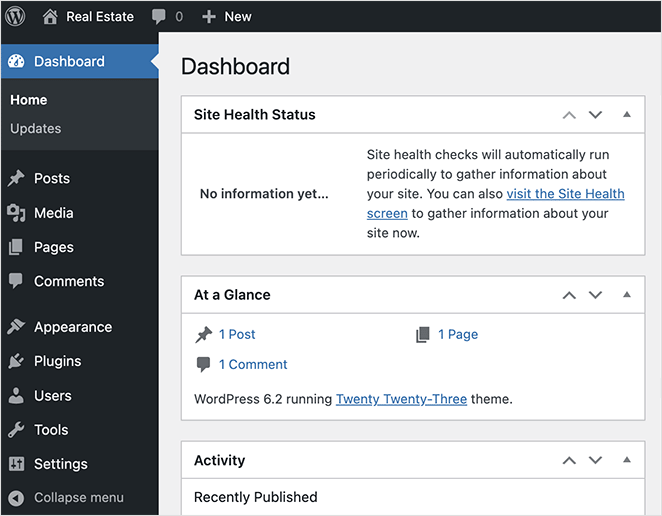
This is where you can manage your WordPress site, create content, and adjust your settings.
Step 2. Decide How to Design Your Photography Website
The next step is to choose a website design. This is the template that dictates your site’s layout and styling.
There are several ways to create a professional web design for your photography site. You can use a premade WordPress theme or create a custom WordPress theme from scratch.
WordPress themes are a great place to start because they come with many of the features and styling you need. For help choosing one, you can see this collection of the best WordPress themes for photographers.
If you want a custom website design unique to your photography business, you can use a page builder like SeedProd.

SeedProd is the best drag-and-drop page builder and theme builder, with over 1+ million users. It offers full control over the look and feel of your site and lets you build any WordPress theme without code.
You can start with a premade website template kit, then customize every page visually without hiring a developer. It also includes WooCommerce support, allowing you to sell photos from WordPress, and is 100% mobile-friendly, so your site looks perfect on mobile devices.
In this guide, we’ll use SeedProd to show you how to create a photography website.
Note: There is a free version of SeedProd’s landing page builder. However, we’ll use SeedProd Pro in this guide for its theme-building features.
To get started, install and activate SeedProd on your WordPress site. For help with this, you can see our documentation on installing SeedProd Pro, which explains how to activate your plugin license key.
Alternatively, launch a custom website in seconds using SeedProd’s AI website builder. Simply provide a brief description of your site, and it will generate a fully custom theme, helping you save time and get online faster.
Step 3. Select a Photography Website Template Kit
With SeedProd activated, navigate to SeedProd » Theme Builder from your admin and click the Theme Template Kits button.
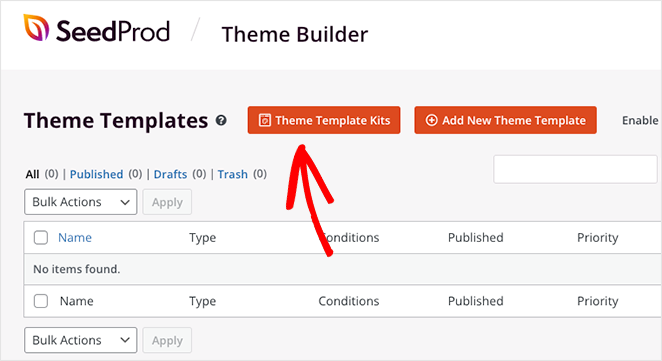
Here you can browse a library of premade WordPress theme templates. Each template is a full website kit with all the pages you need to create a complete website.
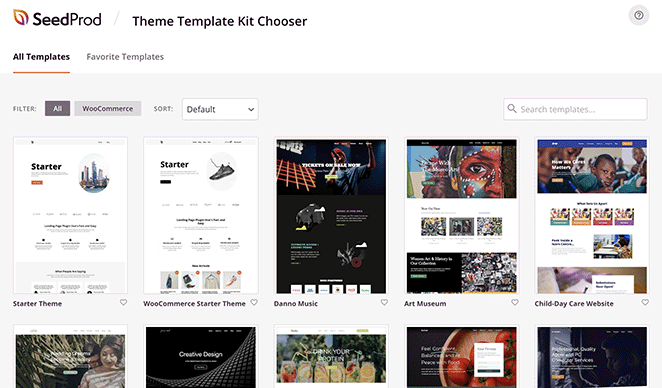
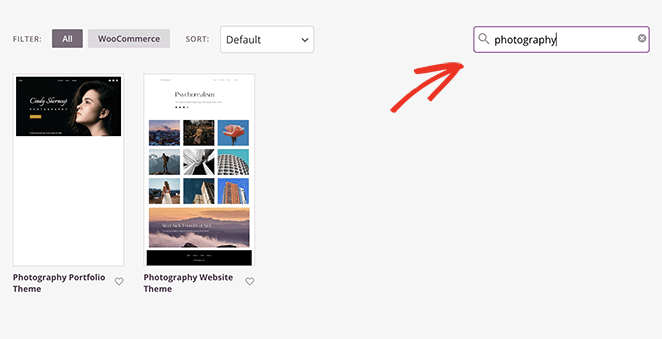
You’ll find kits for virtually every industry, but you can use the search box to find a specific design to narrow your search down. For example, typing “Photography” reveals a photography portfolio theme and a photography website theme.
To choose a design, simply hover over it and click the checkmark icon.
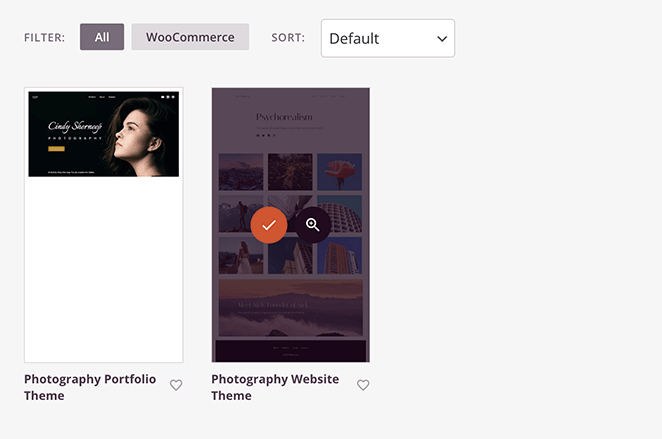
For this guide, we’ll use the photography website theme.
It’ll take just a few seconds to import the theme. After, you’ll see the individual templates that make up your custom theme.
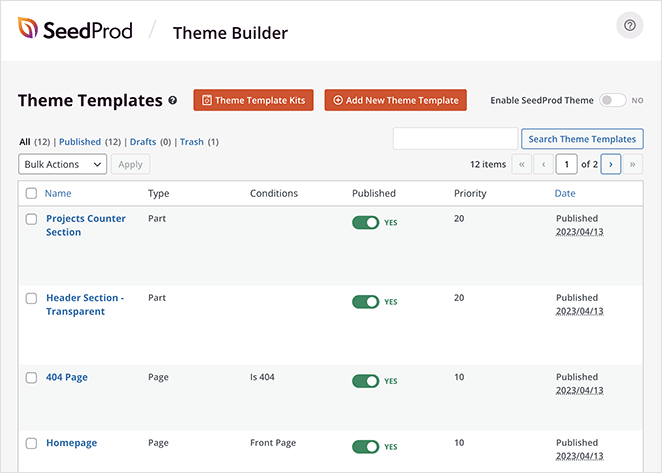
From here, you can edit each template to customize your website design to suit your photography business. We’ll show you how to do this next.
Step 4. Customize Your Photography Website
Customizing any template is incredibly easy. Simply hover your mouse over one, then click the Edit Design link, which takes you to SeedProd’s drag-and-drop page builder.
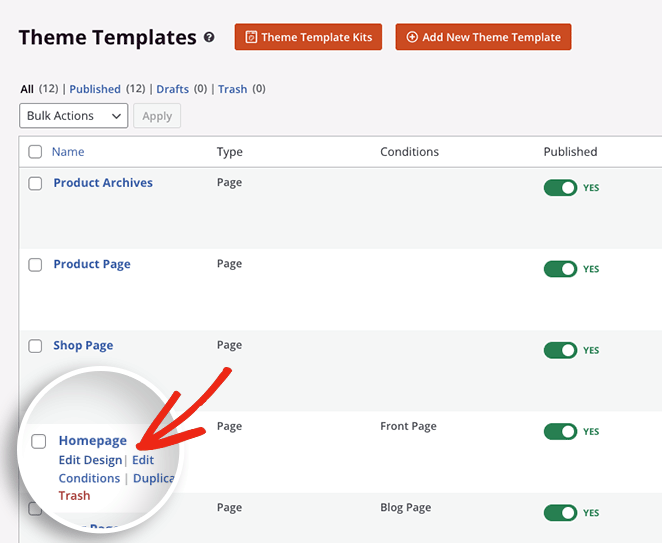
Let’s start by customizing your photography template’s homepage.
Creating a Custom Photography Website Homepage
After opening your homepage template, you’ll see SeedProd’s page builder, which has WordPress blocks, sections, and settings on the left-hand side. On the right is a live preview of your page that you can click and edit in real-time.
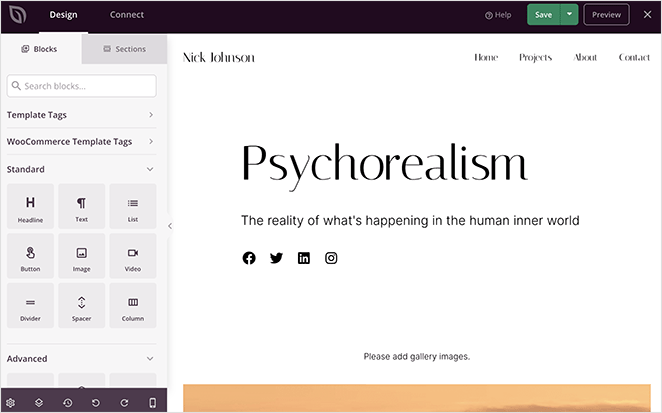
Clicking any page element opens a panel on the left-hand side. Here you can customize the elements’ content, styling, and display options with point-and-click.
For example, clicking a heading or text element lets you replace the demo content with information about your photography business.
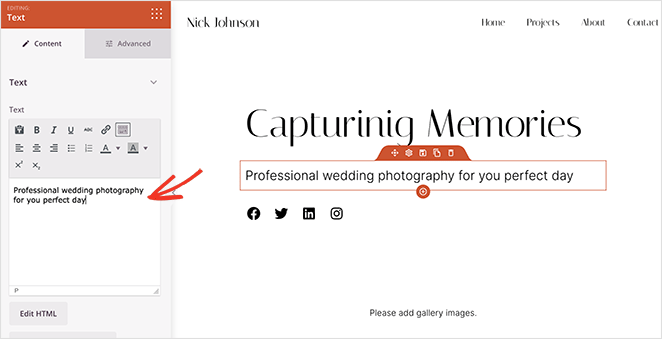
Additionally, clicking the Social Profiles block lets you add icons and links to your social media accounts.
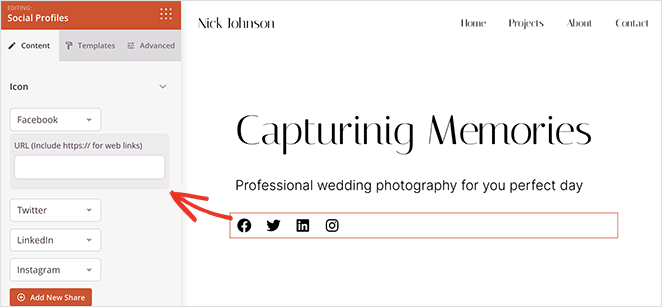
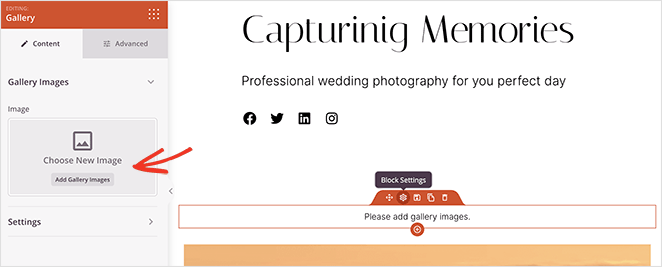
Many of SeedProd’s themes come with certain elements by default. This theme automatically includes the Gallery block to display your best work, but to see the full effect, you’ll need to add your own photos.
To do this, hover over the Gallery block element until you see an orange outline, then click it. On the left, a panel opens where you can click to upload gallery images from your computer or WordPress media library.
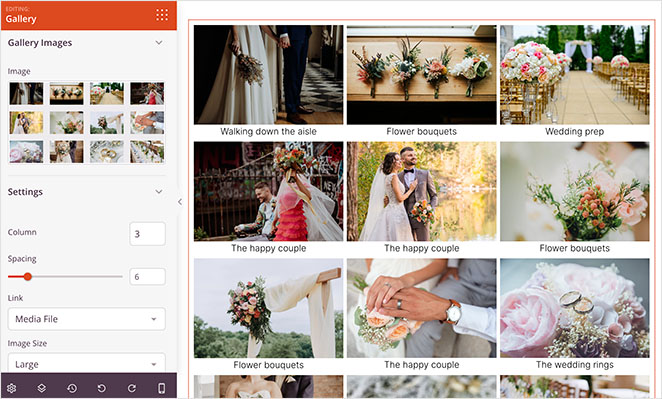
After adding your photos, you can change the number of columns, spacing, link source, image size, and more.
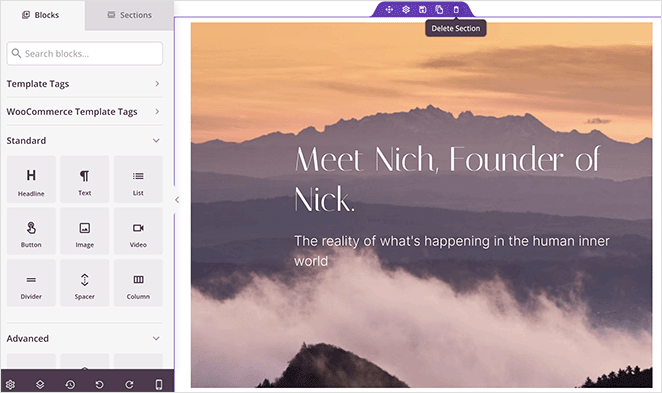
Further down the page is a premade area you can customize to include more information. Let’s customize it to show an “About Me” area with a call-to-action to learn more.
First, remove the section by hovering over it until it has a purple outline and clicking the trashcan icon.
Next, click the Sections tab in the left-hand panel.
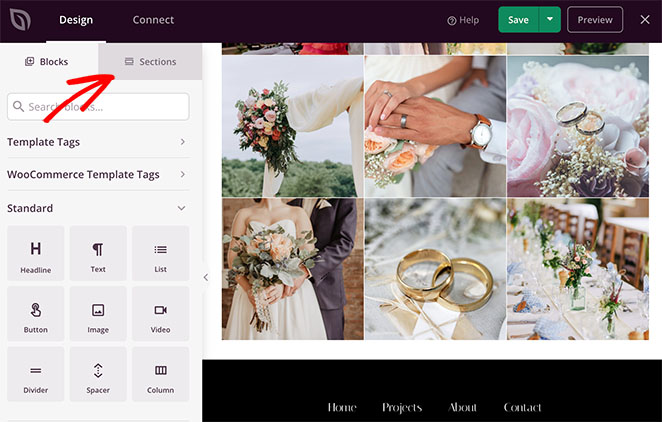
On this page, you can choose from different premade website sections, including Call-to-Action, Header, Features, FAQ, and more. Each has a unique design that you can customize easily after adding to your page.
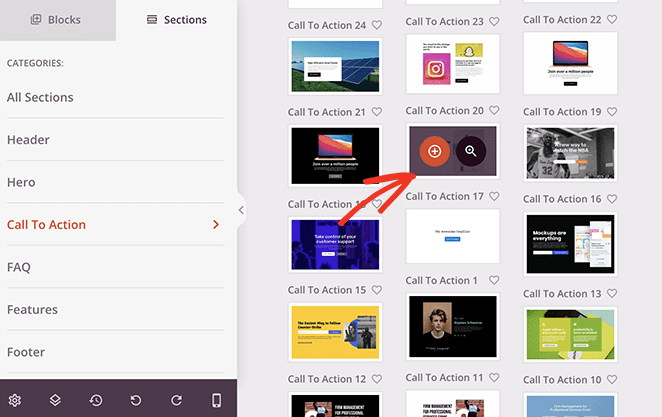
Let’s use the Call to Action 17 section by hovering over it and clicking the plus icon.
SeedProd will automatically add the section to the bottom of your page. From there, you can edit the content to suit your business needs.
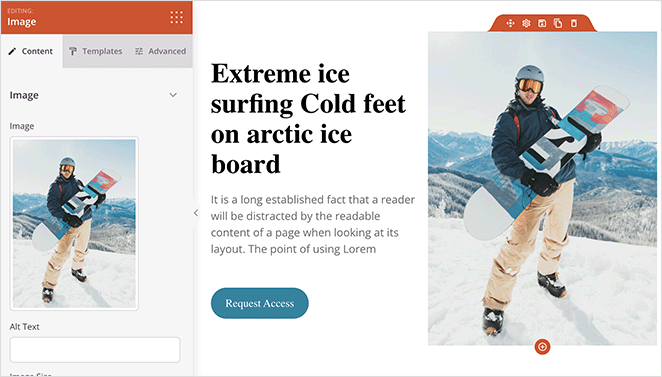
In this example, we’ve changed the photo, description, and CTA button.
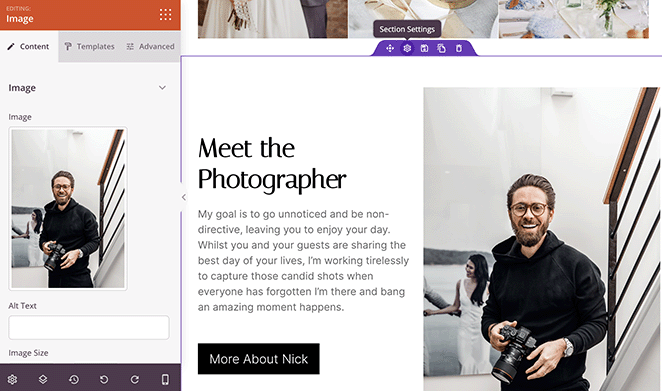
Remember to save your changes before customizing the rest of your photography website.
Creating a Photography Gallery Page
Now let’s look at building and customizing your gallery page.
The template we’re using calls this a Projects page, which you can find by visiting Pages » All Pages from your WordPress admin.
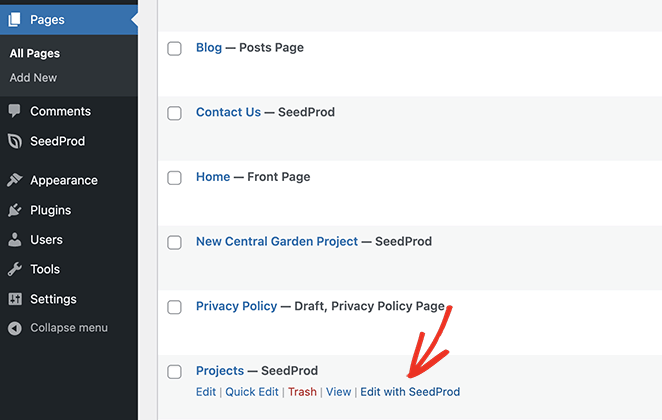
To edit this page, hover over it and click the Edit with SeedProd link.
By default, this page uses the Advanced Gallery block to give users a great first impression of your business. Simply click it to configure its settings and add your photos.
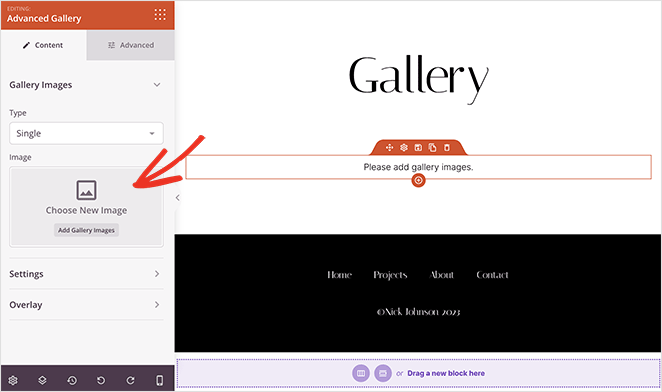
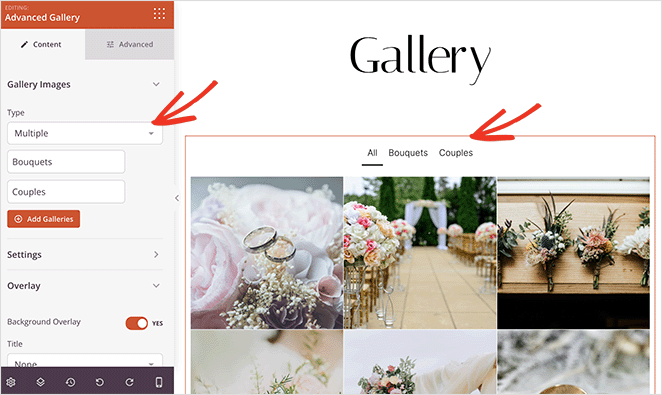
Unlike the standard Gallery block, the Advanced Gallery lets you add multiple photo galleries on the same page. This creates handy tabs that allow visitors to filter between different photo categories.
To set it up, choose the Multiple gallery type from the dropdown menu, then add photos to each gallery.
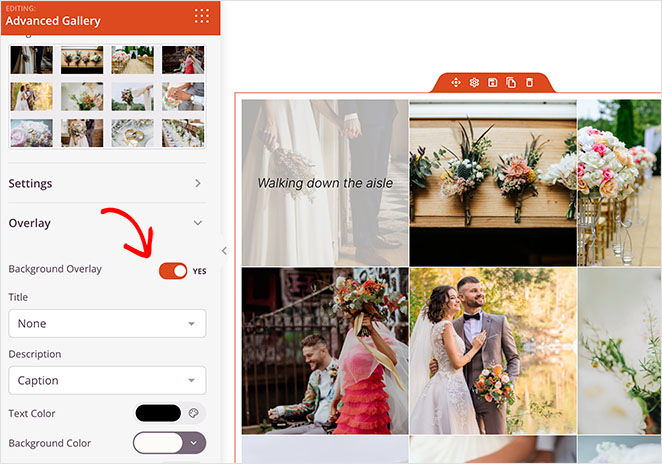
The Advanced Gallery also has extra customization options. For instance, you can change the photo aspect ratio and add overlays to create an attractive hover effect without writing custom CSS.
Creating a Photography Website About Me Page
Another page your photography website should have is an About page where potential clients can learn about your process, background, and other details.
The photography website theme creates this page for you automatically. Customizing it simply requires visiting Pages » All Pages and editing the About page with SeedProd like before.
Start by swapping out the demo content with custom information about yourself and your business.
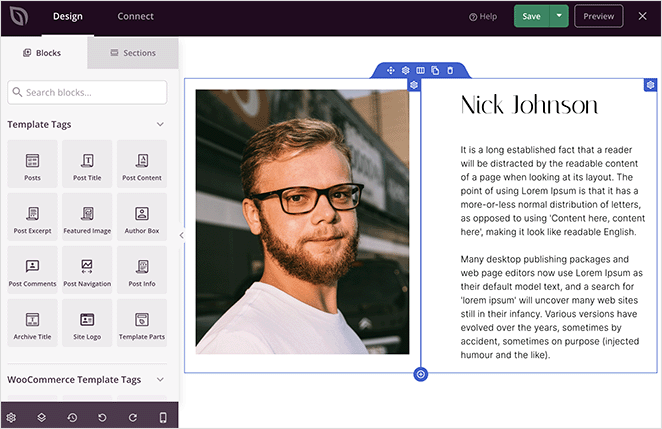
You can also add your own profile photo to improve user experience and make your About page more personal.
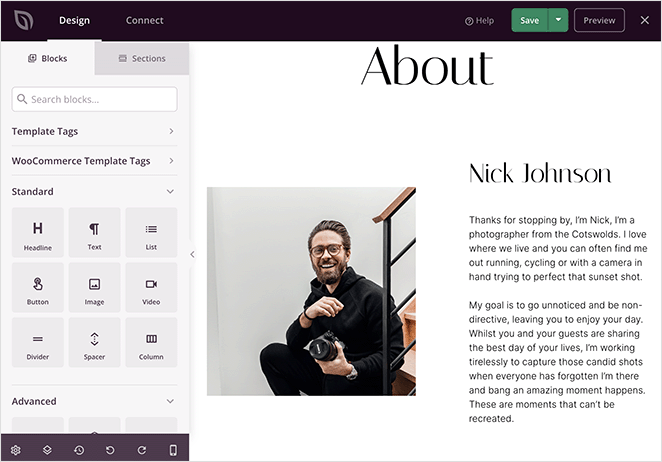
This page is an excellent place to add logos and testimonials from past clients. When visitors see this social proof, they’re more likely to trust your business.
To add testimonials, drag and drop the Testimonials block from the left-hand panel.
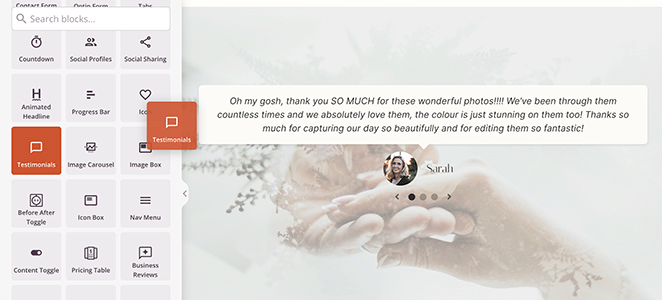
In the customization options, you can add a headshot for each client, description, name, and title.
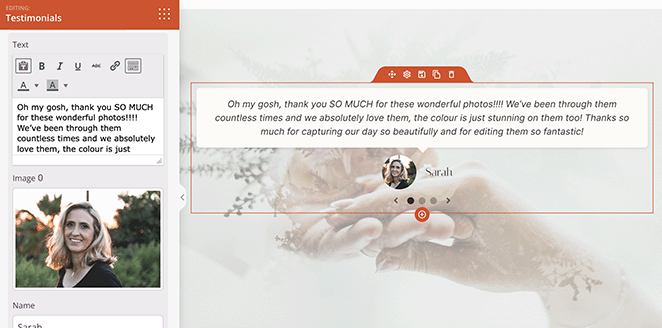
You can add as many testimonials as you like and display them in multiple columns or as a sliding testimonial carousel.
Creating a Photography Website Contact Page
Now let’s customize your contact page by going to Pages » All Pages and clicking the Edit with SeedProd link on the Contact Us heading.
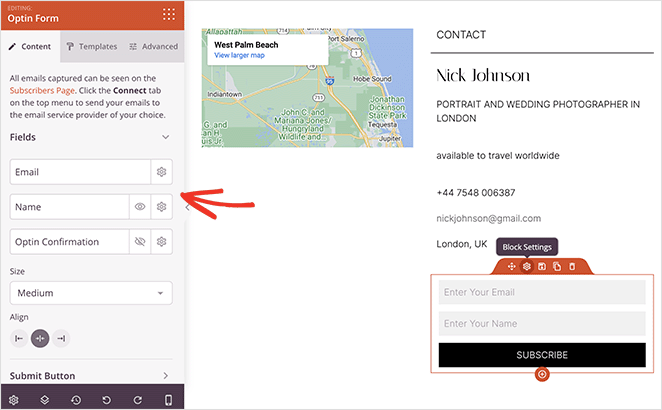
This page design includes the Google Maps block, contact information, and the Opt-in form block.
The Google Maps block is ideal if you have a physical office for your photography business. You can enter your address so potential clients know where to find you for a face-to-face consultation.
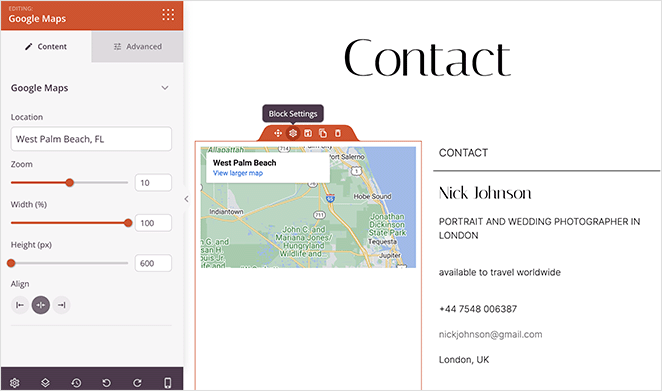
Maps are also an excellent way to list your business in local search engine results. Often, Google will display the map in search results, which can have a positive impact on search engine optimization (SEO).
Keeping the opt-in form is an excellent idea to grow your email list. With this form, users can subscribe to get updates and notifications via email.
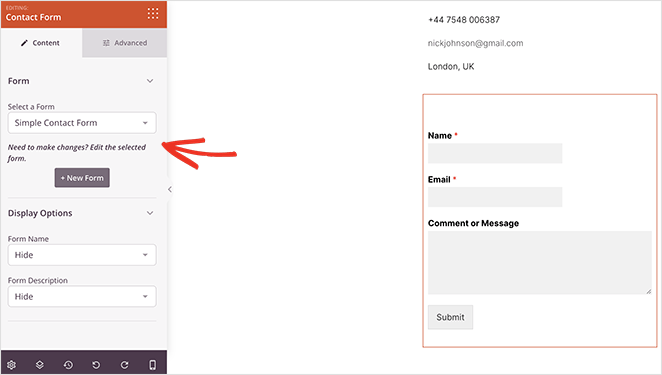
Alternatively, you can drag over the Contact Form block, which integrates seamlessly with WPForms, the best WordPress form builder. From there, you can create and display any form for users to get in touch.
Continue customizing your photography website until you’re happy with how everything looks. You can even add extra pages, such as a photography blog, online store, pricing page, and more.
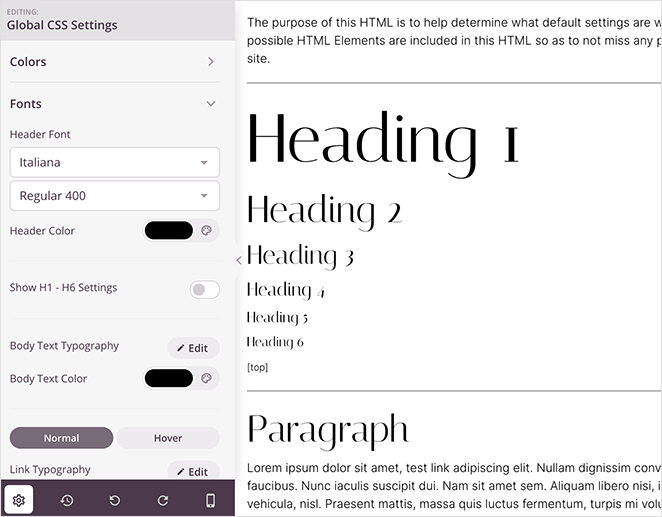
For consistent styling across your whole site, you can edit the Global CSS template. It includes customization options for fonts, colors, backgrounds, buttons, forms, Custom CSS, and more.
Remember to click the Save button to save your changes.
Check out this detailed guide on creating a beautiful wedding website for more tips and inspiration.”
Step 5. Optimize for Mobile Viewing
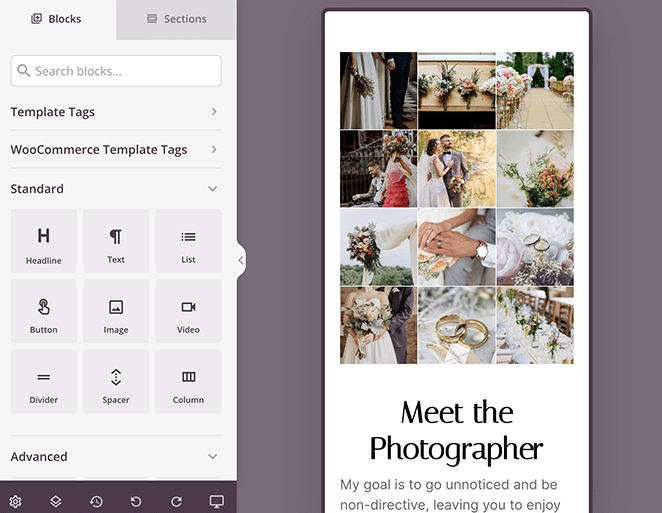
Before publishing your custom photography website, you’ll want to ensure it looks perfect across different devices, including smartphones, desktops, and tablets.
Luckily, SeedProd’s builder includes a live mobile preview option you can access by clicking the mobile phone icon in the bottom-left toolbar.
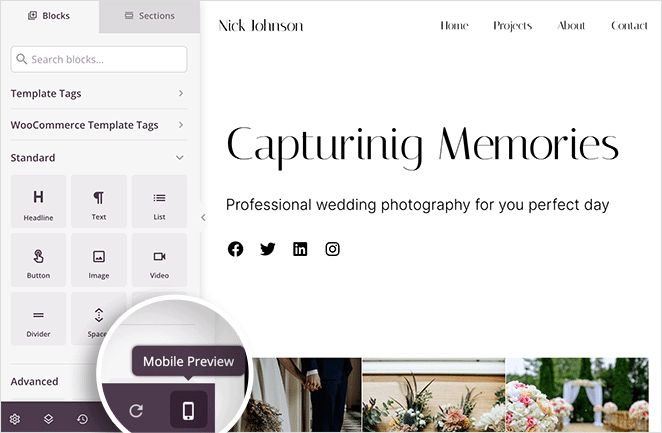
From there, you can tweak your design until it displays beautifully on both mobile and desktop devices without messing around with HTML.
Step 6. Publish Your Photography Website
When your photography website design is complete, the final step is to enable your SeedProd theme.
To do this, head to SeedProd » Theme Builder and look for the Enable SeedProd Theme toggle. Now click the toggle until it moves to the Yes position.

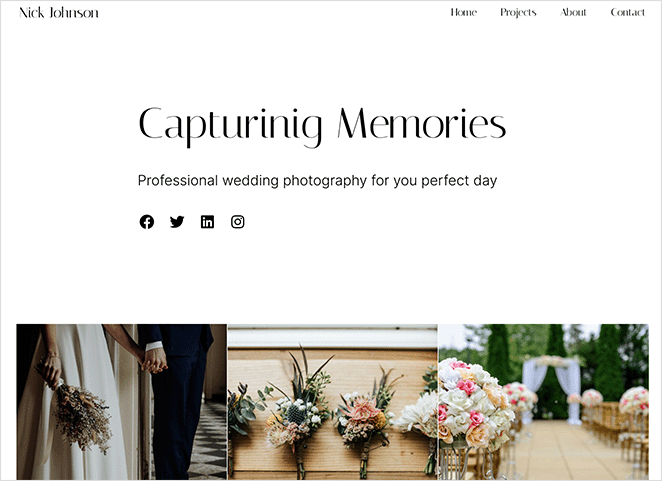
In just a few seconds, you’ll see a success message saying your site is live. Go ahead and visit your homepage to see it in action.
How to Create a Photography Website FAQs
Absolutely! WordPress provides several plugins and integrations that enable you to sell your photographs directly from your website. By installing WooCommerce, which works seamlessly with SeedProd, you can set up a custom online store, create product pages for your photographs, set prices, manage inventory, and process secure payments.
You can use a WordPress SEO plugin like All in One SEO with SeedProd to optimize your photography site for search engines. The plugin includes helpful tools for editing metadata, sitemaps, local SEO, and more.
To protect your photos from unauthorized use, you can add watermarks to your photos, turn off right-click saving with a WordPress plugin, enable hotlink protection, and feature a copyright notice on your website.
To promote your new photography website, consider writing regular blog posts on relevant photography topics to generate organic traffic. You can also share your best content on social media, run email marketing campaigns, and collaborate with influencers in your niche.
Next: Generate Leads for Your Photography Site Launch
We hope this guide has helped you learn how to create a photography website in WordPress.
Before you launch your site, consider following this tutorial on how to create a coming soon page in WordPress. With a coming soon page, you can rank in search engines and generate leads before your site goes live.
Ready to create a photography website in WordPress?
Thanks for reading! We’d love to hear your thoughts, so please feel free to leave a comment with any questions and feedback.
You can also follow us on YouTube, X (formerly Twitter), and Facebook for more helpful content to grow your business.

