Creating a landing page in WordPress doesn’t have to involve writing code. In fact, thanks to modern drag-and-drop builders like SeedProd, anyone—from small business owners to bloggers—can build a high-converting page in under 30 minutes.
When I built my first WordPress landing page back in 2013, I had no idea how to code. Tutorials kept mentioning HTML and CSS, and I just wanted a simple signup page. That experience led me to help thousands of users do the same, without touching a line of code.
In this guide, I’ll show you step-by-step how to create a landing page in WordPress.
Quick Answer: To create a landing page in WordPress without coding, use a drag-and-drop plugin like SeedProd. Choose a pre-made template, customize your content visually, and publish it in just a few clicks. It’s fast, beginner-friendly, and works with any WordPress theme.
How to Create a WordPress Landing Page (No Code Required)
Follow these simple steps to create a custom landing page in WordPress without writing code. This method works with any theme, doesn’t require a developer, and takes under 30 minutes:
This method works for beginners, marketers, and small business owners. It’s the fastest way I’ve found to create a custom landing page in WordPress without hiring a developer.
Benefits of Using a Landing Page in WordPress
Unlike your homepage, a landing page is designed for one goal, whether it’s lead generation, product sales, or event signups.

Here are the main reasons marketers prefer using landing pages:
- Higher conversion rates: Landing pages eliminate distractions by removing menus, footers, and unnecessary links—helping visitors focus on the call to action.
- Full design control: Tools like SeedProd allow full customization of your layout, fonts, colors, and CTAs—no code required.
- Faster campaign setup: Launch and remove time-sensitive offers without affecting your full website.
- Better tracking: Each landing page can be tied to its own analytics, helping you optimize performance with A/B testing or heatmaps.
Need ideas? Here are some proven landing page examples you can use for inspiration.
Plus, there are many plugins, including page builders, that help create landing pages easily. These page builders are user-friendly and don’t require coding skills. They let beginners make effective landing pages without needing a developer.
Types of WordPress Landing Pages You Can Create
Not all landing pages are the same. Depending on your goal, whether it’s collecting emails, launching a product, or replacing your homepage, WordPress makes it easy to create a custom landing page without writing code.
Here are some of the most effective types:
- Waitlist Landing Pages: Perfect for pre-launch products or services. These pages help you build early interest and collect email signups before going live.
- Squeeze Pages: Designed specifically for email capture. Usually paired with a lead magnet like a free ebook, checklist, or exclusive content to encourage opt-ins.
- Sales Pages: Focused on driving purchases or signups. These pages highlight your offer with compelling copy, CTAs, social proof, and often include pricing sections.
- Event or Webinar Pages: Promote online or in-person events. Often includes a countdown timer, registration form, and calendar integration to increase attendance.
- Homepage Replacements: Ideal when your full site isn’t ready. Use a focused landing page as your temporary homepage to welcome visitors and guide them to take action.
Each of these pages can be built quickly using a drag-and-drop builder like SeedProd. Just choose a template, customize your content, and publish.
How to Build a Custom Landing Page in WordPress with SeedProd
While you don’t technically need a WordPress landing page plugin to build your page, using one is always my first choice. They’re easy to use, don’t require any coding skills, and allow you to spin up a page in minutes.
I also always use SeedProd instead of the other options available. Let’s look at why.

First off, SeedProd is fast. Really fast. Independent tests show SeedProd pages loading in under a second, which is crucial because slow pages lose visitors and sales. This speed advantage gives you a head start.
Speed is just one part of it. SeedProd includes helpful blocks like countdown timers and opt-in forms that can improve your conversion rates.
What I like most is how easy it is to build your pages with no code needed. The drag-and-drop system and pre-built templates make designing a professional-looking landing page (or even a whole website) a breeze.

I built my entire site with SeedProd without writing a single line of code.
So, let’s jump right into the steps for using SeedProd to create a landing page in WordPress:
Paso 1. Instalar SeedProd Instalar SeedProd Landing Page Plugin
Click here to get started with SeedProd and quickly download the plugin. In just a few clicks, you’ll have it installed on your WordPress site.
If you’d like a walkthrough, we have a guide on installing SeedProd.
✏️ Note
While there’s a free version available, this tutorial will focus on the Pro version, which provides access to advanced features like premium templates and powerful integrations.
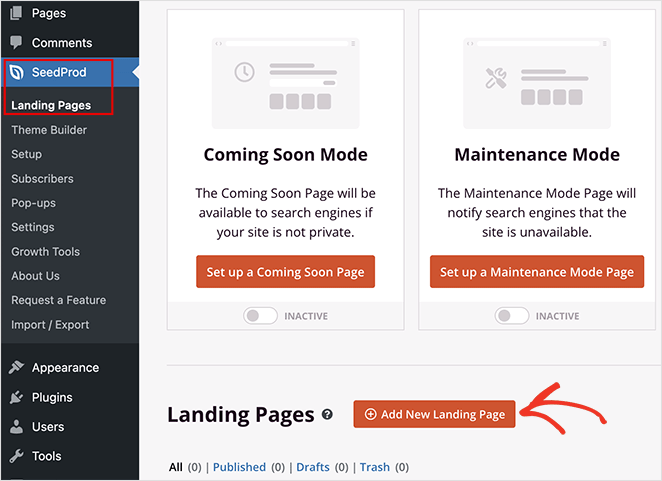
After activating the plugin, navigate to SeedProd » Landing Pages from your WordPress dashboard and click the Add New Landing Page button.
Paso 2. Elija una plantilla de página de destino
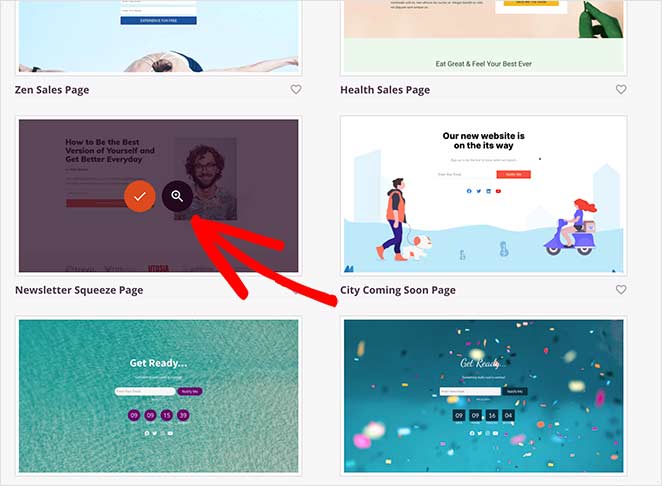
On the next page, you can choose a landing page template to jumpstart your design process. Whether you need a landing page for sales, lead generation, webinar registrations, or a custom project, there’s a template to match your goals.
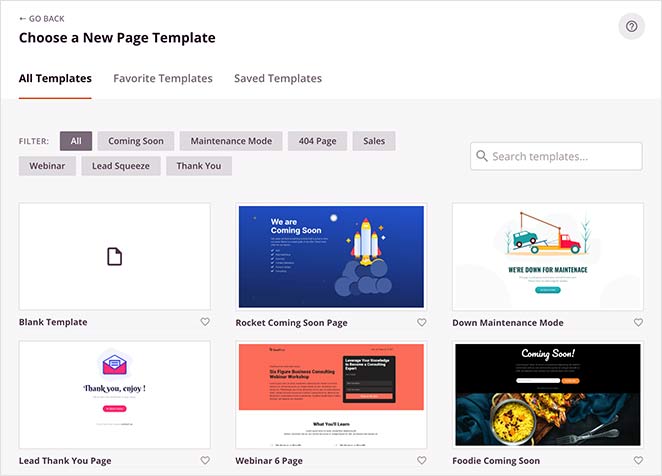
These fully customizable templates eliminate the need for design experience, allowing you to create a professional-looking landing page with ease.
También puede seleccionar la plantilla en blanco para crear y diseñar su propia página en el editor visual.
Para este tutorial, elegiré la plantilla Newsletter Squeeze Page. Para utilizarla, pasa el ratón por encima de la plantilla y haz clic en el icono de la marca.
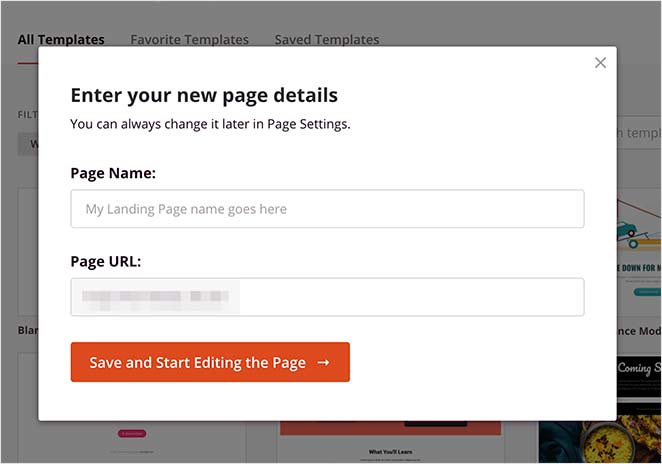
A continuación, aparecerá una ventana emergente en la que podrás asignar un nombre y una URL personalizada a tu página. A continuación, haz clic en el botón Guardar y empezar a editar la página para cargar tu plantilla en el constructor de arrastrar y soltar.
Paso 3. Personalice la plantilla de su página de destino
After creating your new page, you’ll see the visual drag-and-drop page builder. This makes it simple to customize your landing page’s layout and content.
Drag and drop elements like headlines, images, buttons, and more directly onto the page. No coding required.
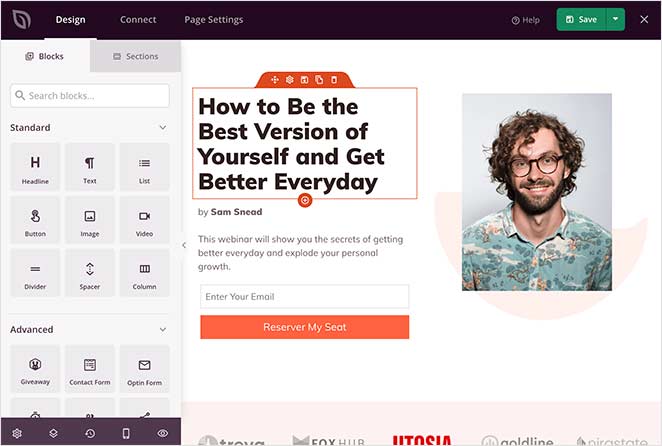
You’ll find various blocks in the sidebar, each with customizable options to match your brand.
Por ejemplo, si haces clic en el bloque Botón para abrir la configuración, verás varios estilos de plantilla, colores, degradados y contornos.
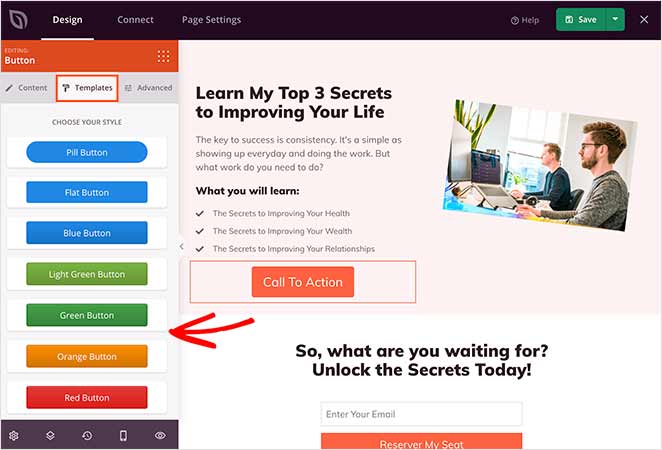
The Advanced tab also allows you to change the block’s content, size, alignment, color, and typography.
Need to boost conversions? The Advanced blocks have you covered, with options for lead generation forms, countdown timers, testimonials, and more.
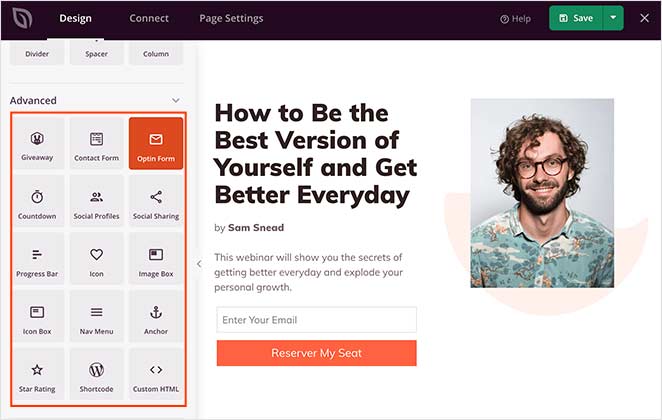
To learn how to add some of these features, check out the following tutorials:
- Cómo incrustar Google Maps en WordPress
- Cómo añadir antes y después Photo Slider a WordPress
- Cómo añadir testimonios a WordPress
- Cómo crear una página de aterrizaje con temporizador de cuenta atrás
- Cómo añadir horarios comerciales a WordPress
- Cómo añadir iconos personalizados de redes sociales de WordPress a su sitio web
Adding Landing Page Sections
Want to create entire sections quickly? SeedProd offers pre-made layouts for headers, hero areas, FAQs, and more, giving you a head start on your design.
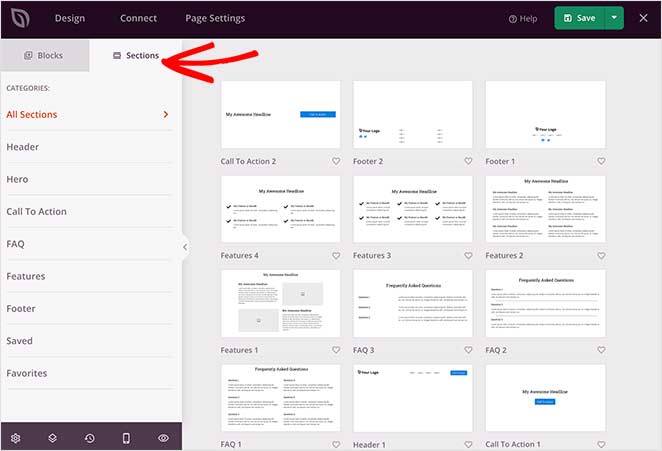
Para añadir una sección a su página de destino, pase el ratón por encima de un ejemplo y haga clic en el icono +.
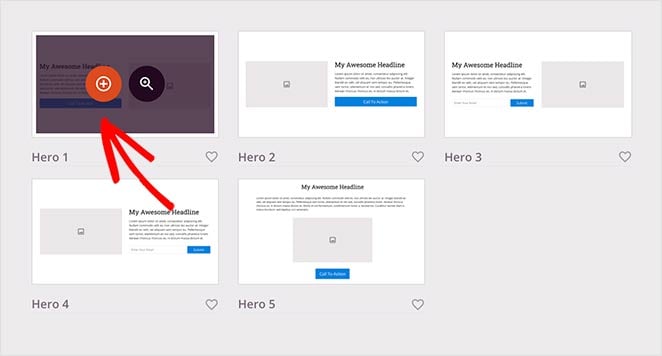
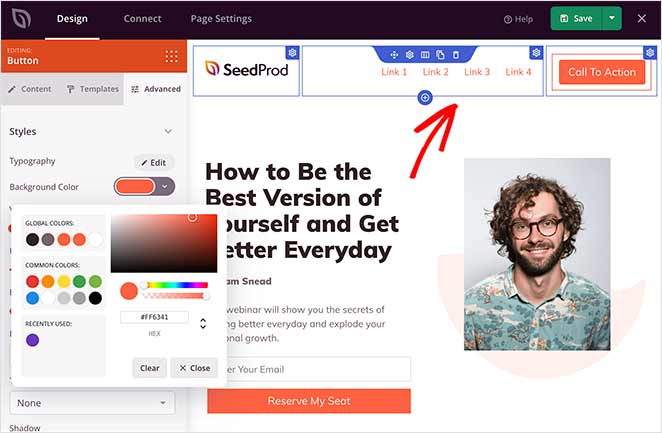
SeedProd entonces inserta la sección en su página. A continuación, puede hacer clic y editar los elementos como lo haría con los bloques.
Customizing Global Styling Options
To maintain a consistent look and feel across your landing page, use the global styling options to easily control colors, fonts, and background images.
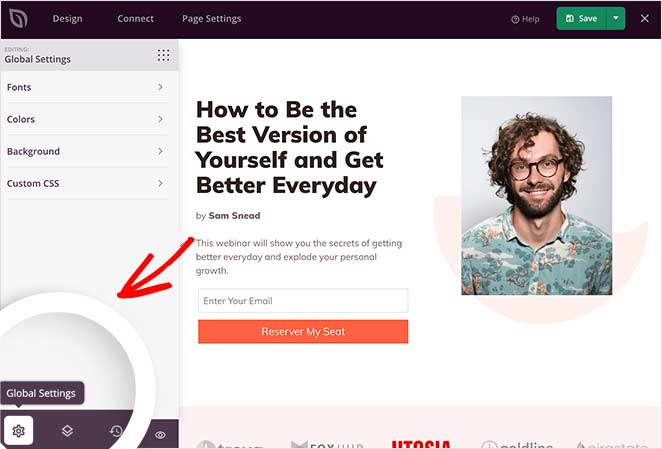
Por ejemplo, puede añadir un fondo de vídeo o una función de presentación de diapositivas de fondo a su página. O puede cambiar el color de fondo y dar a su página de destino una paleta de colores coherente.
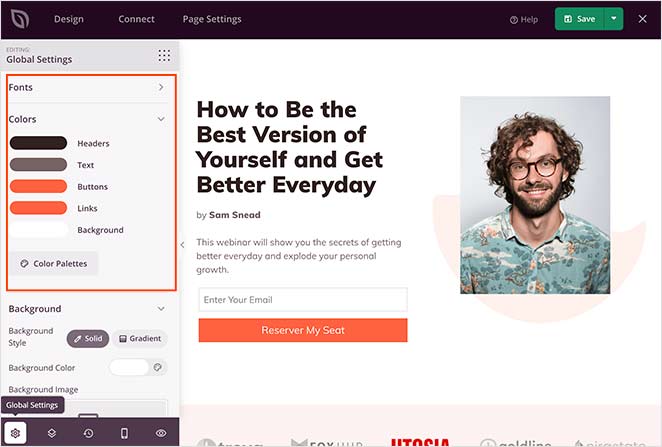
Remember to save your changes during the design process by clicking the Save button at the top-right corner.
Restoring to an Older Landing Page Version
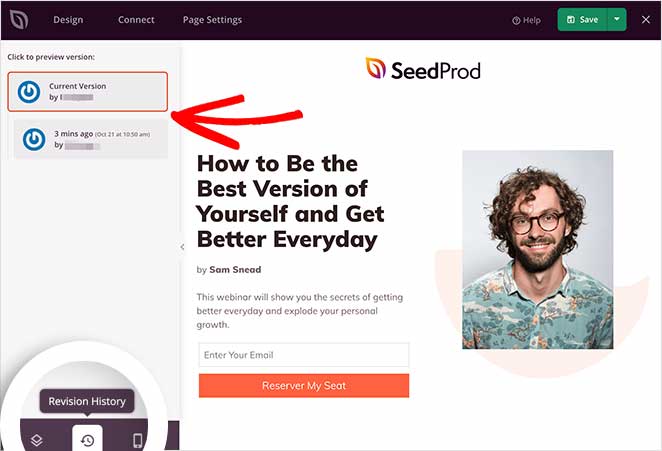
A veces, puede que necesite volver a una versión anterior de la página de destino.
Para ello, haz clic en el icono del reloj situado en la parte inferior izquierda de la pantalla. A continuación, puedes ver tu historial de revisiones y cambiar a una versión diferente.
Step 4: Connect Your Email Marketing Service
You can easily grow your email list by connecting your favorite tools.
Connect to popular email providers like Constant Contact, GetResponse, Mailchimp, ActiveCampaign, and more, ensuring every lead captured through your landing page goes straight to your email list.
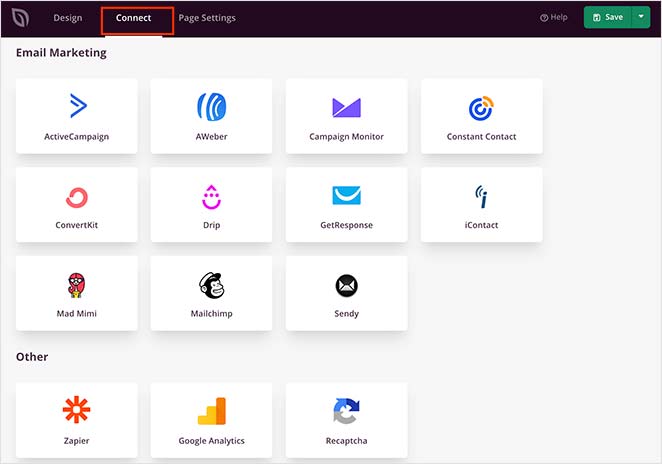
También puede configurar el seguimiento de Google Analytics, la protección contra el spam y otras aplicaciones con Zapier.
Búscalo en la lista de integraciones y haz clic en Conectar para vincular tu servicio de correo electrónico.
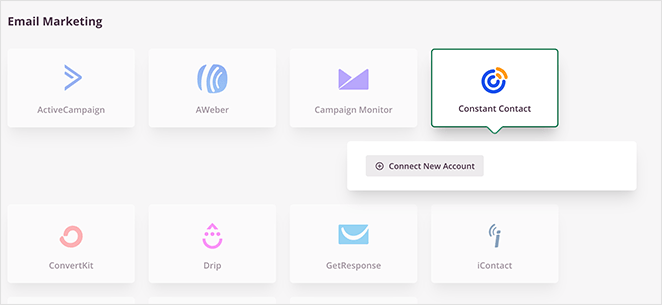
A continuación, siga las instrucciones para conectarse y verificar su cuenta. Después de eso, puedes vincular todos tus formularios opt-in a tu lista de correo electrónico.
Paso 5: Configure los ajustes de su página de destino
Next, take control of your landing page’s performance with easy-to-use settings.

Adjust SEO settings to boost your page’s visibility in search results, ensuring more potential customers can find you. You can also connect to analytics platforms to track your landing page’s effectiveness.
For advanced users, there are options for custom header, body, and footer scripts, giving you full control over your page’s functionality.
No olvide hacer clic en Guardar para conservar los cambios.
Paso 6: Publique su página de destino en WordPress
Antes de publicar su página de destino, debería previsualizarla. De ese modo, podrá ver si se ve bien tanto en dispositivos de sobremesa como móviles.
Para previsualizar tu página, haz clic en el icono de previsualización del generador de páginas de destino. Verá una vista previa de la página móvil al instante, para que pueda desplazarse y hacer cualquier cambio. Vuelve a hacer clic en el icono para volver a la vista previa de escritorio.
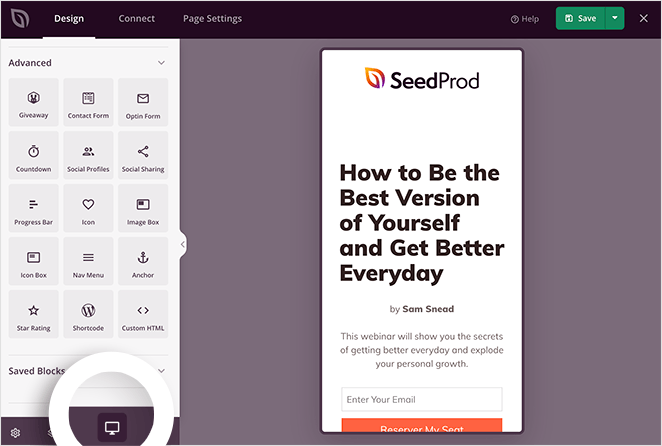
Si desea ver una vista previa en directo de su página, haga clic en el icono del ojo para abrir su página de destino en una nueva pestaña.
Cuando estés satisfecho con el aspecto de todo, haz clic en la flecha situada bajo el botón Guardar y haz clic en Publicar.
He aquí un ejemplo de página de aterrizaje que he creado para esta guía en mi sitio web de prueba:

💡 Expert Tip
This landing page took me around 15 minutes to create.
You can make that time even quicker by using SeedProd’s Import and Export feature. It lets you export your designs as a .zip file so you can quickly reuse them for other projects.
For example, design a stock template and use it as a framework for your client projects to make the design process faster.
How Do I Make My WordPress Homepage a Landing Page?
Si quieres que tu página de aterrizaje sea lo primero que vean los visitantes de tu sitio web, tendrás que configurarla como tu página de inicio estática.
Para ello, vaya a Ajustes " Lectura desde su panel de control de WordPress. A continuación, seleccione la opción "Una página estática" y elija la página de destino que acaba de crear en el menú desplegable.
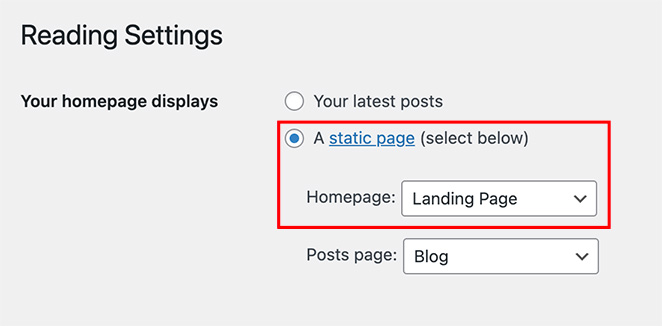
No será la misma que su página de inicio habitual. En su lugar, significa que su página de destino personalizada es donde los visitantes aterrizan cuando hacen clic a través de su sitio principal de WordPress.
🤔 Frequently Asked Questions About WordPress Landing Pages
A continuación, optimice su página de destino
I hope this guide helped you learn how to create a landing page in WordPress without writing a single line of code. Whether you’re building a simple landing page, a custom sales page, or even replacing your homepage, WordPress makes it easy when you use the right plugin.
Once your landing page is live, take a few minutes to test how it performs. Small tweaks can lead to big wins, especially if you’re using tools like A/B testing, countdown timers, or analytics integrations.
Para ayudarle en esta tarea, puede que le resulten útiles las siguientes guías:
- Consejos de expertos para optimizar la página de destino
- Cómo probar A/B su página de destino
- Tipos de páginas de destino que garantizan la conversión
- Mejores prácticas de página de aterrizaje para lograr tasas de conversión increíbles
- Ejemplos de URL de páginas de destino y buenas prácticas
- Cómo crear una página de aterrizaje rápida para probar ideas
- Fórmulas de titulares de páginas de destino para aumentar las tasas de conversión
- ¿No convierte su página de destino? 9 consejos para solucionarlo
Gracias por leernos. Nos encantaría conocer tu opinión, así que no dudes en dejarnos un comentario con tus preguntas y comentarios.
También puede seguirnos en YouTube, X (antes Twitter) y Facebook para obtener más contenidos útiles para hacer crecer su negocio.

