

Resumen: Cómo crear una página de destino de lista de espera en WordPress
Crea una página de lista de espera en WordPress y empieza a recopilar registros previos al lanzamiento en unos 20 minutos. Aquí tienes la versión rápida:
- Instala SeedProd: añade el plugin a tu sitio de WordPress y activa tu licencia.
- Elige una plantilla: selecciona una plantilla de página de destino de lista de espera de la biblioteca de SeedProd y ponle un nombre y una URL a tu página.
- Personaliza tu diseño: edita tu titular, formulario de registro y fondo con el editor de arrastrar y soltar.
- Conecta tu lista de correo: vincula tu proveedor de marketing por correo electrónico para que los registros vayan directamente a tu lista.
- Publica: haz clic en Publicar y comparte tu página de lista de espera para empezar a recopilar registros anticipados.
Estás creando algo y necesitas registros anticipados antes de lanzar. Pero no estás seguro de qué poner en la página, o si alguien se registrará realmente.
Ahí es donde entra una página de destino de lista de espera en WordPress. La configuración es más sencilla de lo que parece.
Este tutorial te guía a través de todo el proceso utilizando SeedProd, que es lo que yo uso para crear páginas de destino en mi propio sitio. Todo lleva unos 20 minutos.
Las páginas de lista de espera bien optimizadas convierten entre el 5% y el 10% de los visitantes en suscriptores. Aquí te explicamos cómo crear una que alcance ese rango.
- How to Create a Waitlist Landing Page in WordPress (Step-by-Step)
- Paso 1: Instala el plugin SeedProd
- Paso 2: Elige una plantilla de página de destino de lista de espera
- Paso 3: Personaliza el diseño de tu página de lista de espera
- Paso 4: Conecta tu formulario de registro a tu lista de correo
- Paso 5: Configura los ajustes de tu página
- Paso 6: Publica tu página de destino de lista de espera
- Best Waitlist Landing Pages (With Takeaways)
- Cómo crear una lista de espera viral con incentivos de referencia
- What to Do After Someone Joins Your Waitlist
¿Cómo funciona una página de registro de lista de espera?
Configurar una lista de espera antes del lanzamiento es una de las decisiones más sencillas que puedes tomar. Pones una página en línea, empiezas a recopilar registros y tienes una audiencia lista cuando abres.
El proceso es sencillo. Los visitantes introducen su correo electrónico en un formulario de registro conectado a tu servicio de marketing por correo electrónico. Cada nuevo registro se almacena automáticamente en tu lista y puede activar mensajes de confirmación o agradecimiento automatizados.
Cuando tu producto se lance, podrás enviar anuncios a todos los de la lista al instante. También puedes usar tu lista de espera para ofrecer acceso beta o ventajas anticipadas, como:
- Invitaciones exclusivas de acceso anticipado
- Descuentos especiales de lanzamiento
- Plazas limitadas para probadores beta
Una vez publicada, tu página de lista de espera funciona automáticamente, recopilando nuevos registros y generando expectación las 24 horas del día.
¿Qué debe incluir una página de destino de lista de espera?
Las páginas de destino de listas de espera de alta conversión comparten algunas características clave. Aquí tienes lo que siempre incluyo cuando creo una:
| Elemento | Lo que hace | Ejemplo |
|---|---|---|
| Encabezado claro | Le dice a los visitantes exactamente para qué se están registrando | “Lanzamiento Próximo” o “Obtén Acceso Anticipado Hoy” |
| Formulario de registro corto | Reduce la fricción y aumenta las conversiones | Solo campo de correo electrónico |
| Botón CTA fuerte | Impulsa la acción inmediata con lenguaje activo | “Reserva Mi Lugar” o “Únete a la Lista de Espera” |
| Elementos de urgencia | Fomenta los registros ahora en lugar de más tarde | Temporizador de cuenta atrás, plazas limitadas, ventajas para los primeros en registrarse |
| Prueba o vistas previas | Genera confianza y despierta curiosidad | Testimonio, captura de pantalla o adelanto de características |
No necesitas herramientas complejas para estos elementos. Yo uso las plantillas de lista de espera de SeedProd y añado estos bloques rápidamente.
La fila del encabezado es donde la mayoría de las páginas de lista de espera pierden conversiones. “Lanzamiento Próximo” no ofrece nada a los visitantes para actuar.
Una versión más fuerte se ve así: “Obtén acceso anticipado a [resultado específico] antes de que abramos al público”. La redacción vaga es la razón autodiagnosticada más común por la que las páginas de lista de espera no convierten.
La propuesta de valor de tu producto explica lo que estás construyendo. La propuesta de valor de tu lista de espera responde a una pregunta diferente: ¿qué obtiene el lector por registrarse ahora mismo?
Una vez que tus elementos estén en su lugar, tres estrategias aumentarán las conversiones:
- Ofrece incentivos: Dale a los visitantes una razón clara para registrarse ahora. Podría ser acceso anticipado, un código de descuento o contenido adicional exclusivo. Cuando las personas sienten que están obteniendo algo especial, es más probable que se unan y compartan tu página con otros.
- Crea urgencia: Utiliza elementos de diseño que activen el FOMO (miedo a perderse algo) y fomenten la acción inmediata. Añade un temporizador de cuenta atrás que muestre cuándo lanzas tu producto, o incluye una barra de progreso que muestre lo cerca que estás de un objetivo de registro. Plazas limitadas o plazos para los primeros en registrarse también funcionan.
- Mantén el compromiso: No dejes que la emoción decaiga después de que alguien se registre. Envía un breve correo electrónico de bienvenida agradeciéndoles por unirse. Adelanta características o recompensas próximas para mantener su interés hasta el día del lanzamiento.

Mantén tu formulario corto. Solo correo electrónico es la regla, no una sugerencia.
Incluso añadir un solo campo adicional, como un nombre o el nombre de la empresa, puede reducir notablemente tu tasa de conversión. Añade un CTA llamativo como “Únete a la Lista de Espera” o “Reserva Mi Lugar”, y deja el formulario con un solo campo.
Cómo crear una página de destino de lista de espera en WordPress (paso a paso)
Paso 1: Instala el plugin SeedProd
La forma más eficiente de crear una página de destino de lista de espera en WordPress es usar un plugin de página de destino dedicado como SeedProd. Está diseñado para la velocidad, la flexibilidad y la facilidad de uso, sin necesidad de codificación.
SeedProd te ayuda a diseñar páginas profesionales en minutos. Incluye cientos de plantillas y un editor visual de arrastrar y soltar perfecto para principiantes.

Para empezar, descarga el plugin SeedProd, luego cárgalo y actívalo en tu panel de WordPress. Si eres nuevo en los plugins, sigue esta guía paso a paso para instalar un plugin de WordPress.
Paso 2: Elige una plantilla de página de destino de lista de espera
Después de instalar SeedProd, ve a SeedProd » Landing Pages en tu administrador de WordPress. Luego, haz clic en el botón “Añadir Nueva Landing Page”.

La siguiente pantalla muestra la biblioteca de plantillas de landing page de SeedProd. Puedes filtrar estos diseños por tipo de página, incluyendo:
- Próximamente
- Modo de mantenimiento
- Página 404
- Páginas de ventas
- Páginas de seminarios web
- Páginas de captura de leads
- Páginas de agradecimiento
- Páginas de inicio de sesión

Explora las plantillas hasta que encuentres un diseño que te guste para tu página de lista de espera. Luego, pasa el ratón sobre él y haz clic en el icono de la marca de verificación.
Recomiendo filtrar por ‘Próximamente’ para encontrar plantillas de landing page de lista de espera. Los diseños de pre-lanzamiento vienen con las secciones clave ya incorporadas, por lo que no empiezas desde cero.
Para este ejemplo, elegí la plantilla City Coming Soon Page.

Después de seleccionar tu plantilla, introduce los detalles de tu landing page en el pop-up, como su nombre y URL. Haz clic en el botón Guardar y Empezar a Editar la Página para abrir el editor de arrastrar y soltar.

Paso 3: Personaliza el diseño de tu página de lista de espera
Ahora es el momento de personalizar tu landing page de lista de espera usando el editor visual de SeedProd. Esto te permite personalizar tu diseño, texto y disposición sin tocar una sola línea de código.
El editor incluye dos paneles: a la izquierda, verás los bloques de contenido y las opciones de diseño, y a la derecha, una vista previa en vivo de las actualizaciones de tu diseño.

Haz clic en cualquier elemento para editarlo. Puedes cambiar titulares, subtítulos o botones directamente en la vista previa en vivo. Usa la pestaña Avanzado en la barra lateral para opciones de estilo más detalladas como color, espaciado o tipografía.

Para cambiar tu imagen de fondo, haz clic en el icono de configuración en la esquina inferior izquierda y selecciona la pestaña Fondo. Puedes subir una imagen personalizada o elegir entre miles de fotos gratuitas si tienes una licencia SeedProd Plus o superior.
Solo ten en cuenta que si tu plantilla utiliza Secciones específicas, es posible que necesites cambiar el fondo en la configuración de la Sección en lugar de la configuración global del fondo.

SeedProd también incluye bloques avanzados que puedes añadir para hacer tu página más atractiva. A continuación, se muestra una tabla de referencia rápida de algunos tipos de bloques útiles y sus funciones principales.
| Tipo de Bloque | Función Principal |
|---|---|
| Bloque de sorteos | Fomenta la participación a través de concursos e incentivos |
| Formulario de contacto | Permite a los visitantes enviar mensajes o consultas directamente |
| Compartir en Redes Sociales | Permite a los usuarios compartir tu página en plataformas sociales |
| Temporizador de cuenta atrás | Crea urgencia mostrando el tiempo restante hasta el lanzamiento |
| Perfiles sociales | Muestra tus perfiles de redes sociales para conectar |
| Llamada a la acción | Pide a los usuarios que realicen una acción como “Únete Ahora” |
| Formulario de Suscripción | Recopila correos electrónicos para tu lista de espera |
| Barra de Progreso | Visualiza hitos u objetivos de registro |
| Tabla de Precios | Destaca los detalles del plan u oferta claramente |
| Testimonios | Añade prueba social para generar confianza con los visitantes |
Una vez que tu diseño se vea bien, asegúrate de que tu formulario de suscripción destaque. Aquí es donde recopilarás correos electrónicos de usuarios interesados en tu lanzamiento. Ajusta los campos del formulario, los colores y el espaciado para que coincidan con el estilo de tu página.

Una vez que estés satisfecho con tu diseño, pasa al siguiente paso para conectar tu proveedor de correo electrónico y empezar a recopilar clientes potenciales reales.
Paso 4: Conecta tu formulario de registro a tu lista de correo
En mi experiencia, el paso más crítico es asegurar que tus nuevos clientes potenciales vayan al lugar correcto de inmediato. Conectar tu formulario de suscripción a tu proveedor de marketing por correo electrónico en SeedProd es sencillo. Simplemente haz clic en la pestaña Conectar en la parte superior de tu pantalla.

Luego puedes buscar entre los servicios populares de marketing por correo electrónico. Sigue las instrucciones para conectar tu lista cuando encuentres la tuya.
Si SeedProd no se integra directamente con tu proveedor, usa su integración Zapier o pega manualmente el código HTML de tu formulario. Cada nuevo registro se guarda automáticamente y está listo para el día del lanzamiento. También encontrarás integraciones para Google Analytics y reCAPTCHA en la misma página.

Antes de publicar, envía un correo electrónico de prueba a través de tu formulario para confirmar que los registros llegan a tu lista. Tarda 30 segundos y te evita descubrir una conexión rota después de haber compartido la página.
Paso 5: Configura los ajustes de tu página
El siguiente paso asegura que la configuración de tu página de destino sea correcta. Haz clic en la pestaña Configuración de página y revisa cada sección.

Aquí tienes una breve descripción de lo que hace cada sección:
| Configuración | Lo que hace |
|---|---|
| General | Edita el nombre, la URL y el estado de tu página |
| SEO | Gestiona los títulos y descripciones meta si usas un plugin SEO |
| Analíticas | Conecta Google Analytics a través de MonsterInsights para rastrear conversiones |
| Scripts | Añade píxeles de seguimiento para anuncios o marketing por correo electrónico |
| Dominio personalizado | Usa un dominio personalizado (requiere plan SeedProd Elite) |
Después de configurar la configuración de tu página, haz clic en el botón Guardar en la esquina superior derecha.
Paso 6: Publica tu página de destino de lista de espera
El paso final es publicar tu página. Haz clic en la flecha desplegable del botón guardar y luego selecciona Publicar.

Echa un vistazo rápido a tu página de destino de acceso anticipado para asegurarte de que todo se ve correcto. Luego, estarás listo para compartirla y empezar a hacer crecer tu lista.
Así es como se ve la página que creé en mi sitio web de prueba:

¡Enhorabuena!
Las Mejores Páginas de Destino de Lista de Espera (Con Lecciones)
Estudiar ejemplos exitosos te ayuda a identificar lo que funciona y lo que debes evitar. Seleccioné estos tres porque muestran diferentes enfoques de minimalismo, prueba social y diseño de conversión.
Software Descript
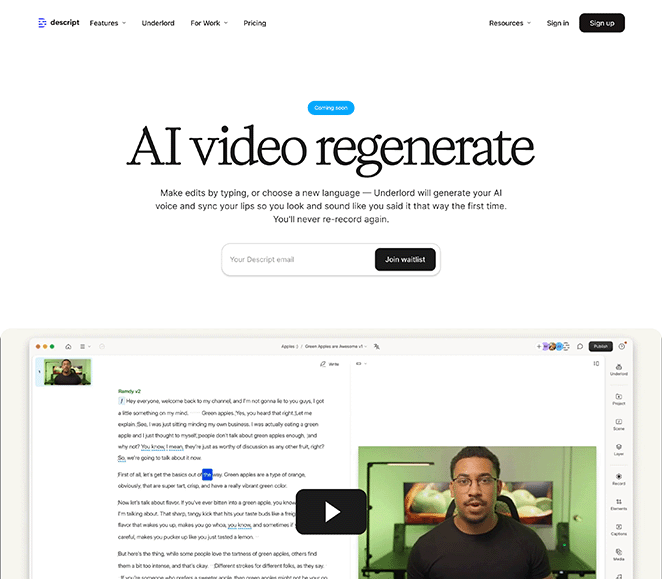
Lo que funciona:
- El titular explica inmediatamente lo que hace el producto. No hay que adivinar.
- Un vídeo de demostración muestra el producto en acción, lo que genera confianza antes de pedir un correo electrónico.
- El formulario de registro solo pide una dirección de correo electrónico. Menos campos significan más registros.
Lo que se podría mejorar:
- No hay elemento de urgencia como un temporizador de cuenta atrás o plazas limitadas.
- Falta prueba social. Un testimonio o un recuento de usuarios añadirían credibilidad.
Lección clave: Muestra cómo tu producto resuelve un problema antes de pedir registros. La claridad supera a la astucia.
Curso de Freelancer Poderoso
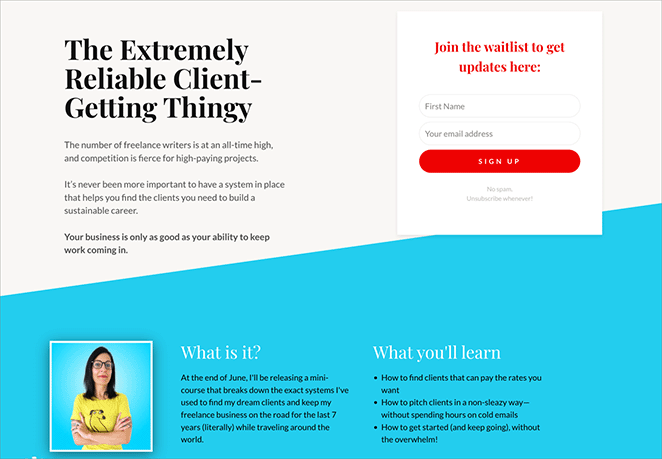
Lo que funciona:
- El tono amigable y conversacional hace que se sienta personal en lugar de corporativo.
- El botón de llamada a la acción destaca con una frase de acción clara.
- Una vista previa visual del contenido del curso ofrece a los suscriptores una muestra de lo que obtendrán.
Lo que se podría mejorar:
- Sin incentivo de referencia para fomentar el intercambio.
- La página podría beneficiarse de una fecha de lanzamiento o una cuenta atrás para crear urgencia.
Conclusión clave: Un tono personal genera confianza. Muestra exactamente lo que los suscriptores obtendrán al unirse a tu lista de espera.
Tapster App
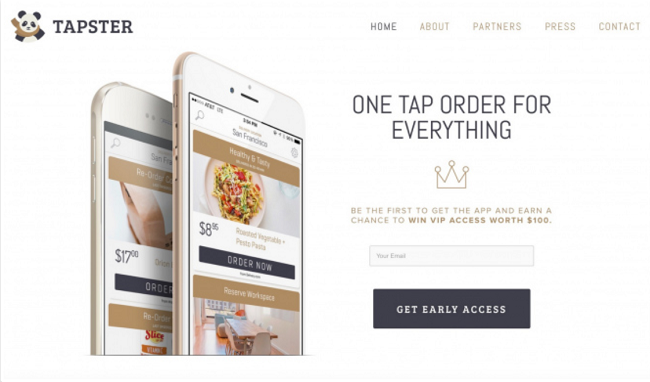
Lo que funciona:
- El diseño limpio y mobile-first coincide con el producto de la aplicación.
- El formulario de registro permanece visible mientras te desplazas, por lo que los visitantes nunca pierden de vista la llamada a la acción.
- Un sorteo como incentivo recompensa los registros tempranos, lo que fomenta la acción inmediata.
Lo que se podría mejorar:
- La propuesta de valor podría ser más específica sobre lo que hace la aplicación.
- Agregar un programa de referidos convertiría a los primeros suscriptores en promotores.
Conclusión clave: Los incentivos y las llamadas a la acción siempre visibles aumentan las conversiones. Haz que unirse se sienta gratificante y sin esfuerzo.
Cada ejemplo mantiene el enfoque en un objetivo: conseguir que los visitantes se unan. Ya sea que destaques una demostración de producto, un incentivo o un mensaje personal, mantén tu diseño simple y tu mensaje claro.
Cómo crear una lista de espera viral con incentivos de referencia
Si tus suscriptores no comparten tu lista de espera, estás perdiendo crecimiento. Un sistema de referidos otorga a cada persona un enlace único y, cuando sus amigos se registran, ambos obtienen beneficios como acceso anticipado o un puesto más alto en la cola.
Este enfoque convierte tu lista de espera en un motor de crecimiento. En lugar de depender solo de tu propia promoción, tus suscriptores hacen el trabajo de compartir por ti.
La forma más fácil de agregar mecánicas de referidos a tu lista de espera de WordPress es con RafflePress, un plugin de sorteos que rastrea los referidos automáticamente. Incluye una plantilla de sorteo de pre-lanzamiento diseñada para campañas de listas de espera.

Así es como funciona:
- Cada suscriptor recibe un enlace de intercambio único. Cuando alguien se registra a través de ese enlace, RafflePress rastrea el referido.
- Los referidos ganan participaciones adicionales. Puedes recompensar a los suscriptores con participaciones extra en el sorteo por cada amigo que traigan.
- Las acciones de compartir en redes sociales también cuentan. Los suscriptores pueden ganar participaciones compartiendo en Twitter, Facebook u otras plataformas.
- Una tabla de clasificación crea competencia. Mostrar a los principales referidores motiva a los suscriptores a compartir más.
Para configurar esto, instala RafflePress y elige la plantilla Sorteo de Pre-lanzamiento. Agrega acciones de participación para el registro por correo electrónico, referidos y comparticiones en redes sociales. Luego, incrusta el widget del sorteo en tu página de lista de espera de SeedProd usando el bloque o shortcode de RafflePress.

El resultado es una lista de espera que crece por sí sola. Los suscriptores corren la voz porque obtienen recompensas por los referidos. Esto aprovecha el FOMO (miedo a perderse algo): cuando las personas ven a sus amigos unirse y obtener beneficios, también quieren participar.
Qué hacer después de que alguien se una a tu lista de espera
Conseguir registros es solo la mitad del trabajo. Lo que hagas después de que alguien se una determinará si se mantiene entusiasmado u olvida tu proyecto antes del lanzamiento.
El momento de tu lanzamiento también importa. Los creadores que se lanzan dentro de los tres meses posteriores al cierre de su lista de espera convierten significativamente a más suscriptores en clientes de pago que aquellos que esperan.
Aquí está la estrategia posterior al registro que utilizo para mantener a los suscriptores de la lista de espera comprometidos:
| Etapa | Acción | Por qué funciona |
|---|---|---|
| Inmediatamente | Mostrar una página de agradecimiento con botones para compartir en redes sociales y su enlace de referencia | Los suscriptores están más entusiasmados justo después de registrarse. Aprovecha ese impulso antes de que se vayan. |
| En cuestión de minutos | Enviar un correo electrónico de bienvenida confirmando su lugar y estableciendo expectativas | Confirma que el registro funcionó y mantiene tu lanzamiento en mente. |
| Semanal o quincenalmente | Enviar actualizaciones de progreso con contenido detrás de escena o vistas previas de funciones | Evita que los suscriptores se olviden de ti. Genera anticipación con el tiempo. |
| 48 horas antes del lanzamiento | Enviar un correo electrónico de urgencia con una cuenta regresiva y un recordatorio sobre los beneficios para los primeros en registrarse | Crea un último impulso para las referencias y prepara a los suscriptores para el día del lanzamiento. |
| Día del lanzamiento | Ofrece a los suscriptores de la lista de espera acceso anticipado antes del anuncio público | Recompensa su paciencia y haz que se sientan como si fueran de dentro. |
En SeedProd, puedes crear una página de agradecimiento personalizada y establecerla como la redirección después del envío del formulario.

Cuando llegue el día del lanzamiento, desactiva el modo "Próximamente" y redirige tu página de lista de espera a la página del producto en vivo al instante.
Preguntas frecuentes sobre páginas de destino de listas de espera
Reflexiones finales: Creación de una página de lista de espera con SeedProd
Crear una página de lista de espera en WordPress es mucho más fácil con las herramientas adecuadas. SeedProd ofrece plantillas, controles de arrastrar y soltar e integraciones para ayudarte a crear y publicar tu página rápidamente.
Para obtener más formas de optimizar tu página, explora estas guías prácticas de SeedProd:
- Anatomía de una página de destino: 9 elementos esenciales
- Pruebas A/B para Páginas de Destino en WordPress: La Guía Fácil
- Consejos de expertos para la optimización de páginas de destino
- Ejemplos y mejores prácticas de URL de páginas de destino
- Cómo Crear Páginas de Destino Personalizadas para Impulsar las Conversiones
- Fórmulas de titulares para páginas de destino que aumentan las tasas de conversión
- La navegación en las páginas de destino ha muerto: he aquí por qué
- ¿Cuál es una buena tasa de conversión de página de destino?
¡Gracias por leer! Nos encantaría conocer tu opinión, así que únete a la conversación en YouTube, X y Facebook para obtener más consejos y contenido útil para hacer crecer tu negocio.


