TL;DR: So erstellen Sie eine Wartelisten-Landingpage in WordPress
Erstellen Sie eine Wartelissenseite in WordPress und beginnen Sie in etwa 20 Minuten mit dem Sammeln von Vorab-Anmeldungen. Hier ist die schnelle Version:
- Installieren Sie SeedProd – Fügen Sie das Plugin zu Ihrer WordPress-Site hinzu und aktivieren Sie Ihre Lizenz.
- Wählen Sie eine Vorlage – Wählen Sie eine Wartelisten-Landingpage-Vorlage aus der Bibliothek von SeedProd und geben Sie Ihrer Seite einen Namen und eine URL.
- Passen Sie Ihr Design an – Bearbeiten Sie Ihre Überschrift, Ihr Anmeldeformular und Ihren Hintergrund mit dem Drag-and-Drop-Editor.
- Verbinden Sie Ihre E-Mail-Liste – Verknüpfen Sie Ihren E-Mail-Marketing-Anbieter, damit Anmeldungen direkt in Ihre Liste gelangen.
- Veröffentlichen – Klicken Sie auf Veröffentlichen und teilen Sie Ihre Wartelissenseite, um frühe Anmeldungen zu sammeln.
Sie bauen etwas auf und benötigen frühe Anmeldungen, bevor Sie live gehen. Aber Sie sind sich nicht sicher, was Sie auf die Seite setzen sollen oder ob sich überhaupt jemand anmeldet.
Hier kommt eine Wartelisten-Landingpage in WordPress ins Spiel. Die Einrichtung ist einfacher, als es aussieht.
Dieses Tutorial führt Sie durch den gesamten Prozess mit SeedProd, das ich verwende, um Landingpages auf meiner eigenen Website zu erstellen. Das Ganze dauert etwa 20 Minuten.
Gut optimierte Wartelisten-Seiten konvertieren etwa 5 % bis 10 % der Besucher in Abonnenten. Hier erfahren Sie, wie Sie eine erstellen, die diesen Bereich erreicht.
- So erstellen Sie eine Wartelisten-Landingpage in WordPress (Schritt für Schritt)
- Schritt 1: Installieren Sie das SeedProd-Plugin
- Schritt 2: Wählen Sie eine Wartelisten-Landingpage-Vorlage
- Schritt 3: Passen Sie das Design Ihrer Wartelisten-Seite an
- Schritt 4: Verbinden Sie Ihr Anmeldeformular mit Ihrer E-Mail-Liste
- Schritt 5: Konfigurieren Sie Ihre Seiteneinstellungen
- Schritt 6: Veröffentlichen Sie Ihre Wartelisten-Landingpage
- Die besten Wartelisten-Landingpages (mit Erkenntnissen)
- So erstellen Sie eine virale Warteliste mit Empfehlungsanreizen
- Was tun, nachdem jemand Ihrer Warteliste beigetreten ist
Wie funktioniert eine Wartelisten-Anmeldeseite?
Die Einrichtung einer Warteliste vor dem Start ist eine der einfachsten Entscheidungen, die Sie treffen können. Sie schalten eine Seite live, sammeln Anmeldungen und haben ein Publikum bereit, wenn Sie öffnen.
Der Prozess ist unkompliziert. Besucher geben ihre E-Mail-Adresse in ein Anmeldeformular ein, das mit Ihrem E-Mail-Marketing-Dienst verbunden ist. Jede neue Anmeldung wird automatisch in Ihrer Liste gespeichert und kann automatisierte Bestätigungs- oder Dankesnachrichten auslösen.
Wenn Ihr Produkt startet, können Sie sofort Ankündigungen an alle auf der Liste senden. Sie können Ihre Warteliste auch nutzen, um Beta-Zugang oder frühe Vorteile anzubieten, wie zum Beispiel:
- Exklusive Einladungen zum Early Access
- Sonderangebote zum Start
- Begrenzte Plätze für Beta-Tester
Nach der Veröffentlichung läuft Ihre Wartelisten-Seite automatisch, sammelt neue Anmeldungen und baut rund um die Uhr Vorfreude auf.
Was sollte eine Wartelisten-Landingpage enthalten?
Hochkonvertierende Wartelisten-Landingpages teilen einige Schlüsselfunktionen. Hier ist, was ich immer einbeziehe, wenn ich eine erstelle:
| Element | Was es tut | Beispiel |
|---|---|---|
| Klare Überschrift | Teilt Besuchern genau mit, wofür sie sich anmelden | „Bald verfügbar“ oder „Heute Frühzugang erhalten“ |
| Kurzes Anmeldeformular | Reduziert Reibungsverluste und erhöht die Konversionen | Nur E-Mail-Feld |
| Starker CTA-Button | Fordert sofortiges Handeln mit aktiver Sprache | „Platz sichern“ oder „Zur Warteliste hinzufügen“ |
| Dringlichkeitselemente | Fördert Anmeldungen jetzt statt später | Countdown-Timer, begrenzte Plätze, Frühbucher-Vorteile |
| Beweise oder Vorschauen | Baut Vertrauen auf und weckt Neugier | Testimonial, Screenshot oder Vorschau auf eine Funktion |
Sie benötigen keine komplexen Tools für diese Elemente. Ich verwende die Wartelisten-Vorlagen von SeedProd und füge diese Blöcke schnell hinzu.
Die Überschriftenzeile ist der Punkt, an dem die meisten Wartelisten-Seiten Konversionen verlieren. „Bald verfügbar“ gibt Besuchern nichts, worauf sie reagieren können.
Eine stärkere Version sieht so aus: „Erhalten Sie frühzeitig Zugang zu [spezifisches Ergebnis], bevor wir uns für die Öffentlichkeit öffnen.“ Vage Formulierungen sind der am häufigsten selbst diagnostizierte Grund, warum Wartelisten-Seiten nicht konvertieren.
Ihr Produktwertversprechen erklärt, was Sie entwickeln. Ihr Wartelisten-Wertversprechen beantwortet eine andere Frage: Was erhält der Leser, wenn er sich jetzt anmeldet?
Sobald Ihre Elemente vorhanden sind, steigern drei Strategien die Konversionen:
- Bieten Sie Anreize: Geben Sie Besuchern einen klaren Grund, sich jetzt anzumelden. Dies kann Frühzugang, ein Rabattcode oder exklusiver Bonusinhalt sein. Wenn Menschen das Gefühl haben, etwas Besonderes zu bekommen, melden sie sich eher an und teilen Ihre Seite mit anderen.
- Schaffen Sie Dringlichkeit: Verwenden Sie Designelemente, die FOMO (Angst, etwas zu verpassen) auslösen und sofortiges Handeln fördern. Fügen Sie einen Countdown-Timer hinzu, der zeigt, wie bald Ihr Produkt startet, oder integrieren Sie eine Fortschrittsanzeige, die zeigt, wie nah Sie einem Anmeldeziel sind. Begrenzte Plätze oder Frühbucher-Fristen funktionieren ebenfalls.
- Halten Sie das Engagement aufrecht: Lassen Sie die Begeisterung nach der Anmeldung nicht nachlassen. Senden Sie eine kurze Willkommens-E-Mail, in der Sie sich für die Teilnahme bedanken. Teasern Sie kommende Funktionen oder Belohnungen an, um ihr Interesse bis zum Starttag hoch zu halten.

Halten Sie Ihr Formular kurz. Nur E-Mail ist die Regel, keine Empfehlung.
Selbst das Hinzufügen eines einzigen zusätzlichen Feldes, wie z. B. eines Vornamens oder Firmennamens, kann Ihre Konversionsrate spürbar reduzieren. Fügen Sie einen auffälligen CTA wie „Zur Warteliste hinzufügen“ oder „Platz sichern“ hinzu und belassen Sie das Formular bei einem Feld.
So erstellen Sie eine Wartelisten-Landingpage in WordPress (Schritt für Schritt)
Schritt 1: Installieren Sie das SeedProd-Plugin
Der effizienteste Weg, eine Wartelisten-Landingpage in WordPress zu erstellen, ist die Verwendung eines speziellen Landingpage-Plugins wie SeedProd. Es ist auf Geschwindigkeit, Flexibilität und Benutzerfreundlichkeit ausgelegt, ganz ohne Programmierung.
SeedProd hilft Ihnen, professionelle Seiten in wenigen Minuten zu gestalten. Es enthält Hunderte von Vorlagen und einen visuellen Drag-and-Drop-Editor, der perfekt für Anfänger geeignet ist.

Laden Sie zunächst das SeedProd-Plugin herunter, laden Sie es dann hoch und aktivieren Sie es in Ihrem WordPress-Dashboard. Wenn Sie neu bei Plugins sind, folgen Sie dieser Schritt-für-Schritt-Anleitung zur Installation eines WordPress-Plugins.
Schritt 2: Wählen Sie eine Wartelisten-Landingpage-Vorlage
Nach der Installation von SeedProd gehen Sie in Ihrem WordPress-Adminbereich zu SeedProd » Landing Pages. Klicken Sie dann auf die Schaltfläche „Neue Landing Page hinzufügen“.

Der nächste Bildschirm zeigt die Landing-Page-Vorlagen-Bibliothek von SeedProd. Sie können diese Designs nach Seitentyp filtern, einschließlich:
- Bald verfügbar
- Wartungsmodus
- 404-Seite
- Verkaufsseiten
- Webinar-Seiten
- Lead-Squeeze-Seiten
- Danke-Seiten
- Login-Seiten

Durchsuchen Sie die Vorlagen, bis Sie ein Design finden, das Ihnen für Ihre Wartelisten-Seite gefällt. Bewegen Sie dann die Maus darüber und klicken Sie auf das Häkchen-Symbol.
Ich empfehle, nach „Coming Soon“ zu filtern, um Vorlagen für Wartelisten-Landing-Pages zu finden. Pre-Launch-Designs enthalten die wichtigsten Abschnitte bereits, sodass Sie nicht bei Null anfangen.
Für dieses Beispiel habe ich die Vorlage „City Coming Soon Page“ gewählt.

Nachdem Sie Ihre Vorlage ausgewählt haben, geben Sie im Popup Ihre Landing-Page-Details ein, wie z. B. den Namen und die URL. Klicken Sie auf die Schaltfläche Seite speichern und mit der Bearbeitung beginnen, um den Drag-and-Drop-Editor zu öffnen.

Schritt 3: Passen Sie das Design Ihrer Wartelisten-Seite an
Jetzt ist es an der Zeit, Ihre Wartelisten-Landing-Page mit dem visuellen Editor von SeedProd anzupassen. Damit können Sie Ihr Design, Ihren Text und Ihr Layout personalisieren, ohne eine einzige Zeile Code anfassen zu müssen.
Der Editor enthält zwei Bereiche: Links sehen Sie Inhaltsblöcke und Layoutoptionen, und rechts eine Live-Vorschau Ihrer Design-Updates.

Klicken Sie auf ein beliebiges Element, um es zu bearbeiten. Sie können Überschriften, Unterüberschriften oder Schaltflächen direkt in der Live-Vorschau ändern. Verwenden Sie die Registerkarte „Erweitert“ in der Seitenleiste für detailliertere Styling-Optionen wie Farbe, Abstände oder Typografie.

Um Ihr Hintergrundbild zu ändern, klicken Sie auf das Einstellungssymbol in der unteren linken Ecke und wählen Sie die Registerkarte „Hintergrund“. Sie können ein benutzerdefiniertes Bild hochladen oder aus Tausenden von lizenzfreien Fotos wählen, wenn Sie eine SeedProd Plus-Lizenz oder höher haben.
Beachten Sie nur, dass Sie, wenn Ihre Vorlage bestimmte Abschnitte verwendet, den Hintergrund möglicherweise in den Abschnittseinstellungen anstelle der globalen Hintergrund-Einstellungen ändern müssen.

SeedProd enthält auch erweiterte Blöcke, die Sie hinzufügen können, um Ihre Seite ansprechender zu gestalten. Nachfolgend finden Sie eine Kurzübersicht über einige nützliche Blocktypen und ihre Hauptfunktionen.
| Blocktyp | Hauptfunktion |
|---|---|
| Verlosungsblock | Fördert das Engagement durch Wettbewerbe und Anreize |
| Kontaktformular | Ermöglicht Besuchern, direkt Nachrichten oder Anfragen zu senden |
| Social Sharing | Ermöglicht Benutzern, Ihre Seite auf sozialen Plattformen zu teilen |
| Countdown-Timer | Schafft Dringlichkeit, indem die verbleibende Zeit bis zum Start angezeigt wird |
| Soziale Profile | Zeigt Ihre Social-Media-Profile für die Vernetzung an |
| Handlungsaufforderung | Fordert Benutzer auf, Maßnahmen zu ergreifen, wie z. B. „Jetzt beitreten“ |
| Opt-in-Formular | Sammelt E-Mails für Ihre Warteliste |
| Fortschrittsbalken | Visualisiert Meilensteine oder Anmeldeziele |
| Preistabelle | Hebt Pläne oder Angebotsdetails hervor |
| Referenzen | Fügt Social Proof hinzu, um Vertrauen bei den Besuchern aufzubauen |
Sobald Ihr Design gut aussieht, stellen Sie sicher, dass Ihr Anmeldeformular hervorsticht. Hier sammeln Sie E-Mails von Nutzern, die an Ihrem Launch interessiert sind. Passen Sie Formularfelder, Farben und Abstände an den Stil Ihrer Seite an.

Wenn Sie mit Ihrem Design zufrieden sind, gehen Sie zum nächsten Schritt, um Ihren E-Mail-Anbieter zu verbinden und echte Leads zu sammeln.
Schritt 4: Verbinden Sie Ihr Anmeldeformular mit Ihrer E-Mail-Liste
Meiner Erfahrung nach ist der wichtigste Schritt, sicherzustellen, dass Ihre neuen Leads sofort an den richtigen Ort gelangen. Die Verbindung Ihres Opt-in-Formulars mit Ihrem E-Mail-Marketing-Anbieter in SeedProd ist einfach. Klicken Sie einfach auf die Registerkarte Verbinden oben auf Ihrem Bildschirm.

Anschließend können Sie beliebte E-Mail-Marketing-Dienste durchsuchen. Befolgen Sie die Anweisungen, um Ihre Liste zu verbinden, wenn Sie Ihre gefunden haben.
Wenn SeedProd nicht direkt mit Ihrem Anbieter integriert ist, nutzen Sie die Zapier-Integration oder fügen Sie den HTML-Code Ihres Formulars manuell ein. Jede neue Anmeldung wird automatisch gespeichert und ist bereit für den Launch-Tag. Auf derselben Seite finden Sie auch Integrationen für Google Analytics und reCAPTCHA.

Bevor Sie live gehen, senden Sie eine Test-E-Mail über Ihr Formular, um zu bestätigen, dass die Anmeldungen Ihre Liste erreichen. Es dauert 30 Sekunden und erspart Ihnen die Entdeckung einer fehlerhaften Verbindung, nachdem Sie die Seite bereits geteilt haben.
Schritt 5: Konfigurieren Sie Ihre Seiteneinstellungen
Der nächste Schritt stellt sicher, dass Ihre Landingpage-Einstellungen korrekt sind. Klicken Sie auf die Registerkarte Seiteneinstellungen und sehen Sie sich jeden Abschnitt an.

Hier ist eine kurze Übersicht darüber, was jeder Abschnitt tut:
| Einstellung | Was es tut |
|---|---|
| Allgemein | Bearbeiten Sie Ihren Seitennamen, Ihre URL und Ihren Status |
| SEO | Verwalten Sie Meta-Titel und -Beschreibungen, wenn Sie ein SEO-Plugin verwenden |
| Analysen | Verbinden Sie Google Analytics über MonsterInsights, um Conversions zu verfolgen |
| Skripte | Fügen Sie Tracking-Pixel für Anzeigen oder E-Mail-Marketing hinzu |
| Benutzerdefinierte Domain | Verwenden Sie eine benutzerdefinierte Domain (SeedProd Elite-Plan erforderlich) |
Nachdem Sie Ihre Seiteneinstellungen konfiguriert haben, klicken Sie auf die Schaltfläche Speichern in der oberen rechten Ecke.
Schritt 6: Veröffentlichen Sie Ihre Wartelisten-Landingpage
Der letzte Schritt ist, Ihre Seite live zu schalten. Klicken Sie auf den Dropdown-Pfeil der Schaltfläche Speichern und wählen Sie dann Veröffentlichen.

Geben Sie Ihrer Early-Access-Landingpage eine schnelle Vorschau, um sicherzustellen, dass alles korrekt aussieht. Dann sind Sie bereit, sie zu teilen und mit dem Aufbau Ihrer Liste zu beginnen.
So sieht die Seite aus, die ich auf meiner Testwebsite erstellt habe:

Herzlichen Glückwunsch!
Die besten Wartelisten-Landingpages (mit Erkenntnissen)
Das Studium erfolgreicher Beispiele hilft Ihnen, zu erkennen, was funktioniert und was zu vermeiden ist. Ich habe diese drei ausgewählt, weil sie unterschiedliche Ansätze für Minimalismus, Social Proof und Conversion-Design zeigen.
Descript Software
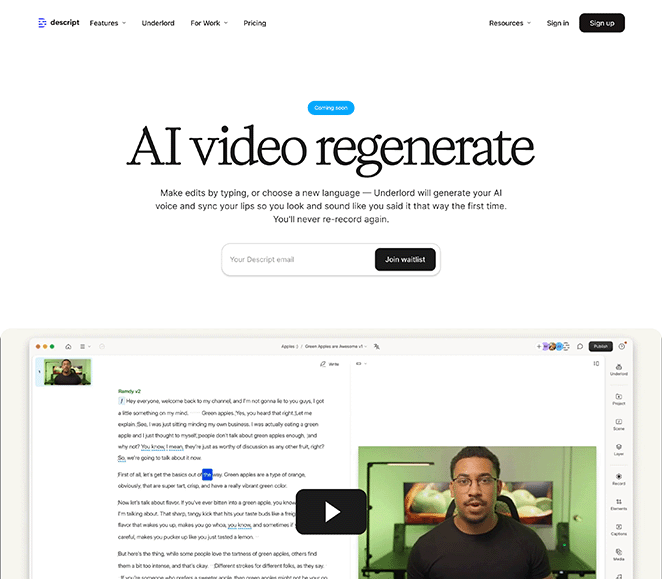
Was funktioniert:
- Die Überschrift erklärt sofort, was das Produkt tut. Kein Rätselraten erforderlich.
- Ein Demo-Video zeigt das Produkt in Aktion, was Vertrauen aufbaut, bevor nach einer E-Mail gefragt wird.
- Das Anmeldeformular fragt nur nach einer E-Mail-Adresse. Weniger Felder bedeuten mehr Anmeldungen.
Was verbessert werden könnte:
- Kein Dringlichkeitselement wie ein Countdown-Timer oder begrenzte Plätze.
- Fehlender Social Proof. Ein Testimonial oder eine Benutzeranzahl würde die Glaubwürdigkeit erhöhen.
Wichtigste Erkenntnis: Zeigen Sie, wie Ihr Produkt ein Problem löst, bevor Sie nach Anmeldungen fragen. Klarheit schlägt Cleverness.
Mighty Freelancer Kurs
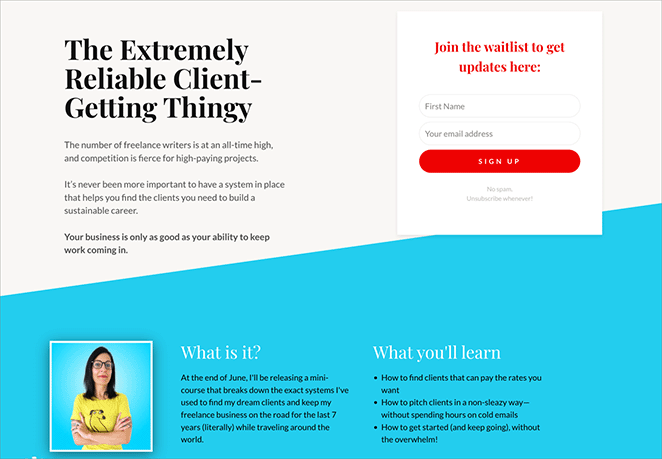
Was funktioniert:
- Der freundliche, gesprächige Tonfall lässt es persönlich und nicht wie eine Massenmail wirken.
- Der CTA-Button sticht mit einer klaren Handlungsaufforderung hervor.
- Eine visuelle Vorschau des Kursinhalts gibt Abonnenten einen Vorgeschmack auf das, was sie erwartet.
Was verbessert werden könnte:
- Kein Anreiz für Empfehlungen, um das Teilen zu fördern.
- Die Seite könnte von einem Startdatum oder einem Countdown profitieren, um Dringlichkeit zu erzeugen.
Wichtigster Punkt: Ein persönlicher Ton schafft Vertrauen. Zeigen Sie genau, was Abonnenten davon haben, Ihrer Warteliste beizutreten.
Tapster App
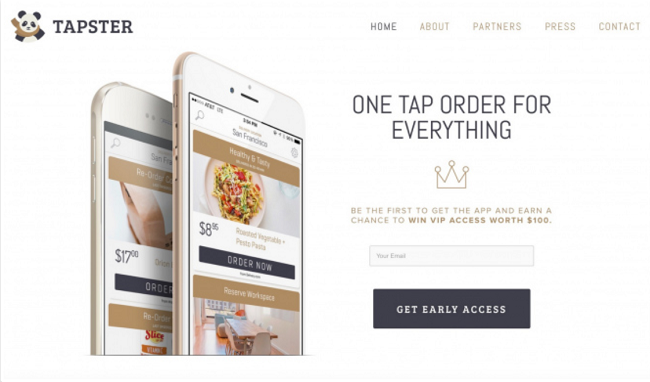
Was funktioniert:
- Das klare, mobile-first Design passt zum App-Produkt.
- Das Anmeldeformular bleibt beim Scrollen sichtbar, sodass Besucher den CTA nie aus den Augen verlieren.
- Ein Gewinnspielanreiz belohnt frühe Anmeldungen, was sofortiges Handeln fördert.
Was verbessert werden könnte:
- Das Wertversprechen könnte spezifischer darauf eingehen, was die App tut.
- Das Hinzufügen eines Empfehlungsprogramms würde frühe Abonnenten zu Promotern machen.
Wichtigster Punkt: Anreize und immer sichtbare CTAs steigern die Konversionen. Sorgen Sie dafür, dass die Teilnahme lohnend und mühelos ist.
Jedes Beispiel konzentriert sich auf ein Ziel: Besucher zum Mitmachen bewegen. Egal, ob Sie eine Produkt-Demo, einen Anreiz oder eine persönliche Nachricht hervorheben, halten Sie Ihr Design einfach und Ihre Botschaft klar.
So erstellen Sie eine virale Warteliste mit Empfehlungsanreizen
Wenn Ihre Abonnenten Ihre Warteliste nicht teilen, lassen Sie Wachstum liegen. Ein Empfehlungssystem gibt jeder Person einen eindeutigen Link, und wenn sich ihre Freunde anmelden, erhalten beide Vorteile wie frühen Zugang oder einen höheren Platz in der Warteschlange.
Dieser Ansatz verwandelt Ihre Warteliste in eine Wachstumsmaschine. Anstatt sich nur auf Ihre eigene Werbung zu verlassen, teilen Ihre Abonnenten die Arbeit für Sie.
Der einfachste Weg, Empfehlungsmechanismen zu Ihrer WordPress-Warteliste hinzuzufügen, ist mit RafflePress, einem Gewinnspiel-Plugin, das Empfehlungen automatisch verfolgt. Es enthält eine Vorlagen für Pre-Launch-Gewinnspiele, die für Wartelistenkampagnen entwickelt wurden.

So funktioniert es:
- Jeder Abonnent erhält einen eindeutigen Share-Link. Wenn sich jemand über diesen Link anmeldet, verfolgt RafflePress die Empfehlung.
- Empfehlungen bringen Bonuspunkte. Sie können Abonnenten für jeden Freund, den sie werben, zusätzliche Gewinnspiel-Teilnahmen belohnen.
- Auch Social-Sharing-Aktionen zählen. Abonnenten können durch Teilen auf Twitter, Facebook oder anderen Plattformen Punkte sammeln.
- Eine Rangliste schafft Wettbewerb. Die Anzeige der Top-Empfehlungsgeber motiviert Abonnenten, mehr zu teilen.
Um dies einzurichten, installieren Sie RafflePress und wählen Sie die Vorlage "Pre-Launch Giveaway". Fügen Sie Einstiegsaktionen für E-Mail-Anmeldung, Empfehlungen und Social-Shares hinzu. Betten Sie dann das Gewinnspiel-Widget auf Ihrer SeedProd-Wartelisten-Seite mit dem RafflePress-Block oder Shortcode ein.

Das Ergebnis ist eine Warteliste, die sich selbst erweitert. Abonnenten verbreiten die Nachricht, weil sie Belohnungen für Empfehlungen erhalten. Dies nutzt die FOMO (Fear Of Missing Out): Wenn Leute sehen, wie Freunde beitreten und Vorteile erhalten, wollen sie auch dabei sein.
Was tun, nachdem jemand Ihrer Warteliste beigetreten ist
Anmeldungen zu erhalten ist nur die halbe Miete. Was Sie tun, nachdem jemand beigetreten ist, bestimmt, ob er begeistert bleibt oder Sie vor dem Start vergisst.
Der Zeitpunkt Ihres Starts ist ebenfalls wichtig. Entwickler, die innerhalb von drei Monaten nach Schließung ihrer Warteliste live gehen, konvertieren deutlich mehr Abonnenten in zahlende Kunden als diejenigen, die warten.
Hier ist die Strategie nach der Anmeldung, die ich verwende, um Abonnenten der Warteliste zu binden:
| Phase | Aktion | Warum es funktioniert |
|---|---|---|
| Sofort | Zeigen Sie eine Dankesseite mit Social-Sharing-Buttons und ihrem Empfehlungslink an | Abonnenten sind direkt nach der Anmeldung am aufgeregtesten. Nutzen Sie diesen Schwung, bevor sie gehen. |
| Innerhalb von Minuten | Senden Sie eine Willkommens-E-Mail, die ihren Platz bestätigt und Erwartungen festlegt | Bestätigt, dass die Anmeldung funktioniert hat und hält Ihren Start im Gedächtnis. |
| Wöchentlich oder zweiwöchentlich | Senden Sie Fortschrittsaktualisierungen mit Einblicken hinter die Kulissen oder Feature-Vorschauen | Verhindert, dass Abonnenten Sie vergessen. Baut im Laufe der Zeit Vorfreude auf. |
| 48 Stunden vor dem Start | Senden Sie eine E-Mail mit Dringlichkeit, einem Countdown und einer Erinnerung an Frühbucher-Vorteile | Schafft einen letzten Anstoß für Empfehlungen und bereitet Abonnenten auf den Starttag vor. |
| Starttag | Geben Sie Abonnenten der Warteliste frühen Zugang, bevor die öffentliche Ankündigung erfolgt | Belohnt ihre Geduld und gibt ihnen das Gefühl, Insider zu sein. |
In SeedProd können Sie eine benutzerdefinierte Dankesseite erstellen und diese als Weiterleitung nach dem Absenden des Formulars festlegen.

Wenn der Starttag kommt, deaktivieren Sie den "Coming Soon"-Modus und leiten Sie Ihre Wartelisten-Seite sofort auf die Live-Produktseite weiter.
Halten Sie Ihre Warteliste warm: Lassen Sie WPVibe Ihre Willkommens-E-Mail und die Fortschrittsaktualisierungen entwerfen, die zwischen jetzt und dem Start versendet werden und mit Ihrer echten Website verbunden sind. So bleiben die Abonnenten begeistert, anstatt zu vergessen, dass sie sich jemals angemeldet haben.
FAQs zu Wartelisten-Landingpages
Abschließende Gedanken: Erstellen einer Wartelisten-Seite mit SeedProd
Das Erstellen einer Wartelisten-Seite in WordPress ist mit den richtigen Werkzeugen viel einfacher. SeedProd bietet Vorlagen, Drag-and-Drop-Steuerelemente und Integrationen, um Ihnen beim schnellen Erstellen und Veröffentlichen Ihrer Seite zu helfen.
Für weitere Möglichkeiten, Ihre Seite zu optimieren, erkunden Sie diese praktischen Anleitungen von SeedProd:
- Anatomie einer Landingpage: 9 wesentliche Elemente
- A/B-Testing für Landing Pages in WordPress: Der einfache Leitfaden
- Experten-Tipps zur Optimierung von Landing Pages
- Beispiele und Best Practices für Landingpage-URLs
- So erstellen Sie personalisierte Landing Pages zur Steigerung der Konversionen
- Landing Page Headline-Formeln zur Steigerung der Konversionsraten
- Navigation auf Landingpages ist tot: Hier ist der Grund
- Was ist eine gute Landingpage-Conversion-Rate?
Danke fürs Lesen! Wir würden uns freuen, Ihre Gedanken zu hören. Treten Sie also gerne der Unterhaltung auf YouTube, X und Facebook bei, um weitere hilfreiche Ratschläge und Inhalte für das Wachstum Ihres Unternehmens zu erhalten.