

TL;DR : Comment créer une page de destination de liste d'attente dans WordPress
Créez une page de liste d'attente dans WordPress et commencez à collecter des inscriptions avant le lancement en environ 20 minutes. Voici la version rapide :
- Installez SeedProd – Ajoutez le plugin à votre site WordPress et activez votre licence.
- Choisissez un modèle – Sélectionnez un modèle de page de destination de liste d'attente dans la bibliothèque de SeedProd et donnez un nom et une URL à votre page.
- Personnalisez votre design – Modifiez votre titre, votre formulaire d'inscription et votre arrière-plan à l'aide de l'éditeur glisser-déposer.
- Connectez votre liste d'e-mails – Liez votre fournisseur de marketing par e-mail pour que les inscriptions arrivent directement dans votre liste.
- Publiez – Cliquez sur Publier et partagez votre page de liste d'attente pour commencer à collecter les premières inscriptions.
Vous construisez quelque chose et avez besoin d'inscriptions anticipées avant le lancement. Mais vous n'êtes pas sûr de ce qu'il faut mettre sur la page, ou si quelqu'un s'inscrira réellement.
C'est là qu'intervient une page de destination de liste d'attente dans WordPress. La configuration est plus simple qu'il n'y paraît.
Ce tutoriel vous guide tout au long du processus en utilisant SeedProd, que j'utilise pour créer des pages de destination sur mon propre site. L'ensemble prend environ 20 minutes.
Les pages de liste d'attente bien optimisées convertissent environ 5 % à 10 % des visiteurs en abonnés. Voici comment en créer une qui atteint cette fourchette.
- How to Create a Waitlist Landing Page in WordPress (Step-by-Step)
- Étape 1 : Installer le plugin SeedProd
- Étape 2 : Choisir un modèle de page de destination de liste d'attente
- Étape 3 : Personnaliser le design de votre page de liste d'attente
- Étape 4 : Connecter votre formulaire d'inscription à votre liste d'e-mails
- Étape 5 : Configurer les paramètres de votre page
- Étape 6 : Publier votre page de destination de liste d'attente
- Best Waitlist Landing Pages (With Takeaways)
- Comment créer une liste d'attente virale avec des incitations de parrainage
- What to Do After Someone Joins Your Waitlist
Comment fonctionne une page d'inscription sur liste d'attente ?
Mettre en place une liste d'attente avant le lancement est l'une des décisions les plus simples que vous puissiez prendre. Vous mettez une page en ligne, commencez à collecter des inscriptions et avez une audience prête lorsque vous ouvrez.
Le processus est simple. Les visiteurs saisissent leur e-mail dans un formulaire d'inscription connecté à votre service de marketing par e-mail. Chaque nouvelle inscription est automatiquement stockée dans votre liste et peut déclencher des messages de confirmation ou de remerciement automatisés.
Lorsque votre produit sera lancé, vous pourrez envoyer des annonces à toutes les personnes de la liste instantanément. Vous pouvez également utiliser votre liste d'attente pour offrir un accès bêta ou des avantages exclusifs, tels que :
- Invitations exclusives en accès anticipé
- Remises de lancement spéciales
- Places limitées pour les testeurs bêta
Une fois publiée, votre page de liste d'attente fonctionne automatiquement, collectant de nouvelles inscriptions et créant de l'anticipation 24h/24 et 7j/7.
Que doit inclure une page de destination de liste d'attente ?
Les pages de liste d'attente à forte conversion partagent quelques caractéristiques clés. Voici ce que j'inclus toujours lorsque j'en crée une :
| Élément | Ce qu'il fait | Exemple |
|---|---|---|
| Titre clair | Indique aux visiteurs exactement à quoi ils s'inscrivent | « Lancement prochain » ou « Obtenez un accès anticipé aujourd'hui » |
| Formulaire d'inscription court | Réduit les frictions et augmente les conversions | Champ e-mail uniquement |
| Bouton CTA fort | Invite à une action immédiate avec un langage actif | « Réserver ma place » ou « Rejoindre la liste d'attente » |
| Éléments d'urgence | Encourage les inscriptions maintenant plutôt que plus tard | Compte à rebours, places limitées, avantages pour les premiers inscrits |
| Preuves ou aperçus | Renforce la confiance et suscite la curiosité | Témoignage, capture d'écran ou aperçu d'une fonctionnalité |
Vous n'avez pas besoin d'outils complexes pour ces éléments. J'utilise les modèles de liste d'attente de SeedProd et j'ajoute ces blocs rapidement.
La ligne de titre est l'endroit où la plupart des pages de liste d'attente perdent des conversions. « Lancement prochain » ne donne rien aux visiteurs sur quoi agir.
Une version plus forte ressemble à : « Obtenez un accès anticipé à [résultat spécifique] avant notre ouverture au public. » Une copie vague est la raison la plus couramment auto-diagnostiquée pour laquelle les pages de liste d'attente ne convertissent pas.
La proposition de valeur de votre produit explique ce que vous construisez. La proposition de valeur de votre liste d'attente répond à une question différente : qu'obtient le lecteur en s'inscrivant maintenant ?
Une fois vos éléments en place, trois stratégies augmenteront les conversions :
- Offrez des incitations : Donnez aux visiteurs une raison claire de s'inscrire maintenant. Il peut s'agir d'un accès anticipé, d'un code de réduction ou d'un contenu bonus exclusif. Lorsque les gens ont l'impression d'obtenir quelque chose de spécial, ils sont plus susceptibles de rejoindre et de partager votre page avec d'autres.
- Créez de l'urgence : Utilisez des éléments de conception qui déclenchent la peur de manquer quelque chose (FOMO) et encouragent une action immédiate. Ajoutez un compte à rebours indiquant quand votre produit sera lancé, ou incluez une barre de progression affichant à quel point vous êtes proche d'un objectif d'inscription. Des places limitées ou des offres pour les premiers inscrits fonctionnent également.
- Maintenez l'engagement : Ne laissez pas l'enthousiasme retomber après qu'une personne se soit inscrite. Envoyez un court e-mail de bienvenue pour la remercier de sa participation. Taquinez les fonctionnalités ou les récompenses à venir pour maintenir son intérêt jusqu'au jour du lancement.

Gardez votre formulaire court. Le champ e-mail uniquement est la règle, pas une suggestion.
Même l'ajout d'un seul champ supplémentaire, comme un prénom ou un nom d'entreprise, peut réduire considérablement votre taux de conversion. Ajoutez un CTA audacieux comme « Rejoindre la liste d'attente » ou « Réserver ma place », et laissez le formulaire à un seul champ.
Comment créer une page de liste d'attente dans WordPress (étape par étape)
Étape 1 : Installer le plugin SeedProd
La façon la plus efficace de créer une page de liste d'attente dans WordPress est d'utiliser un plugin de page de destination dédié comme SeedProd. Il est conçu pour la vitesse, la flexibilité et la facilité d'utilisation, sans codage requis.
SeedProd vous aide à concevoir des pages professionnelles en quelques minutes. Il comprend des centaines de modèles et un éditeur visuel par glisser-déposer, parfait pour les débutants.

Pour commencer, téléchargez le plugin SeedProd, puis téléchargez-le et activez-le dans votre tableau de bord WordPress. Si vous débutez avec les plugins, suivez ce guide étape par étape pour installer un plugin WordPress.
Étape 2 : Choisir un modèle de page de destination de liste d'attente
Après avoir installé SeedProd, allez dans SeedProd » Pages de destination dans votre administration WordPress. Cliquez ensuite sur le bouton « Ajouter une nouvelle page de destination ».

L'écran suivant affiche la bibliothèque de modèles de pages de destination de SeedProd. Vous pouvez filtrer ces conceptions par type de page, notamment :
- Bientôt disponible
- Mode maintenance
- Page 404
- Pages de vente
- Pages de webinaires
- Pages de capture de prospects
- Pages de remerciement
- Pages de connexion

Parcourez les modèles jusqu'à ce que vous trouviez un design qui vous plaît pour votre page de liste d'attente. Ensuite, passez votre souris dessus et cliquez sur l'icône en forme de coche.
Je recommande de filtrer par « Bientôt disponible » pour trouver des modèles de pages de destination pré-lancement. Les conceptions pré-lancement comportent les sections clés déjà en place, vous ne partez donc pas d'une toile vierge.
Pour cet exemple, j'ai choisi le modèle de page « City Coming Soon Page ».

Après avoir sélectionné votre modèle, saisissez les détails de votre page de destination dans la fenêtre contextuelle, tels que son nom et son URL. Cliquez sur le bouton Enregistrer et commencer à modifier la page pour ouvrir l'éditeur glisser-déposer.

Étape 3 : Personnaliser le design de votre page de liste d'attente
Il est maintenant temps de personnaliser votre page de destination de liste d'attente à l'aide de l'éditeur visuel de SeedProd. Cela vous permet de personnaliser votre design, votre texte et votre mise en page sans toucher une seule ligne de code.
L'éditeur comprend deux panneaux : sur la gauche, vous verrez les blocs de contenu et les options de mise en page, et sur la droite, un aperçu en direct de vos modifications de conception.

Cliquez sur n'importe quel élément pour le modifier. Vous pouvez modifier les titres, sous-titres ou boutons directement dans l'aperçu en direct. Utilisez l'onglet Avancé dans la barre latérale pour des options de style plus détaillées comme la couleur, l'espacement ou la typographie.

Pour changer votre image d'arrière-plan, cliquez sur l'icône des paramètres dans le coin inférieur gauche et sélectionnez l'onglet Arrière-plan. Vous pouvez télécharger une image personnalisée ou choisir parmi des milliers de photos libres de droits si vous avez une licence SeedProd Plus ou supérieure.
Gardez simplement à l'esprit que si votre modèle utilise des sections spécifiques, vous devrez peut-être modifier l'arrière-plan dans les paramètres de la section plutôt que dans les paramètres d'arrière-plan globaux.

SeedProd inclut également des blocs avancés que vous pouvez ajouter pour rendre votre page plus attrayante. Ci-dessous se trouve un tableau de référence rapide de certains types de blocs utiles et de leurs fonctions principales.
| Type de bloc | Fonction principale |
|---|---|
| Bloc de cadeau | Encourage l'engagement par des concours et des incitations |
| Formulaire de contact | Permet aux visiteurs d'envoyer des messages ou des demandes directement |
| Partage social | Permet aux utilisateurs de partager votre page sur les plateformes sociales |
| Compte à rebours | Crée un sentiment d'urgence en affichant le temps restant avant le lancement |
| Profils sociaux | Affiche vos profils de médias sociaux pour la connexion |
| Appel à l'action | Invite les utilisateurs à agir, comme « Rejoignez-nous maintenant » |
| Formulaire d'opt-in | Collecte les e-mails pour votre liste d'attente |
| Barre de progression | Visualise les étapes importantes ou les objectifs d'inscription |
| Tableau des prix | Met en évidence les détails du plan ou de l'offre clairement |
| Témoignages | Ajoute une preuve sociale pour renforcer la confiance des visiteurs |
Une fois que votre design vous convient, assurez-vous que votre formulaire d'inscription se démarque. C'est là que vous collecterez les e-mails des utilisateurs intéressés par votre lancement. Ajustez les champs du formulaire, les couleurs et l'espacement pour qu'ils correspondent au style de votre page.

Une fois que vous êtes satisfait de votre design, passez à l'étape suivante pour connecter votre fournisseur d'e-mails et commencer à collecter de vrais prospects.
Étape 4 : Connecter votre formulaire d'inscription à votre liste d'e-mails
D'après mon expérience, l'étape la plus critique est de s'assurer que vos nouveaux prospects arrivent immédiatement au bon endroit. Connecter votre formulaire d'opt-in à votre fournisseur de marketing par e-mail dans SeedProd est simple. Cliquez simplement sur l'onglet Connexion en haut de votre écran.

Vous pouvez ensuite parcourir les services populaires de marketing par e-mail. Suivez les instructions pour connecter votre liste une fois que vous l'avez trouvée.
Si SeedProd ne s'intègre pas directement avec votre fournisseur, utilisez son intégration Zapier ou collez manuellement le code HTML de votre formulaire. Chaque nouvelle inscription est automatiquement enregistrée et prête pour le jour du lancement. Vous trouverez également des intégrations pour Google Analytics et reCAPTCHA sur la même page.

Avant de mettre en ligne, soumettez un e-mail de test via votre formulaire pour confirmer que les inscriptions parviennent à votre liste. Cela prend 30 secondes et vous évite de découvrir une connexion défectueuse après avoir déjà partagé la page.
Étape 5 : Configurer les paramètres de votre page
L'étape suivante garantit que les paramètres de votre page de destination sont corrects. Cliquez sur l'onglet Paramètres de la page et parcourez chaque section.

Voici un bref aperçu de ce que fait chaque section :
| Paramètre | Ce qu'il fait |
|---|---|
| Général | Modifiez le nom, l'URL et le statut de votre page |
| SEO | Gérez les titres et descriptions méta si vous utilisez un plugin SEO |
| Analytique | Connectez Google Analytics via MonsterInsights pour suivre les conversions |
| Scripts | Ajoutez des pixels de suivi pour les publicités ou le marketing par e-mail |
| Domaine personnalisé | Utilisez un domaine personnalisé (plan SeedProd Elite requis) |
Après avoir configuré les paramètres de votre page, cliquez sur le bouton Enregistrer dans le coin supérieur droit.
Étape 6 : Publier votre page de destination de liste d'attente
La dernière étape consiste à rendre votre page publique. Cliquez sur la flèche déroulante du bouton d'enregistrement, puis sélectionnez Publier.

Donnez un aperçu rapide à votre page de destination en accès anticipé pour vous assurer que tout est correct. Ensuite, vous êtes prêt à la partager et à commencer à développer votre liste.
Voici à quoi ressemble la page que j'ai créée sur mon site Web de test :

Félicitations !
Meilleures pages de destination de liste d'attente (avec leçons à retenir)
Étudier des exemples réussis vous aide à repérer ce qui fonctionne et ce qu'il faut éviter. J'ai sélectionné ces trois exemples car ils montrent différentes approches du minimalisme, de la preuve sociale et de la conception de conversion.
Logiciel Descript
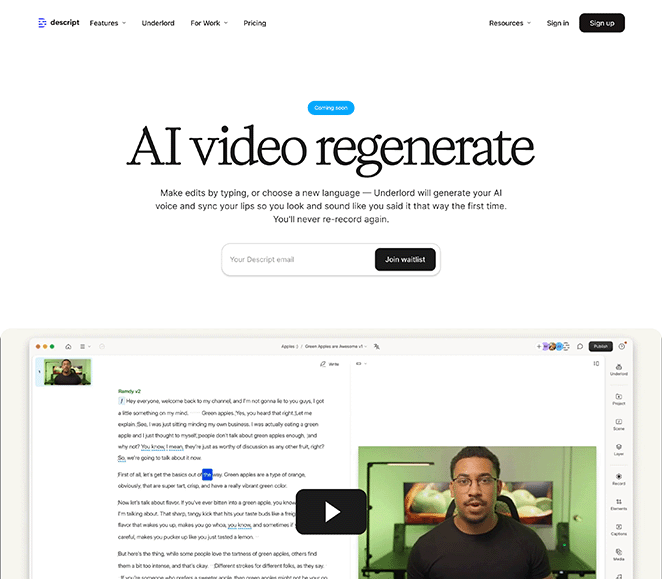
Ce qui fonctionne :
- Le titre explique immédiatement ce que fait le produit. Aucune supposition nécessaire.
- Une vidéo de démonstration montre le produit en action, ce qui renforce la confiance avant de demander un e-mail.
- Le formulaire d'inscription ne demande qu'une adresse e-mail. Moins de champs signifient plus d'inscriptions.
Ce qui pourrait être amélioré :
- Aucun élément d'urgence comme un compte à rebours ou des places limitées.
- Manque de preuve sociale. Un témoignage ou un nombre d'utilisateurs ajouterait de la crédibilité.
Leçon clé : Montrez comment votre produit résout un problème avant de demander des inscriptions. La clarté l'emporte sur l'astuce.
Cours Mighty Freelancer
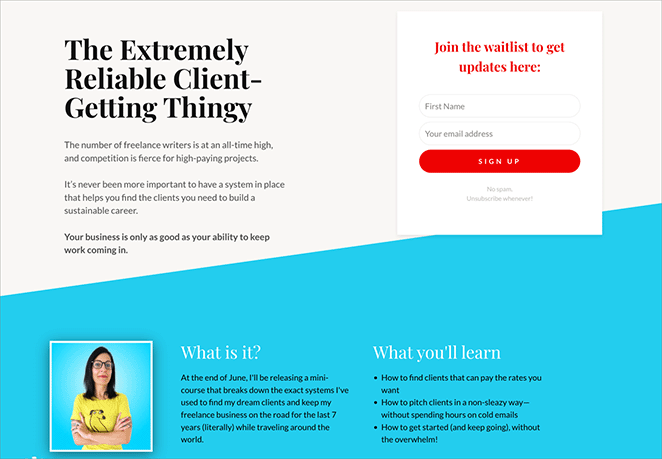
Ce qui fonctionne :
- Le ton amical et conversationnel le rend personnel plutôt que corporatif.
- Le bouton CTA se démarque avec une phrase d'action claire.
- Un aperçu visuel du contenu du cours donne aux abonnés un avant-goût de ce qu'ils recevront.
Ce qui pourrait être amélioré :
- Aucune incitation de parrainage pour encourager le partage.
- La page pourrait bénéficier d'une date de lancement ou d'un compte à rebours pour créer un sentiment d'urgence.
Leçon clé : Un ton personnel renforce la confiance. Montrez exactement ce que les abonnés gagneront en rejoignant votre liste d'attente.
Application Tapster
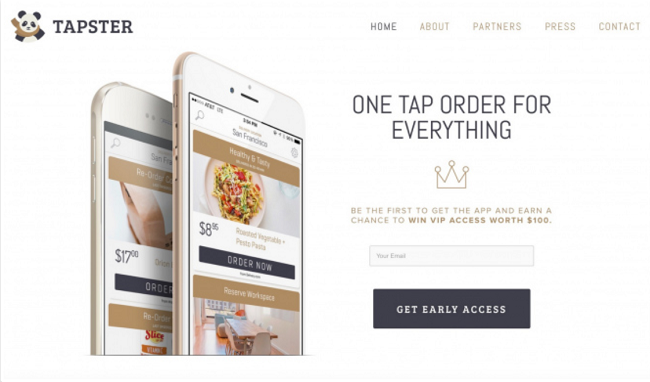
Ce qui fonctionne :
- La conception épurée, axée sur le mobile, correspond au produit de l'application.
- Le formulaire d'inscription reste visible lorsque vous faites défiler, de sorte que les visiteurs ne perdent jamais de vue le CTA.
- Une incitation à un cadeau récompense les inscriptions anticipées, ce qui encourage une action immédiate.
Ce qui pourrait être amélioré :
- La proposition de valeur pourrait être plus spécifique sur ce que fait l'application.
- L'ajout d'un programme de parrainage transformerait les premiers abonnés en promoteurs.
Leçon clé : Les incitations et les CTA toujours visibles augmentent les conversions. Faites en sorte que rejoindre soit gratifiant et sans effort.
Chaque exemple met l'accent sur un objectif : inciter les visiteurs à s'inscrire. Que vous mettiez en avant une démo de produit, une incitation ou un message personnel, gardez votre design simple et votre message clair.
Comment créer une liste d'attente virale avec des incitations de parrainage
Si vos abonnés ne partagent pas votre liste d'attente, vous perdez des opportunités de croissance. Un système de parrainage donne à chaque personne un lien unique, et lorsque leurs amis s'inscrivent, tous deux bénéficient d'avantages tels qu'un accès anticipé ou une meilleure place dans la file d'attente.
Cette approche transforme votre liste d'attente en un moteur de croissance. Au lieu de vous fier uniquement à votre propre promotion, vos abonnés font le partage pour vous.
Le moyen le plus simple d'ajouter des mécanismes de parrainage à votre liste d'attente WordPress est d'utiliser RafflePress, un plugin de concours qui suit automatiquement les parrainages. Il comprend un modèle de concours de pré-lancement conçu pour les campagnes de liste d'attente.

Voici comment cela fonctionne :
- Chaque abonné reçoit un lien de partage unique. Lorsque quelqu'un s'inscrit via ce lien, RafflePress suit le parrainage.
- Les parrainages rapportent des participations bonus. Vous pouvez récompenser les abonnés avec des participations supplémentaires au concours pour chaque ami qu'ils amènent.
- Les actions de partage sur les réseaux sociaux comptent aussi. Les abonnés peuvent gagner des participations en partageant sur Twitter, Facebook ou d'autres plateformes.
- Un classement crée de la compétition. Afficher les meilleurs parrains motive les abonnés à partager davantage.
Pour configurer cela, installez RafflePress et choisissez le modèle de concours de pré-lancement. Ajoutez des actions de participation pour l'inscription par e-mail, les parrainages et les partages sur les réseaux sociaux. Ensuite, intégrez le widget de concours sur votre page de liste d'attente SeedProd en utilisant le bloc ou le shortcode RafflePress.

Le résultat est une liste d'attente qui grandit d'elle-même. Les abonnés font passer le mot car ils gagnent des récompenses pour les parrainages. Cela exploite la peur de manquer quelque chose (FOMO) : lorsque les gens voient leurs amis s'inscrire et gagner des avantages, ils veulent aussi participer.
Que faire après que quelqu'un a rejoint votre liste d'attente
Obtenir des inscriptions n'est que la moitié du travail. Ce que vous faites après qu'une personne s'est inscrite détermine si elle reste enthousiaste ou si elle vous oublie avant le lancement.
Le moment de votre lancement est également important. Les créateurs qui lancent dans les trois mois suivant la clôture de leur liste d'attente convertissent significativement plus d'abonnés en clients payants que ceux qui attendent.
Voici la stratégie post-inscription que j'utilise pour maintenir l'engagement des abonnés de la liste d'attente :
| Étape | Action | Pourquoi ça marche |
|---|---|---|
| Immédiatement | Afficher une page de remerciement avec des boutons de partage social et leur lien de parrainage | Les abonnés sont plus enthousiastes juste après s'être inscrits. Capturez cet élan avant qu'ils ne partent. |
| Dans les minutes qui suivent | Envoyer un e-mail de bienvenue confirmant leur place et définissant les attentes | Confirme que l'inscription a fonctionné et maintient votre lancement à l'esprit. |
| Hebdomadaire ou bi-hebdomadaire | Envoyer des mises à jour de progression avec du contenu en coulisses ou des aperçus de fonctionnalités | Empêche les abonnés de vous oublier. Crée de l'anticipation au fil du temps. |
| 48 heures avant le lancement | Envoyer un e-mail d'urgence avec un compte à rebours et un rappel des avantages pour les premiers arrivants | Crée une dernière poussée pour les parrainages et prépare les abonnés pour le jour du lancement. |
| Jour J | Donnez aux inscrits de la liste d'attente un accès anticipé avant l'annonce publique | Récompense leur patience et leur donne l'impression d'être des initiés. |
Dans SeedProd, vous pouvez créer une page de remerciement personnalisée et la définir comme redirection après la soumission du formulaire.

Le jour J, désactivez le mode "Bientôt disponible" et redirigez instantanément votre page de liste d'attente vers la page du produit en direct.
FAQ sur les pages de destination de liste d'attente
Réflexions finales : Créer une page de liste d'attente avec SeedProd
Créer une page de liste d'attente dans WordPress est beaucoup plus facile avec les bons outils. SeedProd propose des modèles, des contrôles par glisser-déposer et des intégrations pour vous aider à créer et publier votre page rapidement.
Pour plus de moyens d'optimiser votre page, explorez ces guides pratiques de SeedProd :
- Anatomie d’une page de destination : 9 éléments essentiels
- Tests A/B pour les pages de destination dans WordPress : Le guide facile
- Conseils d'experts pour l'optimisation des pages de destination
- Exemples d'URL de pages de destination et meilleures pratiques
- Comment créer des pages de destination personnalisées pour augmenter les conversions
- Formules de titres de pages de destination pour augmenter les taux de conversion
- La navigation des pages de destination est morte : voici pourquoi
- Quel est un bon taux de conversion de page de destination ?
Merci de votre lecture ! Nous serions ravis d'entendre vos réflexions, alors n'hésitez pas à rejoindre la conversation sur YouTube, X et Facebook pour plus de conseils et de contenu utiles pour développer votre entreprise.


