Back in 2013, I needed a simple landing page for my first WordPress site, but every tutorial expected me to write code. I didn’t know what HTML or CSS even meant. I just wanted a page that looked clean and got people to sign up.
That first struggle stuck with me. Since then, I’ve helped thousands of WordPress users build high-converting landing pages without touching a single line of code. And today, tools like SeedProd make it easier and faster than ever—even if you’ve never built a page before.
In this guide, I’ll show you the exact steps I use to create a landing page in WordPress—no coding, no confusion. It takes under 30 minutes from start to publish.
Quick Answer: You can create a landing page in WordPress by installing a drag-and-drop builder like SeedProd, choosing a template, customizing your content, and clicking publish. It’s fast, beginner-friendly, and works with any WordPress site.
🏁 Quick Summary: How to Create a Landing Page in WordPress
Over the years, I’ve learned that a landing page works best when it has one job. No menus, no distractions, just a clear path for your visitors to follow. Whether you’re asking people to sign up, buy, or join a waitlist, the goal is always focused.
Here’s how I build a WordPress landing page in under 30 minutes with zero coding:
This method works for beginners, marketers, and small business owners. It’s the fastest way I’ve found to create a custom landing page in WordPress without hiring a developer.
Benefits of a WordPress Landing Page
I’ve built hundreds of landing pages over the years, and one thing is always true—landing pages work better when they’re focused. Unlike your homepage, which tries to do a bit of everything, a landing page has one job: guide your visitor to take action.

Here’s what I’ve seen personally from using landing pages in my own WordPress projects:
- Higher conversions: Removing menus and sidebars keeps visitors focused on one thing—signing up, buying, or clicking. Every time I simplify a landing page, I see better results.
- Full design control: With tools like SeedProd, I can match each landing page to its campaign. I’ve built pages for webinars, waitlists, and product launches—each one with its own look.
- Easy to launch and remove: When I run limited-time offers, I spin up landing pages fast. I publish when the promotion starts and remove them when it’s over—without messing with the rest of my site.
- Better tracking: I always know how a landing page is performing. I can track visits, clicks, and signups on that single page, which helps me tweak and improve future campaigns.
That’s why I build nearly all my campaigns with landing pages now—sales pages, waitlists, lead capture forms, and more. They’re simple, focused, and they work.
Need ideas? Here are some proven landing page examples you can use for inspiration.
Plus, there are many plugins, including page builders, that help create landing pages easily. These page builders are user-friendly and don’t require coding skills. They let beginners make effective landing pages without needing a developer.
What Kind of Landing Pages Can You Make?
I’ve built landing pages for all kinds of projects, some for list building, others for sales, launches, or one-time events. If you’re not sure what type of landing page to create, here are a few common (and proven) options:
- Waitlist landing pages
- Great for pre-launch interest
- Collects emails before your product goes live
- Squeeze-Seiten
- Focused on collecting email addresses
- Usually includes a freebie or lead magnet
- Verkaufsseiten
- Highlight your product or service
- Designed to drive immediate action
- Event or webinar pages
- Drive signups for a specific date and time
- Often include countdowns and calendar links
- Homepage replacements
- Use when your full site isn’t ready
- Gives visitors a clean, focused intro
Each of these works without hiring a developer. I usually just pick a SeedProd template, swap in my content, and hit publish.
How to Build a Custom Landing Page in WordPress with SeedProd
While you don’t technically need a WordPress landing page plugin to build your page, using one is always my first choice. They’re easy to use, don’t require any coding skills, and allow you to spin up a page in minutes.
I also always use SeedProd instead of the other options available. Let’s look at why.

First off, SeedProd is fast. Really fast. Independent tests show SeedProd pages loading in under a second, which is crucial because slow pages lose visitors and sales. This speed advantage gives you a head start.
Speed is just one part of it. SeedProd includes helpful blocks like countdown timers and opt-in forms that can improve your conversion rates.
What I like most is how easy it is to build your pages with no code needed. The drag-and-drop system and pre-built templates make designing a professional-looking landing page (or even a whole website) a breeze.

I built my entire site with SeedProd without writing a single line of code.
So, let’s jump right into the steps for using SeedProd to create a landing page in WordPress:
Schritt 1. SeedProd Landing Page Plugin installieren
Click here to get started with SeedProd and quickly download the plugin. In just a few clicks, you’ll have it installed on your WordPress site.
If you’d like a walkthrough, we have a guide on installing SeedProd.
✏️ Note
While there’s a free version available, this tutorial will focus on the Pro version, which provides access to advanced features like premium templates and powerful integrations.
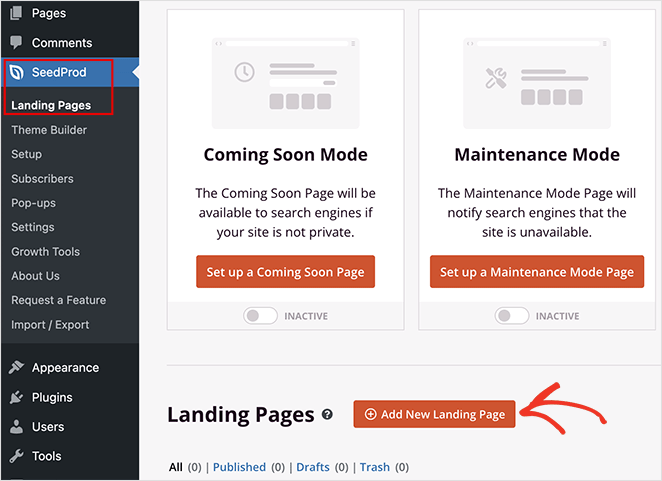
After activating the plugin, navigate to SeedProd » Landing Pages from your WordPress dashboard and click the Add New Landing Page button.
Schritt 2. Wählen Sie eine Landing Page-Vorlage
On the next page, you can choose a landing page template to jumpstart your design process. Whether you need a landing page for sales, lead generation, webinar registrations, or a custom project, there’s a template to match your goals.
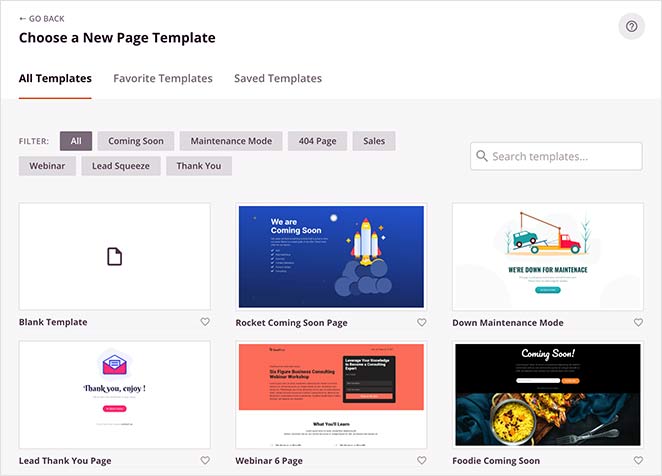
These fully customizable templates eliminate the need for design experience, allowing you to create a professional-looking landing page with ease.
Alternativ können Sie auch die leere Vorlage auswählen, um Ihre eigene Seite im visuellen Editor zu erstellen und zu gestalten.
Für dieses Tutorial wähle ich die Vorlage Newsletter Squeeze Page. Um sie zu verwenden, fahren Sie mit der Maus über die Vorlage und klicken Sie auf das Häkchensymbol.
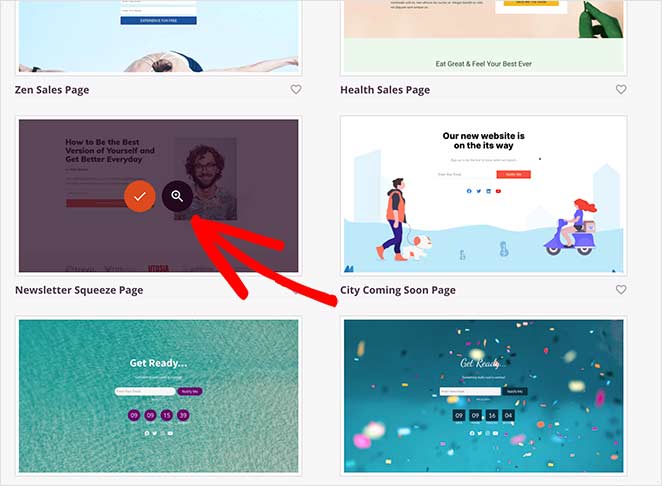
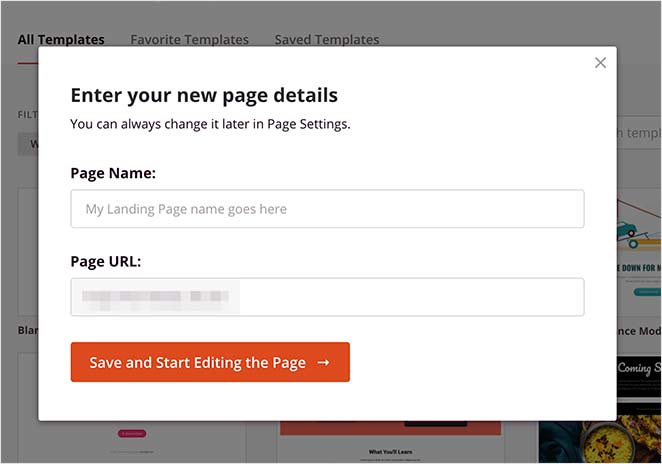
Daraufhin erscheint ein Popup-Fenster, in dem Sie Ihrer Seite einen Namen und eine benutzerdefinierte URL geben können. Klicken Sie dann auf die Schaltfläche Speichern und mit der Bearbeitung der Seite beginnen, um Ihre Vorlage in den Drag-and-Drop-Builder zu laden.
Step 3. Customize Your Landing Page Template
After creating your new page, you’ll see the visual drag-and-drop page builder. This makes it simple to customize your landing page’s layout and content.
Drag and drop elements like headlines, images, buttons, and more directly onto the page. No coding required.
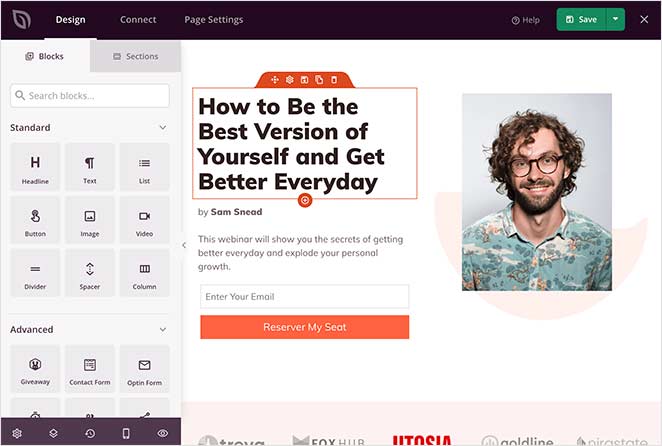
You’ll find various blocks in the sidebar, each with customizable options to match your brand.
Wenn Sie z. B. auf den Block Schaltfläche klicken, um die Einstellungen zu öffnen, sehen Sie verschiedene Vorlagenstile, Farben, Farbverläufe und Umrisse.
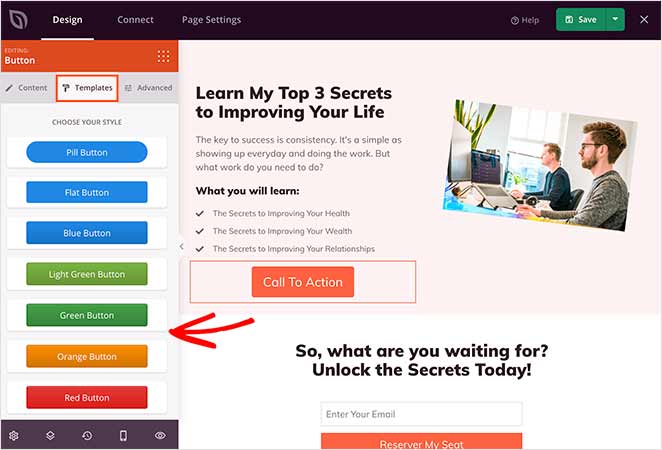
The Advanced tab also allows you to change the block’s content, size, alignment, color, and typography.
Need to boost conversions? The Advanced blocks have you covered, with options for lead generation forms, countdown timers, testimonials, and more.
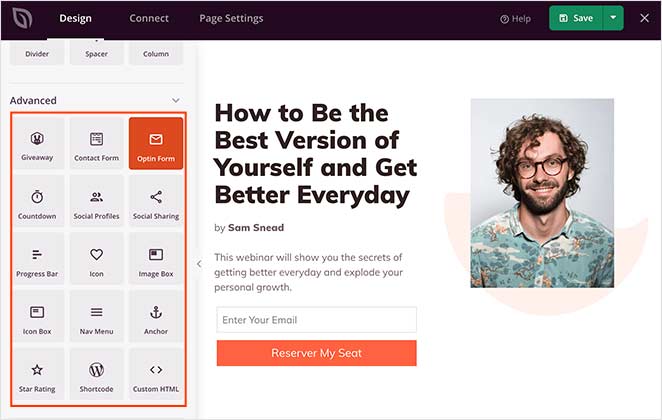
To learn how to add some of these features, check out the following tutorials:
- Wie man Google Maps in WordPress einbettet
- Wie füge ich einen Vorher-Nachher-Fotoslider zu WordPress hinzu?
- How to Add Testimonials to WordPress
- Wie man eine Landing Page mit Countdown-Timer erstellt
- Hinzufügen von Geschäftszeiten zu WordPress
- So fügen Sie Ihrer Website benutzerdefinierte WordPress-Symbole für soziale Medien hinzu
Adding Landing Page Sections
Want to create entire sections quickly? SeedProd offers pre-made layouts for headers, hero areas, FAQs, and more, giving you a head start on your design.
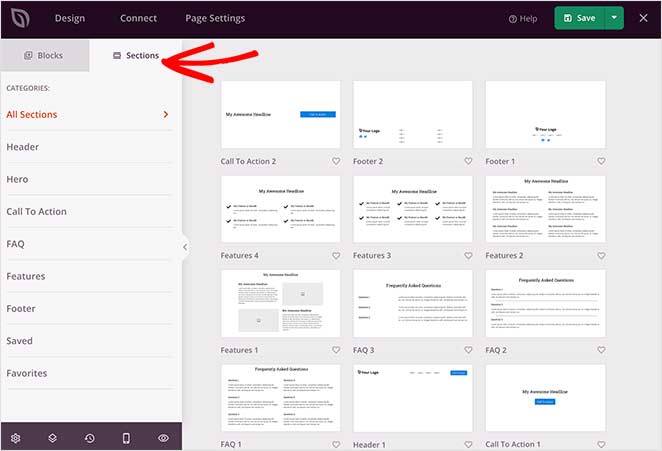
Um einen Abschnitt zu Ihrer Landing Page hinzuzufügen, fahren Sie mit der Maus über ein Beispiel und klicken Sie auf das Pluszeichen +.
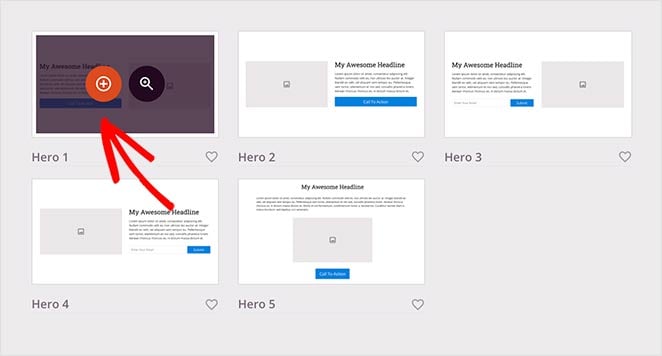
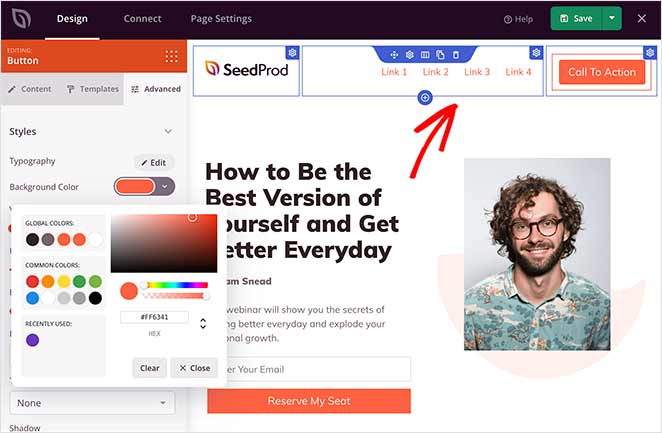
SeedProd fügt dann den Abschnitt in Ihre Seite ein. Sie können dann auf die Elemente klicken und sie bearbeiten, wie Sie es mit den Blöcken tun würden.
Customizing Global Styling Options
To maintain a consistent look and feel across your landing page, use the global styling options to easily control colors, fonts, and background images.
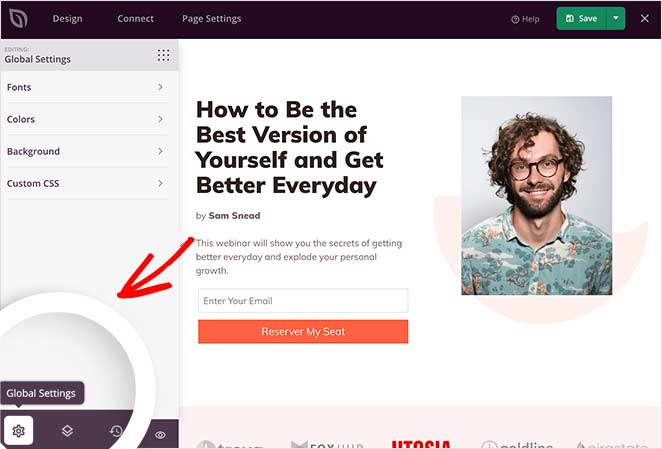
Sie können Ihrer Seite zum Beispiel einen Videohintergrund oder eine Diashow-Funktion im Hintergrund hinzufügen. Oder Sie können die Hintergrundfarbe ändern und Ihrer Landing Page eine einheitliche Farbpalette geben.
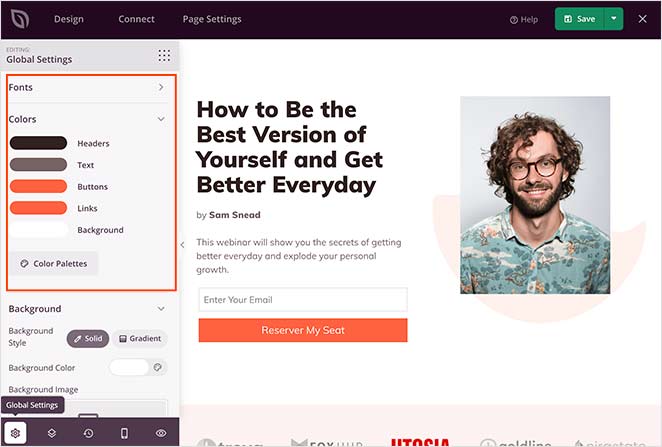
Remember to save your changes during the design process by clicking the Save button at the top-right corner.
Restoring to an Older Landing Page Version
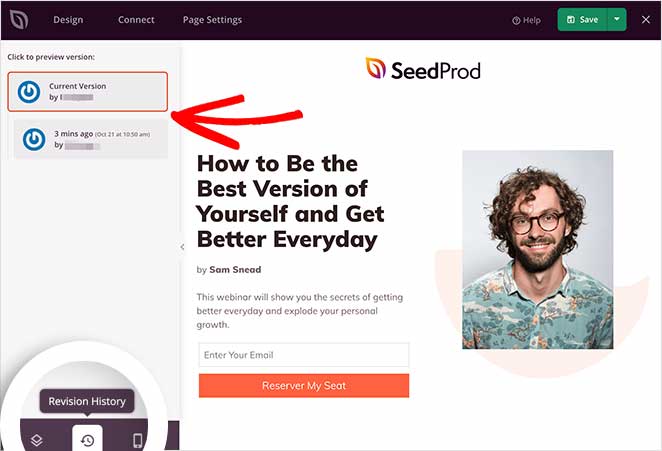
Manchmal müssen Sie vielleicht zu einer früheren Version der Landing Page zurückkehren.
Klicken Sie dazu auf das Uhrensymbol unten links auf Ihrem Bildschirm. Dann können Sie Ihren Änderungsverlauf einsehen und zu einer anderen Version wechseln.
Step 4: Connect Your Email Marketing Service
You can easily grow your email list by connecting your favorite tools.
Connect to popular email providers like Constant Contact, GetResponse, Mailchimp, ActiveCampaign, and more, ensuring every lead captured through your landing page goes straight to your email list.
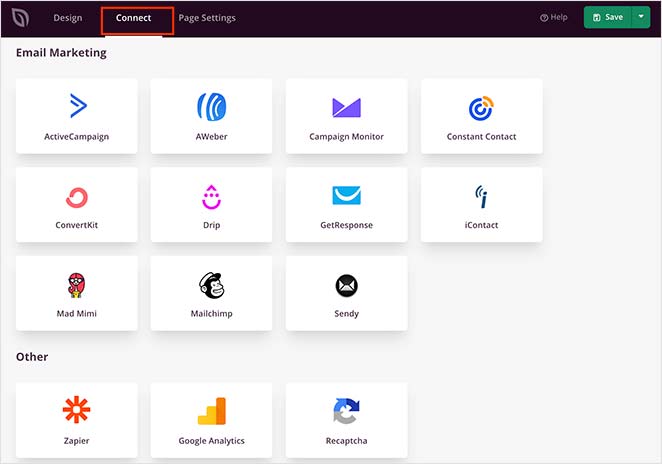
Sie können mit Zapier auch Google Analytics-Tracking, Spamschutz und andere Anwendungen einrichten.
Suchen Sie sie in der Integrationsliste und klicken Sie auf Verbinden, um Ihren E-Mail-Dienst zu verknüpfen.
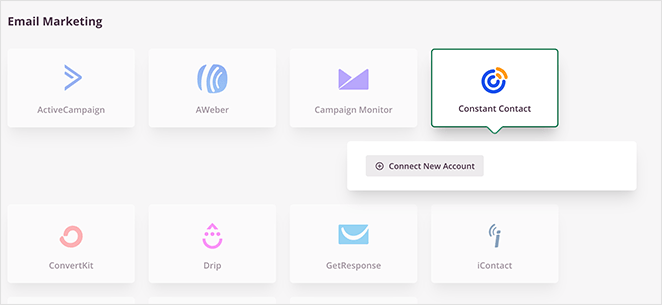
Folgen Sie dann den Anweisungen, um Ihr Konto zu verbinden und zu verifizieren. Danach können Sie alle Ihre Opt-in-Formulare mit Ihrer E-Mail-Liste verknüpfen.
Schritt 5: Konfigurieren Sie Ihre Landing Page-Einstellungen
Next, take control of your landing page’s performance with easy-to-use settings.

Adjust SEO settings to boost your page’s visibility in search results, ensuring more potential customers can find you. You can also connect to analytics platforms to track your landing page’s effectiveness.
For advanced users, there are options for custom header, body, and footer scripts, giving you full control over your page’s functionality.
Denken Sie daran, auf Speichern zu klicken, um Ihre Änderungen zu speichern.
Schritt 6: Veröffentlichen Sie Ihre Landing Page in WordPress
Bevor Sie Ihre Landing Page veröffentlichen, sollten Sie sie in der Vorschau anzeigen. Auf diese Weise können Sie sehen, ob sie sowohl auf dem Desktop als auch auf mobilen Geräten gut aussieht.
Um eine Vorschau Ihrer Seite anzuzeigen, klicken Sie auf das Vorschausymbol im Landing Page Builder. Es wird sofort eine Vorschau der mobilen Seite angezeigt, sodass Sie durch die Seite scrollen und Änderungen vornehmen können. Klicken Sie einfach erneut auf das Symbol, um wieder zur Desktop-Vorschau zu wechseln.
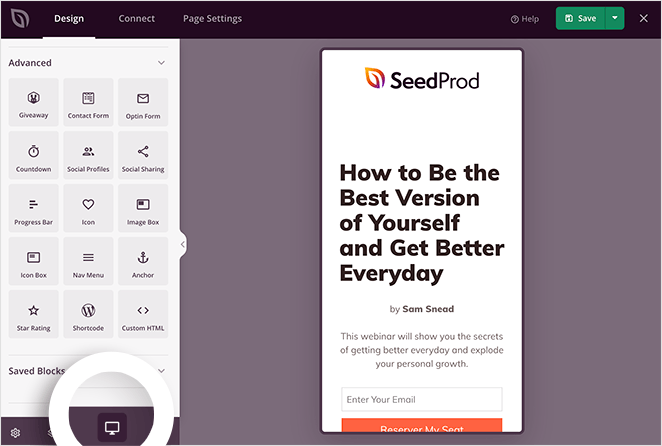
Wenn Sie eine Live-Vorschau Ihrer Seite sehen möchten, klicken Sie auf das Augensymbol, um Ihre Landing Page in einer neuen Registerkarte zu öffnen.
Wenn Sie mit dem Aussehen zufrieden sind, klicken Sie auf den Pfeil unter der Schaltfläche Speichern und dann auf Veröffentlichen.
Hier ist ein Beispiel für eine Landing Page, die ich für diesen Leitfaden auf meiner Test-Website erstellt habe:

💡 Expert Tip
This landing page took me around 15 minutes to create.
You can make that time even quicker by using SeedProd’s Import and Export feature. It lets you export your designs as a .zip file so you can quickly reuse them for other projects.
For example, design a stock template and use it as a framework for your client projects to make the design process faster.
How Do I Make My WordPress Homepage a Landing Page?
Wenn Sie möchten, dass Ihre Landing Page das erste ist, was die Besucher Ihrer Website sehen, müssen Sie sie als statische Homepage einrichten.
Gehen Sie dazu in Ihrem WordPress-Dashboard auf Einstellungen " Lesen. Wählen Sie dann die Option "Eine statische Seite" und wählen Sie die soeben erstellte Landing Page aus dem Dropdown-Menü.
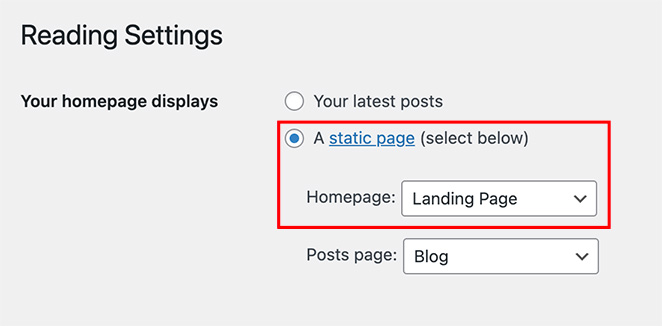
Sie ist nicht dasselbe wie Ihre normale Homepage. Stattdessen bedeutet es, dass Ihre benutzerdefinierte Landing Page dort landet, wo Besucher landen, wenn sie sich zu Ihrer Haupt-WordPress-Website durchklicken.
🤔 Frequently Asked Questions About WordPress Landing Pages
Optimieren Sie als nächstes Ihre Landing Page
I hope this guide helped you learn how to create a landing page in WordPress without writing a single line of code. Whether you’re building a simple landing page, a custom sales page, or even replacing your homepage, WordPress makes it easy when you use the right plugin.
Once your landing page is live, take a few minutes to test how it performs. Small tweaks can lead to big wins, especially if you’re using tools like A/B testing, countdown timers, or analytics integrations.
Die folgenden Leitfäden könnten Ihnen dabei behilflich sein:
- Experten-Tipps zur Optimierung von Landing Pages
- Wie Sie Ihre Landing Page einem A/B-Test unterziehen
- Arten von Landing Pages, die garantiert konvertieren
- Landing Page Best Practices für unglaubliche Konversionsraten
- Beispiele für Landing Page URLs und Best Practices
- Wie man eine schnelle Landing Page zum Testen von Ideen erstellt
- Formeln für die Überschrift einer Landing Page zur Steigerung der Konversionsrate
- Landing Page nicht konvertiert? 9 Tipps zur schnellen Behebung
Vielen Dank fürs Lesen! Wir würden uns freuen, Ihre Meinung zu hören. Bitte hinterlassen Sie einen Kommentar mit Ihren Fragen und Ihrem Feedback.
Sie können uns auch auf YouTube, X (früher Twitter) und Facebook folgen, um weitere hilfreiche Inhalte für Ihr Unternehmen zu erhalten.

