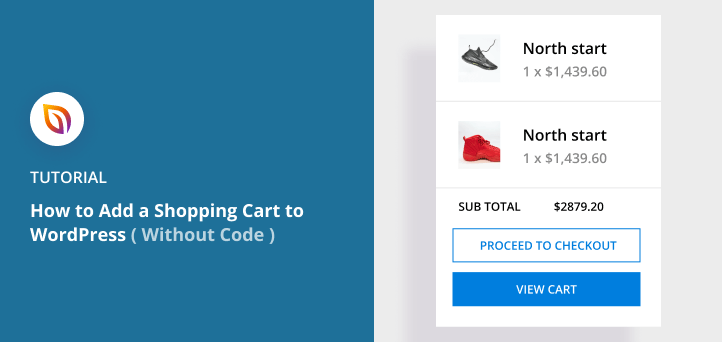

TL;DR: How to Add a Shopping Cart to WordPress (Step by Step)
WordPress doesn’t include a cart by default. Here’s the fastest way to get one live and converting.
- Understand what you need – A WordPress shopping cart is a plugin that handles product selection, pricing, and checkout in one place.
- Install WooCommerce – The free plugin that adds a full cart and checkout to any WordPress site.
- Run the setup wizard – Enter your store details, choose product types, and configure payment gateways.
- Add your products – Import via CSV or add items manually through the WooCommerce dashboard.
- Customize your cart page with SeedProd – Replace the default cart with a high-converting custom layout using drag-and-drop blocks.
- Publish and connect – Point WooCommerce to your new cart URL and go live.
When I first needed to add a shopping cart to WordPress, I was frustrated. WordPress doesn’t include a cart or checkout by default, and I didn’t want to waste time coding. The good news is you can add a shopping cart to WordPress quickly with the right plugins.
In this guide, I’ll show you step by step how to add a shopping cart to WordPress using WooCommerce. I’ll also show you how to customize your cart page with SeedProd to boost conversions and create a seamless checkout experience.
- What Is a WordPress Shopping Cart?
- What Is the Best Shopping Cart Plugin for WordPress?
- How to Add a Shopping Cart to WordPress with WooCommerce
- Step 1: Describe Your Business
- Step 1: Enter Your WooCommerce Store Details
- Step 2: Choose Your Store's Industry in WooCommerce
- Step 3: Select Which Products You'll Sell
- Step 4: Add Your Business Information
- Step 5: Pick a WordPress Theme for Your Store
- Step 6: Add Products to Your WooCommerce Store
- Step 7: Configure Your WooCommerce Payment Methods
- How Do You Customize a WooCommerce Cart Page with SeedProd?
- How to Optimize Your WordPress Shopping Cart for More Sales
- FAQs About WordPress Shopping Carts
What Is a WordPress Shopping Cart?
A WordPress shopping cart is a plugin that lets customers add products, manage their selections, and complete payment, all without leaving your site. WordPress doesn’t include any of this out of the box.
A fresh WordPress install has no cart, no checkout, and no payment processing. You need a dedicated eCommerce plugin to add those features.
The most widely used option is WooCommerce, which is free and powers the steps in this guide. It automatically creates cart, checkout, and account pages when you install it.
What Is the Best Shopping Cart Plugin for WordPress?
There are several WordPress shopping cart plugins available, but the one I keep coming back to is WooCommerce, the most popular eCommerce plugin for WordPress.

WooCommerce is a free, open-source plugin that lets you sell physical and digital products on your WordPress site.
You can accept credit card payments with payment gateways like Stripe, PayPal, Amazon Pay, and Authorize.net, along with offline options like cash on delivery and check.
When orders come in, you manage their status from the dashboard. You can connect shipping carriers like USPS and FedEx, and add thousands of extensions to expand what your store can do.
WooCommerce works with any WordPress theme and is what I’ll use throughout this guide. Let’s get into it.
How to Add a Shopping Cart to WordPress with WooCommerce
To get started, log in to your WordPress dashboard and go to Plugins » Add New. Search for “WooCommerce” and click Install Now, then Activate.
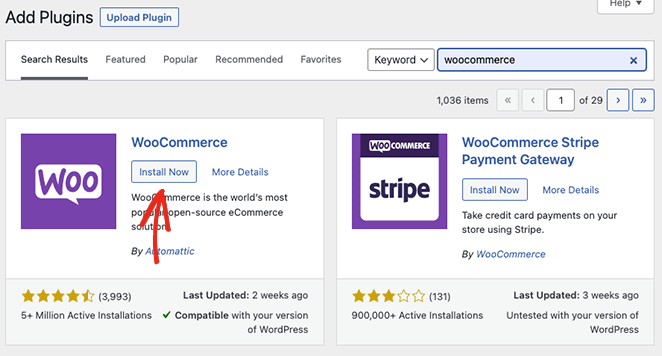
After activating WooCommerce, it launches the setup wizard.

Step 1: Describe Your Business
First, you’ll need to tell Woo what stage you’re at with your store. For this guide, I’ll click “I’m already selling” and select the selling online option from the dropdown menu.
You can then choose which platform you’re using, which in this case is WordPress.
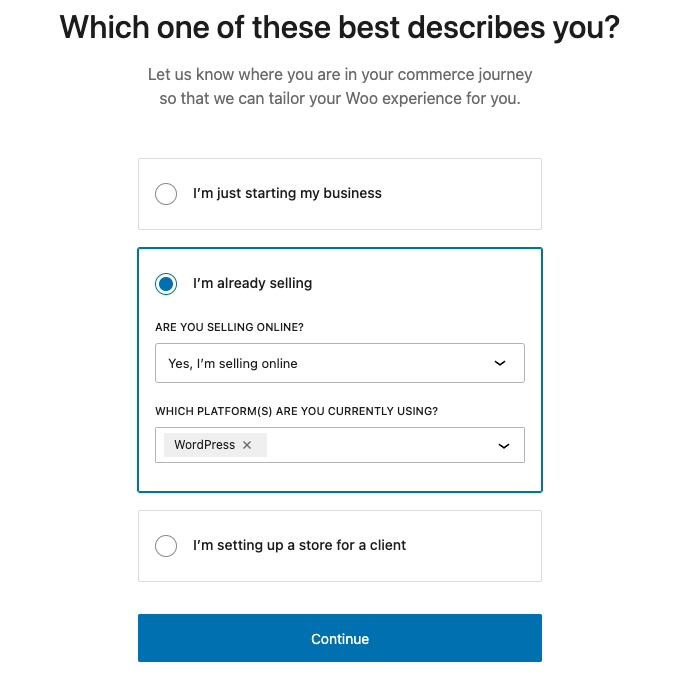
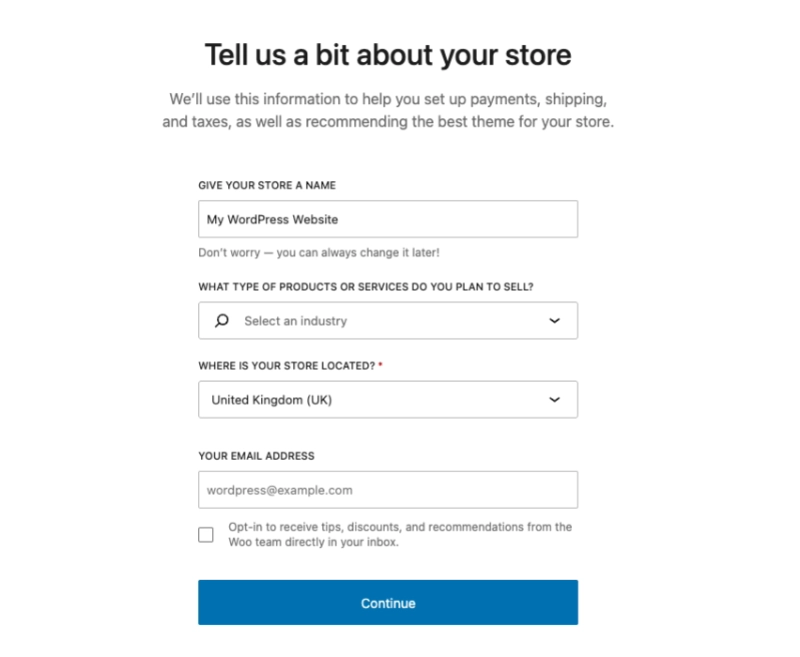
Step 2: Enter Your WooCommerce Store Details
The next screen asks for more information about your business, including your store’s name, industry, and location. Fill in your details and click Continue.
Step 3: Install Optional Woo Features
The following screen allows you install recommended features automatically. You can always skip this for now and set them up later once you’ve had time to look through them properly.
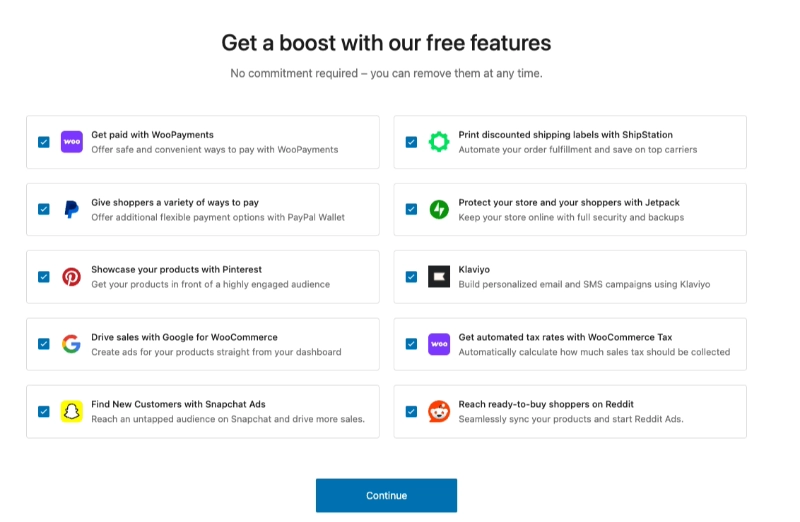
That’s the setup wizard completed. Now, you’ll head back to your WordPress dashboard where you can begin adding your products.
Step 4: Add Products to Your WooCommerce Store
With your store configured, go to WooCommerce » Home and click the “Import your products” option.
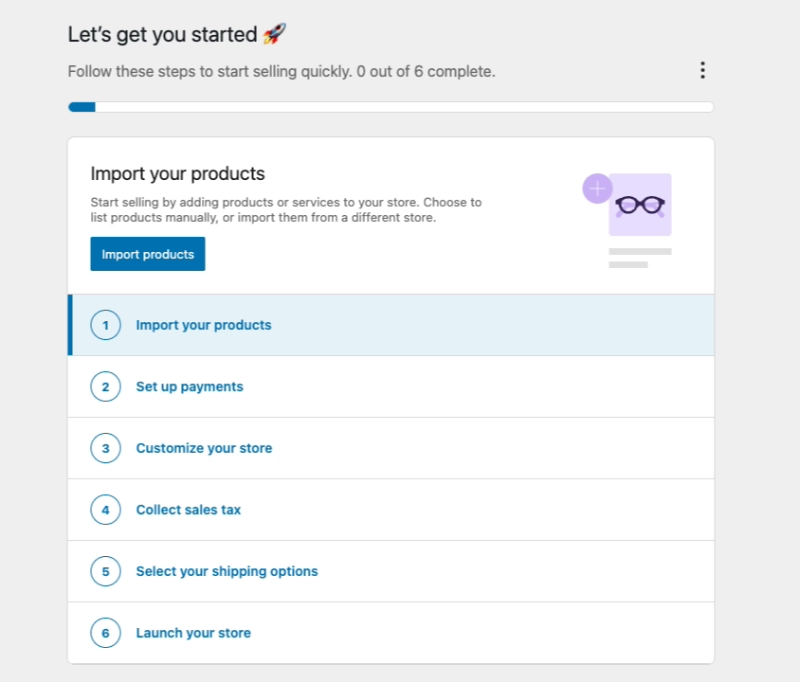
There are several ways to add products to WooCommerce:
- Starting with a template
- Manually adding each product
- Importing products via CSV
- Importing products from another service
One of the quickest ways is to import products from a CSV file, so let’s choose this option.
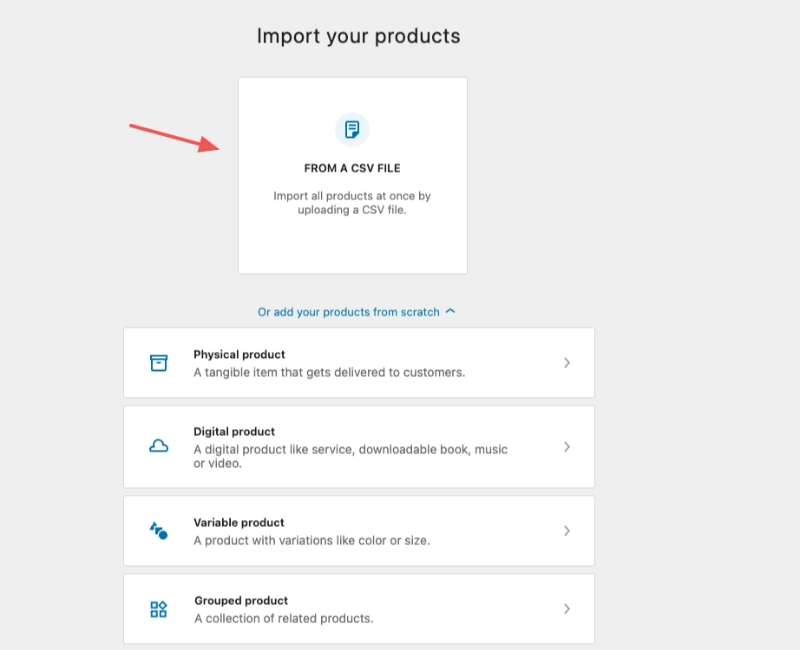
Choose your product CSV file and click Continue.
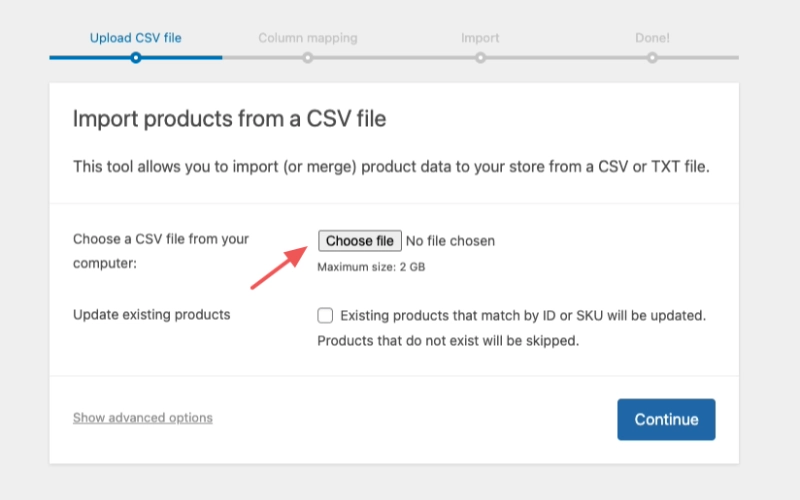
WooCommerce will ask you to map CSV fields to product fields like image, price, and description. Once mapped, click Run the Importer. Depending on your product count, this may take a few minutes.
Step 7: Configure Your WooCommerce Payment Methods
Go to your WordPress admin and click the Payments tab. Follow the setup instructions for each payment method. Stripe, PayPal, and others are available as suggested add-ons. Click Save Changes when done.
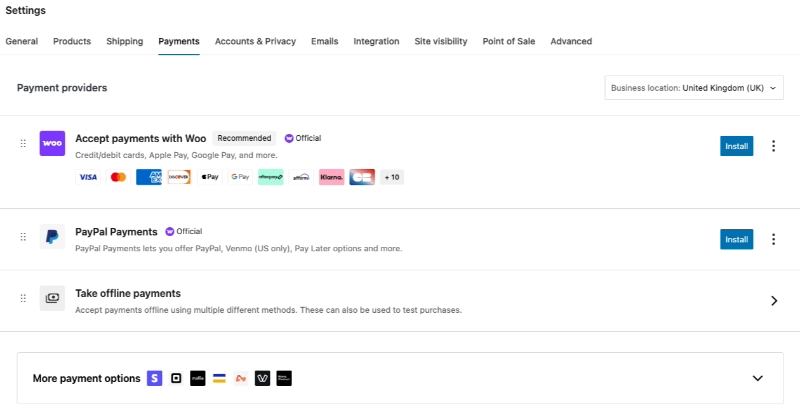
One thing worth noting for readers wondering about cost: WooCommerce itself is completely free. WooCommerce Payments (for accepting credit cards) is also free, with no monthly fee. You only pay per-transaction fees.
If you want a simpler option, WordPress Simple Shopping Cart is a free plugin for basic PayPal or Stripe stores without the full WooCommerce setup.
Now that your WooCommerce store is set up, you may be wondering about your shopping cart. WooCommerce automatically creates pages for the:
- Cart page
- Checkout page
- My account page
You don’t need to take any further action. But with a custom WooCommerce cart page, you can meaningfully increase sales and conversions.
According to Baymard Institute, nearly 7 in 10 shoppers abandon their cart before completing a purchase. By optimizing the default WooCommerce cart page, you can make more sales without increasing your current traffic.
When visitors have items in their cart, they are very close to finishing the purchase. Your WooCommerce cart page should do everything possible to make that happen.
With that in mind, let’s look at how to create a custom WooCommerce cart page with SeedProd.
How Do You Customize a WooCommerce Cart Page with SeedProd?
Once WooCommerce is set up, you can use SeedProd, a drag-and-drop website builder used by over 1 million websites, to design a custom shopping cart page that converts better.
It lets you build a custom WooCommerce cart page to make more sales without hiring a developer. You can also use it to create any landing page in WordPress, and even set up a WooCommerce coming soon page before launch.

Video Tutorial
Step 1: Install and Activate SeedProd
To get started, install and activate the SeedProd plugin. Click here to get started with SeedProd.
If you need help, follow this guide on how to install a WordPress plugin.
Note: There is a free version of SeedProd, but for this tutorial we’ll use the Pro version because it includes the WooCommerce blocks we need.
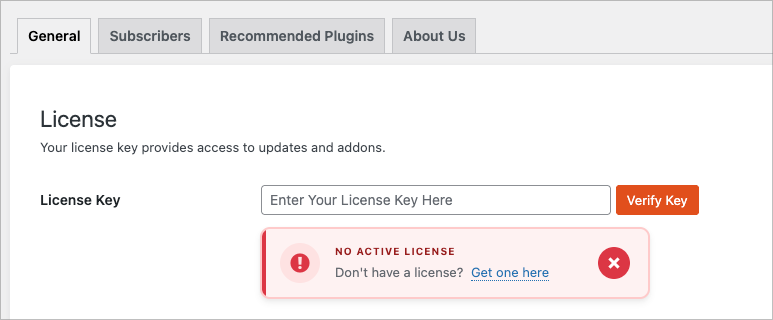
After activating the plugin, go to SeedProd » Settings and enter your product license key. You can find it in your account dashboard on the SeedProd website.
Step 2: Build a New Custom WooCommerce Cart Page
Once you’ve verified your license key, go to SeedProd » Pages and click the ‘Add New Landing Page’ button.
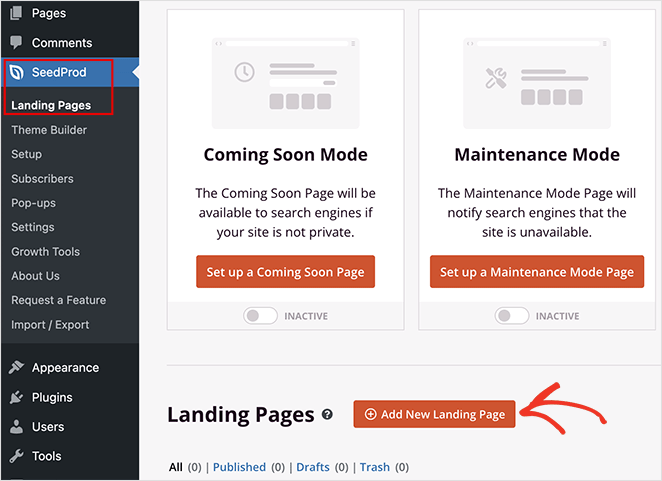
You’ll see a library of landing page templates you can use to add a premade design quickly.
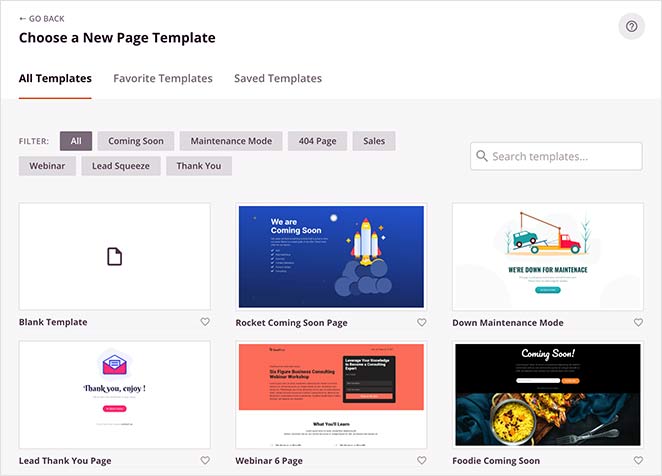
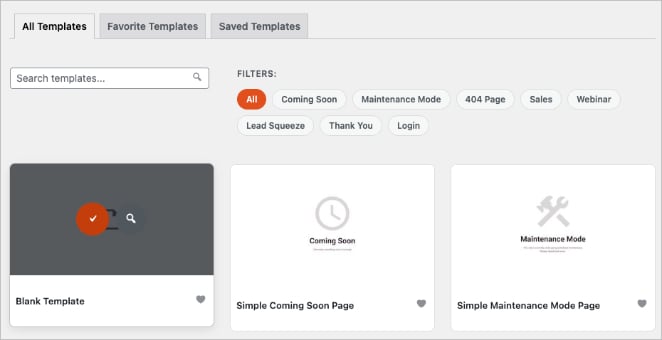
There are dozens of professionally designed templates for almost any business goal. Hover over a template and click the checkmark icon to select it.
We’ll use the Blank Template for this guide, as we want to add only the essential page elements.
In the popup that follows, enter a name for your shopping cart page. Then click Save and Start Editing the Page.
Step 3: Customize Your Cart Page Layout and Design
After naming your page, SeedProd opens the drag-and-drop builder where you’ll put together the key parts of your cart page.
Add a Logo
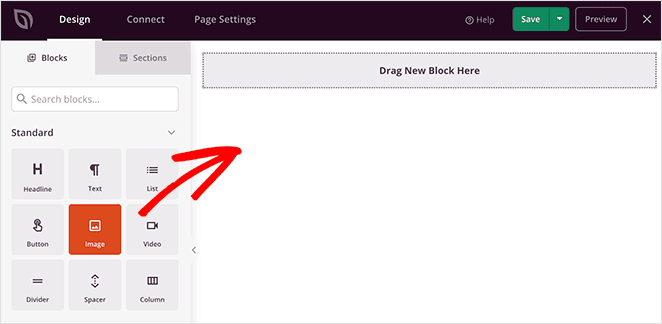
Start by adding an image block so you can upload a logo. You can adjust this block to look like your website’s header without making it a clickable link.
Keeping branding consistent and giving users fewer places to exit your page helps you reduce shopping cart abandonment.
Select the Image Block and drag it to your page preview on the right. Upload a logo from your computer or WordPress media library.
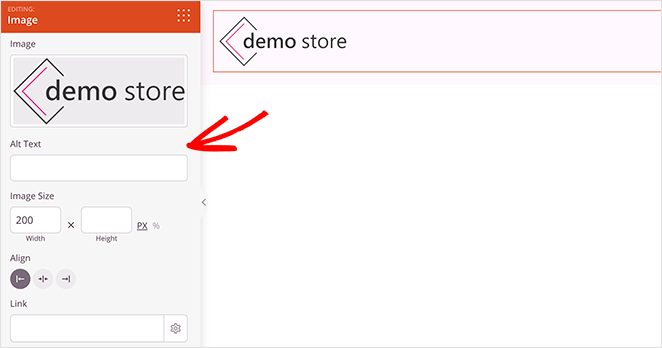
Clicking the block opens the left-hand panel where you can fully customize your logo size, alignment, and link behavior.
Add Your Shopping Cart
Now add a new column for your cart page layout. We chose the content and sidebar option in the “Choose your layout” section.
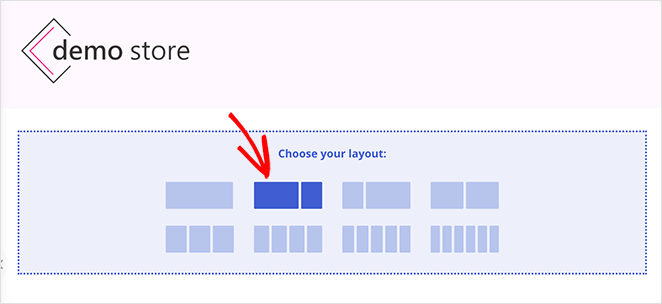
This layout gives you a section for your shopping cart and an area to display reviews and testimonials. Let’s add the cart first.
Scroll down to the WooCommerce blocks section. Drag the Cart block into the content column. Your WooCommerce cart displays in the preview automatically.
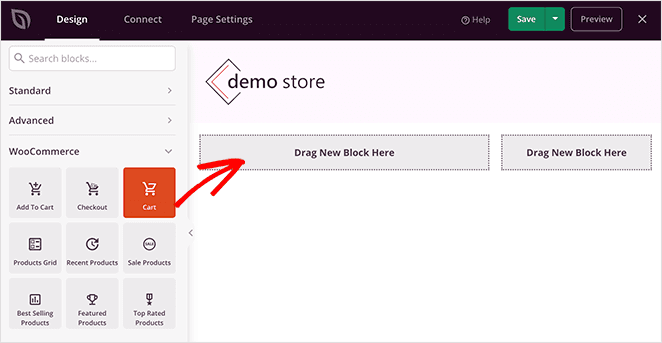
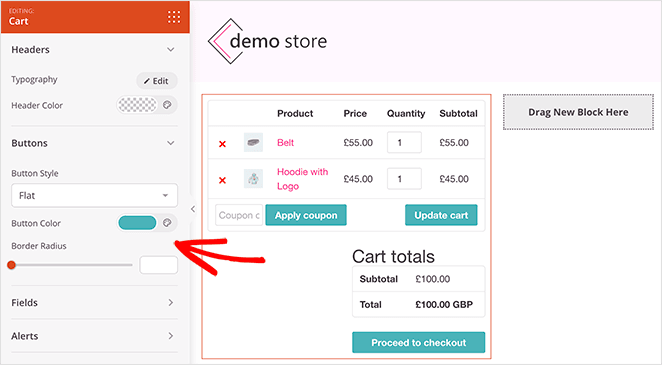
Clicking the block lets you customize every part of your cart: button labels, colors, field backgrounds, and more.
Include Customer Testimonials
Add the SeedProd Testimonials block to show social proof and convince users to check out from your sidebar column. Find it under Advanced blocks and drag it into place.
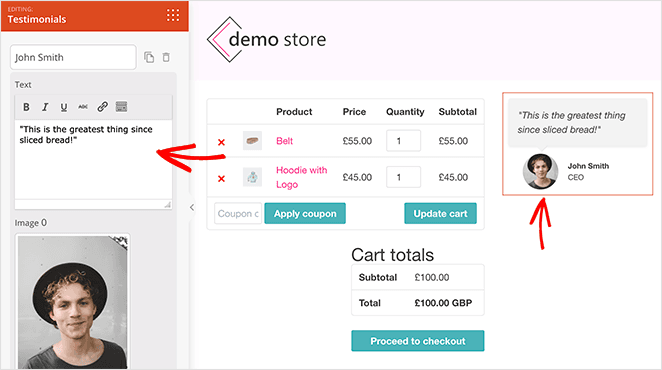
This block gives you full control over how testimonials look. You can add multiple testimonials, choose custom photos, and set up a sliding carousel.
To double down on social proof, add a Star Rating block below your testimonials.
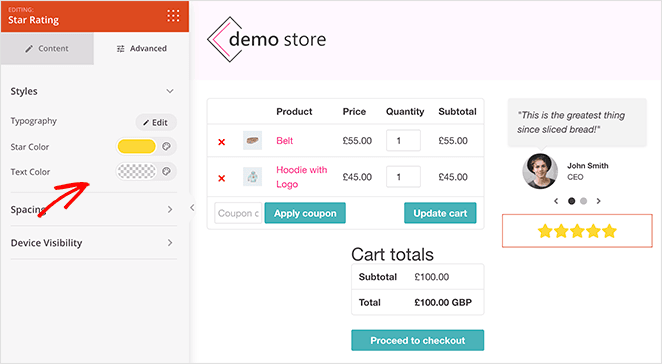
From there, you can customize the rating icon, colors, position, and more.
Conversion Tactics for Your Cart Page
If you want to encourage shoppers to act, you can add a scarcity timer to your cart. SeedProd’s Countdown Timer block adds a custom countdown clock that ticks down in real time.
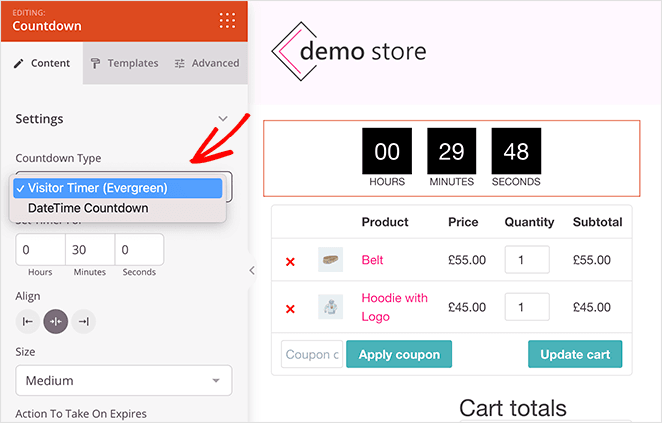
Drag the Countdown Timer block above your shopping cart. In the settings panel, choose the Visitor Timer option. This resets the timer for each individual visitor rather than using a shared global countdown.
That distinction matters because a visitor-specific timer creates genuine urgency because it’s tied to that shopper’s session, not a date that’s already passed. Standard WooCommerce doesn’t include this feature.
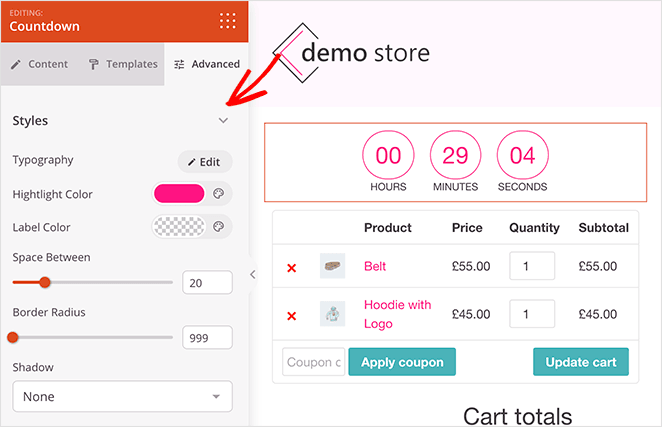
In the Advanced settings panel, you can match the timer colors to the rest of your cart design.
Add a headline above the timer notifying shoppers how long their cart will be reserved. Drag the Headline block into place and enter your text.
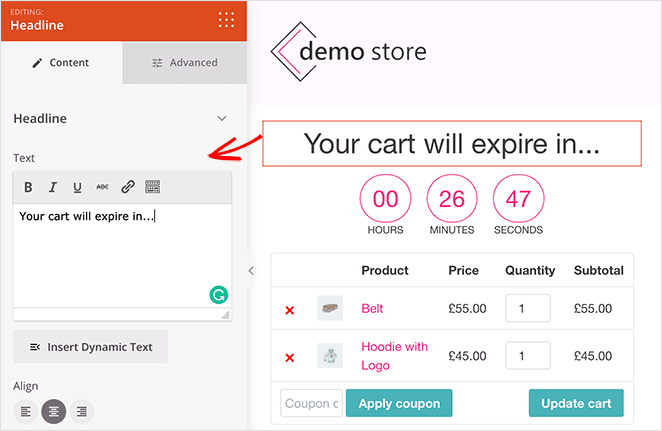
Remember: nearly 7 in 10 shoppers abandon before checkout. A visible countdown combined with social proof in the sidebar is one of the most effective ways to close that gap.
Add Popular Products
Another excellent feature you can add is a popular products section. This helps improve sales by recommending other products your customers may like.
Drag the Best Selling Products block from the WooCommerce section into your page.
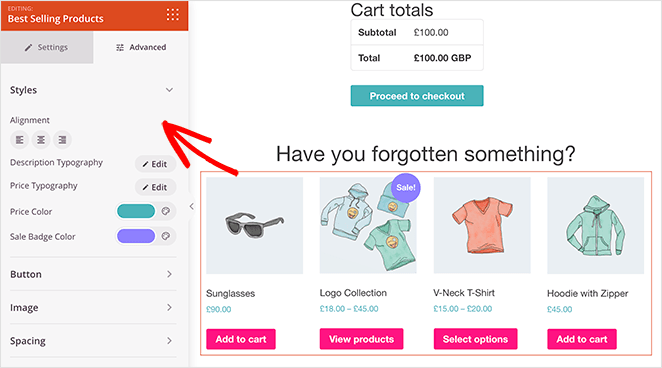
You can also add other product blocks to this area, including:
- Recent Products
- Sale Products
- Featured Products
- Top Rated Products
For more details on configuring these blocks, see our guide on how to display new products in WooCommerce.
Step 4: Publish and Connect Your Custom Cart Page in WooCommerce
When your custom cart design is finished, click the dropdown arrow next to the green Save button and click Publish.
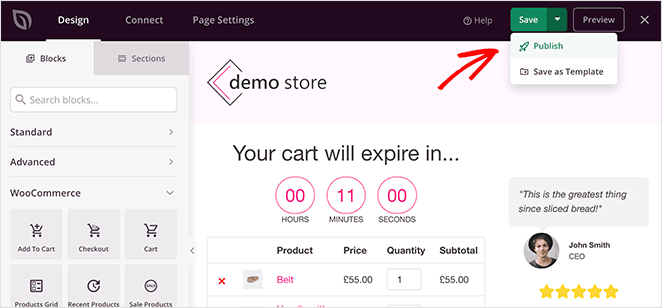
Before making your cart visible to customers, change your cart URL in WooCommerce settings.
Go to WooCommerce » Settings and click the Advanced tab.
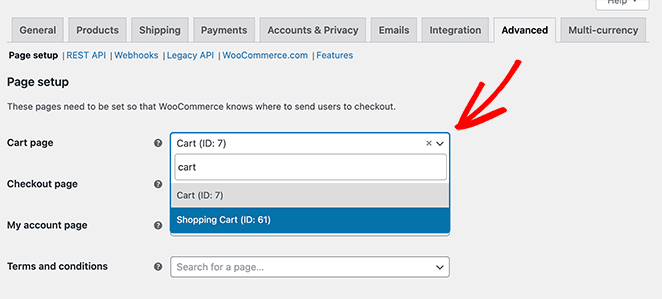
Select the new cart page URL you created with SeedProd and click Save Changes.
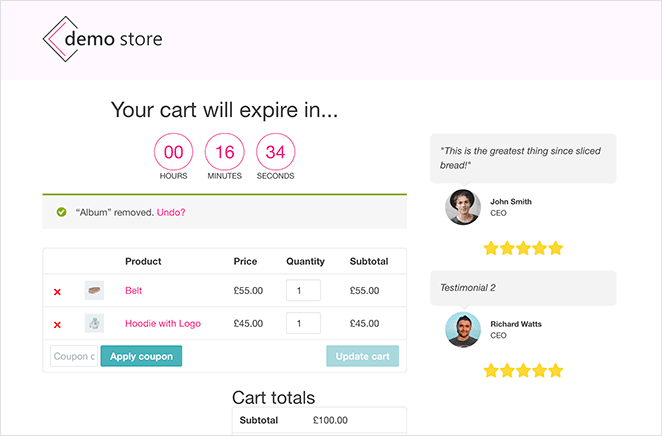
After clicking the Add to Cart button on a product page, shoppers can click “View Cart” and see your new custom cart design.
To track your WooCommerce cart conversions, see our guide on how to set up WooCommerce conversion tracking.
Getting your cart live is step one. Here’s how to make it convert.
How to Optimize Your WordPress Shopping Cart for More Sales
A live cart page is just the starting point. These five tactics can meaningfully increase the number of shoppers who actually complete their purchase.
- Show a cart icon in your header. Shoppers who can see what’s in their cart at a glance are less likely to lose track and leave. SeedProd supports this natively with the WooCommerce Cart block so the item count is always visible in your site header.
- Enable guest checkout. Forcing account creation before checkout is one of the biggest friction points in eCommerce. In WooCommerce, go to Settings » Accounts & Privacy and enable “Allow customers to place orders without an account.”
- Show transparent pricing. Surprise fees at checkout are the top reason shoppers abandon, according to Baymard Institute. Display shipping estimates and any fees on the cart page, before the customer reaches checkout.
- Add social proof near the cart. Testimonials and star ratings placed alongside the cart reduce the last-minute hesitation that kills conversions. The SeedProd sidebar layout from Step 3 is built exactly for this.
- Optimize for mobile. Most WooCommerce stores see 60% or more of their traffic on mobile. Test your cart on a phone before going live. SeedProd’s builder lets you preview and adjust mobile layouts without leaving the editor.
FAQs About WordPress Shopping Carts
Does WordPress have a built-in shopping cart?
No. WordPress doesn’t include a shopping cart by default. You need a plugin to add cart and checkout functionality to your site.
WooCommerce is the most widely used option. It’s free and automatically creates cart, checkout, and account pages when you install it.
Do I need WooCommerce to add a shopping cart to WordPress?
In most cases, yes. WooCommerce is the standard for WordPress eCommerce and powers the steps in this guide.
For very simple stores, WordPress Simple Shopping Cart is a free alternative that handles basic PayPal and Stripe transactions without the full WooCommerce setup.
Can I add a shopping cart to WordPress for free?
Yes. WooCommerce is free, and WooCommerce Payments (for accepting credit cards) has no monthly fee. You only pay per-transaction fees. The core shopping cart and checkout setup costs nothing.
SeedProd also has a free version, though the WooCommerce cart customization blocks covered in this guide require the Pro plan.
How do I add a WooCommerce cart to a page using a shortcode?
WooCommerce provides the [woocommerce_cart] shortcode to embed the cart on any page. Add a Shortcode block in the WordPress editor and paste it in.
Keep in mind this renders the default WooCommerce cart layout. For a custom design, use SeedProd’s WooCommerce Cart block instead.
How do I reduce cart abandonment on my WordPress store?
The most effective tactics are enabling guest checkout, showing transparent pricing before checkout, and adding social proof near the cart. A visitor-specific countdown timer (available in SeedProd) also creates real urgency without a fake deadline.
For a full breakdown of conversion tactics, see the “How to Optimize Your WordPress Shopping Cart for More Sales” section above.
Your WooCommerce store is live and your cart page is optimized for conversions. If you want more control over how your cart converts, SeedProd makes it straightforward to build and test custom layouts without code. Get SeedProd now to start.
You might also like this step-by-step tutorial on how to enable maintenance mode for WooCommerce shop pages.
Thanks for reading! We’d love to hear your thoughts, so please feel free to join the conversation on YouTube, X and Facebook for more helpful advice and content to grow your business.