
TL;DR:
Most WooCommerce stores under-count their sales. Here is how to set up tracking that catches more of them, starting with the easy method and adding the parts that close the gap.
- Install MonsterInsights: connect WordPress to your Google Analytics 4 account in a few clicks.
- Turn on eCommerce tracking: the MonsterInsights eCommerce addon records WooCommerce purchase events for you.
- Add your ad platforms: connect Google Ads and the Meta Pixel so paid sales get attributed.
- Catch what pixels miss: server-side tracking recovers sales lost to ad blockers, iOS, and consent rules.
- Verify and troubleshoot: place a test order, then compare a day of WooCommerce orders against GA4.
Want to understand which products drive the most revenue in your WooCommerce store? With WooCommerce conversion tracking, you can see where your sales come from, what is working, and where shoppers drop off.
Here is the part most guides skip. Accurate tracking in 2026 is less about installing one plugin and more about catching the sales your pixels never see.
In this guide, I will walk you through the easy starting method with Google Analytics and MonsterInsights, the plugins I use myself, then show you the extra steps that stop your store from under-counting its sales.
- Why Set Up WooCommerce Conversion Tracking?
- How to Set Up WooCommerce Conversion Tracking (Step by Step)
- What Is Server-Side Conversion Tracking (and Do You Need It)?
- Why Your WooCommerce Conversions Are Not Showing Up
- Add Conversion Tracking to a Custom Thank You Page with SeedProd
- How to Boost Your WooCommerce Conversions
- WooCommerce Conversion Tracking FAQs
Why Set Up WooCommerce Conversion Tracking?
If you are running a WooCommerce store, you need to know what is working and what is not. That is exactly what WooCommerce conversion tracking helps with.
It shows you which products drive the most revenue, where customers drop off, and how your marketing is performing.
Say someone finds your site through a Google ad, clicks a product, adds it to their cart, then leaves. Without conversion tracking, you would have no idea what happened.
With it, you can see every step: product views, checkout behavior, abandoned carts, and completed purchases.
Using tools like Google Analytics and MonsterInsights, you can track key eCommerce metrics like:
- Average order value: see how much each customer spends on average.
- Revenue by traffic source: find out which marketing channels actually lead to sales.
- Cart and checkout abandonment: spot where people give up before buying.
- Product and sales performance: track which items convert the best and when.
How to Set Up WooCommerce Conversion Tracking (Step by Step)
There are plenty of WooCommerce conversion tracking plugins to choose from. Yet most are hard to set up and have limited settings.
That is not helpful if you are a new store owner without analytics experience. So we will start with the easiest method, then build toward a setup that catches more of your sales.
The easiest way to start tracking your WooCommerce store is with the MonsterInsights plugin for WordPress.
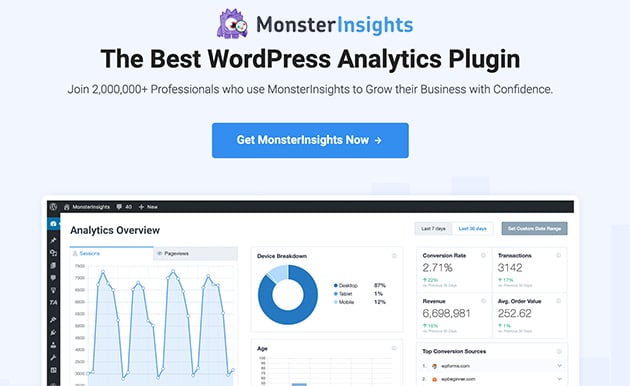
MonsterInsights is a complete Google Analytics plugin for WordPress. With the eCommerce addon, you can turn on the Enhanced eCommerce setting in Google Analytics with a few clicks and no custom coding.
For you, that means no tracking codes or JavaScript scripts to copy, and no complicated configurations to set up your store.
With that in mind, follow the steps below to set up conversion tracking for your WooCommerce site.
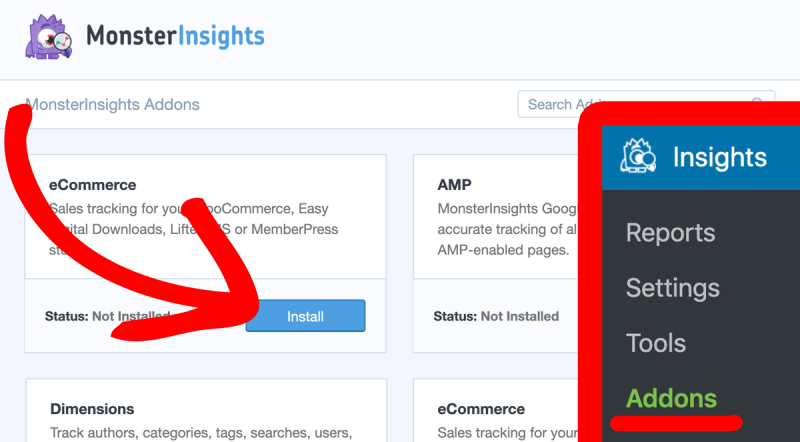
Step 1: Install MonsterInsights to Track WooCommerce Conversions
First, click the Add New button from your WordPress dashboard and install the MonsterInsights plugin, then connect MonsterInsights to Google Analytics.
That ensures your website and Google Analytics are communicating with each other.
Step 2: Enable eCommerce Conversion Tracking with MonsterInsights Addon
Next, install the MonsterInsights eCommerce addon, which lets you enable eCommerce tracking for your store and view reports inside your WordPress admin.
With both the MonsterInsights plugin and eCommerce addon installed, and Google Analytics 4 connected, that is it. You are now tracking purchase events in WordPress.
Step 3 (Optional): Set Up Google Ads Conversion Tracking for WooCommerce
If you have a Google Ads account ID and run ad campaigns, you can set up PPC conversion tracking in MonsterInsights.
To do that, go to Insights » Settings » Conversions, turn on PPC ads tracking, and add your Conversion ID and your Conversion Label.
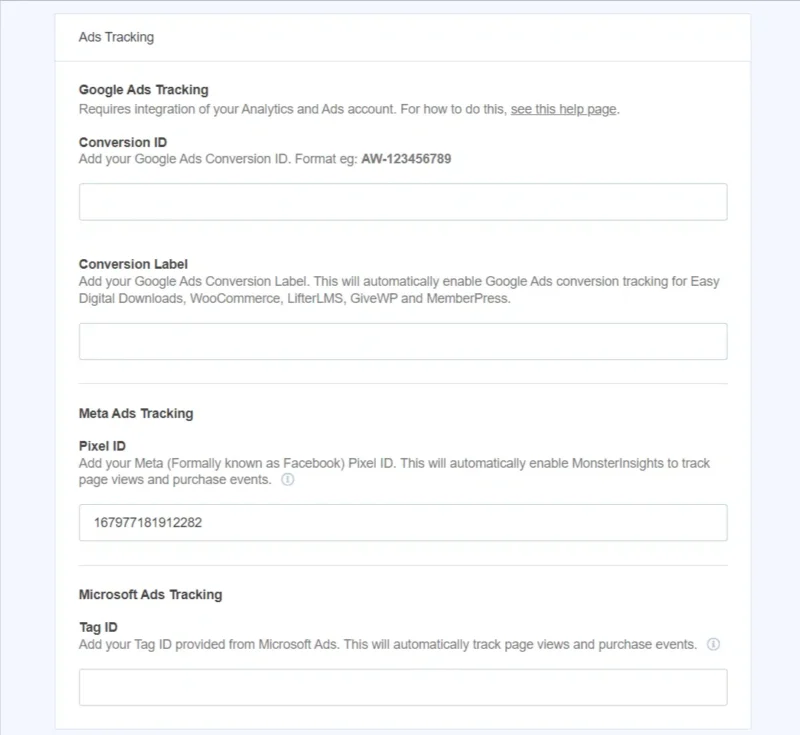
Google Ads is not the only ad platform that needs its own tracking, though. If you run Facebook or Instagram ads, the Meta Pixel needs the same attention.
Track WooCommerce Conversions with the Meta Pixel
If you advertise on Facebook or Instagram, the Meta Pixel tracks the same key actions in your store: add-to-cart, checkout started, and purchase.
You add it with a dedicated WooCommerce plugin or through Meta’s own setup, then map each store event to the matching pixel event.
One thing to know is, the browser pixel alone now under-reports your sales. Ad blockers and iOS privacy settings stop a chunk of those events from ever firing.
That is what the Meta Conversions API (CAPI) fixes. It sends purchase data to Meta from your server as well as the browser, so fewer sales fall through the cracks.
The Other Way People Do This: Google Tag Manager
A plugin like MonsterInsights is the simplest route for most stores. The other common method is Google Tag Manager (GTM).
GTM is a free tool that holds all your tracking tags in one place. You manage GA4, Google Ads, and the Meta Pixel from a single dashboard instead of separate plugins.
GTM is the right call when you send data to several platforms or want full control over how each event fires. For a single store on GA4, the plugin method is faster and easier to keep working.
Step 4: View WooCommerce Conversion Data in WordPress Reports
To view your store’s conversion tracking data in your WordPress dashboard, head to Insights » Reports » WooCommerce.
From there, you will see an overview of your top products with the sales percentage and total revenue.
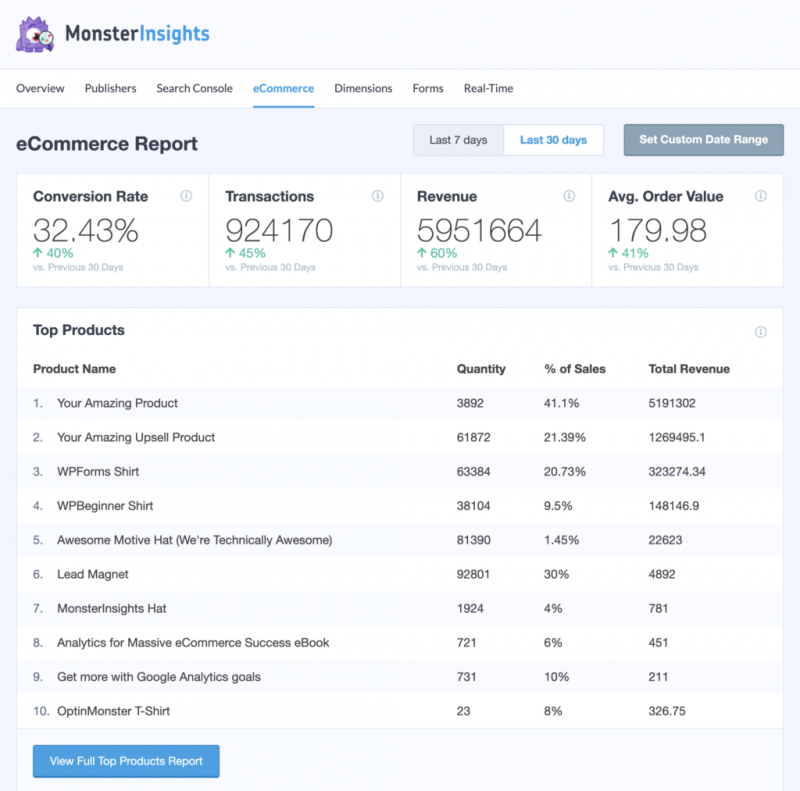
Scroll further down the page and you will see your top conversion event sources and your shopper behavior.
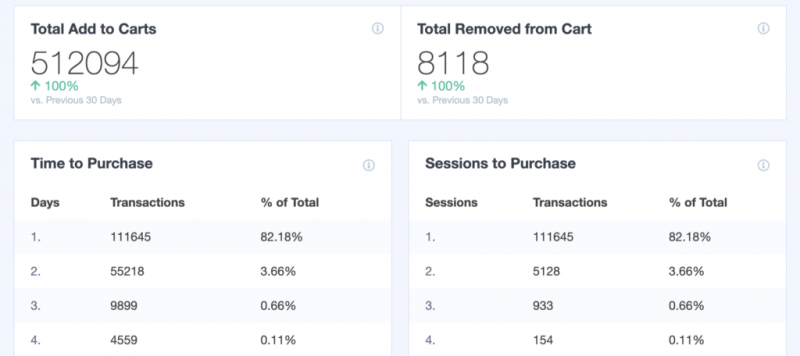
With these reports, you get a clear overview of your online store’s health without leaving your WordPress dashboard.
If you would rather track conversions and see the data in Google Analytics, follow the next step.
Step 5: Check WooCommerce Sales in Google Analytics 4
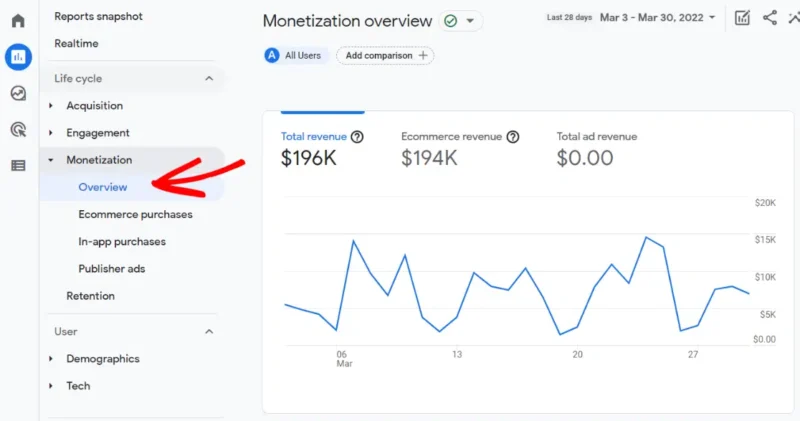
To find your WooCommerce conversion data in Google Analytics, open your analytics profile and go to Monetization » Overview.
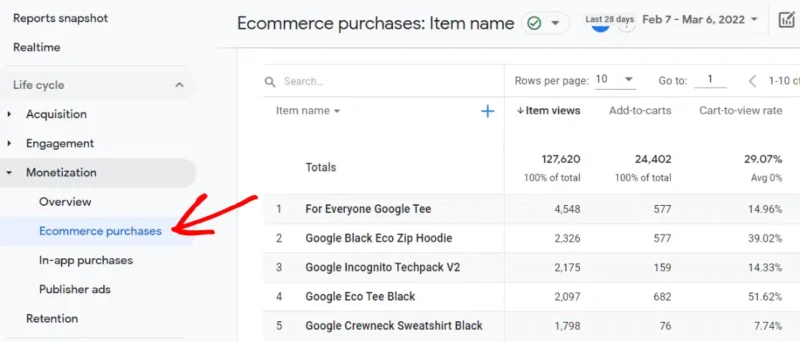
For a more detailed look at items purchased, go to Monetization » Ecommerce purchases.
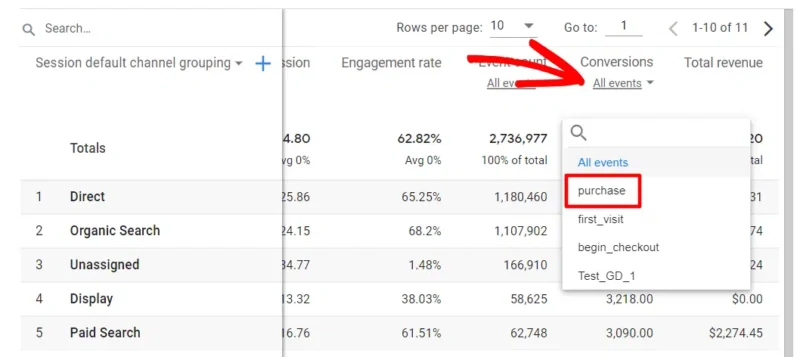
To see your GA4 eCommerce sales and revenue organized by channel, head to Acquisition » Traffic acquisition.
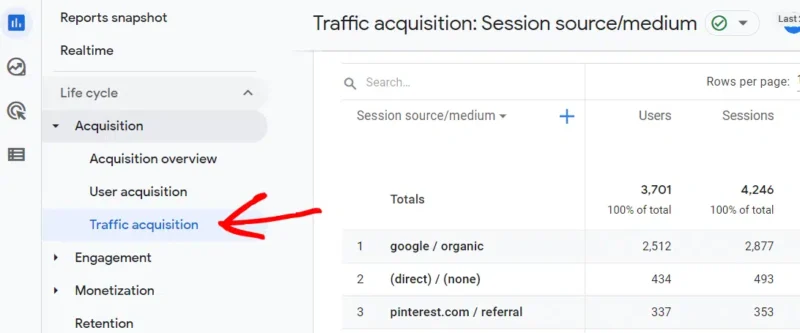
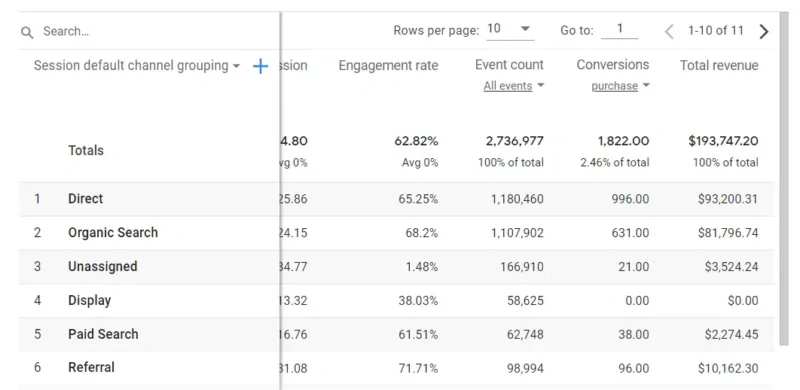
Scroll down to the right to find Conversions and Total Revenue. Click the All Events drop-down arrow under Conversions and select Purchase.
The table will now show your total purchases and revenue by traffic channel.
Try a OnePageGA 14-Day Free Trial
How to Check Your Tracking Is Actually Working
Before you trust any of this data, confirm the tracking actually fires. The fastest check is to place a small test order yourself.
You can also watch it live in GA4 DebugView or with Google Tag Assistant. Both show you each event as it happens on your site.
What you want to see is one purchase event, fired once, with the correct order value. A purchase that fires twice will double-count your revenue.
For a wider check, compare one day of WooCommerce orders against the same day in GA4 or Google Ads. A match of about 85 to 90 percent is healthy, since some loss is normal.
Ready to track every sale?
Build a custom WooCommerce thank you page you can actually track
SeedProd’s drag-and-drop builder lets you design a branded order-received page and drop your own GA4, Ads, or Pixel code onto it. No theme files, no code editor.
Start Building FreeWhat Is Server-Side Conversion Tracking (and Do You Need It)?
GA4 shows you what it can see, but it does not see every sale. Server-side tracking is how you catch the ones it misses.
Standard tracking runs in the visitor’s browser. That browser code can be blocked, which means real sales go uncounted.
Server-side tracking sends the same purchase data from your own server instead. Because it does not depend on the browser, far less gets lost.
That gap is bigger than most store owners expect. Server-side tracking can recover roughly 15 to 30 percent of conversions lost to three things:
- Ad blockers: browser extensions that stop tracking scripts from loading at all.
- iOS and ITP: Safari and iPhone privacy features that limit how long tracking lasts.
- Consent choices: shoppers who decline cookies, which blocks the browser tags from firing.
You do not need this on day one. It is worth the effort once your ad spend is high enough that a 15 to 30 percent reporting gap means real money.
When you are ready, the two common routes are a Google Tag Manager server container or a dedicated server-side tracking plugin for WooCommerce. MonsterInsights does not do server-side tracking on its own, so this is a separate step.
Why Your WooCommerce Conversions Are Not Showing Up
If your numbers look too low or nothing shows at all, the cause is usually one of a few common problems. Work through these before assuming the setup is broken.
- Caching on the checkout or thank-you page: a cached order-received page can stop the purchase event from firing. Exclude those pages from your cache.
- Duplicate plugins firing the same event: two tracking plugins can both send a purchase, which double-counts revenue. Pick one tool per platform. If you run several, our guide to the best WooCommerce plugins can help you trim the stack.
- Consent blocking the tags: if a shopper declines cookies, the browser tags will not fire. This is expected, not a bug, but it lowers your counts.
- Order and analytics mismatch: WooCommerce counts an order the moment it is placed, while GA4 may attribute it differently. Small gaps between the two are normal.
Add Conversion Tracking to a Custom Thank You Page with SeedProd
The order-received page is where a sale actually completes, so it is the natural home for your purchase tracking. The default WooCommerce thank-you page is plain and hard to customize.
SeedProd is a drag-and-drop website builder for WordPress. You can use it to build a custom WooCommerce thank you page that matches your brand, then add your GA4, Google Ads, or Meta Pixel code straight onto that page.

That gives you one clear page where the purchase event lives, instead of tracking code scattered across theme files. It is also a good spot for a thank-you message, a discount for the next order, or related products.
How to Boost Your WooCommerce Conversions
Once you have set up WooCommerce conversion tracking, the next step is using that data to improve your store’s performance. Here are a few practical ways to turn more visitors into paying customers:
1. Improve Site Speed and Performance
A one-second delay can cause about a 7 percent drop in conversions, according to Akamai’s online retail performance research. A slow store makes visitors leave before they even see your products.
Compress your images, use a fast theme, and follow our guide to speed up WooCommerce for better results.
2. Reduce Cart Abandonment
Online stores lose about 70 percent of potential sales to cart abandonment, as we cover in our guide on why it happens and how to fix it.
Set up recovery emails, simplify your checkout, and use popups or coupons to encourage users to complete their purchase.
3. Capture Lost Leads with Email
Not every visitor is ready to buy. Instead of losing them forever, offer a simple way to stay in touch, like a discount in exchange for their email.
You can start building an email list with just one opt-in form and a lead magnet.
4. Show Social Proof and Trust Signals
Reviews, testimonials, and trust badges all help people feel safe buying from your store. Add these to product pages, your homepage, and even near your checkout.
It is one of the fastest ways to improve WooCommerce conversions with very little effort.
5. Use Upsells and Cross-Sells
If someone is ready to buy, do not miss the chance to offer more. Recommend related products, bundles, or upgrades right before they check out.
This can raise your average order value without extra traffic or ad spend.
WooCommerce Conversion Tracking FAQs
Why are my WooCommerce conversions not showing in Google Ads or GA4?
The usual causes are caching on the thank-you page, two plugins firing the same event, or shoppers declining cookies, which blocks the browser tags. Start by clearing your cache, exclude the order-received page, and confirm you only have one tracking tool per platform.
Do I need Google Tag Manager to track WooCommerce conversions?
No. A plugin like MonsterInsights handles GA4 and WooCommerce tracking without it. Google Tag Manager is worth it when you send data to several platforms or want full control over how each tag fires. For a single store on GA4, the plugin route is simpler.
What is server-side conversion tracking and do I need it for WooCommerce?
Server-side tracking sends purchase data from your server instead of the visitor’s browser, so ad blockers and privacy settings cannot block it. It can recover roughly 15 to 30 percent of lost conversions. You do not need it early on, but it pays off once your ad spend is high.
How accurate is WooCommerce conversion tracking, and why do the numbers not match my orders?
Some loss is normal, so aim for about an 85 to 90 percent match between your WooCommerce orders and GA4. The gap comes from ad blockers, declined cookies, and the different ways WooCommerce and GA4 count an order. A bigger gap usually points to a caching or duplicate-event issue.
Start Tracking Every WooCommerce Sale
You now have a setup that catches far more of your sales than a single pixel ever could. If you are still building the store itself, see our guide on how to create an online store in WordPress.
And if you liked this article, don’t forget to like us on Facebook and follow our Twitter account for more helpful WordPress guides.


