TL;DR:
ほとんどのWooCommerceストアでは売上が過小評価されています。ここでは、簡単な方法から始めて、ギャップを埋める部分を追加して、より多くの売上をキャッチする測定を設定する方法を説明します。
- MonsterInsightsをインストール:数回のクリックでWordPressをGoogle Analytics 4アカウントに接続します。
- eCommerce測定を有効化:MonsterInsights eCommerceアドオンがWooCommerceの購入イベントを記録します。
- 広告プラットフォームを追加:Google広告とMetaピクセルを接続して、有料広告による売上を正確に記録します。
- ピクセルが見逃すものをキャッチ:サーバーサイド測定により、広告ブロッカー、iOS、同意ルールで見逃された売上を回復します。
- 確認とトラブルシューティング:テスト注文を行い、WooCommerceの1日の注文数とGA4のデータを比較します。
WooCommerceストアで最も収益を上げている商品を知りたいですか?WooCommerceコンバージョン測定を使用すると、売上の出所、何がうまくいっていて、どこで買い物客が離脱しているかを確認できます。
ほとんどのガイドがスキップする部分です。2026年の正確な測定は、単一のプラグインをインストールすることよりも、ピクセルが見ることのない売上をキャッチすることに重点が置かれます。
このガイドでは、私が自分で使用しているプラグインであるGoogle AnalyticsとMonsterInsightsを使用した簡単な開始方法を説明し、その後、ストアの売上の過小評価を防ぐための追加の手順を示します。
WooCommerceコンバージョン測定を設定する理由
WooCommerceストアを運営しているなら、何がうまくいっていて何がうまくいっていないかを知る必要があります。それこそがWooCommerceコンバージョン測定が役立つことです。
最も収益を上げている商品、顧客がどこで離脱しているか、マーケティングがどのように機能しているかを示します。
例えば、誰かがGoogle広告経由であなたのサイトを見つけ、商品をクリックし、カートに追加してから離脱したとします。コンバージョン測定がなければ、何が起こったのか全く分かりません。
それがあれば、商品閲覧、チェックアウト行動、カート放棄、購入完了など、すべてのステップを確認できます。
Google AnalyticsやMonsterInsightsのようなツールを使用すると、次のような主要なeCommerce指標を測定できます。
- 平均注文額:顧客一人あたりの平均支出額を確認します。
- トラフィックソース別の収益:どのマーケティングチャネルが実際に売上につながっているかを把握します。
- カートとチェックアウトの放棄:購入前に離脱する場所を特定します。
- 商品と売上のパフォーマンス:どの商品が最もよく売れ、いつ売れるかを測定します。
WooCommerceコンバージョン測定の設定方法(ステップバイステップ)
WooCommerceコンバージョン測定プラグインはたくさんありますが、ほとんどは設定が難しく、設定項目も限られています。
分析経験のない新しいストアオーナーにとっては、それは役に立ちません。そのため、最も簡単な方法から始め、より多くの売上をキャッチする設定に向けて構築していきます。
WooCommerceストアのトラッキングを開始する最も簡単な方法は、WordPress用のMonsterInsightsプラグインを使用することです。
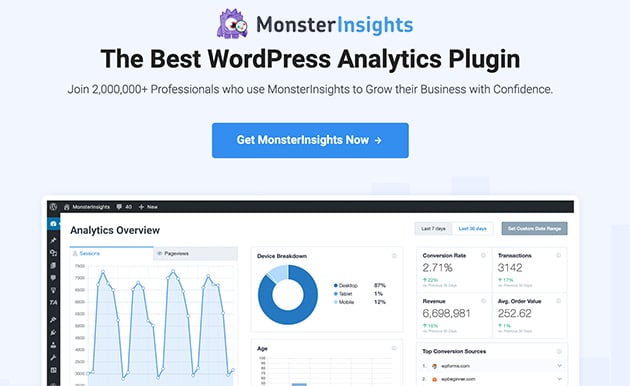
MonsterInsightsは、WordPress用の完全なGoogleアナリティクスプラグインです。eCommerceアドオンを使用すると、カスタムコーディングなしで数回のクリックでGoogleアナリティクスで拡張eコマース設定を有効にできます。
つまり、コピーするトラッキングコードやJavaScriptスクリプトがなく、ストアを設定するための複雑な構成も不要になります。
これを念頭に置いて、以下の手順に従ってWooCommerceサイトのコンバージョン追跡を設定してください。
ステップ1:MonsterInsightsをインストールしてWooCommerceコンバージョンを測定する
まず、WordPressダッシュボードから「新規追加」ボタンをクリックしてMonsterInsightsプラグインをインストールし、次にMonsterInsightsをGoogleアナリティクスに接続します。
これにより、ウェブサイトとGoogleアナリティクスが互いに通信するようになります。
ステップ2:MonsterInsightsアドオンでeコマースコンバージョン測定を有効にする
次に、MonsterInsights eコマースアドオンをインストールします。これにより、ストアのeコマース測定を有効にし、WordPress管理画面内でレポートを表示できます。
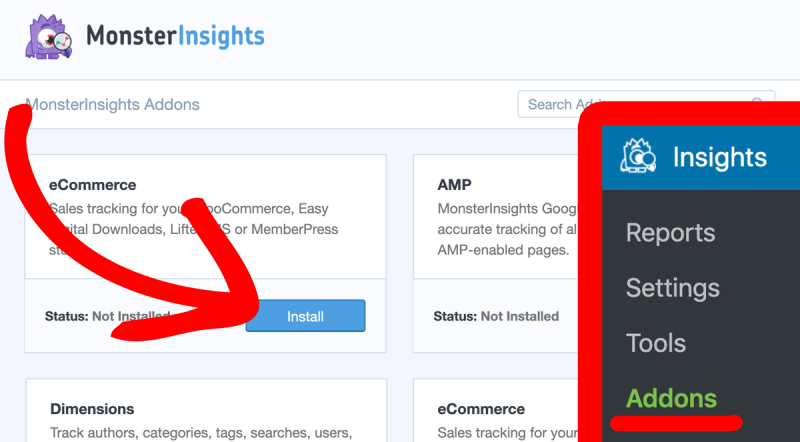
MonsterInsightsプラグインとeCommerceアドオンの両方がインストールされ、Googleアナリティクス4が接続されると、完了です。これでWordPressで購入イベントを追跡できるようになりました。
ステップ3(オプション):WooCommerceのGoogle広告コンバージョン測定を設定する
Google広告アカウントIDをお持ちで、広告キャンペーンを実行している場合は、MonsterInsightsでPPCコンバージョン追跡を設定できます。
これを行うには、インサイト » 設定 » コンバージョンに移動し、PPC広告追跡をオンにして、コンバージョンIDとコンバージョンラベルを追加します。
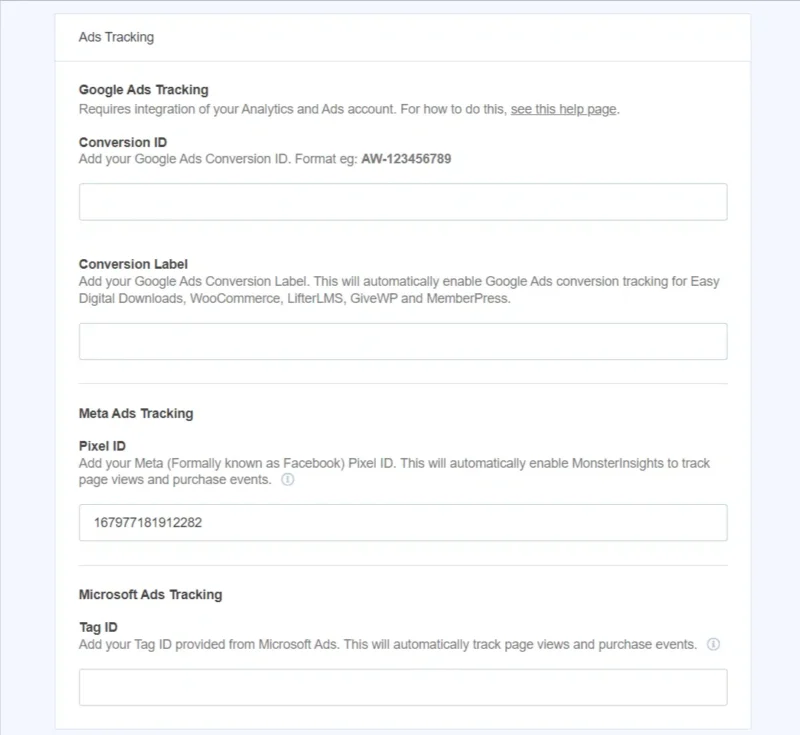
ただし、独自の追跡が必要な広告プラットフォームはGoogle広告だけではありません。FacebookまたはInstagram広告を実行している場合は、Metaピクセルも同様の注意が必要です。
MetaピクセルでWooCommerceコンバージョンを追跡する
FacebookまたはInstagramで広告を掲載している場合、Metaピクセルはストア内のカート追加、チェックアウト開始、購入といった同じ主要なアクションを追跡します。
専用のWooCommerceプラグインを使用するか、Meta独自のセットアップを通じて追加し、各ストアイベントを対応するピクセルイベントにマッピングします。
注意点として、ブラウザピクセルだけでは現在、売上が過少報告されています。広告ブロッカーやiOSのプライバシー設定により、これらのイベントの一部はまったく発生しなくなります。
これはMetaコンバージョンAPI(CAPI)が解決することです。ブラウザだけでなくサーバーからもMetaに購入データを送信するため、見逃される売上が少なくなります。
他の人々が行う方法:Googleタグマネージャー
MonsterInsightsのようなプラグインは、ほとんどのストアにとって最も簡単な方法です。もう1つの一般的な方法は、Googleタグマネージャー(GTM)です。
GTMは、すべてのトラッキングタグを1か所にまとめる無料ツールです。個別のプラグインではなく、単一のダッシュボードからGA4、Google広告、Metaピクセルを管理します。
複数のプラットフォームにデータを送信する場合や、各イベントの発生方法を完全に制御したい場合は、GTMが適しています。GA4の単一ストアの場合は、プラグイン方式の方が維持が速く簡単です。
ステップ4:WordPressレポートでWooCommerceコンバージョンデータを表示する
WordPressダッシュボードでストアのコンバージョン測定データを表示するには、インサイト » レポート » WooCommerceに移動します。
そこから、売上パーセンテージと総収益とともに、トップ製品の概要が表示されます。
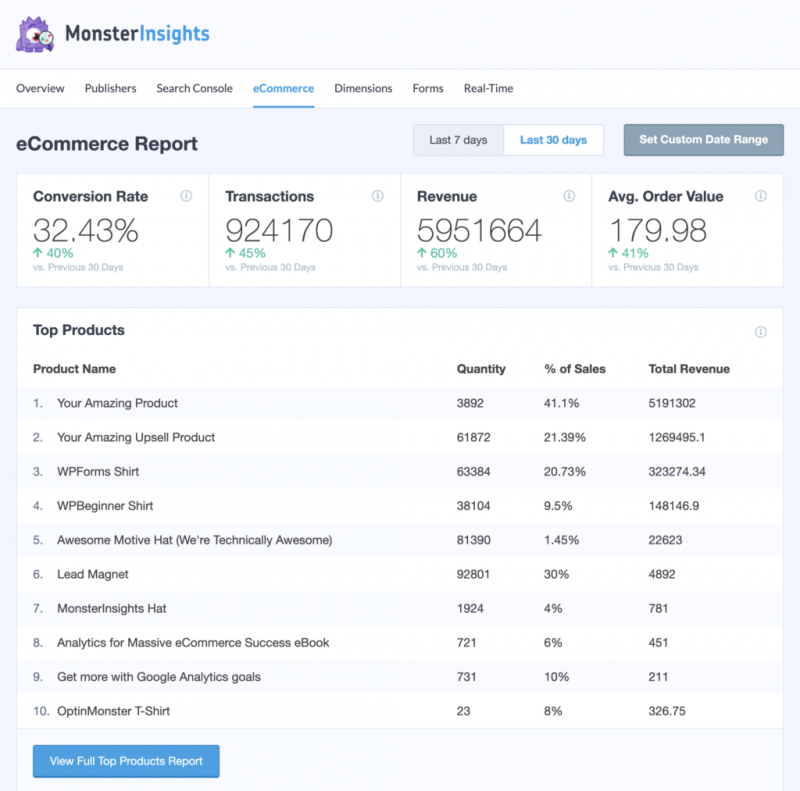
さらにページを下にスクロールすると、トップコンバージョンイベントソースと買い物客の行動が表示されます。
これらのレポートを使用すると、WordPressダッシュボードを離れることなく、オンラインストアの健全性を明確に把握できます。
コンバージョンを追跡し、Googleアナリティクスでデータを確認したい場合は、次の手順に従ってください。
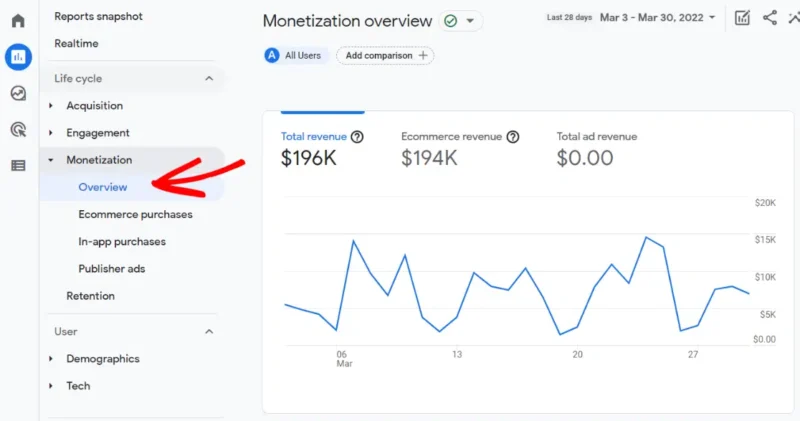
ステップ5:Googleアナリティクス4でWooCommerceの売上を確認する
GoogleアナリティクスでWooCommerceのコンバージョンデータを見つけるには、アナリティクスプロファイルを開き、収益化 » 概要に移動します。
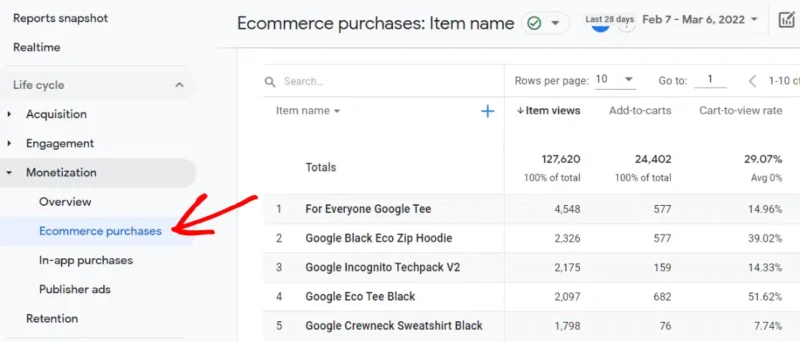
購入された商品に関する詳細を確認するには、収益化 » Eコマース購入に移動します。
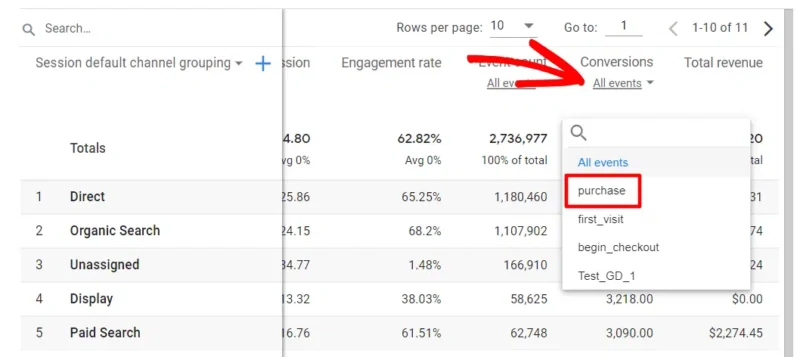
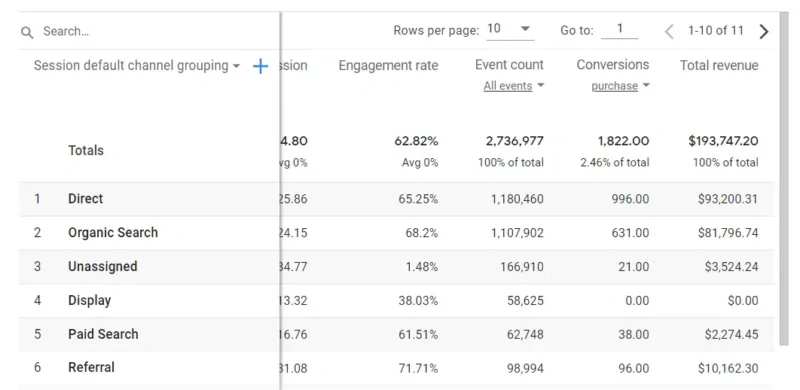
チャネル別に整理されたGA4のEコマース売上と収益を確認するには、集客 » トラフィック獲得状況に移動します。
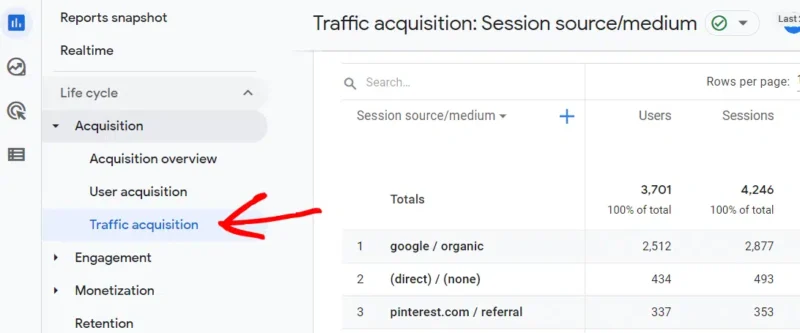
右にスクロールしてコンバージョンと総収益を見つけます。コンバージョン下のすべてのイベントドロップダウン矢印をクリックし、購入を選択します。
これで、テーブルにトラフィックチャネル別の総購入数と収益が表示されます。
トラッキングが実際に機能しているかを確認する方法
これらのデータのいずれかを信頼する前に、トラッキングが実際に機能していることを確認してください。最も簡単な確認方法は、自分で小さなテスト注文をすることです。
GA4のDebugViewまたはGoogle Tag Assistantでライブで確認することもできます。どちらも、サイトでイベントが発生するたびに表示されます。
確認したいのは、購入イベントが1回だけ発生し、正しい注文金額が表示されていることです。購入が2回発生すると、収益が2倍にカウントされます。
より広範な確認のために、WooCommerceの注文の1日分をGA4またはGoogle広告の同じ日と比較してください。約85〜90パーセントの一致は健全ですが、ある程度の損失は正常です。
すべての販売を追跡する準備はできましたか?
実際に追跡できるカスタムWooCommerceサンキューページを作成する
SeedProdのドラッグアンドドロップビルダーを使用すると、ブランド化された注文受付ページをデザインし、独自のGA4、広告、またはピクセルコードをドロップできます。テーマファイルやコードエディターは不要です。
無料で作成を開始サーバーサイドコンバージョン測定とは(そして必要ですか)?
GA4は見えるものを表示しますが、すべての販売を見ているわけではありません。サーバーサイドトラッキングは、見逃されたものをキャッチする方法です。
標準トラッキングは訪問者のブラウザで実行されます。そのブラウザコードはブロックされる可能性があり、実際の販売がカウントされないままになる可能性があります。
サーバーサイドトラッキングは、同じ購入データを独自のサーバーから送信します。ブラウザに依存しないため、失われるものがはるかに少なくなります。
このギャップは、ほとんどのストアオーナーが予想するよりも大きいです。サーバーサイドトラッキングは、3つの要因によって失われたコンバージョンの約15〜30パーセントを回復できます。
- 広告ブロッカー: トラッキングスクリプトの読み込みを完全に停止するブラウザ拡張機能。
- iOSとITP: トラッキングの持続時間を制限するSafariとiPhoneのプライバシー機能。
- 同意の選択: クッキーを拒否する買い物客は、ブラウザタグの実行をブロックします。
初日からこれが必要なわけではありません。広告費が十分に高くなり、15〜30パーセントのレポートギャップが実際のお金を意味するようになれば、労力に見合う価値があります。
準備ができたら、一般的な2つのルートはGoogleタグマネージャーのサーバーコンテナまたはWooCommerce専用のサーバーサイドトラッキングプラグインです。MonsterInsightsは単独ではサーバーサイドトラッキングを行わないため、これは別のステップになります。
WooCommerceコンバージョンが表示されない理由
数値が低すぎる、または何も表示されない場合は、通常、いくつかの一般的な問題のいずれかが原因です。セットアップが壊れていると仮定する前に、これらの問題を確認してください。
- チェックアウトページまたはサンキューページでのキャッシュ:キャッシュされた注文受信ページは、購入イベントの発生を停止させる可能性があります。これらのページをキャッシュから除外してください。
- 同じイベントを発生させる重複プラグイン:2つのトラッキングプラグインが両方とも購入を送信すると、収益が二重にカウントされます。プラットフォームごとに1つのツールを選択してください。複数実行している場合は、最適なWooCommerceプラグインに関するガイドが、スタックを整理するのに役立ちます。
- 同意によるタグのブロック:買い物客がCookieを拒否した場合、ブラウザタグは発生しません。これはバグではなく予期された動作ですが、カウントは減少します。
- 注文と分析の不一致:WooCommerceは注文が配置された時点で注文をカウントしますが、GA4は異なる方法で帰属させる場合があります。両者の間のわずかなずれは正常です。
SeedProdでカスタムのお礼ページにコンバージョン測定を追加する
注文受信ページは、実際に販売が完了する場所であるため、購入トラッキングの自然な場所です。デフォルトのWooCommerceサンキューページはシンプルでカスタマイズが困難です。
SeedProdはWordPress用のドラッグアンドドロップウェブサイトビルダーです。これを使用して、ブランドに合ったカスタムWooCommerceサンキューページを作成し、GA4、Google広告、またはMetaピクセルコードをそのページに直接追加できます。

これにより、テーマファイル全体にトラッキングコードが散らばるのではなく、購入イベントが存在する明確なページが1つできます。また、お礼のメッセージ、次の注文の割引、または関連商品の表示にも適した場所です。
WooCommerceのコンバージョンを増やす方法
WooCommerceコンバージョン測定を設定したら、次のステップは、そのデータを使用してストアのパフォーマンスを向上させることです。より多くの訪問者を支払いを行う顧客に変えるための実用的な方法をいくつか紹介します。
1. サイトの速度とパフォーマンスを改善する
Akamaiのオンライン小売パフォーマンス調査によると、1秒の遅延でコンバージョンが約7パーセント減少する可能性があります。ストアが遅いと、訪問者は製品を見る前に離れてしまいます。
画像を圧縮し、高速なテーマを使用し、WooCommerceを高速化するガイドに従って、より良い結果を得てください。
2. カート放棄を減らす
オンラインストアでは、カート放棄により潜在的な売上の約70パーセントを失います。これは、発生理由とその修正方法に関するガイドで説明しています。
リカバリメールを設定し、チェックアウトを簡素化し、ポップアップまたはクーポンを使用して、ユーザーに購入を完了するように促します。
3. メールで失われたリードを獲得する
すべての訪問者がすぐに購入する準備ができているわけではありません。彼らを永遠に失う代わりに、メールアドレスと引き換えに割引を提供するなど、連絡を取り合う簡単な方法を提供しましょう。
1つのオプトインフォームとリードマグネットだけで、メールリストの構築を開始できます。
4. ソーシャルプルーフと信頼シグナルを表示する
レビュー、お客様の声、信頼バッジはすべて、お客様があなたのストアで購入する際に安心感を与えるのに役立ちます。これらを商品ページ、ホームページ、さらにはチェックアウトの近くに追加しましょう。
これは、ほとんど労力をかけずにWooCommerceのコンバージョンを改善するための最も速い方法の1つです。
5. アップセルとクロスセルを使用する
購入する準備ができている人がいたら、さらに多くのものを提供するチャンスを逃さないでください。チェックアウトの直前に、関連商品、バンドル、またはアップグレードをお勧めします。
これにより、追加のトラフィックや広告費用なしで、平均注文額を増やすことができます。
WooCommerceコンバージョン測定FAQ
なぜ私のWooCommerceコンバージョンはGoogle広告やGA4に表示されないのですか?
一般的な原因としては、お礼ページのキャッシュ、同じイベントをトリガーする2つのプラグイン、またはクッキーを拒否してブラウザタグをブロックする買い物客などが挙げられます。まずキャッシュをクリアし、注文受信ページを除外し、プラットフォームごとに1つの追跡ツールのみを使用していることを確認してください。
WooCommerceコンバージョンの追跡にGoogleタグマネージャーは必要ですか?
いいえ。MonsterInsightsのようなプラグインは、それなしでGA4とWooCommerceの追跡を処理します。複数のプラットフォームにデータを送信する場合や、各タグの発火方法を完全に制御したい場合は、Googleタグマネージャーの価値があります。GA4の単一ストアの場合は、プラグインを使用する方が簡単です。
サーバーサイドコンバージョン追跡とは何ですか?WooCommerceに必要ですか?
サーバーサイド追跡は、訪問者のブラウザではなく、サーバーから購入データを送信するため、広告ブロッカーやプライバシー設定でブロックされることはありません。失われたコンバージョンの約15〜30%を回復できます。初期段階では必要ありませんが、広告費用が高くなると元が取れます。
WooCommerceコンバージョン追跡の精度はどのくらいですか?また、数字が注文と一致しないのはなぜですか?
ある程度の損失は正常なので、WooCommerceの注文とGA4の間で約85〜90%の一致を目指してください。差は、広告ブロッカー、拒否されたクッキー、およびWooCommerceとGA4が注文をカウントするさまざまな方法から生じます。差が大きい場合は、通常、キャッシュまたは重複イベントの問題を示しています。
すべてのWooCommerce販売を追跡し始める
これで、単一のピクセルでは決してキャッチできなかったよりもはるかに多くの販売をキャッチするセットアップができました。ストア自体をまだ構築している場合は、WordPressでオンラインストアを作成する方法に関するガイドを参照してください。
この記事が気に入ったら、Facebookで「いいね!」をすることを忘れずに、さらに役立つWordPressガイドについてはTwitterアカウントをフォローしてください。