I ran into a big problem when promoting events on Facebook. People on my website had no idea those events existed. They weren’t checking my page regularly, and I didn’t want to send them somewhere else just to RSVP.
So I looked for a way to embed Facebook events right inside WordPress. That way, visitors could see what was coming up, join in with a click, and stay on my site the whole time.
If you’ve been trying to figure out how to do that yourself, you’re in the right place. In this guide, I’ll show you three ways to display your Facebook events on a WordPress site—whether you want a simple widget, a full event calendar, or an embedded feed that updates on its own.
Why Embed Facebook Events on WordPress?
Embedding Facebook Events on WordPress increases visibility by displaying your events directly on your site. It saves time by syncing updates automatically, builds excitement through RSVP options, and boosts credibility by showing social proof. Customization options ensure the display matches your website’s design.
How to Embed Facebook Events on WordPress
In this guide, I’ll share three ways to put Facebook events on your WordPress website:
- Make a special events page. This is like having a VIP section on your website just for events. It helps people find and sign up for events easily.
- Use a tool that grabs your events from Facebook. This tool acts like a bridge, pulling your events onto any page of your website. Plus, you can change how the events look to match your style.
- Add a snippet of code (if you’re comfortable with that). Facebook lets you grab a bit of code to put events directly on your site. This is the simplest way, but it doesn’t give you many options to make them look nice.
How Do You Know Which Embedding Method Is Best for You?
Not sure the best way to show a Facebook events feed on your website? Here’s a side-by-side comparison table to help you choose the right method to embed a Facebook calendar in WordPress.
| Method | Features | Ease of Use | Pricing | Mobile-Friendly | Free Version? | Free Version Limits |
|---|---|---|---|---|---|---|
| SeedProd | Landing pages, Facebook integrations | Easy | Paid/Free | Yes | Yes | Limited features, Facebook Page block requires paid |
| Smash Balloon | Customizable Facebook feeds | Moderate | Paid/Free | Yes | Yes | Limited features |
| Manual Embed (Code) | Basic event display | Difficult | Free | Maybe | Yes | Very limited, needs coding knowledge |
Now let’s jump in.
How to Display Facebook Events on a WordPress Landing Page

SeedProd is a popular drag-and-drop WordPress page builder, with coming soon and maintenance mode functionality. You can use this plugin to create high-converting landing pages without writing CSS and PHP code or hiring a developer.
If you’ve heard of Elementor, it works just like it but with a more streamlined user interface and a focus on simplicity.
Not only can you use hundreds of templates right out of the box, but SeedProd also includes content blocks that let you embed social media content like your Facebook events calendar, live page feed, and RSVP tools—all without needing code.
Most notable are the Facebook blocks, which allow you to embed social media content, including:
- Facebook Like Button
- Facebook Comments
- Facebook Page
- Facebook Embed
We’ll use the Facebook Page block to add events right on your landing page for this method. The best part is that there are no access tokens, shortcodes, or IDs to copy and paste.
1. Install and Activate SeedProd
To get started, install and activate the SeedProd plugin. For this guide, we’ll use SeedProd Pro because it has the advanced Facebook blocks we need.
2. Create a WordPress Landing Page
After installing SeedProd on your WordPress website, you’ll need to create a new landing page.
Luckily, you can follow this step-by-step guide on creating a landing page in WordPress to get started quickly. Or you can follow this guide to specifically create an event landing page.
Once your landing page design is in place, navigate to SeedProd » Pages and click Edit on the landing page you made by following our tutorial.
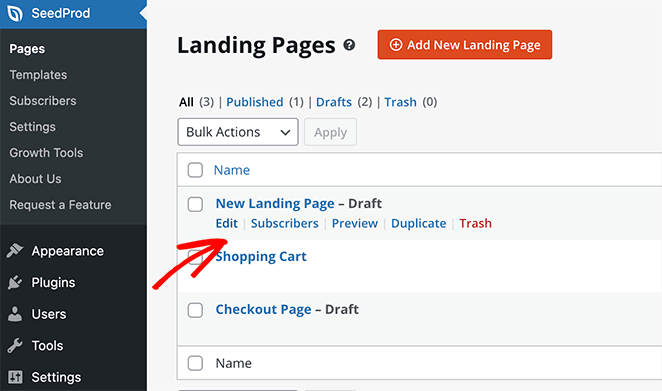
This will open the SeedProd visual editor, where you can add your events.
3. Add the Facebook Page Block
Next, find a space on your page where you’d like to display your Facebook Events calendar. Then, go to the Advanced blocks section on the right and find the Facebook Page block.
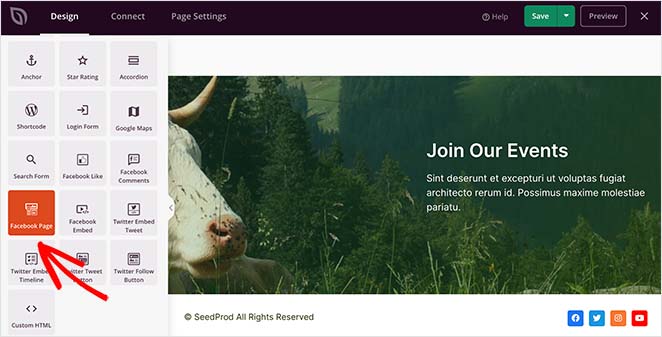
To add this block to your page, drag it from the left onto your preview.
Then in the Facebook Page block content settings, paste your page’s URL. This is how SeedProd pulls in your public Facebook events feed and displays it right inside your WordPress layout.
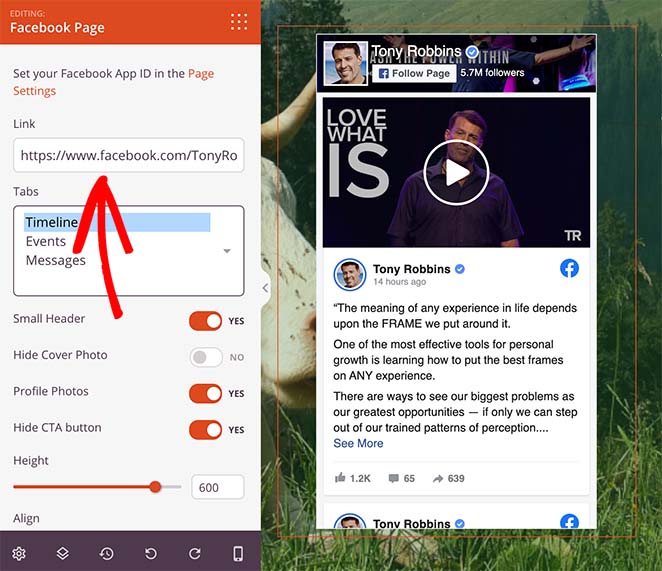
By default, SeedProd displays your Facebook page timeline automatically. To show your events instead, click the Events option under the Tabs heading.
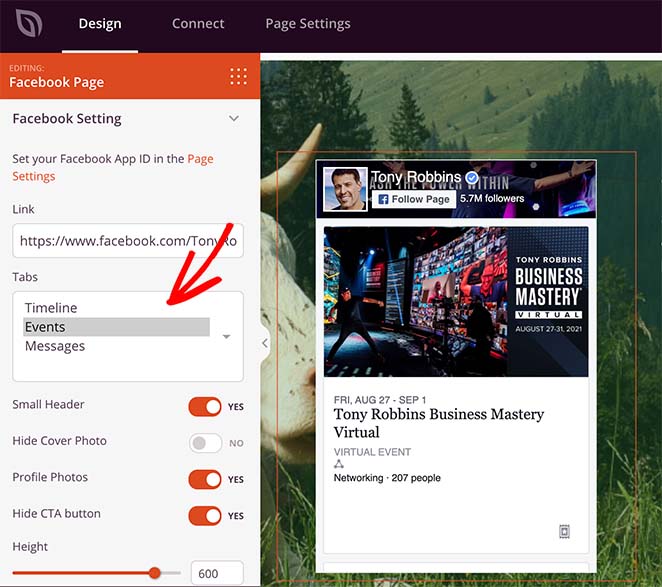
In the same panel, you can also change the header style, show or hide your cover photo, adjust the alignment, and more.
And if you want to increase your Facebook page engagement, you can use the Facebook Embed block to embed a post, Facebook video, or comment right alongside your events schedule.
4. Publish Your Landing Page
All that’s left to do is click the dropdown arrow next to the Save button in the top-right corner and click Publish.
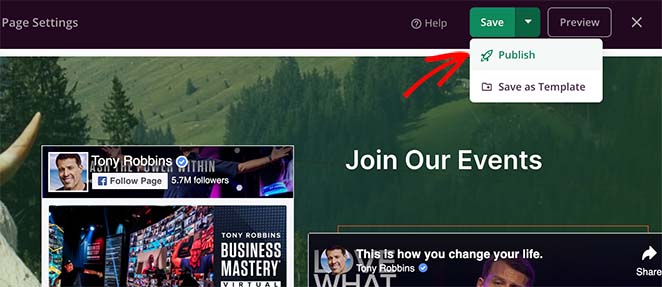
Then, when you click Preview, you’ll see your events calendar live on your landing page.
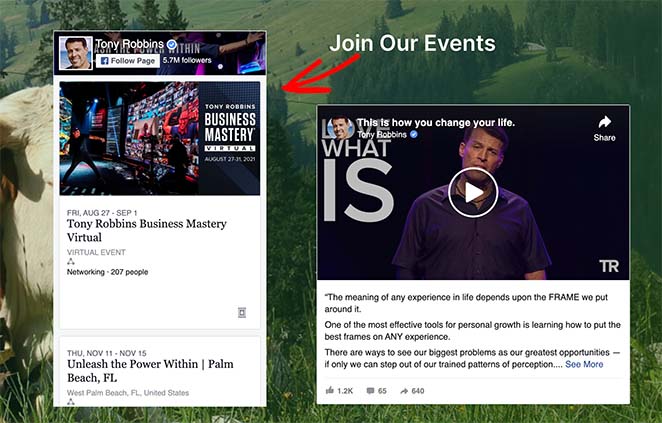
That’s it. Website visitors can now see your Facebook events on your landing page.
But if you’d like to display an entire Facebook Event feed, we suggest trying the following method.
How to Sync Facebook Events to Your WordPress Site
You’ll need to install and activate the Smash Balloon Custom Facebook Feed Pro plugin for this method. For help with this step, check out this step-by-step tutorial on how to install a WordPress plugin.
1. Create a New Facebook Feed
After installing and activating the plugin, go to the Facebook Feed » All Feeds menu from your WordPress dashboard. From there, click the Add New button to start creating your event feed.
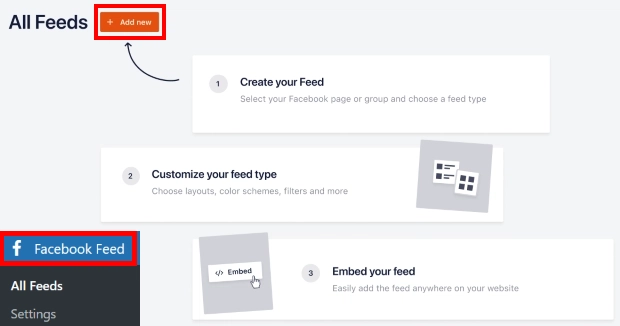
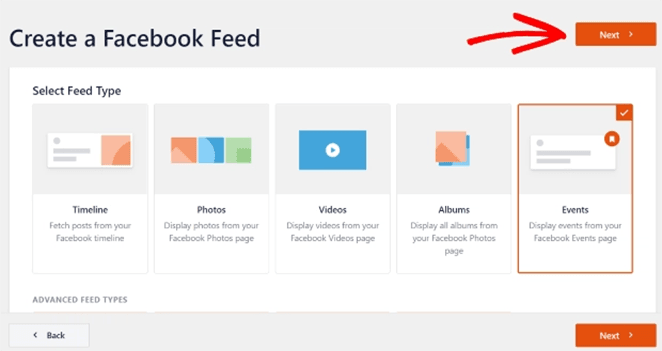
On the following page, you’ll see 9 different types of Facebook feeds you can add to your website, including:
- Timeline
- Photos
- Videos
- Albums
- Events
- Reviews
- And more
Choose the Events option and click the Next button to continue.
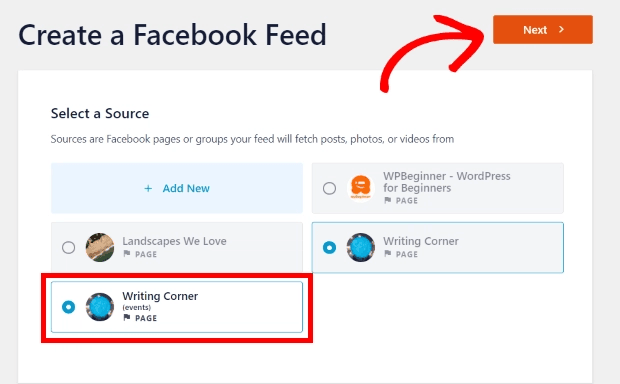
2. Select a Facebook Page Source
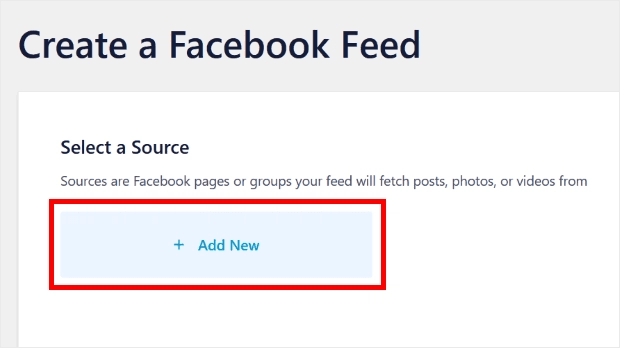
After selecting a feed type, it’s time to choose a Facebook page source. This can be a Facebook group or a page where you post your business’s events.
To add a source, click the Add New button.
This opens a popup asking for your Facebook Page ID and Event Access Token.
If you’re unsure how to find the app ID and app secret token for your page, follow these instructions.
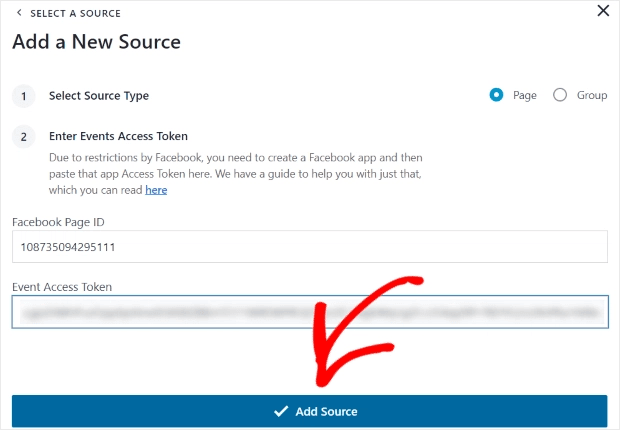
After entering your Facebook app details, click the Add Source button.
On the next screen, you’ll see your newly added Facebook page. Just select that page and click Next to continue.
3. Customize Your Facebook Events Calendar Layout
Now, you can start customizing your events. The customization options are on the left-hand side, while a preview of your feed is on the right.
The customization options allow you to change the feed type, layout, color, header design, post design, and more.
First, choose the Feed Layout option on the left.
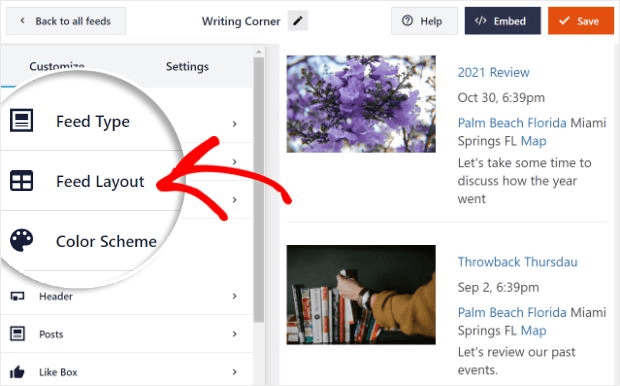
This option offers 3 different settings, including List, Masonry, and Carousel layouts.
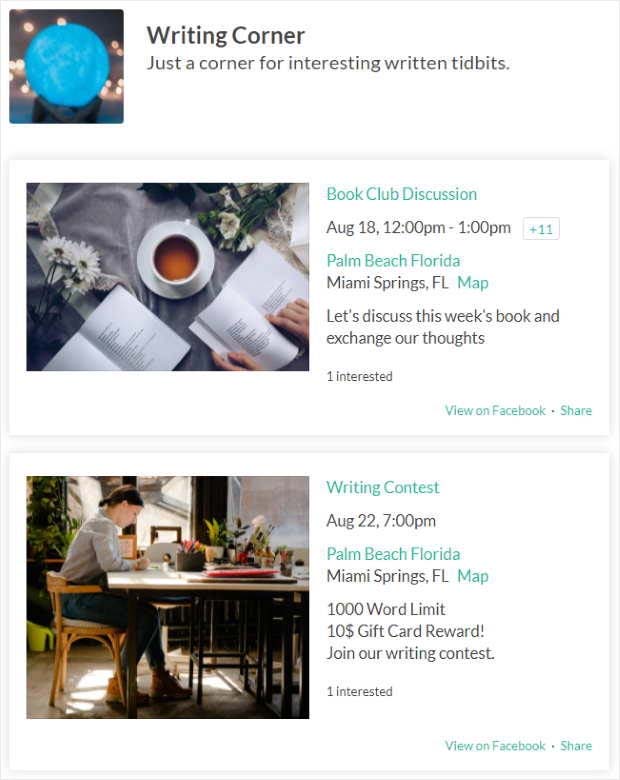
To show events one after the other, choose the List layout option.
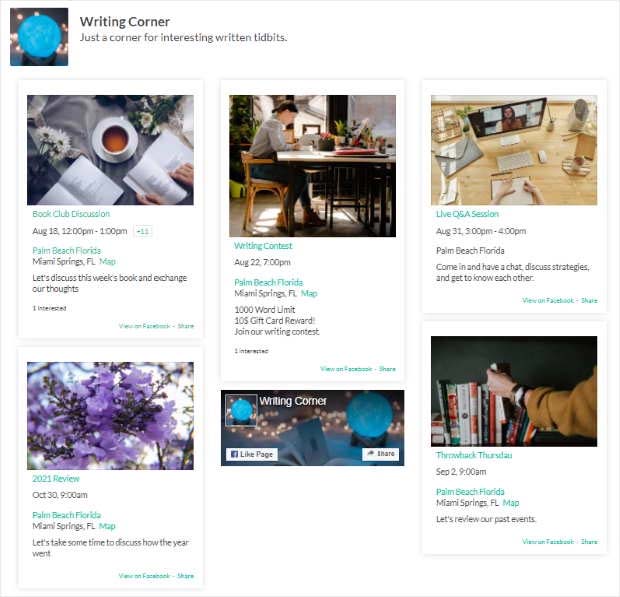
You can also select the Masonry option if you prefer to show your events in a multi-column layout.
Lastly, there’s the Carousel option, which allows you to show your events in a stunning image slider.
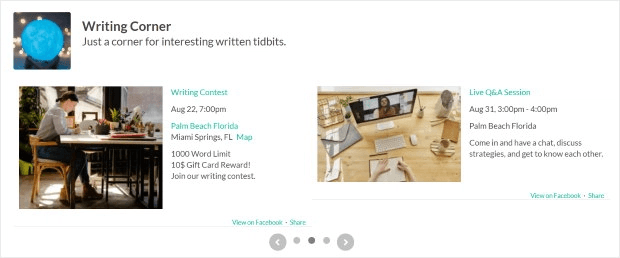
Go ahead and select a layout that best suits your website. Then, click the Customize button once more to return to the previous settings.
4. Customize Your Facebook Events Feed Color Scheme
If you’d like to change the color of your feed, click the Color Scheme heading. In this panel, you can choose from 4 different color options, such as:
- Inherit from Theme: Copy the color scheme of your website
- Light: Have a light background with dark-colored text
- Dark: Turn the background dark with light-colored text
- Custom: Enter all the colors yourself
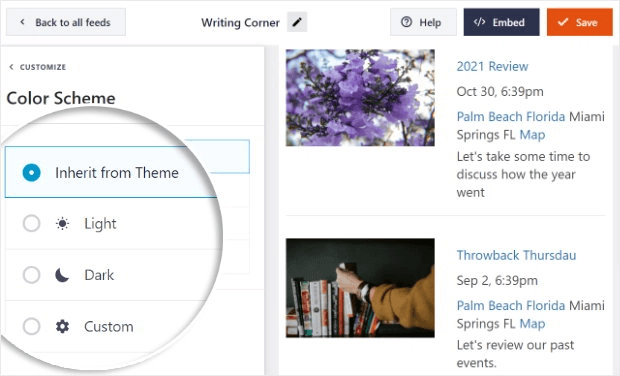
After, you can customize other settings, including the header design, feed size, margins, and more.
When you’re happy with how everything looks, click the Save button.
5. Display Events from Facebook in WordPress Pages
Now, you’re ready to embed Facebook Events on your WordPress website, and Smash Balloon allows you to do this in 2 ways.
First, click the Embed button in the top-right corner. This opens a popup with different publishing options.
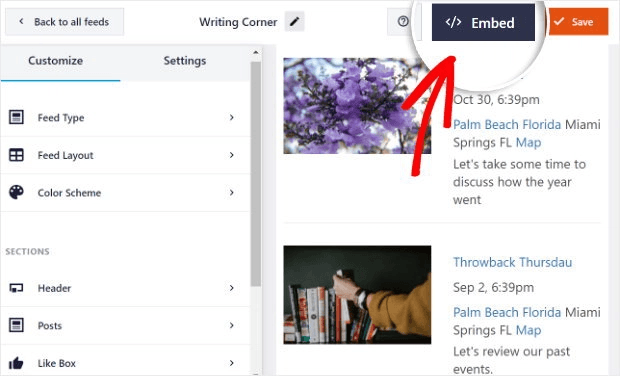
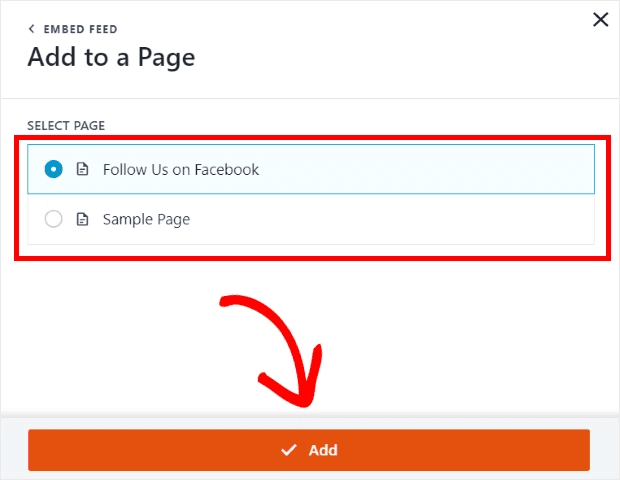
Click the Add to a Page button to embed your Facebook Events in a regular WordPress page.
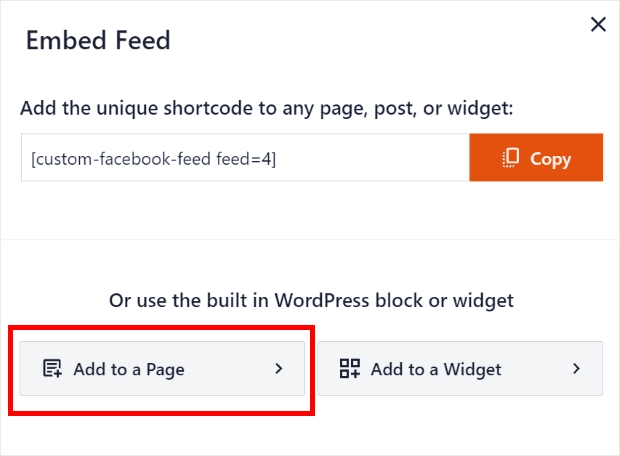
From there, you can choose any page on your website from the list and click the Add button.
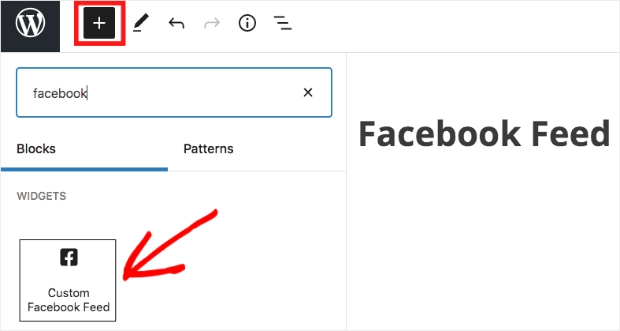
Clicking that option takes you to the editing screen for your chosen page. From there, click the plus icon (+) and select the Custom Facebook Feed widget.
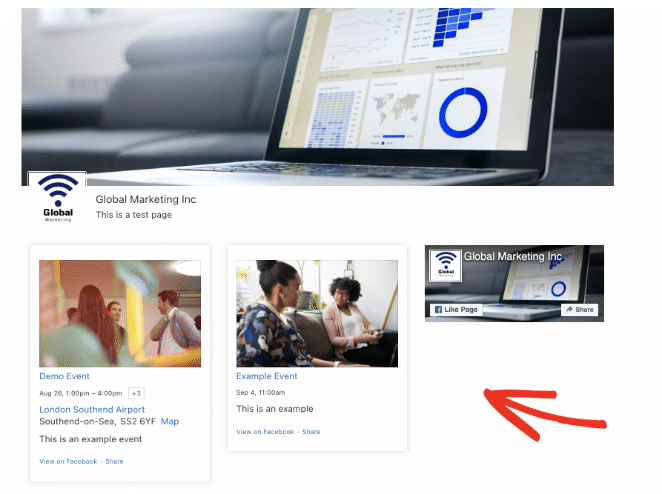
When you update or publish the page, you can preview it to see how your events look.
6. Add Facebook Events to WordPress Sidebars
If you prefer to add your feed to a sidebar area, simply click the Add to a Widget button in the Embed window.
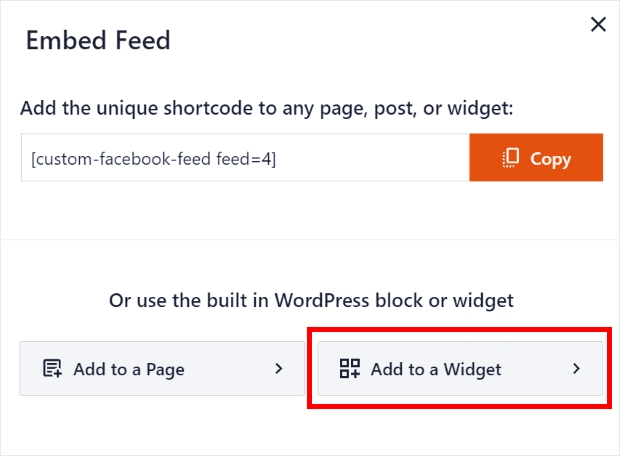
Clicking that option sends you to the widgets page, where you can choose a sidebar to display your events.
After choosing a sidebar, click the plus icon (+) to add a new widget and choose the Custom Facebook Feed widget.
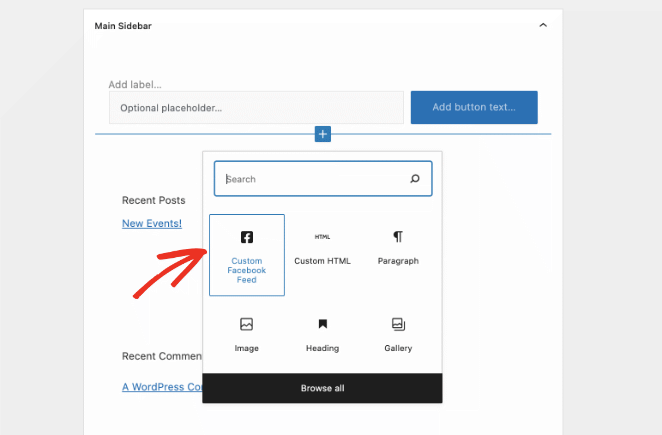
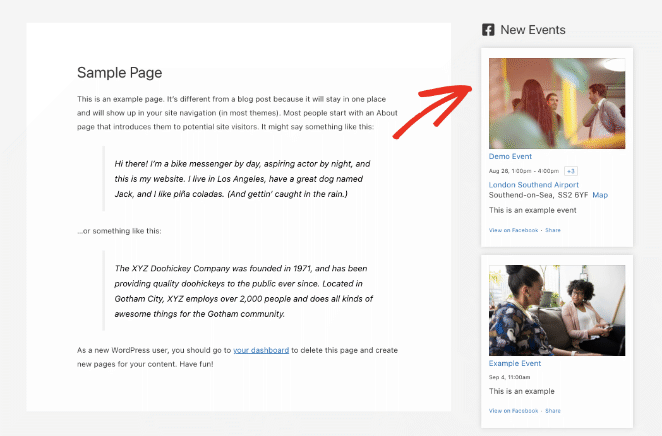
Once you’ve done that, you can preview your website and see your Facebook Events in your website’s sidebar area.
Adding Facebook Events to WordPress Without a Plugin
If you’re not a fan of using too many WordPress plugins on your website, you can show Facebook events on WordPress without a plugin.
Yet this method requires you to add some code to your site, so it’s not something we recommend for beginners. It also doesn’t offer much control over how your events look.
1. Visit the Facebook Page Plugin website.
To get started with this method, you’ll need the Facebook Page Plugin. This isn’t a WordPress plugin but a standalone tool by Facebook for developers.
So head to the Facebook Plugin tool and paste your Facebook page URL.
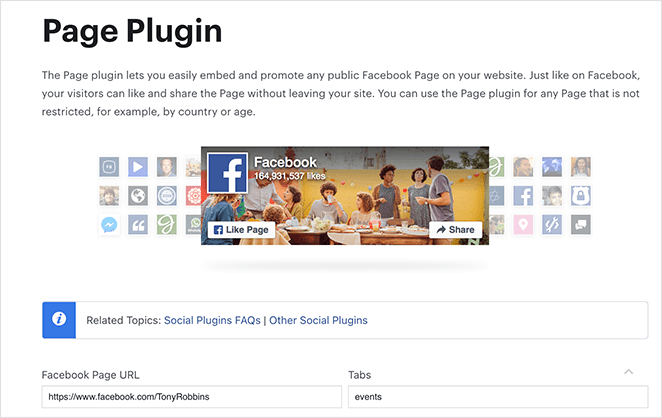
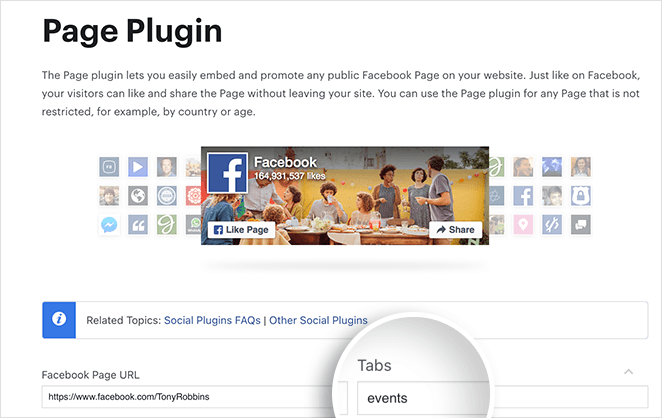
After entering your Facebook page URL, the tool will show a preview of your timeline. Since we want to show your Facebook events, delete the word “timeline” in the Tabs field and enter “events.”
2. Generate Your Facebook Event Embed Code
The preview panel now shows a list of your page’s events. To get the code, click the Get Code button below the preview.
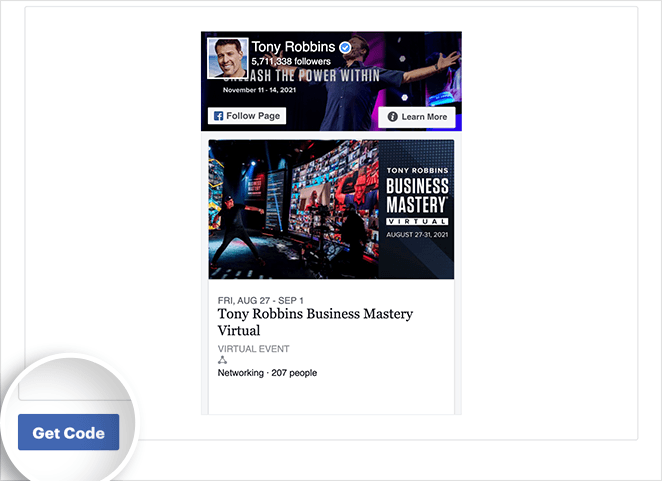
Clicking the Get Code button opens a lightbox popup with 2 tabs: JavaScript SDK and IFrame. Click the IFrame tab, then copy the embed code to your clipboard.
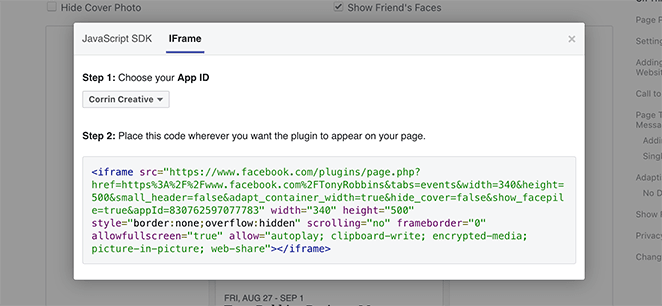
3. Embed the Facebook Events Code in WordPress
Next, head to your WordPress website and edit the post or page where you want to show your Facebook Events.
On the post or page edit screen, click the plus (+) icon and find the Custom HTML WordPress block.
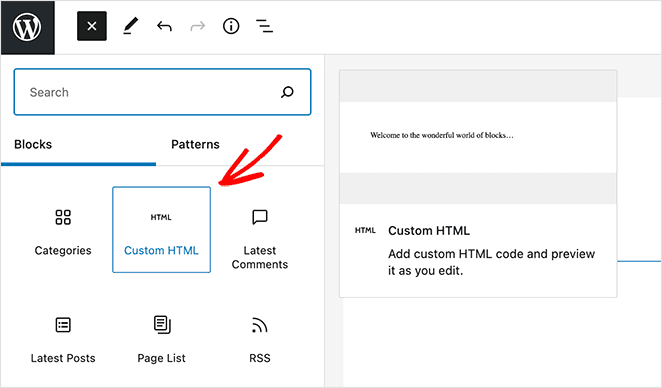
Now, click inside the HTML block and paste the embed code from the Facebook Page Plugin tool.
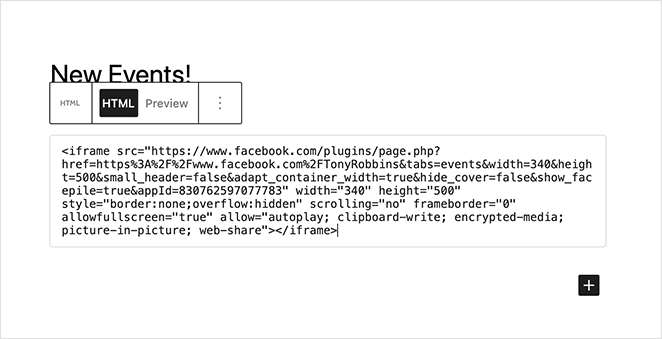
You can then save or publish the post, and when you preview it, your Facebook Events will be live on your website.
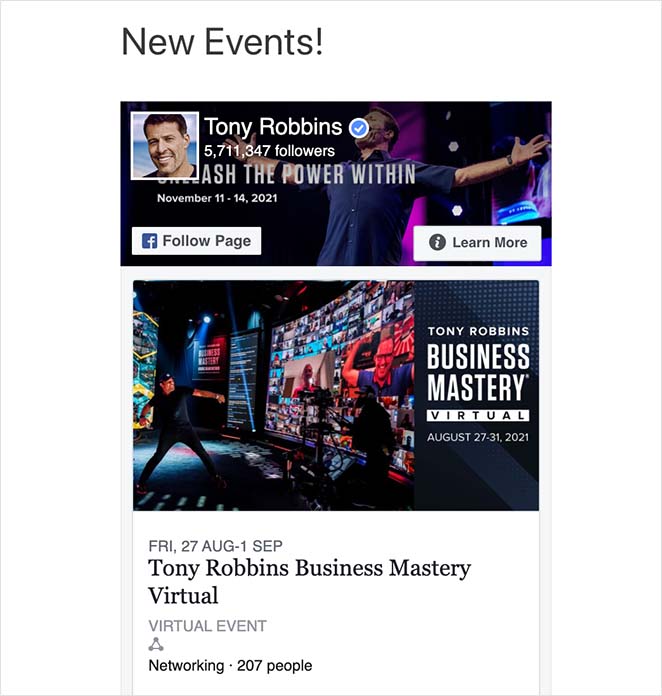
If you want to change how this feed displays, you’ll need to return to the Facebook Page Plugin and generate the wp embed Facebook code again. That said, there are limited Facebook settings you can change.
Utilizing iCal URL for Event Synchronization
If you want to integrate your Facebook events into your website’s calendar, using an iCal URL is an efficient method.
Here’s how you can get and use the iCal URL:
Log into your Facebook account, go to your events section, and select the event you want to share.
In the top right, you will see a button labeled Add to Calendar.
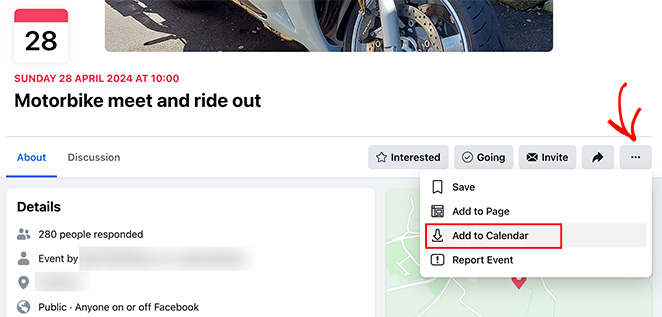
Click this button, and in the popup, right-click the Export button and select “Copy Link Address.”
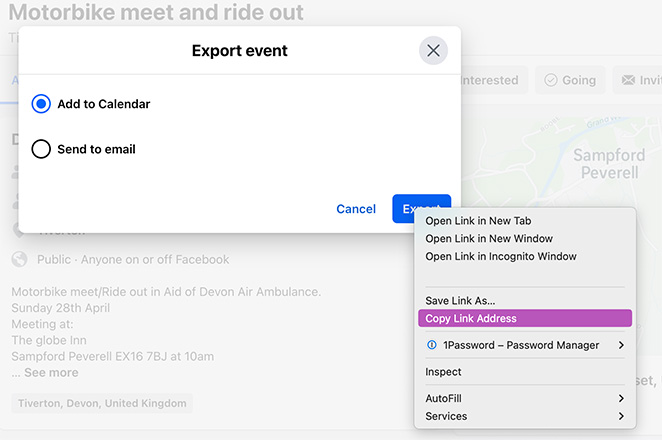
Paste this iCal URL into your WordPress calendar plugin or any tool that supports external feeds. This lets you sync your Facebook events with your WordPress events calendar automatically.
This will automatically sync your Facebook events with your website’s calendar.
Frequently Asked Questions on Embedding Facebook Events
How else can I customize the appearance of Facebook events in WordPress?
Customizing beyond the options in this guide may require custom CSS or JavaScript. Users with coding knowledge can directly modify the styles or scripts in their WordPress theme or use a child theme to apply more personalized styles to the Facebook events feed.
How can I Troubleshoot issues when Facebook events won’t display?
If Facebook events won’t display on your WordPress site, check for common issues like outdated plugins, conflicts with other plugins, or incorrect Facebook API setup. Ensuring all plugins are up-to-date and reviewing the plugin documentation for setup accuracy can often resolve these issues.
Can embedding Facebook events affect my site’s performance?
Embedding a Facebook event calendar in WordPress can impact performance if the embed loads too many resources. To reduce load times, use tools like SeedProd or Smash Balloon, which are optimized to show social feeds without slowing your site.
Can I embed Facebook group events in WordPress?
Most Facebook embedding tools only support public page events, not private or group events. If you’re running a Facebook Group, try using the iCal sync method or manually listing your events on a WordPress page.
Now you know how to embed your Facebook events directly on WordPress—whether you want a full event feed, a single tab, or a calendar sync.
Want to make your events convert better? Try building an event landing page with SeedProd next.
You might also like the following guides for your WordPress site:
- How to Add a Facebook Page to WordPress
- How to Embed Facebook Videos in WordPress
- How to Add a Facebook Like Button to Your WordPress Site
- How to Easily Create a Facebook Group Landing Page
Thanks for reading! We’d love to hear your thoughts, so please feel free to leave a comment with any questions and feedback.
You can also follow us on YouTube, X (formerly Twitter), and Facebook for more helpful content to grow your business.

