

TL;DR: How to Set Up WooCommerce Maintenance Mode
Hide your store during updates without taking your whole site offline. Here’s the process:
- Install SeedProd: Download and activate the Pro plugin on your WordPress site.
- Choose a template: Pick a maintenance page template from SeedProd’s library and customize it with your brand, a countdown timer, and contact info.
- Set Access Controls: Use SeedProd’s Access Controls to hide only your WooCommerce pages (/shop, /cart, /checkout) while keeping your homepage and blog live.
- Activate and verify: Publish your maintenance page, toggle Maintenance Mode to Active in SeedProd » Pages, then test it in an incognito window.
Store owners who update plugins or revamp their checkout flow on a live site often find out the hard way: shoppers hit error messages mid-purchase, and sales stop cold.
This is why a proper maintenance mode is non-negotiable for any serious WooCommerce store. It lets you work on your shop pages behind the scenes with total confidence.
Unlike plugins that take your whole site offline, SeedProd‘s Access Controls let you target only your shop, cart, and checkout pages, and you get it done in minutes without touching code.
In this guide, I’ll walk you through the exact steps I use to put a WooCommerce store in maintenance mode the right way.
- What Is WooCommerce Maintenance Mode?
- When Should You Use WooCommerce Maintenance Mode?
- How to Put WooCommerce in Maintenance Mode (Step-by-Step)
- Frequently Asked Questions (FAQ)
What Is WooCommerce Maintenance Mode?
WooCommerce maintenance mode is a WordPress feature that temporarily hides your store from visitors while you make updates behind the scenes.
It prevents shoppers from seeing errors and keeps your site looking professional. A proper maintenance page returns an HTTP 503 Service Unavailable status, which tells Google the downtime is temporary so your rankings stay intact.
When Should You Use WooCommerce Maintenance Mode?
Maintenance mode is useful anytime your store might look broken or confusing to shoppers.

Here are common situations and the best way to handle them:
| Situation | Best Mode | Time Needed | What Shoppers See | Analytics |
|---|---|---|---|---|
| Installing updates or plugins | Full 503 maintenance | 15-30 minutes | “We’ll be back soon” message | Little to no data lost |
| Adding products in bulk | Coming Soon page (no 503) | A few hours | Countdown or launch notice | Traffic still tracked |
| Changing design or theme | 503 with branded message | Several hours or a day | “Site improvements in progress” | Visits may dip |
| Fixing urgent security issues | Immediate 503 | As short as possible | Quick “Under maintenance” note | Short gap in data |
| Testing new features | Use a staging site (no downtime) | N/A | N/A | No impact |
Using the right mode keeps customers informed, protects your SEO, and helps you avoid lost sales.
How to Give Customers a Heads Up Before You Go Offline
Before you go live with your maintenance page, give customers a heads up.
- Email your list at least 24 hours before maintenance starts, with the expected downtime window
- Post on your social channels so followers know the WooCommerce store will be temporarily offline
- Add a countdown timer to your maintenance page so visitors know exactly when you’ll be back
- Send a “we’re back” email once your store is live again to bring shoppers back
Should You Use Code or a Plugin for WooCommerce Maintenance Mode?
Before you set up WooCommerce maintenance mode, decide whether you want the speed and safety of a plugin or the manual control of adding code.
Using a Plugin (Best for Most Users)

A plugin like SeedProd is the easiest way to enable WooCommerce maintenance mode. You don’t have to touch code, and you can design a custom page with your logo, brand colors, and even an email opt-in form. It’s also safer since you won’t risk breaking your site by editing theme files.
Using Code (For Advanced Users)
If you’re comfortable with PHP, you can add a small code snippet to your theme’s functions.php file. This will show a basic “Maintenance” message to visitors.
Note: Editing your theme files directly can cause errors if you make a mistake. Always back up your site before adding code, and remember that you won’t get design options like you do with a plugin.
For large updates, a new theme, a major WooCommerce version bump, or custom code changes, a staging site is a safer option than maintenance mode. You make and test changes on a copy of your site before touching the live store, which means no downtime at all for your customers.
How to Put WooCommerce in Maintenance Mode (Step-by-Step)
Here’s exactly how to put WooCommerce in maintenance mode using SeedProd without code or plugin conflicts.
Step 1. Install a WooCommerce Maintenance Mode Plugin
First, you’ll need to get SeedProd up and running on your WordPress site. SeedProd is a drag-and-drop website builder for WordPress. You can use it to build maintenance pages, coming soon pages, and full site themes without code.
- Download SeedProd Pro: Visit the SeedProd website and choose a Pro plan. To follow this tutorial and hide specific WooCommerce pages using Access Controls, you will need the Pro version.
- Install the Plugin: Once you’ve downloaded SeedProd, go to your WordPress dashboard, navigate to Plugins » Add New, and upload the plugin file.
- Activate SeedProd: After installation, click the “Activate” button.
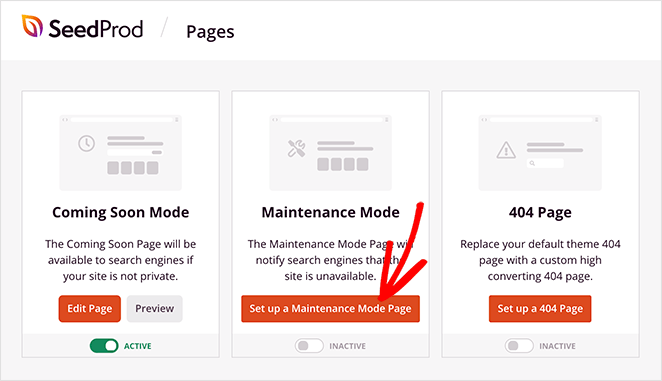
- Start Building: You’ll see a new “SeedProd” menu in your WordPress dashboard. Click it, then click the “Set up a Maintenance Mode Page” button. You are now ready to create your custom maintenance page.
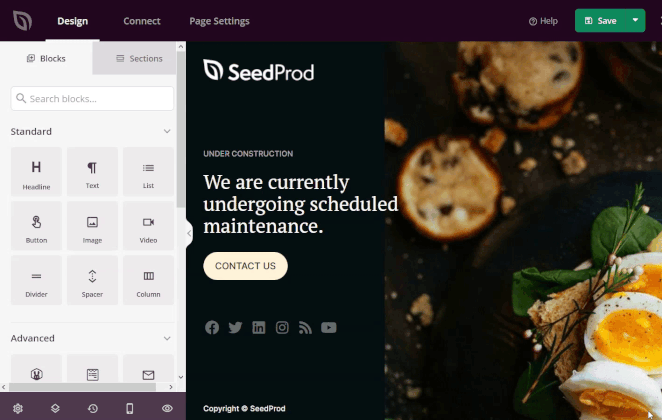
Step 2. Design Your WooCommerce Maintenance Page
A good WooCommerce maintenance page does more than say “We’ll be back soon.” It’s a chance to reassure customers, build trust, and even collect leads. With SeedProd’s drag-and-drop builder, you can create a polished design in minutes.
Choose a Maintenance Mode Template (Or Start from Scratch)
SeedProd includes a library of professionally designed templates, so you don’t need to start from scratch. Pick one that matches your brand, then make it your own.
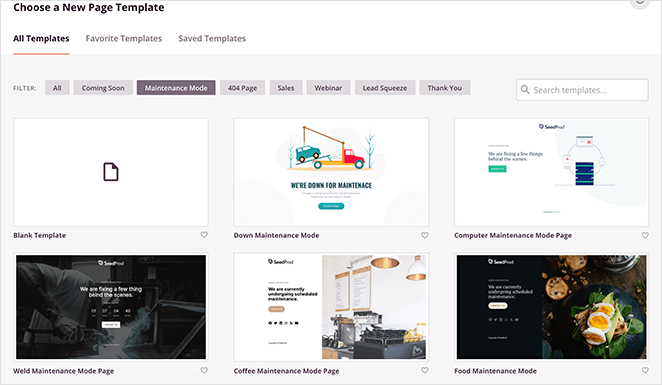
If you prefer full control, choose a blank template and design it from the ground up. Just hover over the template you like and click the checkmark to use it.
Customize Your Maintenance Mode Page
The visual builder makes editing simple. Drag and drop text, images, videos, countdown timers, or forms directly onto your layout, no coding needed.
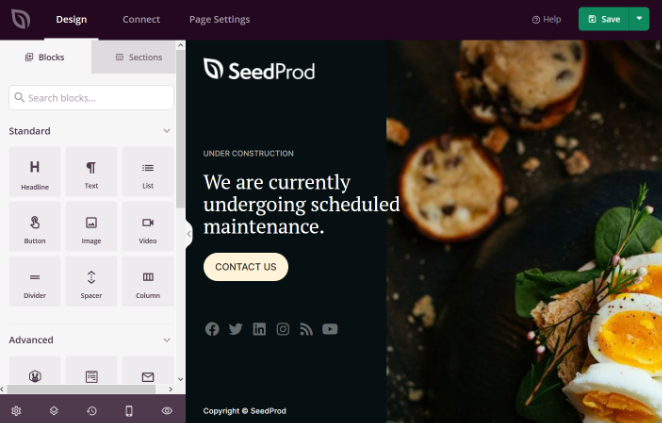
For example, you can add a countdown timer to show when your store will reopen. Click the block to style it, set the date and time, and customize it to fit your page.
You can also add pre-made sections like FAQs, features, or calls to action. Try including a discount code or opt-in form to bring visitors back once your store reopens.
What to Put on Your WooCommerce Maintenance Page
I’ve learned that a generic “Under Construction” page often frustrates visitors. To keep shoppers happy and potential sales warm, I use a specific layout strategy.
Here are the three non-negotiable elements I put on every maintenance page:
- A Concrete Timeline: I always use the Countdown Timer block. It reassures customers that the site isn’t broken forever, just briefly offline.
- A “Notify Me” Option: You don’t want to lose that traffic. I place an Optin Form front and center so I can email interested shoppers the moment the catalog is back up.
- Emergency Contact Info: If a customer is waiting on an order, they need a way to reach you. I usually add a simple Social Profiles block or a support email link at the bottom.
Once your page looks the way you want, click “Save” at the top right of the builder.
Step 3. Hide WooCommerce Store Pages While You Work
By default, SeedProd hides your entire website. However, you likely want to keep your blog and homepage live while you work on your products.
To do this, we will use Access Controls to hide only specific WooCommerce pages, keeping your homepage and blog live for regular visitors while your WooCommerce store is offline.
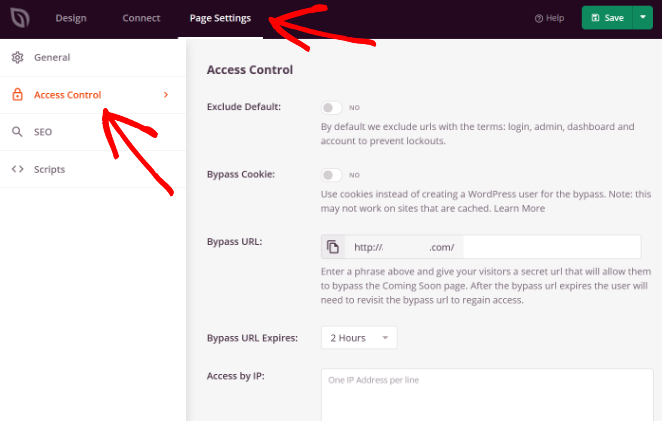
- Open Access Controls: In the SeedProd builder, go to Page Settings » Access Controls.
- Include URLs: Select the “Include URLs” option. This tells SeedProd to show your maintenance page only on the specific links you list here.
- Add WooCommerce Pages: Paste the URLs you want to hide. Make sure you replace “example.com” with your actual domain name.
- https://yourdomain.com/shop
- https://yourdomain.com/cart
- https://yourdomain.com/checkout
- https://yourdomain.com/my-account
Pro Tip: If you want existing customers to access their downloads or order history, remove the “my-account” link from this list.
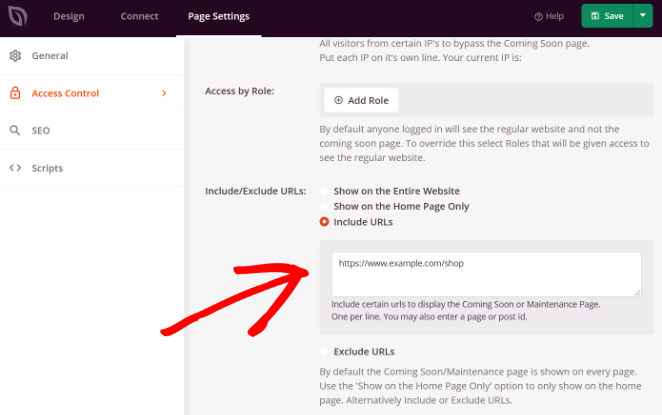
- Protect Product Pages: To hide all product listings, use wildcard URLs so every product or category page stays hidden:
- https://yourdomain.com/product/*
- https://yourdomain.com/product-category/*
- https://yourdomain.com/product-tag/*
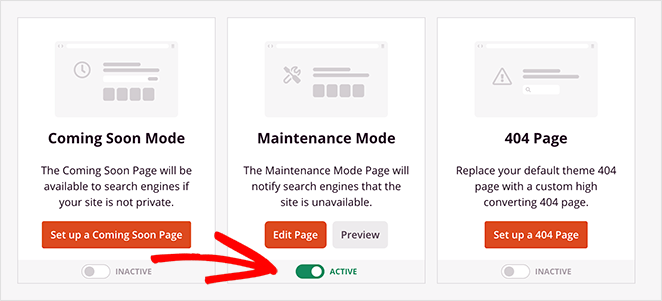
Step 4. Activate WooCommerce Maintenance Mode
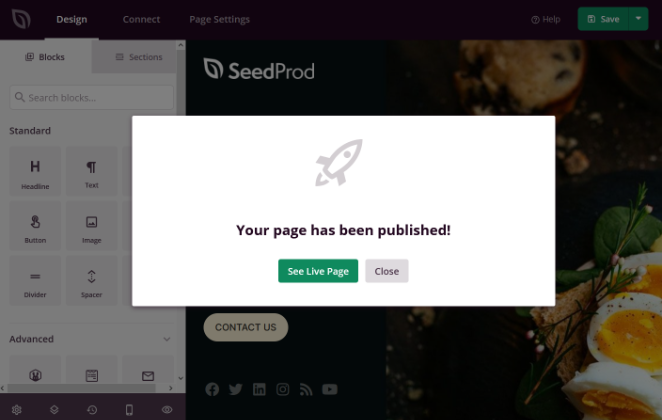
- Publish: Click the dropdown arrow next to the “Save” button in the SeedProd builder and select “Publish.”
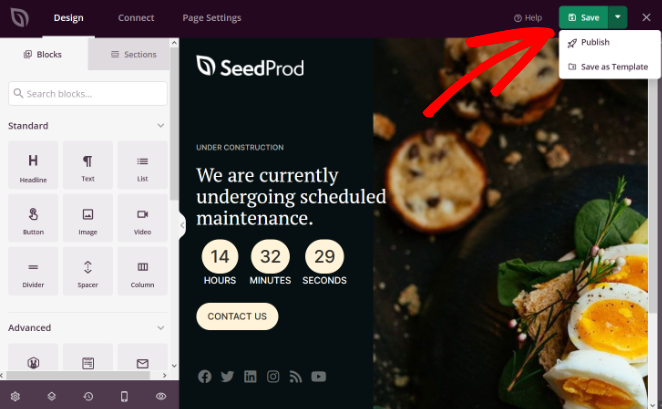
- Preview: Once your page is live, click “See Live Page” to make sure everything displays correctly.
- Enable Maintenance Mode: In your WordPress dashboard, go to SeedProd » Pages. Under “Maintenance Mode,” toggle the switch from “Inactive” to “Active.”
Your WooCommerce store is now in maintenance mode. Visitors will see your custom WooCommerce maintenance page while you safely make updates in the background.
Here’s an example of what your WooCommerce maintenance page might look like when it’s live:

Verify Your Maintenance Page Is Working
Before you start making changes, take 60 seconds to confirm your maintenance page is actually showing to visitors. I’ve seen store owners skip this step and spend hours working on a store that was still fully visible to customers.
- Open an incognito or private browser window and navigate to your /shop URL. You should see your maintenance page, not your products.
- Visit your homepage and blog in the same incognito window. These should load normally since they’re not in your “Include URLs” list.
- Log in to your WordPress admin in a regular browser to confirm you can still access the dashboard and work while visitors see the offline page.
Turning Maintenance Mode Off
When your updates are done, go back to SeedProd » Pages and toggle “Maintenance Mode” back to “Inactive.”

Your WooCommerce store is now back online and ready for shoppers.
Bonus: Capture Leads with a Coming Soon Page
If you want to capture leads while your store is offline, SeedProd’s coming soon mode lets you add a waitlist signup form. See how to design a waitlist landing page with SeedProd.
Frequently Asked Questions (FAQ)
Will maintenance mode break WooCommerce webhooks or API calls?
It can. A full 503 block may stop webhooks, payment gateways, or third-party integrations.
If you need those active during updates, use a Coming Soon page instead of strict maintenance mode. It keeps your site accessible without triggering the 503 status that can interrupt API connections.
Will Cloudflare or my CDN cache the maintenance page?
Yes, and this is an important step to check. CDNs and browsers can cache your temporary page.
If you don’t clear your cache after turning maintenance mode off, visitors might still see the old maintenance page instead of your live store. Always clear your CDN and website cache after you’re done.
How long can my store stay in maintenance mode without hurting SEO?
Since this guide shows you how to hide only your store pages, the overall risk is low. For the hidden pages, keep downtime under 24 hours ideally.
Longer outages may cause Google to treat the 503 status as a permanent error. If you need extended downtime, consider switching to a Coming Soon page instead, which doesn’t send a 503 signal.
Should I use 503 or noindex for WooCommerce maintenance mode?
Use a 503 Service Unavailable status with a Retry-After header. This tells search engines the downtime is temporary and that they should check back later.
Avoid noindex, since it can cause your store pages to drop from search results. The 503 approach preserves your rankings as long as downtime stays short.
Do I need to put WooCommerce in maintenance mode for plugin updates?
It depends on the size of the update. For minor plugin updates on a stable site, maintenance mode is optional but recommended as a precaution.
For major WooCommerce version updates or changes that could cause plugin conflicts, always enable maintenance mode first. This prevents customers from seeing errors if something breaks mid-update.
Your updates are done and your shoppers come back to a working store. That’s what doing this right looks like. Get started with SeedProd to set up WooCommerce maintenance mode in minutes.
For more practical WooCommerce tips, check out these helpful guides:
- Best WooCommerce Affiliate Plugins to Maximize Your Sales
- Best WooCommerce Plugins To Skyrocket Your Sales
- How to Customize Your WooCommerce Checkout Page
- Best WooCommerce SEO Plugins for Better Rankings
- How to Make a Custom WooCommerce Thank You Page
- How to Speed Up Your WooCommerce Store (10 Easy Ways)
Thanks for reading! We’d love to hear your thoughts, so please feel free to join the conversation on YouTube, X and Facebook for more helpful advice and content to grow your business.


