

TL;DR:
The WooCommerce thank you page is the order-confirmation screen shoppers see right after checkout. There are three ways to customize it, depending on how much control you want.
- No-code builder: Build a custom thank you page in SeedProd with upsells and product grids, then point WooCommerce at it.
- Plugin redirect: Send buyers to your new page with a free redirect plugin, best for a marketing or upsell screen.
- Code and hooks: Edit content directly on the native order-received page with the woocommerce_thankyou hook or a template override.
- Best for most stores: The no-code route, since it keeps order details and adds conversion blocks without touching files.
One of the most overlooked moments in an online store is what happens right after a sale. That final page isn’t just a confirmation. This is your first chance to build on the trust a new customer just placed in you.
In this guide, I’ll walk you through three ways to create a custom WooCommerce thank you page: a no-code builder, a plugin redirect, and the code and hooks method. Let’s start with the easiest one.
- Why Customize Your WooCommerce Thank You Page?
- How to Create a Custom WooCommerce Thank You Page in WordPress
- How to Edit the WooCommerce Thank You Page with Code
- How to Replace the Default WooCommerce Thank You Page
- What Makes a Good WooCommerce Thank You Page?
- What to Do Once Your Thank You Page Is Live
- WooCommerce Thank You Page FAQs
Why Customize Your WooCommerce Thank You Page?
The default WooCommerce thank you page isn’t built to sell anything. After shoppers finish your checkout page, they land on a plain confirmation screen like this:
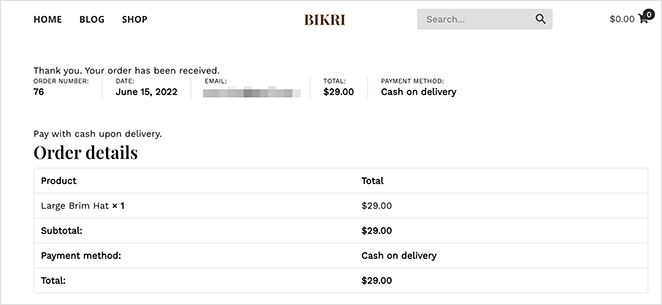
How your thank you page looks depends on your WordPress theme. Either way, that default screen isn’t optimized for conversions or customer engagement.
Replace it with a custom design and you can turn that page into a high-converting screen that helps you:
- Add a post-checkout upsell or cross-sell
- Showcase best-selling items or new arrivals
- Offer a coupon for future purchases
- Link to product guides, setup help, or bonus content
- Add social sharing buttons to increase reach
How to Create a Custom WooCommerce Thank You Page in WordPress
We’ll use SeedProd to create a custom WooCommerce thank you page for your online store.

SeedProd is a drag-and-drop WordPress website builder used by over 1 million WordPress sites. It’s one of the best website builders for WordPress.
It lets you create high-converting landing pages, custom WordPress themes, and responsive layouts without code. You can even use it to create WooCommerce websites without hiring a developer.
Follow the steps below to build a custom WooCommerce thank you page with SeedProd.
Video Tutorial
Step 1. Install the SeedProd Plugin
First, download the SeedProd plugin and install it on your WordPress website. Here’s a guide on how to install a WordPress plugin if you need help.
You can get a free version of SeedProd, but we’ll use SeedProd Elite for the WooCommerce blocks. The Add-to-Cart and Best-Selling Products blocks both require the Elite tier, so check your plan before you start.
After installing and activating the plugin, go to SeedProd » Settings from your WordPress dashboard and enter your license key.
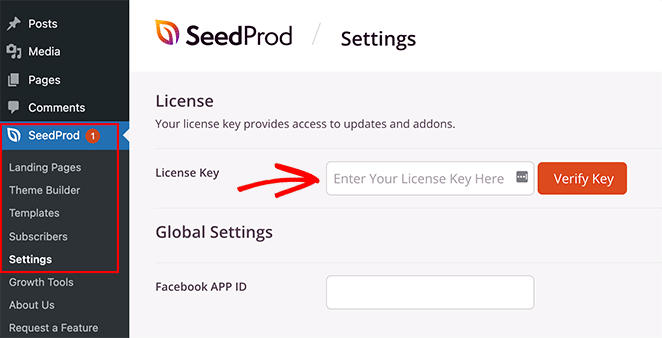
You can find your license key in the account section of SeedProd’s website.
Next, go to SeedProd » Landing Pages. This is where you enable any of SeedProd’s page modes and create a new thank you page.
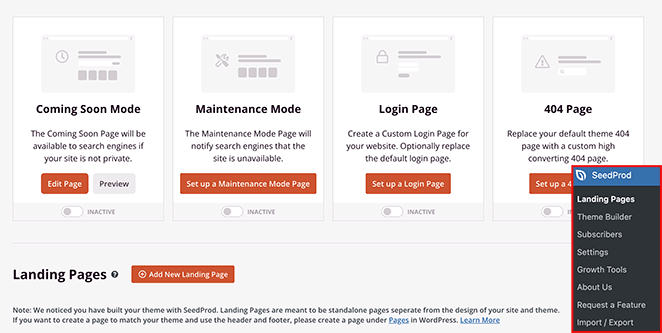
Select the Add New Landing Page button to create your thank you page.
Step 2. Choose a Thank You Page Template in SeedProd
You can choose a landing page template on the next screen, and hundreds of templates are available.
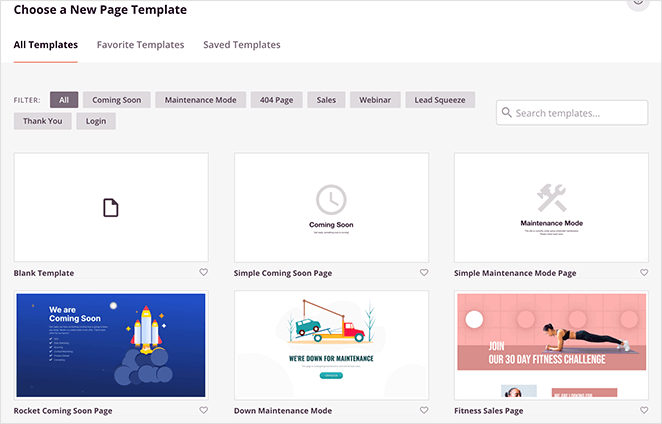
Click the Thank You tab to show only the thank you page templates. Then hover over a template you like and click the checkmark icon to launch it.
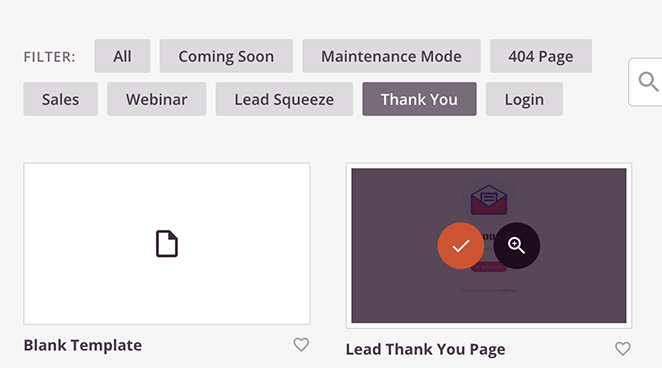
We’ll use the ‘Order Completed Thank You Page’ for this tutorial.
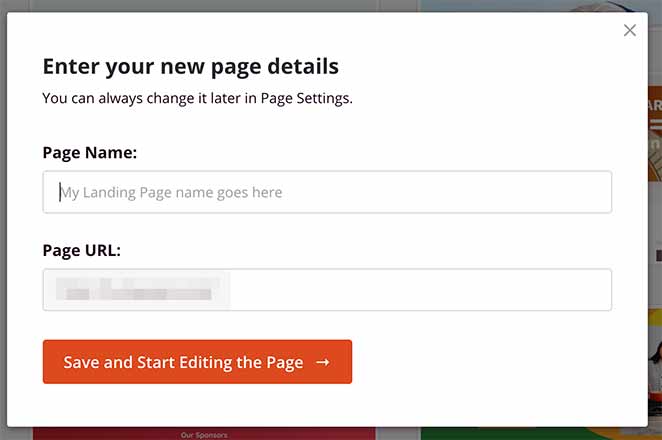
After choosing your template, enter a name and page URL. Then click the Save and Start Editing the Page button.
Step 3. Customize Your Thank You Page with Upsells
You can now start editing your thank you page with the drag-and-drop builder. The visual editor shows a live preview of your page on the right.
To edit any element, click it, and a settings menu appears on the left-hand side.
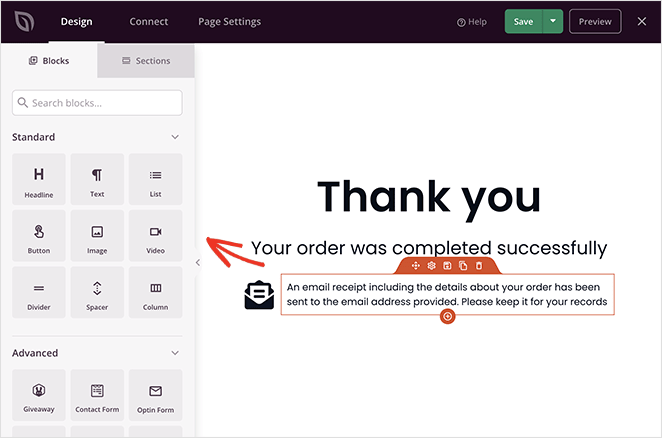
The left-hand panel has elements called Blocks you can drag and drop onto the page.
We’ll start by changing the page’s fonts to match our WooCommerce theme. Click the Global Settings icon in the bottom-left corner and expand the Fonts tab.
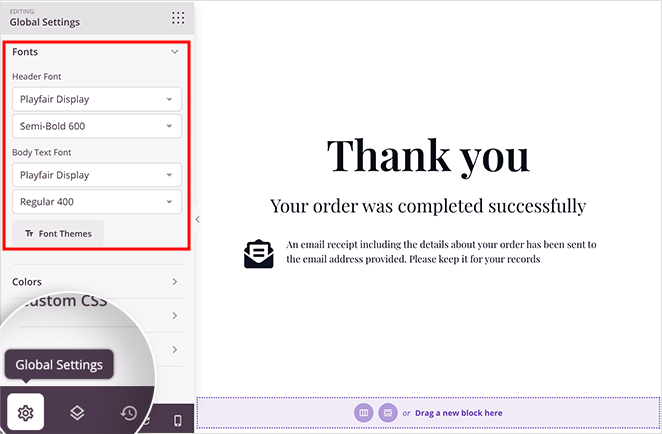
You can then choose custom Google fonts and apply them globally. The same panel handles global colors, background, and custom CSS.
Next, you can turn your WooCommerce thank you page into a conversion-optimized post-checkout screen using the drag-and-drop builder.
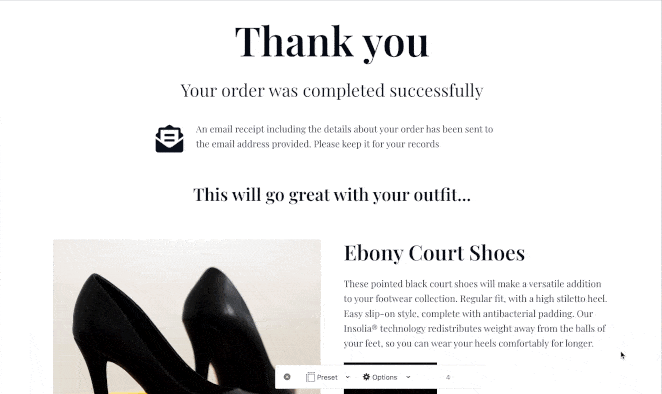
Adding a WooCommerce Upsell
Adding a related-product upsell to your thank you page helps increase average order value and drive more store sales.
Here’s how to create an upsell on your store’s order confirmation page.
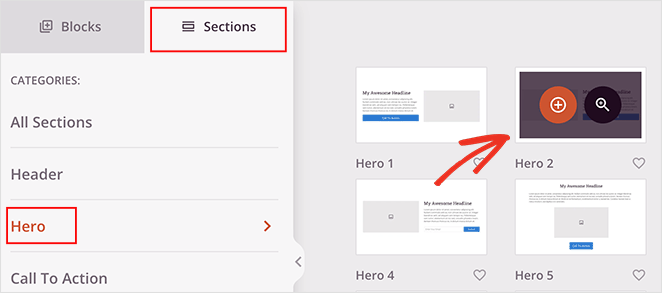
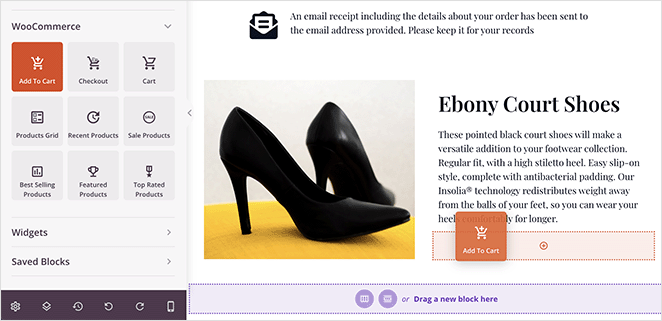
Click the Sections tab in the left-hand panel to open a screen of pre-made content sections. Select the Hero tab, then the Hero 2 section by clicking the orange plus icon to insert it.
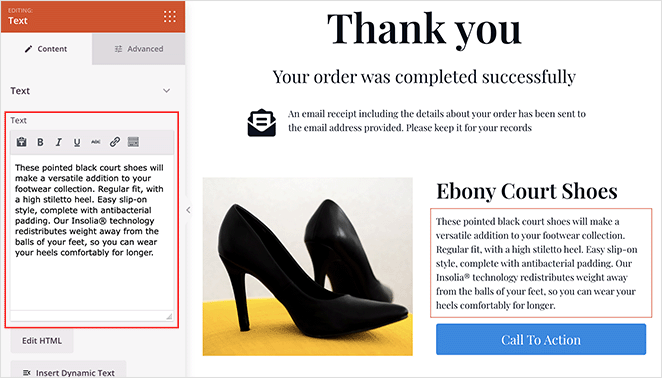
Now click the Image block in the new section and add an image of the product you want to upsell.
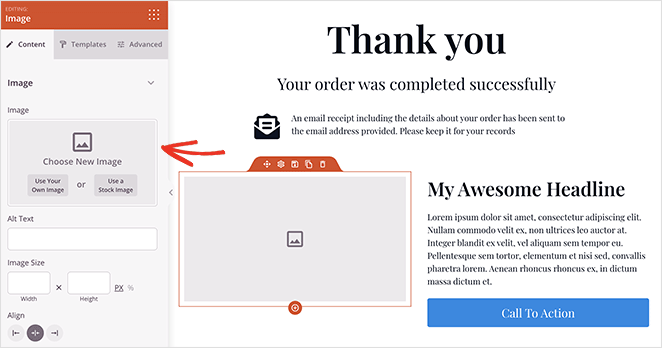
You can do the same for the product title and the product description.
Now we’ll add a new call-to-action button. Hover over the existing button and click the trash can icon to remove it.

Next, scroll down to the WooCommerce blocks and drag over the Add-to-Cart button. It replaces your old button with one that connects to your WooCommerce products.
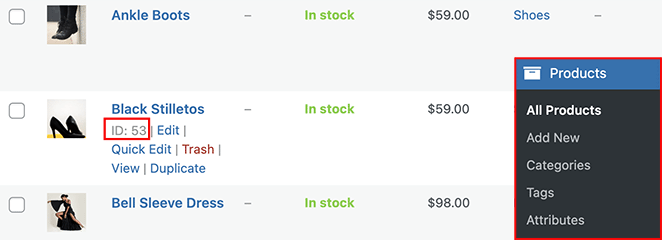
Click the button to open the settings panel, then enter that product’s Product ID. This automatically adds the item to your customer’s cart.
You can find your product ID by going to Products » All Products from your WordPress admin area and finding your product.
After adding the Product ID, turn on the Direct To Checkout toggle. The Add-to-Cart block plus Direct-to-Checkout is the part most beginners miss, and it’s what turns the upsell into a one-tap buy instead of an extra step.
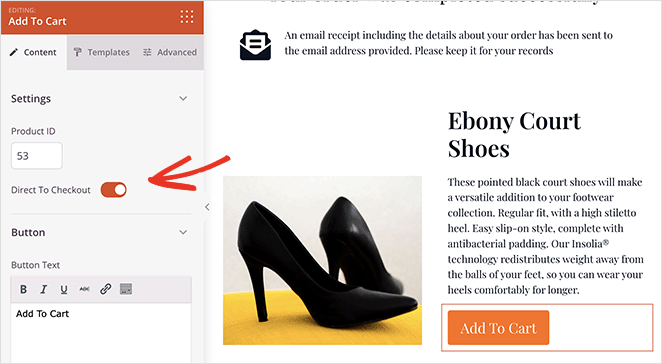
You can also click the Advanced tab to customize your button color, padding, alignment, and more.
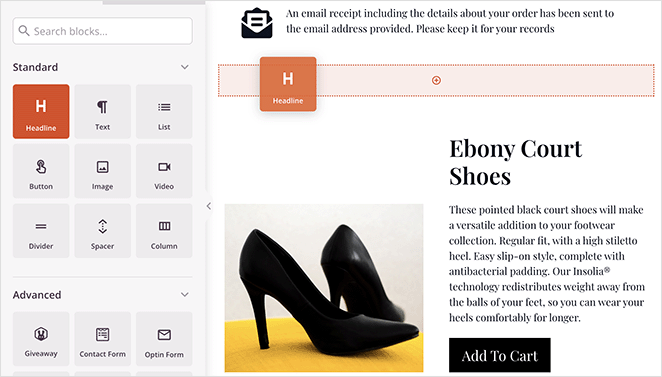
Now let’s add a heading to promote your upsell. Drag the headline block above your upsell and add an enticing headline to encourage shoppers to buy.
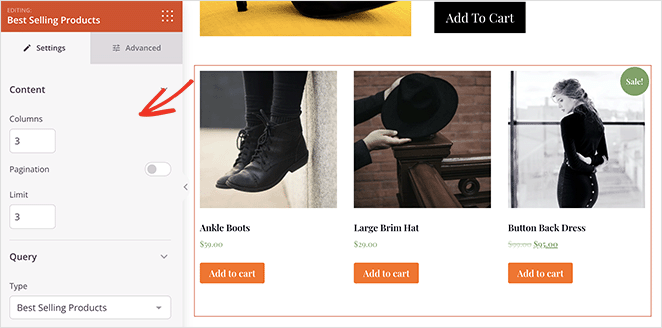
Adding a Best-Selling Products Grid
Adding best-selling products to your thank you page is an easy way to boost sales. Because these products are proven to sell, your customers are likely ready to buy them.
To do that, scroll to the WooCommerce Blocks section and drag the Best-Selling Products grid onto your page.

You can set the block to show multiple products, columns, pagination, and more. In the Advanced tab, you can customize the grid colors, styling, alignment, and spacing.
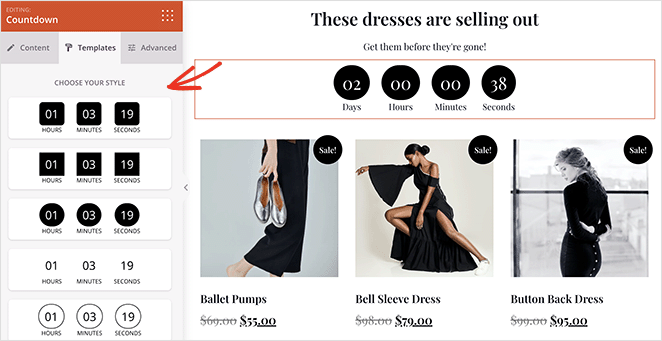
There are plenty of other ways to customize your thank you page with SeedProd, such as adding:
- Recent products
- Sale products
- Featured products
- Top-rated products
You can even add a countdown timer to encourage buyers to grab sale items before the offer ends.
Remember to click the Save button in the top-right corner to save your changes.
Step 4. Publish Your WooCommerce Thank You Page
When you’re happy with how your order confirmation page looks, you can make it live. Click the dropdown arrow on the save button and select Publish.
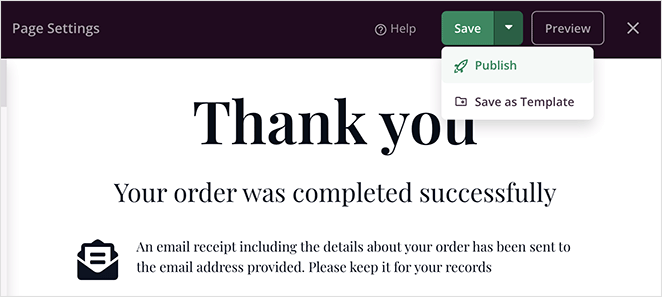
Now you can visit your thank you page to see how it looks.
Ready to build yours?
Turn your thank you page into your best-selling screen
SeedProd’s WooCommerce blocks let you drop in upsells, best-sellers, and one-tap buy buttons without touching code. Build it once and let it work after every order.
Build My Thank You PageHow to Edit the WooCommerce Thank You Page with Code
If you’d rather edit the native order-received page than build a separate one, you can do it with code. I’ll be honest that this route is for developers, but it keeps WooCommerce’s live order details in place while you add your own content.
The thank you page in WooCommerce isn’t a normal page with a shortcode. It renders from the thankyou.php template at the order-received endpoint, which looks like yoursite.com/checkout/order-received/.
There are two ways to change what shows up there:
- The woocommerce_thankyou hook: Add content below the order confirmation without editing template files. Drop a snippet into a code snippets plugin or your child theme.
- A template override: Copy WooCommerce’s
templates/checkout/thankyou.phpinto your child theme atwoocommerce/checkout/thankyou.php, dropping thetemplatesfolder, then edit the copy. WooCommerce only loads your version if the path matches exactly.
The hook is the safer of the two. A short snippet like this adds a custom message under the confirmation:
add_action( 'woocommerce_thankyou', 'custom_thankyou_message' );
function custom_thankyou_message( $order_id ) {
    $order = wc_get_order( $order_id );
    echo '<p>Thanks, ' . esc_html( $order->get_billing_first_name() ) . '! Your order is on its way.</p>';
}
One thing to know is, a template override survives plugin updates but not always theme updates, so always edit the copy inside a child theme. If you edit WooCommerce’s original file or your parent theme, the next update wipes your changes.
How to Replace the Default WooCommerce Thank You Page
After publishing your SeedProd page, you’ll need to redirect the default thank you page so buyers land on your new screen instead. The easiest way is a free redirect plugin.
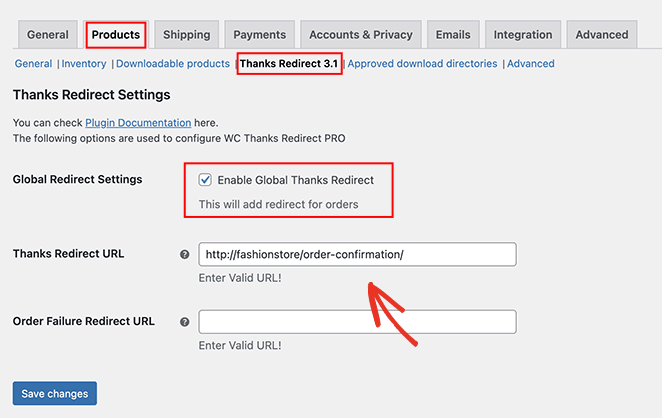
We recommend the Thanks Redirect for WooCommerce plugin. It’s free in the WordPress plugin repository and adds the redirect quickly. Here’s how to set it up:
- Install and activate the Thanks Redirect for WooCommerce plugin.
- Go to WooCommerce » Settings and click the Products tab.
- Click the Thanks Redirect link, then check the Enable Global Thanks Redirect box.
- Paste your new thank you page URL into the Thanks Redirect URL field and click Save Changes.
You can also set a different thank you page per product. The Thanks Redirect plugin has a per-product redirect setting, and the hook method can branch on the product ID in the order. That’s worth doing when each product calls for a different upsell.
What Makes a Good WooCommerce Thank You Page?
The best thank you pages I’ve seen do a few things well at once. They confirm the order clearly, then use the leftover attention to point the buyer toward a next action.
If you want a page that earns its place, build in these elements:
- A clear confirmation: The order number, items, and total, so the buyer knows the purchase went through.
- One relevant upsell: A single related product beside the confirmation, not a cluttered grid that competes for attention.
- A reason to come back: A coupon for the next order or a link to a setup guide for what they just bought.
- A share or follow prompt: Social buttons that turn one buyer into reach, since they’re at their happiest right after purchase.
Keep it focused. A thank you page that tries to do everything ends up converting on nothing.
What to Do Once Your Thank You Page Is Live
Building the page is only half the job. Once it’s live, set up a way to measure whether it’s actually working.
- Track the purchase: Add a GA4 purchase event or your ad pixel to the order-received page so conversions are recorded.
- Watch the upsell take-rate: Check how many buyers add the upsell product, then test a different offer if it’s flat.
Start with the purchase event. Without it, you’re guessing whether any of this moved the needle.
WooCommerce Thank You Page FAQs
How do I edit the WooCommerce thank you page without a plugin?
You can edit it with code. Add a snippet using the woocommerce_thankyou action hook to insert content below the order confirmation, or copy the thankyou.php template into your child theme and edit the copy.
The hook method is safer because it survives theme and plugin updates. Editing the original template file does not.
What is the WooCommerce thank you page URL?
The default thank you page lives at the order-received endpoint, which looks like yoursite.com/checkout/order-received/. You can rename that endpoint under WooCommerce » Settings » Advanced » Checkout endpoints.
Can I set a different thank you page for each product?
Yes. A redirect plugin with a per-product setting can send buyers of each product to a different page. You can also branch the woocommerce_thankyou hook on the product ID in the order.
It’s worth the extra setup when each product needs a different upsell or follow-up.
Will customers still see their order details on a custom thank you page?
Only if you keep them. A redirect to a separate page drops the live order data unless you pull it in dynamically.
If the confirmation details matter, use the hook or template method on the native order-received page, or keep WooCommerce’s order details block on your custom page.
Start Customizing Your WooCommerce Thank You Page
You now have a custom WooCommerce thank you page that turns a plain confirmation into a screen that sells. With SeedProd, you can build it without code and have it live in an afternoon.
Want to keep improving your WooCommerce store? Check out these tutorials next:
- How to Control Related Products in WooCommerce
- How to Secure Your WooCommerce Site
- How to Hide Out-of-Stock Products in WooCommerce
- Customize the “Additional Information” Tab in WooCommerce
- How to Fix WooCommerce View Cart Not Working
- How to Change the Shop Page Title in WooCommerce
- Improve Your Product Image Gallery in WooCommerce
- How to Add Star Ratings to WooCommerce Products
Thanks for reading! We’d love to hear your thoughts, so please feel free to join the conversation on YouTube, X and Facebook for more helpful advice and content to grow your business.


