

TL;DR: How to Set Up a Thank You Page in WordPress
A thank you page confirms a visitor’s action and gives you a natural opening to guide them to the next step. Here’s how to build one in minutes with SeedProd.
- Install SeedProd – Activate the plugin and enter your license key.
- Create a landing page – Choose a pre-made thank you page template from the library.
- Add your content – Drag in a headline, confirmation text, and a clear CTA.
- Customize the design – Match your brand colors, fonts, and layout.
- Connect your email list – Link your email provider to capture signups automatically.
- Publish – Preview on mobile, then go live.
You submit a form or make a purchase, and you land on a blank page. No confirmation. No branding. No idea what happens next.
That moment right after someone converts is the most engaged they’ll ever be on your site, whether you’re running a plumbing business or a food blog. I’ve been building thank you pages in WordPress for years, and getting one live with SeedProd takes about 15 minutes. Let’s set yours up.
Quick steps to create a thank you page in WordPress:
- Step 1: Install and Activate SeedProd
- Step 2: Set Up a Thank You Page
- Step 3: Add Content to Your Thank You Page
- Step 4: Customize Your Thank You Page
- Step 5: Connect Your Email List
- Step 6: Configure Your Thank You Page Settings
- Step 7: Publish Your Thank You Page in WordPress
What Is a Thank You Page in WordPress?
A thank you page in WordPress is the page visitors see right after completing an action, like filling out a form, making a purchase, or subscribing to your newsletter. Its main job is to thank them while also showing what to do next.
For example, an online store can use a thank you page to confirm an order and share tracking details. A blogger might use it to deliver a free download or suggest related content. On service websites, it could encourage people to book a call or join an email list.
These pages build trust, reassure visitors their action worked, and create a chance to guide them toward another step.
Here’s a quick look at how a thank you page differs from a landing page:
| Feature | Thank You Page | Landing Page |
|---|---|---|
| Timing | After the visitor takes an action | Before the visitor takes an action |
| Primary Goal | Confirm and nurture | Persuade and convert |
| User Mindset | High trust (they just converted) | Skeptical (still deciding) |
How to Create a Thank You Page in WordPress
The simplest way to create a thank you page in WordPress is to use a visual page builder. You can technically add a new page with the block editor, but getting it to look polished and include the right features often takes custom code or extra plugins.
On my own sites, I use SeedProd because it lets me design a thank you page quickly with drag-and-drop. Instead of worrying about CSS or layouts, I can pick a template, add my content, and see the results in real time.

SeedProd also includes pre-made thank you page templates, so you can start from a design that already works. From there, it’s just a matter of customizing the text, colors, and images to match your brand.
Here’s how to set up a thank you page in WordPress step by step.
Step 1: Install and Activate SeedProd
To start, install and activate the SeedProd plugin on your WordPress site. If you’ve never installed a plugin before, you can follow this step-by-step guide.

After activation, enter your license key in the field provided and click Verify Key. Once verified, you’ll see the option to Create Your First Page.

Click that button to head to the SeedProd dashboard, where you’ll build your thank you page.
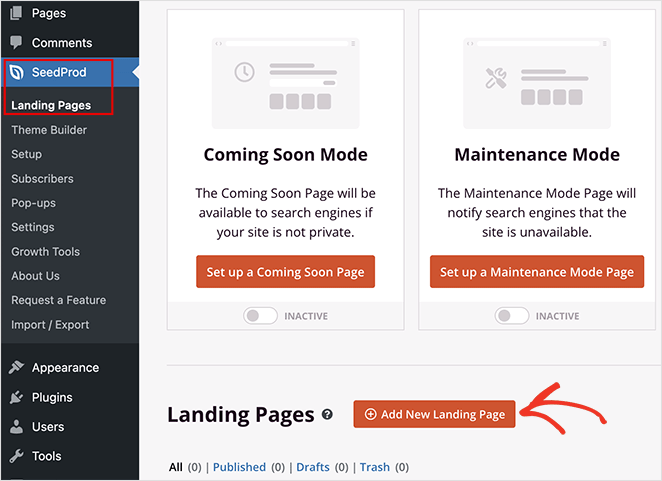
Step 2: Set Up a Thank You Page
From the SeedProd dashboard, click Add New Landing Page to create your thank you page.
You’ll see a library of templates organized by type.
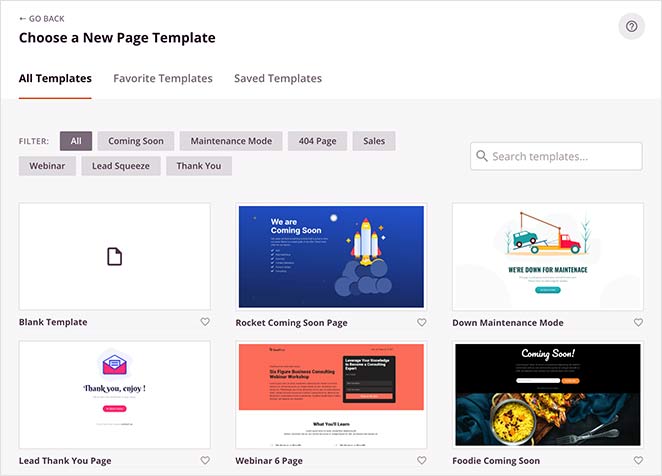
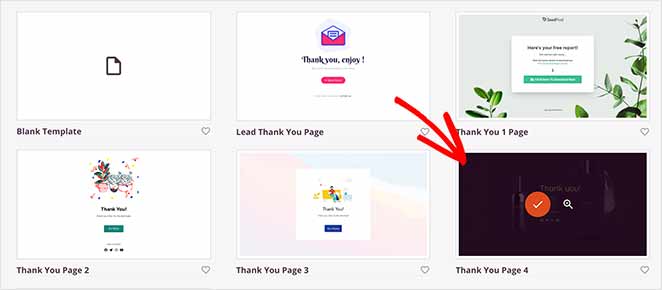
Select the Thank You filter to view ready-made designs. Choose the template you like, give it a name and URL, then click Save and Start Editing to open it in the visual builder.
Step 3: Add Content to Your Thank You Page
Now it’s time to add your content.
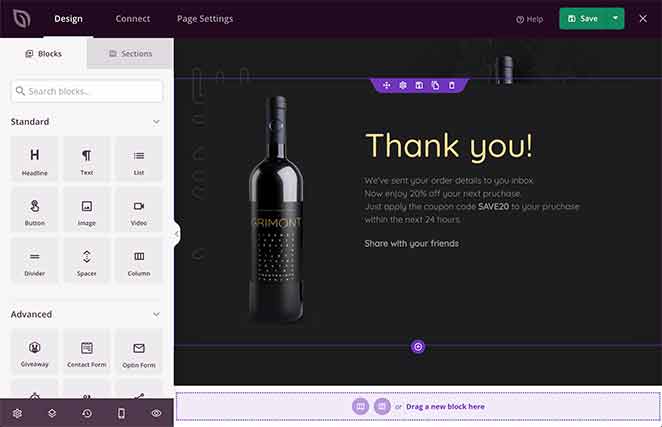
SeedProd’s drag-and-drop editor makes this simple. You can choose blocks from the left panel and drop them anywhere on your thank you page.
Common blocks you might want to use include:
- Headline and text to thank visitors and confirm their action
- Optin or contact form to capture more leads
- Countdown timer to create urgency for an offer
- Social sharing buttons to spread the word
- Footer section with your logo and social profiles

You can also use pre-made sections like headers, hero areas, or calls to action instead of designing from scratch. Just pick the layout you want and customize it with your own text and images.
Remember to click Save as you go. Once your content is in place, you’re ready to customize the design to fit your brand.
Step 4: Customize Your Thank You Page
Next, customize your thank you page so it matches your brand. In SeedProd’s settings you can adjust colors, fonts, backgrounds, and layouts with just a few clicks.
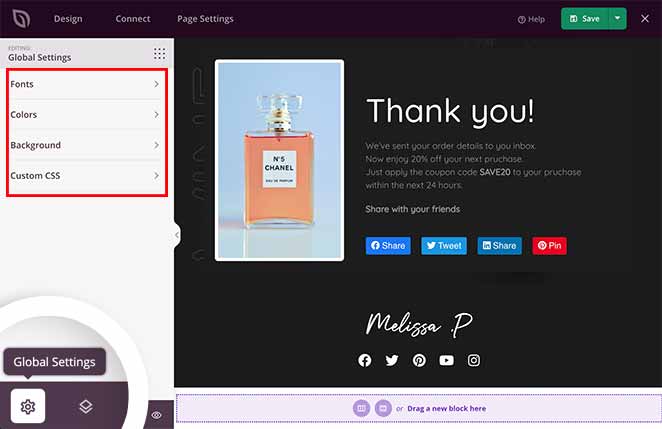
For example, you might change the background to your brand color, pick a clean font that matches your site, or use one of SeedProd’s pre-made palettes and font themes to save time.
The goal here is consistency. Your thank you page should feel like a natural extension of your website, not a generic template.
Once you’re happy with the design, click Save to lock in your changes.
Step 5: Connect Your Email List
A thank you page is the perfect place to grow your email list. In SeedProd, you can connect directly to popular email marketing services so new subscribers are automatically added to your list. You can also hook up Google Analytics to track conversions or use Zapier to connect thousands of other apps.
To do this, open the Connect tab in SeedProd, choose your provider, and follow the prompts to link your account. Once connected, every signup on your thank you page can trigger follow-up emails, automations, or analytics tracking without extra work.
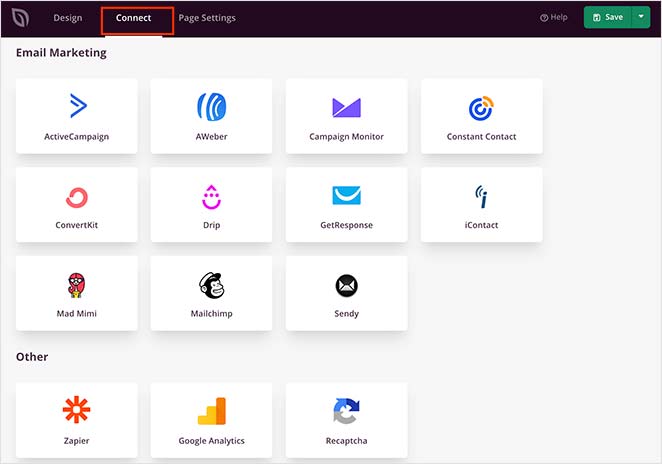
If you’d like step-by-step instructions for a specific provider, see the SeedProd integration documentation.
Step 6: Configure Your Thank You Page Settings
Before you publish, take a moment to fine-tune your thank you page settings. In SeedProd’s Page Settings tab, you can update basics like the page name and URL, but also connect SEO and analytics tools to track results.
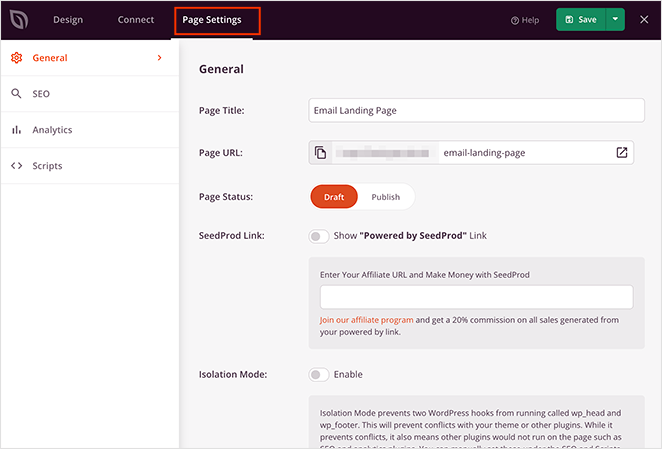
For example, you might add your Google Analytics code or connect with All in One SEO and MonsterInsights to monitor performance. This ensures you can see exactly how many signups or sales come from your thank you page.
If you run ads, you can also paste tracking scripts (like a Facebook pixel) so conversions are recorded automatically. These small tweaks give you better data and make your thank you page more effective.
When everything looks good, click Save to store your settings.
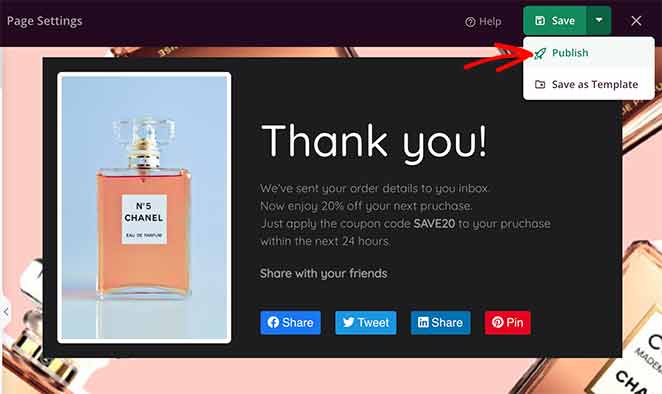
Step 7: Publish Your Thank You Page in WordPress
Before publishing, use the Mobile Preview option in SeedProd to make sure your thank you page looks good on all devices.

You can edit the mobile version in real time, just like the desktop view.
When you’re happy with the design, click Publish. SeedProd will confirm your page is live, and you can select See Live Page to preview it on your site.
Depending on your site type, you might also want a custom thank you page for WooCommerce purchases or membership registrations:
How to Send Visitors to Your Thank You Page After Form Submission
Most visitors who fill out a contact or lead form are primed to take another step. A redirect to your thank you page keeps that momentum going.
If you’re using WPForms, here’s how to set it up:
- Open the form you want to edit in WPForms and go to Settings > Confirmations.
- Under Confirmation Type, select Go to URL (Redirect).
- Paste your thank you page URL in the Redirect URL field.
- Click Save to store the setting.
The next time someone submits your form, they’ll land on your thank you page automatically.
Most other WordPress form plugins have a similar setting. Look for “Redirect URL,” “Success URL,” or “Confirmation URL.” For WooCommerce order pages, the Custom WooCommerce Thank You Page guide covers that separately.
Thank You Page Examples
Thank You Page Example with Social Sharing

This webinar thank you page thanks registrants with a personal message and includes social sharing buttons. The CTA to share on Facebook or Twitter encourages attendees to spread the word, amplifying reach with no extra effort from the brand.
Thank You Page Example with Video

Kindlepreneur welcomes new subscribers with a bold headline, “Your Freebies Are On The Way!”, and a short video from the founder. The video builds trust and makes the experience feel personal, while the clear next step (“Check your inbox”) keeps visitors moving forward.
Thank You Page Example with Countdown Timer

This thank you page uses a countdown timer to show when a free PDF will arrive. Visitors can also click to download it instantly. Adding a feedback survey makes the page interactive, giving the business valuable insights while keeping subscribers engaged.
Thank You Page Best Practices
Before your thank you page goes live, here are four things worth checking:
- Keep it on-brand. Colors, fonts, and tone should match your main site. A jarring design shift at this moment undermines the trust you just earned.
- Include one clear CTA. Pick one next step and make it the focus. Multiple CTAs split attention and reduce clicks on all of them.
- Add social sharing buttons. Someone who just signed up or bought something is in the best mindset to share it. Don’t miss that window.
- Test before going live. Submit a test form, make a test purchase, or preview the redirect flow end-to-end. Check the mobile view and confirm any confirmation emails arrive.
WordPress Thank You Page FAQs
What is the difference between a thank you page and a landing page?
A landing page appears before a visitor takes an action. Its job is to persuade. A thank you page appears after the action. Its job is to confirm, reassure, and guide the visitor toward the next step. Both are standalone pages, but they serve opposite ends of the same conversion moment. Landing pages target people who haven’t decided yet. Thank you pages work with people who already have.
How do I redirect to a thank you page after form submission in WordPress?
In WPForms, open the form and go to Settings > Confirmations. Set the Confirmation Type to “Go to URL (Redirect)” and paste your thank you page URL. Most other WordPress form plugins have a similar setting. Look for “Redirect URL” or “Success URL.” Once set, every form submission automatically sends visitors to your thank you page instead of showing a generic success message.
How do I track conversions on a thank you page in WordPress?
Connect Google Analytics to your thank you page and set the page as a conversion event. In SeedProd, you can add your Analytics tracking code directly in the Page Settings tab. You can also use MonsterInsights to see conversion data inside your WordPress dashboard. If you run ads, paste your ad network’s pixel code in the Page Settings tab to track paid conversions automatically.
What should I include on a thank you page?
Start with a clear confirmation that the action worked. A headline like “You’re in” or “Your order is confirmed” tells visitors immediately what happened. From there, include one strong call to action: join your email list, browse related products, or share with a friend. You can also add social sharing buttons, a coupon code for a first purchase, or a short welcome video to build trust fast.
Do I need a plugin to create a thank you page in WordPress?
You don’t technically need a plugin. WordPress lets you create any page with the block editor and set a redirect via your form plugin. But without a dedicated page builder, matching your brand and including features like countdown timers or opt-in forms is difficult without custom code. A plugin like SeedProd gives you pre-made templates, drag-and-drop editing, and built-in integrations without touching code.
Now you know how to set up a thank you page in WordPress that not only thanks visitors but also guides them toward the next step.
If you want the easiest way to create a professional thank you page, you can do it in minutes with SeedProd’s drag-and-drop builder and ready-made templates. It’s the same tool I rely on whenever I need a page that looks good and works right away.
You might also find the following guides helpful:
- Call-to-Action Best Practices
- Landing Page URL Examples and Best Practices
- Landing Page Best Practices
- A/B Testing for Landing Pages in WordPress
Thanks for reading! We’d love to hear your thoughts, so please feel free to join the conversation on YouTube, X and Facebook for more helpful advice and content to grow your business.


