TL;DR: How to Change Your WordPress Theme Safely
Follow these steps to switch themes without losing your content, menus, or custom code.
- Back up your site: Create a full backup before touching anything.
- Save your custom code: Copy any CSS, tracking scripts, and functions.php snippets to a text file.
- Note your menus and widgets: Screenshot your header, footer, sidebars, and homepage layout.
- Preview first: Use Live Preview, the Theme Switcha plugin, or a staging site to test before activating.
- Check after activating: Verify menus, widgets, tracking codes, and page layouts are intact.
- Monitor GSC: Watch Google Search Console for 4-6 weeks for any crawl errors or Core Web Vitals changes.
I’ve changed WordPress themes plenty of times, and I’ve broken things in the process. It’s easy to lose your sidebar, mess up your layout, or forget the one bit of custom code that makes everything work.
That’s why switching themes without losing content comes down to preparation and testing, not guesswork.
In this guide, I’ll walk you through the exact steps I use to switch themes safely. Whether you’re activating a new theme from WordPress.org or building a custom theme with SeedProd (a drag-and-drop website builder for WordPress), you’ll know what to do before, during, and after the change.
- What Changes When You Switch WordPress Themes?
- Will Changing Your WordPress Theme Affect Your SEO?
- What Should I Do Before Changing My WordPress Theme?
- Method 1. Preview Your New Theme Before Activating It
- Method 2. Change WordPress Theme with Theme Switcha Plugin
- Method 3. Change WordPress Theme with Staging Environment
- Method 4. Change WordPress Theme on Live Website
- Method 5. Change WordPress Theme via FTP
- What Should I Check After Changing My WordPress Theme?
- Want to Skip the Theme-Switching Hassle Entirely?
- FAQs on Changing Your WordPress Theme
What Changes When You Switch WordPress Themes?
You won’t lose your posts, pages, or images when you switch themes. WordPress stores your content in the database, so your theme mainly controls design and layout.
What usually changes is your site structure and styling, like menus, widgets, and templates. That’s why the checklist below matters.
| What Stays Safe | What Can Change |
|---|---|
| Posts, pages, and media | Menus and menu locations |
| Comments | Widgets and sidebars |
| Users and roles | Homepage layout |
| Plugin settings | Custom theme code (CSS, functions.php snippets) |
| WooCommerce orders and products | Tracking scripts in theme files |
| All other database content | Theme-specific page templates |
Watch out for page builders and shortcodes:
If your current theme includes a built-in page builder (common with premium ThemeForest themes), or if you see bracketed [shortcode] tags in your pages, copy that content to a plain text file before switching. The new theme won’t render those shortcodes, and you could lose visible page content.
A code snippets plugin is a safer home for any shortcodes you want to carry forward.
Will Changing Your WordPress Theme Affect Your SEO?
Yes, it can, but mainly through site speed, mobile responsiveness, and structured data, not through content loss.
I’ve seen sites lose rankings after a theme switch, and it’s almost never about the content. It’s usually one of three things:
- Page speed changes: A heavier theme adds more CSS and JavaScript, which slows your pages down. A lighter theme can improve your load time. Run a speed test before and after with a tool like GTmetrix or Google PageSpeed Insights.
- Structured data and schema: If your old theme included built-in schema markup (common with SEO-focused themes), switching away from it removes that structured data. You’ll need to re-add it through AIOSEO or a schema plugin.
- Core Web Vitals shift: New theme code can change your Largest Contentful Paint, Cumulative Layout Shift, and Interaction to Next Paint scores. These affect how Google ranks your pages.
That’s why the checklist below includes a speed test step and GSC monitoring after the switch.
What Should I Do Before Changing My WordPress Theme?
Before activating a new theme, complete this checklist. It prevents the most common post-switch problems like missing menus, broken layouts, and lost tracking codes.
You only need to do this once. After that, you can preview and switch themes with far less risk.
- Create a full site backup so you can restore everything if something goes wrong.
- Save any custom code added to your theme, including tracking scripts and functions.php snippets. For custom CSS: copy it to a text file, then after switching, go to Appearance » Customize » Additional CSS (classic themes) or Appearance » Editor » Styles (block themes) and paste it there. CSS saved in Additional CSS is stored in the database and survives future theme switches.
- Note your current menu structure and which menu is assigned to each location.
- Check your homepage and blog settings under Settings » Reading.
- Take screenshots of your header, footer, sidebars, and homepage layout for reference.
- Test your current page load times so you can compare performance after the switch.
- If switching to a block (Full Site Editing) theme, note that your sidebar widgets won’t transfer. You’ll rebuild navigation and layout using the Site Editor instead.
- If your site uses WooCommerce, check that your new theme supports WooCommerce. Specifically test the product page, cart, and checkout pages on staging before going live.
- Use a staging site or enable maintenance mode to hide changes from visitors.
Once you’ve completed this checklist, you’re ready to preview your new theme and start the switch.
Method 1. Preview Your New Theme Before Activating It
After completing the pre-switch checklist, preview your new theme to check layouts, menus, and widgets before making it live.
If You’re Using a Classic WordPress Theme
Go to Appearance » Themes in your WordPress dashboard.
Hover over the theme you want to try and click Live Preview. This opens the theme in the WordPress Customizer.
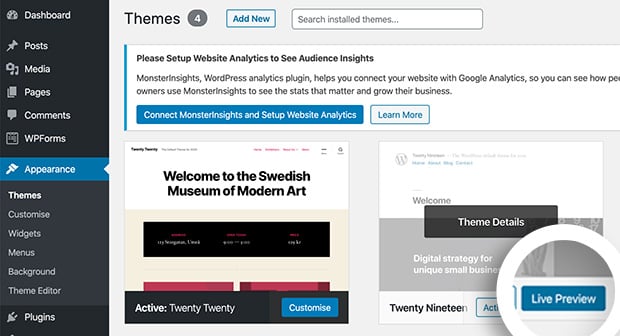
Click through your homepage and a few key pages. Check menus, sidebars, and page layouts.
If You’re Using a Block (Full Site Editing) Theme
Block themes use the Site Editor, not the Customizer. After activating the theme, go to Appearance » Editor to review your templates, navigation, and layout.
In a block theme, templates and template parts replace traditional widgets and sidebars. To preview a block theme before committing, install it and check Appearance » Editor to see how your content maps to the new template structure.
If something looks missing, it usually means the new theme uses different templates and content needs re-placing in the Site Editor.
Method 2. Change WordPress Theme with Theme Switcha Plugin
Use this method if you want to preview a theme quickly without setting up a full staging environment.
Another option for previewing and testing your WordPress theme before going live is to use the Theme Switcha Plugin. This lets you preview your new theme without going live with the changes.
First, download, install and activate the free plugin. Then go to Settings » Theme Switcha from the left-hand sidebar of your admin panel.
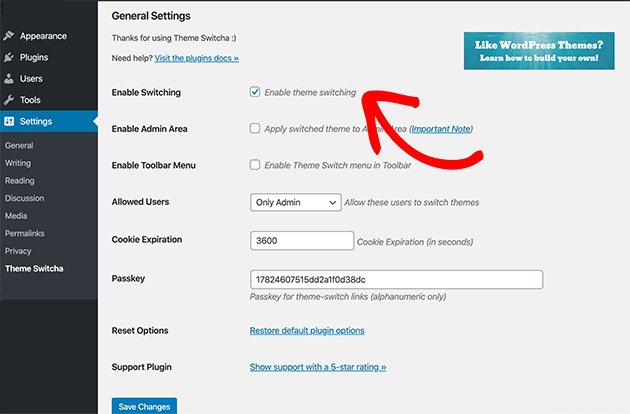
From the general settings page, select the Enable Theme Switching option. Then scroll down to the bottom of the page and click Save Changes.
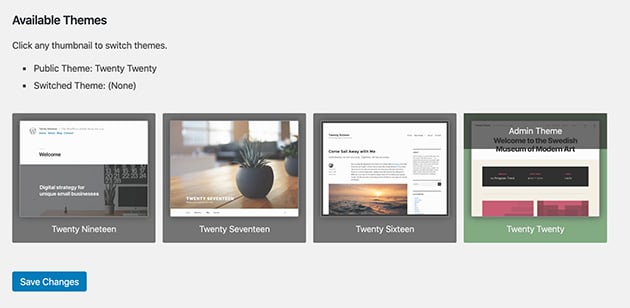
At the bottom of the page, the plugin will now display all your installed themes. Click your new theme to preview it in a new browser tab.
Method 3. Change WordPress Theme with Staging Environment
Most managed WordPress hosting companies offer a staging environment where you can test changes on a full copy of your site before going live. I use staging for any theme switch on a site with live traffic, because it’s the safest option when you have the time to set it up.
Here’s an example of creating a staging environment using Bluehost. From your admin panel, select Bluehost » Staging. This will bring up a page that asks if you’d like to copy your production (live) site to a staging site.
Click Create Staging Site to begin making the clone.
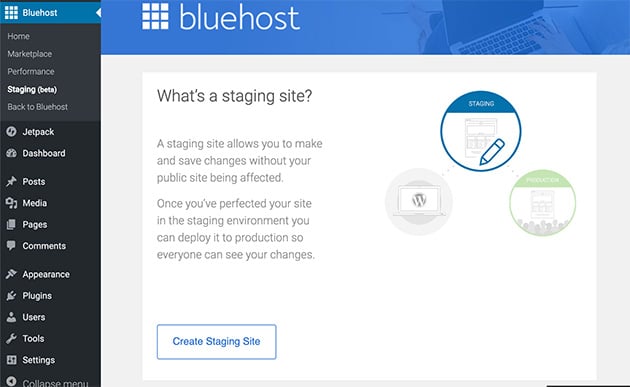
After a short while, you’ll see a page with a success message telling you your staging environment is ready to work on.
Click Go to Staging Site to go to this version of your website.
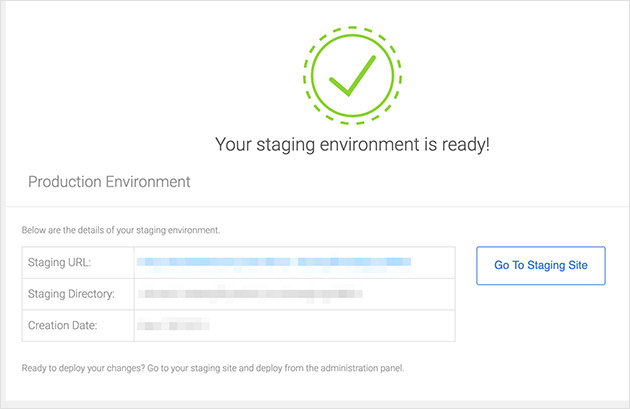
You can now test that your theme works properly without any changes affecting your site’s original version.
The staging interface varies by host. Check your host’s documentation for the equivalent option if you’re not using Bluehost.
Note: Some hosting plans don’t offer staging sites unless you use an advanced plan.
Method 4. Change WordPress Theme on Live Website
Now that you’ve tested your new theme, you’re ready to make it live. First, you need to add the new theme files to your site.
Go to Appearance » Themes and click Add New. Upload your theme’s zip file and click Install.
Once installed, hover your mouse cursor over your chosen theme. Then click the Activate button.
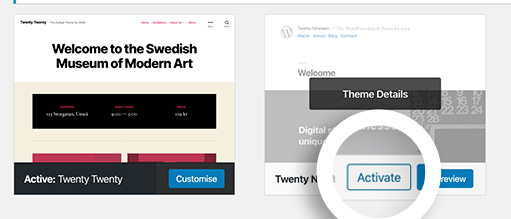
If you head to your homepage, you’ll see your new WordPress theme in action.
To publish your new theme from a staging environment, follow these steps.
Go to Bluehost » Staging Site and scroll down the page from your staging environment. You’ll see 3 options for copying your test site to your original, live site.
- Deploy files only.
- Deploy files and database.
- Deploy database only.
In most cases, you should choose the Deploy Files and Database option since it will include any changes to your site.
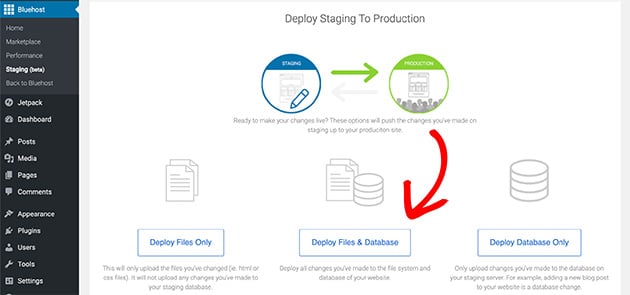
It may take a minute or 2 for the information to copy over. You’ll see a success message when the process is complete.
After doing that, navigate back to your main (production) site, where your new theme will be in action.
Some people prefer using an older method of changing their WordPress theme using File Transfer Protocol (FTP client) to upload files to WordPress. Others prefer to configure themes via their WordPress host’s cPanel.
Check this beginner’s guide on using FTP to learn how to upload themes on your web hosting with FTP.
Method 5. Change WordPress Theme via FTP
Warning: This method is for advanced users. Please ensure you have a full backup of your site before proceeding.
If you can’t access your WordPress dashboard, you can install a theme manually. You can use an FTP client like FileZilla for this.
First, connect to your hosting account using FTP. Navigate to the /wp-content/themes/ folder.
Next, unzip your theme folder on your computer. Upload the entire unzipped folder to the themes directory on your server.
This installs the theme files safely. If you were locked out of your site, you can now rename your old theme folder to force WordPress to switch to a default theme. Then you can log in and activate the new one you just uploaded.
What Should I Check After Changing My WordPress Theme?
After switching themes, take a few minutes to check that everything works as expected. Most issues are small and easy to fix if you catch them early.
- Check your pages, posts, menus, and forms to make sure nothing is missing or misaligned.
- Go to Appearance » Widgets. Any widgets from your old theme will be in an “Inactive Widgets” area at the bottom. Drag them into the new widget areas provided by your new theme.
- Test your site in a few different browsers to confirm the layout looks consistent.
- Add back any tracking codes or custom snippets you saved before the switch.
- Disable maintenance mode so visitors can see your updated site.
- Test your page load times and compare them with your old theme.
- Monitor Google Search Console for the next 4-6 weeks. Watch for new crawl errors, changes in Core Web Vitals, or drops in organic impressions. Most theme-related SEO impact shows up within 2-3 weeks.
Want to Skip the Theme-Switching Hassle Entirely?
If you followed these steps, your new theme should be live and working. But if this whole process felt like more work than it should be, there’s another option worth knowing about.
A lot of theme switching happens because someone wants a completely different site design: a fresh look without hunting through theme marketplaces, testing compatibility, and worrying about shortcode loss.
SeedProd is a drag-and-drop website builder for WordPress that lets you build a custom theme directly, without the theme marketplace. Instead of searching for a theme that’s close to what you want and then fighting to customize it, you start from one of the 200+ pre-built website kits and adjust it visually.

There’s no shortcode risk because you’re building with SeedProd’s blocks. There’s no compatibility testing because SeedProd replaces the theme layer entirely. I use it on my own sites because it’s the fastest way to get a professional result without touching code.
If that sounds like what you actually wanted from a theme switch, see SeedProd’s plans to get started.
FAQs on Changing Your WordPress Theme
Will changing my WordPress theme affect my SEO rankings?
It can, but the risk is manageable. The main SEO risks are page speed changes (a heavier theme slows your site down), loss of structured data or schema markup built into your old theme, and Core Web Vitals shifts from new theme code. Your content, URLs, and meta titles are stored in WordPress and stay intact. Run a speed test before and after, and monitor Google Search Console for 4-6 weeks following the switch.
What happens to page builder content and shortcodes when I switch themes?
If your current theme includes a built-in page builder, or if your pages contain [shortcode] tags, the new theme won’t render those shortcodes and you’ll see broken or missing content. Copy all shortcode-dependent pages to a plain text file before switching. After switching, rebuild those pages using standard WordPress blocks or a standalone page builder plugin that isn’t tied to the theme.
What happens to my widgets when I change WordPress themes?
Your widgets don’t disappear, they move to an “Inactive Widgets” area in Appearance » Widgets. Your new theme may have different widget areas, so the widgets can’t automatically map across. Go to Appearance » Widgets, scroll to the bottom to find the Inactive Widgets section, and drag each widget into the new theme’s widget areas. Block themes don’t use traditional widgets at all. You’ll manage navigation and sidebar content in the Site Editor instead.
Can I switch back to my old theme if something goes wrong?
Yes, as long as you haven’t deleted your old theme files. Go to Appearance » Themes and activate your previous theme. Any content stored in WordPress (posts, pages, images) will remain intact. However, theme-specific settings, widget placements, and custom CSS saved in your old theme’s options panel will need to be reconfigured. This is why taking screenshots of your layout before switching is part of the pre-switch checklist.
How do I keep my custom CSS when I change themes?
Before switching, copy your custom CSS to a text file. After switching, go to Appearance » Customize » Additional CSS (for classic themes) and paste it there. CSS in Additional CSS is stored in the WordPress database, not in the theme files, so it survives future theme changes. For block themes, go to Appearance » Editor » Styles to add custom CSS. If you used your old theme’s built-in CSS panel, that CSS will not transfer automatically.
Switching themes is straightforward when you follow the checklist before you start. Back up first, test on staging if you can, and give your site a couple of weeks in Google Search Console to confirm nothing shifted.
If you want to skip theme hunting altogether, SeedProd lets you build a custom WordPress theme from scratch without touching code.
Thanks for reading! We’d love to hear your thoughts, so please feel free to join the conversation on YouTube, X and Facebook for more helpful advice and content to grow your business.
For more helpful WordPress guides, see these posts next:
- How to Add or Remove Space Between Blocks in WordPress
- How to Add a Different Sidebar for Different Pages in WordPress
- How to Add Custom CSS in WordPress (Beginner Friendly)
- How to Add a Box Shadow in WordPress: 4 Easy Ways
If you enjoyed this article, remember to follow us on Facebook and Twitter for more helpful WordPress guides.