I added a Facebook Like button to my site last year because I wanted a quick way to boost engagement. Asking people to comment or share felt like too much. A simple Like button was easier.
At first, I tried a free plugin, but it broke my layout. Then I messed with the embed code from Facebook. It worked, but only after a lot of trial and error.
Eventually, I used SeedProd. It took less than five minutes, and I didn’t have to touch any code.
In this guide, I’ll show you both methods so you can choose the one that fits your setup.
TL;DR: How to Add a Facebook Like Button
- Use SeedProd: Drag-and-drop a Facebook Like button anywhere on your site with no code.
- Manual Method: Embed the Like button using code from Facebook’s developer tools.
- Both methods make it easier for visitors to like your content and grow your Facebook page.
Why Add a Facebook Like Button to WordPress?
Adding a Like button to your WordPress site can help drive engagement on your Facebook page. It’s also a great way to encourage users to share your content on their Facebook news feeds, which helps attract new people to your website.
Additionally, embedding a Facebook Like button on your web page can help grow your social media followers and build your online community on the most popular social network. As a result, you can raise awareness about your products or services and, ultimately, increase conversions.
Currently, WordPress doesn’t have a built-in solution for adding a Facebook button for Likes, so you’ll need to install a WordPress plugin or manually add the Facebook Like button code. With this in mind, we’ll show you how to do both below.
How to Add a Facebook Like Button in WordPress Using SeedProd
🔹 This is the easiest way to add a Facebook Like button to your WordPress site. You’ll use SeedProd’s drag-and-drop builder to place it anywhere, without coding.
First, we’ll use a WordPress plugin to add a Facebook Like button to your site. We’ll use SeedProd, the best WordPress website and page builder plugin.

SeedProd makes it super easy to create flexible page designs in WordPress, including custom landing pages, homepages, sidebars, headers, footers, and more. It comes with a drag-and-drop builder and numerous WordPress blocks to customize your site easily without code or CSS.
Besides allowing you to build fully customized landing pages, SeedProd lets you create complete WordPress themes from scratch, and you won’t need to touch a single WordPress theme file.
For this method, we’ll show you how to use SeedProd’s Facebook Like block widget to show a Like button virtually anywhere on your WordPress site.
Install and Activate SeedProd
To get started, install and activate the SeedProd plugin on your WordPress website.
If you need help with this, you can see our documentation on how to install SeedProd. This guide will walk you through installing the plugin and activating your license key.
Note: SeedProd has a free version that lets you create a simple landing page without code. For this guide, we’ll use SeedProd Pro for its Pro WordPress blocks.
Next, you’ll need to determine how to use SeedProd on your website. You can use it to create individual WordPress Pages or create a brand new WordPress theme to replace your current website design.
For this guide, we’ll show you how to add a Facebook Like button to a landing page, so navigate to SeedProd » Landing Pages from your WordPress dashboard to get started.
Choose a Premade Template
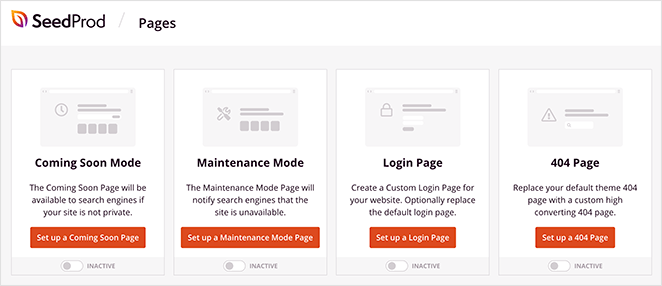
On this page, you can choose one of SeedProd’s premade landing page designs, such as Coming Soon, Maintenance, Login, or 404.
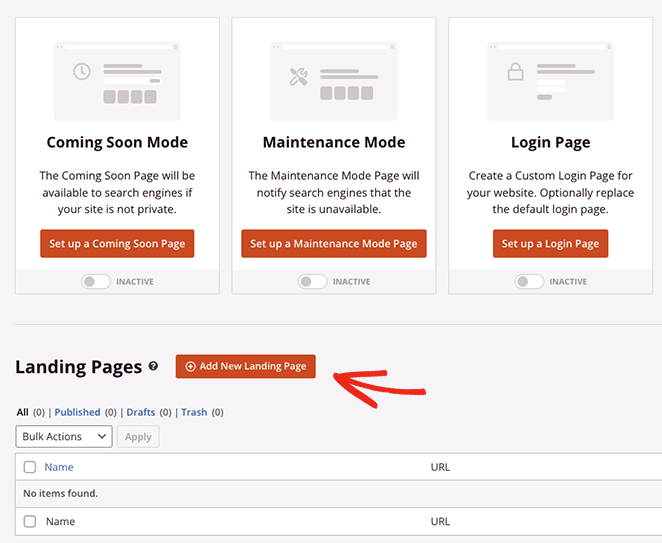
Alternatively, you can build a custom landing page using a landing page template that you can customize to fit your needs. We’ll use this option, so go ahead and click the Add New Landing Page button.
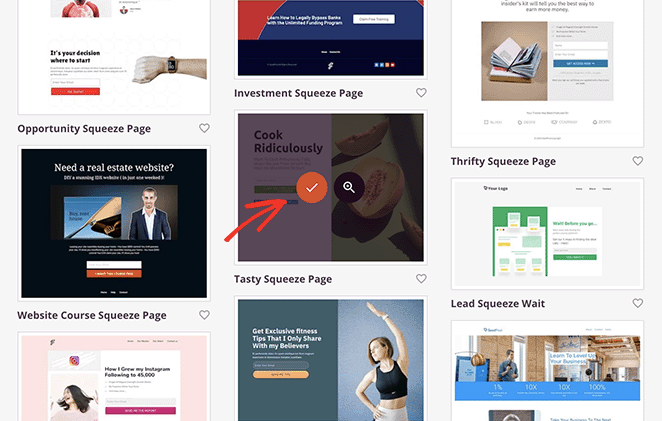
On the next screen, you’ll see a library of professional landing page templates you can customize with SeedProd’s drag-and-drop builder. Click any of the tabs at the top to filter the designs by page type, including:
- Coming Soon
- Maintenance Mode
- 404 Page
- Sales
- Webinar
- Lead Squeeze
- Thank You
- Login
Once you find a design you like, hover your mouse over it and click the checkmark icon. For this guide, we’ll use the Tasty Squeeze Page template.
Next, you’ll see a popup where you can give your page a name. SeedProd will give the page a URL automatically, but you can change this later if you like.
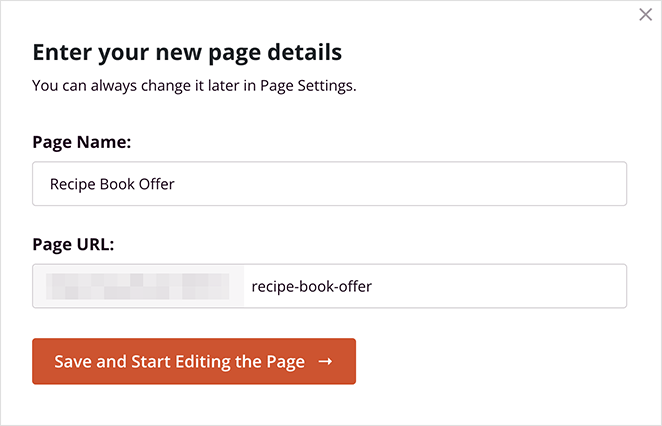
When you’re happy with the details, click the Save and Start Editing the Page button.
Add the Facebook Like Block
After choosing a template, you’ll go to SeedProd’s visual editor, where you can start customizing your landing page design. It’s easy to use, with blocks and sections on the left and a live preview on the right.
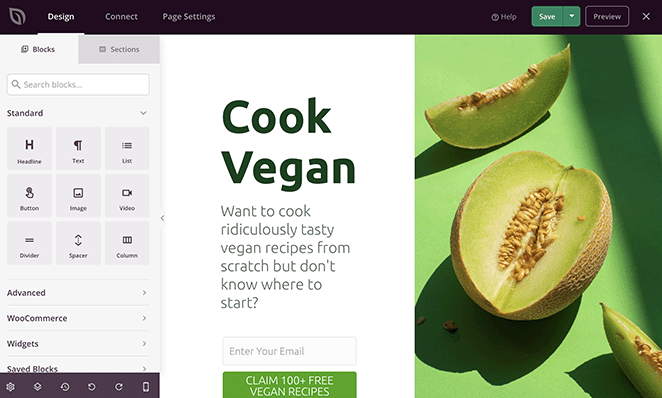
Simply click any element on your preview to customize the content to fit your needs.
For example, you can click any text or headline block to change the heading and descriptions.
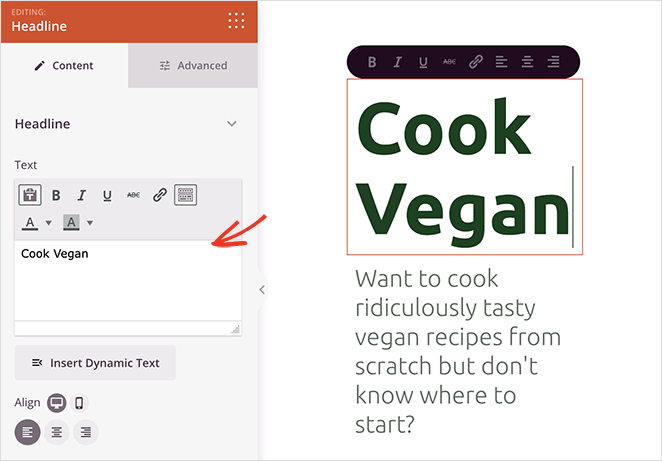
When you do, a settings panel will open on the left for you to change the content, font size, alignment, and more.
You can also swap out the template images and replace them with your own. To do this, click any image, then select the trashcan icon in the settings panel to remove it.

From there, you can upload a new image from your computer or WordPress media library.
Now you know the basics of navigating the page builder, let’s look at how to add a Facebook Like button to your landing page.
SeedProd has numerous WordPress blocks that you can add to your landing page design. Not only do they make your page more engaging, but they’re also great for generating leads and social media followers.
For example, with SeedProd’s Facebook blocks, you can embed your Facebook page, individual posts, comments, and even a Like button.
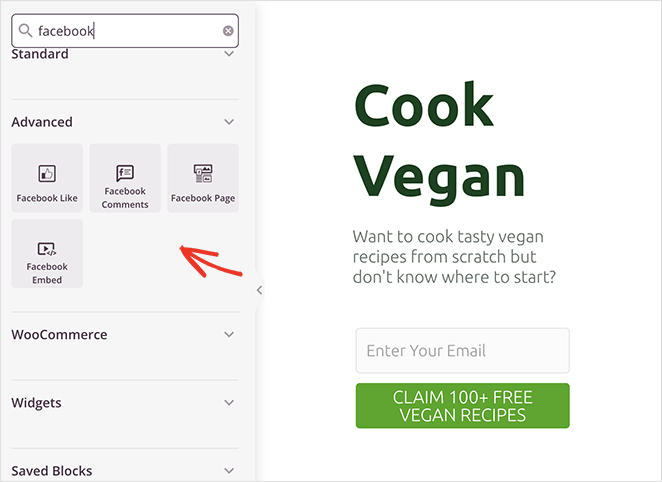
To add the Facebook Like button block to your page, simply drag it from the Advanced Blocks panel onto your landing page.
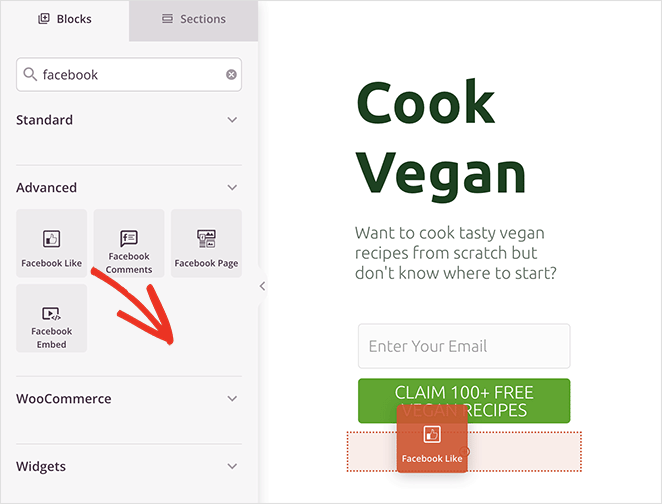
From there, you can change the Like button design and appearance using the dropdown menus in the block settings panel. For example, you can change the button layout to show your button count, a like box, and more.
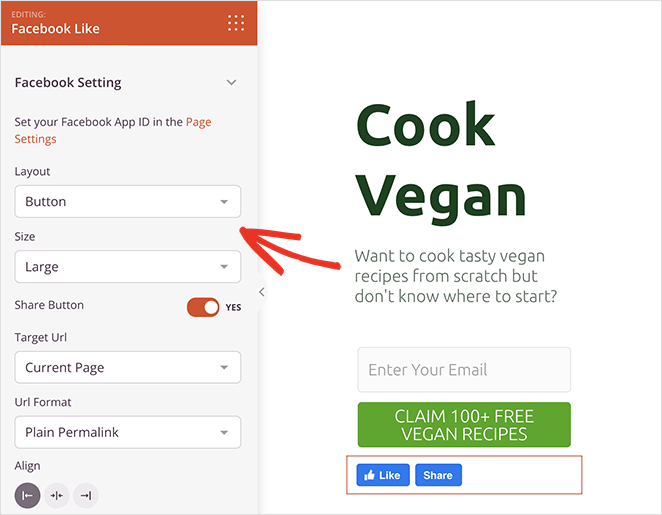
You can also change the font size and toggle the option to display a Facebook Share button alongside it.
Additionally, there are options to target a custom URL instead of your current landing page and change the permalink format to a pretty link.
In the Advanced settings tab, you can customize the Like button spacing and visibility on mobile and desktop devices and animate it without writing any code.
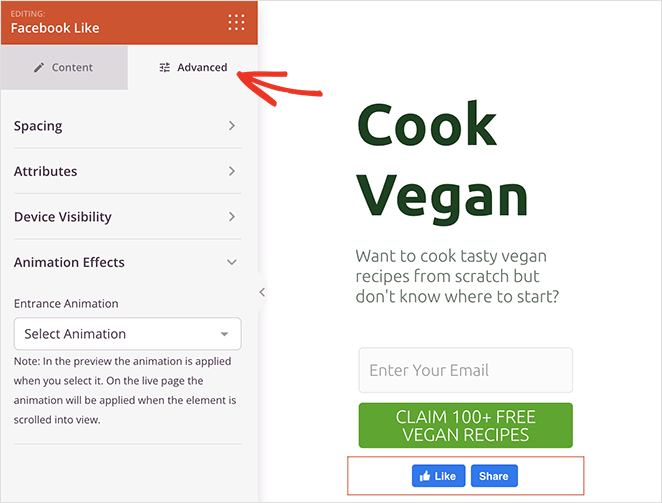
Note: You can enter your Facebook app ID to SeedProd by going to SeedProd » Settings.
Continue customizing your landing page design until you’re happy with how everything looks. For instance, you can edit the page color scheme and typography in the Global Settings panel.
Don’t forget to click the Save button in the top-right corner to save your changes.
Configure Your Page Settings
Since the page we’re making includes an opt-in form, we’ll need to connect an email marketing service next. To do this, click the Connect tab at the top and find your email marketing provider in the list.
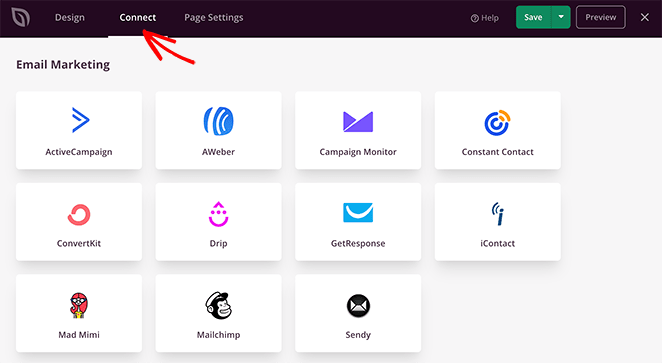
From there, follow the on-screen instructions to connect your email list.
You can also click the Page Settings tab at the top to tweak your landing page settings. On this screen, you can change your landing page name and URL and configure your on-page SEO settings for search engines.

For instance, in the SEO settings section, you can use All in One SEO, the best WordPress SEO plugin, to configure the open graph settings for your page.
This metadata helps Facebook collect information about your page, including the thumbnail image, page title, description, and author.
Furthermore, the Page Settings also allow you to add custom scripts, such as your Facebook pixel or Google Analytics tracking code.
For more details, see our landing page settings docs.
Publish Your Changes
Once your page looks exactly how you want it, you’re ready to make it live on your WordPress site. To do this, click the dropdown arrow on the Save button and select Publish.
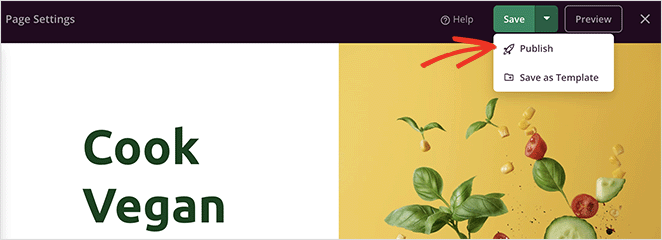
Now you can visit your landing page and see your Facebook Like button in action.

How to Add a Facebook Like Button Manually Using Code
🔹 If you prefer not to use a plugin, this method shows you how to copy and paste Facebook’s Like button code directly into WordPress. It takes a few extra steps but works on any site.
Another way to add a Facebook Like button to your WordPress site is by using custom code. However, this method requires you to copy and paste HTML code directly into WordPress, so we only recommend it for people comfortable with editing code.
That said, we’ll use the WPCode plugin to make adding custom code to WordPress easier.
First, you’ll need to go to the ‘Like Button’ page on the Meta for Developers website (developers.facebook.com) and scroll down to the ‘Like Button Configurator’ section.
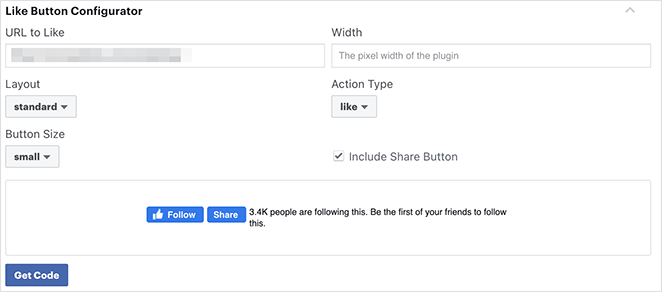
Next, enter your Facebook Page URL in the ‘URL to Like’ field. This should be the page you’d like to connect with the Facebook Like button.
After that, simply adjust the settings to choose the Like button layout and size. You’ll also see a preview of the Like button.
When you’re happy with the preview, click the Get Code button.
Now you’ll see a popup with 2 code snippets and 2 different tabs called JavaScript SDK and iFrame. Click the JavaScript option.
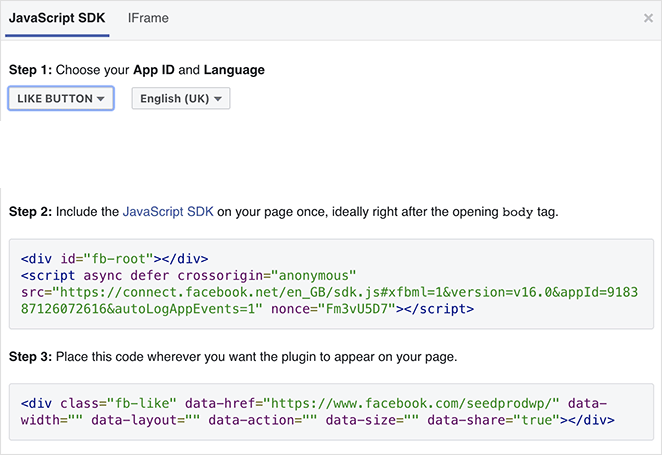
This is what you’ll need to add to your WordPress website to display the Like button.
If you directly add these code snippets to your WordPress theme, there’s a chance it could break your website. Plus, when you update your theme, it could overwrite the code snippets.
An easier way to add this code is with the WPCode plugin. It lets you paste code snippets on your website and manage it without directly editing your theme files.
First, you’ll need to install and activate the WPCode plugin.
After activating the plugin, navigate to Code Snippets » Header and Footer from your WordPress dashboard.
Now, copy the first code snippet from Facebook and add it to your WordPress theme’s header.php file after the <body> tag.
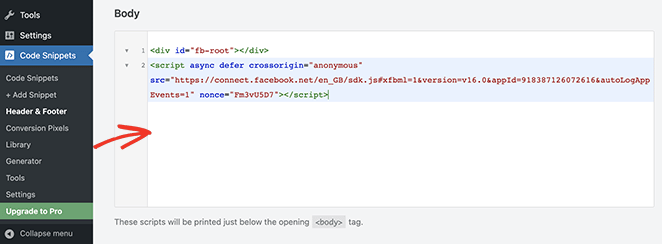
Simply copy the code and enter it in the ‘Body’ section and click the Save Changes button.
Next, you’ll need to copy the second code snippet and paste it into your WordPress site to show the Facebook Like button.
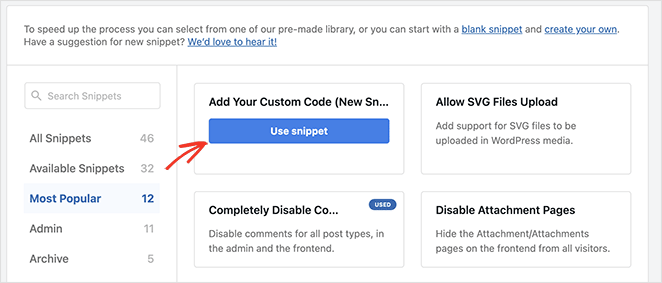
To do this, navigate to Code Snippets » + Add Snippet from your WordPress admin or click the Add New button.
On the next screen, you can choose a snippet from the pre-built library or add a new custom code.
So go ahead and click the ‘Add Your Custom Code (New Snippet)’ option and select the Use snippet button.
From there, give your custom code a name and enter the second code snippet from Facebook into the ‘Code Preview’ section.
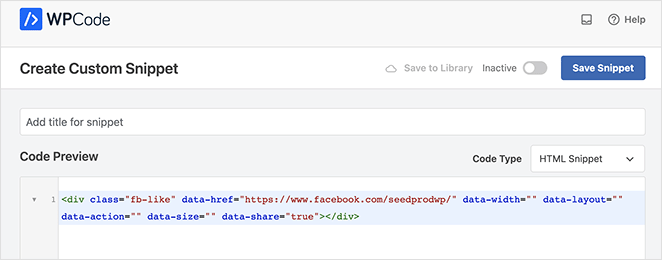
Make sure you click the ‘Code Type’ dropdown menu and select ‘HTML Snippet.’
Next, scroll down to the ‘Insertion’ section and choose where to display the Facebook Like button. For example, you make it appear before your blog post content.
To do this, click the ‘Location’ dropdown menu and choose the Insert Before Content option under the Page-Specific section.
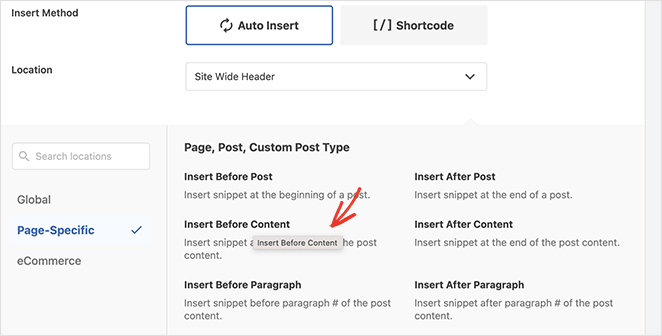
Finally, click the Save Snippet button and switch the toggle from Inactive to Active.
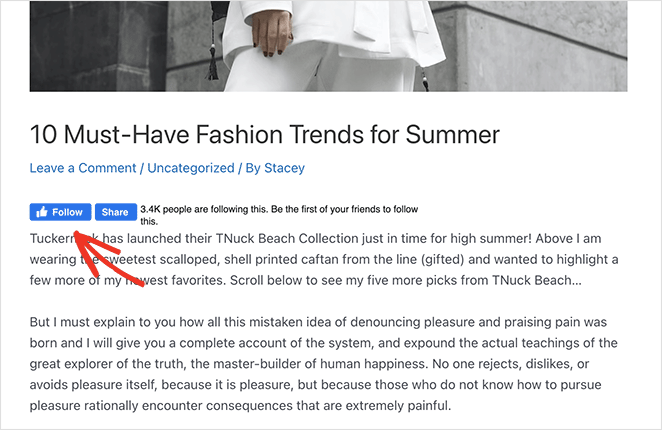
Now you can visit any blog post to see your Facebook Like button before the post content.
FAQs About Adding a Facebook Like Button
We hope this article has helped you learn how to add a Facebook Like button to your site. You might also like this tutorial on how to embed Facebook events in WordPress.
Thanks for reading! We’d love to hear your thoughts, so please feel free to leave a comment with any questions and feedback.
You can also follow us on YouTube, X (formerly Twitter), and Facebook for more helpful content to grow your business.

