

TL;DR: How to Add a Lightbox in WordPress
There are three real ways to add a lightbox, and the right one depends on whether you want zero plugins, a visual builder, or advanced gallery controls.
- Built-in method: Turn on the “Expand on click” toggle in a core Image or Gallery block for a native lightbox with no plugin.
- SeedProd method: Set an Image block’s link type to “Media – Lightbox” while you build the page visually.
- Envira Gallery method: Build a gallery, tick “Enable Lightbox,” then drop the gallery block into any page.
- Pick by need: Built-in for quick galleries, SeedProd for full page design, Envira for control over captions and effects.
- If it breaks: Link each image to its media file (not the attachment page) and test on mobile.
You drop a few images onto a page, and clicking one either does nothing or dumps the visitor on an ugly attachment page. What you actually want is a lightbox, where the image opens in a clean pop-up and the rest of the page dims behind it.
I ran an interior design blog for years, so I know how much a portfolio lives or dies on how images display. In this guide, I’ll show you three ways to create a lightbox in WordPress, starting with the free built-in option most guides skip.
- What Is a Lightbox (and When Should You Use One)?
- Method 1: Use the Built-In WordPress Lightbox (No Plugin)
- Method 2: Create a Lightbox in WordPress Using SeedProd
- Method 3: Create a Lightbox Using a Gallery Plugin
- Bonus: Add Envira Gallery to SeedProd Pages
- Why Isn't My Lightbox Working?
- FAQs About Creating a Lightbox in WordPress
What Is a Lightbox (and When Should You Use One)?
A lightbox in WordPress is a pop-up overlay that enlarges an image, video, or content when a visitor clicks it, dimming the rest of the page so the content is the focus.

Reach for a lightbox any time you want visitors to focus on one piece of content without leaving the page. It keeps people engaged and saves extra page loads.
Common uses for a WordPress lightbox include:
- Showcasing photography or creative portfolios
- Displaying product images with more detail
- Highlighting screenshots, design mockups, or examples of work
- Playing videos from YouTube or Vimeo in a distraction-free way
You can also use lightboxes for sign-up forms or important announcements. Because the background dims, visitors are more likely to notice and act on the message.
Which Lightbox Method Should You Use?
If you just need a lightbox on a single gallery, the free built-in option is usually enough. Choose SeedProd when you’re building pages or a theme visually, and Envira when you want advanced gallery controls like captions and transition effects.
| Method | Best for | Plugin needed? |
|---|---|---|
| Built-in WordPress lightbox | A quick lightbox on a single image or gallery | No |
| SeedProd | Building pages or a full theme visually | Yes (SeedProd) |
| Envira Gallery | Advanced gallery control and customization | Yes (Envira) |
Method 1: Use the Built-In WordPress Lightbox (No Plugin)
The fastest way to add a lightbox is the one built right into WordPress. Since version 6.4, the Image block has a built-in Enlarge on click option that opens images in a native lightbox, no plugin needed.
You’ll need WordPress 6.4 or later and the block editor. The Classic Editor doesn’t have this option.
Here’s the part that trips people up: it’s a link option, not a sidebar toggle. Add an Image block, select the image, then click the link (chain) icon in the block toolbar.

In the popover that opens, turn on Enlarge on click.

Save the page, and that image now opens in an enlarged lightbox.
One honest catch: this is reliable for single images, but not for the Gallery block. WordPress added the option to the Image block first, and on many versions it’s still missing from galleries.
So if you want a lightbox across a whole gallery, don’t fight the built-in option. Use one of the plugin methods below, which handle galleries properly.
I reach for this whenever I just need a single image to enlarge, because there’s nothing to install, update, or slow the page down. The limit is how much control you have.
You get a clean pop-up, but no captions, themes, or transition effects, and no real gallery support. For those, you’ll want one of the next two methods.
Method 2: Create a Lightbox in WordPress Using SeedProd
If you’re designing a page or a whole theme, SeedProd lets you turn on the lightbox while you build, so you can see it working live without touching code. SeedProd is a drag-and-drop WordPress website builder, and its Image block has a lightbox option built in.

| Tool | WordPress website builder |
| Pricing | Free and paid options available |
| Free version | Yes |
| Standout features | Visual drag-and-drop editor, built-in image lightbox toggle, beginner-friendly |
| Best for | Beginners who want a no-code way to add a WordPress lightbox |
SeedProd comes with pre-made website kits and landing page templates, so you can build a design in a few clicks and customize it with the drag-and-drop builder.
With SeedProd’s Image block, you can enable a lightbox to show large versions of your gallery images, and that’s the feature we’ll set up next.
Step 1: Install and Activate SeedProd
First, head to SeedProd’s pricing page, choose a license plan, and create your SeedProd account. Once you’re inside your account dashboard, go to the Downloads tab and download the SeedProd plugin file to your computer.
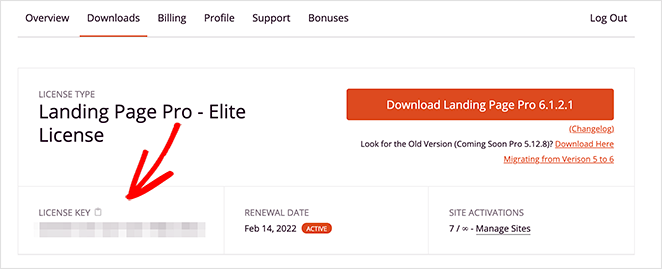
While you’re there, copy the license key, because you’ll need it shortly.
After downloading the plugin, install and activate it on your WordPress website. You can follow this tutorial on installing a WordPress plugin if you’ve never done this before.
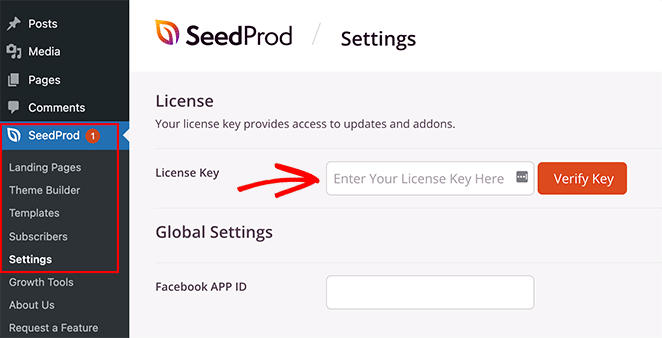
When SeedProd is active, go to SeedProd » Settings and paste in the license key you copied earlier. Click the Verify Key button and move on to the next step.
Step 2: Create a Theme or Landing Page
The next step is to start building your WordPress theme or landing page. SeedProd lets you do both, so here’s the difference:
- Theme Builder: The Theme Builder replaces your current WordPress theme with a custom one. Choose from many website kits, install a design with one click, then customize every part visually.
- Landing Page Builder: The Landing Page Builder makes standalone pages that work alongside your current theme. Pick a responsive template, then customize it with the drag-and-drop builder.
Both let you add image lightboxes, so pick the one that fits your needs. If you need a hand starting out, here are tutorials on creating a custom WordPress theme and building a landing page with SeedProd.
Step 3: Decide Where to Add Your Lightbox
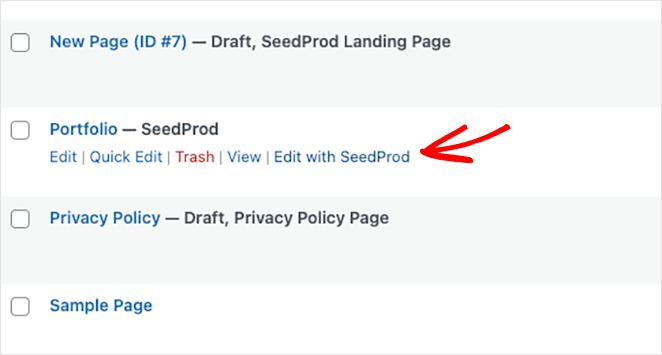
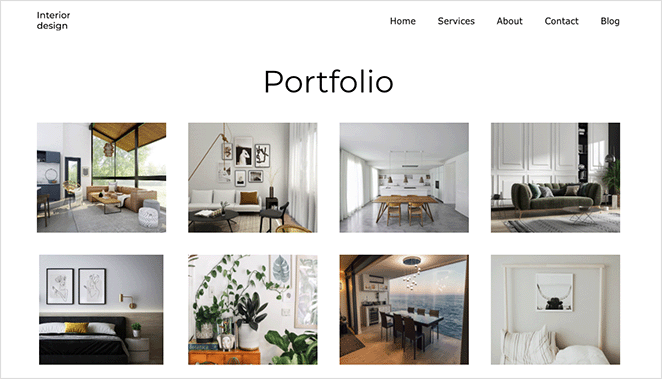
Now decide where you’d like the image lightbox to go. For this guide, I’m building an interior design portfolio page with the theme builder, so I’ll edit the page with SeedProd to open the drag-and-drop builder.
When your design opens, you’ll see blocks and sections on the left and a live preview on the right. You can move elements around by clicking, dragging, and dropping.
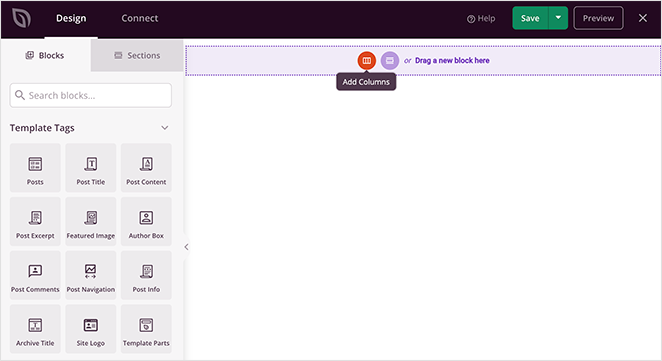
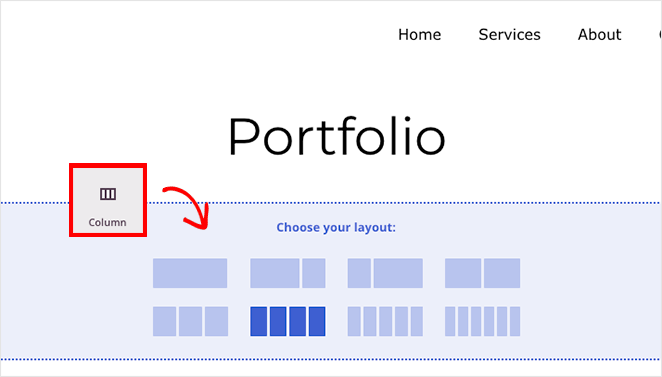
Start by adding a new column for your portfolio images. From the sidebar, drag the Columns block onto your page and choose a layout.
Next, drag the Image block into each column.
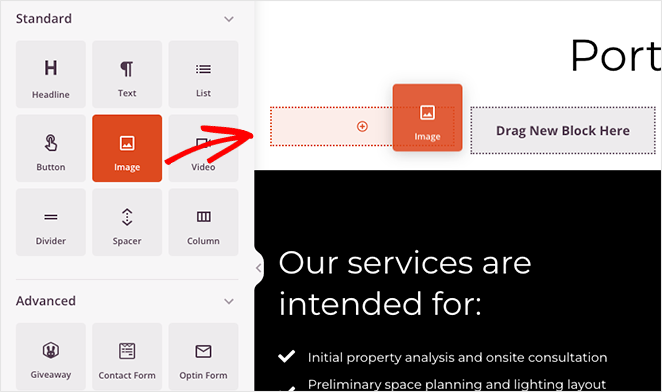
Click each image block and upload an image from your computer or media library.
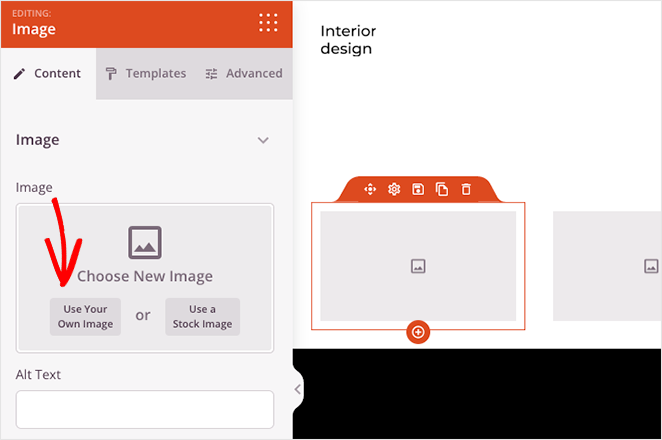
Now add the lightbox to each image. Click an image block, find the Link Type heading, and select Media – Lightbox from the drop-down.
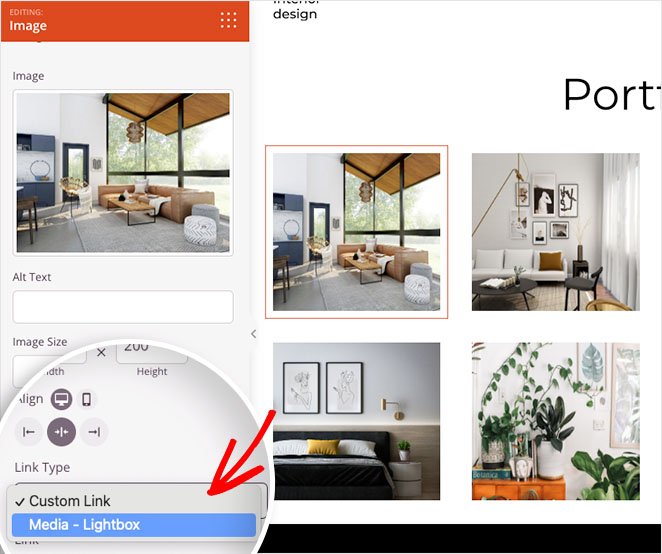
Repeat that for every image in your gallery, then click the Save button in the top-right corner.
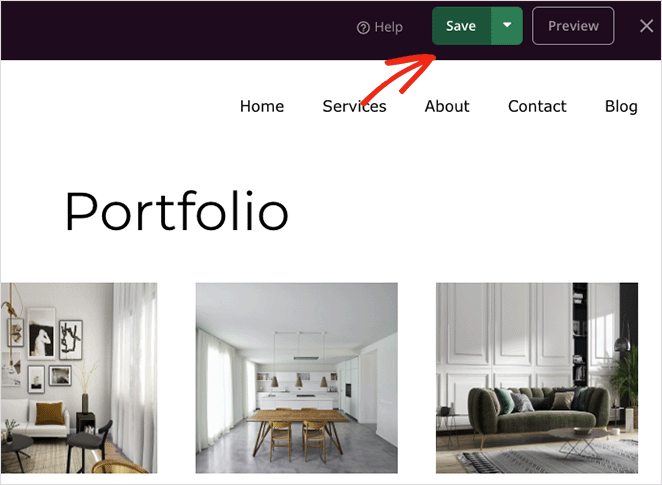
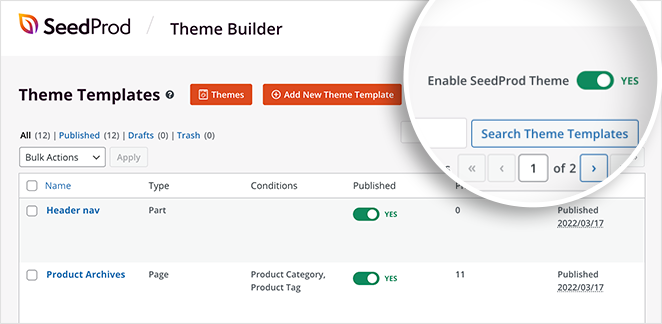
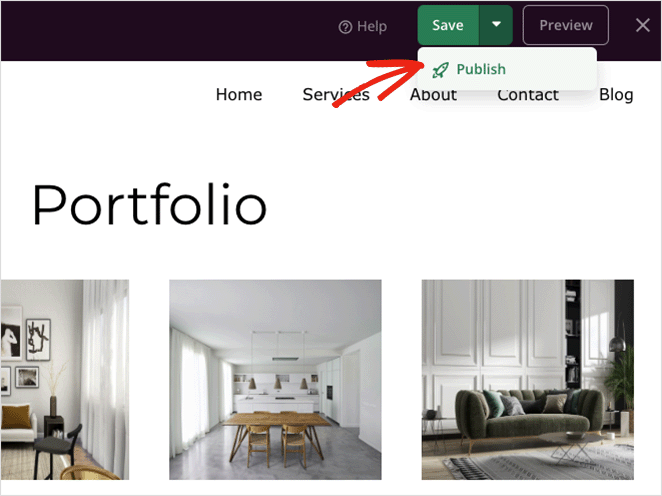
Step 4: Publish Your Changes
The last step is to publish your lightbox gallery. For a custom theme, go to SeedProd » Theme Builder and switch the “Enable SeedProd Theme” toggle to “Yes.”
If you’re publishing a landing page, open it in the page builder, click the Save button’s drop-down arrow, and select Publish.
Now view your new design to see how it looks.
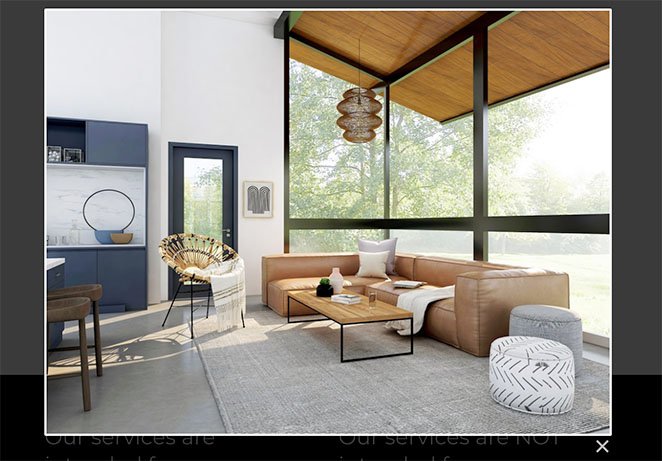
Click any image in your gallery, and it opens in a responsive full-screen lightbox.
Ready to build yours?
Add a lightbox gallery to your site without code
SeedProd’s drag-and-drop builder lets you flip on the lightbox and see it working live while you design the page. No shortcodes or theme editing.
I want to build my galleryMethod 3: Create a Lightbox Using a Gallery Plugin
For more control over how your gallery looks and behaves, use a WordPress gallery plugin. I’ll use Envira Gallery, one of the most popular gallery plugins for WordPress and a tool I know well from the WordPress ecosystem.

| Tool | Envira Gallery plugin |
| Pricing | Starts at $39.50/year (normally $79) |
| Free version | Yes, Envira Gallery Lite |
| Standout features | Drag-and-drop gallery builder, built-in lightbox settings, mobile-responsive templates |
| Best for | Users who need advanced gallery customization |
With this lightweight image gallery plugin, you can build optimized galleries for posts, pages, widget areas, and sidebars. It’s speed-optimized too, so your images load quickly for visitors.
Get started by installing and activating the Envira Gallery plugin. Then go to Envira Gallery » Add New to create a new gallery.
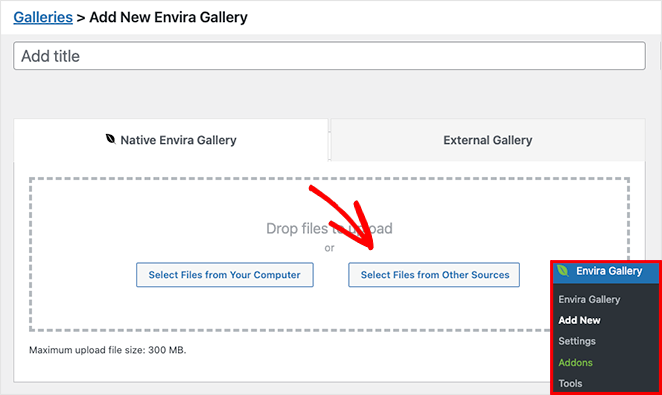
Add images by clicking Select Files from Your Computer. To use images already in your media library, click Select Files from Other Sources instead.
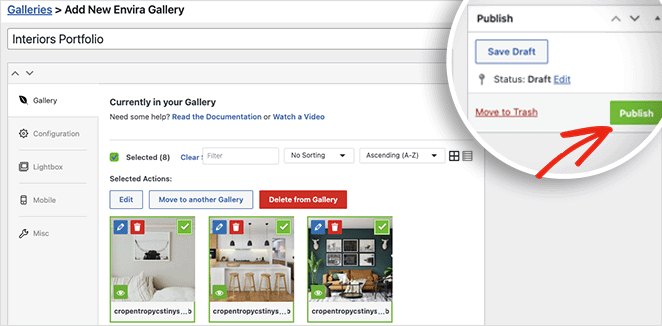
After adding images, you can rearrange them by dragging and dropping the thumbnails. Then click the Configuration tab to set up your gallery.
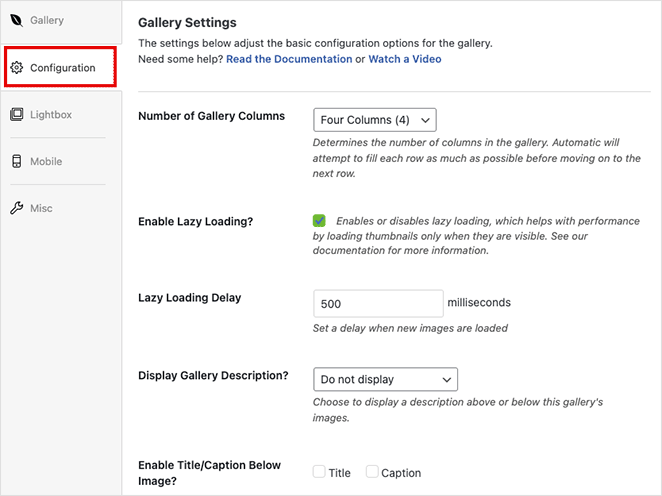
On this screen, you can:
- Change the number of gallery columns
- Enable lazy loading for images
- Display the gallery description
- Enable titles and captions
- Set the image size and crop position
- Change the gallery theme
- Adjust the margins and padding
Next, click the Lightbox tab to set up the lightbox itself.
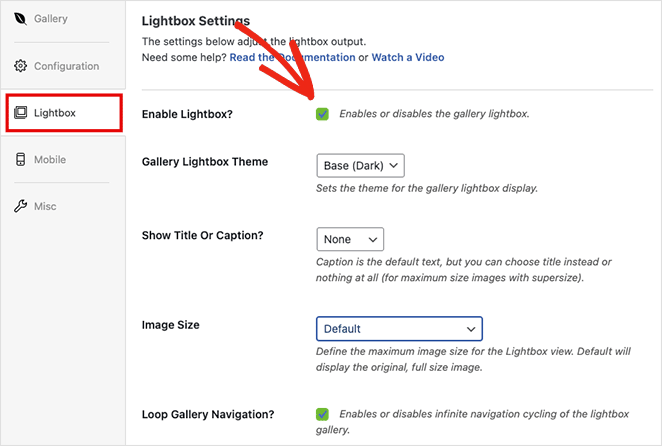
Make sure the Enable Lightbox option is checked. From there, you can change the lightbox theme, display captions, add transition effects, and more.
When you’re happy with the settings, click the Publish button in the top-right corner.
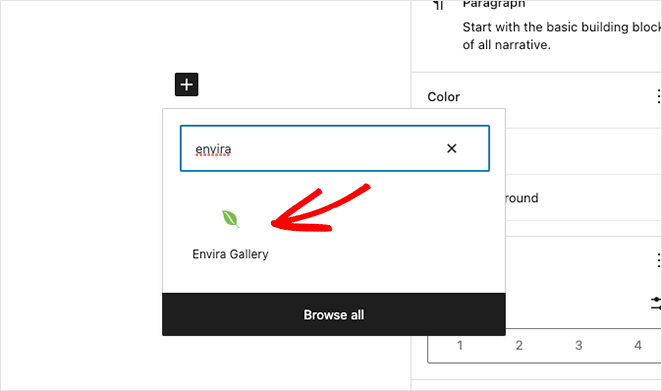
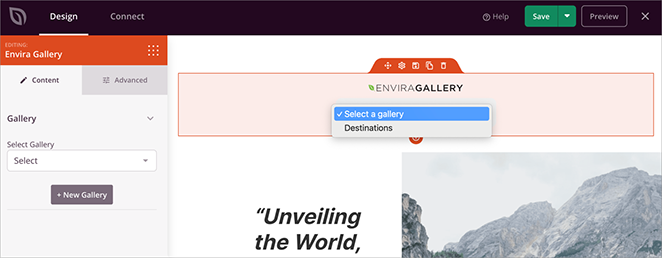
To show the gallery to visitors, edit a post or page, click the plus (+) icon in the block editor, search for the Envira Gallery block, and add it.
Choose your gallery from the drop-down to preview it.
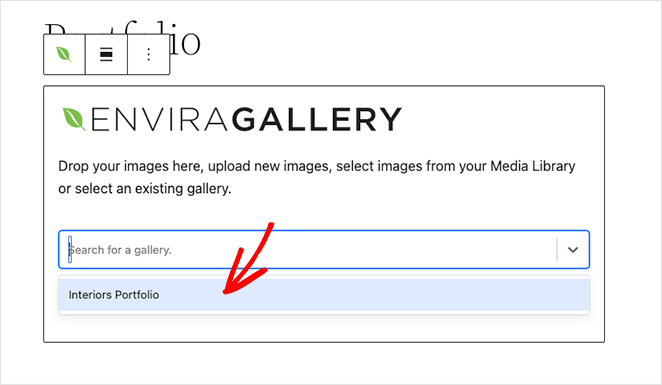
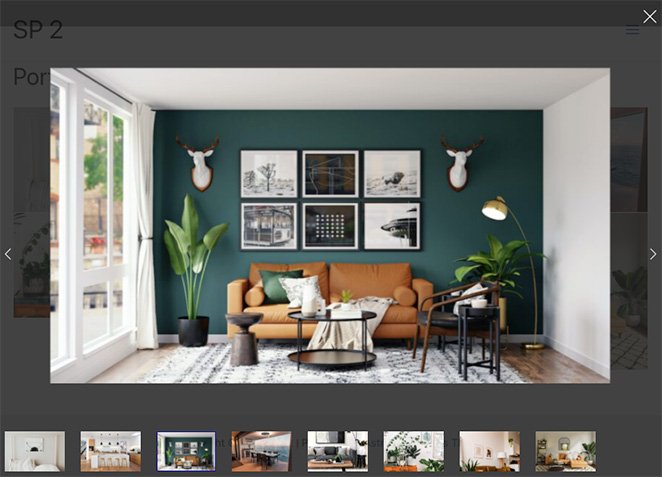
Click Update or Publish to save your changes. When you preview the page, your gallery should look like this:

Click any image to view it in a responsive lightbox gallery like this:
Bonus: Add Envira Gallery to SeedProd Pages
If you’re building pages with SeedProd, you can drop your Envira Gallery lightboxes straight into any page or template. That means no shortcodes and no extra steps.
- Open your SeedProd page or template in the drag-and-drop editor.
- Search for the Envira Gallery block in the sidebar and drag it onto your page.
- Choose your gallery from the dropdown and adjust the display settings.
This combines SeedProd’s flexible page builder with Envira’s lightbox features, so you can create polished image galleries on any page of your site.
Why Isn’t My Lightbox Working?
If you click an image and the lightbox doesn’t open, the cause is usually one of a few common things. Run through these checks:
- Wrong link target: Each image must link to its media file, not its attachment page. An attachment-page link sends visitors to a separate page instead of opening the pop-up.
- Theme or plugin conflict: If your theme or another gallery plugin also adds a lightbox, the two scripts can clash. Disable one and test again.
- Caching: A caching plugin or CDN can serve an old version of the page. Clear your cache, then reload.
- Mobile behavior: Always test the lightbox on a phone or tablet, since touch behavior can differ from desktop clicks.
FAQs About Creating a Lightbox in WordPress
Does WordPress have a built-in lightbox?
Yes. Since WordPress 6.4, the core Image and Gallery blocks include an “Expand on click” toggle in the Settings panel. Turn it on and your images open in a native lightbox with no plugin needed.
How do I add a lightbox to a WordPress gallery without a plugin?
Add a core Gallery block to your post or page and upload your images. Select the block, open the Settings panel, and turn on “Expand on click.” Save the page, and clicking any image opens it in a full-screen lightbox.
Why is my WordPress lightbox not working?
The most common cause is the image linking to its attachment page instead of its media file. Set each image to link to the media file. A theme or plugin conflict, or a cached old page, can also stop it, so disable conflicting lightbox scripts and clear your cache.
Can I use a lightbox for videos as well as images?
Yes. Many lightbox tools open YouTube or Vimeo videos in a pop-up, just like images. It’s a good way to show product demos or tutorials without sending visitors off your site.
What is the best free WordPress lightbox plugin?
Popular free options include Envira Gallery Lite, Simple Lightbox, and WP Featherlight. They’re easy to use and cover the basic lightbox settings. You can upgrade to a paid version later for advanced features.
Add Your WordPress Lightbox Today
That ugly attachment page is now a clean pop-up that keeps visitors on your content. Pick the method that fits your site, whether that’s the free built-in toggle, SeedProd, or Envira, and you’ll have a working lightbox in minutes.
Here are some other helpful tutorials you may like:
- How to Add a Gallery to WordPress Posts and Pages
- How to Create Tabs in WordPress for Stunning Tabbed Content
- How to Add a Tweet Button to WordPress (3 Ways)
- How to Add a Custom Add-to-Cart Button in WooCommerce
Thanks for reading! We’d love to hear your thoughts, so please feel free to join the conversation on YouTube, X and Facebook for more helpful advice and content to grow your business.


