Do you want to create a lightbox in WordPress for individual images?
With a simple lightbox, you can display full-size images on your site without impacting your performance or page speed. In this article, we’ll show you how to add a lightbox for images to WordPress step-by-step.
What Is a Lightbox in WordPress?
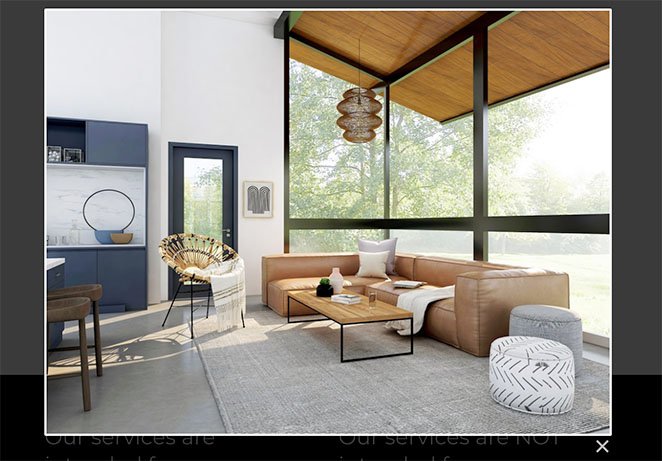
A lightbox is a distraction-free popup that overlays your website content. When opening a lightbox, the web page’s background will be grayed out, helping users focus their attention on your lightbox content until they click the “X” icon to exit the overlay.

Since the overlay sits on top of your website, users won’t need to click away to a different page to see its contents.
Image lightbox style overlays are an excellent way to display large image sizes without impacting your website’s speed. You can create image galleries with thumbnails or small-size images that allow your web pages to load quicker, then let viewers click the small images to open and view large, high-resolution versions in the lightbox.
When Should You Use a Lightbox?
There are several situations where using a lightbox will make sense for your business website. For example, you can use a lightbox on your eCommerce website to let viewers see more product detail.
Here are some other instances where you can use a WordPress image lightbox:
- Showcase a photography portfolio
- Highlight screenshots of your writing examples
- Display product details
- Watch a YouTube/Vimeo video
Did you know that you can also use a lightbox popup to generate leads? With a powerful lead generation tool like OptinMonster, you can create responsive lightbox popups to collect email addresses from your target audience when they’re about to leave.
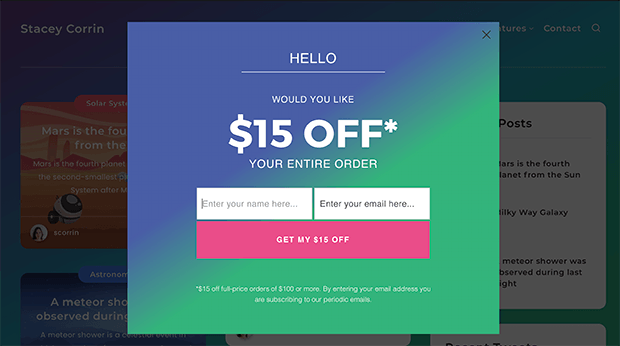
Here’s a guide on creating an exit-intent popup in WordPress.
That being said, let’s look at 2 ways to create a lightbox in WordPress for images, step-by-step.
How to Create a Lightbox in WordPress with SeedProd
First, we’ll show you how to create an image lightbox in WordPress with SeedProd, the best WordPress website builder.

SeedProd comes with pre-made website kits and landing page templates that let you create a WordPress website design with a few clicks. You can then customize your website with its drag-and-drop page builder and customizable WordPress blocks and sections.
With SeedProd’s Image block, you can enable a lightbox to show large versions of your WordPress gallery images, and it’s these features we’ll showcase in the following tutorial.
Before we move on, here’s what else you can do with SeedProd:
- Create landing pages that convert, including (404, sales, squeeze, webinar, thank you, and login)
- Build a custom WooCommerce site for your online store
- Control who can bypass your coming soon or maintenance mode page
- Personalize your landing pages with dynamic text
- Grow your email list with email marketing integrations and the subscriber management dashboard
- 他にもいろいろある。
This website builder plugin is optimized for speed and SEO, so your website will always load quickly without bloat.
Now, let’s dive into the full tutorial.
ステップ1.SeedProdのインストールとアクティベート
First, head to SeedProd’s pricing page, choose a license plan, and create your SeedProd account. Once you’re inside your account dashboard, go to the Downloads tab and download the SeedProd plugin file to your computer.
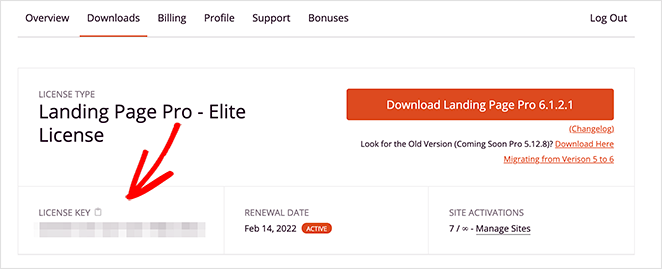
While you’re there, copy the license key because you’ll need that shortly.
After downloading the plugin, install and activate it on your WordPress website. You can follow this tutorial on installing a WordPress plugin if you’ve never done this before.
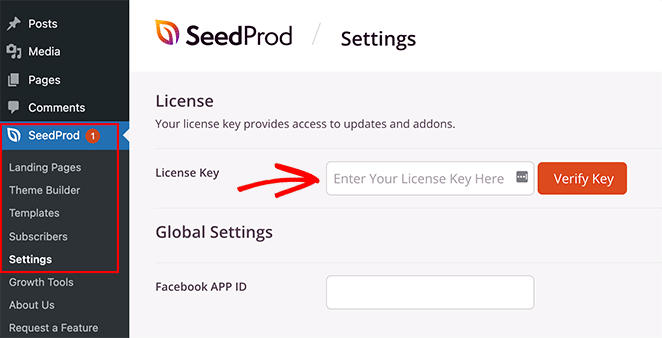
When the SeedProd plugin is active on your site, navigate to SeedProd » Settings and paste the license key you copied earlier into the relevant field. Now click the Verify Key button and move on to the next step.
ステップ2.WordPressテーマまたはランディングページを作成する
The next step is to start building your WordPress theme or landing page. The SeedProd plugin lets you do both but if you’re unsure which option to use, here is an explanation:
- Theme Builder – With the Theme Builder, you can replace your current WordPress theme with a new custom theme. You can choose from many pre-made website kits and install your design with 1 click. SeedProd will then create all the parts of your theme, allowing you to customize them visually with its page builder.
- Landing Page Builder – The Landing Page Builder lets you make standalone landing pages that work alongside your current WordPress theme. You can choose from various responsive landing page templates, then customize them with the drag-and-drop page builder.
Both solutions let you add image lightboxes to your design, so pick one that best fits your needs. If you need help starting, here are some tutorials on creating a custom WordPress theme and building a landing page with SeedProd.
Once you’ve chosen your templates and built the framework for your landing page or theme, you can follow step 3 below to add an image lightbox to your design.
Step 3. Decide Where to Add your Image Lightbox
Now it’s time to decide where you’d like to add your WordPress image lightbox.
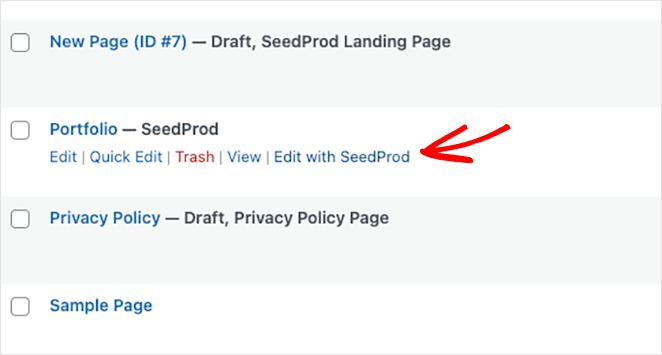
For this guide, we’re creating an interior design website with a custom portfolio page using the theme builder, so we’ll edit the page with SeedProd to open the drag-and-drop builder.
When you open your design, you’ll see a 2 column layout with blocks and sections on the left and a design preview on the right. You can move elements around on your preview by clicking, dragging, and dropping.
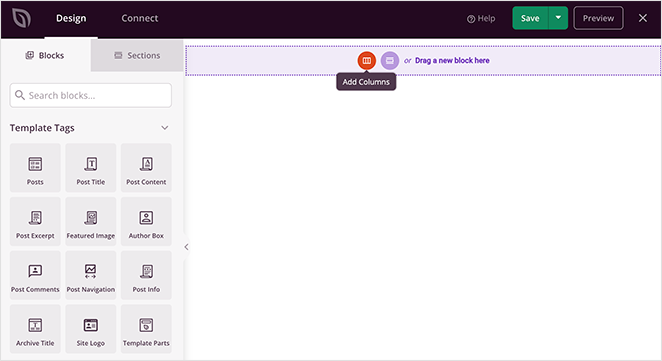
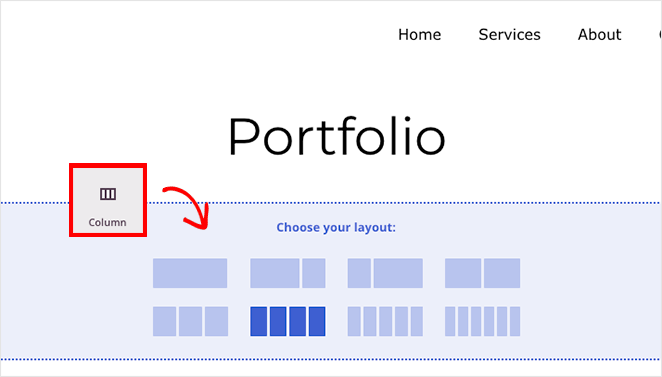
Let’s start by adding a new column for our portfolio images. From the sidebar, drag the Columns block onto your page and choose a layout design.
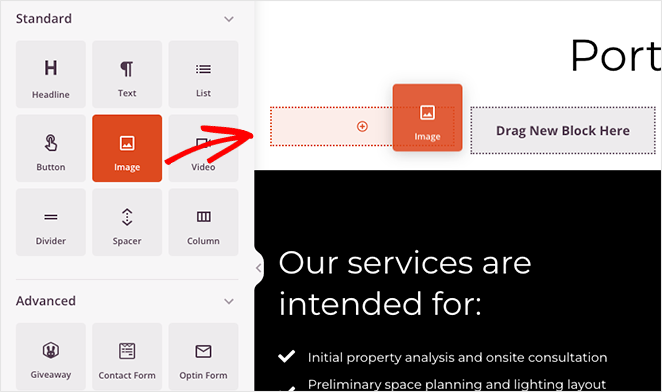
Next, drag the Image block to each column in the page section.
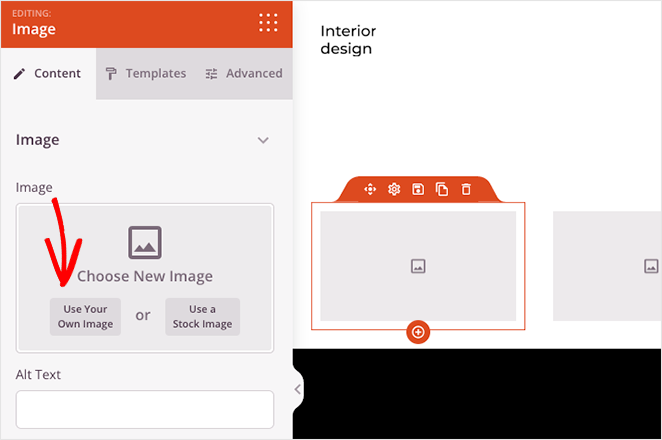
From there, you can click each image block and upload an image from your computer or WordPress media library.
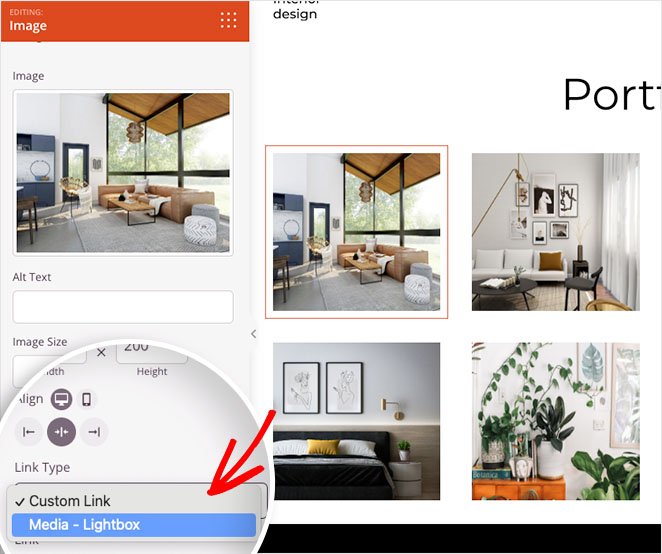
Now you can add a lightbox to each image in your gallery. To do this, simply click any image block, find the “Link Type” heading, and select the Media – Lightbox option from the drop-down menu.
Repeat this for every single image link in your gallery, then click the Save button in the top-right corner to save your changes.

ステップ 4.変更を公開する
The final step is to publish your responsive lightbox gallery on your WordPress website. To do this for a custom WordPress theme, go to SeedProd » Theme Builder from your WordPress admin, and turn the “Enable SeedProd Theme” toggle to the “Yes” position.

If you’re publishing a landing page, open it in the page builder, click the Save button drop-down arrow and select Publish.
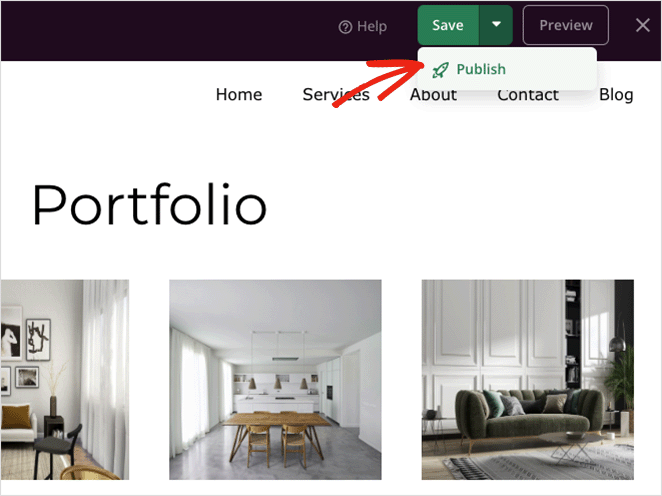
Now you can view your new design to see how it looks.

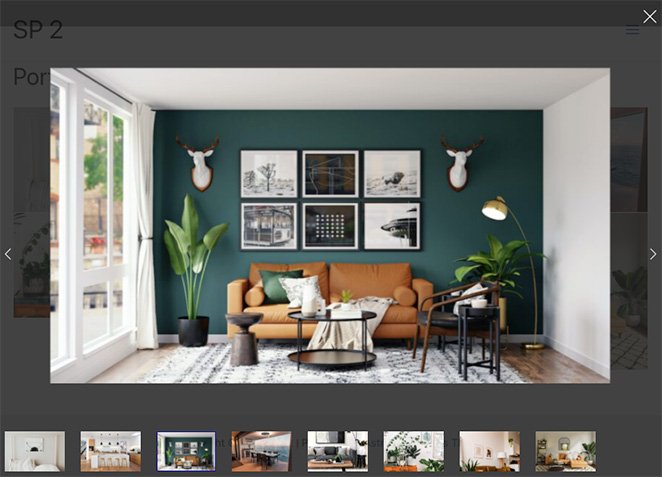
And when you click any image in your gallery, you’ll open a responsive full-screen image lightbox.
How to Create an Image Lightbox with a Gallery Plugin
Another way to add an image lightbox to your WordPress site is with a WordPress image gallery plugin. For this method, we’ll use Envira Gallery, one of the most popular gallery plugins for WordPress.
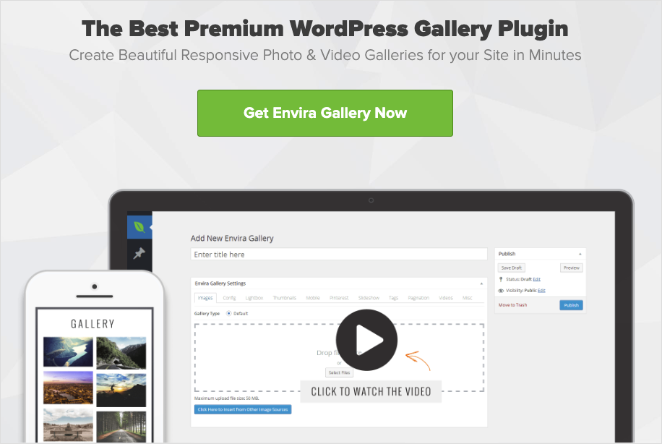
With this lightweight drag-and-drop image gallery plugin, you can create optimized image galleries for posts, pages, widget areas, and sidebars. The plugin is also easy to use and speed optimized, so your images will load quickly for website visitors.
Get started by installing and activating the Envira Gallery plugin on your WordPress website. Next, navigate to Envira Gallery » Add New to create a new image gallery.
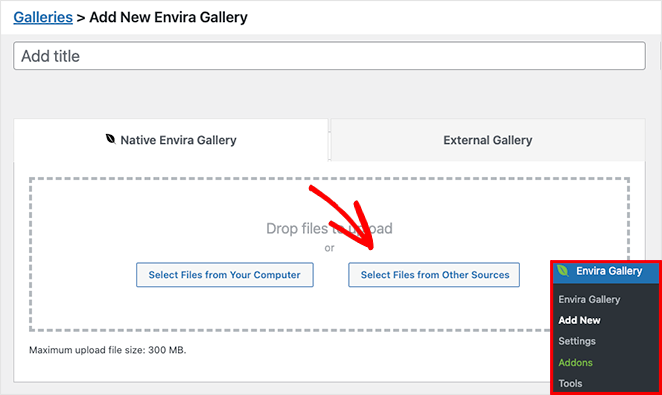
You can add images to your gallery by clicking the Select Files from Your Computer button. However, if you’d like to use images from your media library, click the Select Files from Other Sources button.
After adding images to your gallery, you can rearrange them by dragging and dropping the thumbnails.
Now click the Configuration tab to configure your gallery settings.
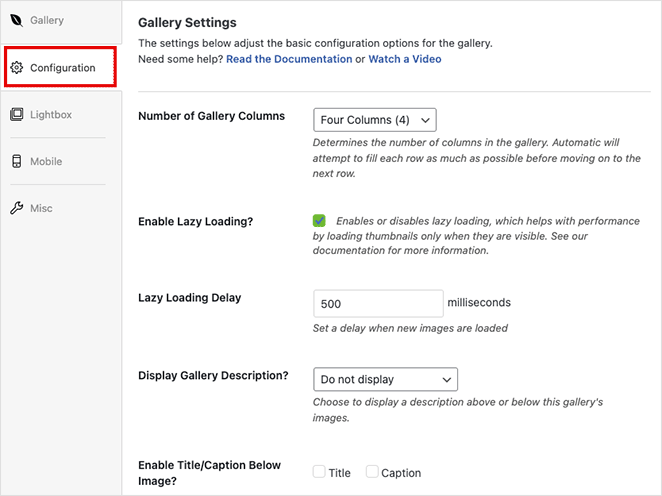
On this screen, you can:
- Change the number of gallery columns
- Enable lazy loading for images
- Display the gallery description
- Enable titles and captions
- Set the image size and crop position
- Change the gallery theme
- Adjust the margins and paddings
Next, click the Lightbox tab, which is for customizing the lightbox settings.
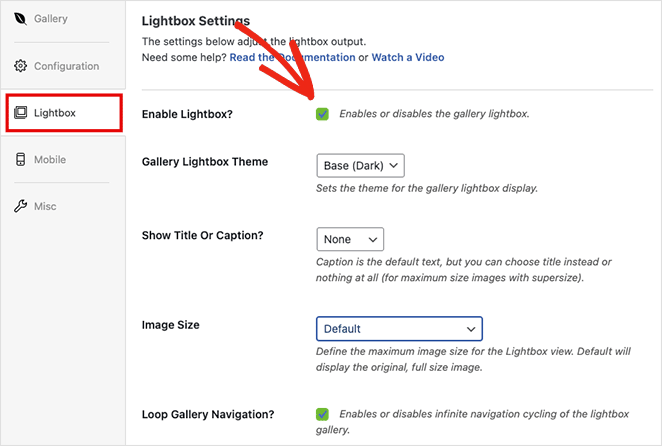
First, ensure the Enable Lightbox option is checked, then adjust the settings to change your lightbox theme, display captions, add transition effects, and more.
When you’re happy with your gallery settings, click the Publish button in the top right corner.
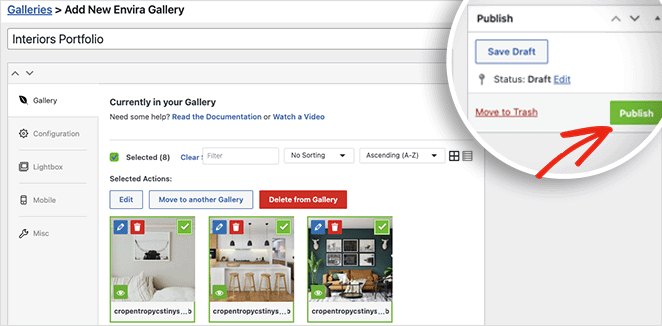
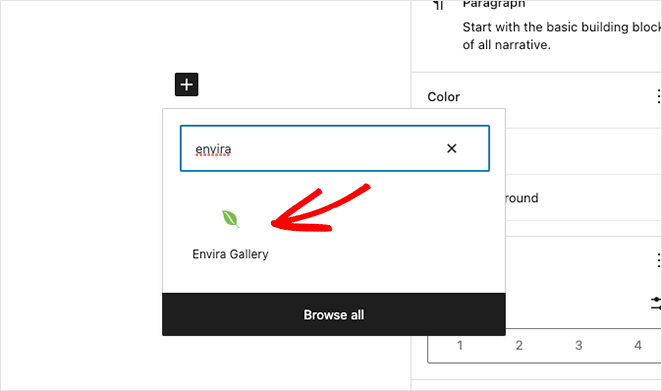
To display your gallery to website visitors, create or edit a post or page, then click the plus (+) icon inside the WordPress block editor to add a new WordPress block.
Search or scroll until you see the Envira Gallery block, and click it to add it to your page.
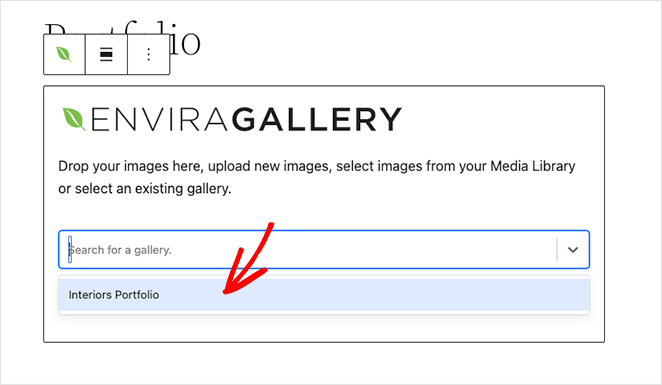
Next, choose your gallery from the drop-down menu to preview your lightbox gallery.
You can then click the Update or Publish button to save your changes.
When you preview your page, your gallery should look similar to this example:
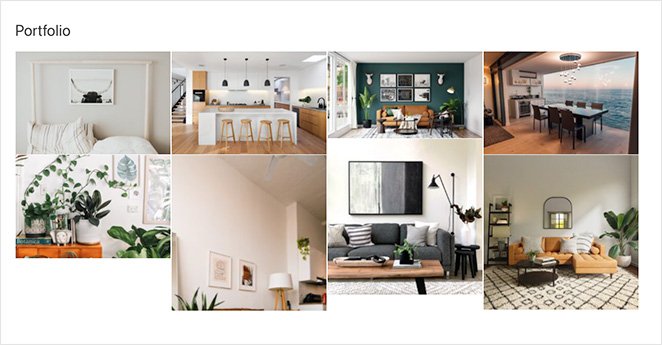
You can then click any image to view it in a responsive lightbox gallery like this:
それだけだ!
In this step-by-step tutorial, you’ve learned how to create a lightbox in WordPress for faster, high-resolution image galleries. Ready to make your next WordPress image lightbox?
Here are some other helpful tutorials you may like:
- WordPressの投稿とページにギャラリーを追加する方法
- WordPressでタブを作成する方法
- WordPressにツイートボタンを追加する方法(3つの方法)
- WooCommerceでカスタムカート追加ボタンを追加する方法
お読みいただきありがとうございました!ご質問やご意見がありましたら、お気軽にコメントをお寄せください。
また、YouTube、X(旧Twitter)、Facebookでも、ビジネスの発展に役立つコンテンツを配信しています。

