Want to know how to change blog layout in WordPress?
Your blog design plays a key role in improving user experience and your site’s look and feel. A great layout makes your visitors feel at home, encouraging them to stay and look around.
In this guide, I’ll show you how to change your blog layout in WordPress with the help of its many themes and plugins. I’ll also share my own tips for perfecting your blog design.
What Is a Blog Layout and Why Is It Important?
A blog layout is the structure that arranges your posts, images, and widgets across the page to guide readers and improve usability. This is important because a well-planned site helps users find what they need. It also looks good, which makes people want to stay on your site for longer.
You can choose from several blog layout types. Here are the most common ones:
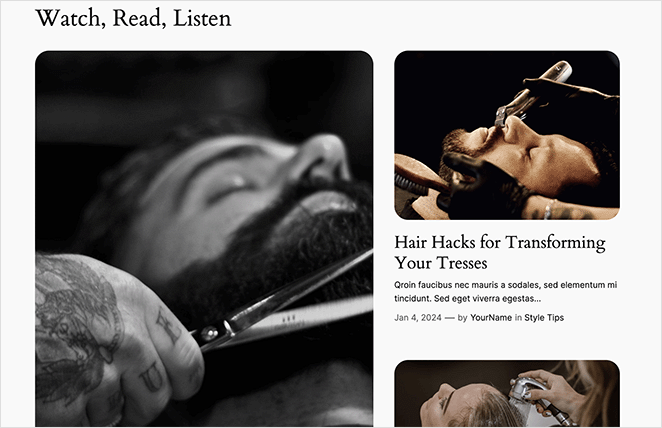
- Grid layout: This layout displays your posts in a grid format.
- List layout: With this layout, your blog posts are displayed one after the other in a single line.
- Single-column layout: This page layout showcases your blog posts in a single, wide column.
Choosing the right layout depends on the feel you want your blog to have. For example, news blogs covering several topics may find the grid layout best for maximizing space.

Alternatively, traditional bloggers may prefer the list layout, which leaves room for a sidebar to display widgets.
Why Change Your WordPress Blog Layout?
Changing your blog layout can improve navigation, reduce bounce rate, and give your site a more modern and branded look.
Plus, no one likes a slow website. Switching to a different layout can improve your blog’s speed, which is another important factor that can improve your search engine rankings and SEO.
Lastly, changing your layout gives your site a fresh look that fits your brand better.
What to Do Before Changing Your WordPress Blog Layout
Before changing your blog layout, you should back up your site and evaluate your current theme’s limitations.
My favorite way to do this is with a WordPress backup plugin. Some of the most popular options include features to schedule backups regularly and even store that data in the cloud as an extra precaution.
If you need help, you can see this guide on how to backup your WordPress site.
Something else that’s worth doing is looking at your current WordPress blog theme. A WordPress theme controls the design, layout, and overall appearance of your blog.
So, what limitations does it have that prevent you from getting the blog layout you want? Can you customize it, or will you need a different theme entirely?
Know what you want—and what your theme can’t do—before starting.
How to Change Blog Layout Using SeedProd
The easiest way to change your blog layout is by using SeedProd’s drag-and-drop WordPress page builder. It makes creating themes for WordPress and landing pages easy without a developer.

SeedProd has blog layout options you can edit in just a few clicks.Every design you make is fast, bloat-free, and integrates with popular WordPress plugins and email marketing services.
Why I Recommend SeedProd:
I’ve personally used SeedProd to build and revamp dozens of WordPress blogs. It’s hands-down the fastest way to create a custom layout without touching code. Compared to other builders, I’ve found it has the best balance of ease-of-use, performance, and flexibility — especially for beginners.
To get started, you’ll need to download the SeedProd plugin and install it on your WordPress site.
If you need help, please see our documentation on installing the SeedPod Pro plugin.
Creating a Custom WordPress Theme
After activating SeedProd and verifying your license key, you’re ready to build a custom WordPress theme. This will replace your existing theme with one you can customize easily with drag-and-drop.
To do this, navigate to SeedProd » Theme Builder from your WordPress dashboard and click the Theme Template Kits button.
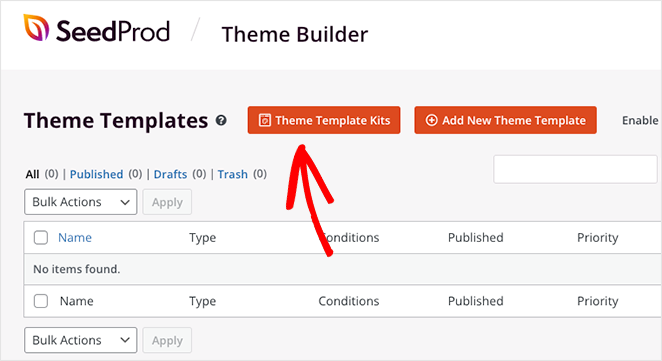
On the next screen, you’ll see a library of 1-click website templates for different niches. Each template is 100% mobile responsive and fully customizable, so you can choose any design and tailor it to your needs.
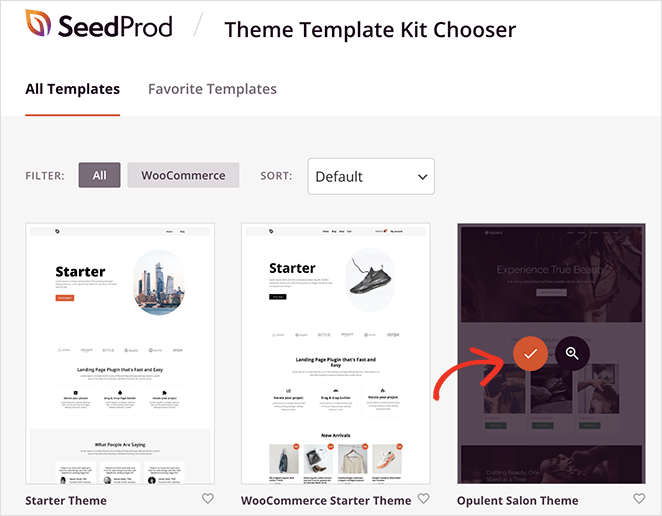
To choose a theme, hover over one and click the checkmark icon. In a few seconds, SeedProd will import the site kit and show its individual templates in a list.
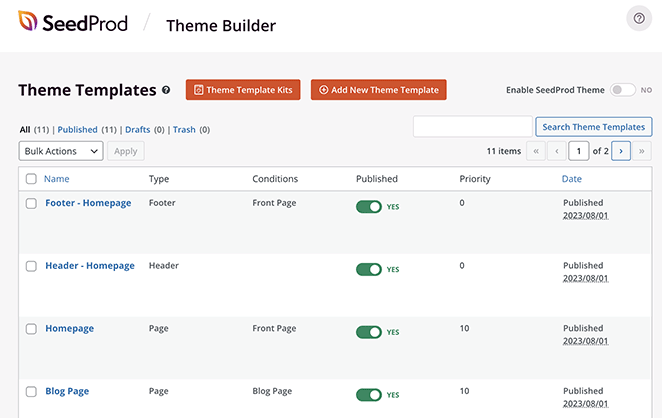
You can customize your theme by editing these templates, including the homepage, header, footer, and archive pages.
For more detailed steps, see our guide on how to create a custom WordPress theme.
Customizing Your Blog Layout
Many of SeedProd’s site kits have a blog page by default, which displays a list of your latest blog posts. This is also sometimes known as an archive page in other site kits.
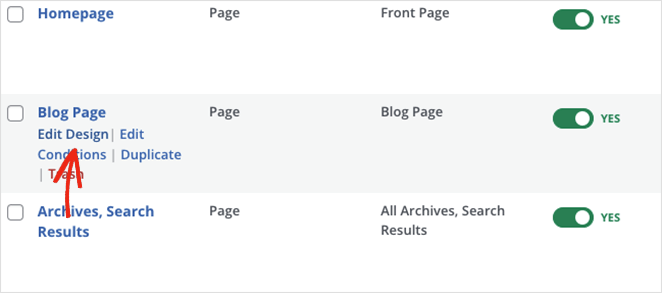
You can customize the blog page by hovering over it in the templates list and clicking the ‘Edit Design’ link.
Upon opening the blog template, you’ll see the design from the site kit demo. Alongside that will be a live preview of the post layout on the left and blocks and settings on the right.
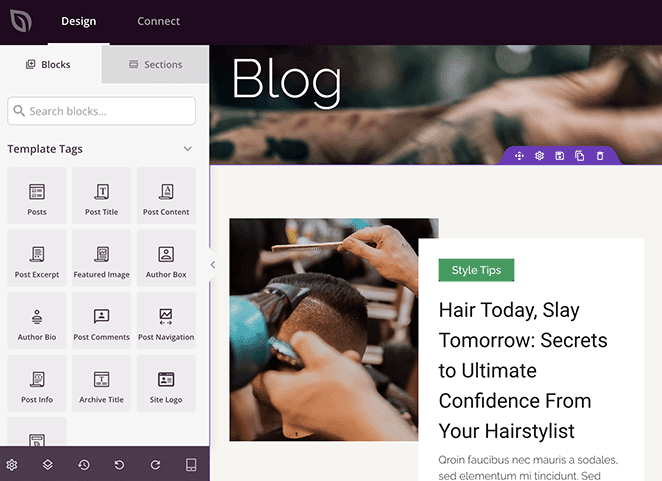
The posts on this page are displayed using the Posts block. When you select it in the page builder, it opens a settings panel on the left-hand sidebar.
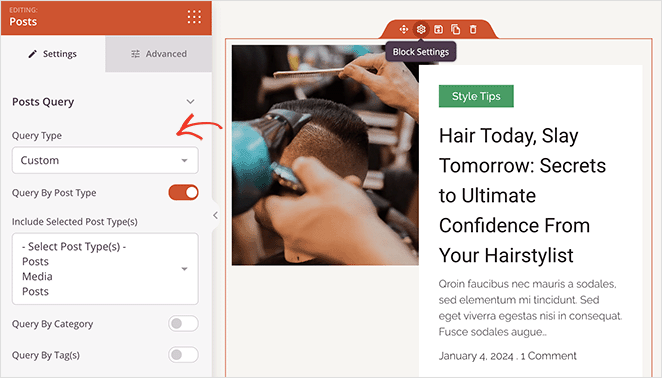
This is where you can customize how your posts appear. For example, you can display content by post type, category, tag, or author and order posts by date, title, and more. You can even show or hide the featured image and change its height.
Further down the settings panel, you’ll see a ‘Layout’ section. Here, you can switch between 4 blog skins: Classic, Card, Creative, and Minimal.
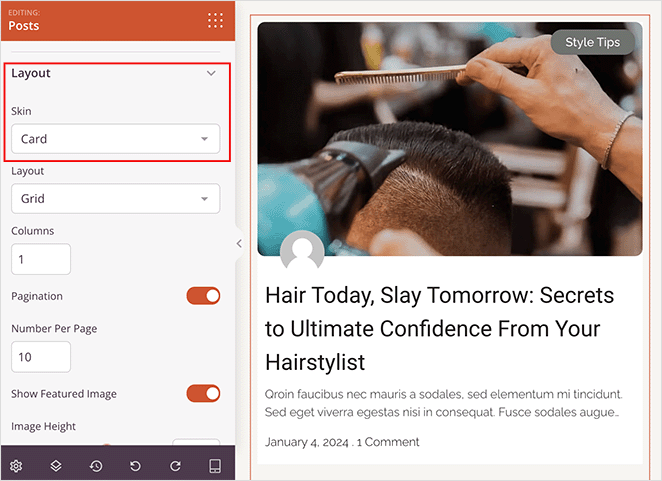
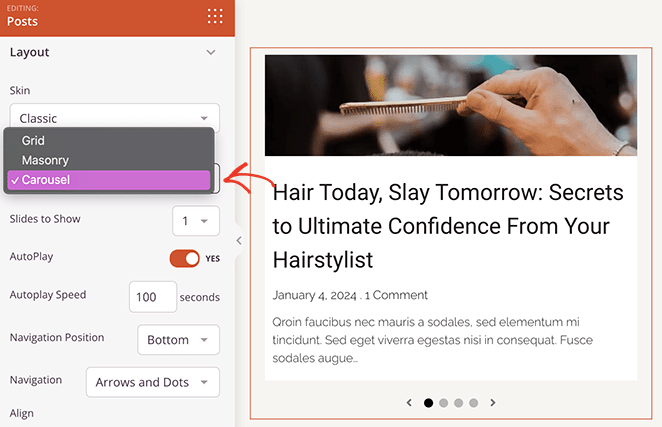
Beneath that is a dropdown that lets you change the post layout. The options you can choose from include Grid, Masonry, and Carousel.
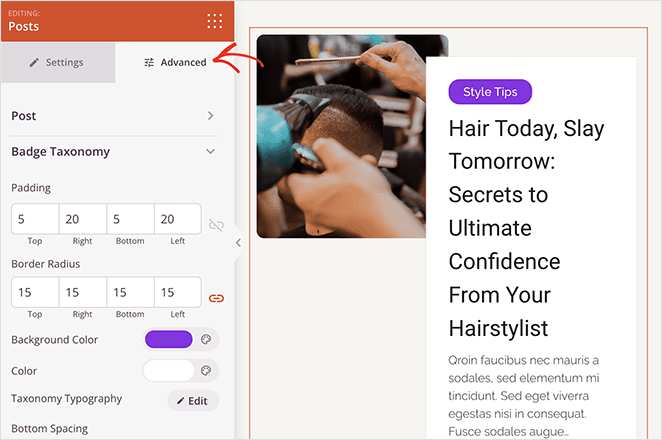
Next, click the ‘Advanced’ tab for the posts block. In this panel, you’ll see further customization options for fonts, spacing, background colors, borders, and badge taxonomy styling.
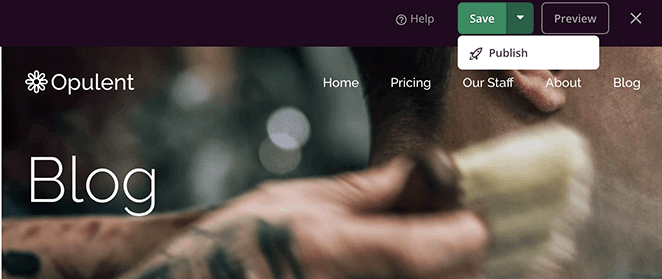
When you’re happy with your new blog layout, click ‘Save’ and ‘Publish.’
You’ll also need to return to SeedProd » Theme Builder and activate your WordPress theme by clicking the ‘Enable SeedProd Theme’ toggle.

Now, you can visit your blog page and see the new layout in action.

Alternative Methods to Change Blog Layout
I completely understand that using a page builder isn’t the best fit for everyone. That’s why we’ll cover a few more ways to change your blog layout in WordPress below.
Change Your WordPress Theme
Another way to change your blog layout is to switch your WordPress theme completely. Since themes dictate your site’s color scheme, typography, and overall structure, changing to a new one can alter your blog’s layout and styling.
You can find a new theme by browsing the WordPress theme directory or by choosing one from a reputable theme developer. You can discover some of our top theme choices by checking out our roundup of the best WordPress themes.
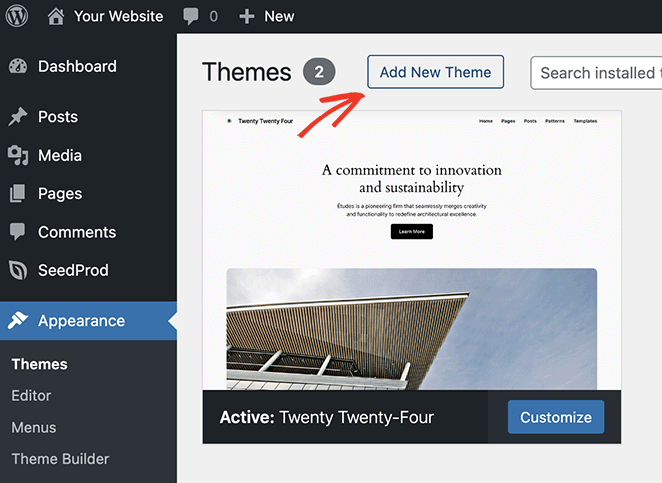
Once you’ve found a theme with a blog layout you like, installing it is easy. Simply navigate to Appearance » Themes from your WordPress dashboard and click the Add New Theme button.
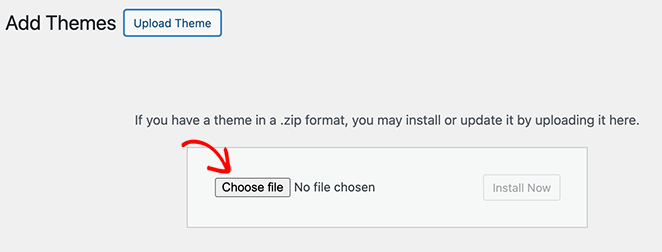
From there, click the Upload Theme button and choose your theme zip file from your computer. Then, click the ‘Install Now’ button, then ‘Activate’.
In this example, we’re using the Astra WordPress theme because it has several easy settings for changing the blog layout.
To find them, go to Appearance » Settings from your dashboard, which opens the WordPress theme customizer.
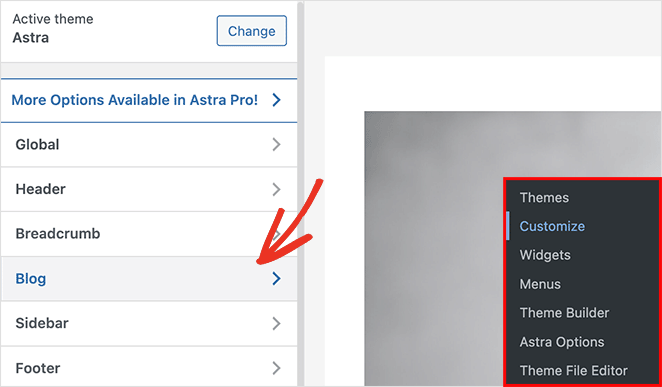
Next, click the ‘Blog’ heading, then select the ‘Blog/Archive’ tab. You’ll see several options here, including customizations for the blog container and sidebar layout.
Scroll down further, and you can choose from 4 different blog layout settings, including Classic, Grid, List, and Cover.
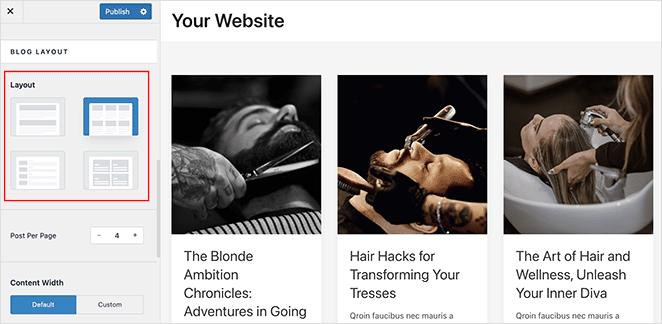
Choose an option that fits your layout needs, then click the Publish button to save your changes.
Then, you can visit your site to see your new blog layout.
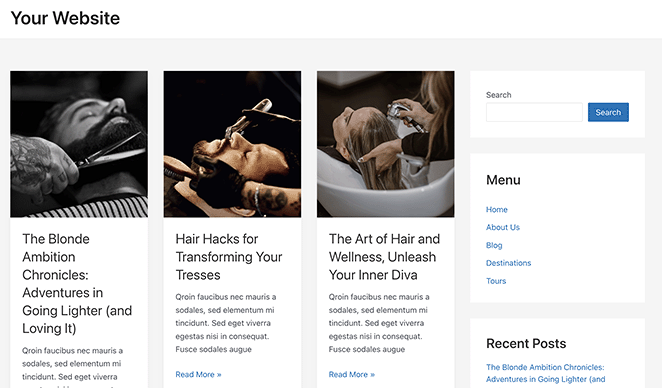
Use the WordPress Full Site Editor
If you’re using a block-based WordPress theme, you may find it easier to use the WordPress Full Site Editor (FSE) to adjust your blog layout. The Full Site Editor (FSE) is a built-in WordPress tool that lets you visually customize your entire site using blocks.
You can edit virtually any page, including your front page, headers, footers, and, of course, your blog page.
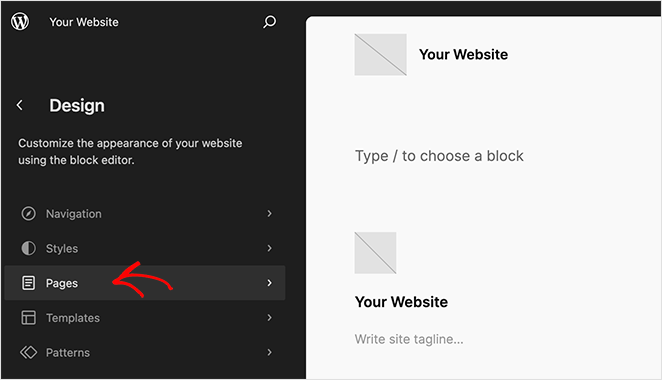
To do this, head to the Appearance » Editor screen from your WordPress dashboard and click ‘Pages’ in the left-hand sidebar.
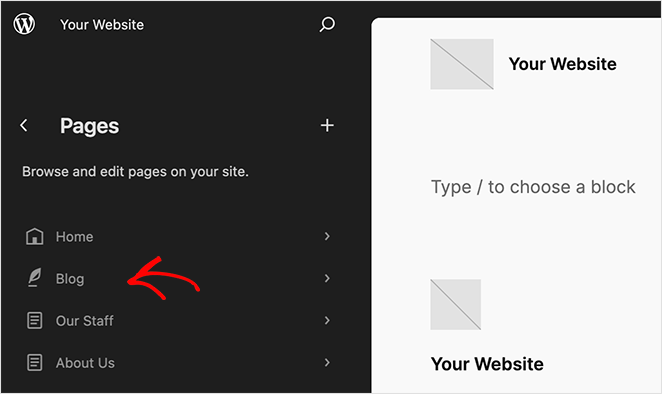
Next, click the ‘Blog’ page option and click preview on the right to customize your page and change its layout.
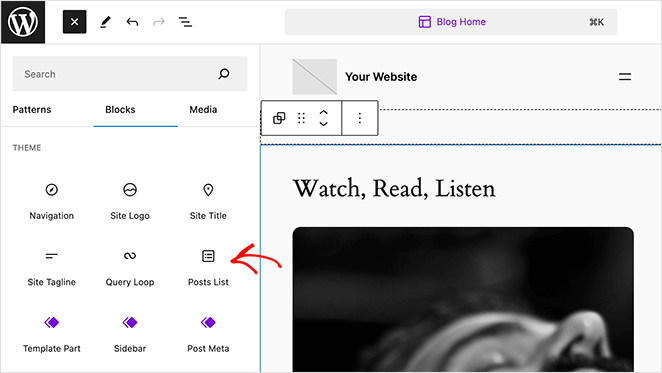
Now, you can click the plus (+) icon to add blocks to the page, such as the Posts List block. You can also change colors and fonts on the page by clicking the ‘Styles’ icon in the left sidebar.
When your layout is complete, click the Save button to save changes instantly. Then, go ahead and visit your blog layout to see how it looks.
Which Blog Layout Method Should You Use?
Not sure whether to use SeedProd, change your theme, or try the Full Site Editor? Here’s a quick comparison of each method to help you choose the best option for your needs and skill level.
| Method | Best For | Skill Level | Requires Plugin? |
|---|---|---|---|
| SeedProd | Full control, drag-and-drop design, landing pages | Beginner | ✅ Yes |
| Change WordPress Theme | Full site redesign and new layout style | Beginner | ❌ No |
| Full Site Editor (FSE) | Tweaking layout in block-based themes | Intermediate | ❌ No |
Design Tips for an Effective Blog Layout
Now that you know how to change blog layout in WordPress, let’s move on to some key tips for its design.
Visual Hierarchy is Key
Visual hierarchy means designing your page so visitors notice the most important parts first. There are many ways to achieve this. For instance, you can play around with the size, color, and position of different elements.
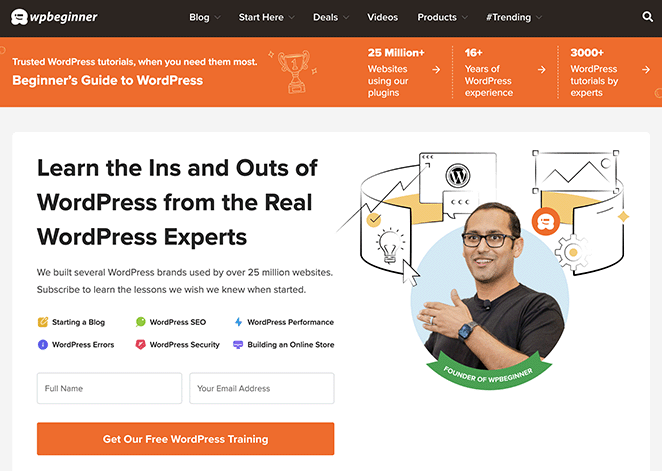
This blog layout example from WPBeginner does a great job of drawing the eye to one of its most important elements: the opt-in form. By placing it at the top in bold, engaging colors, users are drawn to it first before anything else.
Invest in Readability
Your blog content matters most—so it must be easy to read. Choose fonts that are easy on the eyes and ensure they contrast with your background color. If the text is hard to read, it can turn people away.

I love the font choices used on AIOSEO’s blog page. The font size and spacing are easy to read without having to squint.
Prioritize Navigation
Simple and clear navigation makes your blog user-friendly. Help your readers easily find what they need without overthinking. Get rid of any unnecessary clutter and give main features prominent placement.
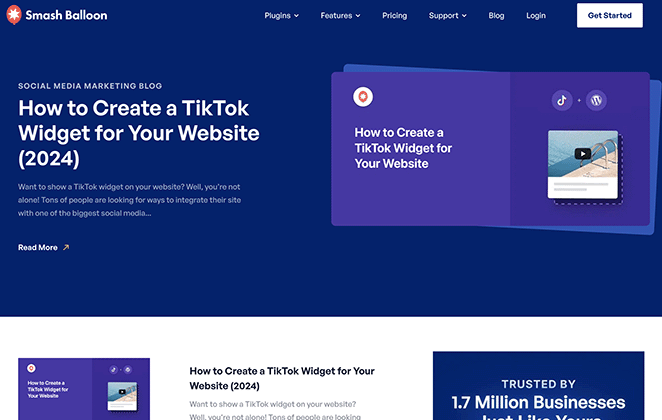
Smash Balloon’s blog layout is a great example of clear navigation. Besides a full-width section for its latest blog post, it features a clean navigation bar for users to explore its products, features, pricing, and support.
Don’t Forget Mobile Users
Mobile browsing has surpassed desktop usage, so a mobile responsive design is a must. When designing your blog layout, think about how it will translate on smaller screens. Keep track of your mobile visitors’ experience to make sure it’s smooth and enjoyable.
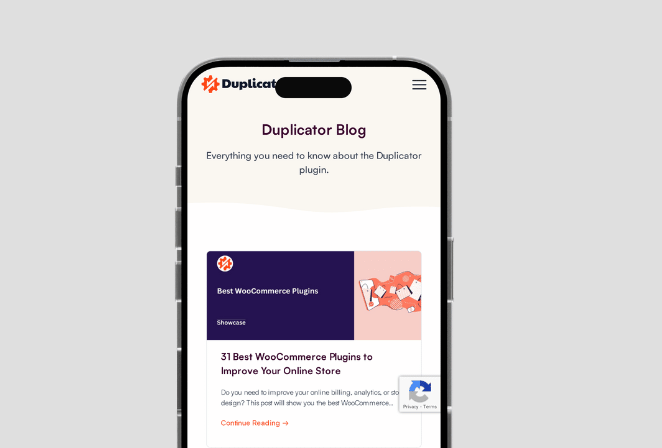
Duplicator has done an excellent job of making its blog mobile-friendly. Whether you’re using a smartphone, tablet, laptop, or desktop, you can browse all areas without facing any issues.
Get Started With a New Blog Layout
I hope this guide helped you learn how to change blog layout in WordPress. Pick a method that works for you to improve your blog’s user experience, engagement, and speed easily.
You might also be interested in reading the following tips and tutorials for more blog tips:
- Stunning Blog Layout Examples to Revamp Your Site
- 23 Best WordPress Blog Plugins for Easy Blog Management
- 8 Blog Landing Page Examples + How to Make One
- How to Make Your Blog Look Like a Website (11 Expert Tips)
- How to Promote Your Blog (Beginner’s Guide)
- 9 Best Blogging Platforms (Pros and Cons)
Thanks for reading! We’d love to hear your thoughts, so please feel free to join the conversation on YouTube, X and Facebook for more helpful advice and content to grow your business.

