Are you looking for the best Mailchimp WordPress integration?
Mailchimp is a popular email marketing service you can integrate with your WordPress site to help grow your email list. In this article, we’ll share the best Mailchimp integrations for WordPress to streamline your list-building efforts.
Why Build an Email List with Mailchimp?
Email marketing is an effective way to talk with your audience and keep you on their minds. By building a list of subscribers, you can speak directly to potential customers or clients that want to hear what you have to say.
Plus, Mailchimp has various features to help you create and send targeted email campaigns. For instance, with its segmentation features, you can organize email subscribers by location, purchase history, or engagement levels. This allows you to send more relevant, personalized content that resonates with your audience.
Additionally, Mailchimp provides detailed analytics to help you track your email campaign performance. You can analyze email open rates, click-through rates, and conversion rates to help refine your marketing efforts and results.
Finally, Mailchimp works with many other platforms and tools, making it a versatile and flexible option for your email marketing needs. Whether you’re looking to integrate it with your WordPress website, social media channels, or eCommerce platform, Mailchimp likely has an integration available to make the process easier.
With this in mind, let’s look at the top Mailchimp WordPress integrations to help grow your small business.
Mailchimp WordPress Integration Basics
Before using Mailchimp with WordPress, you’ll need to set up a Mailchimp account.
Creating a Mailchimp Account
To do this, visit the Mailchimp website and click the Start Free Trial button.

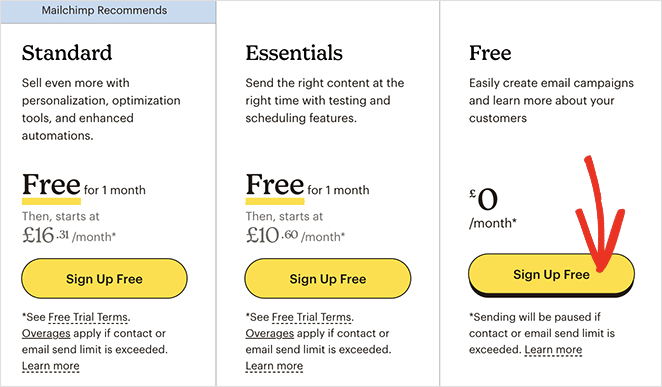
Afterward, you’ll visit the pricing page to choose a plan. For this guide, go ahead and click the Sign Up Free button.
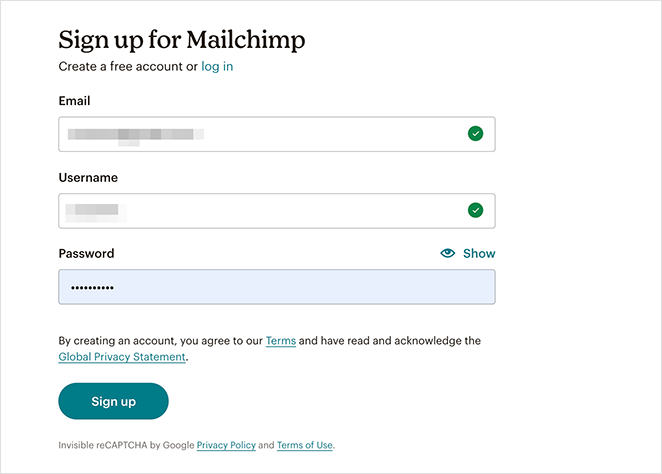
On the next screen, you can enter an email address, username, and password for your Mailchimp account. It will also send an email to verify your account.
After verifying your new account, follow the on-screen instructions to complete the setup process.
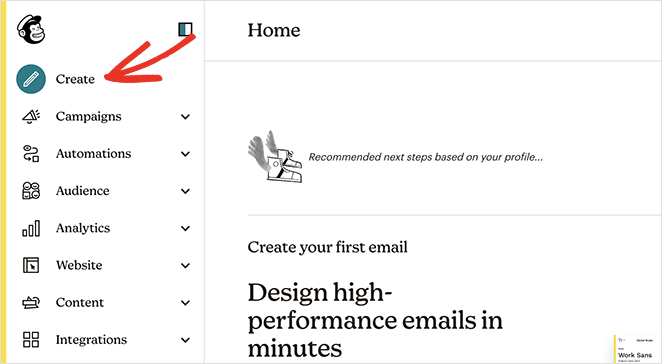
Once you’ve created your account, you’ll see your Mailchimp dashboard, which looks like this:
Adding Mailchimp Email Signup Form to WordPress
Mailchimp has built-in subscription forms that you can embed on your WordPress website.
To find them, click the Create option in the sidebar.
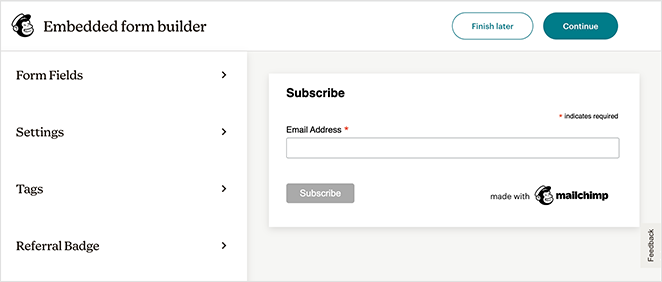
From there, click Signup Form » Embedded Form and select Begin.
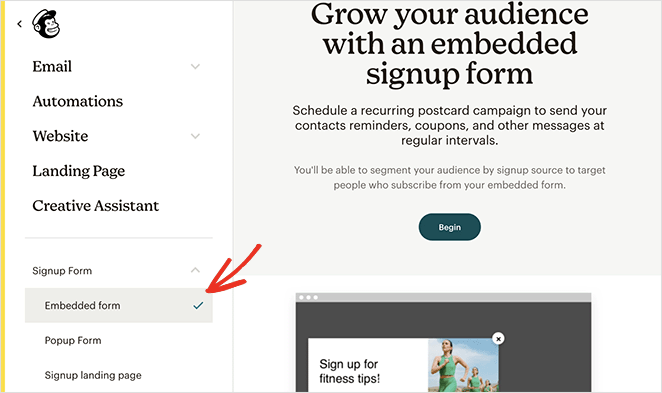
On the next screen, you can select which form fields to display and other options for your sign up form, then click the Continue button.
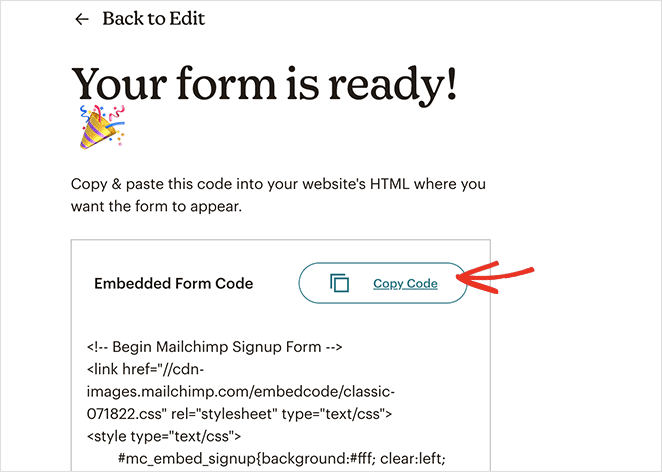
Now you’ll need to copy the embed code shown on your screen.
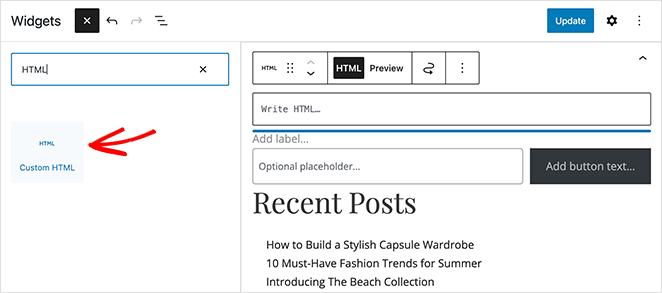
Next, head over to your WordPress admin area and navigate to the Appearance » Widgets page. From there, find the Custom HTML block and add it to your sidebar widget area.
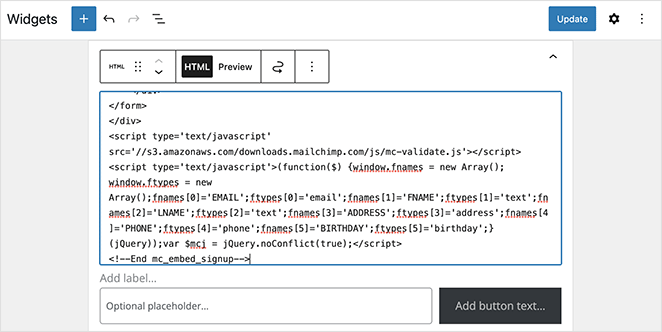
Inside the widget settings, you can paste the Mailchimp embed code you copied earlier and click the Update button.
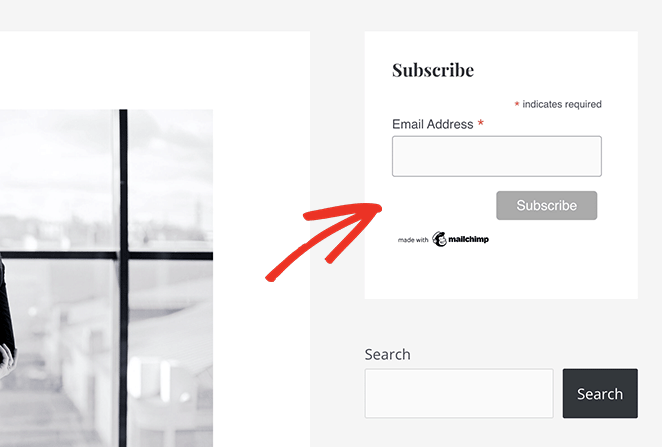
When you visit your site, you’ll see the signup form in your WordPress sidebar, ready to grow your Mailchimp list.
Best Mailchimp WordPress Integrations
Mailchimp signup forms work fine with their standard embed code. However, the forms you get are fairly basic and offer few customization options. In situations like this, it’s best to integrate Mailchimp with other tools that do the job better.
Below, you’ll find some of our favorite Mailchimp integrations and how to use them on your WordPress site.
1. SeedProd

SeedProd is one of the best Mailchimp WordPress integrations. It’s a powerful drag-and-drop page builder that lets you customize your entire WordPress site without writing code or hiring a developer.
With SeedProd, you can create high-converting landing pages, WordPress themes with custom headers, footers, sidebars, and WooCommerce stores and use its easy WordPress blocks to connect Mailchimp with your website.
How to Integrate Mailchimp with SeedProd
First, you’ll need at least a SeedProd Plus account, which includes Mailchimp email integration. You’ll then need to download and activate the WordPress plugin on your website.
If you need help, you can see our knowledge base guide on installing and activating SeedProd.
Once you’ve activated SeedProd on your WordPress website, you can follow this guide to create a Mailchimp landing page in WordPress. It’ll show you how to choose a landing page template, set up your first page, and use the drag-and-drop interface to add an opt-in form to your page.
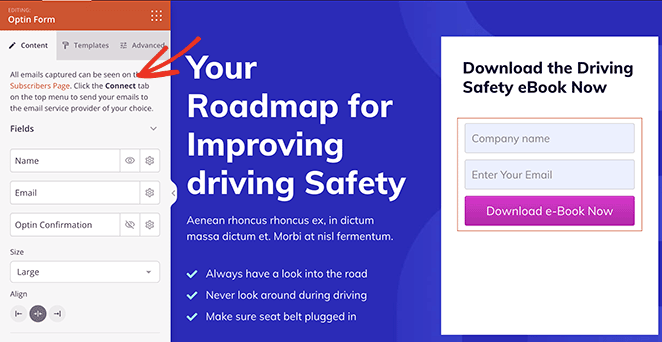
When you’re satisfied with your landing page design, visit the Connect tab at the top of your screen. From there, find the Mailchimp integration and click Connect.
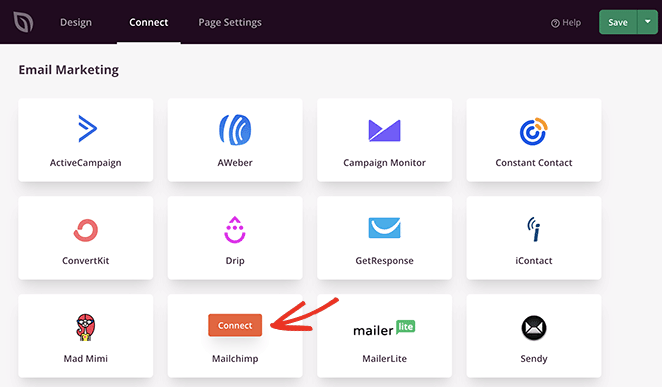
Next, click the Connect a New Account button.
Now you can click the Get Mailchimp API Key button to open a popup window with your key.
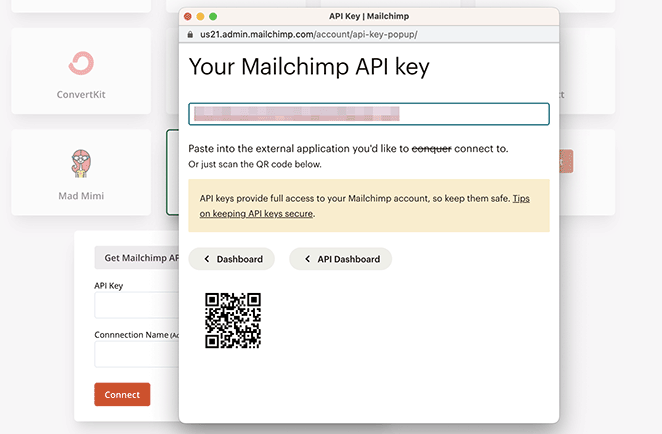
Simply copy the key, paste it into the API Key field, and click Connect.
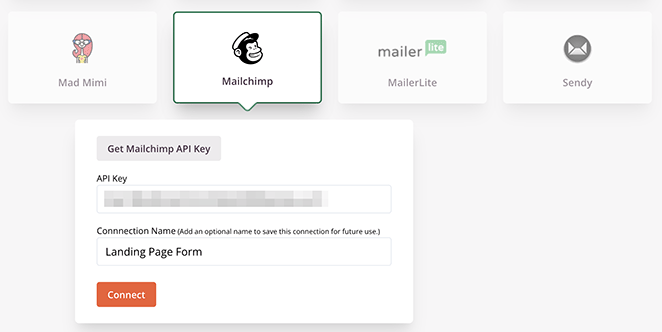
From there, you can choose your email list from the dropdown menu, and if you like, enable the Mailchimp double opt-in checkbox.
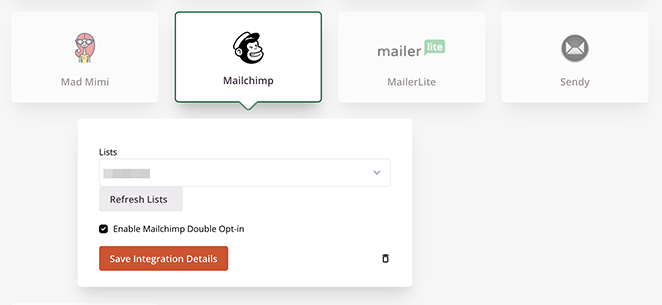
Click the Save Integration Details button to store your Mailchimp list settings.
With Mailchimp now integrated with your landing page, you can finish customizing your design. After publishing your page, anyone subscribing via your landing page subscription form will be automatically added to your Mailchimp email list.

2. OptinMonster
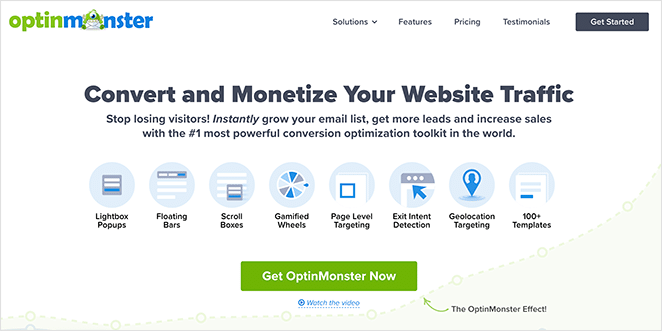
OptinMonster is another powerful Mailchimp WordPress integration. It’s the best conversion optimization software available, helping you convert website visitors into subscribers.
OptinMonster has built-in Mailchimp integration, allowing you to grow your Mailchimp list easily. It also comes with a drag-and-drop campaign builder, countless pre-made templates, and targeting options that help you display opt-in forms to the right people at the right time.
For example, you can show a popup form to WordPress users about to leave your site or display a different marketing campaign to users in specific locations and more. It’s quite frankly the best email subscription popup plugin around.
How to Integrate Mailchimp with OptinMonster
To get started, you’ll first need to sign up for an OptinMonster account. Once you’ve done that, you’ll need to install the OptinMonster WordPress plugin on your website, which connects your OptinMonster account and website.
After activating the plugin, go to the OptinMonster » Settings page and click the Connect an Existing Account button.
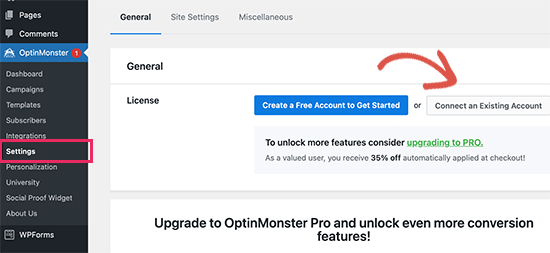
Once your account is linked, click the Add New button.
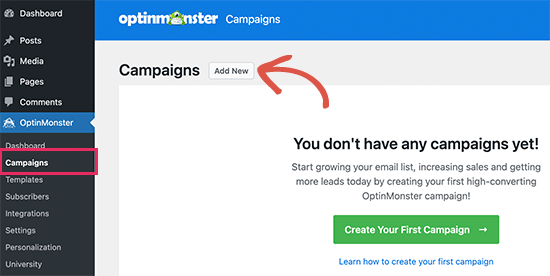
Now you can choose a campaign type such as:
- Lightbox popup
- Floating bar
- Fullscreen
- And more
After that, you can choose a template for your form. OptinMonster has several beautiful templates, and you can customize them to suit your campaign needs easily.
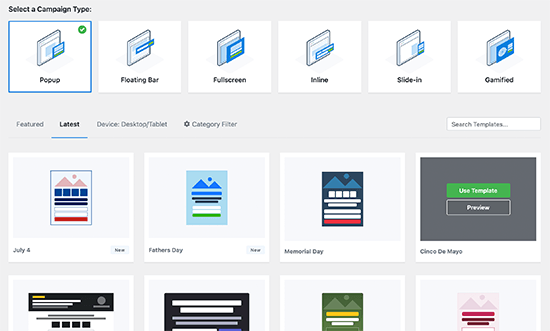
Once you’ve found a template you like, you can name it and open the campaign builder.
With OptinMonster’s drag-and-drop functionality, you can click anywhere to customize your form design. You can add new images, change button colors, add extra elements, and more.
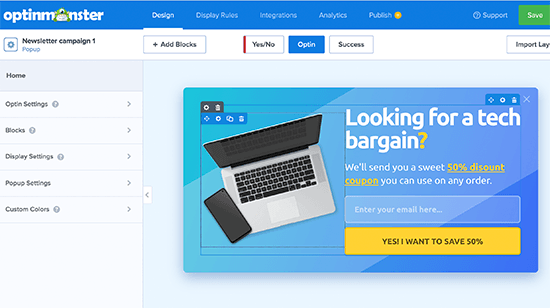
When you’re happy with your campaign design, you’re ready to integrate it with Mailchimp. To do this, click the Integrations tab and the Add New Integration button.
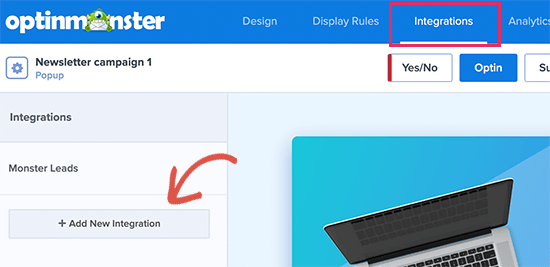
Next, select Mailchimp as your email service provider and name the connection. From there, paste your Mailchimp API key and click the Connect to Mailchimp button.
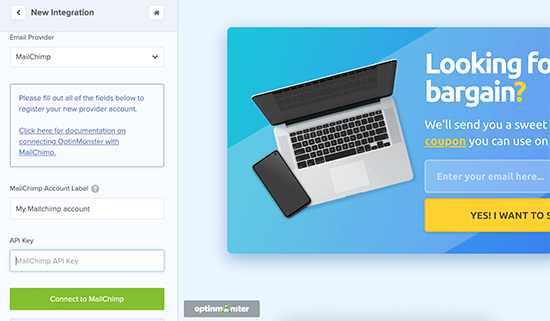
Pro Tip: You can find your Mailchimp API key by visiting your Mailchimp dashboard, clicking your profile icon, and clicking Extras » API keys.
After connecting your Mailchimp account, you’ll need to select it and choose your email list from the dropdown.
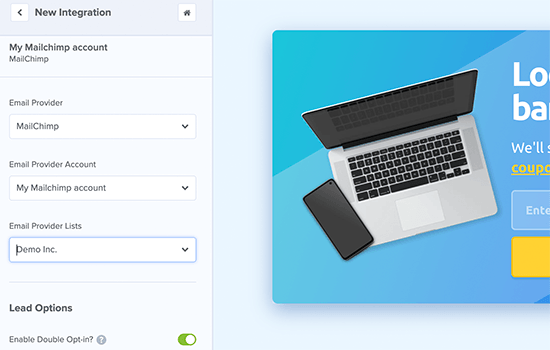
After doing that, you can publish your campaign and exit the builder.
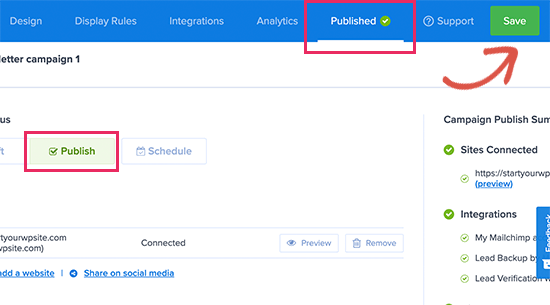
On the next screen, you can choose where to display your campaign and make it live.
After publishing your campaign, you can visit your website and see the form in action.

3. WPForms

Another way to integrate Mailchimp with your WordPress website is with a WordPress form builder. WPForms is the best contact form builder for WordPress, making it easy to create any form without writing code or CSS.
It integrates directly with Mailchimp, so you can save form entries to your Mailchimp email list. You can also connect WPForms with popular payment processors, including PayPal, Stripe, Square, and more.
How to Integrate Mailchimp with WPForms
To get started, you’ll need to install and activate WPForms on your WordPress site and build your first online form. If you need help with this, we have several step-by-step guides on creating different form types with WPForms:
- Creating a user registration form with custom fields
- How to create an event registration form
- Creating a multi-step form
- How to create a form with file upload
- Creating a Typeform style form
After creating a contact form, you’ll need to integrate it with your Mailchimp email list. To do this, visit WPForms » Addons and install the Mailchimp addon.
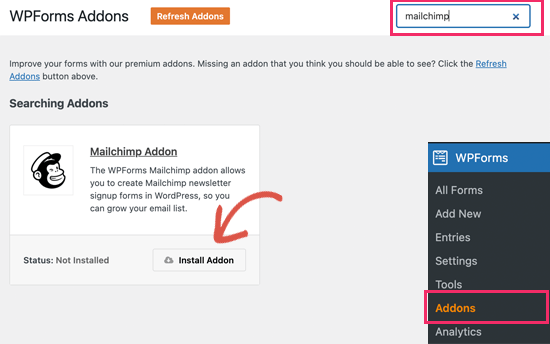
Next, edit your form, click the Marketing tab, and click the Mailchimp option. From there, click on the Add New Connection button.
On the next screen, name the connection and paste your Mailchimp API key.
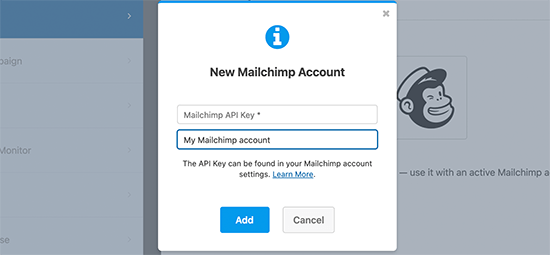
From there, choose your Mailchimp account, audience, and the form field corresponding to the email field.
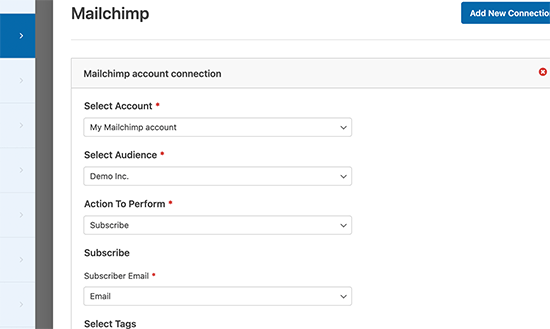
Now you can save your form settings and exit the form builder.
Next, you’ll need to embed your form on your site. To do this, you can add the WPForms WordPress block to a post, page, or sidebar.
For example, to add your form to a contact page, you’ll need to create or edit a page, then find the WPForms block.
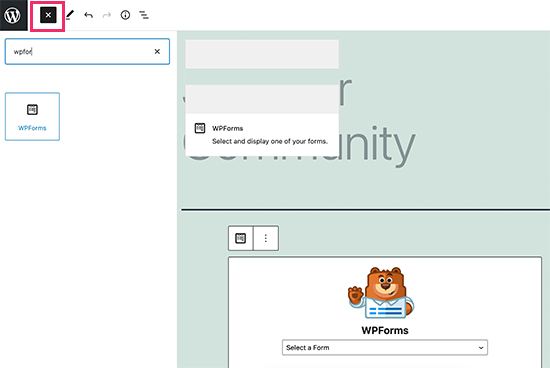
Inside the block, choose your form from the dropdown menu, then save or publish your changes.
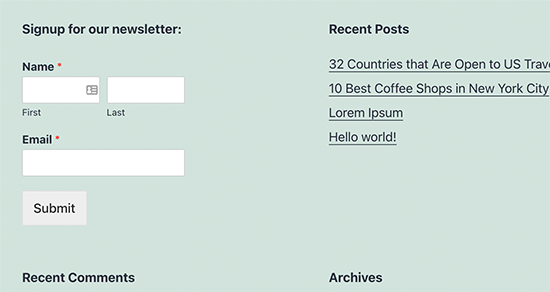
When you visit your page, you’ll see your new form, ready to receive subscriptions.
4. RafflePress
If you’re looking for a way to grow your Mailchimp email list and go viral at the same time, RafflePress is an excellent choice.

It’s the best WordPress giveaway plugin, allowing you to run viral giveaways to grow your subscribers, brand awareness, and WordPress website traffic.
With RafflePress’s drag-and-drop giveaway builder, you can run any giveaway and integrate it with Mailchimp to quickly grow your list. Plus, with countless giveaway actions, visitors can earn more chances to win by:
- Following your social media profiles
- Referring friends
- Sharing on social media
- Visiting specific pages
- Leaving a comment
- And more.
How to Integrate Mailchimp with RafflePress
To integrate your Mailchimp list with a RafflePress giveaway, you’ll first need a RafflePress Pro account. From there, you need to install and activate RafflePress on your WordPress website.
Next, start building your first giveaway campaign. To help you get started, here’s a step-by-step guide on how to create an online contest with RafflePress.
To create a giveaway to grow your email list, you’ll need to add the ‘Join an Email Newsletter’ giveaway action.
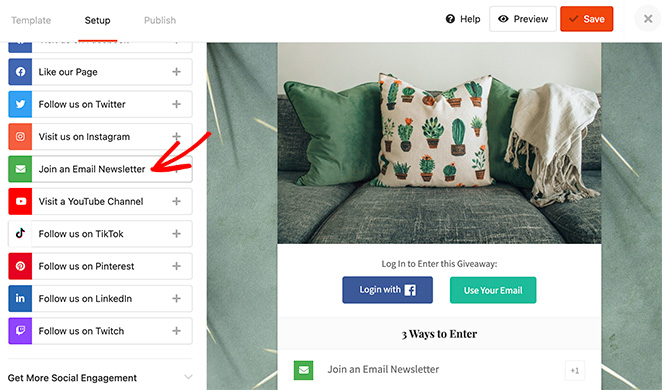
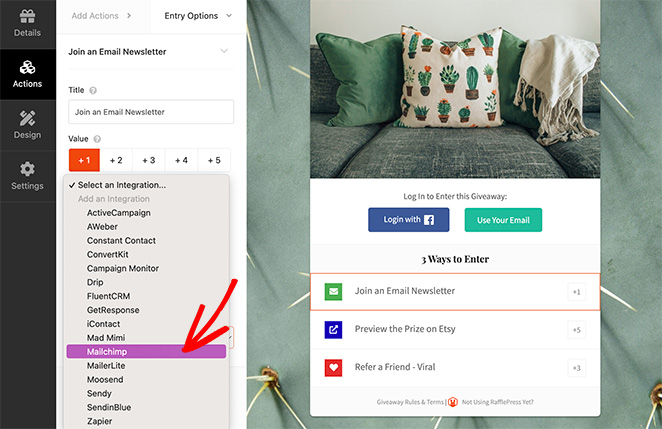
After adding it to your giveaway widget, click the ‘Select an Integration’ dropdown menu, and choose Mailchimp from the list.
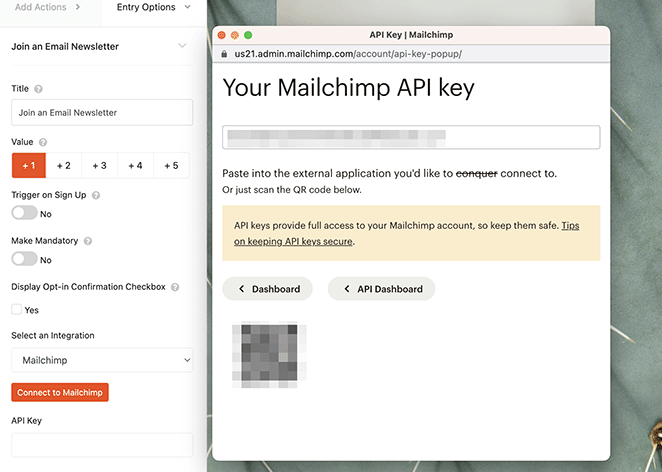
Now, go ahead and click the Connect to Mailchimp button, which opens a popup window where you can copy your API key.
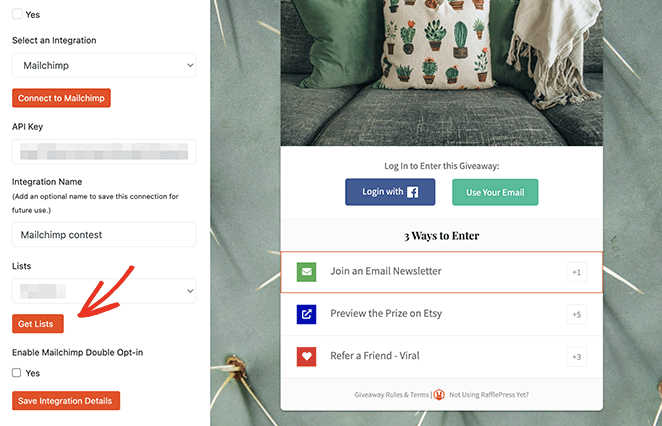
After pasting the API Key into the settings panel, you can select your specific email list and enable the double opt-in checkbox.
Once you’ve done that, you can publish your giveaway using either the RafflePress WordPress block, shortcode, or the built-in giveaway landing page.
Simply click the Publish tab at the top of your screen, and follow the instructions for your preferred choice.
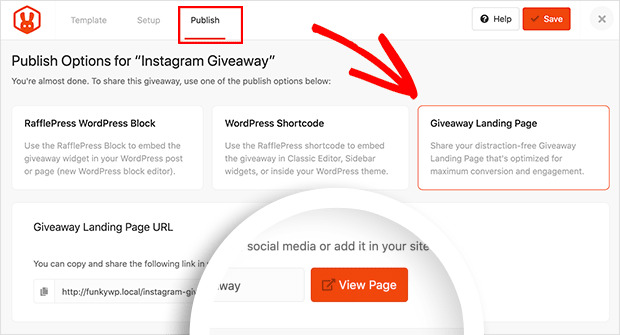
When your giveaway starts, anyone who enters via your newsletter signup action, will automatically be added to your Mailchimp email list.

5. Uncanny Automator
Email is a fantastic tool, especially when personalizing it to specific users and sending your messages at the right time. And with the right tools, you can make targeted marketing automations with incredible conversion rates.
For example, you could automatically send an email after a customer purchases, suggesting similar products. Or, you can send automatic emails for new blog posts.
An excellent way to do this is with the Uncanny Automator plugin. It helps you create automated workflows for your WordPress site.

Uncanny Automator works seamlessly with popular WordPress plugins, eCommerce platforms, membership plugins, and thousands of apps with Zapier. It also connects with Mailchimp, so you can create smarter email campaigns in minutes.
How to Integrate Mailchimp with Uncanny Automator
To get started with this plugin, install and activate Uncanny Automator on your WordPress site.
After activating the plugin, go to Automator » Add New from your WordPress dashboard to create your first recipe. From there, the plugin will ask you to choose the type of recipe you want to make.
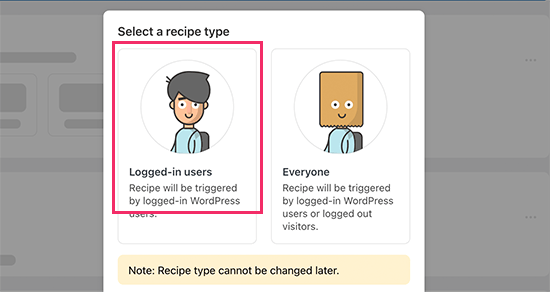
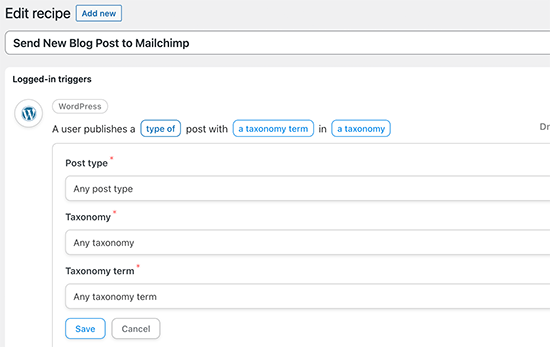
For this tutorial, we’ll automatically email subscribers when we publish a new post. To do that, first, choose the logged-in users option.
Next, select WordPress as your integration that triggers the action. Then, for the trigger, you can choose when a user publishes a post.
Now you can choose which action is triggered, so click the Mailchimp option to connect it to your website.
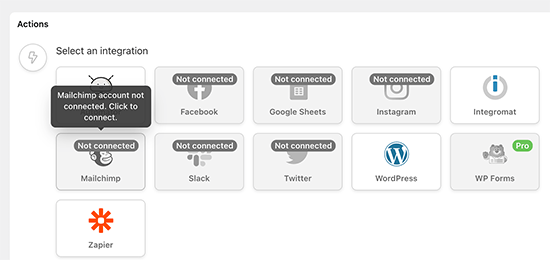
Next, you’ll see a popup where you can follow the on-screen instructions to finish the connection.
From there, you can choose the action you want to perform on your Mailchimp account.
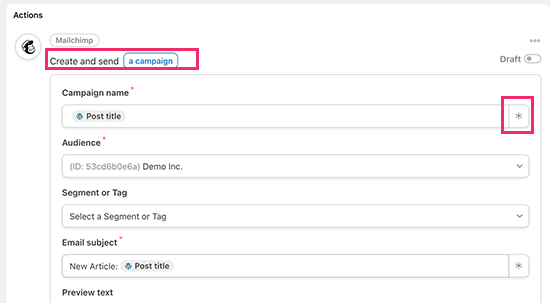
In the above example, we’ve set it to send a new email to our audience with the blog post title and a custom message.
When you’re happy with the recipe, you can switch it from Draft to Live.
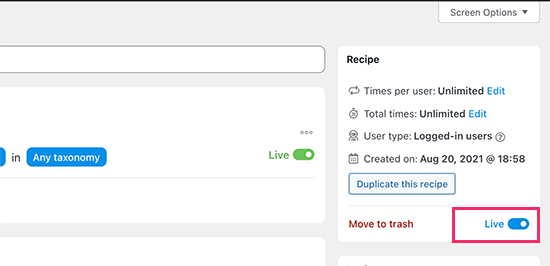
Now, whenever you publish a new article, Mailchimp will automatically send an email notification to your subscribers with all the details.
More Mailchimp Integrations for WordPress
If you’re looking for more Mailchimp WordPress integrations, here are some of our favorite choices:
- Thrive Themes – Connect your Mailchimp list to Thrive’s suite of WordPress plugins, including its website builder, lead generation tool, landing page builder, quiz builder, and more.
- MemberPress – Integrate your Mailchimp email list with the best WordPress membership plugin.
- Formidable Forms – Create more complex WordPress forms and link them to your Mailchimp list.
- UserFeedback – Display user-friendly survey popups in WordPress and add contacts to your Mailchimp email list.
There you have it!
We hope this guide has helped you find the best Mailchimp WordPress integrations for your small business website. Before you go, you might also like this ultimate guide on how to password protect a WordPress website.
Thanks for reading! We’d love to hear your thoughts, so please feel free to leave a comment with any questions and feedback.
You can also follow us on YouTube, X (formerly Twitter), and Facebook for more helpful content to grow your business.

