Looking for an easy way to customize your WooCommerce shop page?
WooCommerce powers over 29.35% of all online stores, making it a popular eCommerce platform for WordPress website owners. However, making your WooCommerce store unique isn’t straightforward if you lack development skills.
Does that sound like you? Don’t worry.
This article will show you how to customize your WooCommerce shop page without writing a single line of code.
What Is the WooCommerce Shop Page?
The WooCommerce shop page is an archive page that displays your products to potential customers. WooCommerce will fetch the details about your products, including:
- Product images
- Product titles
- Product categories
It will then display that information in a grid or list on your shop page.

Why Should You Customize Your WooCommerce Shop Page?
Imagine walking into a shop, and all you see are rows upon rows of disorganized goods. Chances are you’d walk away because it’s hard to find what you’re looking for.
The same is true for online stores. If your shop page shows a wall of products with no organization, shoppers will bounce away and move on to the next website.
That’s the problem with the default WooCommerce shop page layout. It only displays a simple list of products, making it hard for visitors to find the goods they want.
Luckily there are ways to edit the WooCommerce shop page, which can give your store the following benefits:
- Stand out from your competitors with a unique design
- Improve customer experience by organizing products by category
- Boost sales by displaying featured, sale, and best selling products
- Improve your SEO by adding content that targets highly searched keywords
- Boost trust by showing testimonials, star ratings, and user-generated content (UGC)
The key to designing a high-converting WooCommerce shop page is to create a user-friendly design that makes buying your products easier.
How to Customize WooCommerce Shop Page in WordPress
There are several ways to customize your shop page in WordPress. You could use a WooCommerce plugin, page builders, or code the customizations from scratch.
Because we want to keep this tutorial as simple as possible, we’ll focus on 2 of the easiest ways to customize WooCommerce pages.
The first method will use a powerful WordPress website builder plugin that’s easy to use and packed with customization options. Then we’ll show you how to use the WooCommerce customizer to change the layout of your shop page.
Method 1: Create a Custom Shop Page with SeedProd
We’ll use SeedProd to add customizations to your online store for the first method.
SeedProd is the best website builder for WordPress, with over 1 million users. It lets you create custom WordPress themes, high converting landing pages, and responsive website layouts without code.
This powerful plugin also allows you to create entire online stores with its WooCommerce integration. As a result, you can make and customize your WooCommerce shop page, product pages, shopping cart, checkout, and more with just a few clicks.
SeedProd comes with 150+ professional themes and templates to create your website. From there, you can customize your design with easy-to-use content blocks and sections.
Follow these steps to customize your WooCommerce shop page with SeedProd.
Step 1. Install SeedProd Website Builder
The first step is downloading a copy of the SeedProd website builder plugin.
Note: SeedProd offers a free version to build simple landing pages. However, we’ll use the SeedProd Elite plan for the WooCommerce features we need.
You’ll need to install SeedProd on your WordPress website next. You can follow these instructions for installing a WordPress plugin if you need help.
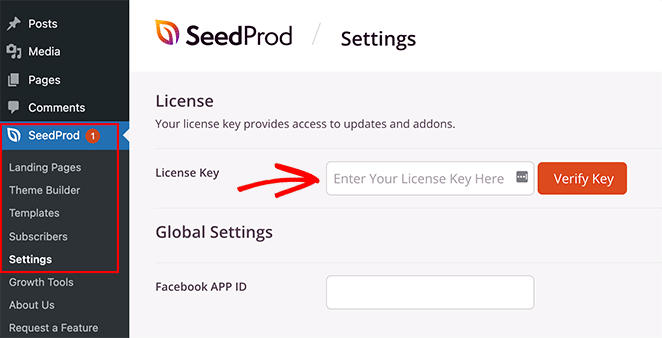
After installing and activating SeedProd, go to SeedProd » Settings and enter your plugin license key.
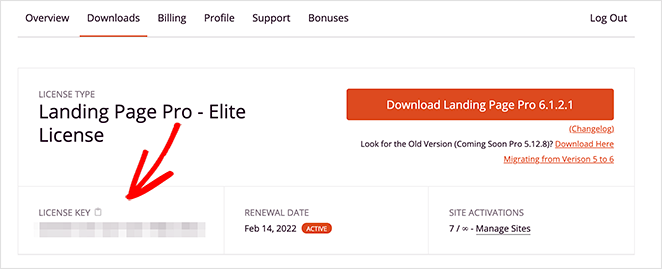
You can find your license key by logging into the SeedProd website and copying it from the ‘Downloads’ section.
Enter your license key and click the Verify Key button before moving on to the next step.
Step 2. Create a Custom WooCommerce Theme
We’ll use SeedProd’s theme builder feature to customize your WooCommerce shop page. It will override your existing WordPress theme, replacing it with your customizations.
You can find it by going to SeedProd » Theme Builder from your WordPress dashboard.
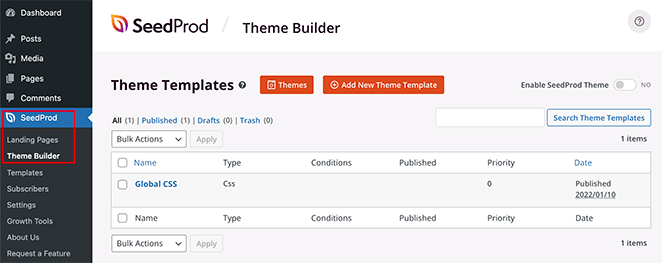
There are 2 ways to create your eCommerce theme with SeedProd:
- Create each part (template) of your theme individually
- Create all of your theme templates with a pre-made WordPress theme template
We’ll use the 2nd option for this tutorial because it automatically makes every part of your WooCommerce website.
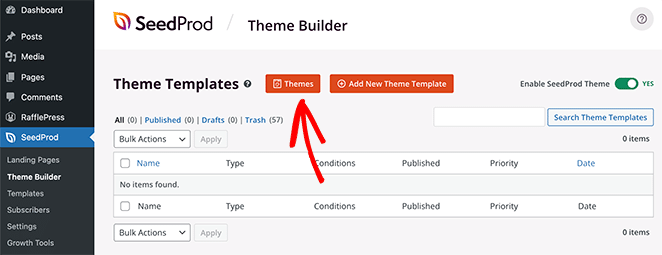
Click the Themes button at the top of your screen to launch SeedProd’s theme templates gallery. You can choose from many themes, including designs for online stores.
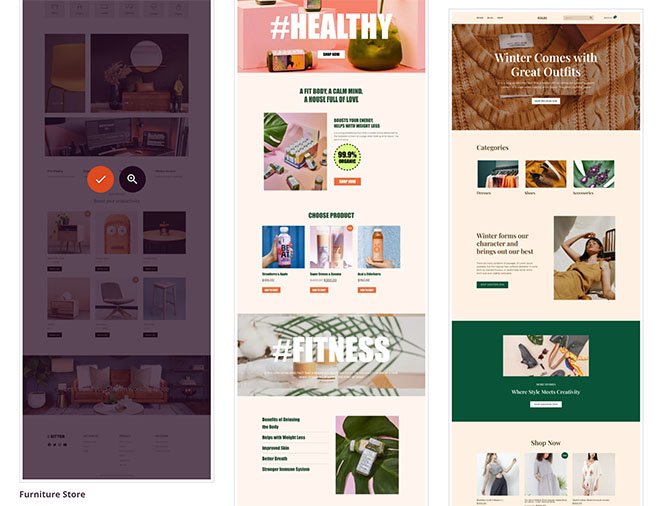
We’ll go with the ‘Furniture Store’ theme for this tutorial.
To import the theme, hover over the thumbnail and click the checkmark icon.
As you can see in the screenshot below, SeedProd will create all of the templates for your theme automatically, including:
- Header Navigation
- Product Archives
- Product Page
- Shop Page
- Single Page
- Single Post
- Blog Index, Archives, Search
- Homepage
- Sidebar
- Footer
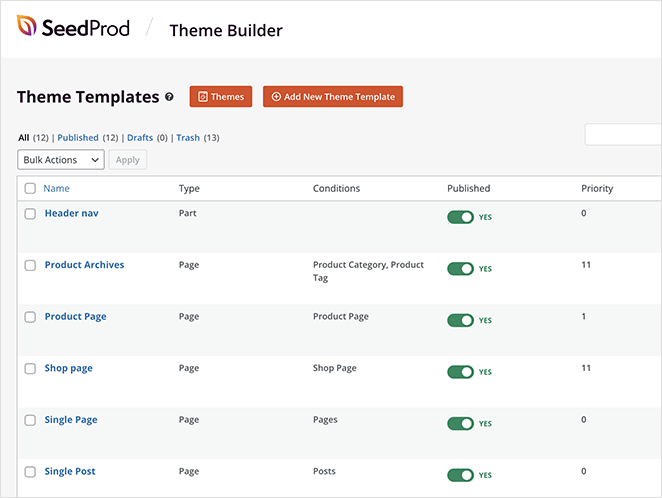
You can customize each template with SeedProd’s drag-and-drop builder. We’ll show you how to customize the shop page template in step 3.
Step 3. Customize WooCommerce Shop Page
To customize your WooCommerce shop page with SeedProd, hover over the ‘Shop Page’ template and click the Edit Design link.
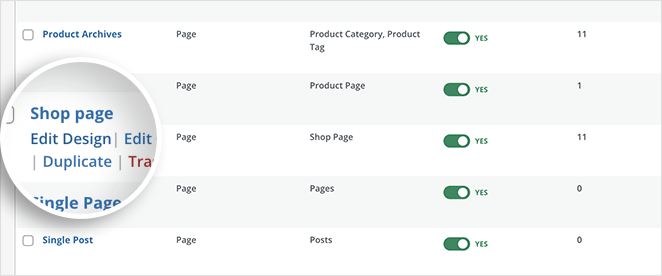
After clicking the link, your shop page template will open in SeedProd’s visual drag-and-drop page builder.
On the left are blocks and sections you can add to your page. You can see a preview of how your page looks in real-time on the right.
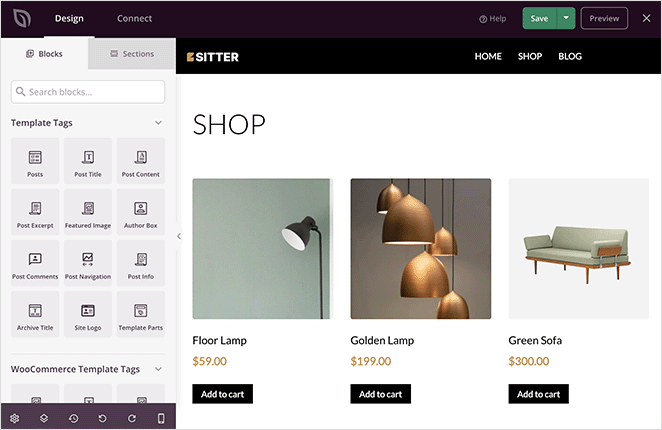
Your shop page will show a list of all your products by default. However, you can change that easily by adding new layouts, content blocks, and sections.
Let’s say you want to add a scrolling banner showcasing a sale or promotion. In that case, you can drag over the Image Carousel block and upload custom banner images.
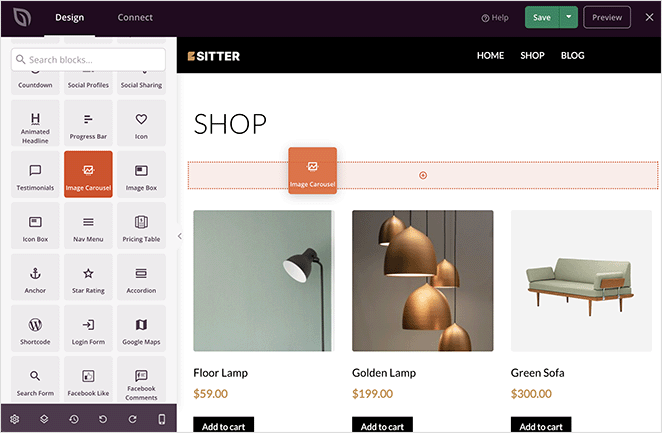
You can then customize your carousel in the block settings by changing it to a dark or light theme, auto-playing the slider, and showing the image captions.
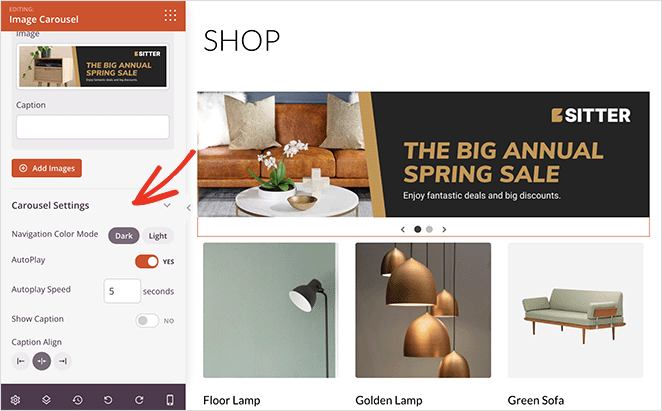
What if you want to highlight your featured products or best-selling products? To do that, add a new section to your page, then scroll down to the WooCommerce blocks panel and drag the Best Selling Products block onto your page.
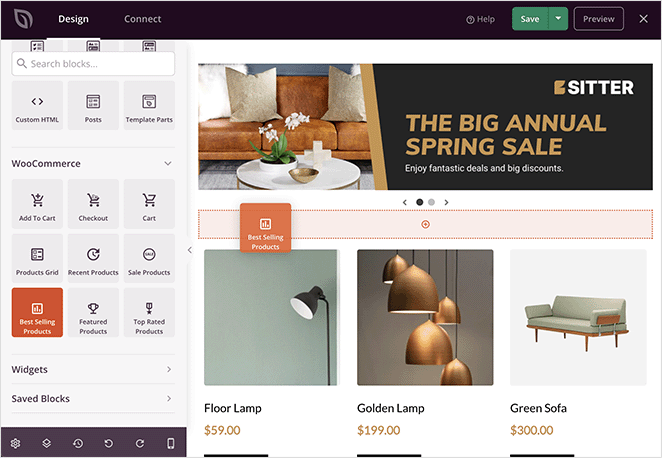
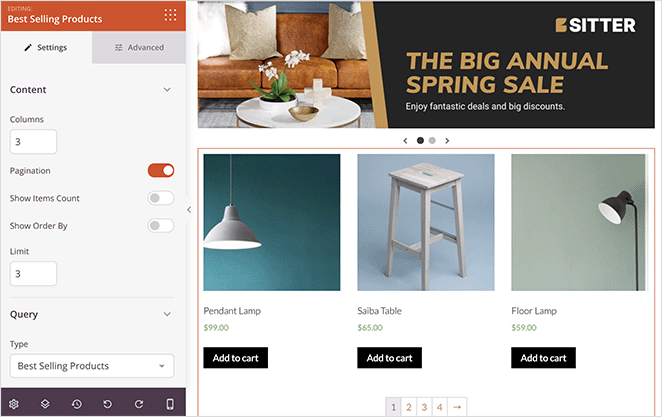
This block will display your top-selling products in a uniform grid.
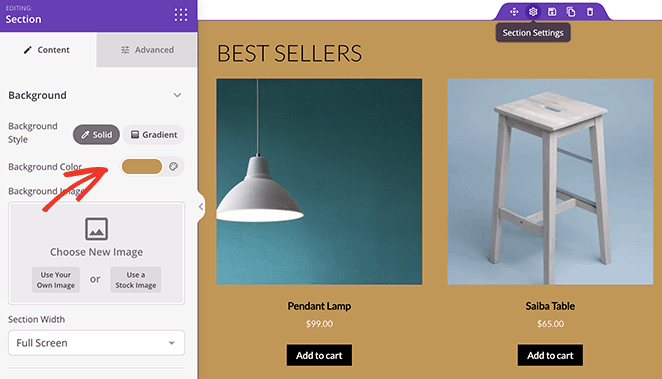
You can make this new page section stand out more by giving it a custom background color.
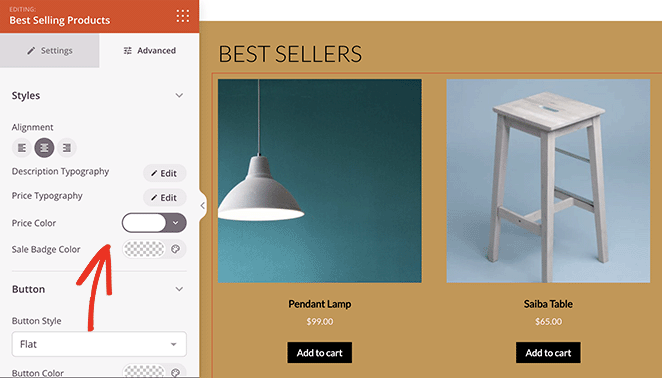
Then in the Best Selling Products block Advanced Settings, you can change the color, typography, and add to cart buttons.
You can also display products by category with SeedProd’s WooCommerce block. To do that, drag over the Product Grids block, change the ‘Query Type’ to Custom Query and click the Select by Category option.
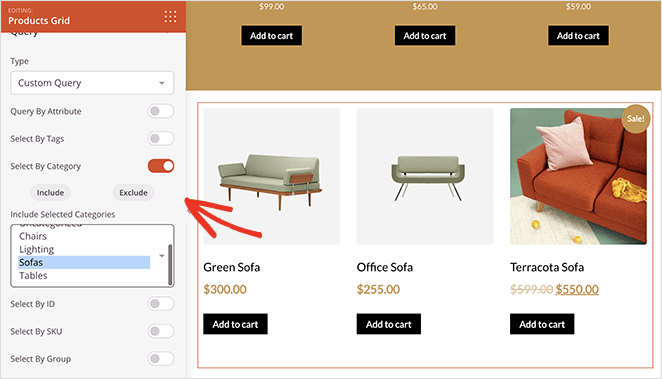
From there, you can choose which categories to include in the product grid.
Some other blocks you can add to your shop page include:
- Testimonials to boost trust and credibility
- Countdown timers to create urgency for your sale
- Accordion to display frequently asked questions
- Facebook or Twitter embeds to display user-generated content
You can even easily change your WooCommerce shop page title.
When you’re happy with your shop page, click the green Save button in the top right corner of your screen.

You can now follow the same process to customize the other parts of your WooCommerce store. Simply click ‘Edit Design’ on any of your theme templates and customize the layout and styling to suit your brand.
Step 4. Publish Your Custom Shop Page
When your WooCommerce site looks how you want, it’s time to make it live. To do that, go to SeedProd » Theme Builder, and in the top-right corner, turn the ‘Enable SeedProd Theme’ toggle to the ‘Yes’ position.
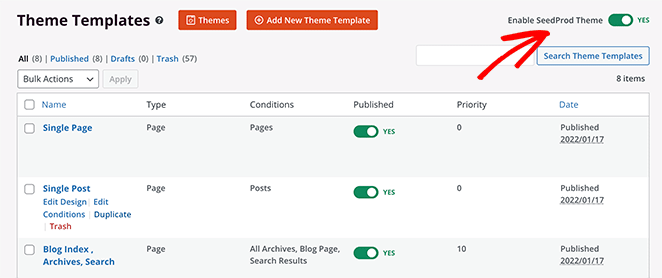
Now you can preview your WooCommerce shop page live on your website.

Method 2: Customize Your Shop Page with WooCommerce Customizer
If you need a more straightforward way to customize the WooCommerce shop page, you can do so with the built-in WooCommerce customizer. The customizer uses the WordPress live theme customizer to edit your shop page in real-time with a live preview.
The customization options you see will depend on the WordPress theme you use on your website. We’re using the default Twenty Twenty-Two theme for this guide.
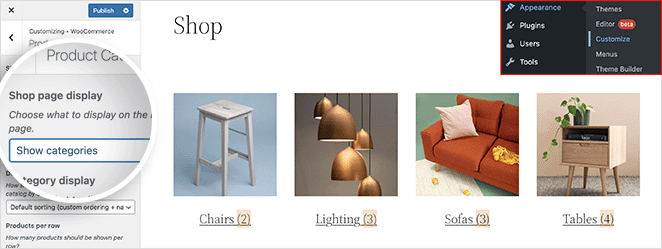
To customize your shop page with the customizer, click Appearance » Customize from your WordPress dashboard. From there, click WooCommerce » Product Catalog to see the customization options.
Next, click the ‘Shop page display’ dropdown menu and choose a layout.
For example, you can choose ‘Show categories’ to show only your product categories on the shop page.
Or you can choose ‘Show products’ to show only products.
Alternatively, you can display your product categories first, then a grid of products with the ‘Show categories and products’ option.
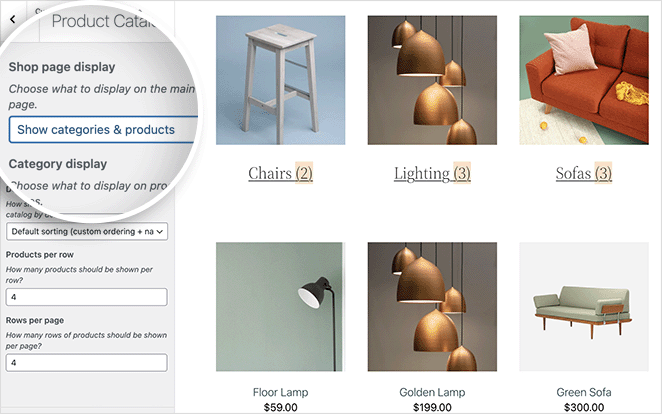
Additionally, you can show products by:
- Popularity
- Average rating
- Most recent
- Price
You can also choose how many products per row and rows to display on each page.
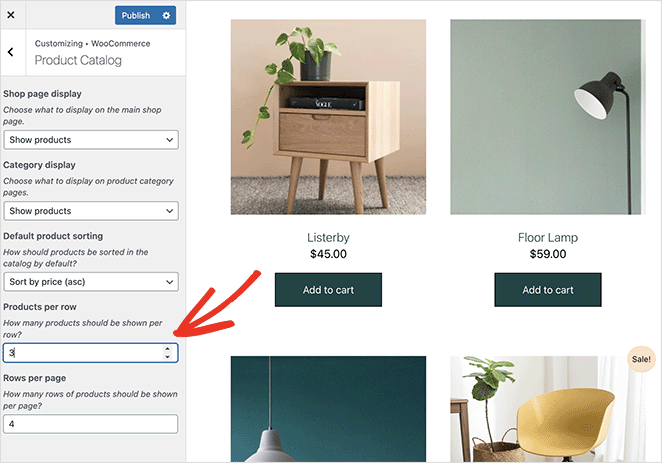
Remember to publish your changes when you’re happy with your design. Here’s a preview of a shop page we styled using the WooCommerce Customizer.
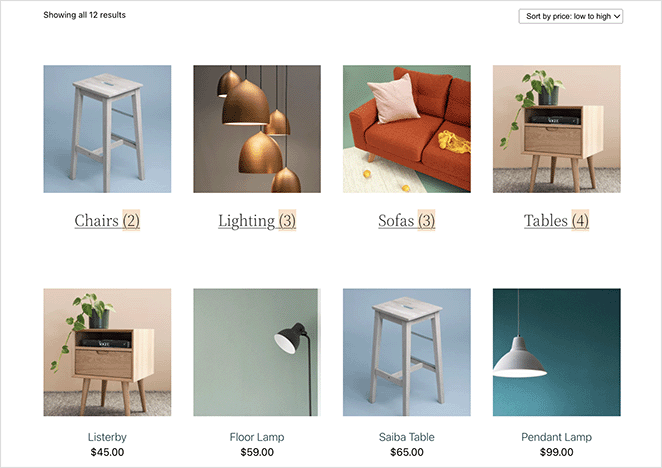
That’s it!
We hope this article helped you learn how to customize the WooCommerce Shop page.
As you can see, SeedProd makes it super easy to create a unique and user-friendly WooCommerce site without needing any prior design experience or code. It’s as simple as pointing and clicking, with stunning results potential customers will love.
Ready to boost your WooCommerce sales?
You might also like this guide on how to set up WooCommerce conversion tracking while you’re here. Or this one on the best WooCommerce affiliate plugins.
Thanks for reading! We’d love to hear your thoughts, so please feel free to leave a comment with any questions and feedback.
You can also follow us on YouTube, X (formerly Twitter), and Facebook for more helpful content to grow your business.

