When I first set up a WooCommerce store, I was excited to start selling, but I quickly realized the default shop page felt plain and didn’t match my brand at all. It just showed a basic grid of products, and I had no idea how to customize it without hiring a developer.
If you’re in the same boat, don’t worry. WooCommerce is the most popular way to add eCommerce functionality to WordPress, and there are easy ways to make your shop page stand out without writing a single line of code.
In this guide, I’ll show you step-by-step how to:
- Customize your WooCommerce shop layout visually
- Organize products by category, popularity, or tags
- Add design elements like testimonials, banners, and featured products
- Use tools like SeedProd to build a storefront that feels like yours
These are the exact methods I used to turn my default shop page into something cleaner, more engaging, and much better at converting visitors into buyers.
WooCommerceショップページとは?
The WooCommerce shop page is the default product archive page that displays all of your store’s products. When you install WooCommerce, it automatically creates this page using your theme’s layout settings.
Think of it as your store’s main catalog or storefront. It’s where customers typically browse before clicking through to specific product pages.
By default, the shop page pulls content from your product listings and displays:
- 商品画像
- Titles and short descriptions
- 価格
- Product categories and tags
- Star ratings and reviews (if enabled)
It’s generated dynamically using your WordPress theme and the WooCommerce template files, and it can be customized to match your brand and improve conversions.
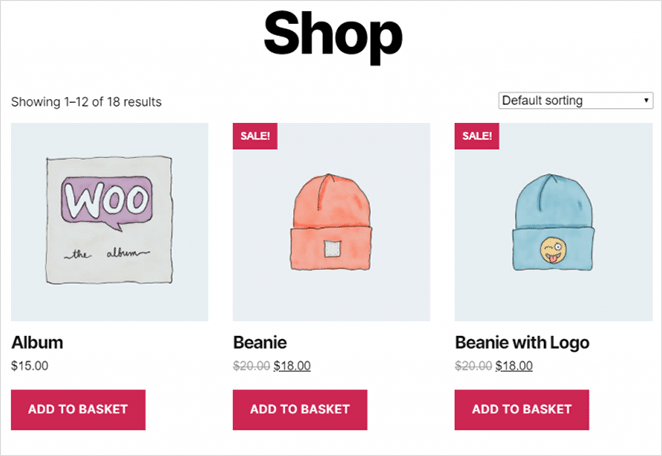
A well-designed shop page can help visitors quickly find what they’re looking for, reduce friction in the buying process, and increase sales. That’s why customizing the default WooCommerce shop page layout is so important.
Why Should You Customize the WooCommerce Shop Page?
Imagine walking into a physical store where all the products are randomly scattered on shelves. No signs, no categories, no featured items. You’d probably walk out fast.
That’s exactly what many shoppers experience when they land on a default WooCommerce shop page. It shows all your products in a plain grid, with little context or direction. This can lead to high bounce rates and missed sales opportunities.
Customizing your shop page helps you:
- Improve user experience (UX) by making it easier for customers to find what they want
- Increase conversions by highlighting bestsellers, sales, or high-margin products
- Improve SEO by adding keyword-rich content and schema markup
- Lower bounce rates by offering better navigation and visual hierarchy
- Build brand trust with testimonials, reviews, or user-generated content
A well-optimized WooCommerce shop layout is a critical part of turning visitors into buyers.
WordPressでWooCommerceのショップページをカスタマイズする方法
WordPressでショップページをカスタマイズする方法はいくつかあります。WooCommerceプラグインやページビルダーを使ったり、ゼロからカスタマイズすることもできます。
Because Iwant to keep this tutorial as simple as possible, I’ll focus on 2 of the easiest ways to customize WooCommerce pages.
The first method will use a powerful WordPress website builder plugin that’s easy to use and packed with customization options. Then I’ll show you how to use the WooCommerce customizer to change the layout of your shop page.
Method 1: Use SeedProd to Customize WooCommerce Shop Page
最初の方法として、SeedProdを使用してオンラインストアにカスタマイズを追加します。
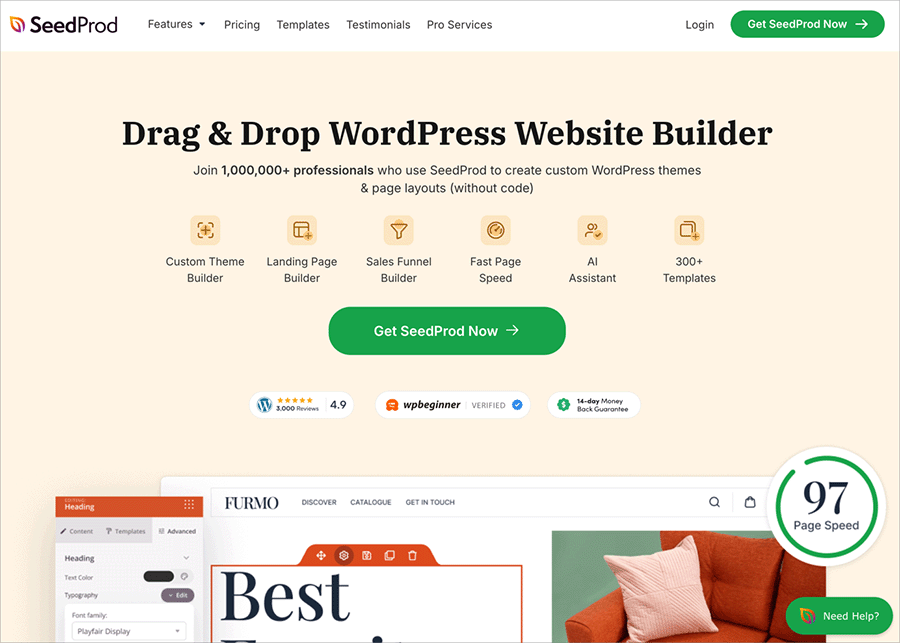
SeedProdは、100万人以上のユーザーを持つWordPressのための最高のウェブサイトビルダーです。カスタムWordPressテーマ、高コンバージョンのランディングページ、レスポンシブWebサイトレイアウトをコードなしで作成できます。
This powerful plugin also allows you to create entire online stores with its WooCommerce integration. As a result, you can make and customize your WooCommerce shop page, product pages, shopping cart, checkout, and more with just a few clicks.
SeedProdには、あなたのウェブサイトを作成するための150以上のプロフェッショナルなテーマとテンプレートが用意されています。そこから、使いやすいコンテンツブロックやセクションを使ってデザインをカスタマイズすることができます。
SeedProdを使用してWooCommerceショップページをカスタマイズするには、以下の手順に従ってください。
ステップ1.SeedProdウェブサイトビルダーをインストールする
最初のステップは、SeedProdウェブサイト・ビルダー・プラグインをダウンロードすることです。
注:SeedProdはシンプルなランディングページを構築するための無料版を提供しています。しかし、私たちが必要とするWooCommerce機能にはSeedProd Eliteプランを使用します。
次に、WordPressウェブサイトにSeedProdをインストールする必要があります。WordPressプラグインのインストール方法については、こちらをご覧ください。
SeedProdをインストールし、有効化した後、SeedProd " Settingsに行き、プラグインのライセンスキーを入力してください。
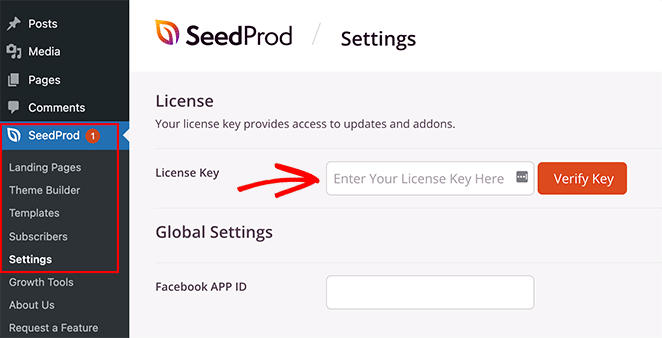
ライセンスキーは、SeedProdのウェブサイトにログインし、「ダウンロード」セクションからコピーすることで見つけることができます。
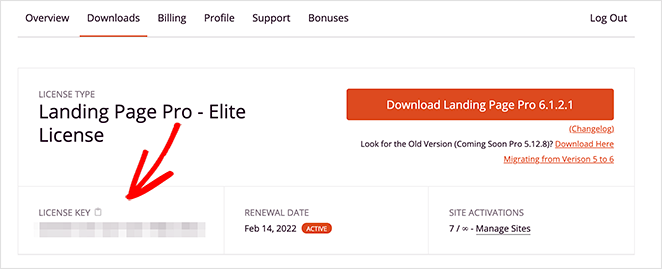
次のステップに進む前に、ライセンスキーを入力し、[Verify Key]ボタンをクリックします。
ステップ2.カスタムWooCommerceテーマを作成する
SeedProdのテーマビルダー機能を使ってWooCommerceのショップページをカスタマイズします。既存のWordPressテーマを上書きし、あなたのカスタマイズで置き換えます。
WordPressのダッシュボードからSeedProd " Theme Builderに アクセスして見つけることができます。
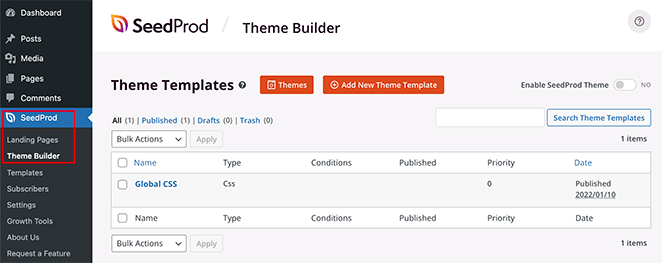
SeedProdでeコマーステーマを作成するには2つの方法があります:
- テーマの各部分(テンプレート)を個別に作成する
- WordPressテーマテンプレートでテーマテンプレートを作成する
このチュートリアルでは、WooCommerceウェブサイトのすべての部分を自動的に作成する2番目のオプションを使用します。
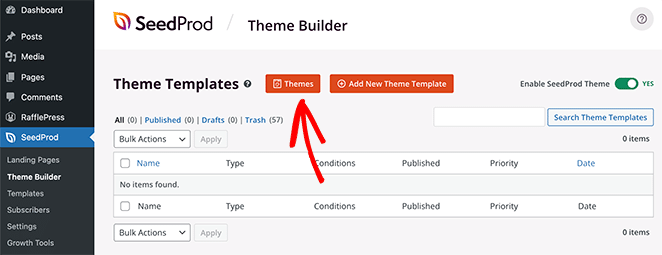
画面上部のテーマボタンをクリックすると、SeedProdのテーマテンプレートギャラリーが起動します。オンラインショップ用のデザインなど、多くのテーマから選ぶことができます。
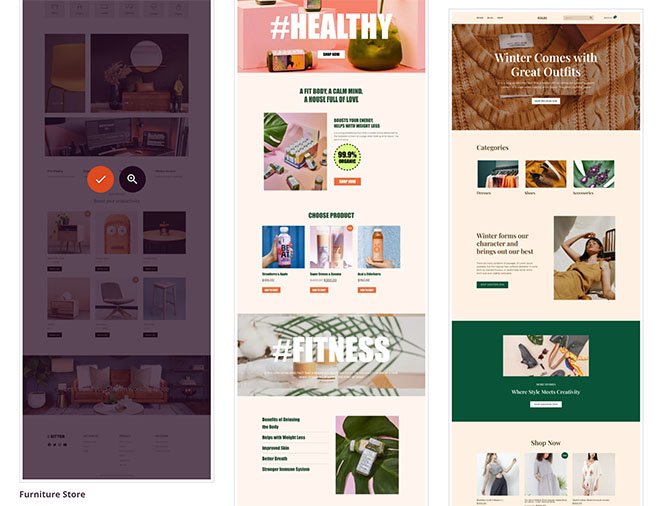
このチュートリアルでは「家具店」をテーマにします。
テーマをインポートするには、サムネイルにカーソルを合わせてチェックマークアイコンをクリックします。
下のスクリーンショットにあるように、SeedProdはあなたのテーマのテンプレートをすべて自動的に作成します:
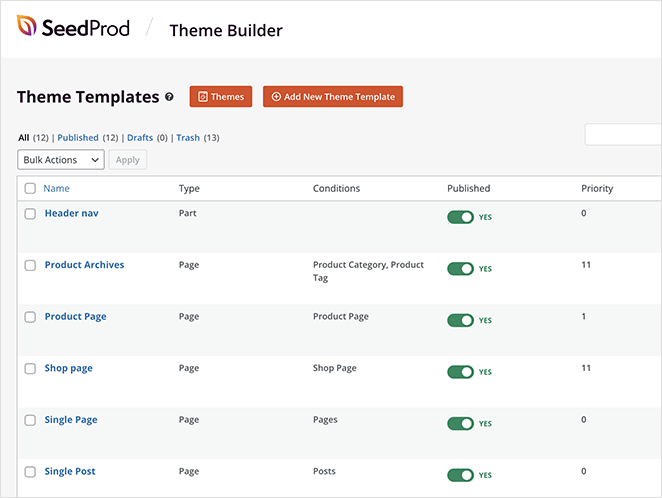
SeedProdのドラッグ&ドロップビルダーで各テンプレートをカスタマイズすることができます。ステップ3でショップページテンプレートのカスタマイズ方法をご紹介します。
ステップ3.WooCommerceショップページをカスタマイズする
SeedProdでWooCommerceショップページをカスタマイズするには、'ショップページ'テンプレートにカーソルを合わせ、デザイン編集リンクをクリックしてください。
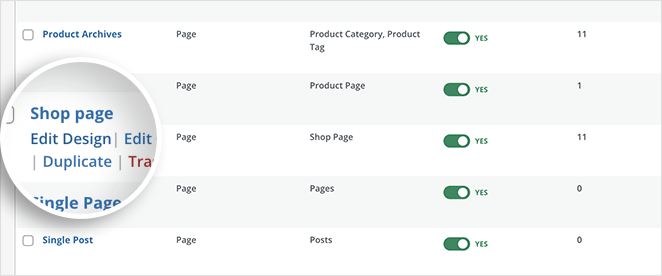
リンクをクリックすると、ショップページのテンプレートがSeedProdのビジュアルドラッグアンドドロップページビルダーで開きます。
左側には、ページに追加できるブロックとセクションがあります。右側には、あなたのページがリアルタイムでどのように見えるかのプレビューが表示されます。
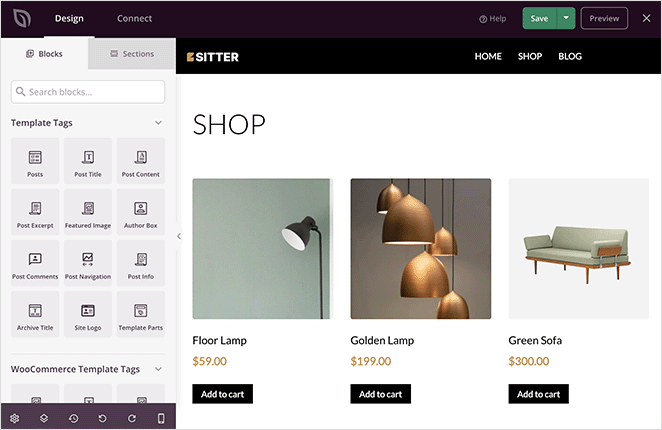
あなたのショップページには、デフォルトで全商品のリストが表示されます。しかし、新しいレイアウト、コンテンツブロック、セクションを追加することで簡単に変更することができます。
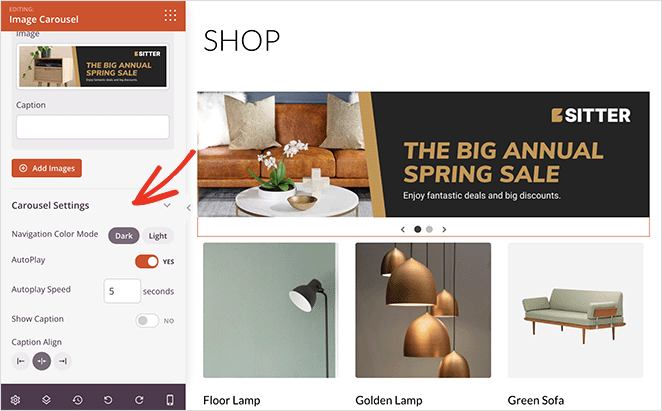
例えば、セールやプロモーションを紹介するスクロールバナーを追加したいとします。その場合、画像カルーセルブロックの上にドラッグし、カスタムバナー画像をアップロードすることができます。
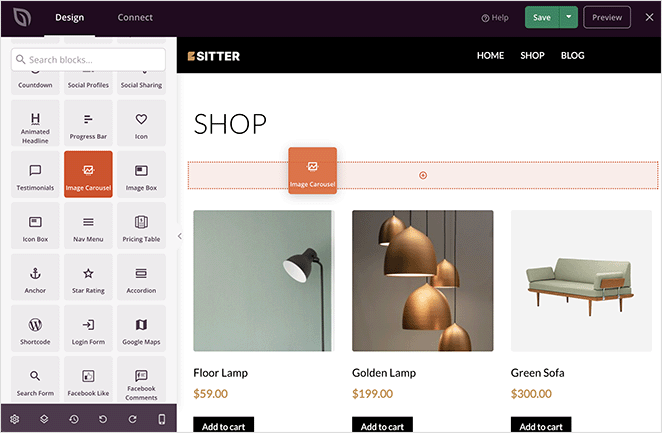
カルーセルは、ブロックの設定でダークまたはライトのテーマに変更したり、スライダーを自動再生したり、画像のキャプションを表示したりとカスタマイズすることができます。
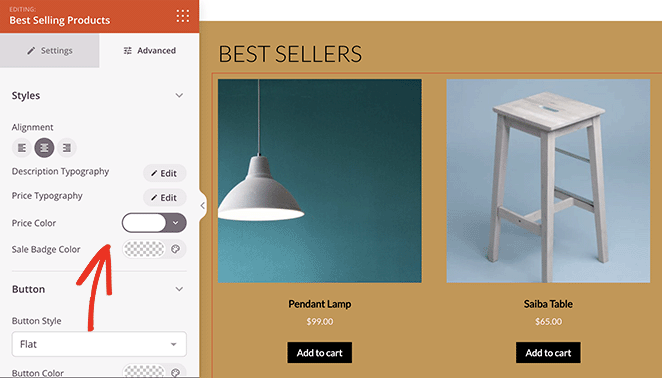
目玉商品や売れ筋商品を強調したい場合はどうすればいいでしょうか?そのためには、ページに新しいセクションを追加し、WooCommerceブロックパネルまでスクロールダウンし、ベストセラー商品ブロックをページにドラッグします。
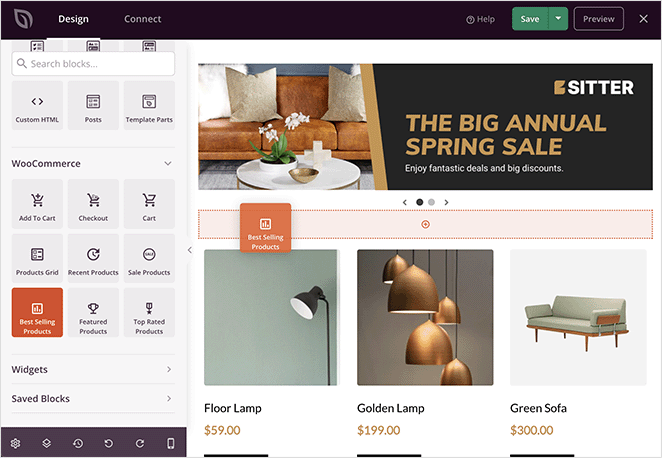
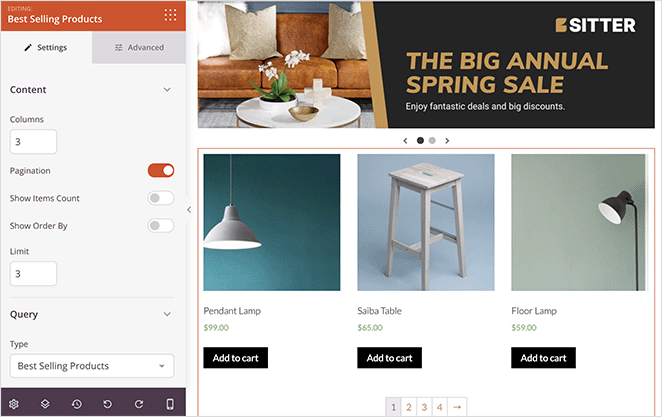
このブロックは、売れ筋商品を均一なグリッドで表示します。
この新しいページ・セクションにカスタム背景色を与えることで、より目立たせることができます。
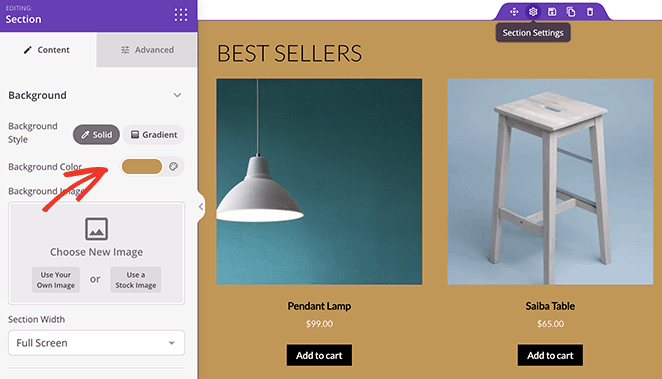
次に、ベストセラー商品ブロックの詳細設定で、色、タイポグラフィ、カートに追加ボタンを変更することができます。
SeedProdのWooCommerceブロックを使って商品をカテゴリー別に表示することもできます。そのためには、Product Gridsブロックの上にドラッグし、'Query Type'をCustom Queryに変更し、Select by Categoryオプションをクリックします。
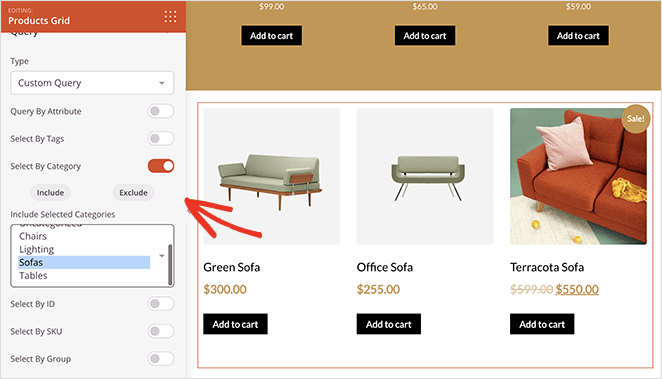
そこから、商品グリッドに含めるカテゴリーを選択できます。
ショップページに追加できる他のブロックには、以下のようなものがあります:
- 信頼と信用を高める証言
- カウントダウン・タイマーで販売の緊急性を高める
- よくある質問を表示するアコーディオン
- ユーザーが作成したコンテンツを表示するためのFacebookやTwitterの埋め込み
WooCommerceショップページのタイトルも簡単に変更できます。
ショップページが完成したら、画面右上の緑色の保存ボタンをクリックしてください。
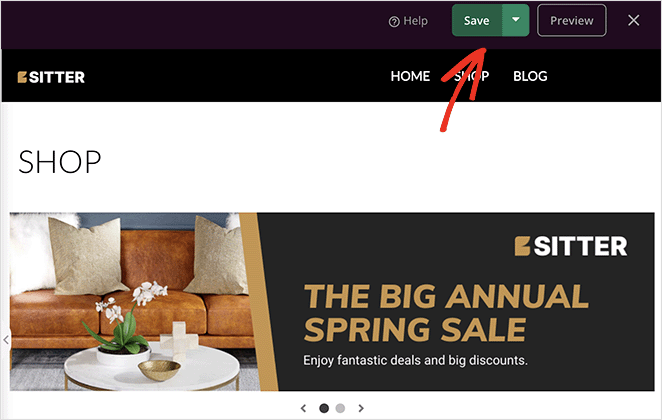
同じ手順でWooCommerceストアの他の部分をカスタマイズすることができます。どのテーマテンプレートでも「デザインの編集」をクリックし、レイアウトとスタイリングをあなたのブランドに合うようにカスタマイズするだけです。
ステップ4.カスタムショップページを公開する
WooCommerceサイトが思い通りになったら、いよいよ本番です。これを行うには、SeedProd " Theme Builderに 移動し、右上隅にある'Enable SeedProd Theme'トグルを'Yes'の位置にします。
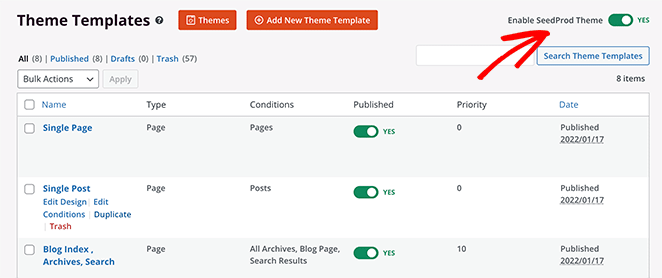
あなたのウェブサイト上でWooCommerceショップページをプレビューすることができます。

Method 2: Customize WooCommerce Shop Page Using Theme Customizer
If you prefer not to use a third-party builder, WooCommerce includes basic customization options via the WordPress Customizer.
表示されるカスタマイズ・オプションは、ウェブサイトで使用しているWordPressテーマによって異なります。このガイドでは、デフォルトのTwenty Twenty-Twoテーマを使用しています。
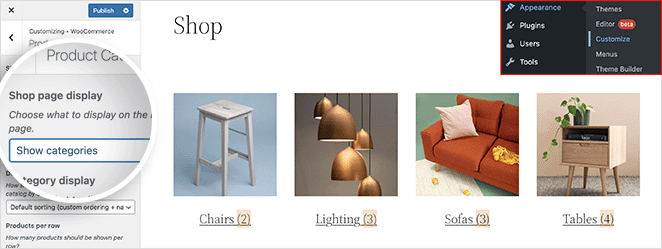
カスタマイザーでショップページをカスタマイズするには、WordPressダッシュボードから外観 " カスタマイズを クリックします。そこから WooCommerce " Product Catalogをクリックし、カスタマイズオプションを表示します。
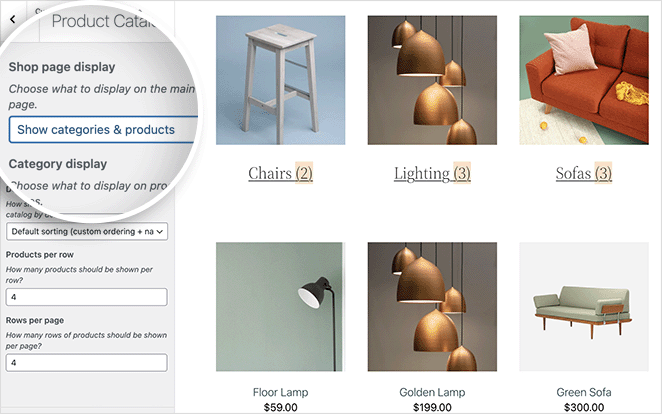
次に、「ショップページの表示」ドロップダウンメニューをクリックし、レイアウトを選択します。
例えば、「カテゴリーを表示」を選択すると、ショップページに商品カテゴリーだけを表示することができます。
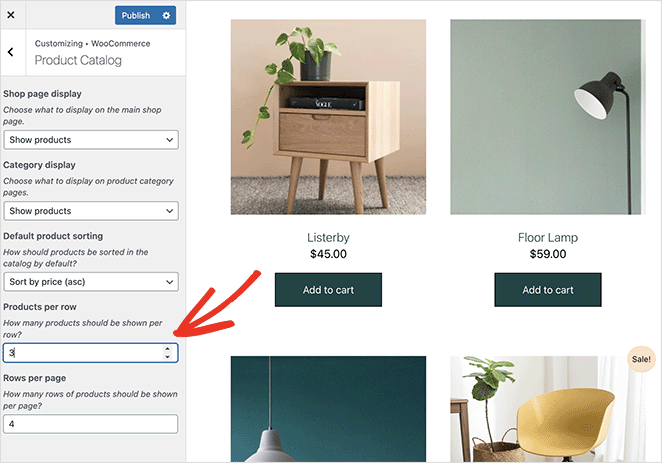
また、「商品を表示」を選択すれば、商品のみを表示することもできます。
また、「カテゴリーと商品を表示」オプションで、最初に商品カテゴリーを表示し、次に商品のグリッドを表示することもできます。
さらに、以下のような方法で商品を表示することもできる:
- 人気
- 平均評価
- 直近
- 価格
また、各ページに表示する行や行ごとの商品数を選択することもできます。
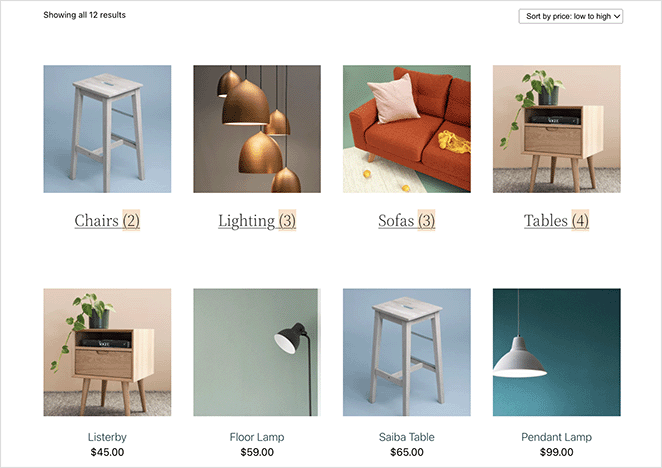
デザインに満足したら、変更を公開することを忘れないでください。WooCommerceカスタマイザーを使ってスタイリングしたショップページのプレビューです。
FAQ: Customizing the WooCommerce Shop Page
SeedProd – a no-code drag-and-drop builder with WooCommerce integration
WooCommerce Customizer – lets you modify layouts directly in the WordPress Customizer
Elementor or Divi (optional) – other visual page builders with WooCommerce support
I hope this article helped you learn how to customize the WooCommerce Shop page.
ご覧のように、SeedProdは、デザインの経験やコードを必要とすることなく、ユニークで使いやすいWooCommerceサイトを超簡単に作成することができます。指をさしてクリックするだけの簡単な作業で、潜在顧客が喜ぶような素晴らしい結果が得られます。
WooCommerceの売上を伸ばす準備はできていますか?
WooCommerceのコンバージョントラッキングの設定方法については、こちらのガイドもお勧めです。また、WooCommerceのベストアフィリエイトプラグインをご紹介します。
お読みいただきありがとうございました!ご質問やご意見がありましたら、お気軽にコメントをお寄せください。
また、YouTube、X(旧Twitter)、Facebookでも、ビジネスの発展に役立つコンテンツを配信しています。

