

TL;DR: How to Password Protect a WordPress Page WordPress has a built-in password option, but there are a few methods worth knowing depending on how much control you need.
- Built-in visibility setting — Quickest option. Open your page, set Visibility to Password Protected, enter a password, and publish.
- Know the limits — One password per page, no expiry, and media files are still accessible by direct URL.
- SeedProd for design control — Build a branded coming soon or maintenance page with access controls and password protection built in.
- PPWP for multiple passwords — Lightweight plugin for multiple passwords per page, expiry settings, and a customizable form.
- Protect files properly — Locking the page doesn’t lock direct file URLs. Rename files or use a download-protection plugin for sensitive documents.
Want to password protect a WordPress page, so only certain people can view it?
I’ve used password protection to keep pages private while working on drafts, sharing client files, or launching gated offers. It’s one of the quickest ways to hide content from the public, and you don’t need any coding to do it.
In this guide, I’ll show you how to do it step-by-step using the built-in WordPress setting. I’ll also walk you through how to create a password-protected page with SeedProd if you want full design control.
- Method 1: How to Password Protect a WordPress Page (No Plugin)
- Method 2: Create a Custom Password Protected Page with SeedProd
- Method 3: Add Multiple Passwords with PPWP
- Method 4: How to Secure Files in a Password Protected Page
- Troubleshooting Password Protection Problems
- Password Protect a WordPress Page FAQs
Why Password Protect a WordPress Page?
Password protection is essential for safeguarding sensitive content on your WordPress site.
With password protection, you can:
- Secure Confidential Information: Protect client data, internal memos, and financial reports by preventing unauthorized access.
- Gate Exclusive Content: Provide premium content to select audiences like paid members or loyal subscribers.
- Maintain a Polished Website: Protect pages under construction, ensuring users only see fully developed content.
- Get Feedback Privately: Share drafts or prototypes with select reviewers for feedback without making them public.
- Develop and Test Privately: Use password protection during site development to safely test without affecting the live site.
Password protection is a straightforward solution for keeping content private until it’s ready for public access.
Method 1: How to Password Protect a WordPress Page (No Plugin)
WordPress makes it easy to password-protect your pages and posts, giving you granular control over your content. Here are the steps to quickly password-protect a single page:
1. Open Your Page in the WordPress Editor
Navigate to the page you want to protect and click “Edit.”

2. Find the “Status & Visibility” Settings
In the right-hand sidebar, find the “Status & Visibility” section.

3. Set the Page to Password Protected Mode
Click the “Visibility” option and select “Password Protected” from the dropdown menu.

4. Choose a Strong Password
Enter your desired password in the provided field. Make sure it’s strong and difficult to guess.
WordPress automatically saves the entered password in the visitor’s browser cookie, so they won’t need to re-enter it on repeat visits. For shared or public devices, remind visitors to clear their browser cookies when done.

5. Update or Publish Your Page
Click the “Update” or “Publish” button to save your changes.

Your page is now marked as private in WordPress, so you can easily see protected pages in the list view.

If you want to remove password protection, switch the status back to “Public.” This method works on every page and post in WordPress, including custom post types.
If the page contains sensitive content you don’t want indexed in Google, open it in AIOSEO and set the Robots Meta to “No Index” on the Advanced tab. See the FAQ below for the full steps.
Limitations of the Built-In Method
The built-in WordPress option works well for simple cases, but it has a few constraints worth knowing before you rely on it.
- One password per page — You can’t set multiple passwords or give different people different access codes.
- No password expiry — The password stays active until you manually remove or change it.
- Can’t customize the password form — The default WordPress prompt can’t be styled without custom code. See how to customize password protected pages in WordPress for a branded alternative.
- Uploaded files stay exposed — PDFs and images embedded on the page are still accessible via their direct URL, even with the page locked.
If any of these limitations are a problem, Method 2 or a dedicated plugin may work better for your situation.
So, you’ve password-protected your page. But what if you want to create a more engaging experience for visitors who haven’t yet gained access?
SeedProd lets you create custom coming soon or maintenance mode pages that are password protected. Let’s find out how.
Method 2: Create a Custom Password Protected Page with SeedProd
(For Custom Pages and Coming Soon/Maintenance Mode)

SeedProd is a powerful drag-and-drop website builder plugin for WordPress that lets you easily create custom coming soon pages, maintenance mode pages, landing pages, and more. It’s a drag-and-drop builder, so you don’t need any coding skills to create beautiful, professional-looking pages.
One of its handy features is the ability to password-protect these pages, giving you more control over who can access your content.
1. Install and Activate SeedProd
First, download the SeedProd plugin. Then, head to your account overview area after logging in.
Now click View License Key, Details, and Downloads.

From here, click the orange button labeled Download Landing Page Pro.

Now head to Plugins » Add New in your WordPress dashboard, and click Upload Plugin.
Click Choose File to find the .zip file you downloaded on your computer, then click Install Now.

After you’ve installed the plugin, click Activate.
2. Create a Coming Soon/Maintenance Page
To password-protect a page, you’ll need to create either a coming soon (under construction) or a maintenance page.

These pages include access controls for protecting your page with a single password. Follow these steps to create a coming soon page with SeedProd.
3. Turn on Password Protection for Your Page
After creating your coming soon page, go to your SeedProd page overview and click the Edit Page button in the Coming Soon Mode section.

Click the Page Settings tab at the top of the visual page editor to see several configuration settings. To hide certain pages, click the Access Control option.
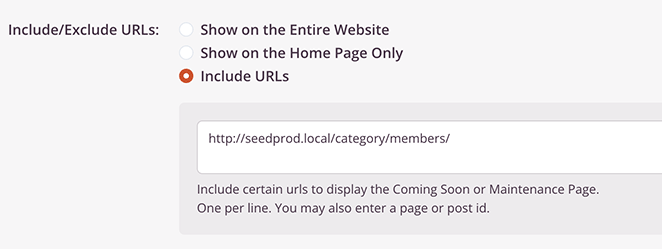
To hide individual WordPress pages instead, scroll down to the Include/Exclude URLs section.

In this section, click the Include URLs radio button, then enter the URL of each page you’d like to protect in the box provided. You should enter each URL on a new line. You can also add the URLs of individual WordPress posts here.
When you’re done, click the Save Changes button.
Optional SeedProd Configurations
The Access Control panel has an option that lets you bypass the restricted page.
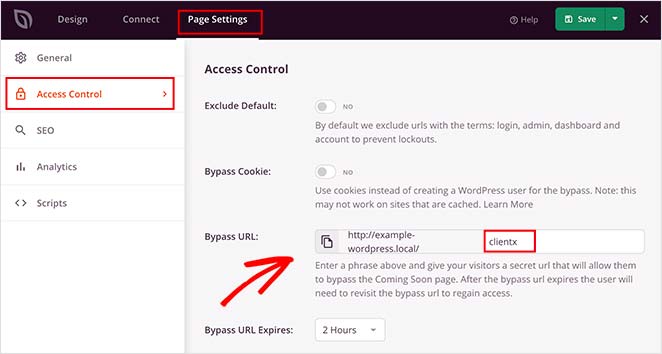
Here, you can add a secure password.
This option makes your WordPress page only accessible via a link you give to visitors, which ignores the coming soon page. If you forget your password, you can quickly glance at this page to refresh your memory.
It’s also possible to add specific visitors’ IP addresses in the Access IP section. This allows anyone with that IP to bypass your coming soon page.

Inside the block, type seed_bypass_form in square [ ] brackets and save your changes. The login form won’t show in the page builder preview.
To view it, you’ll need to visit that specific page on the front end of your site.

You can then paste the full URL for each category you wish to protect. Now, anyone viewing that category will see your coming soon page without needing to add category passwords.
4. Save and Enable Coming Soon/Maintenance Mode
Remember to save your changes before leaving this page. And if you haven’t already, you’ll need to enable your coming soon page from the dashboard.
Go to SeedProd » Pages from your WordPress admin panel to view the different page modes and landing pages available to you.
Under the Coming Soon Mode section, click the toggle to turn it from Inactive to Active.

You’ve now enabled password protection for specific pages on your website.
Pro tip: Did you know that you can also password-protect WooCommerce products by enabling WooCommerce maintenance mode?
Method 3: Add Multiple Passwords with PPWP
If the built-in WordPress method is too limited, PPWP (Password Protect WordPress Pages) is worth a look. It has 30,000+ active installs and adds features the native option doesn’t have, including multiple passwords per page, password expiry, and a customizable password form.
To install it, go to Plugins » Add New in your WordPress dashboard and search for “PPWP.” Install and activate it.
Each page’s edit screen gets a new Password Protection panel in the sidebar where you can add passwords directly, without touching a separate settings page.

It’s the right choice when you need to give different people different access codes, set a password that expires after a set date, or replace the default WordPress password form with something that matches your site design.
Method 4: How to Secure Files in a Password Protected Page
You might wonder, “Can I password protect a PDF file?” The answer is yes, you can. This method involves uploading the file to your WordPress media library and embedding it on a password-protected page.
1. Upload Your File
First, go to Media » Add New in your WordPress dashboard and upload the file (PDF, document, etc.) you want to protect.

2. Create or Edit a Page
Create a new page or edit an existing one where you want to embed the protected file.
Then, insert the file into the page content. You can do this by clicking the “Add Media” button and selecting your uploaded file, or by directly linking to the file URL.

3. Lock the Page with a Password
Follow the steps in Method 1 to password-protect this page. This will effectively protect the embedded file as well.

Important: Password-protecting the page doesn’t protect the direct file URL. Anyone who knows or finds the direct link to the PDF or image in your media library can access it without entering the password.
For truly sensitive files, rename them to an unguessable string before uploading, or use a dedicated download-protection plugin to block direct access.
That way, you can protect your PDF from people who shouldn’t have access.

Troubleshooting Password Protection Problems
Password protection is an easy way to control access to WordPress pages, but sometimes things don’t work as expected. Here are some common issues and how to troubleshoot them:
- Browser Caching: If you’ve changed the password or removed password protection, but the old behavior persists, clear your browser’s cache and cookies. Each browser has slightly different instructions, so do a quick search (like “clear cache in [your browser name]”) for details.
- Plugin Conflicts: Temporarily deactivate any other plugins you’ve installed, one at a time. After each deactivation, check if the password protection works correctly. This helps isolate if a plugin is interfering with WordPress’s built-in password capability.
- Incorrect Password: Double-check that you’re entering the correct password, paying close attention to case sensitivity.
- Incorrect Page Visibility: In the WordPress page editor’s “Status and Visibility” area, ensure the visibility is set to “Password Protected.” It’s easy to accidentally set it as “Private” instead.
- Caching Plugins: If you use a caching plugin like WP Rocket or W3 Total Cache, you might need to clear its cache. Sometimes, the cached version of the page is served even if you’ve updated the password settings.
- Corrupted .htaccess File (Rare): Incorrectly configured .htaccess files can sometimes interfere with WordPress functionality. You can find instructions on restoring a standard .htaccess file online, but proceed with caution if you’re uncomfortable editing site files.
If none of the above solutions work, reach out to your web hosting provider for further guidance. They may have insights specific to your setup.
Password Protect a WordPress Page FAQs
We get a lot of questions from our readers about password protection. Below, we try to answer as many of them as we can:
Does password protection hide a WordPress page from Google?
Not entirely. Google can still crawl and index the page title and URL even when the page is password protected. The content itself is hidden from crawlers, but the page can still appear in search results. To prevent indexing entirely, open the page in AIOSEO, go to the Advanced tab, and set Robots Meta to “No Index.” Do this for any page containing content you don’t want Google to find.
Can I password protect just part of a WordPress page?
Not with WordPress’s built-in setting. The native visibility option locks the entire page. If you need to restrict a section rather than the whole page, the PPWP plugin supports partial content protection using a shortcode you can add directly in the editor.
Will password protection also secure files and images on the page?
No. Password protecting a page doesn’t block direct access to files in your WordPress media library. Anyone who knows the direct URL to a PDF or image can access it without entering the password. For sensitive files, rename them to an unguessable string before uploading, or use a dedicated file protection plugin.
Can I set different passwords for different WordPress pages?
Yes. WordPress lets you assign a unique password to each page or post individually. If you need multiple passwords for the same page, or passwords that expire automatically, the PPWP plugin handles both of those cases from each page’s edit screen.
Can I password protect my entire WordPress site?
Yes. You can password-protect your whole WordPress site using a coming soon or maintenance mode plugin like SeedProd. For step-by-step instructions covering every method, see our complete guide to password protecting a WordPress site.
Next, More Ways to Protect Your Site
You’ve now learned how to password-protect a WordPress page for testing purposes and private content.
Locking pages in WordPress is easy with SeedProd’s powerful Access Controls. Plus, the drag-and-drop page builder gives you complete control over the design of your password-protected page, with no coding required!
You may also want to check out the following guides for protecting your WordPress site:
- The Ultimate Guide to Password Protecting a WordPress Site
- How to Customize Password Protected Pages in WordPress
- Best WordPress Security Plugins to Protect Your Site
- How to Password Protect WordPress While Under Development
- How to Protect Your WordPress Site From Hackers
Thanks for reading! We’d love to hear your thoughts, so please feel free to join the conversation on YouTube, X and Facebook for more helpful advice and content to grow your business.


thanks you
Hi
I am looking to protect one page per user, so that is a different gallery page for each user
So user 1 would have access to only their gallery/custom page
and User 2 would have access to only their gallery
Does your system do this?
Cheers
Rob
Hi Rob. This isn’t possible with SeedProd. You might want to look into a membership plugin for more control. Here are some suggestions.
Please look into allowing Seedprod to protect pages with multiple passwords that either expire after use or after a couple of days. :)
Thanks for the suggestion Nana. I’ll definitely submit this as a feature request for you.