
TL;DR: How to Create a Landing Page in WordPress
A landing page points visitors at one action, and you have three ways to build one in WordPress. Here’s the short version.
- Pick your method: Use the free WordPress Block Editor, SeedProd, or a page builder you already own.
- Start from a template: SeedProd gives you 300+ landing page templates and a drag-and-drop editor, so you launch in 15 to 30 minutes.
- Add your form: Drop in an opt-in form for email signups, or a contact form (powered by WPForms) to capture enquiries.
- Connect your email service: Link Mailchimp, Constant Contact, or ActiveCampaign so new leads land on your list automatically.
- Publish and optimize: Preview on mobile, hit publish, then A/B test your headline and call to action.
Most WordPress websites look fine but convert almost nothing. Visitors browse, click around, and leave without taking action, not because your offer is bad, but because your site was not built to focus them on a single goal.
That’s what a landing page fixes. In this guide, I’ll walk you through 3 proven methods to create a landing page in WordPress, from the free built-in Block Editor to dedicated page builders that get you live in under 30 minutes.
- Quick Comparison: 3 Ways to Create a WordPress Landing Page
- Why Should You Use Landing Pages in WordPress?
- Method 1: Create a Free Landing Page with WordPress Block Editor
- Method 2: Build a Professional Landing Page with SeedProd (Recommended)
- Method 3: Create a Landing Page with Other Page Builders
- How to Add a Form to Your Landing Page
- How Do I Make My WordPress Homepage a Landing Page?
- What Types of Landing Pages Can You Build in WordPress?
- Best Practices for High-Converting WordPress Landing Pages
- FAQs About WordPress Landing Pages
Quick Comparison: 3 Ways to Create a WordPress Landing Page
Here’s a quick overview to help you choose the right method:
| Method | Cost | Difficulty | Time to Build | Customization | Best For |
|---|---|---|---|---|---|
| 1. Block Editor | Free | Moderate | 45-60 min | Low-Medium | Simple pages & tight budgets |
| 2. SeedProd | $39.50+ | Easy | 15-30 min | High | High-converting sales & lead pages |
| 3. Page Builders | Varies | Moderate | 30-45 min | High | Users who already own Elementor/Divi |
Not sure which to choose? For most users, SeedProd offers the best balance of speed, professional design, and conversion optimization. But if you’re on a tight budget, the Block Editor can get you started.
Why Should You Use Landing Pages in WordPress?
A landing page is a standalone web page designed to convert visitors to a single goal, such as a signup, purchase, or download, with no navigation links to distract them. Unlike a regular website page, it removes the menu, sidebar, and footer so visitors stay focused on one action.
That single-minded focus is why landing pages convert at 9.7% on average, compared to 2-3% for standard web pages.

Here’s why marketers prefer using landing pages:
- Higher conversion rates: This is the foundation of effective Conversion Rate Optimization (CRO). Landing pages convert at 9.7% on average simply by removing navigation links and keeping visitors focused on one specific action.
- Full design control: Customize layouts, fonts, colors, and CTAs without coding.
- Faster campaign setup: Launch time-sensitive offers without affecting your main site.
- Better tracking: Each page has its own analytics for testing and optimization.
Need ideas? Check out these landing page examples for inspiration.
Method 1: Create a Free Landing Page with WordPress Block Editor
The WordPress Block Editor (Gutenberg) is built into every WordPress installation, making it a solid free option if you’re willing to put in some extra time and effort.
| Pros | Cons |
|---|---|
| ✅ Completely free, no plugin required | ❌ No pre-made landing page templates |
| ✅ Native to WordPress, no compatibility issues | ❌ Limited design flexibility |
| ✅ Lightweight and won’t slow down your site | ❌ Takes more time (45-60 minutes) |
| ✅ Good learning experience for WordPress fundamentals | ❌ No built-in conversion features |
| ❌ More complex for beginners |
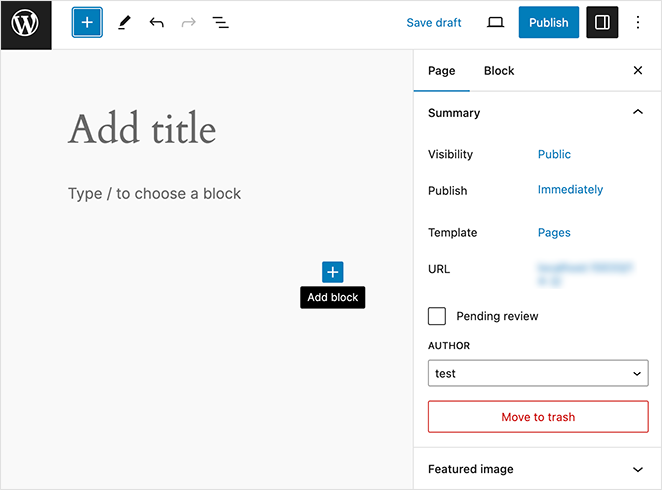
Here’s the basic process:
- Create a new page via Pages » Add New and give it a descriptive title
- Remove header and footer by selecting a Blank template under Settings » Template
- Build your structure using Cover blocks (hero), Heading blocks, Paragraph blocks, Image blocks, and Button blocks
Pro tip: Don’t start from scratch. Click the + icon, open the Patterns tab, and search “headers” or “call to action” to drop in pre-designed sections instantly.
- Style your page using the block settings in the right sidebar for colors, typography, and spacing
- Add a form using a free plugin like WPForms Lite or Contact Form 7
- Preview on mobile and adjust as needed
- Click Publish when you’re satisfied
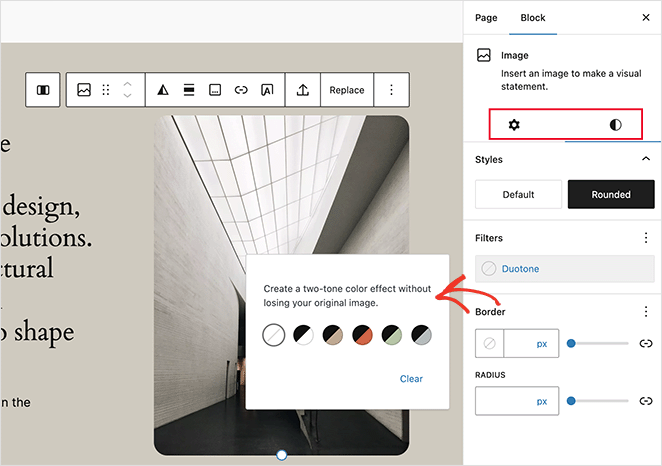
I’ll be honest: this method works, but it’s time-consuming. When I tested it for this guide, a simple landing page took me about 45 minutes to build, and the result looked basic compared to what I could create with a dedicated page builder.

The Block Editor is great for simple pages on a budget, but if you need professional results or plan to create multiple landing pages, you’ll save significant time with Method 2.
Method 2: Build a Professional Landing Page with SeedProd (Recommended)
SeedProd is the fastest way to create professional, high-converting landing pages in WordPress. With 300+ templates and a drag-and-drop builder, you can launch a complete page in 15 to 30 minutes. No coding required.
Here’s why I recommend it: pages load in under 1 second, it includes conversion-boosting features like countdown timers and testimonials, and it connects directly to email services like Mailchimp and Constant Contact, with no extra plugins needed.
Follow these steps to build your landing page:
Step 1. Install SeedProd Landing Page Plugin
Click here to get started with SeedProd and quickly download the plugin. In just a few clicks, you’ll have it installed on your WordPress site.
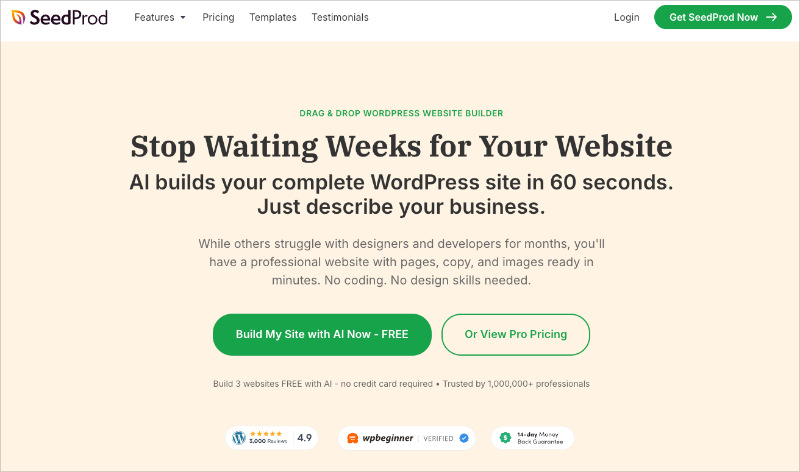
If you’d like a walkthrough, we have a guide on installing SeedProd.
Note: There’s a free version of SeedProd, but this tutorial focuses on Pro, which adds premium templates and the integrations you need for high-converting pages.
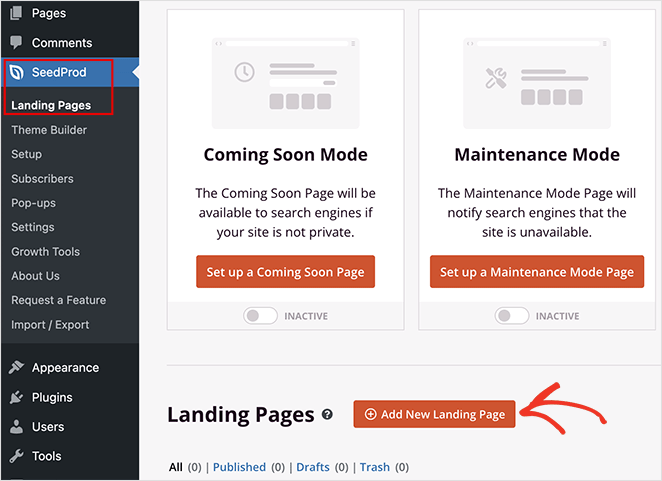
After activating the plugin, navigate to SeedProd » Landing Pages from your WordPress dashboard and click the Add New Landing Page button.
Step 2. Choose a Landing Page Template
On the next page, you can choose a landing page template to jumpstart your design process. Whether you need a landing page for sales, lead generation, webinar registrations, or a custom project, there’s a template to match your goals.
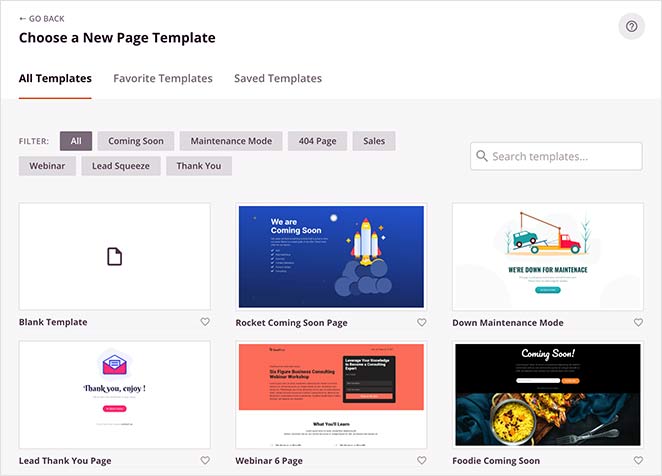
These fully customizable templates eliminate the need for design experience, allowing you to create a professional-looking landing page with ease.
Alternatively, you can select the Blank Template to build and design your own page in the visual editor.
For this tutorial, I’ll choose the Newsletter Squeeze Page Template. This layout is perfect for offering a lead magnet, such as a free ebook or checklist, in exchange for an email address. To use it, hover your mouse over the template and click the tick icon.
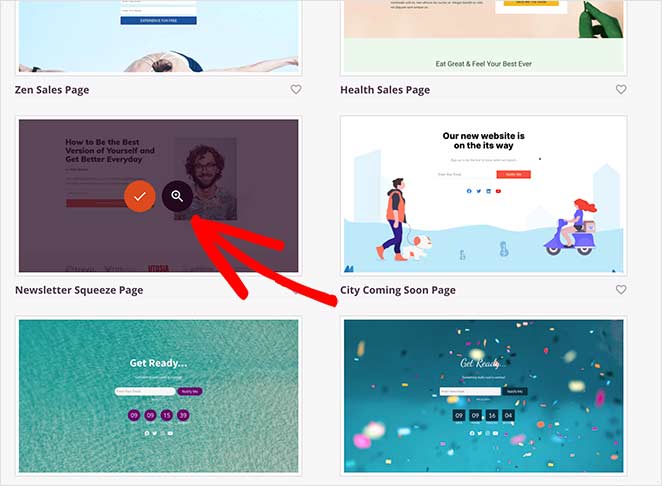
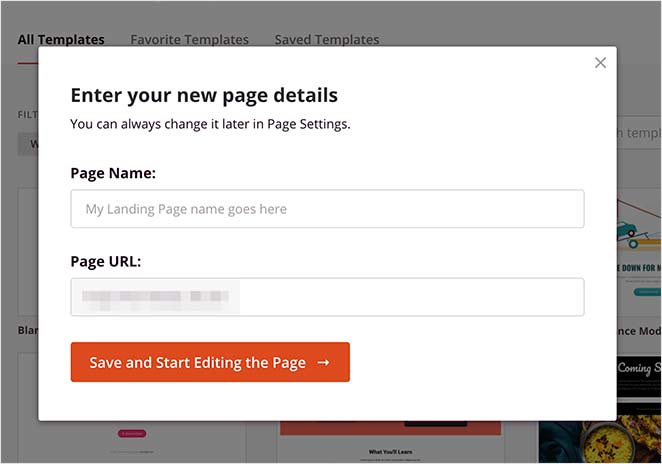
After that, a lightbox popup will appear where you can give your page a name and a custom URL. Then click the Save and Start Editing the Page button to load your template in the drag-and-drop builder.
Step 3. Customize Your Landing Page Template
After creating your new page, you’ll see SeedProd’s visual drag-and-drop builder. This makes it simple to adjust your landing page layout and content in real time.
Drag and drop elements like headlines, images, buttons, and forms directly onto the page. No coding needed.
Call to action (CTA) placement is vital for high-converting pages. For example, I dragged the Optin Form block into the hero section so it was immediately visible before visitors scroll.
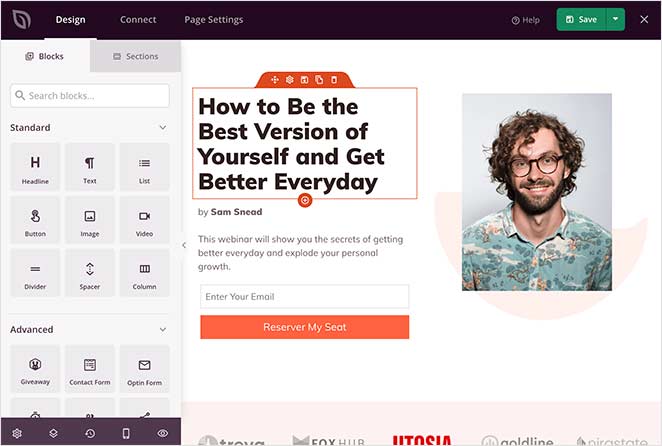
You’ll find various blocks in the sidebar, each with customizable options to match your brand.
For instance, if you click the Button block to open its settings, you’ll see several templates, colors, and gradients you can adjust easily.
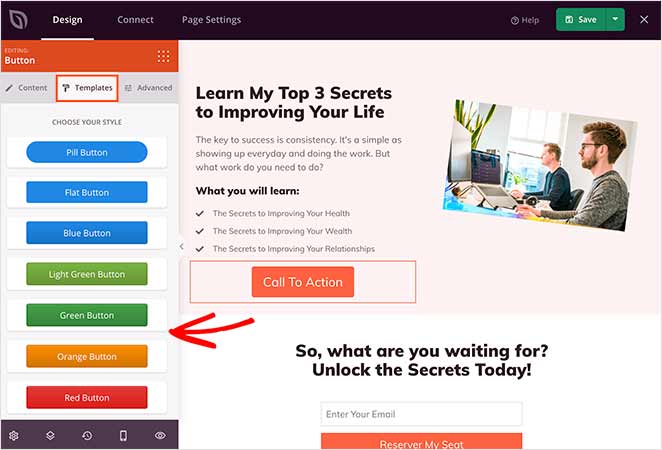
Need to boost conversions? The Advanced blocks have you covered with options like lead generation forms, countdown timers, and testimonials.
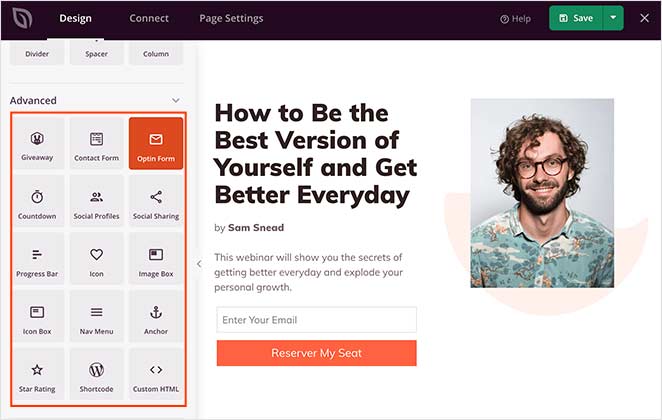
SeedProd includes dozens of advanced blocks like Google Maps, testimonials, countdown timers, and social proof elements, all available in the Advanced Blocks section.
Adding Sections
Want to build full sections fast? SeedProd offers pre-made layouts for headers, hero areas, FAQs, and more. Just hover, click the plus + icon, and the section drops right into your page.
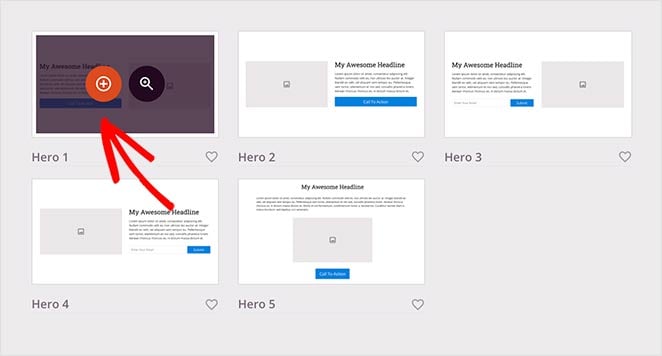
You can edit any section just like a block to match your brand or campaign design.
Customizing Global Styling Options
To keep your page consistent, use SeedProd’s global styling settings to control fonts, colors, and background images across your design.
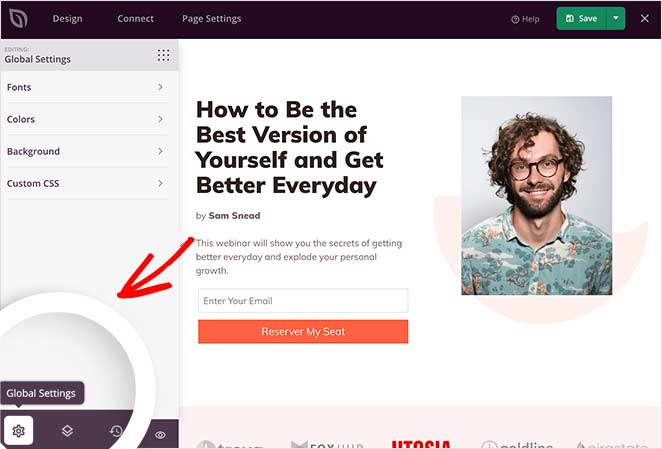
You can even add video or slideshow backgrounds or set a global color palette to maintain a professional look throughout your page.
Restoring to an Older Landing Page Version
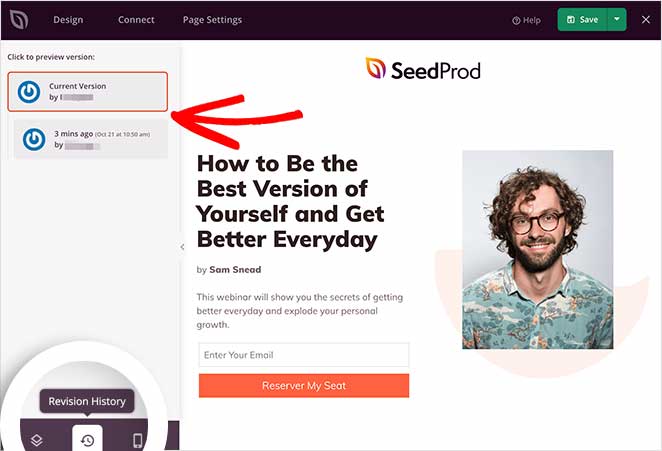
Need to revert to a previous design? Click the clock icon in the bottom-left corner to open your revision history. From there, pick an older version and restore it instantly.
Step 4: Connect Your Email Marketing Service
You can easily grow your email list by connecting your favorite tools.
Connect to popular email providers like Constant Contact, GetResponse, Mailchimp, ActiveCampaign, and more, ensuring every lead captured through your landing page goes straight to your email list.
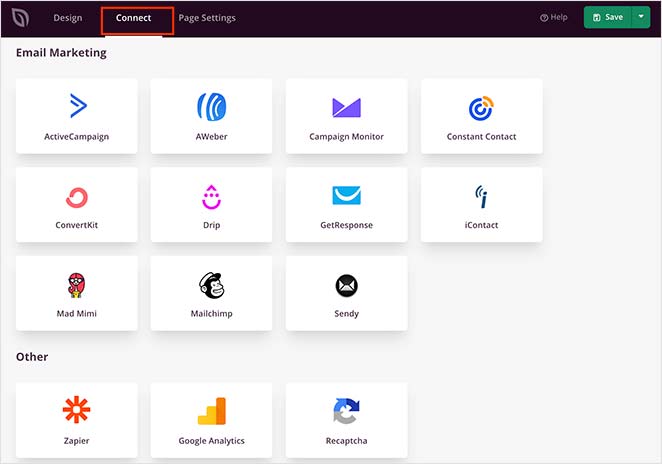
You can also set up Google Analytics tracking, spam protection, and other apps with Zapier.
Find it in the integration list and click Connect to link your email service.
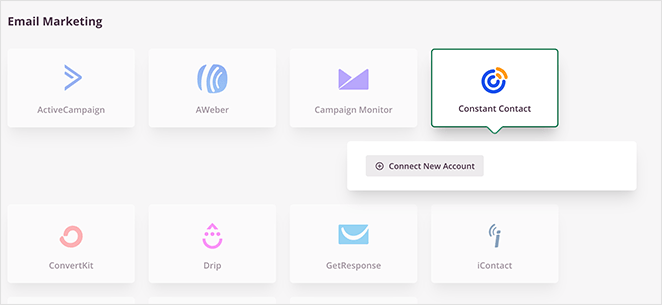
Then, follow the instructions to connect and verify your account. After that, you can link all your opt-in forms to your email list.
Step 5: Configure Your Landing Page Settings
Next, take control of your landing page’s performance with easy-to-use settings.
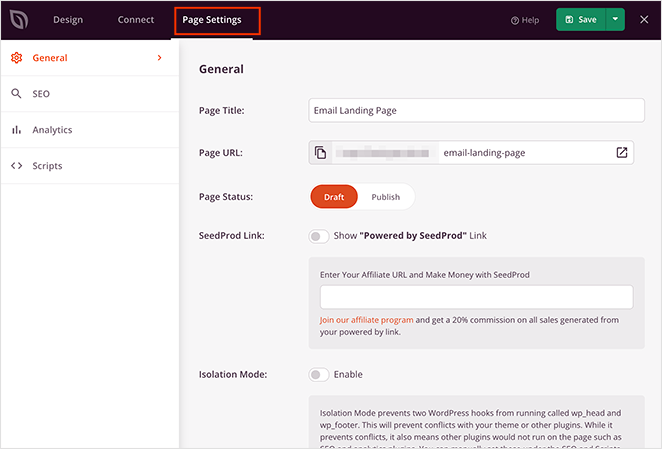
Adjust SEO settings to boost your page’s visibility in search results, ensuring more potential customers can find you. You can also connect to analytics platforms to track your landing page’s effectiveness.
For advanced users, there are options for custom header, body, and footer scripts, giving you full control over your page’s functionality.
Remember to click Save to preserve your changes.
Step 6: Publish Your Landing Page in WordPress
Before publishing your landing page, you should preview it. That way, you can see if it looks good on both desktop and mobile devices.
Since Google uses mobile-first indexing, checking your mobile responsiveness is a must. Click the preview icon in the landing page builder. You’ll see a mobile page preview instantly, so you can scroll through and make any changes. Just click the icon again to switch back to the desktop preview.
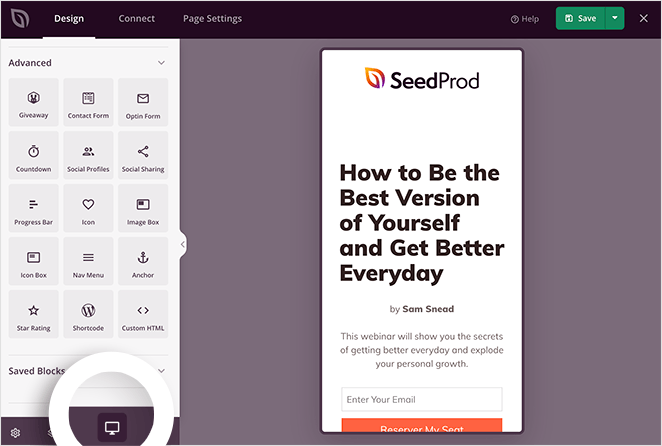
If you’d like to see a live preview of your page, click the eye icon to open your landing page in a new tab.
When you’re happy with how everything looks, click the arrow under the Save button and click Publish.
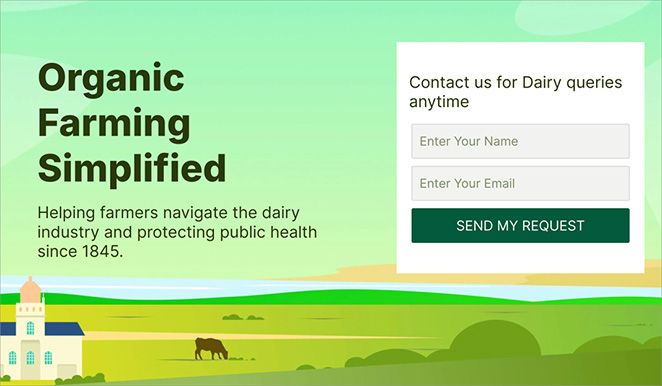
Here’s an example of a landing page I created for this guide on my test website:

This landing page took me around 15 minutes to create, one-third the time of the Block Editor method.
More importantly, it includes features proven to boost conversions:
- Professional design that builds trust
- Countdown timer to create urgency
- Direct email integration (no extra plugins)
- Mobile-optimized automatically
- Fast load times for better SEO
Expert tip: Use SeedProd’s Import and Export feature to save your best designs as templates. Build a base layout once, then reuse it for future projects.
Method 3: Create a Landing Page with Other Page Builders
If you already use Elementor, Divi, or Beaver Builder, you can create landing pages with them too. This keeps your design consistent across your site.
- Elementor – Free version available, with Pro from $59/year. Great for extensive design control but can be slower than SeedProd.
- Divi – $89/year or $249 lifetime. Visual builder with unlimited site license, but bloated for simple landing pages.
- Beaver Builder – From $99/year. Clean code output favored by developers, but smaller template library.
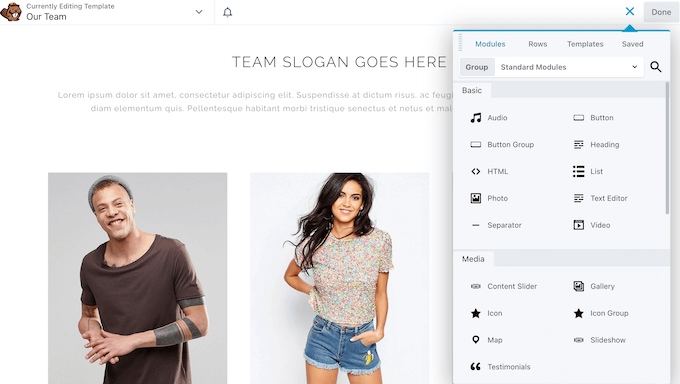
The process is similar across all page builders:
- Install and activate your page builder plugin
- Create a new page (Pages » Add New)
- Launch the builder via the “Edit with [Builder Name]” button
- Choose a landing page template or start from scratch
- Customize with drag-and-drop elements (headlines, images, buttons, forms)
- Configure settings: hide header/footer, add SEO data, set up tracking
- Preview on mobile and desktop, then publish
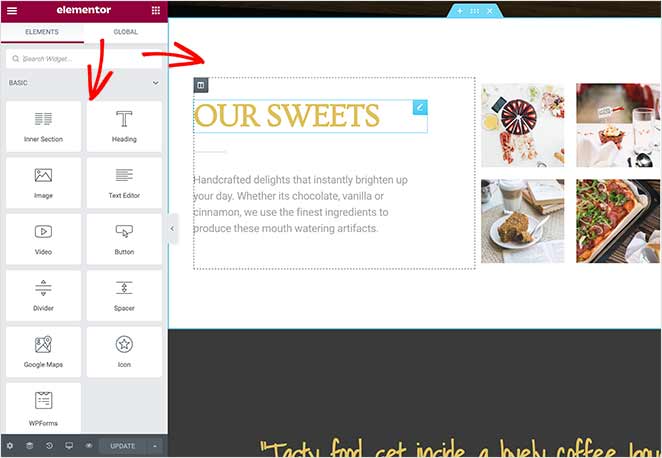
Bottom line: If you already own and know one of these builders, use it. But if you’re starting fresh, SeedProd is faster and specifically built for landing page conversions.
How to Add a Form to Your Landing Page
A landing page without a form is just a brochure. The form is where a visitor turns into a lead, so it’s the one element worth getting right.
You’ll reach for one of two types: an opt-in form that captures email addresses, or a contact form that collects an enquiry or message. Here’s how to add each one in SeedProd.
Which type of form does your landing page need?
Match the form to the single action your page is built around. Most landing pages only need one.
| Form type | Use it when |
|---|---|
| Opt-in form | You want email signups for a newsletter, lead magnet, or waitlist. |
| Contact form | You want visitors to send an enquiry, request a quote, or book a call. |
| Registration form | You’re driving signups for an event, webinar, or online course. |
| Order or payment form | You’re selling a product or taking bookings right on the page. |
Not sure? Start with an opt-in form. Building an email list is the most valuable thing most landing pages can do.
How do I add an opt-in form to collect emails?
Drag the Optin Form block from the SeedProd sidebar onto your page. Put it in the hero section so it’s visible before anyone scrolls, where the most people see it.
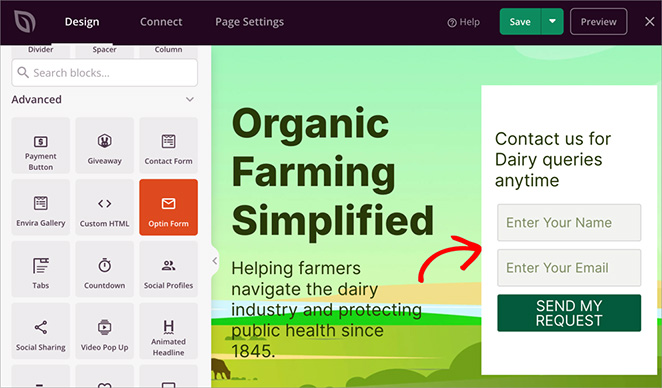
The Optin Form block is a SeedProd Pro feature. Once it’s on the page, connect it to your email service using the same integration steps from Method 2 above, and every signup flows straight to your list.
How do I add a contact form to my landing page?
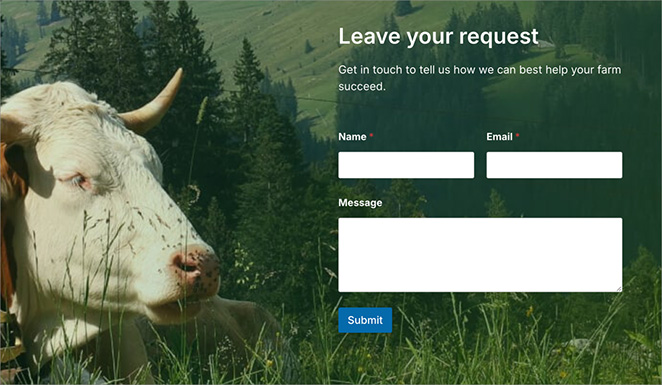
Drag the Contact Form block onto your page. This block runs on WPForms, the form builder I use for every form on my own sites.
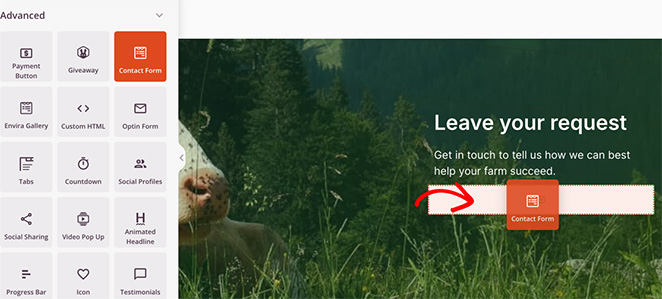
If WPForms isn’t installed yet, SeedProd prompts you to add it in a click. WPForms has a free Lite version, so you can start without paying for it. The Contact Form block itself is a SeedProd Pro feature.
Click + New Form and the WPForms builder opens in a popup right inside the page editor. Pick a template, add or remove fields, then save.
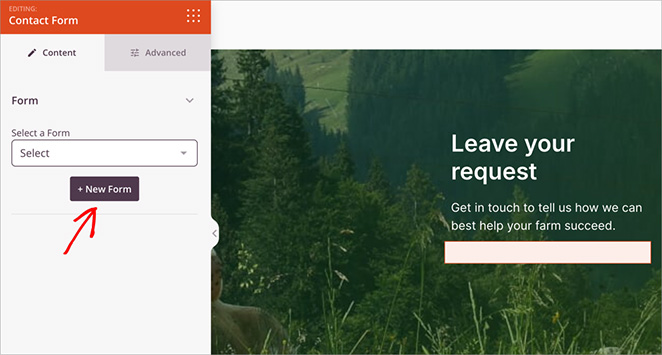
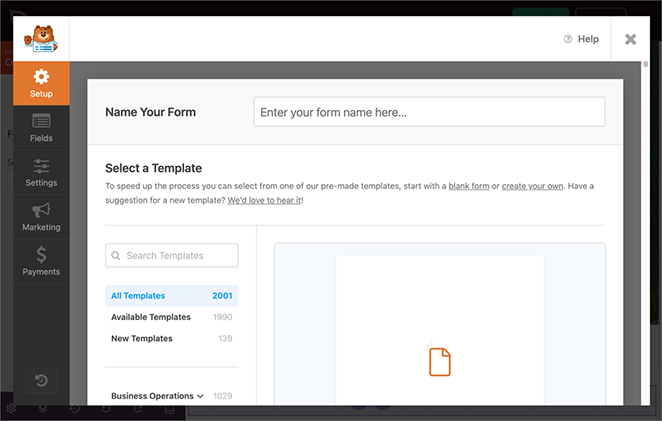
Back in SeedProd, style the form to match your page using the Content and Advanced tabs. No CSS required.
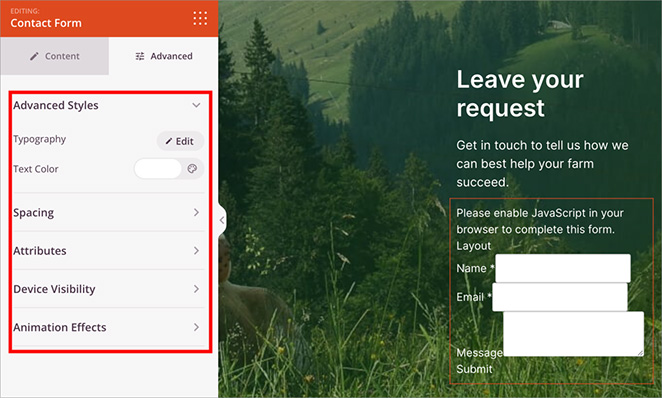
Opt-in or contact form? They do different jobs, and plenty of pages use both: an opt-in form for the newsletter, and a contact form for people who are ready to talk to you.
What happens after someone submits your form?
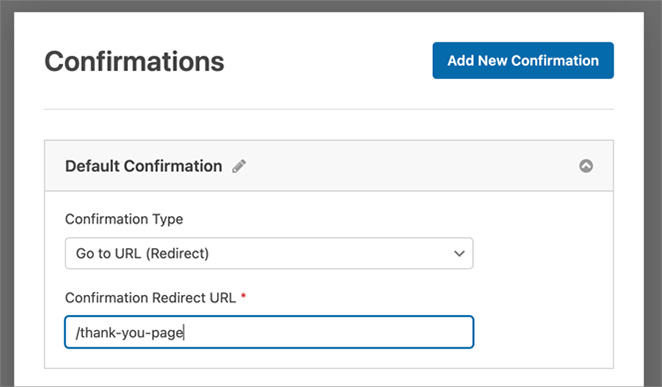
Send them somewhere useful instead of a blank confirmation message. In WPForms, open Settings » Confirmations, choose Go to URL (Redirect), and point it at a thank-you page that delivers the download or explains what happens next.
It’s worth tracking how many visitors actually submit, too. I use MonsterInsights to record form conversions in Google Analytics, so I can see which landing page is pulling its weight.
How Do I Make My WordPress Homepage a Landing Page?
If you want your landing page to be the first thing website visitors see, you’ll need to set it as your static homepage.
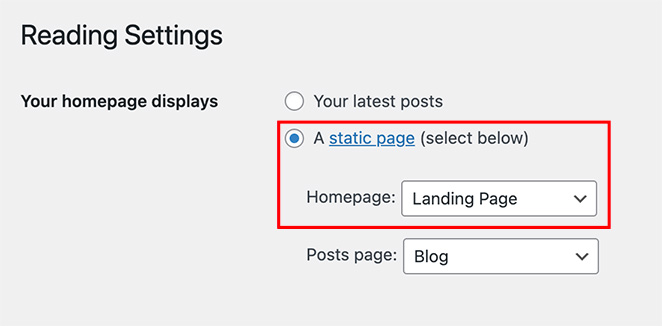
To do this, go to Settings » Reading from your WordPress dashboard. Then, select the ‘A static page’ option, and choose the landing page you just created from the dropdown menu.
It won’t be the same as your regular homepage. Instead, it means your custom landing page is where visitors land when they click through to your main WordPress site.
What Types of Landing Pages Can You Build in WordPress?
Not all landing pages are the same. Depending on your goal, whether it’s collecting emails, launching a product, or replacing your homepage, WordPress makes it easy to create a custom landing page without writing code.
Here are some of the most effective types:
| Page Type | Primary Goal | Best Use Case |
|---|---|---|
| Waitlist Landing Pages | Build early interest and collect email signups | Pre-launch products or services |
| Squeeze Pages | Email capture | Lead magnets like free ebooks or checklists |
| Sales Pages | Drive purchases or signups | Highlighting offers with pricing and social proof |
| Event or Webinar Pages | Increase attendance | Promoting online or in-person events |
| Homepage Replacements | Welcome visitors and guide action | Temporary homepage when the full site isn’t ready |
Each of these pages can be built quickly using a drag-and-drop builder like SeedProd. Just choose a template, customize your content, and publish.
Best Practices for High-Converting WordPress Landing Pages
To ensure your landing page performs well, it’s important to follow a few proven design and optimization best practices. These tips will help you maximize conversions and sales.
- Focus on one goal: Each landing page should target a single action like an email signup, product sale, or webinar registration.
- Eliminate distractions: Hide your navigation menu and footer so visitors stay focused on your main offer.
- Use a strong headline: State your biggest benefit clearly at the top, followed by a short subheadline for context.
- Add social proof: Include testimonials, reviews, or case studies to build trust and credibility.
- Optimize for mobile: Preview mobile and desktop separately before publishing. SeedProd shows both views simultaneously in the builder, no coding required. Mobile accounts for 63% of all web traffic as of 2025, so this step is not optional.
- Keep your page fast: Page speed is a conversion factor. In my testing with GTmetrix, a SeedProd-built landing page loaded in 556ms, well under the 2.5-second LCP threshold Google uses for Core Web Vitals. A 1-second delay in load time reduces conversions by around 7%, so a lightweight builder matters.
- Track and test: Use analytics and A/B testing to identify what copy or design changes improve your results. SeedProd’s Pro plan includes built-in A/B testing for headlines and CTAs, so you can run tests without adding another plugin.
Don’t forget the post-conversion step. Redirect users to a custom Thank You Page to deliver their download and keep them engaged with your site.
Following these steps can turn an average WordPress landing page into one that consistently drives conversions. For more help, see our landing page optimization tips guide.
FAQs About WordPress Landing Pages
What is the difference between a landing page and a homepage in WordPress?
Your homepage serves all audiences and links to everything on your site, including your blog, about page, and navigation menu. A landing page serves one audience and one goal, with no navigation links, no sidebar, and no footer to pull visitors away. Use a homepage to introduce your brand. Use a landing page when you need visitors to take a specific action, such as signing up, buying, or registering.
Which WordPress plugin is best for high-converting landing pages?
After testing multiple options, SeedProd is my top recommendation. It’s specifically built for landing pages and conversions, loads in under 1 second, and includes features proven to boost results. Other solid options include Elementor and Divi, but they’re general page builders rather than landing page specialists.
Do I need a plugin to create a landing page in WordPress?
No, you can use the WordPress Block Editor to build a landing page without any plugins. That said, a dedicated plugin like SeedProd saves significant time and adds conversion features the Block Editor simply doesn’t have, such as pre-built templates, countdown timers, and email integrations. If your goal is to maximize conversions and not just launch a page, a plugin is worth it.
How do I remove the header and footer from a WordPress landing page?
The method depends on which tool you use. With SeedProd, the header and footer are removed automatically when you create a landing page, so you don’t need to configure anything. With the WordPress Block Editor, go to Settings » Template while editing your page and select the Blank template. With Elementor or Divi, look for a Canvas or Full Width layout option in the page settings before you start building.
Can I add conditional logic to a landing page form?
Yes, if you build the form with WPForms. Conditional logic shows or hides fields based on earlier answers, so one form can adapt to each visitor. For example, you can reveal a “which plan?” question only after someone selects “I’m ready to buy.” It keeps the form short while still capturing the detail you need.
How do I stop spam form submissions on my landing page?
Turn on spam protection inside your form builder. WPForms includes anti-spam token protection by default, plus an optional CAPTCHA and a honeypot field that catches bots without bothering real visitors. For opt-in forms, connecting your email service helps too, since most providers filter obvious junk before it reaches your list.
You now know three proven ways to create a landing page in WordPress:
- WordPress Block Editor: Free but time-intensive (45-60 min)
- SeedProd: Fast, professional, conversion-optimized (15-30 min) – my recommendation
- Other Page Builders: Good if you already own one (30-45 min)
For most marketers and business owners, SeedProd offers the best balance of speed, results, and ease of use. But if budget is tight, the Block Editor can get you started.
Whichever method you choose, remember that launching your page is just the beginning. Test your headlines, try different calls-to-action, and use analytics to improve your conversion rates over time.
For more guidance on optimizing your results, check out these related tutorials:
- How to A/B Test Your Landing Page
- Types of Landing Pages Guaranteed to Convert
- Landing Page Best Practices for Incredible Conversion Rates
- Landing Page URL Examples and Best Practices
- How to Create a Quick Landing Page to Test Ideas
- Landing Page Headline Formulas to Boost Conversion Rates
- Landing Page Not Converting? 9 Tips to Fix It Fast
Building a high-converting landing page is just the start. Keep optimizing, testing, and refining your content to grow your traffic and conversions over time.
Thanks for reading! We’d love to hear your thoughts, so please feel free to join the conversation on YouTube, X and Facebook for more helpful advice and content to grow your business.