

TL;DR: How to Add a Particle Background to WordPress
You can add a particle background to any WordPress page section using SeedProd, no coding required. Here is the process from start to finish.
- Install SeedProd: Add the plugin to your WordPress site and activate it.
- Choose a template: Pick a pre-made landing page design to start from.
- Enable the effect: Click a section, open the Advanced tab, and turn on Particle Background.
- Customize it: Choose a style, then adjust density, color, and speed.
- Publish: Save your changes and make the page live.
You have a portfolio site or a hero section that looks flat, and you want to add some visual depth without rebuilding the whole page. A particle background, those slow-moving dots and connecting lines behind your content, is one of the quickest ways to do it.
In this guide, I’ll show you how to add a particle background in WordPress using a plugin, no coding required. You’ll also see how to customize the particles for your own style and keep your site fast and mobile-friendly.
What Is a Particle Background?
A particle background is an animated set of moving elements that display behind your website content. These particles can move, change color, and react to user interactions.
Most particle backgrounds are powered by particle.js, a lightweight JavaScript library. It lets you customize the particle shapes, colors, sizes, and movement without affecting your main content.
One thing worth knowing: the original particle.js library is no longer actively developed and is now maintained as tsParticles. If you use SeedProd or the Particle Background WP plugin, the integration handles this for you. If you want to build a custom config from scratch, the active tool lives at tsparticles.js.org.
Here’s an example of a particle background in action:

Why Use Particle Backgrounds in WordPress?
Particle backgrounds add a dynamic, interactive feel to your site and help draw attention to key sections. The trick is matching the effect to the kind of site you run.
Here are four use cases where a particle background earns its place:
- Portfolio sites: A subtle polygon animation on the hero section shows creativity without distracting from the work.
- Tech and SaaS landing pages: Connection-line particles signal a modern, data-forward brand.
- Seasonal promotions: Snow particles for holiday sales, or floating shapes for a spring launch.
- Coming soon pages: A particle animation keeps the page visually alive while your content is still in development.
That last one is where I reach for this effect most. Coming soon pages are SeedProd’s strongest free-tier feature, and a particle background gives an otherwise empty placeholder page something to look at.
How to Add Particle.js Backgrounds to My WordPress Site?
There are several ways to add particle backgrounds to your WordPress site, even if you’re a beginner.
First, you can use a WordPress particle.js plugin or WordPress page builder with built-in particle effect features. I recommend this option for beginners because it typically requires zero coding knowledge or tech skills.
Another way is to use a WordPress theme that includes particle.js. This is handy if you’re starting a new site and still need a theme.
The final option is using custom code to add particle effects manually. I only recommend this if you’re comfortable with coding.
In this guide, we’ll stick with the easiest option: using a WordPress plugin. Let’s get to it.
How to Add a Particle Background in WordPress with SeedProd
SeedProd is a drag-and-drop website builder with particle backgrounds built right into its editor. You don’t need a separate plugin or any custom code, the effect is a toggle away.

Over 700,000 WordPress sites use SeedProd to build pages and themes without touching code. You can use it to create custom WordPress themes, landing pages, and just about any layout you need.
With hundreds of pre-made page templates and built-in particle backgrounds, setting up a particle background WordPress effect takes only a few minutes. Follow the steps below to add one to your site.
Step 1. Install and Activate SeedProd
First, get started with SeedProd and download the plugin. Then install and activate it on your WordPress website.
If you need help with this, check the SeedProd installation documentation. It walks you through the install process and how to activate your plugin license key.
Step 2. Choose a Pre-made Template
Your next step is to choose a pre-made template. The type you select depends on whether you want to build a WordPress theme or a landing page.
With SeedProd’s Theme Builder, you can build a complete WordPress theme from scratch. Choosing this option will overwrite your existing website design.
The Landing Page Builder lets you create any page without touching your existing theme. For this guide, we’ll go with this option.
From your WordPress admin dashboard, go to SeedProd » Landing Pages. You’ll see various page modes at the top and the option to create your own custom page.
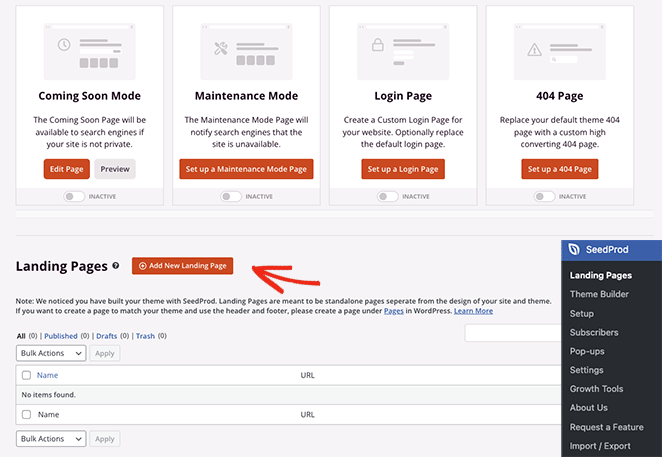
Go ahead and click the Add New Landing Page button. Here, you can choose from hundreds of pre-made landing page templates.
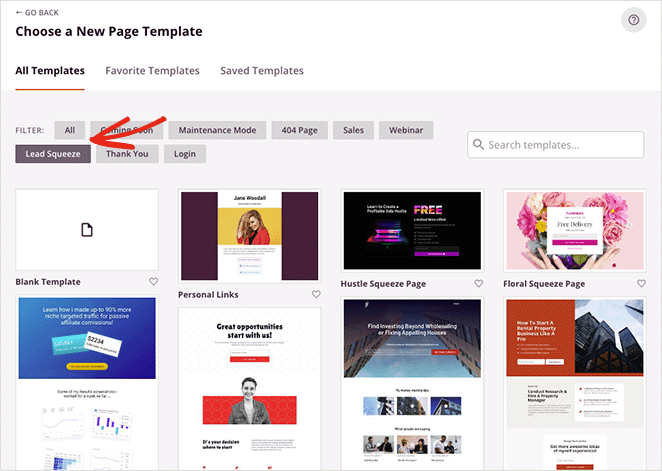
You can filter the templates by type using the tabs along the top, including:
- Coming Soon
- Maintenance Mode
- 404 Page
- Sales
- Webinar
- Lead Squeeze
- Thank You
- Login
To choose a template design, click the orange checkmark icon.
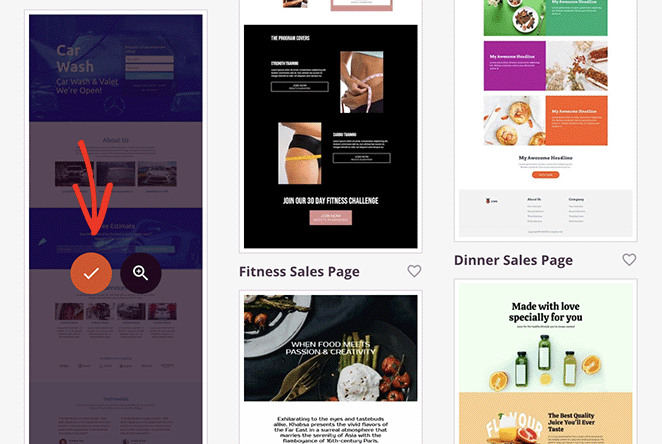
This opens a popup where you can enter your landing page name. SeedProd generates the page slug for you, but you can change it if you like.
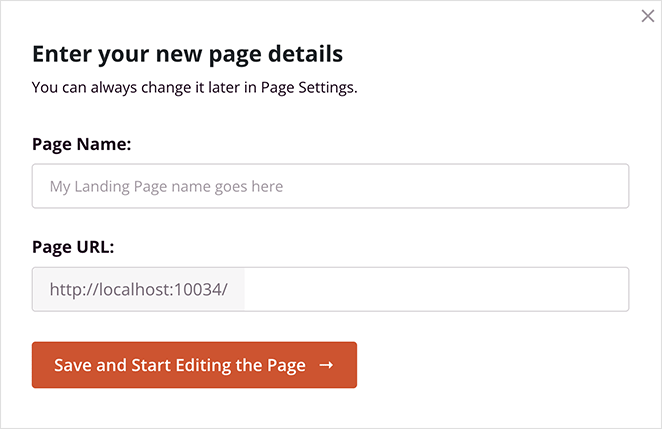
When you’re happy with those details, click the Save and Start Editing the Page button. Once your template opens in the editor, you’re ready to enable particle effects.
Step 3. Enable and Customize Particle Backgrounds
SeedProd has particle.js built into the editor, and you can use it on any page section. Click a section until you see a purple border, then select the Advanced tab.
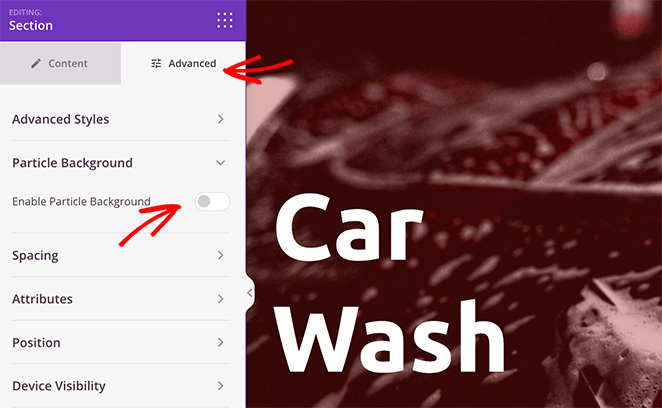
Find the Particle Background heading, expand it, and switch the Enable Particle Background toggle on. You’ll see a Polygon animation effect appear on the section background right away.
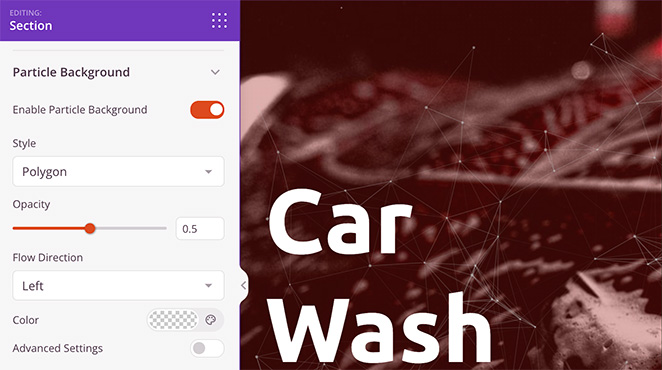
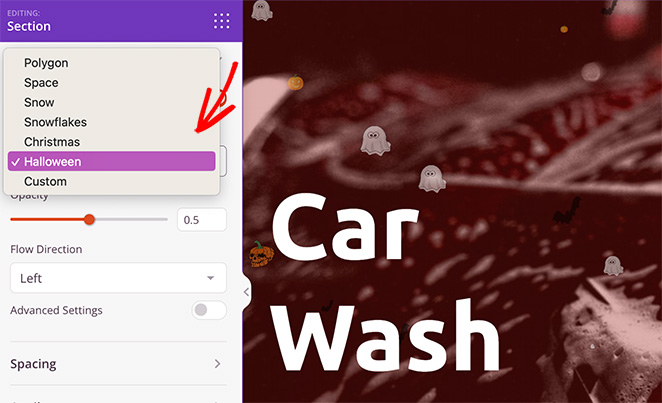
Click the Style dropdown to change the particles to one of the built-in options:
- Space
- Snow
- Snowflakes
- Christmas
- Halloween
- Custom
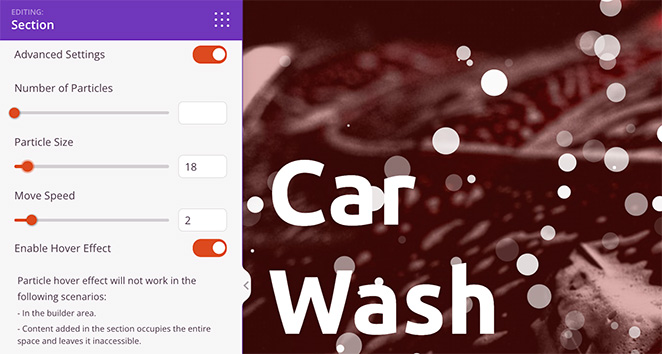
After choosing a style, you can set the particle opacity, flow direction, and color. For more control, enable the Advanced Settings toggle.
Here you can increase the number of particles, change the particle size, and adjust the movement speed.
Keeping Your Particle Background Fast on Mobile
Particle density is the setting that affects performance most. The more particles you render, the more work the browser does on every frame.
A few guidelines I follow to keep things smooth:
- Cap the density: Keep particles under about 60 for desktop hero sections, and around 30 for mobile.
- Test hover effects on mobile: Hover interactions add extra JavaScript, so check how they feel on a phone before publishing.
- Use the mobile preview: SeedProd’s built-in mobile preview lets you check render performance before the page goes live.
SeedProd also has a hover effect option in the same panel. When you enable it, the particles scatter away from your cursor and drift back as you move across the section.
One thing to note: you can only see the hover effect when previewing your page outside the editor, not inside the builder itself.
Adding Custom Particle Backgrounds
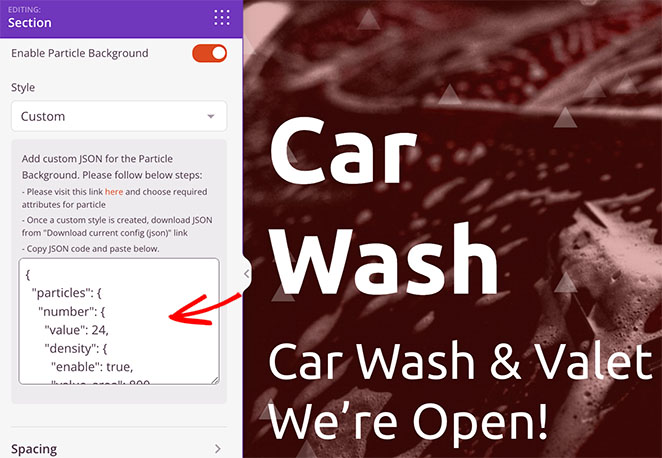
To add a custom particle effect, choose the Custom option from the Style dropdown. The instructions will tell you that you need to add a custom JSON config file.
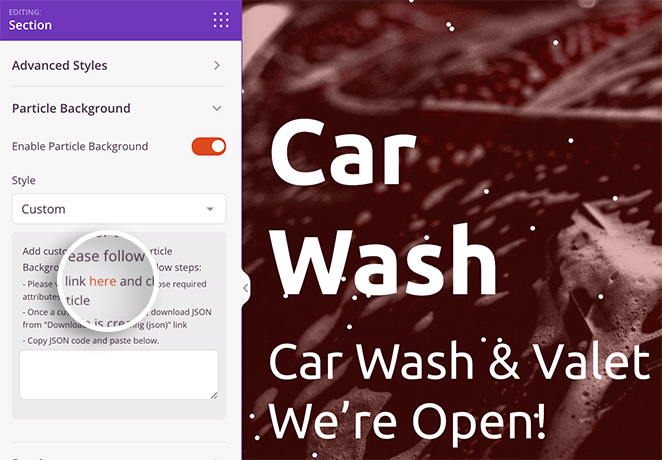
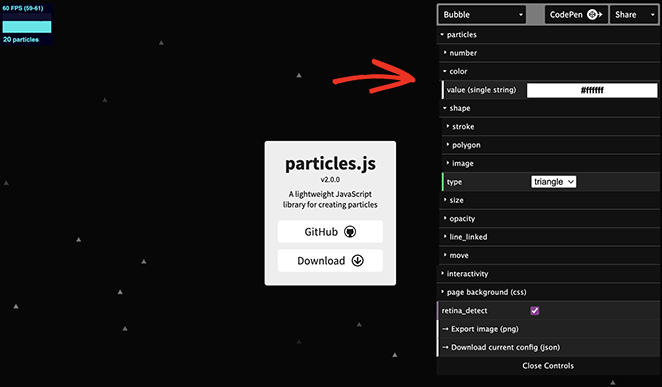
The instructions include a link to vincentgarreau.com/particles.js, a tool that lets you set custom attributes by pointing and clicking. The same JSON config format works with the current tsParticles library, so a config you build there will run in SeedProd.
In the config panel, you can choose custom shapes, densities, sizes, speeds, and colors. If you want to use your own logo or image as the particle shape itself, the Custom JSON approach is the way to do it, you point the shape config at a custom image URL.
When you’re happy with your settings, click the Download current config heading to save the configuration file to your computer.
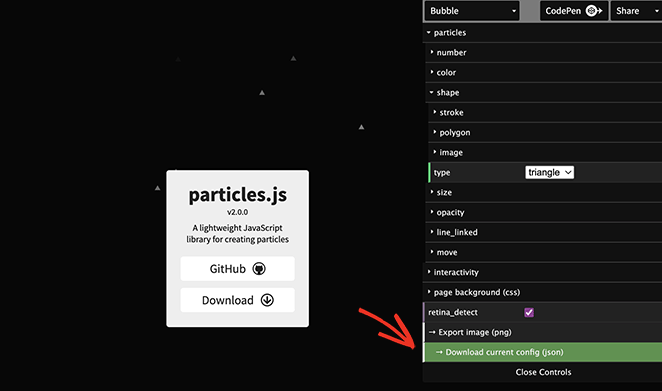
Now open the file, copy the code, and paste it into the empty box in your editor.
Your custom particle background will appear instantly. From there, keep customizing your landing page until it looks exactly how you want, and click Save to store your changes.
Step 4. Publish Your Changes
Once you’re happy with your landing page, you’re ready to make it live. Click the Save dropdown arrow, then click Publish.
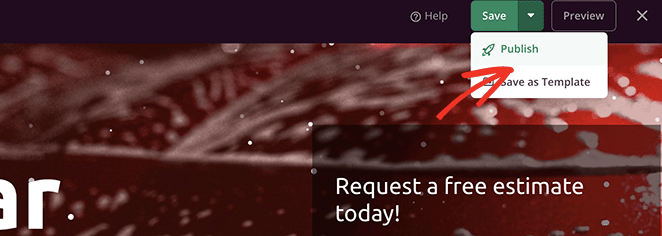
Now visit your landing page to see your particle background in action.

Before you call it done, open the page on your phone using SeedProd’s mobile preview to confirm the effect looks right on a smaller screen. It’s also worth running the live page through Google PageSpeed Insights to check the particle background hasn’t slowed your load time.
Use the Particle Background WP Plugin
Another way to add particle backgrounds to your WordPress site is the Particle Background WP plugin.
Pricing: Free
Free Plan / Trial: Yes
Standout Features: Basic particle effects, shortcode support, simple settings
Rating: B
Best For: Users who want a free, lightweight option
This is a free WordPress particle.js plugin. Its customization options aren’t as easy or extensive as SeedProd’s.
First, install and activate Particle Background WP on your site. Then click the Particle Background menu item in your WordPress admin panel.
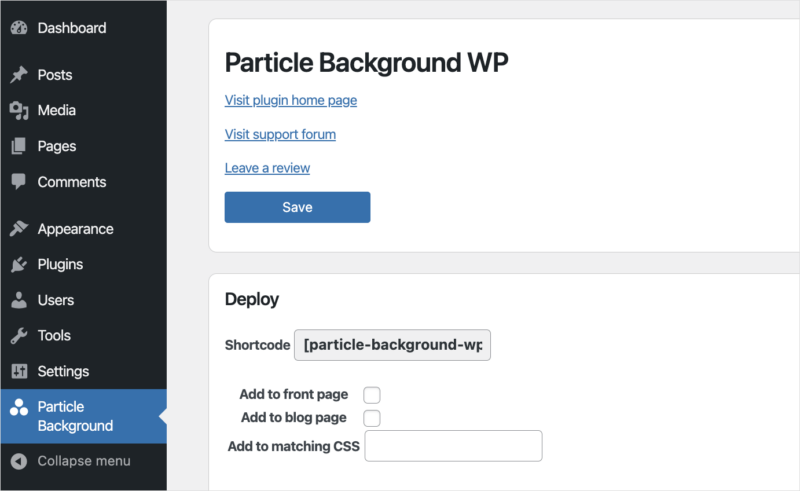
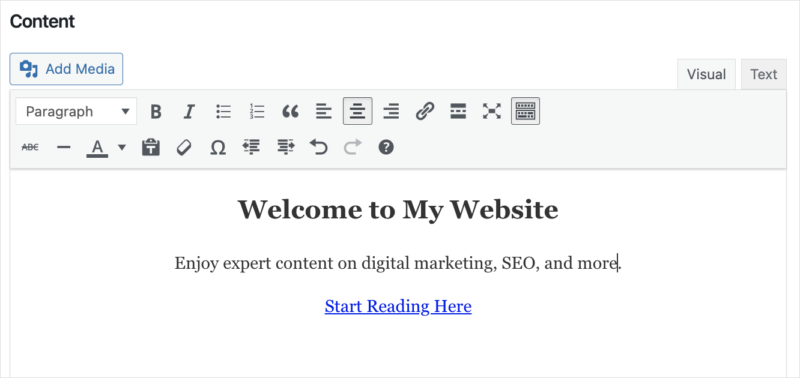
In the first panel, you can show the particle background banner on your front and blog pages or with a shortcode. We’ve enabled the banner for our blog page.
Below that is a content area you can customize with the editor. Here you can enter a heading, a description, and a call to action for your banner.
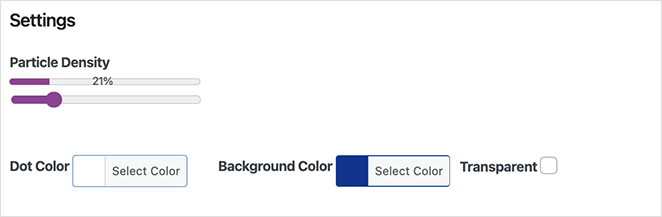
The next panel includes particle customization options, including density, color, and background color. You can also enter custom CSS.
After saving your changes, visit your blog page to see the banner with its particle background in place.

You can also use the shortcode to add the same banner on any page or post. One thing to note: your banner sits over the content, not behind it as it does in SeedProd.
More Ways to Add Particle.js to WordPress
If you use a different page builder, a few add-ons can bring particle effects to your existing setup:
- Ultimate Addons for Elementor: Adds particle effects to pages built with the Elementor page builder plugin.
- Ultimate Addons for Beaver Builder: Adds particle animations to pages made with the Beaver Builder plugin.
- Manually: I only recommend this approach if you’re comfortable with HTML, PHP, JavaScript, and other coding languages.
The easiest way to add a particle background to WordPress is with SeedProd. It requires zero coding and gives you customization options that take a few clicks to set up.
FAQs About WordPress Particle Backgrounds
Does adding a particle background slow down my WordPress site?
It can, because particle.js runs extra JavaScript that the browser processes on every frame. The impact depends on how many particles you render.
Keep the density low, limit the effect to one key section, and test on mobile. A light particle background on a hero section rarely causes a noticeable slowdown.
Can I use a particle background on any section of my WordPress page?
With SeedProd, yes. Particle backgrounds work on any section of a page, so you can apply the effect to a hero block, a call-to-action band, or a footer without affecting the rest of the page.
What particle styles does SeedProd support?
SeedProd includes six built-in styles: Polygon (the default), Space, Snow, Snowflakes, Christmas, and Halloween. There’s also a Custom option that lets you load your own particle.js JSON config for full control over shape, density, and movement.
Is there a free WordPress plugin for particle backgrounds?
Yes. Particle Background WP is a free plugin that adds a particle banner using a shortcode or a front-page setting. It’s more limited than SeedProd, and the banner sits over your content rather than behind it.
Do particle backgrounds work on mobile devices?
They do, as long as you optimize them. Lower the particle density for mobile, around 30 particles is a safe target, and test the effect on a real device.
SeedProd’s built-in mobile preview lets you check how the background renders on a smaller screen before you publish.
Start Adding Particle Backgrounds Today
Once you have your portfolio piece or hero section in mind, a particle background takes that flat layout and gives it depth in a few clicks. With SeedProd, you can build it, customize it, and publish it without writing a line of code.
You might also like our guide on the best WordPress photo gallery plugins to complement your new particle backgrounds. Or see how to add a snow effect in WordPress.
Thanks for reading! We’d love to hear your thoughts, so please feel free to join the conversation on YouTube, X and Facebook for more helpful advice and content to grow your business.


