

TL;DR: How to Create a Lead Capture Page in WordPress
You can build a lead capture page in WordPress in under an hour using SeedProd’s visual editor. Pick a template, add your form and offer, connect your email service, and publish.
- Install SeedProd: Download, install, and activate SeedProd, then verify your license key.
- Choose a template: Open the template library, filter by Lead Squeeze, and select a design.
- Add your content: Drag blocks onto your page, including your opt-in form, headline, and images.
- Customize the design: Set your brand colors, fonts, and background in the global settings panel.
- Connect your email list: Link Mailchimp, ConvertKit, ActiveCampaign, or another service via the Connect tab.
- Configure settings and publish: Set your page URL and SEO settings, then click Publish to go live.
Getting traffic to your website is one thing. Turning those visitors into subscribers or customers is another. I remember spending way too long trying to build a lead capture page that actually looked good and worked the way I wanted. Most of the tools I tried were either too complicated or didn’t play well with WordPress.
That changed when I started using SeedProd. Now I can build a fully customized lead capture page in just a few clicks. It’s fast, it looks professional, and it connects directly to my email list without any hassle.
In this guide, I’ll walk you through how to create a lead capture page in WordPress using the same method I use on all my sites. Whether you’re growing a list, offering a freebie, or just want to collect leads the easy way, these steps will get you there.
How to Create a Lead Capture Page in WordPress:
Why Trust This Guide?
I’ve built dozens of lead capture pages across different websites and niches, including my own. I’ve tested what works, what doesn’t, and which tools make the process easier instead of more frustrating.
This tutorial walks you through the same steps I use myself, using a beginner-friendly WordPress builder that lets you launch pages fast without touching code.
What Is a Lead Capture Page (and Why Do You Need One)?
A lead capture page is a type of website landing page that usually includes an optimized opt-in form. This form allows you to collect the email addresses of your website visitors in exchange for an offer.
Visitors who browse your site without converting are a lost opportunity. A lead capture page gives you a second chance to close the sale after they leave.
Here’s what makes one work:
- Value exchange: Your page must offer something worth trading an email address for. The stronger the offer, the higher your opt-in rate.
- Form simplicity: Don’t ask for more than you need. An email address (and maybe a first name) is enough, since extra fields push visitors away.
- Email nurturing: Once subscribers are on your list, it’s easier to nurture leads down your funnel and increase conversion rates.
What to Include on Your Lead Capture Page
When you build a lead capture page in WordPress, there are a few essential elements to include if you want it to convert well:
- Headline: Use a headline that explains your offer clearly and encourages visitors to stay. Try using your unique selling point to keep it focused.
- Lead magnet: Your offer is what motivates someone to hand over their email. Common options include a free guide or ebook, a discount code, a checklist, or access to a webinar. The more specific to the visitor’s problem, the higher your opt-in rate. A vague freebie (“free newsletter!”) rarely converts. Name what the person will learn or save.
- Call to Action Button (CTA): Make sure your CTA stands out. Your email opt-in page should use button text that feels personal and action-focused, like “Send Me the Free Guide.”
- WordPress lead capture form: A simple WordPress lead capture form should ask for just the essentials: name and email. Too many fields can scare people off.
- Images: Include a mockup or preview of your offer. If you’re using a squeeze page WordPress template, add a photo of the lead magnet or event you’re promoting.
- Copy: Your copy should build interest without overwhelming visitors. Keep things short, benefit-focused, and easy to scan.
- Trust elements: Testimonials, reviews, or security badges help, but the detail most articles skip is a link to your privacy policy near the form. Visitors want to know their email won’t be shared or spammed. If your audience is in the EU or California, a consent checkbox is also legally required under GDPR and CCPA.
You might also like these landing page best practices for tips on getting started.
Now that you know what to include in a lead page, let’s look at how to create one in WordPress.
How to Create a Lead Capture Page for Your Website
The most practical approach is a drag-and-drop WordPress builder. You stay in control, no developer needed, and you can launch the same day.

You can build your pages faster with SeedProd’s pre-made landing page templates. Every template is optimized for generating leads and is completely customizable with the visual drag-and-drop page editor.
To create a successful lead capture page in WordPress with SeedProd, follow these steps.
If you’d prefer to read the written instructions, follow the steps below.
Step 1: Set Up SeedProd to Build a Lead Capture Page in WordPress
SeedProd is a drag-and-drop website builder for WordPress that lets you build landing pages, lead capture pages, and full sites without writing any code. Get started with SeedProd and download the plugin to your computer. Then, if you need help, follow these instructions for installing a WordPress plugin.
After installing and activating SeedProd, you’ll see a page asking you to validate your SeedProd license key. This key will be sent to your registered email address after purchasing the plugin.

Copy the license key and paste it into the blank field on your screen. Then, go ahead and click the Verify Key button.
After verifying your license key, scroll down the page and click the Create Your First Page button.
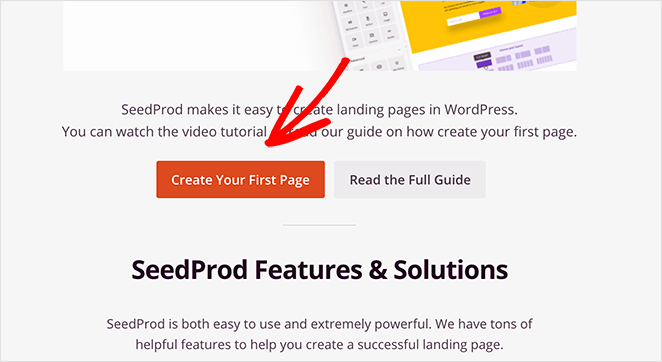
This will redirect you to the SeedProd landing page dashboard, where you can begin creating your lead capture page.
Step 2. Create a New Lead Capture Page
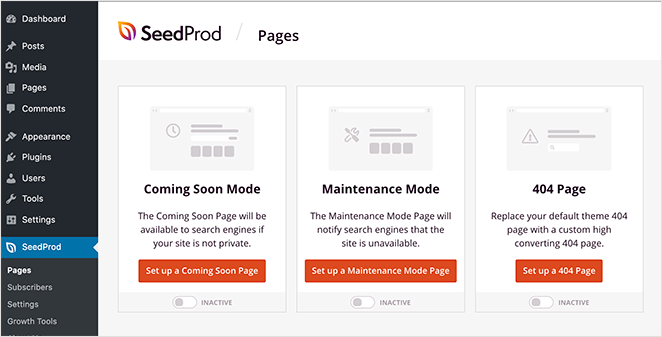
On the SeedProd landing page dashboard, you’ll see 3 different options along the top:
- Coming Soon Mode: To add a coming soon page to your website.
- Maintenance Mode: For putting your website in maintenance mode.
- 404 Page: To display a 404 error page on your website.
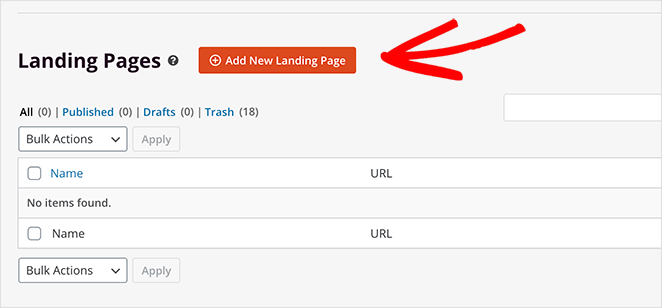
Under that section, you’ll see an area that lists all of your recently created landing pages. To get started, click the Create New Landing Page button.
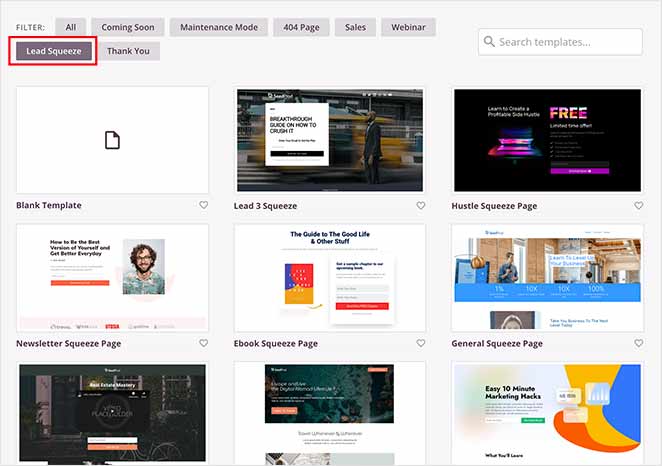
After clicking the button, you’ll see the landing page template library. All of the SeedProd landing page templates are professionally designed and can be customized in real time with the drag-and-drop page builder.
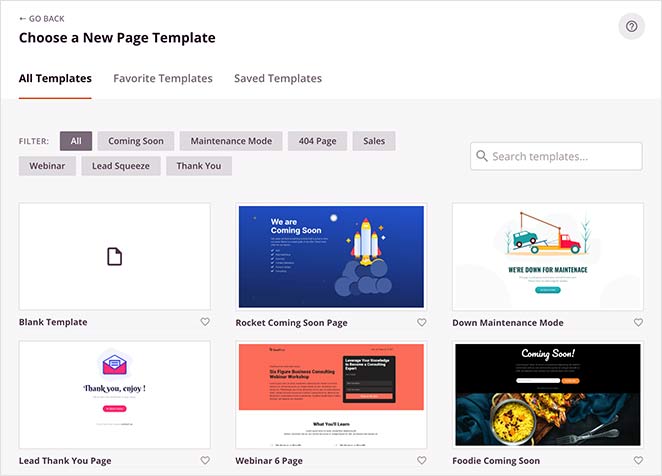
You can filter the templates by clicking one of the following options at the top.
Click the Lead Squeeze filter to see SeedProd’s library of squeeze page WordPress templates. These are designed specifically to help you build a lead capture page quickly, even if you’ve never done it before.
Related: 11 High-Converting Squeeze Page Examples to Boost Your List
Don’t worry if you can’t find the perfect template. You can easily add and remove page elements and customize the template in the visual page builder.
To choose and launch the template, hover your mouse over the template thumbnail and click the tick icon.
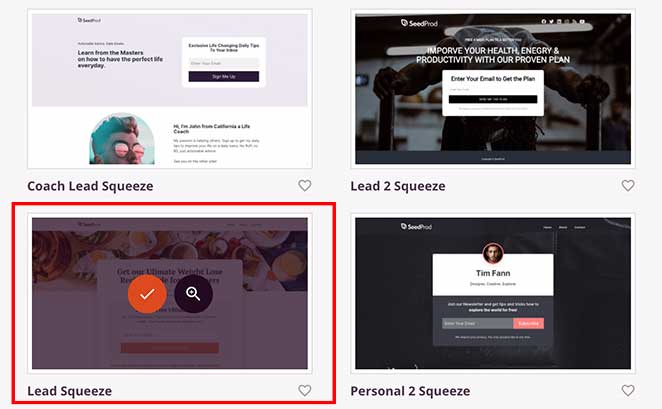
For this tutorial, we chose the Lead Squeeze template.
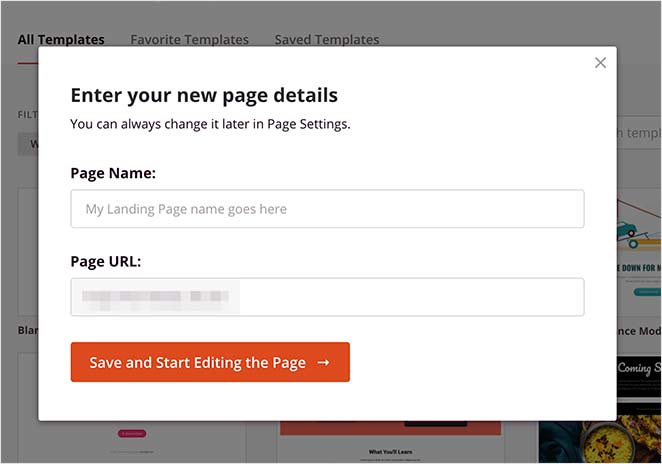
After clicking the tick icon, a window will appear asking you to give the page a name and URL. This can be anything you like, and you can change the details later. Then click the Save and Start Editing the Page button.
Your landing page will now open in the SeedProd drag-and-drop page builder, where you can make changes in real-time with no coding required.
Step 3. Add Content to Your WordPress Lead Capture Page
Before diving into the design, decide on the best type of form for your lead capture page’s goals. Here are some common options:
- Contact Forms: Gather basic information like name, email, and any inquiries.
- Opt-in Forms: Designed for collecting email addresses in exchange for resources (eBooks, discounts, newsletters).
- Webinar Registration Forms: Allow visitors to sign up for webinars, often including additional fields for relevant details.
SeedProd makes it easy to create any of these form types right in the drag-and-drop page builder, giving you complete customization over the design and functionality of your lead capture page.
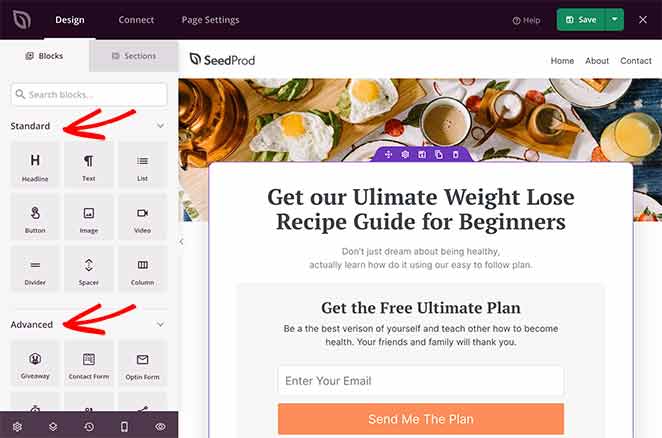
On the left side of your screen are the different landing page blocks. These are page elements that you can drag onto your landing page to add new content.
SeedProd’s landing page blocks are divided into 2 different sections: Standard and Advanced.
Standard blocks include everything you need to change your page’s overall design. For instance, you can add images, videos, buttons, columns, headlines, text, spacers, and more.
The Advanced blocks are focused on helping you generate leads for your business. For instance, you can use the giveaway block to run a RafflePress giveaway on your landing page. Giveaways are an excellent way to raise brand awareness, grow your email list, and generate leads.
Other advanced blocks include contact forms, optin forms, countdown timers, social profiles, anchor links, social media sharing buttons, star ratings, and more.
Adding a block to your lead capture page is as simple as dragging one from the left-hand panel and dropping it onto your page.
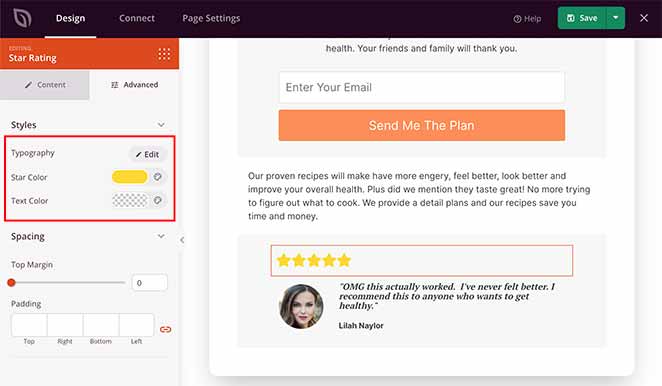
For example, you might want to add a star rating to the template’s testimonial area to show visitors how other customers value your product or service.
To do that, click the Star Rating block in the left panel and drag it onto the testimonial section.
You can then click the block to change the star rating scale, label, size, and alignment. Then, in the Advanced tab, you can change the font, spacing, and colors.
As mentioned earlier, many of SeedProd’s landing page blocks come with pre-made templates, making it easier to pick different styles.
For instance, clicking the optin form block on your page shows you the different customization options for that block. Then, if you click the Templates tab, you can choose from several pre-made field styles.

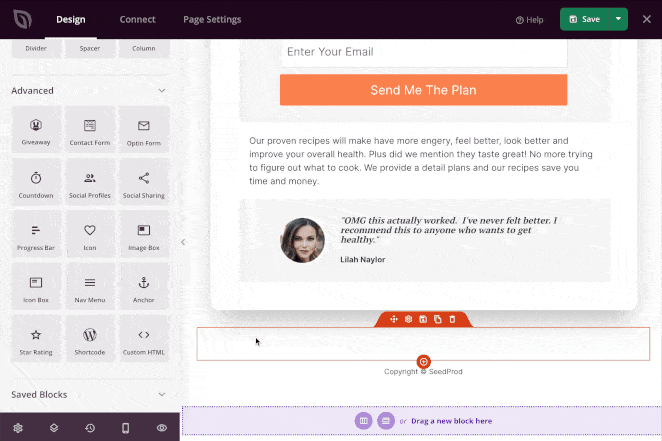
Along with page blocks, there’s also a tab for page Sections. Clicking this tab shows various pre-made page sections you can add to your page with a single click. This saves you from having to build whole page sections block by block.
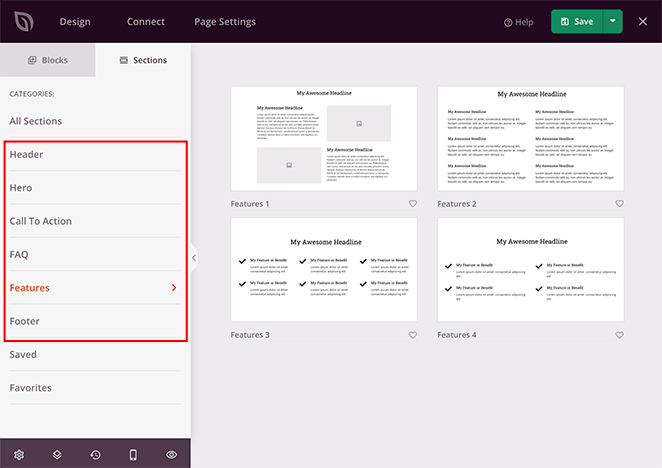
There are different section designs for your page:
- Header
- Hero
- Call to Action
- FAQ
- Features
- Footer
Click any section to add it to your lead capture landing page automatically.
In the following example, we added a Features section, which can help visitors learn more about your offer.
While adding content to your page, make sure you click the green Save button periodically to preserve your changes.
When you’ve finished adding content to your lead capture page, you can move on to customizing the look and feel to match your brand.
Stuck on the words? If the blank layout is what slows you down, you can have ChatGPT or Claude write the copy for you, connected to your real site, with WPVibe. Ask it to draft your headline, lead magnet pitch, and CTA, then drop the text into SeedProd and build the page the way you want it.
Step 4. Customize the Design of Your Lead Capture Page in WordPress
Customizing the look and feel of your email opt-in page is straightforward with SeedProd’s drag-and-drop builder. Whether you’re offering a discount, freebie, or webinar, your page should reflect the value of your offer clearly.
Just click the gear icon in the bottom-left corner to view your global page settings.
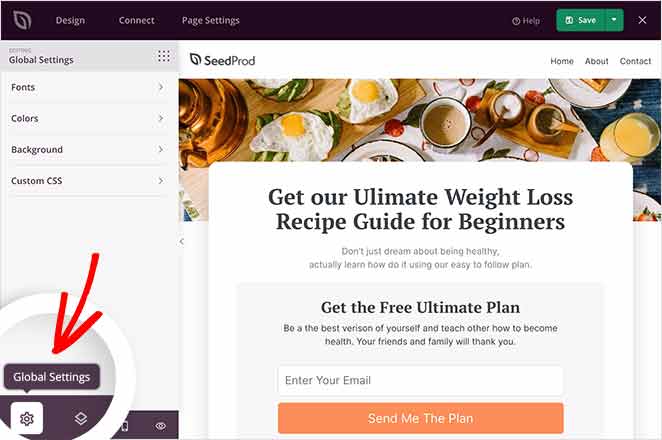
In this area, you can change your global page fonts and colors, upload a new background image, and add custom CSS.
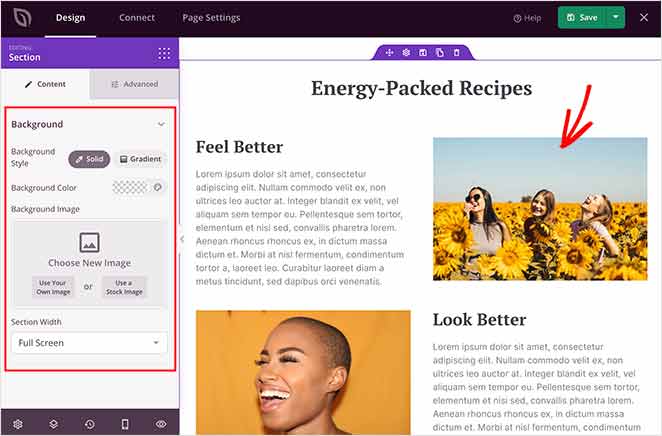
Let’s start by changing the background image. First, click the Background tab to see all the options.
Here, you can set the background as a solid color or gradient or upload a new image. You can also use a video as your background or create a background slideshow by toggling the options on.
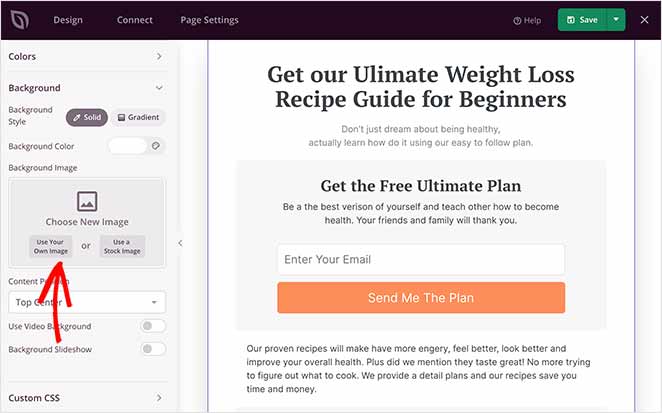
To upload a background image, navigate to the Background Image heading and click Use Your Own Image. You can then choose an image from your WordPress media library or upload one from your computer.
Now, let’s look at how to change your landing page colors. Click the Colors tab to see the different options. Here, you can change the global color options for your header, text, buttons, links, and more.
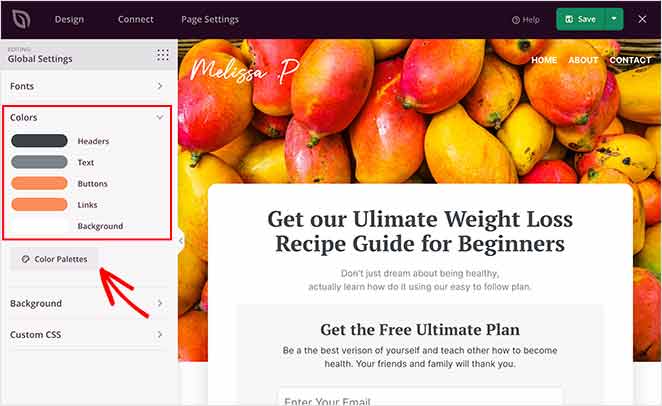
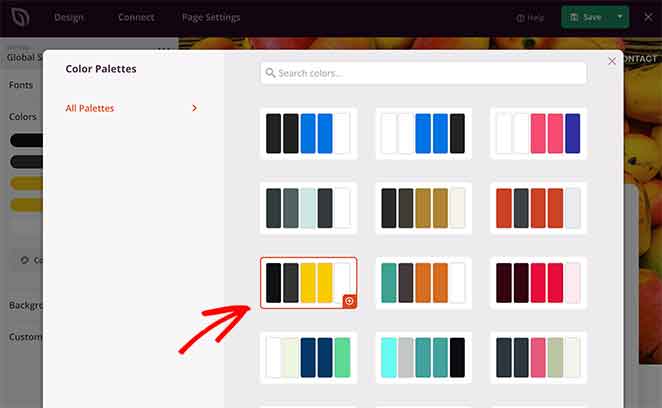
If you prefer, you can click the Color Palettes button and choose from various pre-made color combinations and implement them with a single click.
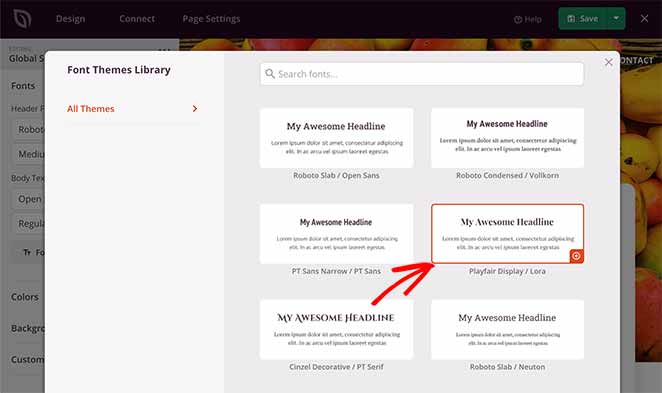
You can follow the same approach to change your global page fonts. Just click the Fonts tab and select from hundreds of Google web fonts and weights for your header and body text.
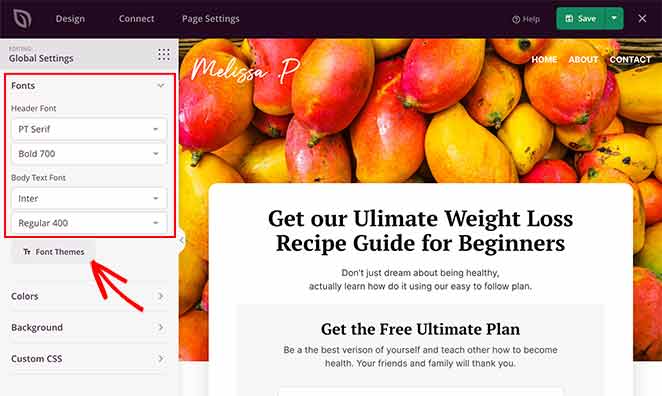
It’s also possible to click the Font Themes button to view various font combinations and preview what they’ll look like on your page.
When you’re happy with your landing page customizations, click the Save button to preserve your changes. You can then move on to connecting your email list.
Step 5. Connect Your Email List
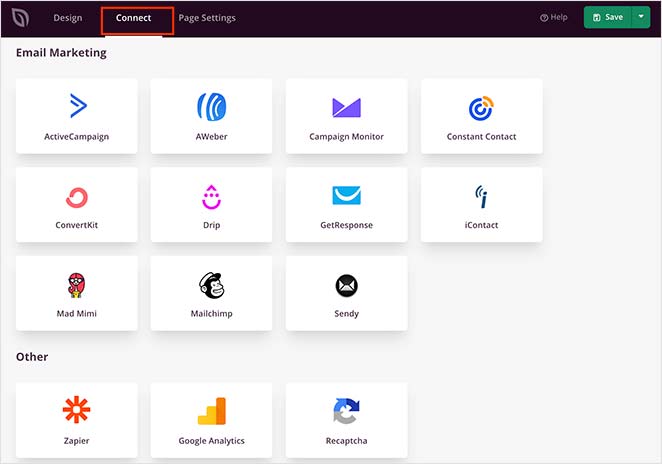
SeedProd connects directly to your email marketing service: Mailchimp, ConvertKit, ActiveCampaign, and 15+ others. If you want to grow your email list and manage the new leads you receive, you’ll need to connect your service to your lead capture page.
First, click the Connect tab at the top of the page builder. This will show you all the different email providers you can connect with your page.
Find it in the list and click Connect New Account.
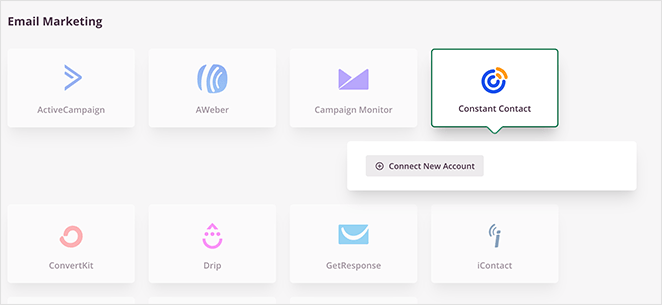
Then, follow the on-screen instructions to link your service and authorize your account.
For the full instructions for integrating specific email providers, see the SeedProd integration documentation.
On the same page, you can also connect to Google Analytics to track your page performance, Recaptcha for spam prevention, and integrate with thousands of third-party apps via Zapier.
Don’t stop at the page: Once your form is wired up, you can have WPVibe draft your welcome email and follow-up nurture sequence too, so new leads hear from you right away instead of going cold.
Step 6. Configure Your Page Settings
The next step is to configure your landing page settings, so go ahead and click the Page Settings tab.
You can edit your general page settings on this page, such as the page title, URL, and published status. You can also enable Isolation Mode, which only loads the elements needed to render your landing page, preventing any WordPress theme or plugin conflicts.
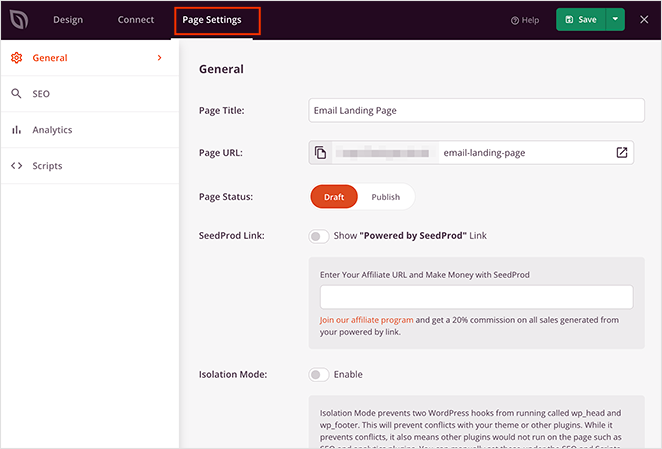
If your business website uses an analytics plugin like MonsterInsights, and an SEO plugin, you can also configure their settings via this page by clicking the relevant tabs.
Then in the Scripts section, you can insert header, body, and footer scripts. This is particularly useful if you wish to use retargeting on your landing page or add your Facebook tracking pixel.
Remember to click Save before moving on to the final step.
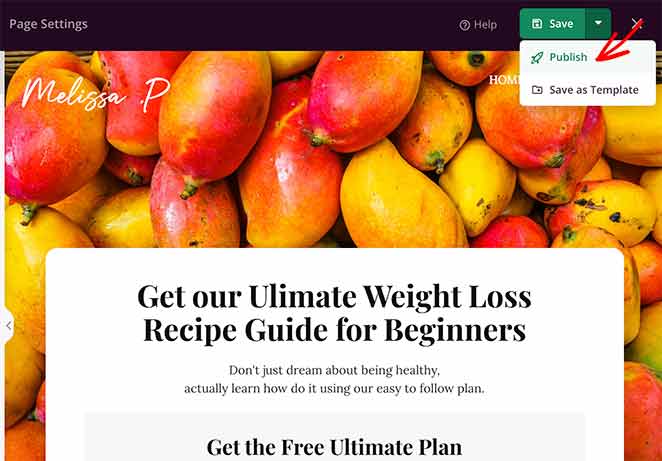
Step 7. Publish Your Lead Capture Page
Now it’s time to make your page live and publish it on your WordPress website. To do that, click the downwards arrow next to the green Save button and click Publish.
An overlay will appear telling you that your page has been published. Now, you can click the See Live Page button to see how it looks.
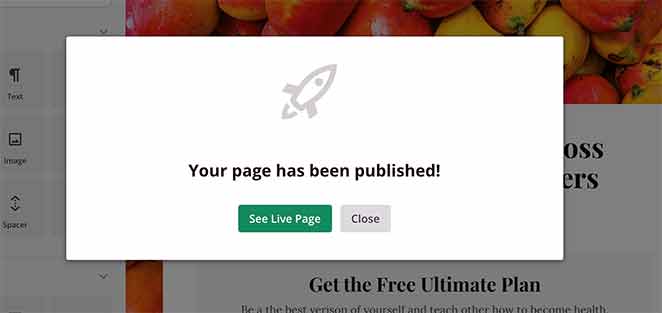
Congratulations!

FAQs About Lead Capture Pages in WordPress
What is a WordPress lead capture form?
A WordPress lead capture form is a simple form that collects contact details from visitors, usually in exchange for something valuable like a guide, discount, or free resource. The best forms only ask for the essentials, such as name and email.
How do I create an opt-in page in WordPress?
You can create an opt-in page in WordPress using a visual page builder like SeedProd. It offers templates and drag-and-drop blocks so you can launch your page fast without needing code.
Can I create a lead capture page in WordPress for free?
SeedProd’s free plan is great for coming soon and maintenance pages, but landing page templates require a paid plan. If you need a fully free setup, Jetpack Forms or WPForms Lite let you embed an opt-in form on any existing page.
For a standalone, professionally designed lead capture page, SeedProd’s paid plans give you templates, a visual editor, and email integrations.
What should I do after publishing my lead capture page?
First, submit a test form entry to confirm lead capture is working. Then set up GA4 or a MonsterInsights integration to track pageviews and form conversions. Configure a thank-you page redirect so new subscribers know their signup worked.
After your first 50-100 visitors, review your opt-in rate. If it’s under 20%, test a new headline or a different offer before making bigger changes.
What’s the difference between a lead capture page and a squeeze page?
They’re very similar. A squeeze page in WordPress is usually shorter and more focused on getting one specific action, like capturing an email, while a lead capture page might include more information, visuals, or trust elements.
You now know how to create a lead capture page in WordPress.
Getting traffic to your website used to be the hard part. Now you can make sure those visitors don’t leave empty-handed. SeedProd gives you everything you need to build a professional lead capture page: templates, a visual editor, and direct email service connections, without touching a line of code.
SeedProd helps you generate leads, boost sales, and grow your business with no coding required.
For more help growing your WordPress website, check out the following guides:
- 7 Best WordPress Banner Plugins to Boost Leads
- How to Make a 404 Page in WordPress That Generates Leads
- 7 Request a Demo Landing Page Examples Proven to Boost Leads
- 10 Best SaaS Landing Page Examples for More Leads
If you liked this article, then please follow us on Twitter and Facebook for more useful business growing tips and tutorials.
Thanks for reading! We’d love to hear your thoughts, so please feel free to join the conversation on YouTube, X and Facebook for more helpful advice and content to grow your business.


