
TL;DR: How to Display WooCommerce Featured and Related Products
Featured products are items you star manually in WooCommerce. Related products are the suggestions your store shows next to them. I’ll walk you through displaying both.
- Mark products as featured: Click the star icon next to any product in Products » All Products.
- SeedProd (recommended): Drag the Featured Products grid block onto your shop page for full design control.
- Block editor or shortcode: Add WooCommerce’s built-in block, or paste
[featured_products]for a quick, basic display. - Set up related products: Add upsells and cross-sells in each product’s Linked Products tab.
- Customize where suggestions appear: Use SeedProd’s Products Related and Upsells blocks on your cart and product pages.
On a WooCommerce store I managed, I used to let the default layout decide what shoppers saw. Customers kept leaving without exploring anything beyond the product they landed on.
Two small changes fixed that: WooCommerce featured products to put the best items where people actually look, and related products to suggest a sensible next purchase. Together they led to more clicks and bigger orders.
In this guide, I’ll show you 3 ways to display featured products, then how to set up and customize related products, upsells, and cross-sells.
What Are WooCommerce Featured Products?
A featured product is one you manually mark in WooCommerce to highlight it. Once you set a product as “Featured,” you can display it in special sections on your site, separate from your regular catalog.
The best products to feature are usually your top sellers, new arrivals, or high-margin items. Many store owners rotate featured products seasonally, featuring winter gear in December or back-to-school items in August.
Featured products aren’t the same as related products. You choose featured products yourself, while WooCommerce picks related products automatically based on shared categories and tags. I’ll cover how to set up related products later in this guide.
How to Add Featured Products in WooCommerce
Before you can display featured products, you need to mark them in WooCommerce first. You can do this by editing any existing product.
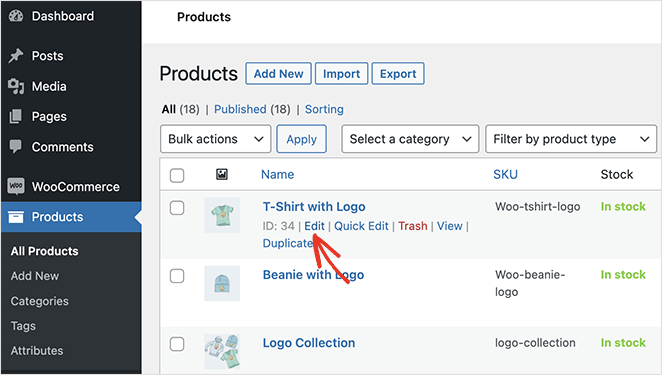
Go to Products » All Products from your WordPress admin area. Then hover your mouse over a product and click the Edit option.
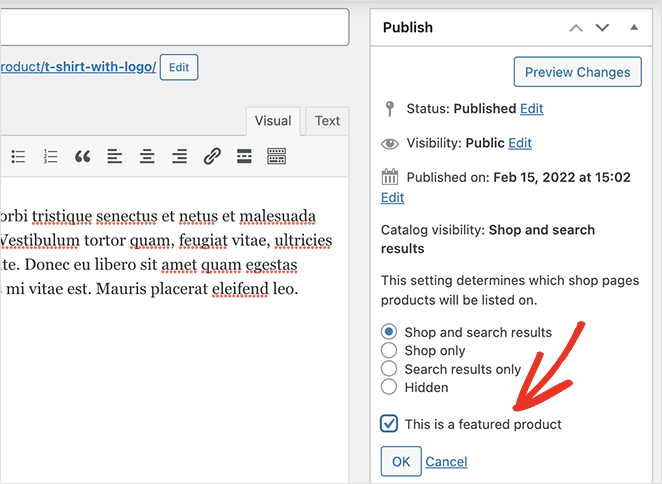
Next, find the “Publish” panel on the right-hand side of the WordPress editor. From there, click Edit next to the “Catalog Visibility” heading.
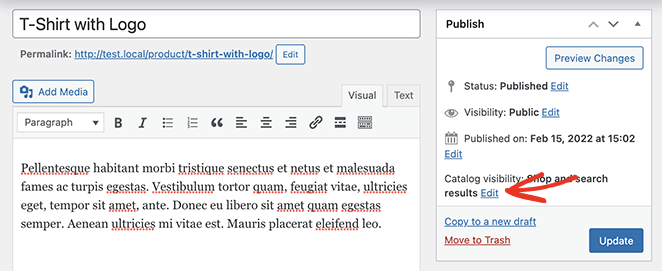
Click the “This is a featured product” checkbox and select OK. Then click Update to save your changes.
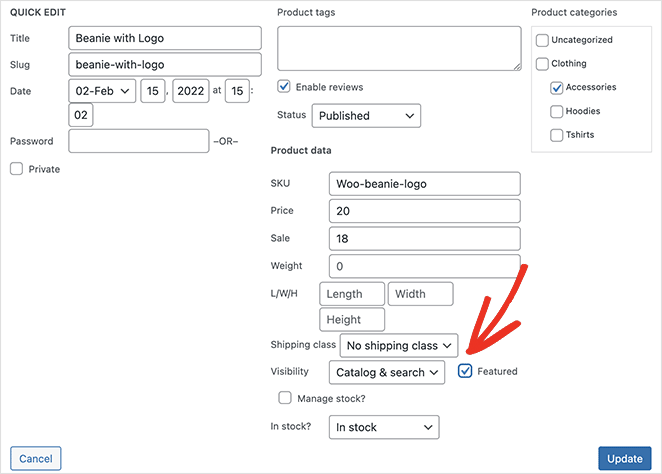
Repeat this process for every product you’d like to set as featured. To make things quicker, you can click the Quick Edit option and find the “Featured Product” checkbox in that panel.
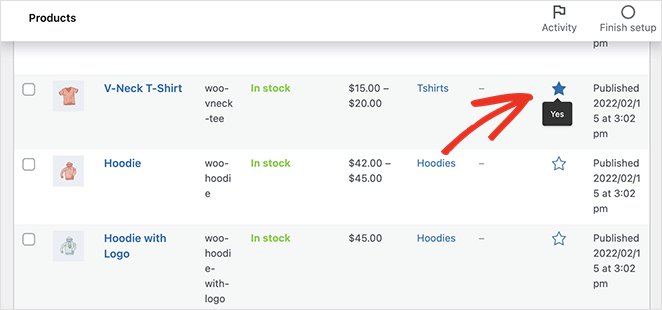
Alternatively, you can click the star icon next to each product to feature it.
Not sure which items to showcase? Start with your top sellers or seasonal offers on your product pages.
Once you’ve marked your products as featured, here are three ways to display them on your store.
- Method 1: Display WooCommerce Featured Products with SeedProd
- Method 2: Use the WooCommerce Featured Product Block
- Method 3: Use the WooCommerce Featured Product Shortcode
- How to Set Up Related Products in WooCommerce (No Plugin Needed)
- How to Customize WooCommerce Related Products With SeedProd
- FAQs About WooCommerce Featured and Related Products
- More Ways to Customize WooCommerce
Method 1: Display WooCommerce Featured Products with SeedProd
This first method uses SeedProd to show multiple featured products on your store at once.
SeedProd is one of the best WordPress website builders, with over 1 million users. You can create a custom WordPress theme with its drag-and-drop builder, no coding required.
For store owners, the useful part is the WooCommerce integration. You can display live product data anywhere on your site, and the flexible product grids make it easy to build custom layouts without code.
Here’s how to use SeedProd to display your WooCommerce featured products.
Step 1. Install and Activate SeedProd
Start by installing and activating SeedProd on your WordPress site.
Plan check before you start: SeedProd’s WooCommerce blocks, including the ones used in this guide, come with the Elite plan.
You can follow this guide on how to install a WordPress plugin if you need help.
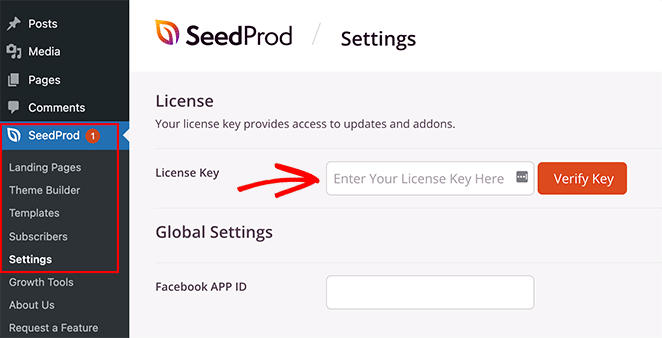
After activating SeedProd, go to SeedProd » Settings and enter your SeedProd license key.
You can find the license key in your account dashboard’s “Downloads” section on the SeedProd website.
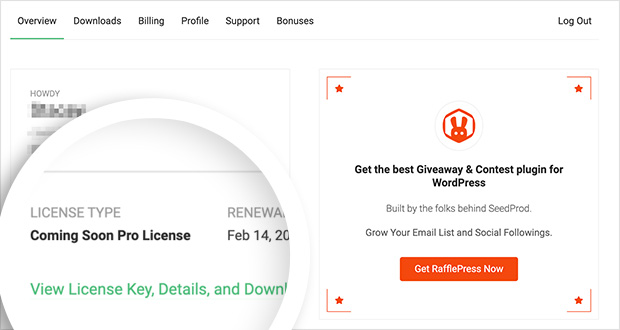
After entering your license key, click the Verify Key button to store your account info.
Step 2. Create a WooCommerce Theme
Next, set up your WooCommerce store.
SeedProd gives you two ways to do this:
- Prebuilt WooCommerce theme: import a ready-made WooCommerce theme template, and SeedProd creates all your store pages automatically.
- Individual theme parts: build each part of your store one at a time using the Theme Templates button.
We’ll use the prebuilt theme for this guide since it sets everything up in one click.
To create a new WooCommerce theme, go to SeedProd » Theme Builder and click the Themes button.
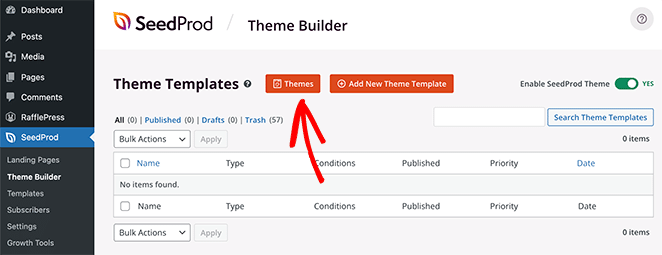
This opens SeedProd’s theme library. Every theme is mobile-friendly, and you can edit the design in the drag-and-drop builder.
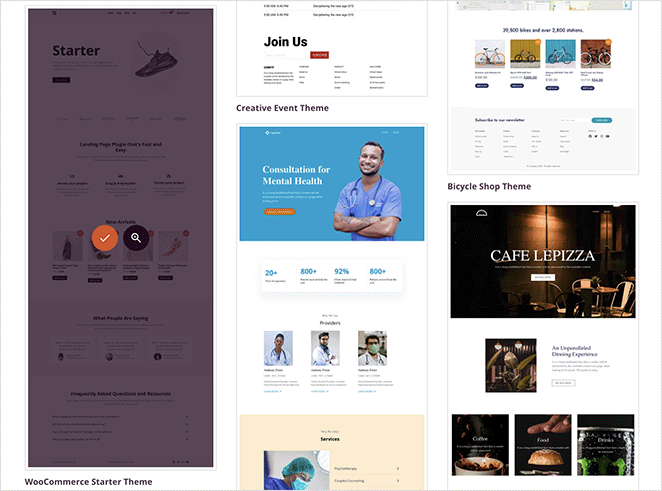
Hover over any design and click the checkmark to import it. We’re using the “WooCommerce Starter Theme” here.
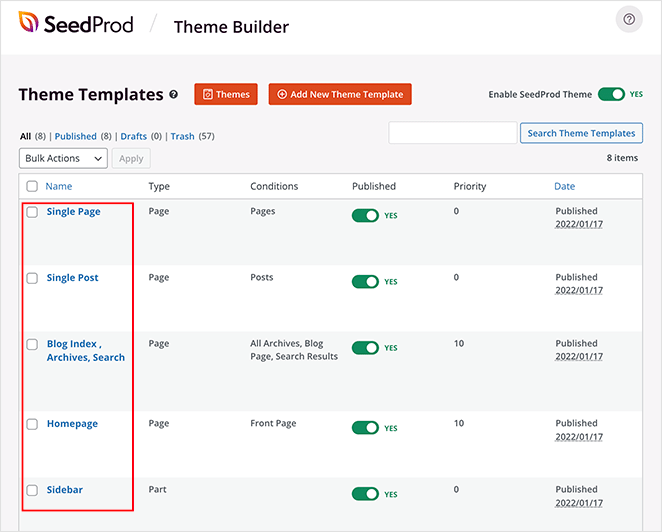
After importing, you’ll see all the templates that make up your site. You can edit each one in SeedProd’s builder, like customizing the Shop page.
Step 3. Add the WooCommerce Featured Product Grid
In this step, you’ll edit the Shop page and add a product grid that shows only your featured products.
Find the Shop page template in the theme builder and click Edit Design.
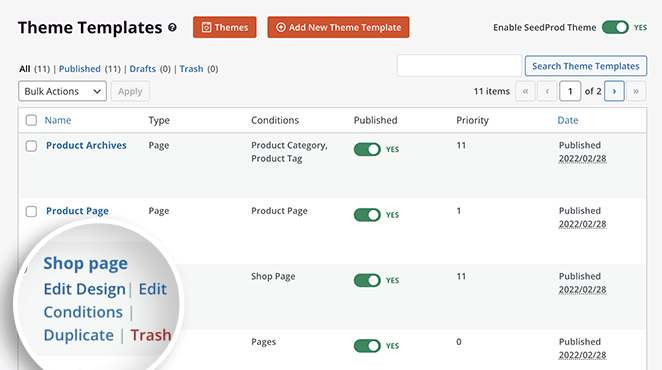
SeedProd’s page builder shows blocks and sections on the left and a live preview on the right.
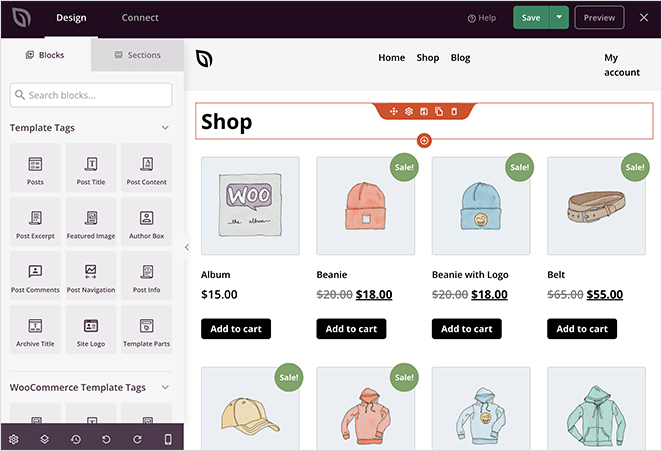
Click any element to edit its settings.
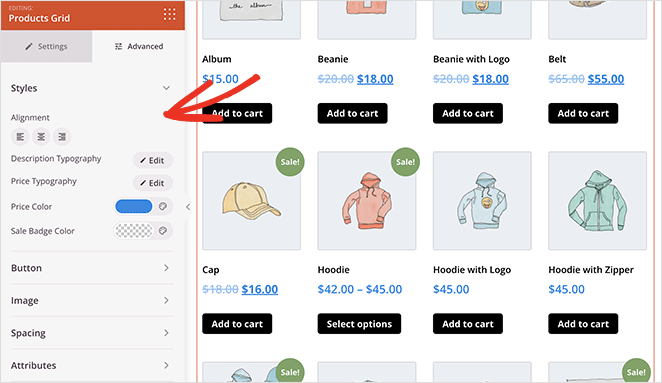
Click a product to open the Product Grid panel, where you can:
- Change the column number
- Display products by type or category for more focused product layouts
- Show pagination
- Change the product order
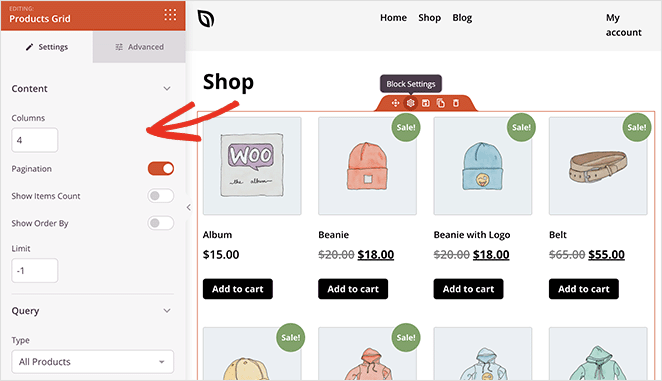
You can customize the fonts, font sizes, colors, spacing, and more in the Advanced tab.
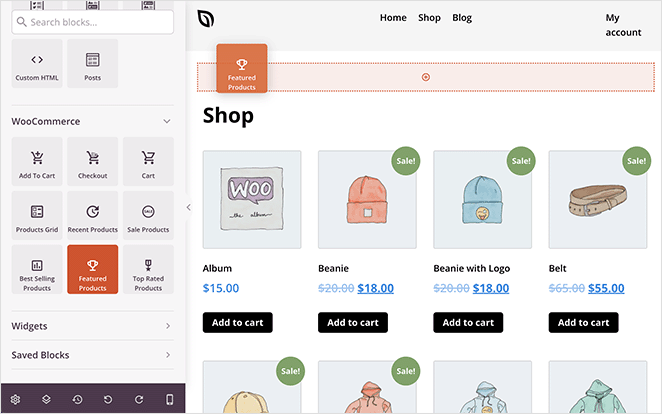
Adding content works the same way. Drag a block from the left panel and drop it onto the page.
Scroll down to the WooCommerce blocks panel in the left sidebar. Then find the Featured Products block and drag it onto your page.
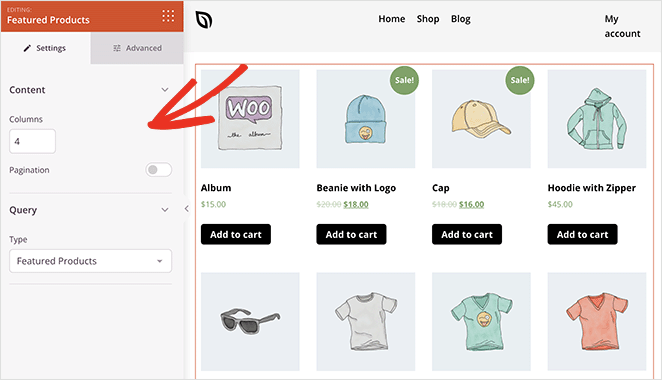
Click the block to open its settings. It filters your products by Featured status automatically.
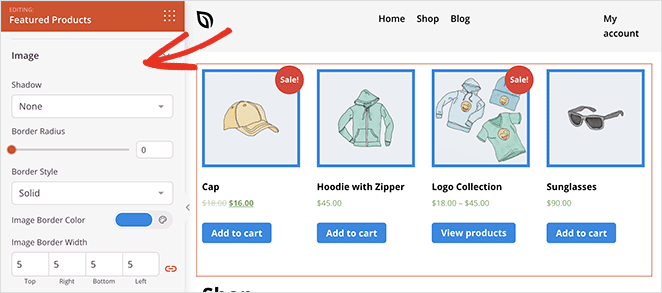
All that’s left is to customize the product grid to suit your needs. You can make featured products stand out by changing the badge color, image border, or adding a heading above the grid.
When you’re happy with the layout, click the green Save button.
You can repeat this process to customize the rest of your theme, including:
- Product Archives
- Product Page
- Header & Footer
- Blog Page
- Sidebar
- Homepage
Step 4. Publish Your WooCommerce Theme
Once you’ve finished setting up your featured products, you’re ready to go live.
To do that, go to SeedProd » Theme Builder and turn the Enable SeedProd Theme toggle to the “On” position.
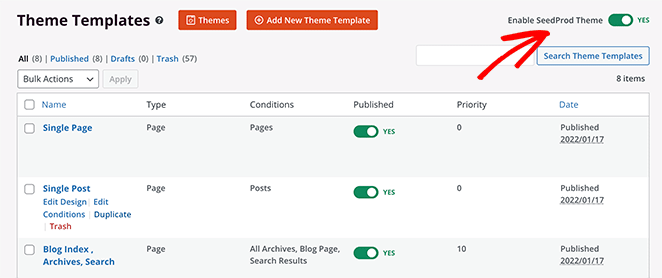
That’s it! You can now preview your store and see your featured products live.
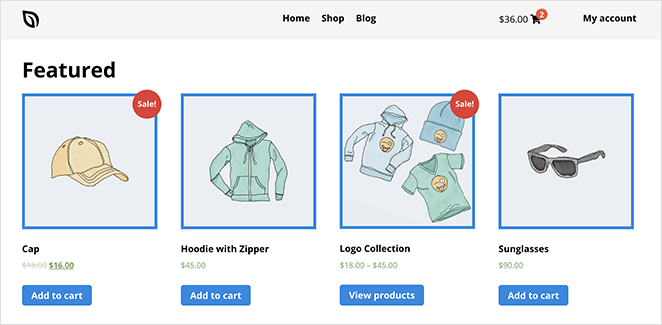
Method 2: Use the WooCommerce Featured Product Block
WooCommerce has a built-in Featured Product block you can add to any page or post of your online store. No extra plugin needed.
It has fewer options than SeedProd, but it’s quick to set up if you just need a basic display.
To use this method, create or edit a page and click the plus (+) icon in the WordPress block editor to add a new block. Then type “WooCommerce” into the search field and click the Featured Product block.
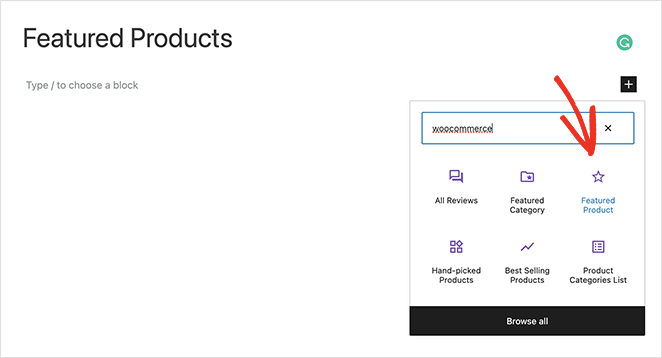
From there, choose a product to display and click Done.
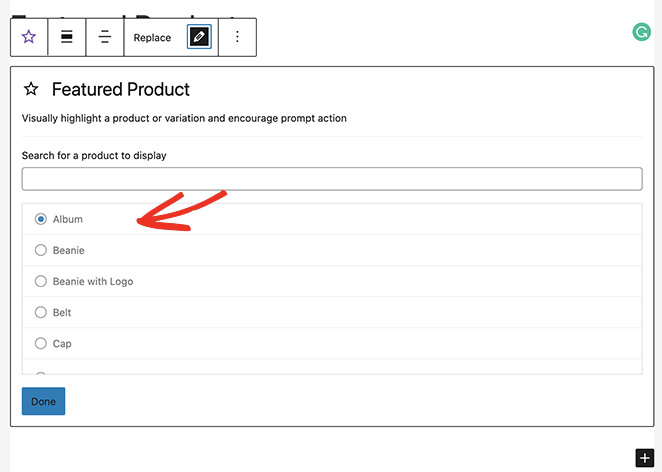
Your product appears on the page right away.
The block settings let you control:
- Description
- Price
- Overlay
- Overlay Opacity
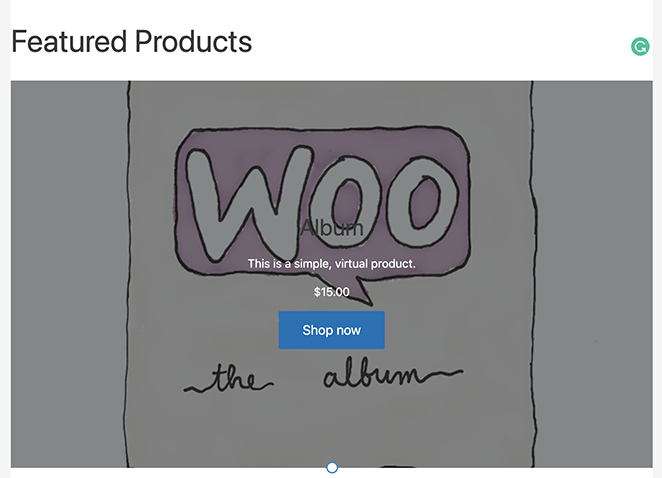
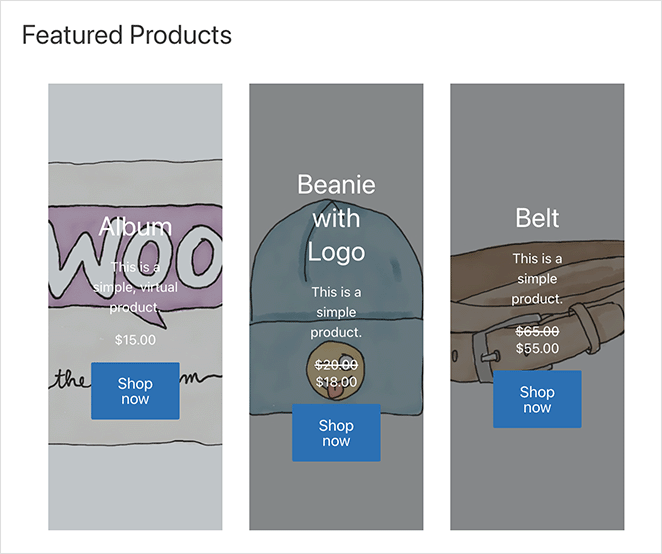
The Featured Product block shows one product at a time. For a grid of several featured items, add the Product Collection block instead and pick its “Featured Products” collection, which filters by featured status for you.
Click Publish or Update when you’re done. Then preview your page to see the products live.
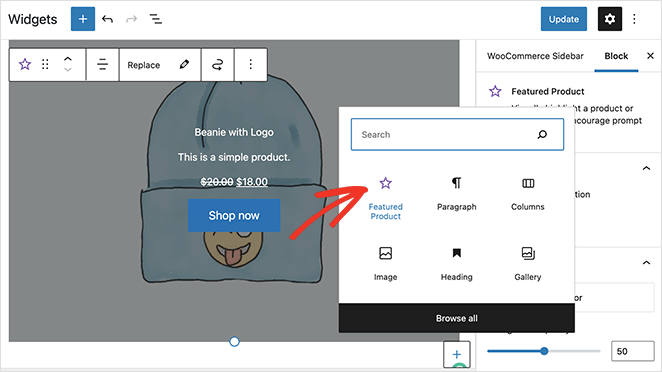
If your store runs a classic theme, you can use the same block to display featured products in your WooCommerce sidebar. Go to Appearance » Widgets, click the plus icon in any sidebar, and add the block there.
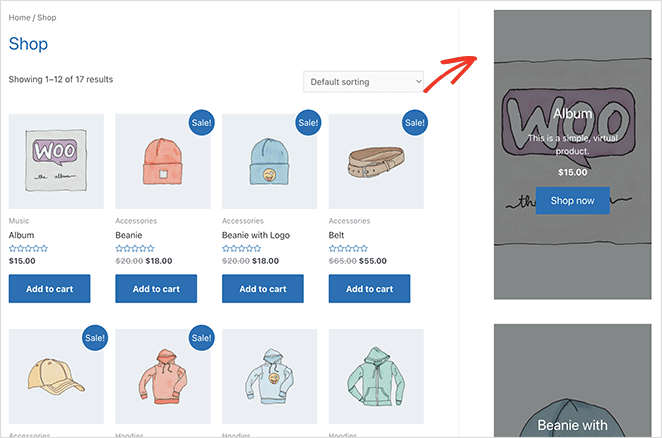
Save your changes, then visit any page with that sidebar to see the widget.
Method 3: Use the WooCommerce Featured Product Shortcode
The third method uses a shortcode. It works in the classic WordPress editor, or if you want to add featured products directly in a WordPress theme template.
Edit or create a page and paste this shortcode into the editor.
[featured_products]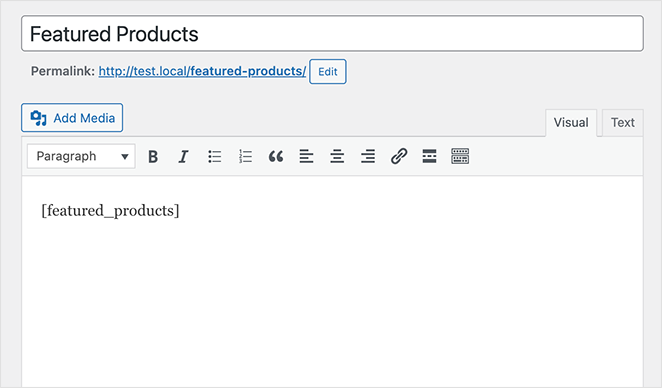
When you preview the page, you’ll see all your featured products in a grid.
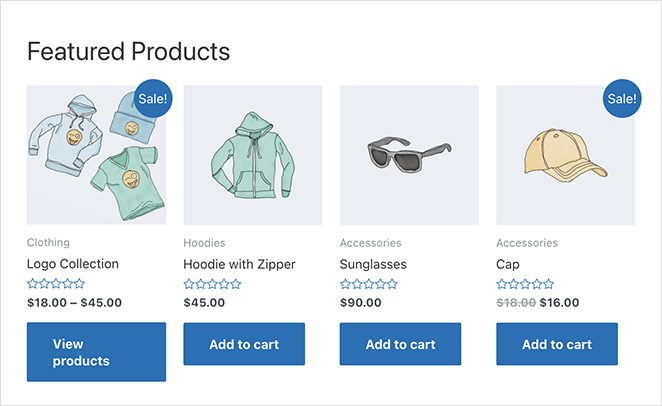
You can control how many products show and how many columns to use. For example:
[featured_products limit="2" columns="2"]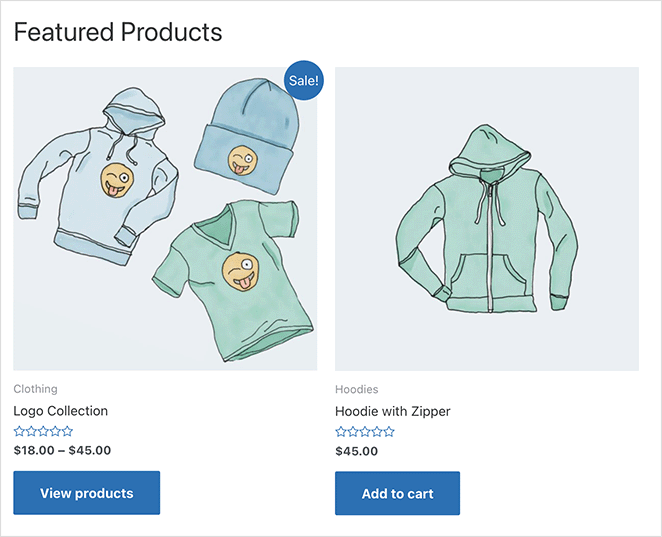
You can also filter by category using category="slug", change the sort order with orderby="date" or orderby="popularity", and set direction with order="ASC" or order="DESC".
WooCommerce’s current documentation only lists [products visibility="featured"], which does the same job. Both shortcodes work, but the products version is the documented one.
Try different values until you find a layout that works. The options are limited compared to SeedProd, but it’s the quickest way to show featured products with no setup.
How to Set Up Related Products in WooCommerce (No Plugin Needed)
Featured products put your best items in front of shoppers. Related products do the opposite job: they suggest what someone might want next, based on the product they’re already viewing.
WooCommerce generates its “Related products” section automatically from shared categories and tags, so you can’t hand-pick those suggestions without a plugin. What you can control are upsells and cross-sells, which you set per product.
An upsell is a pricier version of the product someone is viewing. A cross-sell is a product that pairs with the one in their cart, like a case suggested next to a phone.
Here’s how the default setup compares to customizing your related products with SeedProd:
| Feature | Default WooCommerce | SeedProd Builder |
|---|---|---|
| Setup Difficulty | Moderate (product-by-product) | Easy (drag and drop) |
| Design Control | Limited | Full visual control |
| Placement Options | Product page only | Product, cart, or anywhere |
| Custom Layouts | Not supported | Fully customizable |
| Upsells & Cross-Sells | Yes | Yes |
| Mobile Preview | No | Yes |
| Plugin Required? | No | Yes (SeedProd) |
Let’s start with the built-in route.
Step 1. Add Linked Products in the WooCommerce Editor
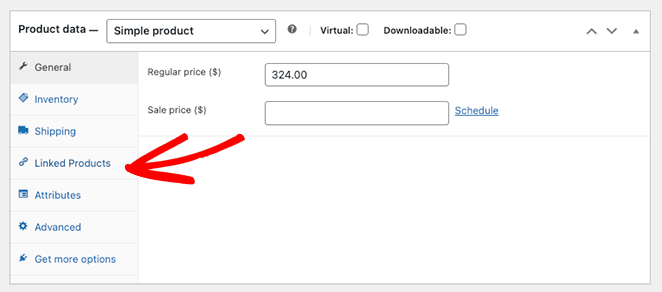
Go to Products » All Products from your WordPress admin and edit any WooCommerce product. Inside the product options, scroll down to the Product Data section and find the Linked Products tab.
Step 2. Choose Upsells and Cross-Sells for Each Product
The Linked Products section has 2 options: Upsells and Cross-Sells.
Start typing product names into the field you wish to use and click the correct items when they appear.
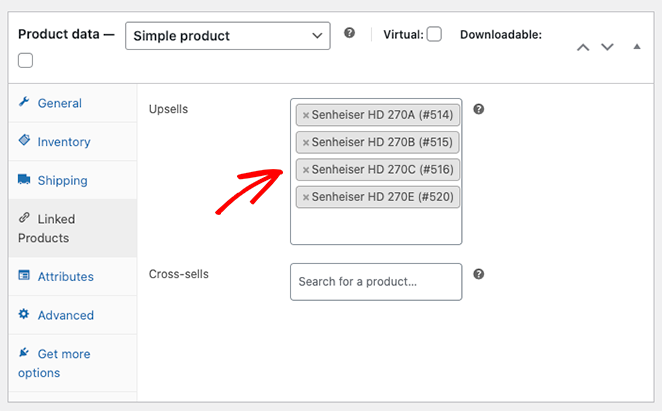
Step 3. Preview Related Products on the Product Page
After adding cross-sells or upsells to your WooCommerce products, scroll up the page and click the Preview Changes button. You’ll see the related products under your current product description.
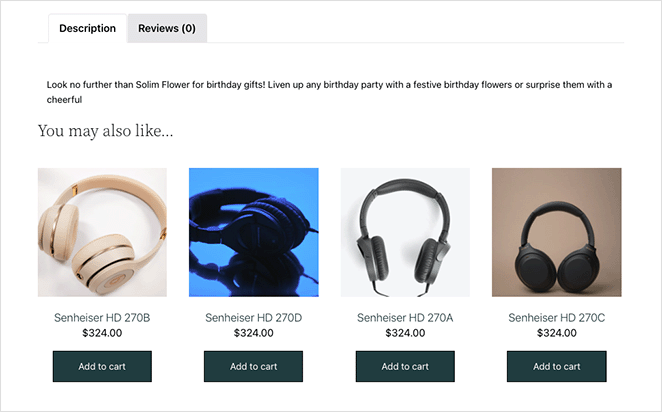
This method doesn’t offer many customization options, but it’s a quick way to start upselling and cross-selling. If you want control over where suggestions appear and how they look, the next section covers that.
How to Customize WooCommerce Related Products With SeedProd
The default related products section only lives on your product pages, and you can’t change how it looks. With SeedProd, you can put product recommendations on your cart page, product pages, or anywhere else, and style them to match your store.
You’ll need SeedProd installed with a WooCommerce theme imported for this. If you haven’t done that yet, follow Steps 1 and 2 in Method 1 first.
Step 1. Add Related Products to Your Cart Page Layout
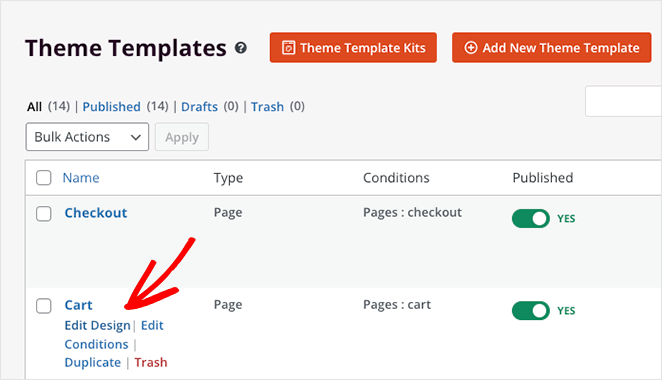
The cart page is a smart place for recommendations because shoppers there have already decided to buy. To edit yours, go to the Theme Builder dashboard, find the Cart template, hover over it, and click Edit Design.
Your shopping cart page opens in the same visual editor you used earlier. Clicking anywhere on the preview lets you customize that block’s settings, like the Cart block’s typography, button styles, and field colors.
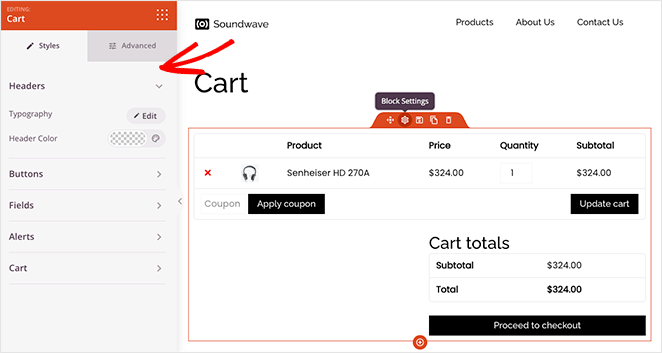
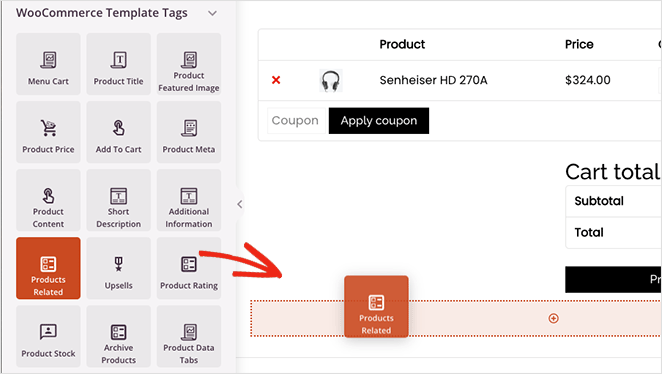
Now scroll to the WooCommerce Template Tags heading in the left sidebar and find the Products Related block. Click and drag the block into place on your page preview.
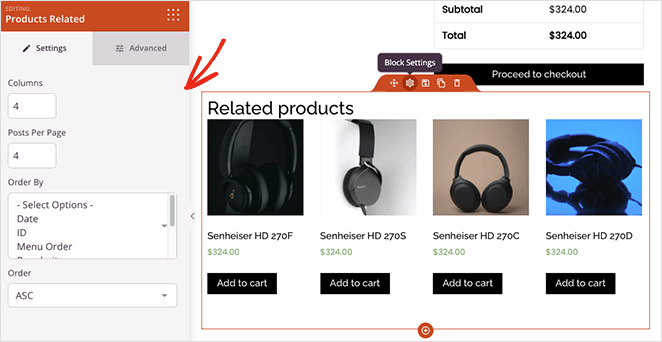
Inside the block settings, you can adjust the columns and change the number of related products. You can also order products by date, popularity, rating, title, and more.
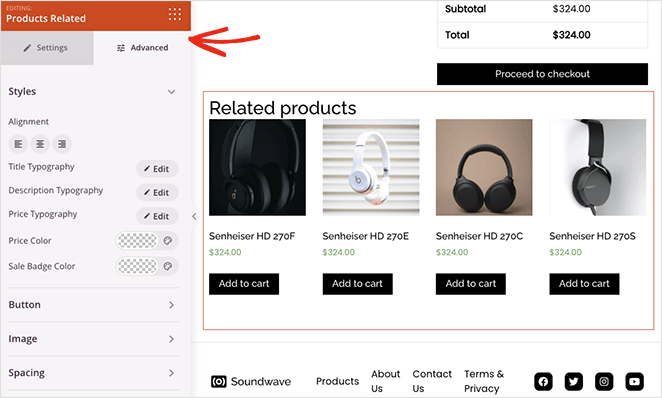
In the Advanced settings tab, you can adjust the styling of your related products block, like the typography, colors, buttons, and image shadows.
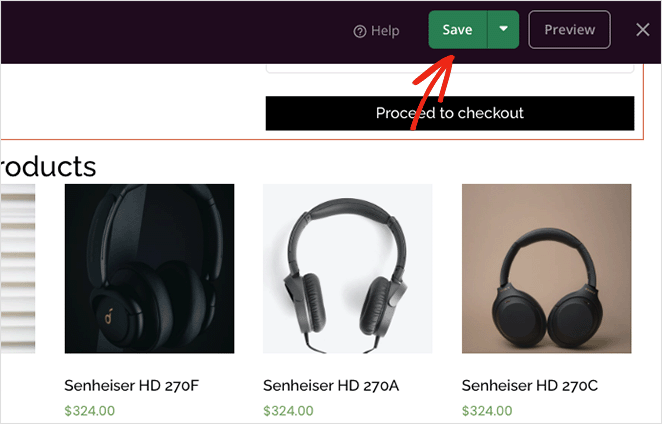
When you’re happy with how everything looks, click the Save button in the top-right corner of your screen.
Step 2. Show Upsell Offers on Single Product Pages
To upsell WooCommerce products, use SeedProd’s Upsells block. It pulls from the upsells you linked in your WooCommerce product settings earlier, so set those first.
The Upsells block only works on single product page templates, so head back to the Theme Builder dashboard and edit your Product Page template.
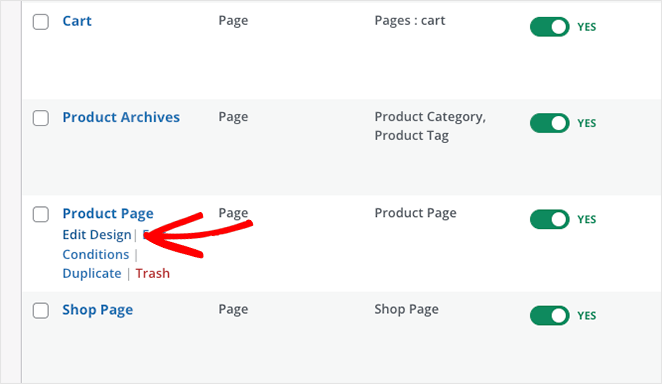
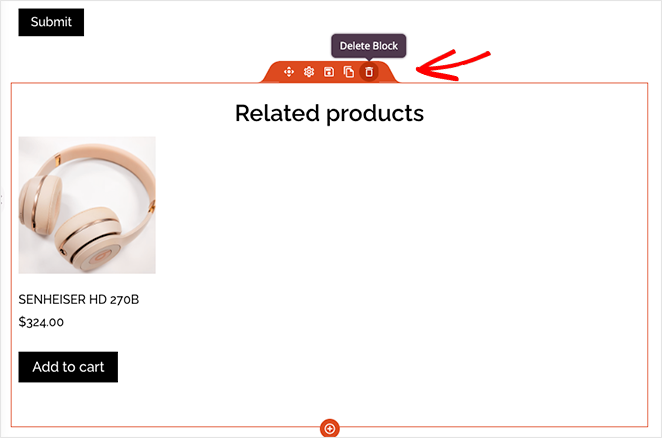
The template we’re using already features product recommendations. So let’s remove those related products by clicking the trashcan icon, making room for the upsells.
Next, find the Upsells block in the WooCommerce Template Tags section and drag it onto your page.
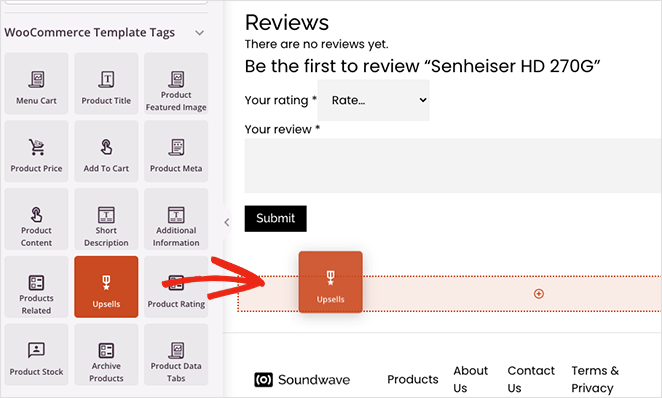
You won’t see a live preview of this block, but you can customize it like the related products block. Don’t forget to click Save when you’re done.
Step 3. Publish and Preview Your Related Products
If your SeedProd theme isn’t live yet, turn the Enable SeedProd Theme toggle on, the same way you did in Method 1. Then preview your product and cart pages to see the recommendations.
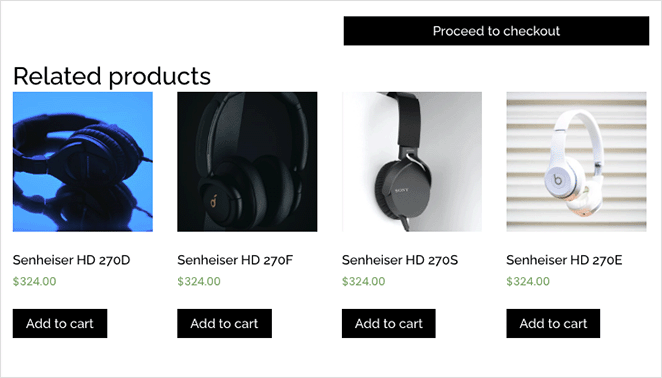
Here’s an example of related products on the cart page:
And here are the upsells on the product page:
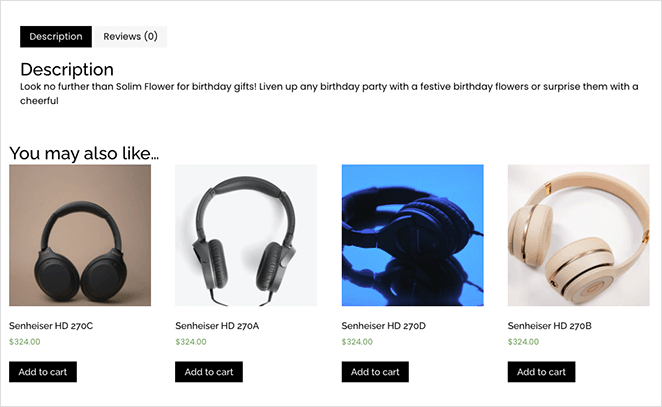
If you ever want to hide related products, remove the block from your template and save again.
FAQs About WooCommerce Featured and Related Products
How do I remove featured status from a product in WooCommerce?
Go to Products » All Products in your WordPress dashboard and click the star icon next to the product to toggle featured status off. You can also use Quick Edit and uncheck the Featured Product box, then save. The product will no longer appear in featured product displays or shortcodes.
How do I show only featured products on my WooCommerce shop page?
The easiest way is to use SeedProd to customize your WooCommerce shop page and add a Featured Products block that filters automatically by featured status. If you prefer the default shop loop, you’ll need a plugin or code snippet that filters products by the featured flag.
Can I limit how many featured products are displayed?
Yes. With the shortcode method, add limit="4" to set the number: [featured_products limit="4"]. With SeedProd’s product grid block, you set the product count directly in the block settings panel, no code required.
Do WooCommerce featured products appear automatically on my homepage?
No. Marking a product as featured only gives it that status in WooCommerce. You still need to add a block, shortcode, or widget to a page for them to display. Most store owners add featured products to their shop page or homepage manually using one of the three methods in this guide.
What is the difference between upsells and cross-sells in WooCommerce?
Upsells are higher-end or upgraded versions of the current product, and they display on the single product page. Cross-sells are complementary products that appear on the cart page during checkout. You can add both in the Linked Products section when editing a product.
Is there a limit on related products in WooCommerce?
There’s no strict limit, but it’s best to keep it to 3 to 5 items. Too many can overwhelm shoppers and clutter the page. With tools like SeedProd, you can choose exactly how many related products to show and where to display them.
More Ways to Customize WooCommerce
Want to do more with your WooCommerce store?
Here are some guides that can help:
- How to Customize the WooCommerce Additional Information Tab
- How to Customize Your WooCommerce Cart Page
- How to Add Star Rating to WooCommerce Product Pages
- How to Display Product Categories and Tags in WooCommerce
- How to Get and Display Product Descriptions in WooCommerce
- How to Add Custom Add to Cart Buttons in WooCommerce
- How to Make a WooCommerce Thank You Page (Easily)
- How to Fix WooCommerce View Cart Not Working
- How to Hide Out of Stock Products in WooCommerce
You now know how to display featured products three ways and how to put related products, upsells, and cross-sells exactly where shoppers will see them. Pick the method that fits your store.
Ready to give your product recommendations a custom look? You don’t need to touch a line of code. Get SeedProd and start designing your store today.
Thanks for reading! We’d love to hear your thoughts, so please feel free to join the conversation on YouTube, X and Facebook for more helpful advice and content to grow your business.