I’ve customized a lot of WordPress menus over the years, and one thing I always notice is how much the default style blends into the background. It works, but it doesn’t really match your brand or help your site stand out.
A few small changes to your menu can make your whole site feel more polished and easier to navigate.
In this guide, I’ll show you how to customize WordPress menu styles step by step, no coding needed.
Why Customize Your WordPress Menu?
Your menu is one of the most essential parts of your WordPress website. It’s what visitors see first when they land on your site, and what they’ll use to navigate around. That’s why ensuring your menu is well-designed and easy to use is important.
Here are a few reasons why you should customize your WordPress navigation menu:
- Improve the look and feel of your website. Your menu is a big part of your site’s overall design. By customizing it, you can match the look and feel of your homepage and other top-level pages and make it more visually appealing.
- Make your website more user-friendly. A well-designed menu can help visitors find what they’re looking for quickly and easily. By customizing your menu, you can make it easier for visitors to navigate your site and find the information they need.
- Improve your website’s SEO. The structure of your menu can also affect your site’s SEO. By customizing your menu, you can make it easier for search engines to index your site and rank it higher in search results.
There are many ways to customize your WordPress menu. You can change the order of menu items, add new items, and even change the design of the menu itself.
There are also many plugins available to help customize things further. In the step-by-step guide below, I share 3 ways to add custom menus to your WordPress site with and without using a WordPress plugin.
How to Customize WordPress Menu with a Page Builder Plugin
First, I’ll show you how to customize your WordPress menu using a page builder plugin. I’ll use SeedProd in this example, but similar principles apply to any other page builder.

SeedProd is a powerful WordPress page builder that allows you to create custom pages and menus in WordPress without writing code. It’s easy to use and offers a wide range of features, including:
- Drag-and-drop page builder
- WordPress theme builder
- Pre-made templates
- Customizable menus
- Social media integration
- And more.
You can even use it to add custom menus to your website footer, header, sidebar, and page content.
This method lets you customize menus no matter your WordPress theme. To get started, follow the easy steps below.
Step 1. Install SeedProd Page Builder
First, download the SeedProd plugin and install and activate it on your WordPress site.
For help with this step, you can follow our guide on how to install SeedProd.
Step 2. Choose a Landing Page Template
Once the plugin is activated, navigate to SeedProd » Landing Pages from your WordPress dashboard, and click the Add New Landing Page button.
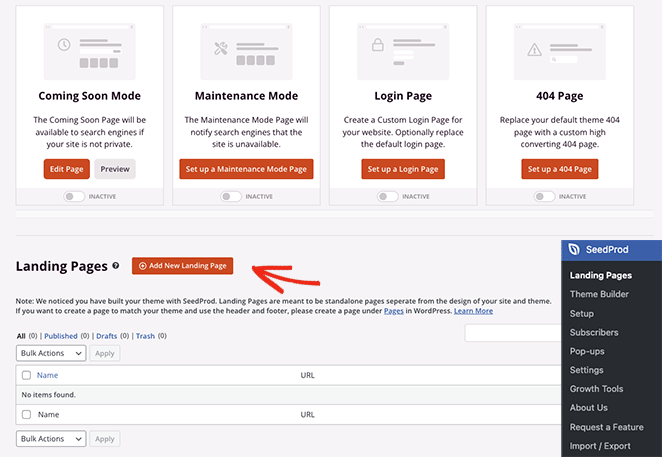
This will bring up a library of landing page templates that you can use to build a custom page quickly.
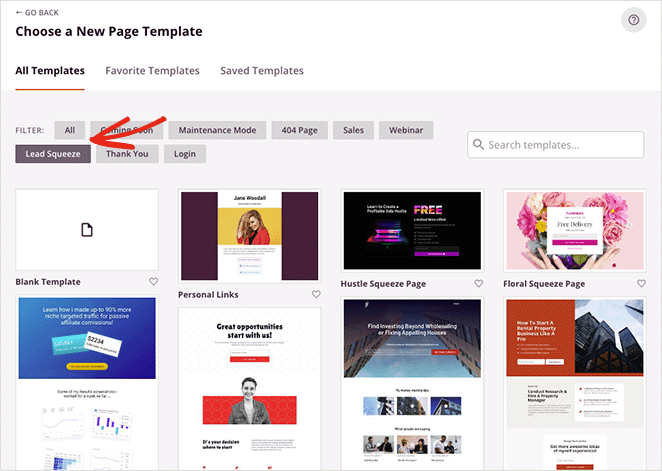
Each template is fully customizable to suit different website niches. For example, clicking the “Lead Squeeze” tab along the top shows templates best suited to creating squeeze pages.
When you find a design that fits your needs, hover over it and click the orange checkmark icon.
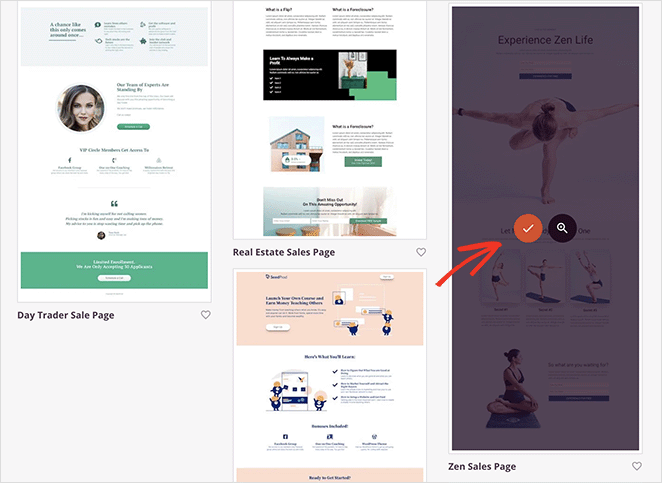
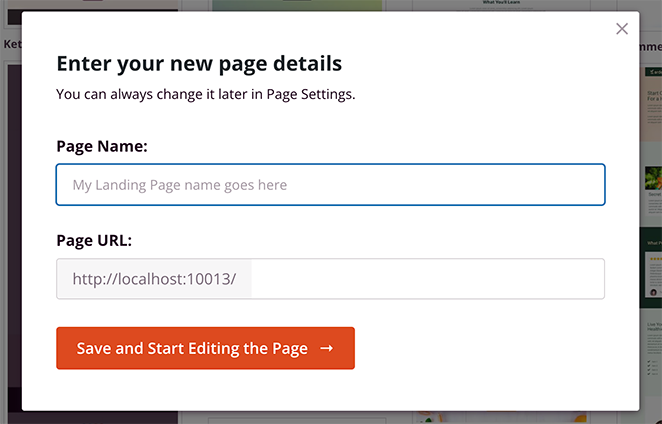
Now a window will pop up that allows you to enter a page name and URL. After entering these details, click the Save and Start Editing the Page button.
Step 3. Customize Your Page Content
The next screen will show your landing page inside SeedProd’s visual page builder. It will have blocks, sections, and settings on the left and a preview of your page on the right.
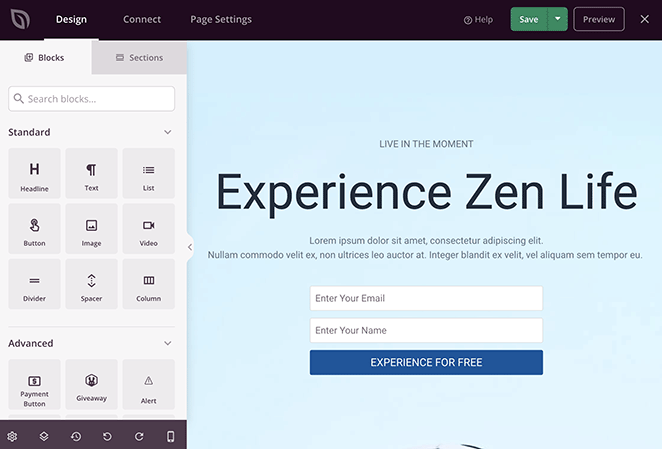
Any changes you make to your page will appear automatically in real time. This way, you can ensure it looks good before you publish the changes.
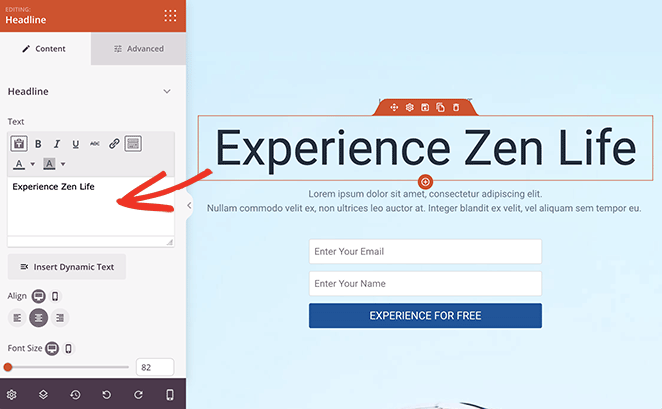
Customizing the template content is as simple as pointing and clicking. For example, to change any text content, click it, delete the existing text, and replace it with your own.
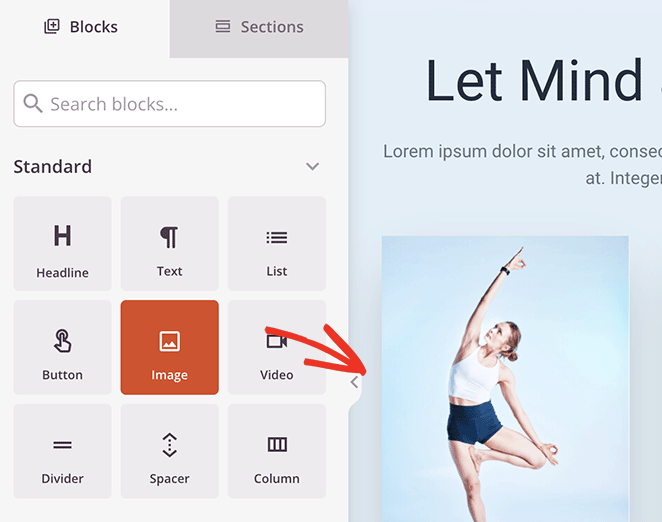
To add new features to your page, such as an image or a call-to-action button, find the block in the left-hand panel and drag it onto the page.
Continue replacing the template content with your own until you have a design you’re happy with. For more customization help, see our guide on how to create a landing page in WordPress.
Step 4. Customize the WordPress Menu
After customizing your page, you can create menus and customize them easily. My template doesn’t include a header area, so I’ll need to make one first.
To do this, find the Column block and drag it to the top of your page.
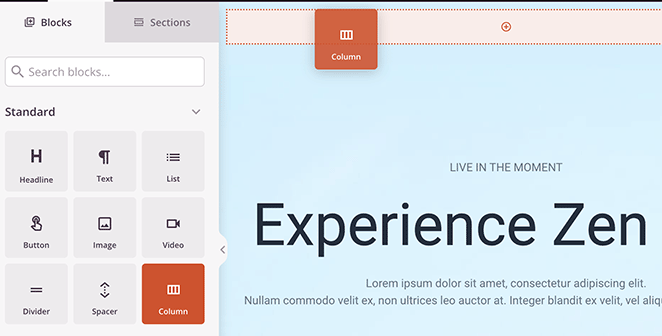
Next, choose a layout. In this case, we’re using a 3 column layout.

Now let’s set up the header area with an image block to display your website logo.
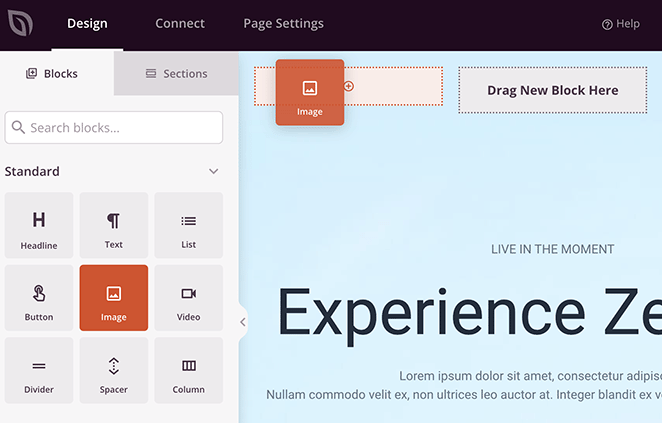
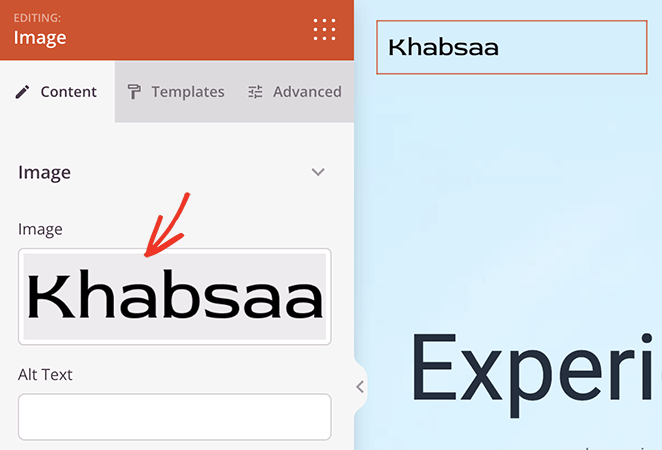
To upload your logo image, click the “Use Your Own Image” button in the block settings panel. This allows you to choose an image from your WordPress media library or upload one from your computer.
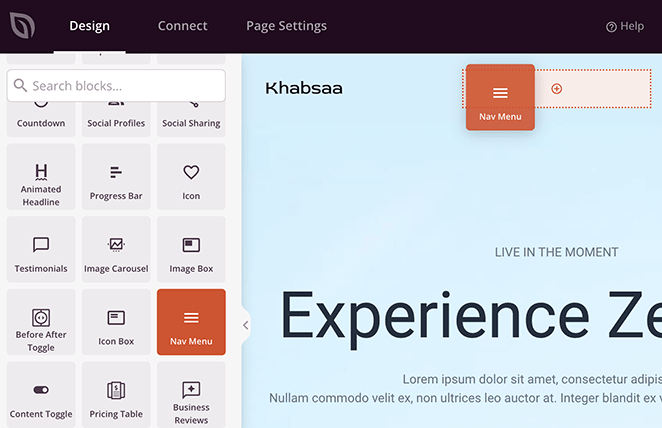
Next, find the Nav Menu block and drag it into another column in your header. This is where you can add menu items for users to click and visit other pages on your site.
In the block settings, there are 2 ways to display your menu.
The Simple menu type lets you add individual menu links without leaving the page builder. Simply add a menu name and paste your custom link.
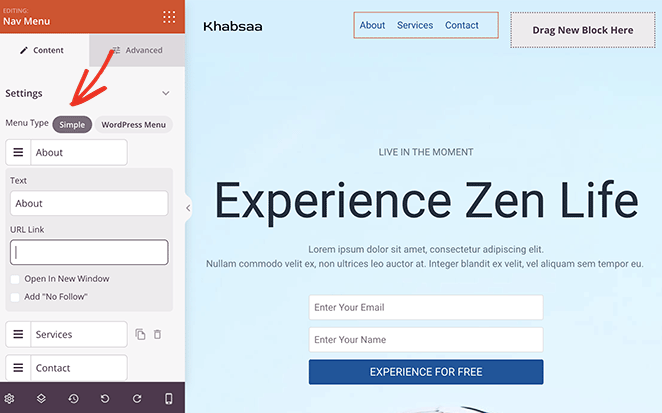
You can also make the link target no follow and open it in a new tab.
The WordPress Menu type lets you display menus you’ve already made in WordPress. Clicking the dropdown menu will show all menus available on your site, such as the Primary Menu or Main Menu.
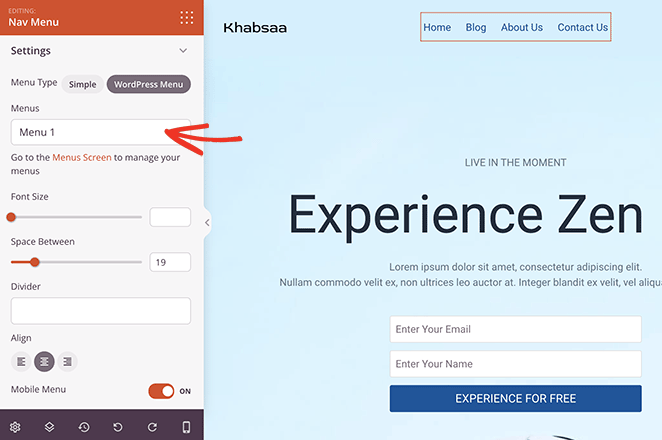
All you need to do is select menus to display them in your header.
SeedProd has advanced customization options for both menu types. In the Advanced tab, you can change menu colors, fonts, text shadows, hover colors, and more.
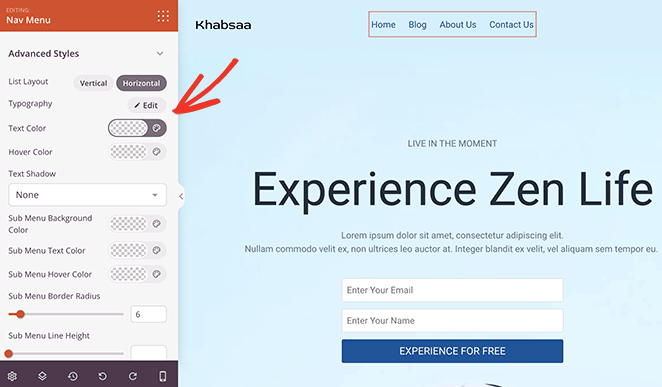
You can even display your menus in a vertical or horizontal layout. The vertical design is excellent for sidebar widget areas and footer menu locations.
To manage your menus, click the Menus Screen link or navigate to Appearance » Menus from your WordPress admin.
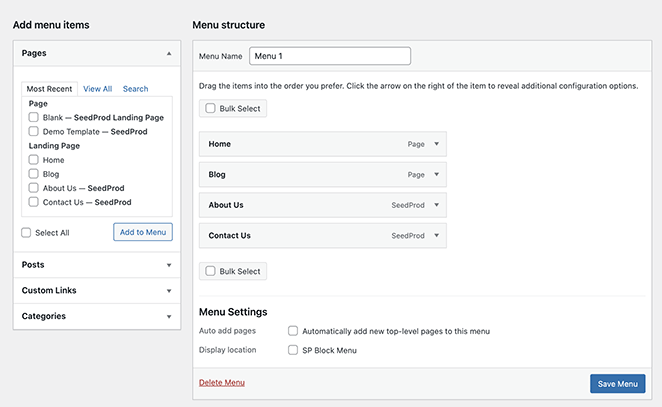
Here you can edit your menu structure, add new menu items and sub-menus by clicking the checkboxes, and manage locations. You can even create a new menu on this page.
Remember to click the Save Menu button to save your menu functions.
Many websites use buttons in the site navigation to promote a specific call to action. With SeedProd’s button block, you can create a Menu Button in a few clicks.
Simply find the button block and add it to your header area.
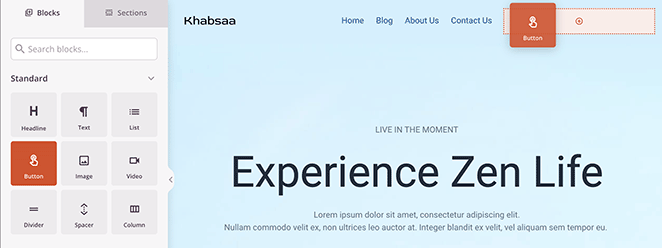
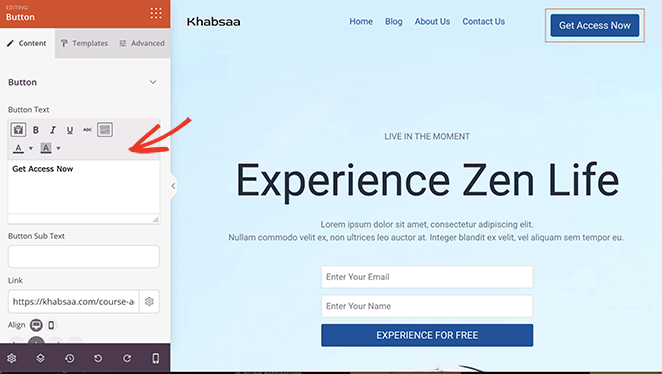
Then in the block settings, you can add your menu link and customize the button style.
Step 5. Publish Your Custom Page
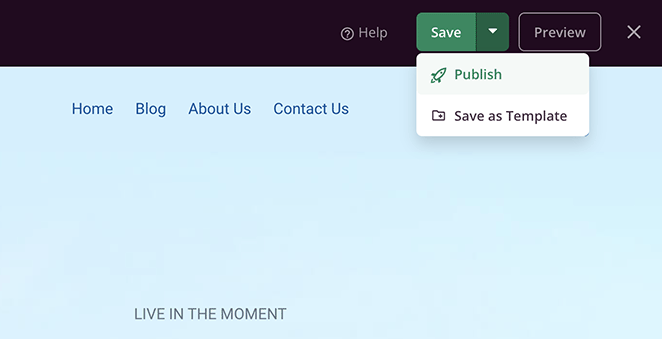
Once you’re happy with how your page looks, click Save and Publish in the top right corner of the screen.
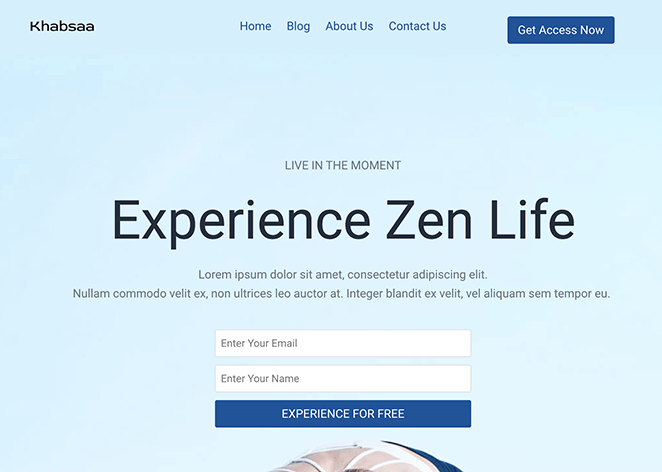
From there, you can visit the page to see your custom WordPress menu in action.
How to Customize WordPress Menu with WordPress Site Editor
The first method is an excellent solution for any website, regardless of which theme you use. However, if you’re using a block-based WordPress theme, like Twenty Twenty Three, you may prefer using the WordPress site editor to customize your menu.
Please note: this method doesn’t work with every theme or let you customize every part of the menu.
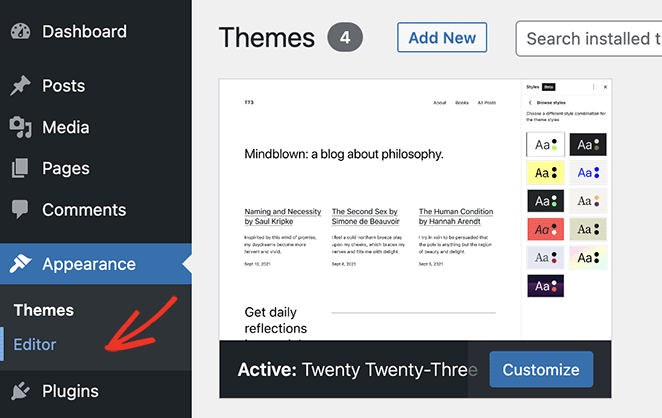
To open the site editor, navigate to Appearance » Editor from your WordPress dashboard.
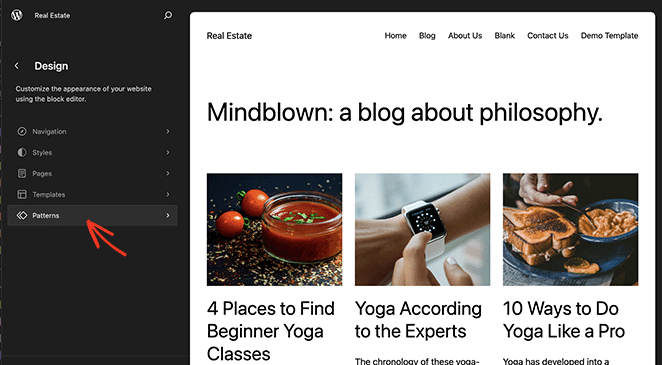
On the next screen, click the Patterns tab.
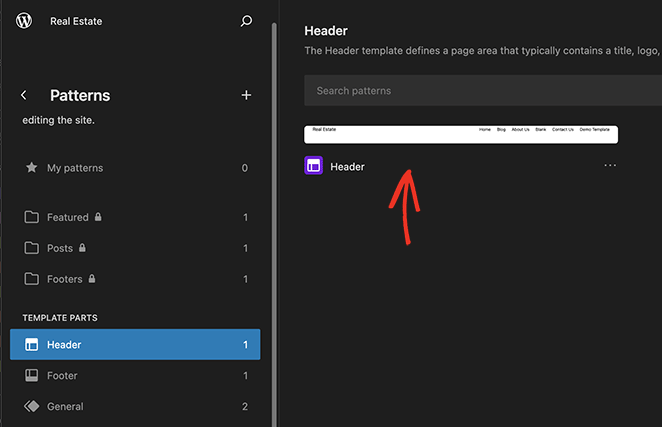
From there, click the Header option and choose your Header template.
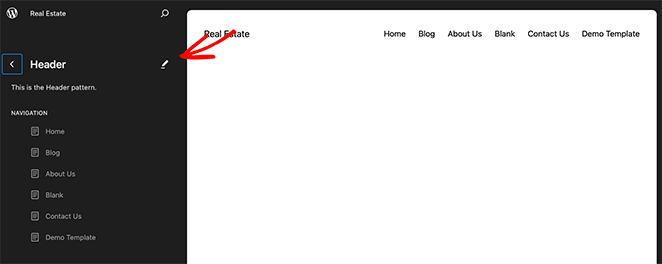
Here, you can drag and drop to rearrange the menu position or remove items from the menu.
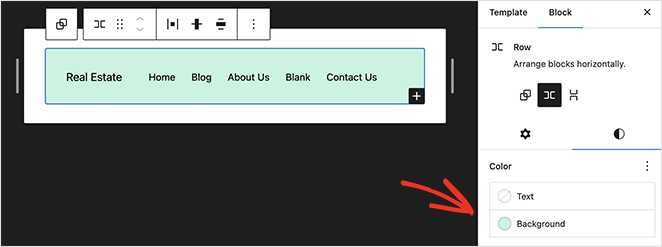
You can also click the pencil icon to edit the menu styling.
For example, you can adjust the menu background color, fonts, padding, margins, borders, and more.
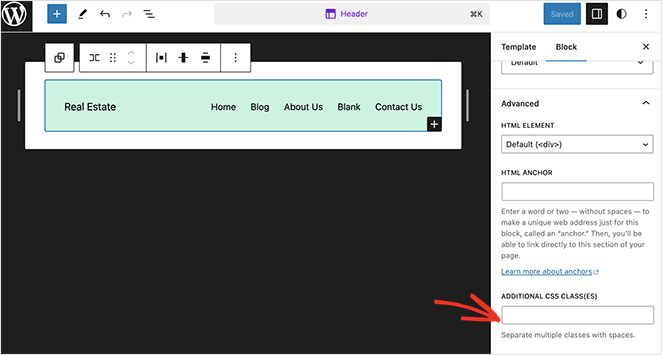
If you scroll down to the Advanced tab, you can enter custom CSS classes.
To add another menu option, like a header button, click the Add Block icon.
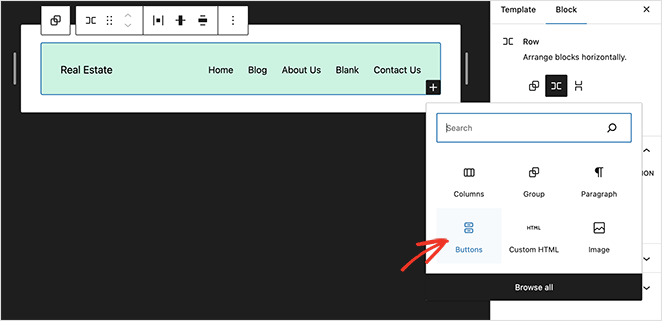
Now you can search for a block and click it to add it to your menu and customize it like any other WordPress block.
When you’re happy with the menu settings and customizations, click the Save button.
You can now visit your site to see your custom menu.

How to Customize WordPress Menu Without a Plugin
If you don’t want to set up a page builder plugin and don’t have a WordPress block theme, you can always use code to add a custom navigation menu.
For this, I recommend using a WordPress code snippet plugin like WPCode. It’s the safest and easiest way to add custom code to WordPress without editing core WordPress files, like your functions.php file.
To do this, install the free WPCode plugin, then go to Code Snippets » Add Snippet from your WordPress dashboard.
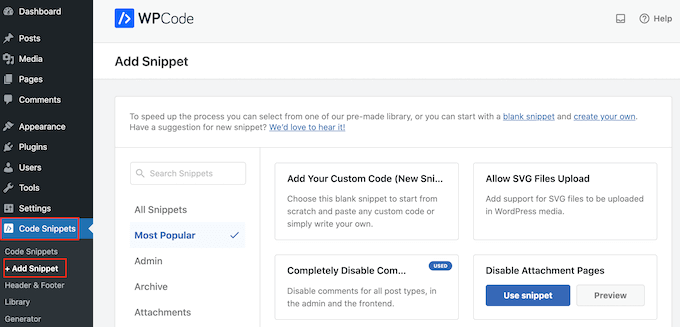
On this page, you’ll see ready-made snippets you can add to your site with a few clicks.
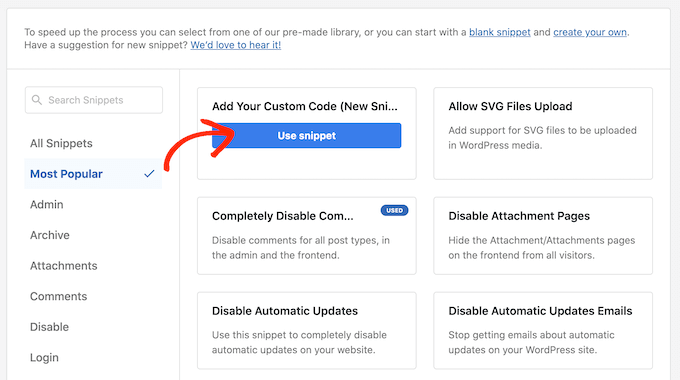
For this tutorial, I want to make our own snippet, so hover your mouse over ‘Add Your Custom Code,’ and click the Use snippet button.
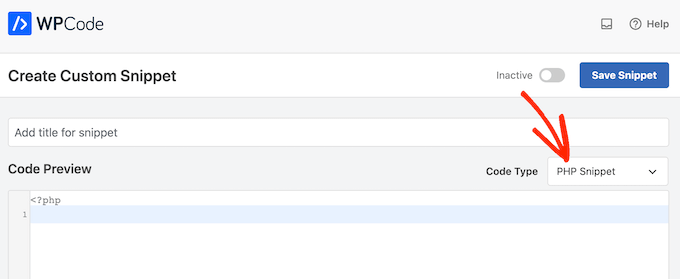
Now enter a title for your snippet, open the “Code Type” dropdown, and click PHP Snippet.
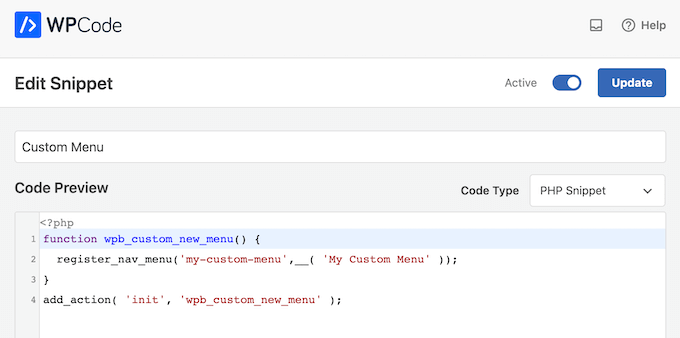
Next, paste the following snippet into the code editor:
function wpb_custom_new_menu() {
  register_nav_menu('my-custom-menu',__( 'My Custom Menu' ));
}
add_action( 'init', 'wpb_custom_new_menu' );
This snippet adds a new menu location to your theme, “My Custom Menu.”
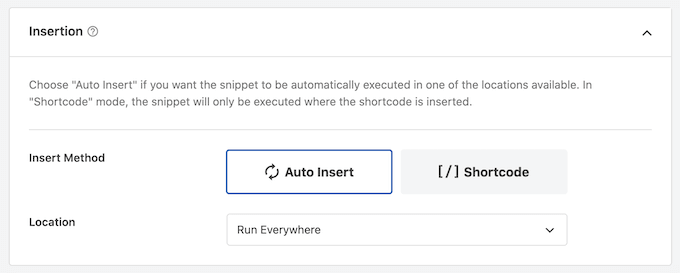
Once you’ve done that, scroll down to the insertion options and choose the “Auto Insert” method to add the snippet across your entire site.
From there, open the “Location” dropdown menu and click Run Everywhere.
Now you can scroll to the top of the screen and click on the “Inactive” toggle to change it to “Active.”
Finally, click Save to make the snippet live.
Now, head to Appearance » Menus and see the ‘Display location’ area.
You should see a new ‘My Custom Menu’ option in this area where you can add menu items.
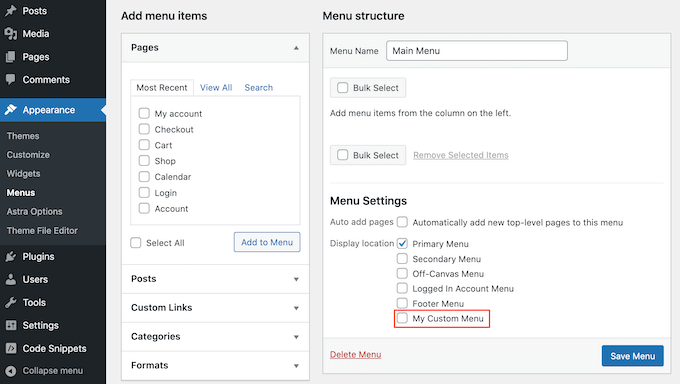
The next step is to add your custom menu to your WordPress theme.
You can show a custom navigation menu anywhere on your site by adding code to your theme’s template file.
Simply go to Appearance » Theme File Editor.
Then, in the right-hand menu, find the template where you want to add the menu, such as your website’s header.
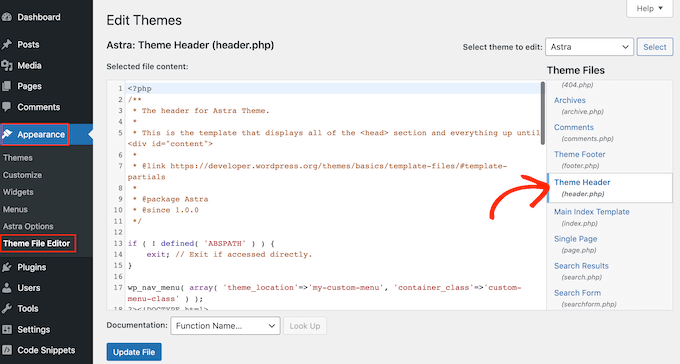
Now you’ll need to add a wp_nav_menu function and specify the name of your custom menu. For example, in the following code snippet, we’re adding My Custom Menu to the theme’s header:
wp_nav_menu( array( 'theme_location'=>'my-custom-menu', 'container_class'=>'custom-menu-class' ) );After adding the code, click the Update File button to save your changes.
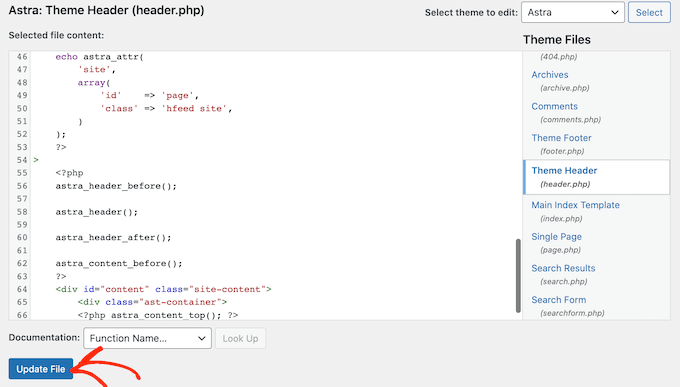
Now if you visit your site, you’ll see the custom menu in action, however, you’ll notice it appears in a simple bullet list.
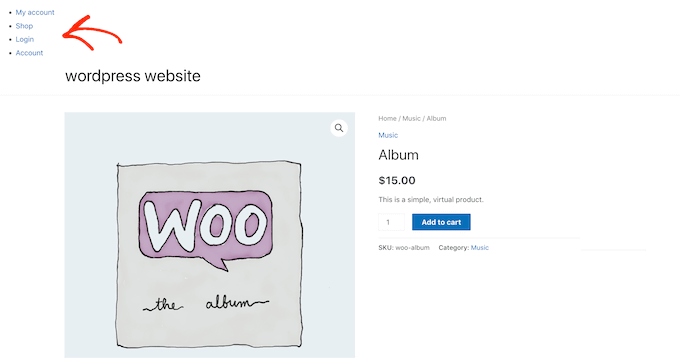
You can style the menu to better match your WordPress theme or branding by adding custom CSS code to your site.
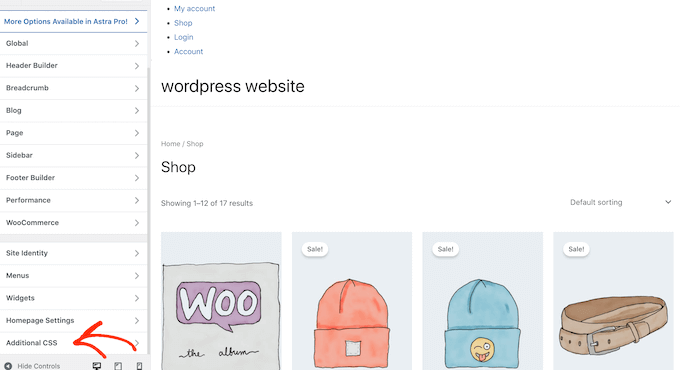
To do this, go to Appearance » Customize and click on Additional CSS in the WordPress customizer.
This opens an editor where you can type your custom CSS.
Now you can style your menu using the CSS class you added to your theme template. In our example, it’s .custom_menu_class.
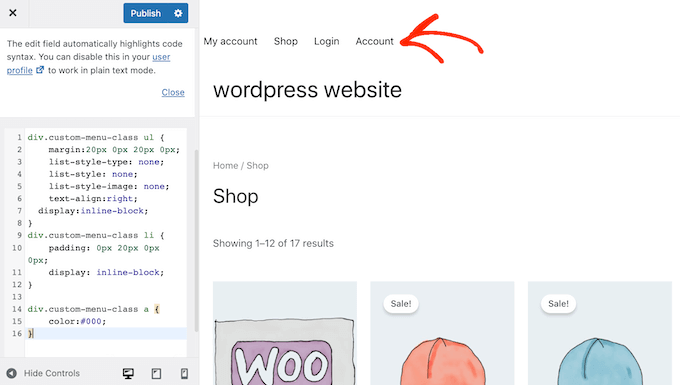
In the following code, we’re adding margins and padding, setting the text color to black, and arranging the menu in a horizontal layout:
div.custom-menu-class ul {
    margin:20px 0px 20px 0px;
    list-style-type: none;
    list-style: none;
    list-style-image: none;
    text-align:right;
    display:inline-block;
}
div.custom-menu-class li {
    padding: 0px 20px 0px 0px;
    display: inline-block;
}

div.custom-menu-class a {
    color:#000;
}
The WordPress customizer updates automatically so you can see how the menu looks with the new style. If you’re happy with the changes, then Publish to make them live.
More WordPress Navigation Tips
I hope this guide has helped you learn how to customize your WordPress menu. For help to get more out of your WordPress navigation, check out the following tips and tutorials:
- How to Edit Mobile Menus in WordPress (Beginner’s Guide)
- How to Add a WooCommerce Shopping Cart Icon In Menus
- Landing Page Navigation Is Dead: Here’s Why
- How to Edit Navigation Bar in WordPress Step-by-Step
- How to Make a Landing Page Without Navigation (Easy Way)
Thanks for reading! We’d love to hear your thoughts, so please feel free to leave a comment with any questions and feedback.
You can also follow us on YouTube, X (formerly Twitter), and Facebook for more helpful content to grow your business.

