TL;DR: How to Create a Waitlist Landing Page in WordPress
Build a waitlist page in WordPress and start collecting pre-launch signups in about 20 minutes. Here is the fast version:
- Install SeedProd – Add the plugin to your WordPress site and activate your license.
- Choose a template – Pick a waitlist landing page template from SeedProd’s library and give your page a name and URL.
- Customize your design – Edit your headline, signup form, and background using the drag-and-drop editor.
- Connect your email list – Link your email marketing provider so signups go directly to your list.
- Publish – Click Publish and share your waitlist page to start collecting early signups.
You’re building something and need early signups before you go live. But you’re not sure what to put on the page, or whether anyone will actually sign up.
That’s where a waitlist landing page in WordPress comes in. The setup is simpler than it looks.
This tutorial walks you through the full process using SeedProd, which is what I use to build landing pages on my own site. The whole thing takes about 20 minutes.
Well-optimized waitlist pages convert about 5% to 10% of visitors into subscribers. Here’s how to build one that hits that range.
How Does a Waitlist Signup Page Work?
Setting up a waitlist before launch is one of the simplest decisions you can make. You get a page live, start collecting signups, and have an audience ready when you open.
The process is straightforward. Visitors enter their email into a signup form connected to your email marketing service. Each new signup is automatically stored in your list and can trigger automated confirmation or thank-you messages.
When your product launches, you can send announcements to everyone on the list instantly. You can also use your waitlist to offer beta access or early perks, such as:
- Exclusive early-access invitations
- Special launch discounts
- Limited beta tester spots
Once published, your waitlist page runs automatically, collecting new signups and building anticipation around the clock.
What Should a Waiting List Landing Page Include?
High-converting waitlist landing pages share a few key features. Here is what I always include when I build one:
| Element | What It Does | Example |
|---|---|---|
| Clear headline | Tells visitors exactly what they are signing up for | “Launching Soon” or “Get Early Access Today” |
| Short signup form | Reduces friction and increases conversions | Email field only |
| Strong CTA button | Prompts immediate action with active language | “Save My Spot” or “Join the Waitlist” |
| Urgency elements | Encourages signups now instead of later | Countdown timer, limited spots, early-bird perks |
| Proof or previews | Builds trust and sparks curiosity | Testimonial, screenshot, or feature sneak peek |
You don’t need complex tools for these elements. I use SeedProd’s waitlist templates and add these blocks quickly.
The headline row is where most waitlist pages lose conversions. “Launching Soon” gives visitors nothing to act on.
A stronger version looks like: “Get early access to [specific outcome] before we open to the public.” Vague copy is the most commonly self-diagnosed reason waitlist pages fail to convert.
Your product value proposition explains what you’re building. Your waitlist value proposition answers a different question: what does the reader get for signing up right now?
Once your elements are in place, three strategies will boost conversions:
- Offer incentives: Give visitors a clear reason to sign up now. This could be early access, a discount code, or exclusive bonus content. When people feel they are getting something special, they are more likely to join and share your page with others.
- Create urgency: Use design elements that trigger FOMO (fear of missing out) and encourage immediate action. Add a countdown timer showing how soon your product launches, or include a progress bar displaying how close you are to a signup goal. Limited spots or early-bird deadlines work too.
- Maintain engagement: Do not let the excitement drop after someone signs up. Send a short welcome email thanking them for joining. Tease upcoming features or rewards to keep their interest high until launch day.

Keep your form short. Email only is the rule, not a suggestion.
Even adding a single extra field, like a first name or company name, can noticeably reduce your conversion rate. Add a bold CTA like “Join the Waitlist” or “Save My Spot,” and leave the form at one field.
How to Create a Waitlist Landing Page in WordPress (Step-by-Step)
Step 1: Install the SeedProd Plugin
The most efficient way to create a waitlist landing page in WordPress is to use a dedicated landing page plugin like SeedProd. It’s built for speed, flexibility, and ease of use, with no coding required.
SeedProd helps you design professional pages in minutes. It includes hundreds of templates and a visual drag-and-drop editor perfect for beginners.

To begin, download the SeedProd plugin, then upload and activate it in your WordPress dashboard. If you’re new to plugins, follow this step-by-step guide to installing a WordPress plugin.
Step 2: Choose a Waitlist Landing Page Template
After installing SeedProd, go to SeedProd » Landing Pages in your WordPress admin. Then, click the “Add New Landing Page” button.

The next screen shows SeedProd’s landing page template library. You can filter these designs by page type, including:
- Coming soon
- Maintenance mode
- 404 page
- Sales pages
- Webinar pages
- Lead squeeze pages
- Thank you pages
- Login pages

Browse the templates until you find a design you like for your waitlist page. Then, hover your mouse over it and click the checkmark icon.
I recommend filtering by ‘Coming Soon’ to find waitlist landing page templates. Pre-launch designs come with the key sections already in place, so you’re not starting from a blank canvas.
For this example, I chose the City Coming Soon Page template.

After selecting your template, enter your landing page details in the popup, like its name and URL. Click the Save and Start Editing the Page button to open the drag-and-drop editor.

Step 3: Customize Your Waitlist Page Design
Now it’s time to customize your waitlist landing page using SeedProd’s visual editor. This lets you personalize your design, text, and layout without touching a single line of code.
The editor includes two panels: on the left, you’ll see content blocks and layout options, and on the right, a live preview of your design updates.

Click any element to edit it. You can change headlines, subheadings, or buttons right inside the live preview. Use the Advanced tab in the sidebar for more detailed styling options like color, spacing, or typography.

To change your background image, click the settings icon in the bottom-left corner and select the Background tab. You can upload a custom image or choose from thousands of royalty-free photos if you have a SeedProd Plus license or higher.
Just keep in mind that if your template uses specific Sections, you may need to change the background on the Section settings rather than the global background settings.

SeedProd also includes advanced blocks you can add to make your page more engaging. Below is a quick reference table of some useful block types and their main functions.
| Block Type | Primary Function |
|---|---|
| Giveaway Block | Encourages engagement through contests and incentives |
| Contact Form | Lets visitors send messages or inquiries directly |
| Social Sharing | Allows users to share your page on social platforms |
| Countdown Timer | Creates urgency by showing time left until launch |
| Social Profiles | Displays your social media profiles for connection |
| Call-to-Action | Prompts users to take action such as “Join Now” |
| Opt-in Form | Collects emails for your waitlist |
| Progress Bar | Visualizes milestones or signup goals |
| Pricing Table | Highlights plan or offer details clearly |
| Testimonials | Adds social proof to build trust with visitors |
Once your design looks right, make sure your signup form stands out. This is where you’ll collect emails from users interested in your launch. Adjust form fields, colors, and spacing to match your page’s style.

Once you’re happy with your design, move on to the next step to connect your email provider and start collecting real leads.
Step 4: Connect Your Signup Form to Your Email List
In my experience, the most critical step is ensuring your new leads go to the right place immediately. Connecting your opt-in form to your email marketing provider in SeedProd is simple. Just click the Connect tab at the top of your screen.

You can then browse popular email marketing services. Follow the instructions to connect your list when you find yours.
If SeedProd doesn’t directly integrate with your provider, use its Zapier integration or paste your form’s HTML code manually. Every new signup is automatically saved and ready for launch day. You will also find integrations for Google Analytics and reCAPTCHA on the same page.

Before you go live, submit a test email through your form to confirm signups are reaching your list. It takes 30 seconds and saves you from discovering a broken connection after you have already shared the page.
Step 5: Configure Your Page Settings
The next step ensures your landing page settings are correct. Click the Page Settings tab and look through each section.

Here is a quick overview of what each section does:
| Setting | What It Does |
|---|---|
| General | Edit your page name, URL, and status |
| SEO | Manage meta titles and descriptions if using an SEO plugin |
| Analytics | Connect Google Analytics via MonsterInsights to track conversions |
| Scripts | Add tracking pixels for ads or email marketing |
| Custom Domain | Use a custom domain (SeedProd Elite plan required) |
After configuring your page settings, click the Save button in the top-right corner.
Step 6: Publish Your Waitlist Landing Page
The final step is to make your page live. Click the dropdown arrow on the save button, and then select Publish.

Give your early access landing page a quick preview to ensure everything looks correct. Then, you are ready to share it and start growing your list.
Here is how the page I created on my test website looks:

Congratulations!
Best Waitlist Landing Pages (With Takeaways)
Studying successful examples helps you spot what works and what to avoid. I selected these three because they show different approaches to minimalism, social proof, and conversion design.
Descript Software
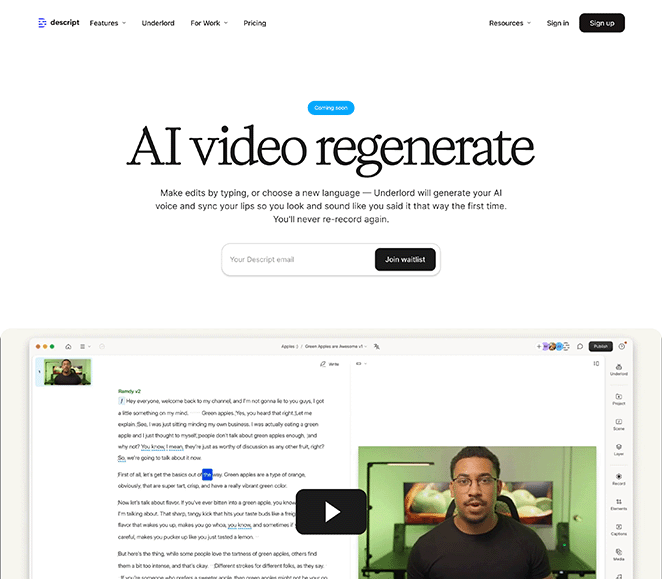
What works:
- The headline immediately explains what the product does. No guessing required.
- A demo video shows the product in action, which builds trust before asking for an email.
- The signup form asks for only an email address. Fewer fields mean more signups.
What could be improved:
- No urgency element like a countdown timer or limited spots.
- Missing social proof. A testimonial or user count would add credibility.
Key takeaway: Show how your product solves a problem before asking for signups. Clarity beats cleverness.
Mighty Freelancer Course
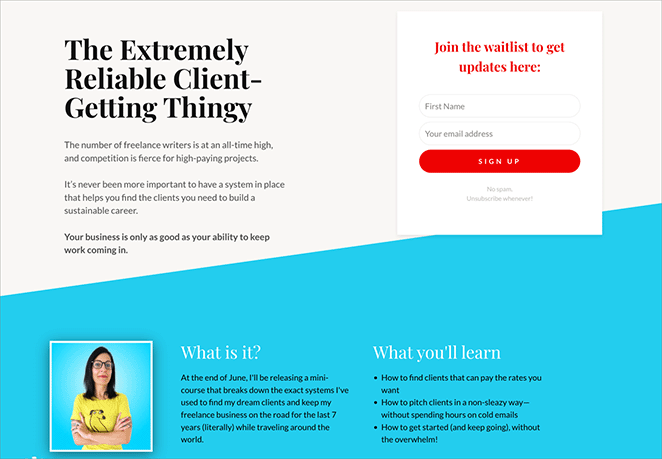
What works:
- The friendly, conversational tone makes it feel personal rather than corporate.
- The CTA button stands out with a clear action phrase.
- A visual preview of the course content gives subscribers a taste of what they will get.
What could be improved:
- No referral incentive to encourage sharing.
- The page could benefit from a launch date or countdown to create urgency.
Key takeaway: A personal tone builds trust. Show exactly what subscribers will gain from joining your waitlist.
Tapster App
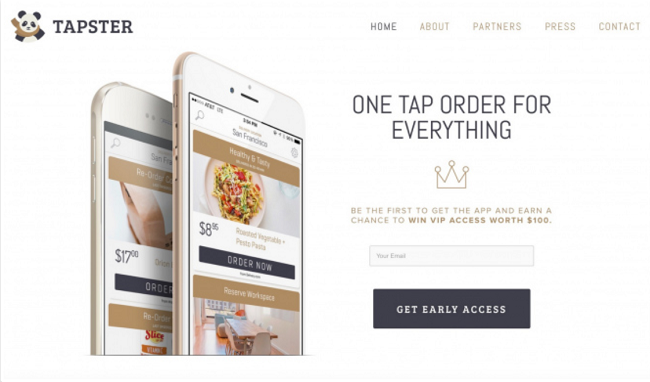
What works:
- The clean, mobile-first design matches the app product.
- The signup form stays visible as you scroll, so visitors never lose sight of the CTA.
- A giveaway incentive rewards early signups, which encourages immediate action.
What could be improved:
- The value proposition could be more specific about what the app does.
- Adding a referral program would turn early subscribers into promoters.
Key takeaway: Incentives and always-visible CTAs boost conversions. Make joining feel rewarding and effortless.
Each example keeps the focus on one goal: getting visitors to join. Whether you highlight a product demo, an incentive, or a personal message, keep your design simple and your message clear.
How to Create a Viral Waitlist with Referral Incentives
If your subscribers are not sharing your waitlist, you are leaving growth on the table. A referral system gives each person a unique link, and when their friends sign up, both get perks like early access or a higher spot in line.
This approach turns your waitlist into a growth engine. Instead of relying only on your own promotion, your subscribers do the sharing for you.
The easiest way to add referral mechanics to your WordPress waitlist is with RafflePress, a giveaway plugin that tracks referrals automatically. It includes a pre-launch giveaway template built for waitlist campaigns.

Here is how it works:
- Each subscriber gets a unique share link. When someone signs up through that link, RafflePress tracks the referral.
- Referrals earn bonus entries. You can reward subscribers with extra giveaway entries for each friend they bring in.
- Social sharing actions count too. Subscribers can earn entries by sharing on Twitter, Facebook, or other platforms.
- A leaderboard creates competition. Showing top referrers motivates subscribers to share more.
To set this up, install RafflePress and choose the Pre-Launch Giveaway template. Add entry actions for email signup, referrals, and social shares. Then embed the giveaway widget on your SeedProd waitlist page using the RafflePress block or shortcode.

The result is a waitlist that grows itself. Subscribers spread the word because they earn rewards for referrals. This taps into FOMO: when people see friends joining and earning perks, they want in too.
What to Do After Someone Joins Your Waitlist
Getting signups is only half the job. What you do after someone joins determines whether they stay excited or forget about you before launch.
The timing of your launch matters too. Builders who go live within three months of closing their waitlist convert significantly more subscribers into paying customers than those who wait.
Here is the post-signup strategy I use to keep waitlist subscribers engaged:
| Stage | Action | Why It Works |
|---|---|---|
| Immediately | Show a thank you page with social sharing buttons and their referral link | Subscribers are most excited right after signing up. Capture that momentum before they leave. |
| Within minutes | Send a welcome email confirming their spot and setting expectations | Confirms the signup worked and keeps your launch top of mind. |
| Weekly or biweekly | Send progress updates with behind-the-scenes content or feature previews | Prevents subscribers from forgetting about you. Builds anticipation over time. |
| 48 hours before launch | Send an urgency email with a countdown and a reminder about early-bird perks | Creates a final push for referrals and primes subscribers for launch day. |
| Launch day | Give waitlist subscribers early access before the public announcement | Rewards their patience and makes them feel like insiders. |
In SeedProd, you can create a custom thank you page and set it as the redirect after form submission.

When launch day arrives, disable Coming Soon mode and redirect your waitlist page to the live product page instantly.
Keep your waitlist warm: Have WPVibe draft your welcome email and the progress updates that go out between now and launch, connected to your real site. That way subscribers stay excited instead of forgetting they ever signed up.
FAQs About Waitlist Landing Pages
Final Thoughts: Building a Waitlist Page with SeedProd
Building a waitlist page in WordPress is much easier with the right tools. SeedProd offers templates, drag-and-drop controls, and integrations to help you build and publish your page quickly.
For more ways to optimize your page, explore these practical guides from SeedProd:
- Anatomy of a Landing Page: 9 Essential Elements
- A/B Testing for Landing Pages in WordPress: The Easy Guide
- Expert Landing Page Optimization Tips
- Landing Page URL Examples and Best Practices
- How to Create Personalized Landing Pages to Boost Conversions
- Landing Page Headline Formulas to Boost Conversion Rates
- Landing Page Navigation Is Dead: Here’s Why
- What Is a Good Landing Page Conversion Rate?
Thanks for reading! We’d love to hear your thoughts, so please feel free to join the conversation on YouTube, X and Facebook for more helpful advice and content to grow your business.