Want more conversions from your Google Ads campaigns? Of course, you do! And you want those conversions to be cost-effective, right?
Using dedicated landing pages can significantly reduce your cost per conversion. In fact, Instapage found that dedicated landing pages resulted in a lower cost per conversion compared to using website ads or generic pages. That’s why you’re running ads in the first place – to drive sales, generate leads, or encourage other valuable actions without breaking the bank.
To get more conversions without overspending, start by creating a well-optimized Google Ads landing page.
In this guide, I’ll show you exactly how to create a landing page for Google Ads that’s optimized for conversions. We’ll also look at some Google Ads landing page examples to inspire your design and share essential Google Ads landing page best practices.
How to Create a Google Ads Landing Page:
- Step 1: Install and Activate SeedProd Landing Page Builder
- Step 2: Choose a High-Converting Google Ads Landing Page Template
- Step 3: Customize Your Google Ads Landing Page
- Step 4: Configure Your Landing Page Settings
- Step 5: Publish Your Google Ads Landing Page
- Step 6: Link Your Landing Page to Google Ads
Why Do You Need a Google Ads Landing Page?
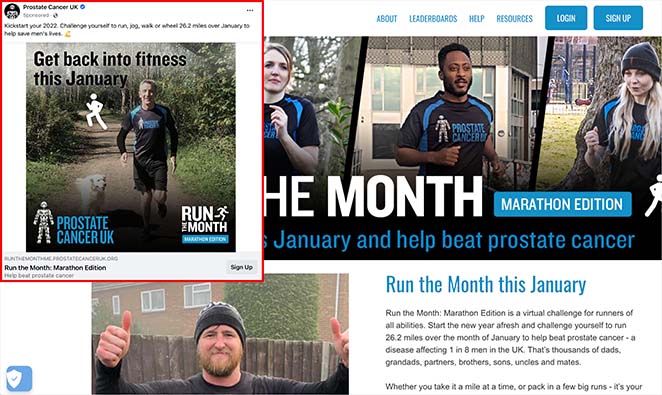
Landing pages are important for Google Ads because they can help convert clicks into customers. When someone clicks on your ad, they expect to land on a page that’s relevant to the ad, and if they don’t, they might leave. Effective landing pages can help you get conversions from your Google Ads traffic.
And, here are some reasons why having a dedicated landing page is important for Google Ads:
- Relevance: Customers expect to land on a page that’s relevant to what they saw in your ad. If the landing page doesn’t match the ad, people are more likely to leave without buying anything.
- Quality score: The experience of a landing page is one of several factors that help determine a keyword’s Quality Score. Other factors include the usefulness and relevance of the information, ease of navigation, and the number of links on the page.
- Post-conversion experience: Your landing page’s post-conversion experience can help you build trust and keep the conversation going with your customers.
Google Ads Landing Page Best Practices
To create the best landing pages for Google Ads that consistently convert, you need to follow proven Google Ads landing page best practices. Your PPC landing page needs to deliver clear value and match visitor expectations.
Ads landing page best practice tips:
- Match Your Message: Make sure your PPC landing page content says the same thing as your ad. If your ad is about blue widgets, your landing page should be about blue widgets too. This keeps people from feeling tricked and leaving.
- Fast Loading: Nobody likes a slow website. According to Google, a one-second delay in mobile page load times can impact conversion rates by up to 20%. Make your landing page load quickly so people don’t get bored waiting.
- Mobile-Friendly: Most people use their phones to browse. Make sure your landing page experience looks good on any phone or tablet.
- Clear Call to Action: Tell people exactly what you want them to do (e.g., “Shop Now,” “Get a Free Quote”). Make the button big and easy to find.
- Keep it Simple: Don’t overload your page with too much information. Get to the point quickly and highlight the main benefits.
- Great Pictures: Use nice, clear pictures or videos that show off your product or service.
- Build Trust: Show testimonials or reviews from happy customers. Add security badges so people feel safe giving you their information.
- Test and Improve: Try different headlines, buttons, and images to see what works best. Keep tweaking your page to get more conversions.
How to Create a Google Ads Landing Page in WordPress (Step-by-Step)
Now that you’ve seen why a dedicated landing page for Google Ads is essential, let’s walk through exactly how you can create a landing page for Google Ads using WordPress, one of the easiest and most effective ways to build high-converting pages.
We’ll use SeedProd for this tutorial to build a high-converting WordPress landing page.

SeedProd is a popular WordPress page builder with drag-and-drop functionality. With 300+ responsive landing page templates, you can make any landing page without coding.
SeedProd also offers tons of elements to build your page visually. With bloat-free coding, the plugin is lightning-fast, ensuring the highest page speeds.
Follow the steps below to create the best Google Ads landing page with SeedProd.
Step 1: Install and Activate SeedProd Landing Page Builder
The first step is downloading SeedProd and uploading the plugin to your WordPress website.
Then, you need to install and activate the plugin. If you’re unsure how to do that, follow this guide on installing SeedProd.
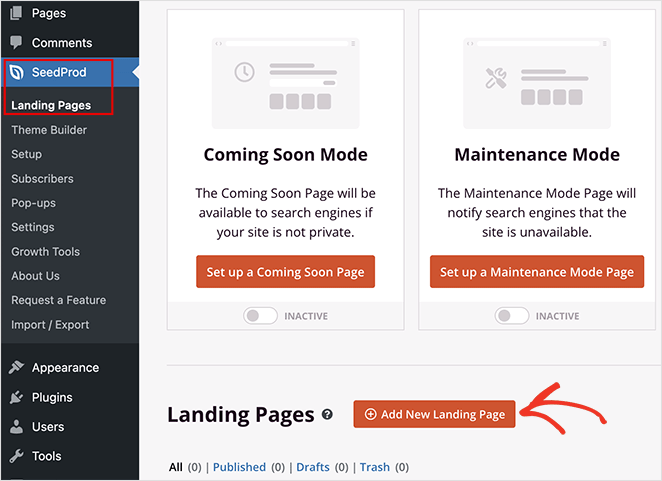
After activating the plugin, go to SeedProd » Landing Pages from your WordPress dashboard and click on the Add New Landing Page button.
Step 2: Choose a High-Converting Google Ads Landing Page Template
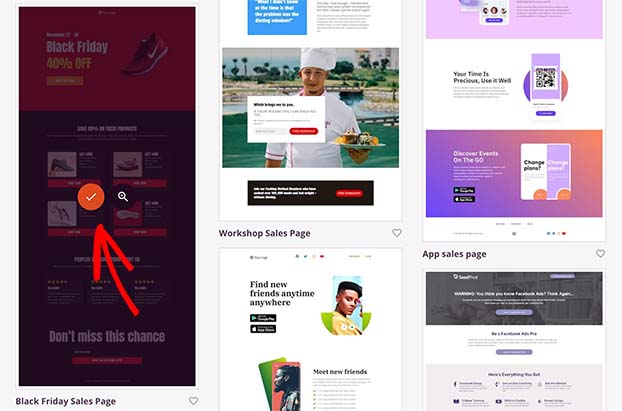
On the next screen, you’ll see a library of mobile-friendly templates.
Don’t worry if you can’t see any Google Adwords landing page templates. SeedProd’s designs are multipurpose, so you can customize any template to fit your campaign.
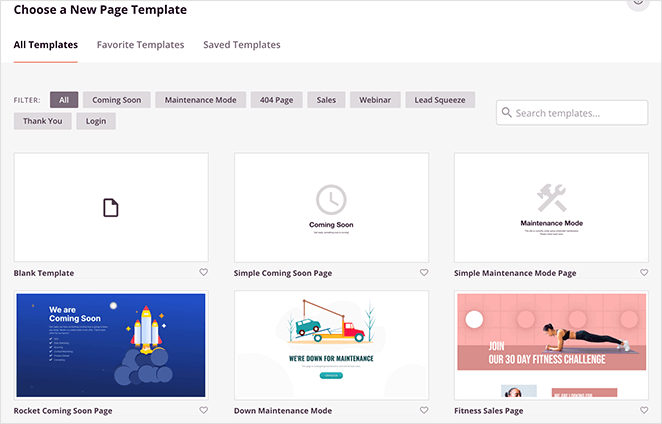
Click any tabs along the top to filter the templates by page type. Then, when you find a design you like, hover over the thumbnail and click the checkmark icon.
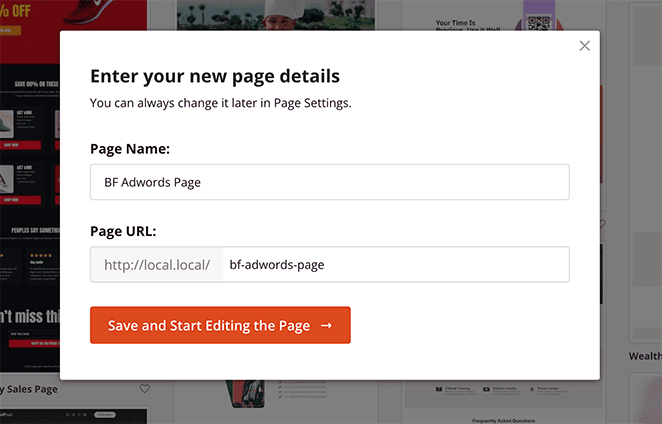
Next, you’ll see a popup where you can add your landing page name and URL. From there, click the Save and Start Editing the Page button to open your design in the visual editor.
Step 3: Customize Your Google Ads Landing Page
SeedProd’s visual editor uses a straightforward 2-column layout, making it simple to build your landing page exactly how you want it.
On the left are blocks and sections for building your ad page. And on the right is a preview of how your design looks.
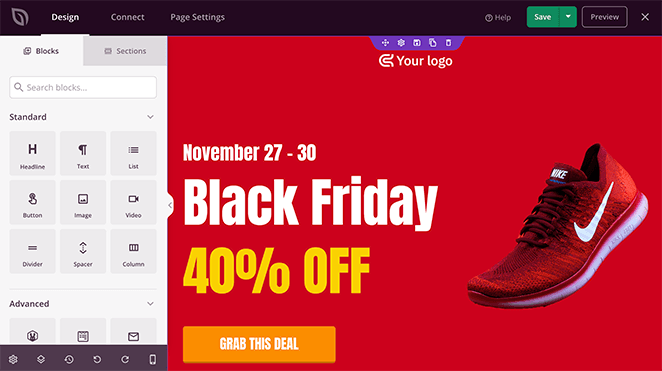
You can click anywhere on your preview to edit the existing content. Adding new content blocks is as simple as dragging one from the left and dropping it into place on your page.
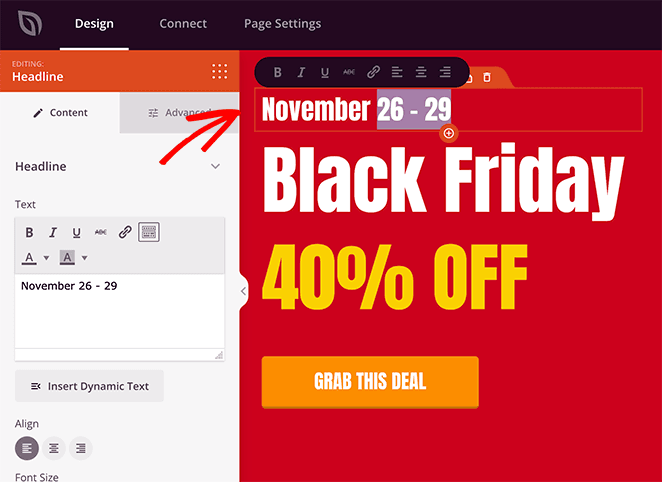
For example, you can click a heading to change the text, alignment, heading level, and more.
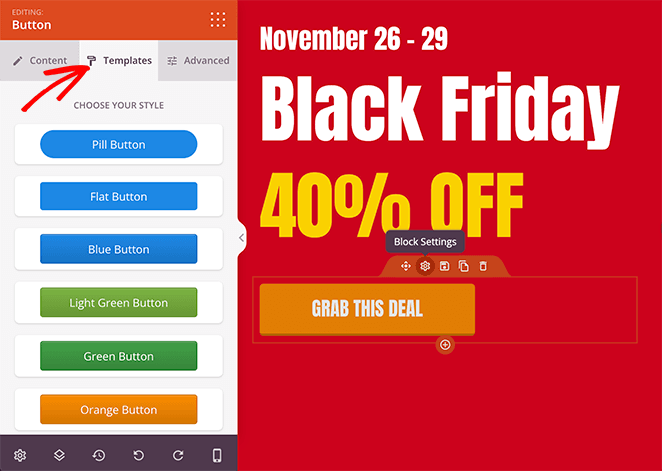
Or, you can click the call-to-action button to edit the button label and click the Templates tab to choose a completely different button design.
Want to change the templates’ default image? Click the picture, and choose the trashcan icon on the left to remove it.

From there, you can upload a new high-quality image from your WordPress media library or computer.
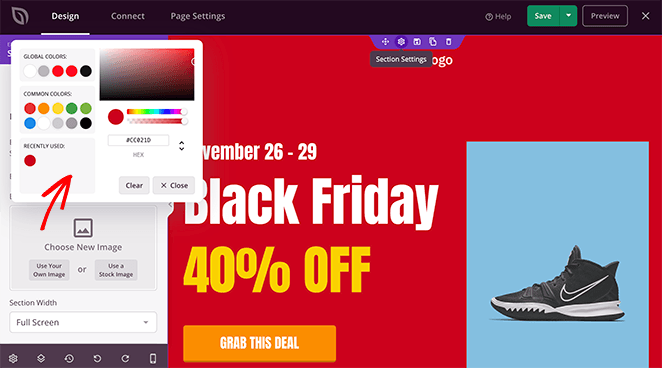
You can also change the background color of any section by clicking the cog icon. For example, you can select a color to match your branding or hero image with the color picker tool.
Earlier, we mentioned dynamic text replacement to personalize your landing page based on different search queries. With the Dynamic Text feature, you can do this for any heading or line of text in SeedProd.
For example, if you target the keywords’ Cyber Monday’ and ‘Black Friday’ for your ad campaign, you can change the heading to reflect those terms on your landing page.
To do that, click the heading, select the Dynamic Text button, and add the keywords from your ad campaign.
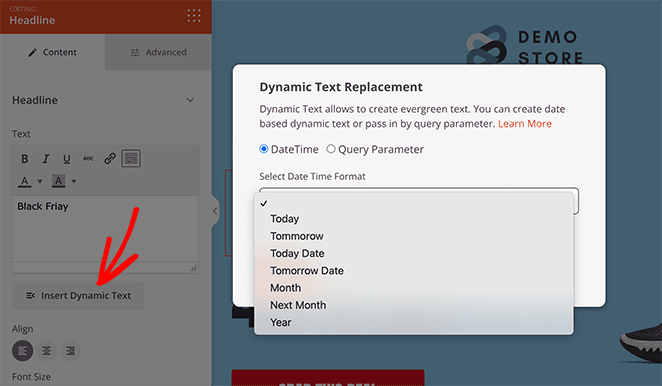
Then, when people click through to your site, the text will change based on the term they found your ad with.
You can learn more about this feature in our dynamic text documentation.
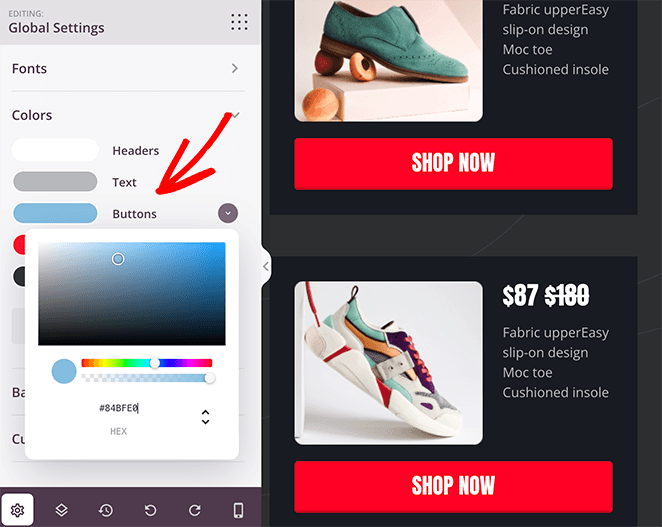
Let’s say you want all your landing page buttons to be the same color. In that case, you can use SeedProd’s global settings to change them all completely.
To do that, click the cog icon in the bottom right corner to see global settings for your fonts, colors, backgrounds, and custom CSS.
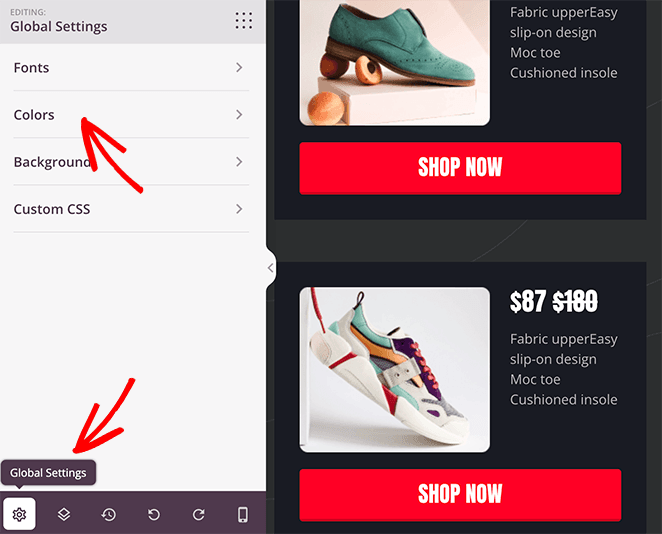
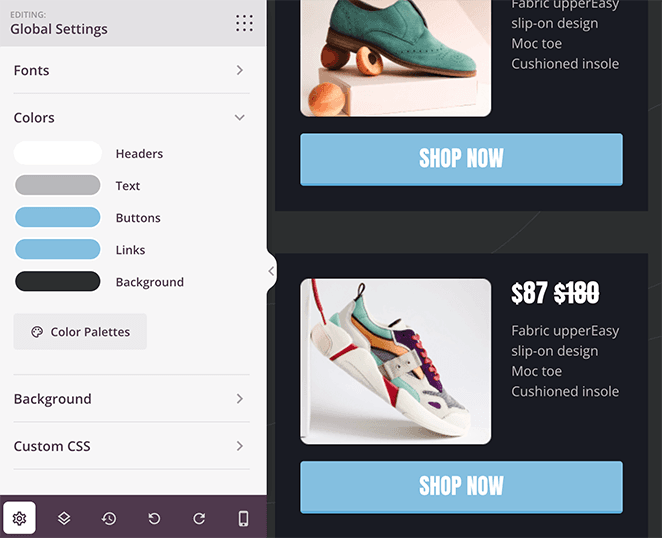
From there, you can click the Colors tab and add a custom color for all the buttons on your page.
Continue customizing your landing page until you’re happy with how it looks.
Expert Tip
Oli Gardner, a globally recognized thought leader on digital marketing and conversion optimization, defines message match as:

“A measure of how well your landing page copy matches the phrasing of the ad or link that brought the visitor there.
For PPC marketers, this means matching your ad copy to your landing page headline. Strong message match increases conversions because it reassures people they’ve come to the right place.”
Step 4: Configure Your Landing Page Settings
After designing your Google Ads page, let’s look at a few settings to help you boost lead generation and conversions.
For example, if your page has an optin form to collect email addresses, you’ll want to link it to your email marketing service. So click the Connect tab at the top of your screen to see all the email providers you can integrate directly in SeedProd.
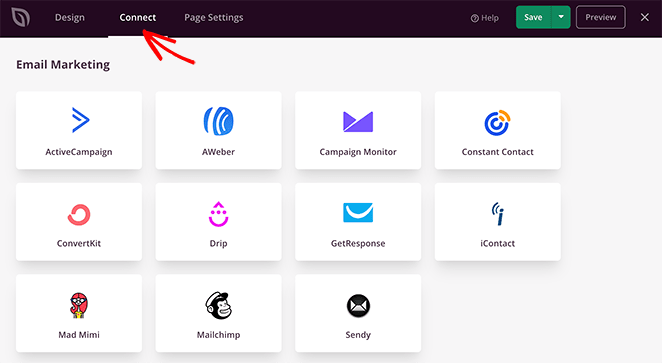
After finding your email service, click it and follow the instructions to connect your account.
You can learn how to connect to individual providers in our email integration documentation.
Now, let’s look at some other settings by clicking the Page Settings tab.

You can edit your page’s name and URL, enter your on-page SEO information, monitor your landing page analytics, and enter custom scripts on this screen.
If you have SeedProd Elite, you can use the Custom Domain feature to give your landing page a unique URL separate from your website. This is an easy way to set up multiple microsites without installing WordPress on each domain.
Don’t forget to click the Save button in the top right corner to store your changes.
Step 5: Publish Your Google Ads Landing Page
Now that your landing page is complete, you can publish it on your WordPress site. In the top right corner, click the dropdown menu next to the Save button and select Publish.
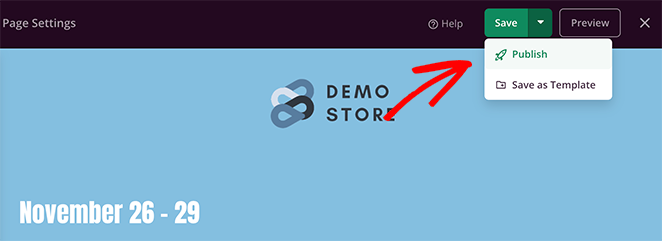
From there, you can click See Live Page to preview your new Google Ads landing page.
Here is the final version of the ads landing page we made on our test website:

Step 6: Link Your Landing Page to Google Ads
You can add your final landing page to your ad campaign during the creation process. When you’re creating a Google Ad campaign, look for the ‘Final URL’ text field at the top of the page and past your landing page URL.
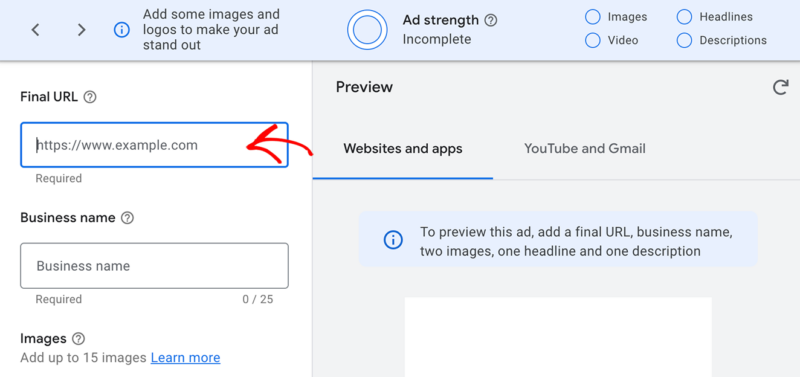
When you’ve published your ad campaign, visitors will go to your landing page after clicking the ad.
Example Google Ads Landing Pages
Looking for inspiration? Here are some excellent Google Ads landing page examples you can use to make your landing page even more effective:
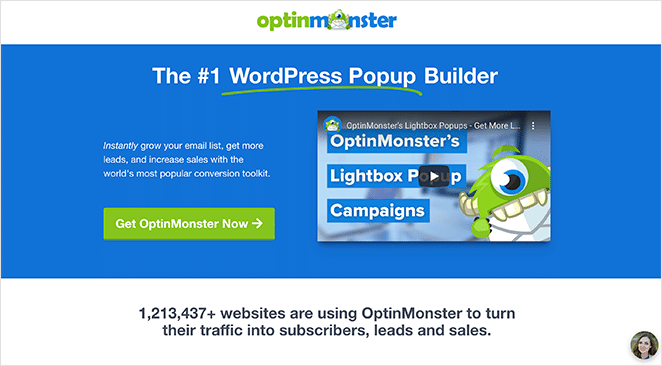
- OptinMonster’s PPC Landing Page: OptinMonster’s landing page uses clear messaging and a compelling call-to-action that matches the ad perfectly. The page keeps visitors focused with simple, uncluttered design.
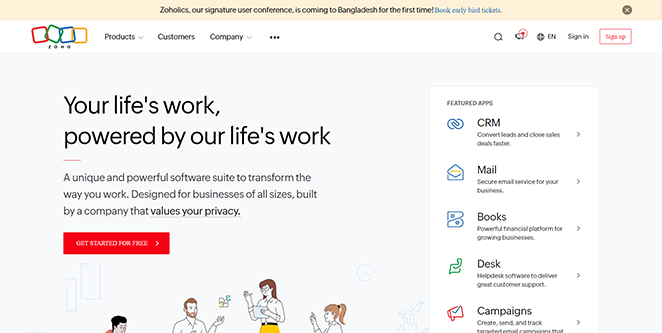
- Zoho’s Google Ads Landing Page: Zoho’s landing page features vibrant visuals, concise copy, and prominent trust signals. The design ensures mobile users have a smooth experience too.
- HubSpot’s PPC Landing Page: HubSpot effectively captures attention with clear headlines, bullet-point benefits, and strong social proof. Their layout encourages visitors to quickly complete the lead capture form.
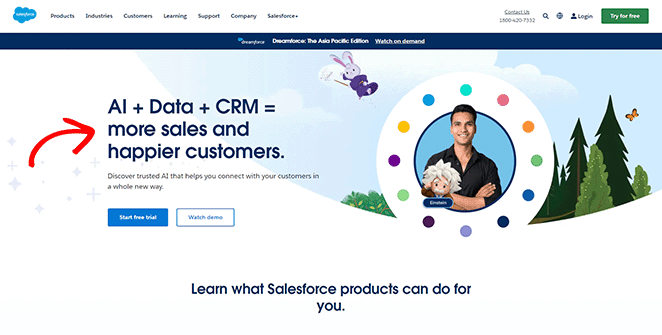
Use these Google Ads landing page examples as a starting point to create your own high-performing landing page.
How to Optimize Your Google Ads Landing Page for Maximum Conversions
Your landing page is the first thing visitors see after clicking your ad. To turn more of those visitors into leads or customers, you need to optimize it carefully. With this in mind, let’s look at some landing page optimization tips that drive clicks.
Write Landing Page Copy That Sells
Your headline should quickly grab visitors’ attention and clearly explain the main benefit or solution you’re offering. Use strong, active verbs and highlight what makes your product or service unique.
In your ads landing page content clearly explain how you can solve the visitor’s problem or fulfill their desire. Focus on benefits, not just features, and address any concerns they might have.
Don’t forget to sprinkle in some social proof – testimonials, reviews, or case studies – to build trust and show potential customers that you deliver results.
Design Your Landing Page for Success
A well-designed landing page guides visitors seamlessly toward conversion. Use contrasting colors, font sizes, and whitespace to emphasize important elements like headlines, benefits, and CTAs.
Make sure your images and videos are high-quality and resonate with your audience.
Remember, most of your visitors will likely be on mobile devices, so ensure your page is fully responsive and looks great on any screen size. Keep the page uncluttered and focused to avoid distractions.
Optimize Your Calls to Action (CTAs)
Your CTAs are the buttons that drive action, so make them irresistible. Use strong action words like “Get Started,” “Claim Your Offer,” or “Sign Up Now.”
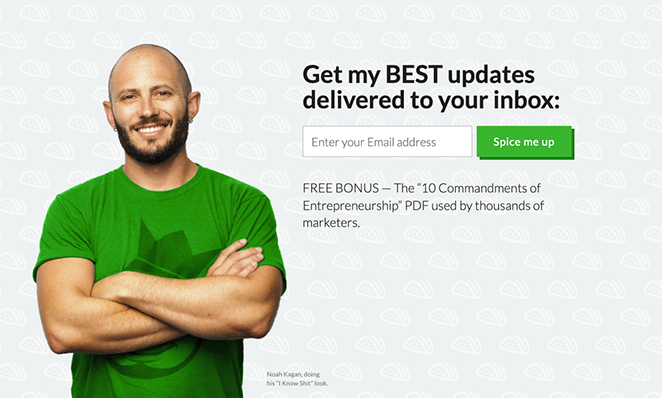
Make sure your CTA buttons are visually prominent and placed strategically throughout the page, especially after key information or benefits. Don’t be afraid to experiment with different CTA styles, colors, and placements to see what works best for your audience.
And if you’re using a lead capture form, keep it short and sweet.
Extra Conversion-Boosting Tips
You can encourage visitors to act quickly by using limited-time offers, countdown timers, or notifications when stock is running low.
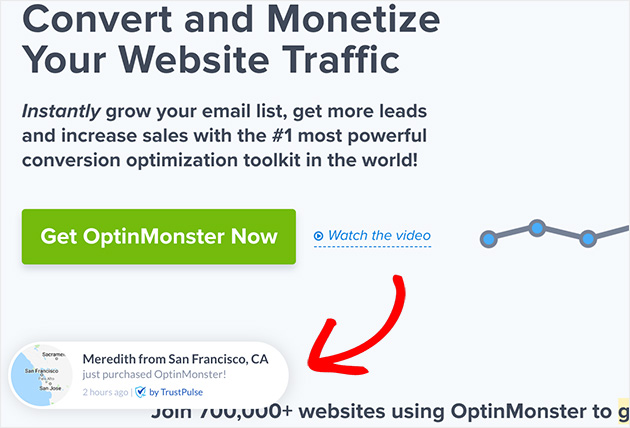
Display trust signals like security badges or guarantees to put their minds at ease. And don’t forget to create a thank-you page to confirm their action and offer further instructions or relevant deals.
By applying these conversion optimization techniques, you’ll transform your Google Ads landing page into a high-performing asset that consistently generates leads and drives sales for your business.
How to Track and Improve Your Google Ads Landing Page Performance
Creating a optimized landing pages is only half the battle won. You need to constantly monitor thier performance to ensure it’s converting visitors into customers. That’s where MonsterInsights comes in.
MonsterInsights is a powerful Google Analytics plugin for WordPress that gives you in-depth insights into your landing page’s performance, right inside your WordPress dashboard.
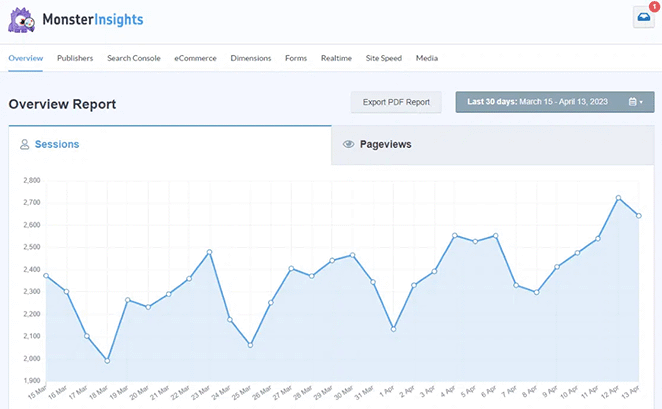
Here’s how MonsterInsights helps you increase your Google Ads conversions:
- Track Your Key Metrics: Easily track crucial metrics like bounce rate, time on page, conversion rate, and more. Understanding these metrics helps identify areas for improvement on your landing page.
- A/B Test Different Headlines and CTAs: Use MonsterInsights to A/B test different elements of your landing page, like headlines and calls to action, to see what resonates best with your audience.
- Analyze Traffic Sources: Understand where your traffic is coming from and focus your efforts on the channels driving the most conversions.
- Form Conversion Tracking: Easily track form submissions on your landing page to see how many visitors are converting into leads.
By providing these insights, MonsterInsights allows you to make data-driven decisions that optimize your landing page for maximum conversions.
Don’t have Google Analytics installed on your WordPress website? Check out our step-by-step guide on how to add Google Analytics to WordPress.
To learn more, please see our step-by-step guide on how to install Google Analytics.
FAQs About Google Ads Landing Pages
Does Google Ads Have a Landing Page Builder?
No, your Google Ads Account does not have them built in. you need to create your landing page on a separate platform and link it to your Google Ads campaign.
What’s the Difference Between Final URL and Expanded Landing Page URL in Google Ads?
The final URL is the main address you set for your ad. The expanded URL is what Google actually shows users after adding tracking info. You control the final URL; Google controls the additions to the expanded URL.
What Are the Requirements for a Google Ads Landing Page?
Yes, Google wants landing pages to be relevant to the ad, transparent about offerings, mobile-friendly, easy to navigate, fast-loading, and secure (HTTPS).
Create Your First High-Converting Google Ads Landing Page Today
We hope this article helped you learn how to create Google Ads landing pages that convert with SeedProd.
With SeedProd, it’s easy to design, build, and launch a great landing page in WordPress without writing code or hiring an expensive developer.
You might also find the following tips and tutorials helpful:
- Best WordPress Banner Plugins to Boost Leads and Sales
- How To Add Google Analytics To WordPress
- How to Embed Google Reviews in WordPress
Thanks for reading! We’d love to hear your thoughts, so please feel free to leave a comment with any questions and feedback.
You can also follow us on YouTube, X (formerly Twitter), and Facebook for more helpful content to grow your business.

