Want more conversions from your Google Ads campaigns? Of course, you do! And you want those conversions to be cost-effective, right?
Using dedicated landing pages can significantly reduce your cost per conversion. In fact, Instapage found that dedicated landing pages resulted in a lower cost per conversion compared to using website ads or generic pages. That’s why you’re running ads in the first place – to drive sales, generate leads, or encourage other valuable actions without breaking the bank.
To get more conversions without overspending, start by creating a well-optimized Google Ads landing page.
In this guide, I’ll show you exactly how to create a landing page for Google Ads that’s optimized for conversions. We’ll also look at some Google Ads landing page examples to inspire your design and share essential Google Ads landing page best practices.
How to Create a Google Ads Landing Page:
Why Do You Need a Google Ads Landing Page?
Landing pages are important for Google Ads because they can help convert clicks into customers. When someone clicks on your ad, they expect to land on a page that’s relevant to the ad, and if they don’t, they might leave. Effective landing pages can help you get conversions from your Google Ads traffic.
And, here are some reasons why having a dedicated landing page is important for Google Ads:
- Relevance: Customers expect to land on a page that’s relevant to what they saw in your ad. If the landing page doesn’t match the ad, people are more likely to leave without buying anything.
- Quality score: The experience of a landing page is one of several factors that help determine a keyword’s Quality Score. Other factors include the usefulness and relevance of the information, ease of navigation, and the number of links on the page.
- Post-conversion experience: Your landing page’s post-conversion experience can help you build trust and keep the conversation going with your customers.
Google Ads Landing Page Best Practices
To create the best landing pages for Google Ads that consistently convert, you need to follow proven Google Ads landing page best practices. Your PPC landing page needs to deliver clear value and match visitor expectations.
Ads landing page best practice tips:
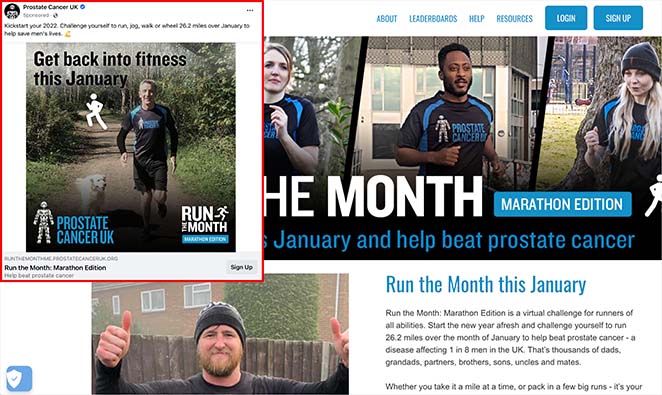
- Match Your Message: Make sure your PPC landing page content says the same thing as your ad. If your ad is about blue widgets, your landing page should be about blue widgets too. This keeps people from feeling tricked and leaving.
- Fast Loading: Nobody likes a slow website. According to Google, a one-second delay in mobile page load times can impact conversion rates by up to 20%. Make your landing page load quickly so people don’t get bored waiting.
- Mobile-Friendly: Most people use their phones to browse. Make sure your landing page experience looks good on any phone or tablet.
- Clear Call to Action: Tell people exactly what you want them to do (e.g., “Shop Now,” “Get a Free Quote”). Make the button big and easy to find.
- Keep it Simple: Don’t overload your page with too much information. Get to the point quickly and highlight the main benefits.
- Great Pictures: Use nice, clear pictures or videos that show off your product or service.
- Build Trust: Show testimonials or reviews from happy customers. Add security badges so people feel safe giving you their information.
- Test and Improve: Try different headlines, buttons, and images to see what works best. Keep tweaking your page to get more conversions.
How to Create a Google Ads Landing Page in WordPress (Step-by-Step)
Now that you’ve seen why a dedicated landing page for Google Ads is essential, let’s walk through exactly how you can create a landing page for Google Ads using WordPress, one of the easiest and most effective ways to build high-converting pages.
En este tutorial utilizaremos SeedProd para crear una página de aterrizaje de WordPress de alta conversión.

SeedProd is a popular WordPress page builder with drag-and-drop functionality. With 300+ responsive landing page templates, you can make any landing page without coding.
SeedProd also offers tons of elements to build your page visually. With bloat-free coding, the plugin is lightning-fast, ensuring the highest page speeds.
Siga los siguientes pasos para crear la mejor página de destino de Google Ads con SeedProd.
Paso 1: Instalar y activar SeedProd Landing Page Builder
El primer paso es descargar SeedProd y cargar el plugin en su sitio web WordPress.
Then, you need to install and activate the plugin. If you’re unsure how to do that, follow this guide on installing SeedProd.
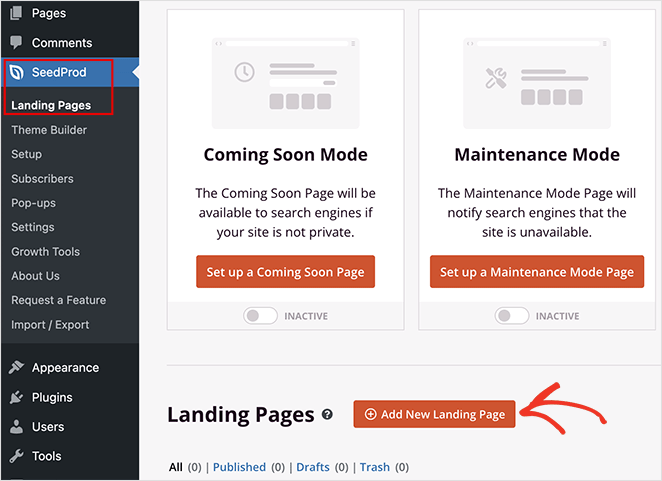
After activating the plugin, go to SeedProd » Landing Pages from your WordPress dashboard and click on the Add New Landing Page button.
Step 2: Choose a High-Converting Google Ads Landing Page Template
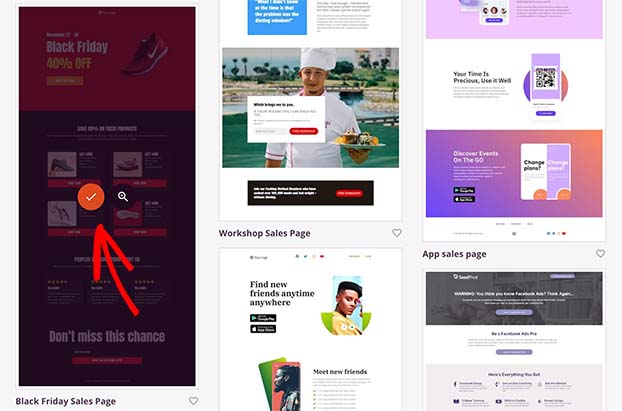
On the next screen, you’ll see a library of mobile-friendly templates.
No te preocupes si no puedes ver ninguna plantilla de página de destino de Google Adwords. Los diseños de SeedProd son polivalentes, por lo que puedes personalizar cualquier plantilla para adaptarla a tu campaña.
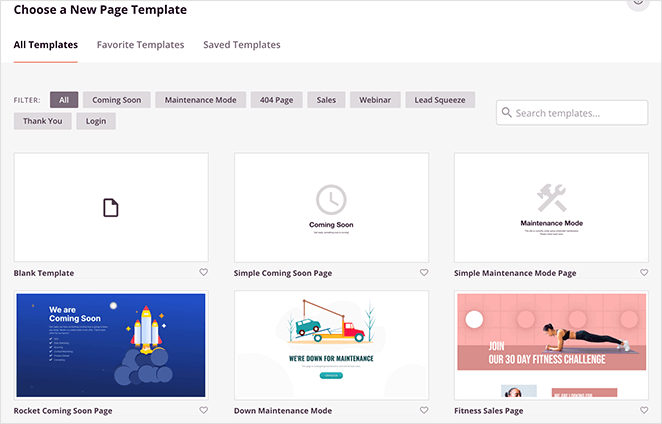
Haz clic en las pestañas de la parte superior para filtrar las plantillas por tipo de página. Luego, cuando encuentres un diseño que te guste, pasa el ratón por encima de la miniatura y haz clic en el icono de la marca de verificación.
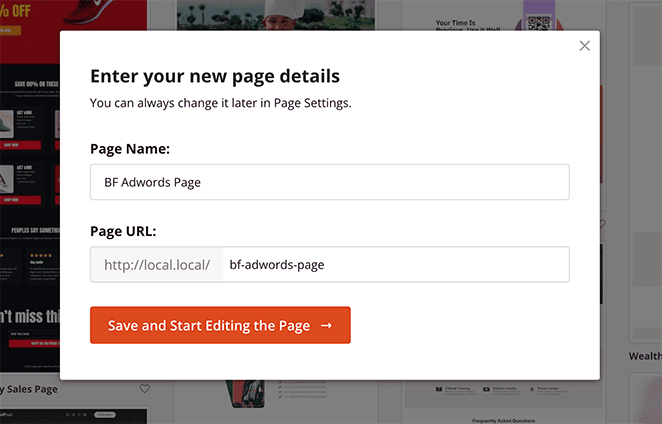
A continuación, verás una ventana emergente en la que puedes añadir el nombre y la URL de tu página de destino. A continuación, haz clic en el botón Guardar y empezar a editar la página para abrir el diseño en el editor visual.
Step 3: Customize Your Google Ads Landing Page
SeedProd’s visual editor uses a straightforward 2-column layout, making it simple to build your landing page exactly how you want it.
A la izquierda hay bloques y secciones para construir tu página de anuncios. Y a la derecha hay una vista previa de cómo queda tu diseño.
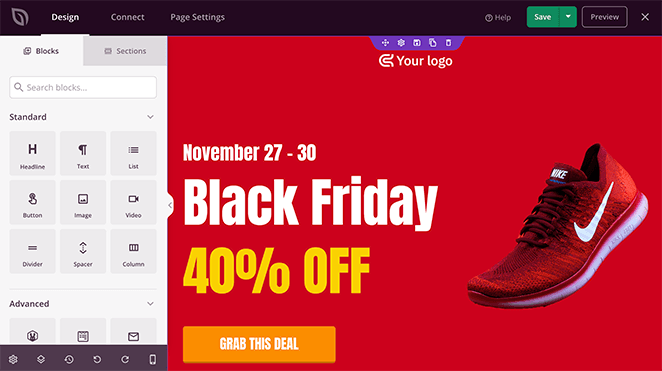
Puedes hacer clic en cualquier parte de la vista previa para editar el contenido existente. Añadir nuevos bloques de contenido es tan sencillo como arrastrar uno desde la izquierda y soltarlo en su sitio en la página.
Por ejemplo, puede hacer clic en un título para cambiar el texto, la alineación, el nivel del título, etc.
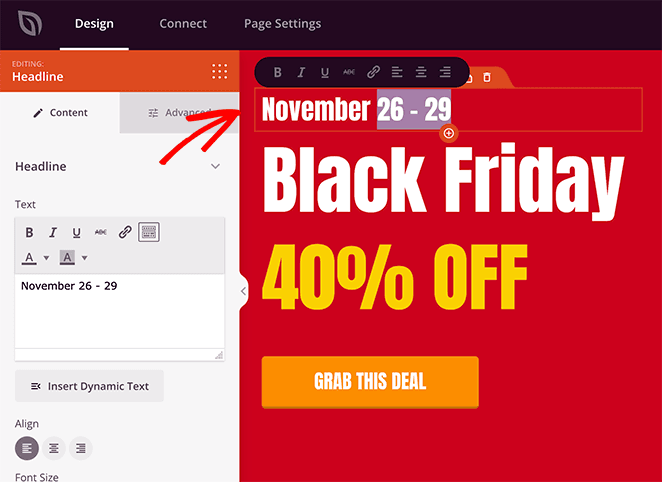
También puede hacer clic en el botón de llamada a la acción para editar la etiqueta del botón y hacer clic en la pestaña Plantillas para elegir un diseño de botón completamente diferente.
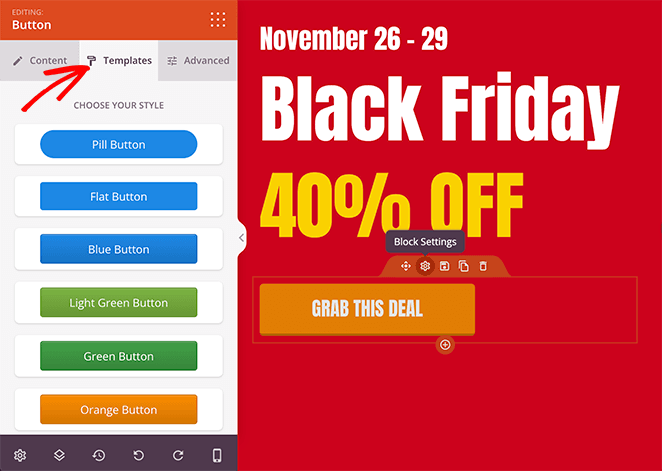
¿Quieres cambiar la imagen por defecto de las plantillas? Haz clic en la imagen y elige el icono de la papelera de la izquierda para eliminarla.

A partir de ahí, puede cargar una nueva imagen de alta calidad desde su biblioteca multimedia de WordPress o desde su ordenador.
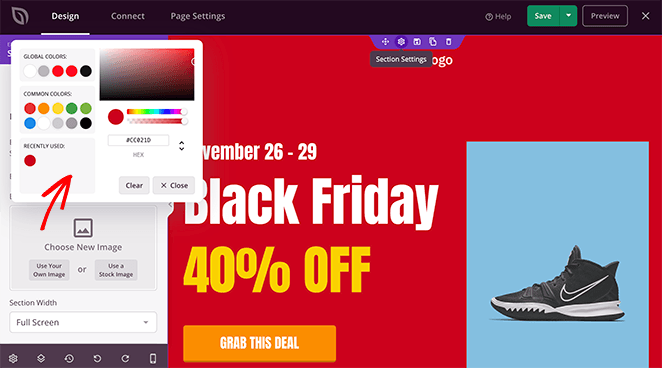
También puede cambiar el color de fondo de cualquier sección haciendo clic en el icono de engranaje. Por ejemplo, puede seleccionar un color que coincida con su marca o imagen principal con la herramienta de selección de color.
Earlier, we mentioned dynamic text replacement to personalize your landing page based on different search queries. With the Dynamic Text feature, you can do this for any heading or line of text in SeedProd.
Por ejemplo, si se dirige a las palabras clave "Cyber Monday" y "Black Friday" para su campaña publicitaria, puede cambiar el encabezado para reflejar esos términos en su página de destino.
Para ello, haga clic en el encabezado, seleccione el botón Texto dinámico y añada las palabras clave de su campaña publicitaria.
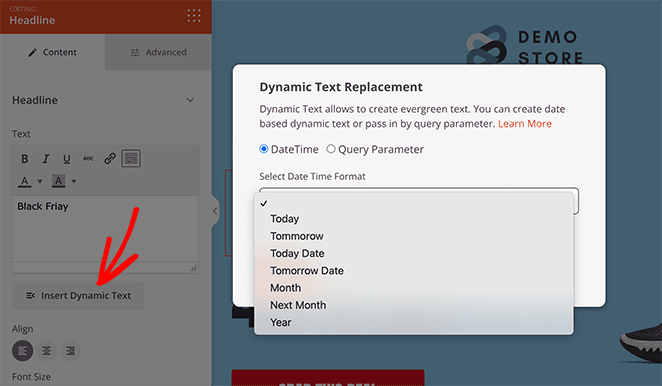
Entonces, cuando la gente haga clic en su sitio, el texto cambiará en función del término con el que encontraron su anuncio.
Puede obtener más información sobre esta función en nuestra documentación sobre texto dinámico.
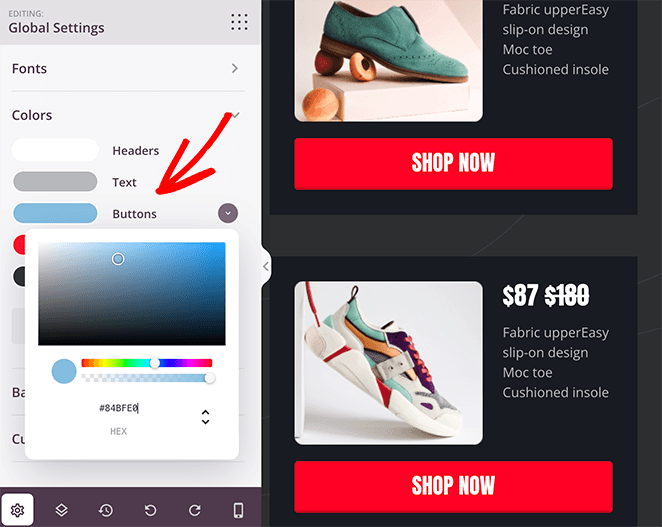
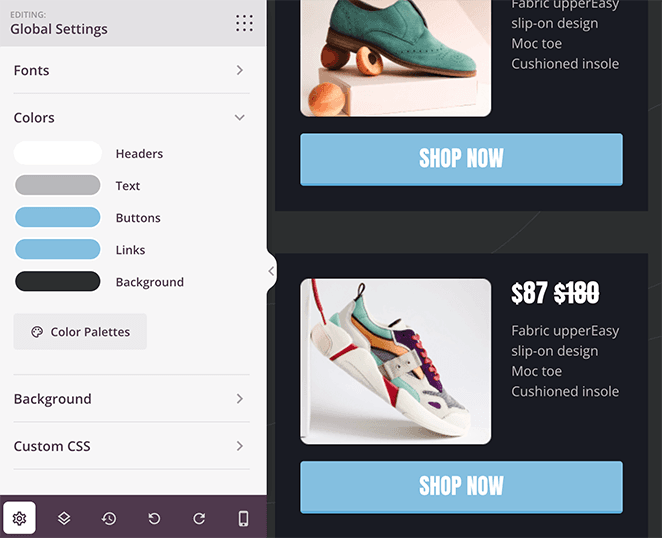
Digamos que desea que todos los botones de su página de destino sean del mismo color. En ese caso, puede utilizar la configuración global de SeedProd para cambiarlos completamente.
Para ello, haz clic en el icono de engranaje de la esquina inferior derecha para ver la configuración global de tus fuentes, colores, fondos y CSS personalizado.
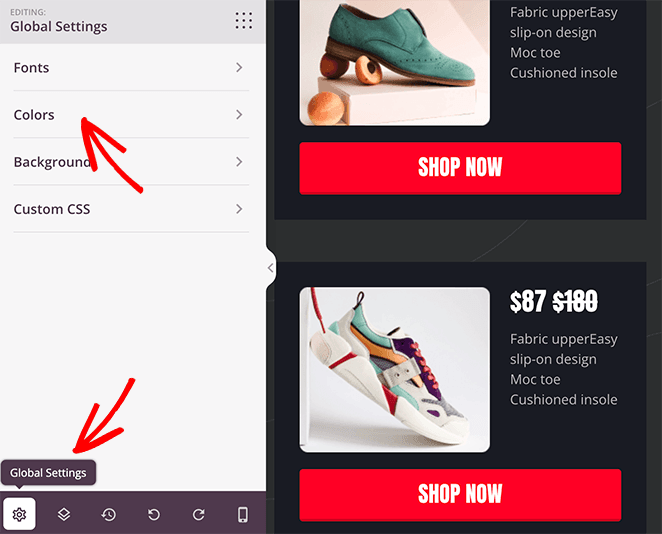
Desde ahí, puedes hacer clic en la pestaña Colores y añadir un color personalizado para todos los botones de tu página.
Continúe personalizando su página de destino hasta que esté satisfecho con su aspecto.
Consejo de experto
Oli Gardner, líder mundialmente reconocido en marketing digital y optimización de la conversión, define la concordancia de mensajes como:

"Mide hasta qué punto el texto de la página de destino coincide con el texto del anuncio o enlace que llevó al visitante hasta allí.
Para los vendedores de PPC, esto significa hacer coincidir el texto del anuncio con el titular de la página de destino. Una buena concordancia del mensaje aumenta las conversiones porque asegura a la gente que ha llegado al lugar adecuado".
Step 4: Configure Your Landing Page Settings
Después de diseñar su página de anuncios de Google, veamos algunos ajustes que le ayudarán a impulsar la generación de clientes potenciales y las conversiones.
Por ejemplo, si su página tiene un formulario para recopilar direcciones de correo electrónico, querrá vincularlo a su servicio de marketing por correo electrónico. Así que haga clic en la pestaña Conectar en la parte superior de la pantalla para ver todos los proveedores de correo electrónico que puede integrar directamente en SeedProd.
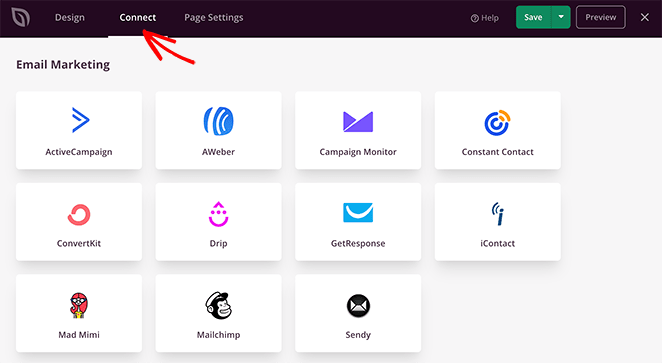
Después de encontrar tu servicio de correo electrónico, haz clic en él y sigue las instrucciones para conectar tu cuenta.
Puede aprender a conectarse a proveedores individuales en nuestra documentación de integración de correo electrónico.
Ahora, veamos otros ajustes haciendo clic en la pestaña Configuración de la página.

En esta pantalla puede editar el nombre y la URL de su página, introducir información sobre SEO en la página, supervisar los análisis de su página de destino e introducir scripts personalizados.
Si tiene SeedProd Elite, puede utilizar la función de Dominio Personalizado para dar a su página de destino una URL única separada de su sitio web. Esta es una manera fácil de configurar múltiples micrositios sin instalar WordPress en cada dominio.
No olvides hacer clic en el botón Guardar de la esquina superior derecha para almacenar los cambios.
Step 5: Publish Your Google Ads Landing Page
Ahora que su página de destino está completa, puede publicarla en su sitio de WordPress. En la esquina superior derecha, haga clic en el menú desplegable junto al botón Guardar y seleccione Publicar.
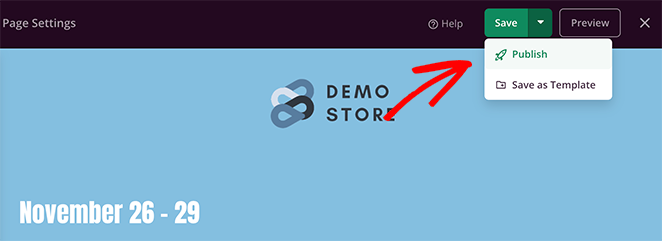
Desde ahí, puede hacer clic en Ver página en directo para obtener una vista previa de su nueva página de destino de Google Ads.
Aquí está la versión final de la página de aterrizaje de anuncios que hicimos en nuestro sitio web de prueba:

Step 6: Link Your Landing Page to Google Ads
Puede añadir su página de destino final a su campaña publicitaria durante el proceso de creación. Cuando cree una campaña de anuncios de Google, busque el campo de texto "URL final" en la parte superior de la página y pegue la URL de su página de destino.
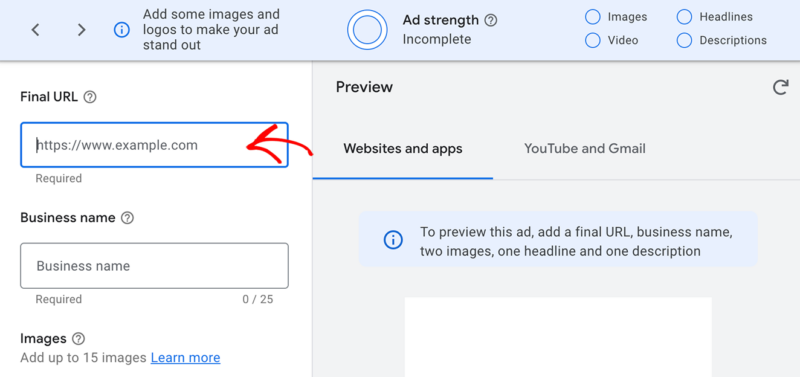
Cuando haya publicado su campaña publicitaria, los visitantes irán a su página de destino después de hacer clic en el anuncio.
Example Google Ads Landing Pages
Looking for inspiration? Here are some excellent Google Ads landing page examples you can use to make your landing page even more effective:
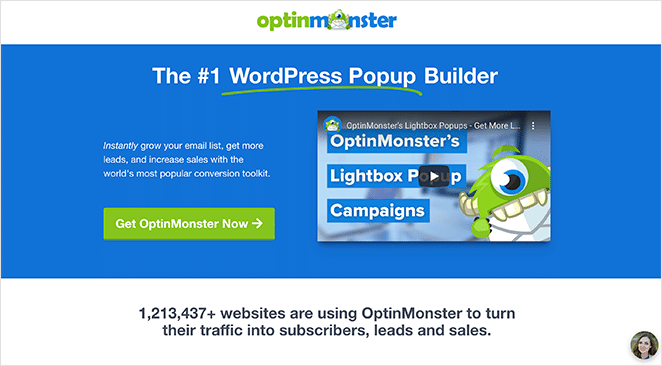
- OptinMonster’s PPC Landing Page: OptinMonster’s landing page uses clear messaging and a compelling call-to-action that matches the ad perfectly. The page keeps visitors focused with simple, uncluttered design.
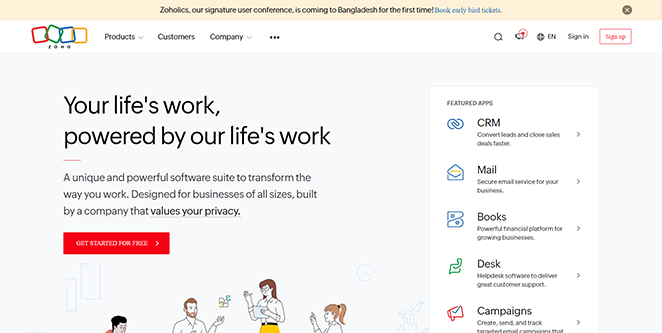
- Zoho’s Google Ads Landing Page: Zoho’s landing page features vibrant visuals, concise copy, and prominent trust signals. The design ensures mobile users have a smooth experience too.
- HubSpot’s PPC Landing Page: HubSpot effectively captures attention with clear headlines, bullet-point benefits, and strong social proof. Their layout encourages visitors to quickly complete the lead capture form.
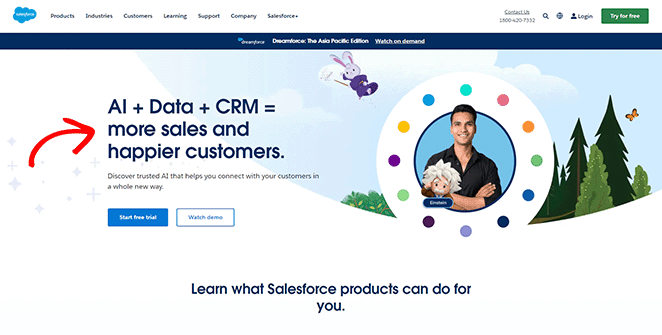
Use these Google Ads landing page examples as a starting point to create your own high-performing landing page.
How to Optimize Your Google Ads Landing Page for Maximum Conversions
Your landing page is the first thing visitors see after clicking your ad. To turn more of those visitors into leads or customers, you need to optimize it carefully. With this in mind, let’s look at some landing page optimization tips that drive clicks.
Write Landing Page Copy That Sells
Your headline should quickly grab visitors’ attention and clearly explain the main benefit or solution you’re offering. Use strong, active verbs and highlight what makes your product or service unique.
In your ads landing page content clearly explain how you can solve the visitor’s problem or fulfill their desire. Focus on benefits, not just features, and address any concerns they might have.
Don’t forget to sprinkle in some social proof – testimonials, reviews, or case studies – to build trust and show potential customers that you deliver results.
Design Your Landing Page for Success
A well-designed landing page guides visitors seamlessly toward conversion. Use contrasting colors, font sizes, and whitespace to emphasize important elements like headlines, benefits, and CTAs.
Make sure your images and videos are high-quality and resonate with your audience.
Remember, most of your visitors will likely be on mobile devices, so ensure your page is fully responsive and looks great on any screen size. Keep the page uncluttered and focused to avoid distractions.
Optimize Your Calls to Action (CTAs)
Your CTAs are the buttons that drive action, so make them irresistible. Use strong action words like “Get Started,” “Claim Your Offer,” or “Sign Up Now.”
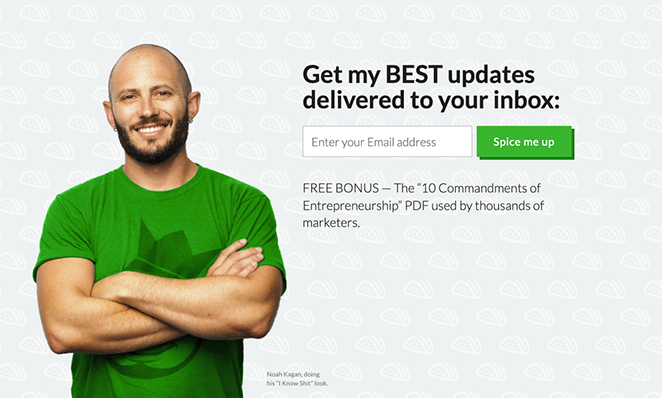
Make sure your CTA buttons are visually prominent and placed strategically throughout the page, especially after key information or benefits. Don’t be afraid to experiment with different CTA styles, colors, and placements to see what works best for your audience.
And if you’re using a lead capture form, keep it short and sweet.
Extra Conversion-Boosting Tips
You can encourage visitors to act quickly by using limited-time offers, countdown timers, or notifications when stock is running low.
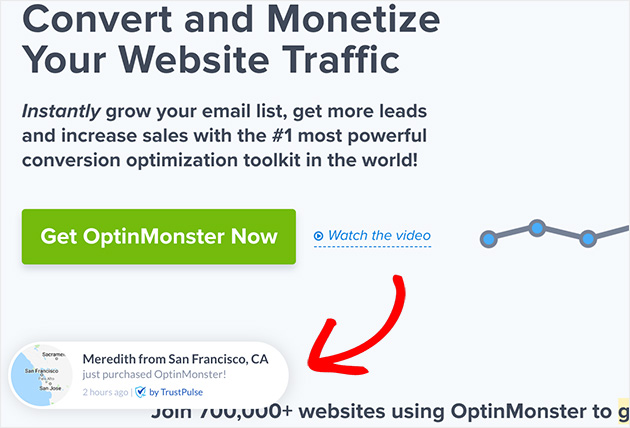
Display trust signals like security badges or guarantees to put their minds at ease. And don’t forget to create a thank-you page to confirm their action and offer further instructions or relevant deals.
By applying these conversion optimization techniques, you’ll transform your Google Ads landing page into a high-performing asset that consistently generates leads and drives sales for your business.
How to Track and Improve Your Google Ads Landing Page Performance
Creating a optimized landing pages is only half the battle won. You need to constantly monitor thier performance to ensure it’s converting visitors into customers. That’s where MonsterInsights comes in.
MonsterInsights is a powerful Google Analytics plugin for WordPress that gives you in-depth insights into your landing page’s performance, right inside your WordPress dashboard.
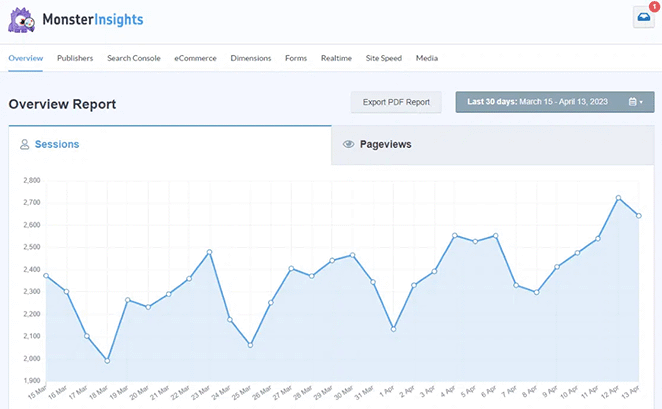
Here’s how MonsterInsights helps you increase your Google Ads conversions:
- Track Your Key Metrics: Easily track crucial metrics like bounce rate, time on page, conversion rate, and more. Understanding these metrics helps identify areas for improvement on your landing page.
- A/B Test Different Headlines and CTAs: Use MonsterInsights to A/B test different elements of your landing page, like headlines and calls to action, to see what resonates best with your audience.
- Analyze Traffic Sources: Understand where your traffic is coming from and focus your efforts on the channels driving the most conversions.
- Form Conversion Tracking: Easily track form submissions on your landing page to see how many visitors are converting into leads.
By providing these insights, MonsterInsights allows you to make data-driven decisions that optimize your landing page for maximum conversions.
Don’t have Google Analytics installed on your WordPress website? Check out our step-by-step guide on how to add Google Analytics to WordPress.
To learn more, please see our step-by-step guide on how to install Google Analytics.
Preguntas frecuentes sobre las páginas de destino de Google Ads
Does Google Ads Have a Landing Page Builder?
No, your Google Ads Account does not have them built in. you need to create your landing page on a separate platform and link it to your Google Ads campaign.
What’s the Difference Between Final URL and Expanded Landing Page URL in Google Ads?
The final URL is the main address you set for your ad. The expanded URL is what Google actually shows users after adding tracking info. You control the final URL; Google controls the additions to the expanded URL.
What Are the Requirements for a Google Ads Landing Page?
Yes, Google wants landing pages to be relevant to the ad, transparent about offerings, mobile-friendly, easy to navigate, fast-loading, and secure (HTTPS).
Create Your First High-Converting Google Ads Landing Page Today
We hope this article helped you learn how to create Google Ads landing pages that convert with SeedProd.
With SeedProd, it’s easy to design, build, and launch a great landing page in WordPress without writing code or hiring an expensive developer.
Puede que también te resulten útiles los siguientes consejos y tutoriales:
- Los mejores plugins de banners de WordPress para aumentar clientes potenciales y ventas
- Cómo añadir Google Analytics a WordPress
- Cómo incrustar reseñas de Google en WordPress
Gracias por leernos. Nos encantaría conocer tu opinión, así que no dudes en dejarnos un comentario con tus preguntas y comentarios.
También puede seguirnos en YouTube, X (antes Twitter) y Facebook para obtener más contenidos útiles para hacer crecer su negocio.

