

Eine kostenlose WordPress-Landingpage ist eine einfache, eigenständige Webseite, die erstellt wird, um Leads zu sammeln, Angebote zu bewerben oder Verkäufe zu tätigen, ohne für einen Designer bezahlen zu müssen.
Kurz gesagt: Erstellen einer kostenlosen Landingpage in WordPress
Der schnellste Weg, eine kostenlose WordPress-Landingpage zu erstellen, ist mit dem kostenlosen Plugin von SeedProd. So sieht der Prozess aus:
- SeedProd kostenlos installieren – Laden Sie es von WordPress.org herunter und aktivieren Sie das Plugin in wenigen Minuten
- Kostenlose Vorlage auswählen – Wählen Sie aus über 16 kostenlosen Vorlagen für Verkaufs-, „Demnächst verfügbar“- und Lead-Kategorien
- Inhalte hinzufügen – Ziehen Sie Text, Bilder und Schaltflächen mit dem visuellen Editor an die richtige Stelle
- Stile anpassen – Legen Sie Schriftarten, Farben und Hintergrund im globalen Einstellungsbereich fest
- Mobile Ansicht prüfen – Vorschau auf dem Handy anzeigen und vor der Veröffentlichung anpassen
- Veröffentlichen – Klicken Sie auf „Veröffentlichen“ und Ihre Landingpage wird auf Ihrer WordPress-Website live geschaltet
Erstellen einer kostenlosen WordPress-Landingpage (in 30 Minuten)
Für dieses Tutorial verwende ich SeedProd, ein beliebtes Drag-and-Drop-WordPress-Plugin mit über 1 Million aktiven Installationen. Es ermöglicht Ihnen, vollständig benutzerdefinierte Landingpages zu erstellen, ohne Code schreiben zu müssen.
Es wurde sowohl für Anfänger als auch für Profis entwickelt, sodass Sie Seiten schnell veröffentlichen und sich auf das Wachstum Ihres Publikums konzentrieren können.

Im Gegensatz zu anderen Seitenerstellern ist SeedProd sehr schnell und verlangsamt Ihre Website nicht. Es verwendet minimalen Code und bewährte Designpraktiken, um sicherzustellen, dass Ihre Website so schnell wie möglich ist.
Video-Anleitung
Sieh es dir lieber als Video an statt zu lesen? Dieses kurze Video führt Sie durch jeden Schritt der Erstellung einer kostenlosen Landingpage in WordPress.
Wenn Sie lieber lesen als zusehen möchten, folgen Sie den nachstehenden Schritten.
1. Installieren Sie den kostenlosen Landingpage-Ersteller von SeedProd
Der erste Schritt ist die Installation des kostenlosen WordPress-Landingpage-Plugins von SeedProd. Sie können dies tun, indem Sie in Ihrem WordPress-Dashboard zu Plugins » Neues Plugin hinzufügen navigieren.
Geben Sie dann „SeedProd“ in das Suchfeld auf der rechten Seite ein. Dies zeigt Ihnen die folgenden Ergebnisse:
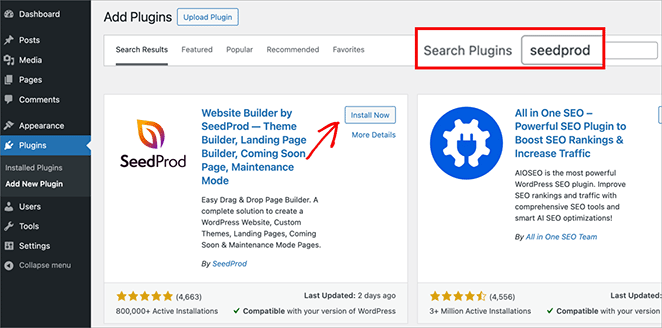
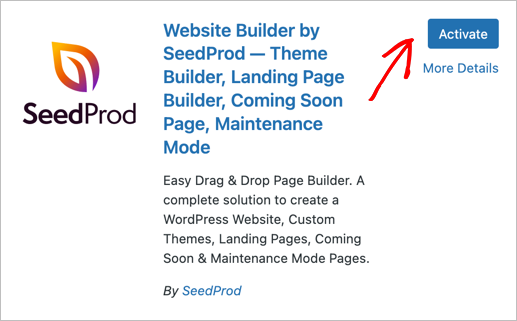
Klicken Sie auf Installieren neben der Option Website Builder by SeedProd. Klicken Sie dann auf Aktivieren.
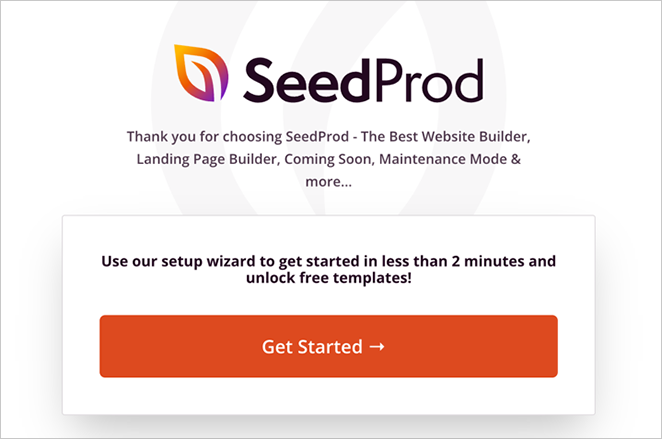
Nach der Aktivierung des Plugins sehen Sie den SeedProd-Einrichtungsassistenten, der Ihnen hilft, in 2 Minuten mit der Erstellung einer Landingpage zu beginnen. Klicken Sie auf „Los geht’s“.
Für den ersten Schritt im Assistenten müssen Sie eine E-Mail-Adresse eingeben, um Ihr kostenloses SeedProd-Konto zu erstellen. Entscheiden Sie dann, welche Art von Landingpage Sie erstellen möchten.
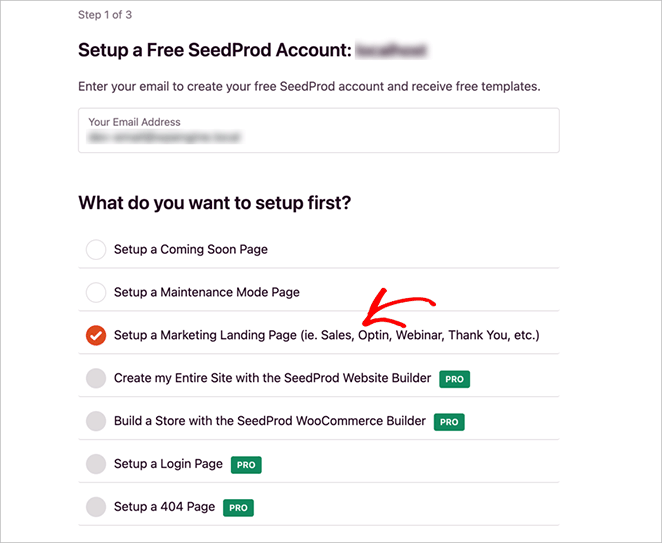
Es gibt 3 kostenlose Optionen zur Auswahl:
- Demnächst verfügbar-Seite einrichten
- Wartungsmodus-Seite einrichten
- Marketing-Landingpage einrichten (z. B. Verkaufs-, Opt-in-, Webinar-, Dankesseiten usw.)
Sie sehen auch mehrere Pro-Optionen, mit denen Sie Anmeldeseiten, 404-Seiten, Online-Shops und sogar ein benutzerdefiniertes WordPress-Theme einrichten können.
Für diese Anleitung konzentrieren wir uns auf die kostenlosen Optionen und wählen „Marketing Landing Page“ und klicken dann auf „Speichern und fortfahren“.
2. Wählen Sie eine kostenlose Landingpage-Vorlage
Der nächste Schritt im Einrichtungsassistenten ermöglicht es Ihnen, eine kostenlose Landingpage-Vorlage auszuwählen.
Sie können die Vorlagen filtern, indem Sie auf die verschiedenen Kategorien am oberen Bildschirmrand klicken:
- Wartungsmodus (Coming Soon)
- Wartungsmodus
- 404-Seite
- Verkäufe
- Webinar
- Lead Squeeze
- Danke
- Anmelden
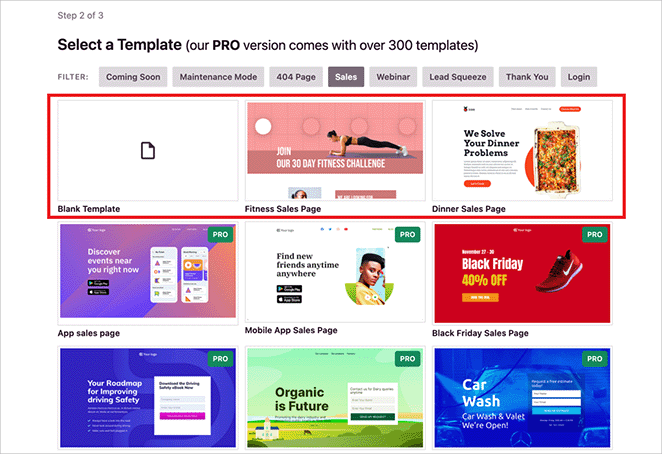
SeedProd bietet eine großartige Auswahl an kostenlosen Landingpage-Vorlagen in verschiedenen Seitenkategorien. Sie können auch noch mehr kostenlose Vorlagen freischalten, indem Sie sich für den E-Mail-Verteiler anmelden.
Um auf die vollständige Bibliothek von über 300 Premium-Vorlagen zuzugreifen, können Sie auf SeedProd Pro upgraden.
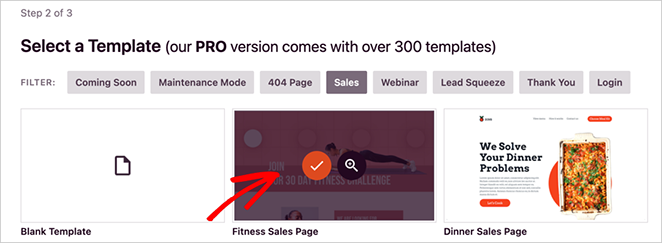
Für dieses Tutorial verwenden wir die kostenlose Vorlage Fitness-Verkaufsseite. Bewegen Sie die Maus über das Vorlagensymbol und klicken Sie auf das Häkchensymbol.
Nachdem Sie Ihre Vorlage ausgewählt haben, gelangen Sie automatisch zum letzten Schritt des Einrichtungsassistenten. Hier können Sie einen Rabatt für das Upgrade auf SeedProd Pro nutzen.
Sie können auch andere optionale kostenlose WordPress-Plugins installieren.
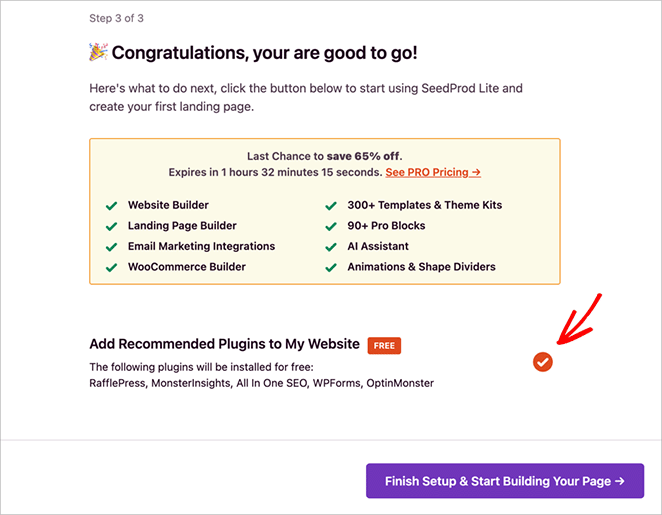
Wenn Sie diese Plugins nicht installieren möchten, klicken Sie auf den Schalter. Klicken Sie dann auf „Einrichtung abschließen & Seite erstellen“.
Nun verlassen Sie den Einrichtungsassistenten und gelangen zur SeedProd-Einrichtungsseite. Hier sehen Sie, dass die Option „Landingpage einrichten“ durchgestrichen ist, was bedeutet, dass Sie diese Aufgabe abgeschlossen haben.
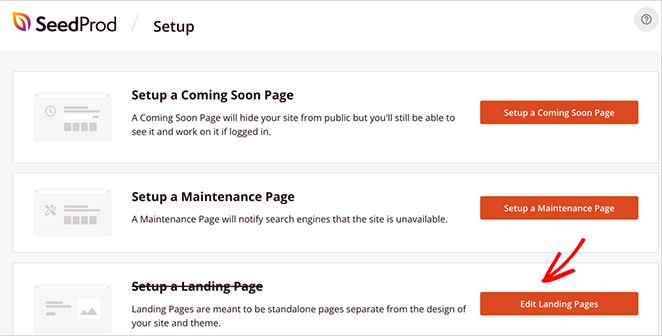
Sie werden auch die Option „Landingpages bearbeiten“ bemerken. Klicken Sie auf diese Schaltfläche.
Nun bringt Sie SeedProd zum Landingpage-Dashboard. Hier sehen Sie die von Ihnen erstellte kostenlose Landingpage unter der Überschrift „Landingpages“.
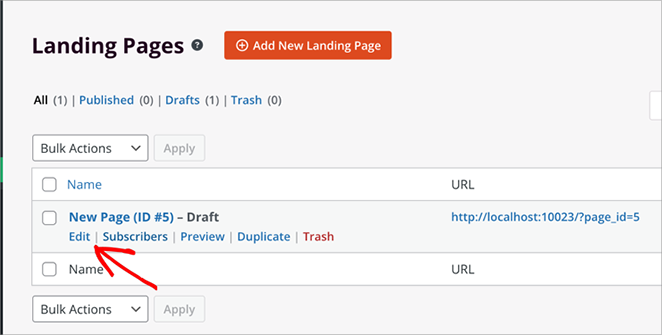
Bewegen Sie den Cursor über den Link der Landingpage und klicken Sie dann auf die Option Bearbeiten, um Ihre Seite zu öffnen und mit der Anpassung zu beginnen.
3. Fügen Sie Ihre einzigartigen Landingpage-Inhalte hinzu
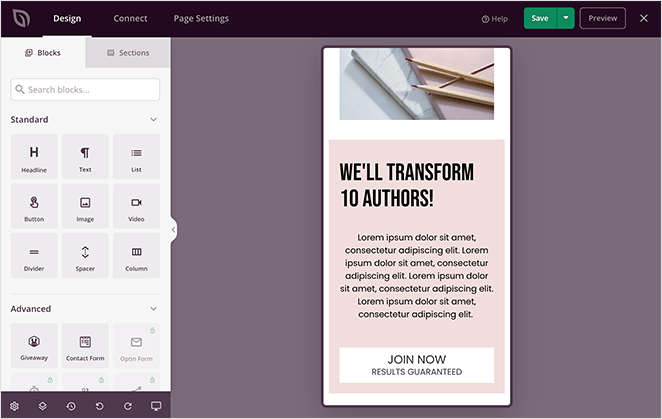
Der visuelle Seitenersteller von SeedProd ist in 2 verschiedene Bereiche unterteilt. Auf der linken Seite befinden sich die verschiedenen Blöcke, mit denen Ihre Seite gestaltet wird, während auf der rechten Seite eine Live-Vorschau Ihrer Landingpage angezeigt wird.
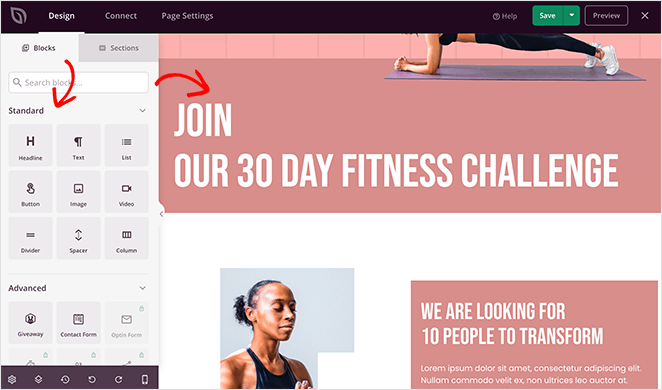
Um Inhalte hinzuzufügen, ziehen Sie einen Block aus dem linken Bereich und legen Sie ihn in Ihrer Live-Vorschau ab. Sie sehen dann die Änderungen in Echtzeit.
Es gibt verschiedene Landingpage-Blöcke zur Auswahl, darunter:
- Überschrift
- Text
- Liste
- Schaltfläche
- Bild
- Video
- Trenner
- Abstandhalter
- Spalte
Sie können auch 5 der erweiterten Seitenblöcke von SeedProd – Giveaway, Zahlungsschaltfläche, Kontaktformular, Envira-Galerie und Benutzerdefinierter HTML-Code – kostenlos nutzen.
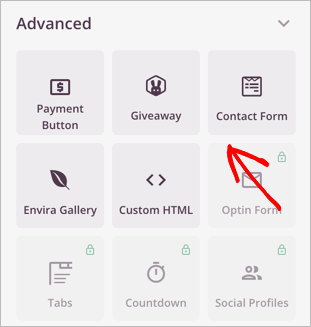
Mit diesen Blöcken können Sie:
- Einen Online-Wettbewerb erstellen und auf Ihrer Seite anzeigen
- Erstellen und betten Sie benutzerdefinierte WordPress-Formulare ein
- Erstellen Sie beeindruckende Bilder-Slider für Ihre Seite
- Fügen Sie benutzerdefinierten HTML-Code hinzu, der nahtlos mit Ihrem Design funktioniert
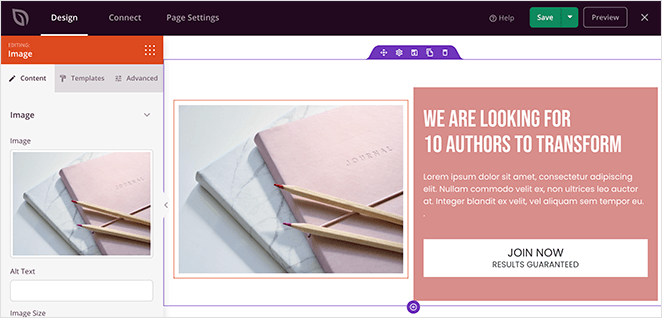
Beginnen Sie mit dem Hinzufügen Ihrer einzigartigen Inhalte, indem Sie auf einen beliebigen Block in Ihrer Live-Vorschau klicken. Daraufhin wird auf der linken Seite ein Einstellungsfenster angezeigt, in dem Sie die Standardinhalte durch Ihre eigenen ersetzen können.
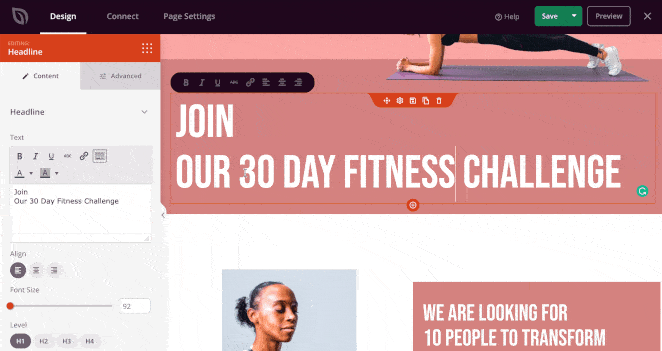
Alternativ können Sie die Inhalte direkt in Ihrer Vorschau mit der Inline-Textbearbeitungsfunktion von SeedProd bearbeiten.
Das Ersetzen der Standardbilder ist ebenso einfach. Klicken Sie auf ein beliebiges Bild in Ihrer Live-Vorschau und dann auf das Papierkorbsymbol im Einstellungsfenster auf der rechten Seite.
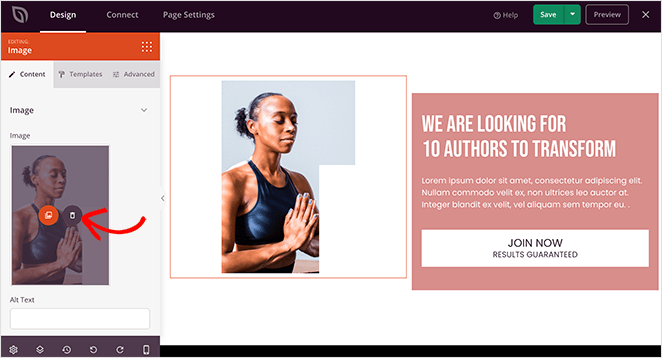
Klicken Sie dann auf die Schaltfläche Eigene Bilder verwenden, um ein Foto von Ihrem Computer oder Ihrer WordPress-Mediathek hochzuladen.
SeedProd enthält auch KI-Tools zur Beschleunigung der Inhaltserstellung. Verwenden Sie den integrierten KI-Schreibassistenten, um Landingpage-Texte zu generieren, oder den KI-Bildgenerator, um benutzerdefinierte Grafiken zu erstellen.
Fügen Sie weiterhin Inhalte hinzu, bis Sie mit dem Gesamterscheinungsbild zufrieden sind. Klicken Sie dann oben rechts auf dem Bildschirm auf die grüne Schaltfläche Speichern.
4. Passen Sie die Stile Ihrer Landingpage an
Nachdem Sie Ihre einzigartigen Inhalte zu Ihrer kostenlosen Landingpage hinzugefügt haben, möchten Sie sicherstellen, dass das Styling mit Ihrer Marke übereinstimmt.
Dies können Sie ganz einfach tun, indem Sie auf das Zahnradsymbol in der unteren linken Ecke klicken, um Ihre globalen Seiteneinstellungen anzuzeigen.
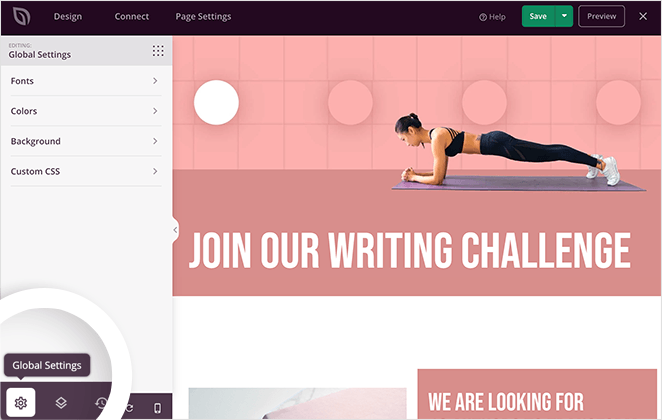
Diese Einstellung ermöglicht es Ihnen, Ihre Landingpage anzupassen:
- Hintergrund
- Farben
- Schriftarten
- Benutzerdefiniertes CSS
Beginnen wir mit der Option Hintergrund, um den Hintergrund Ihrer Landingpage anzupassen. In diesem Bereich können Sie die Hintergrundfarbe ändern, einen Farbverlauf hinzufügen oder ein benutzerdefiniertes Hintergrundbild hochladen.
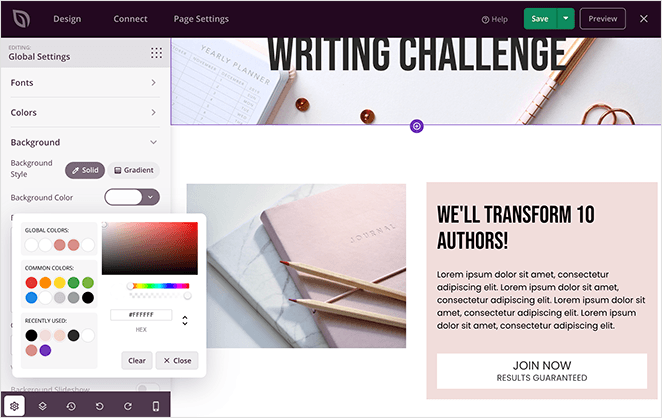
Um ein benutzerdefiniertes Hintergrundbild hinzuzufügen, klicken Sie auf die Schaltfläche Eigene Bilder verwenden.

Im Abschnitt Schriftarten können Sie aus einer riesigen Bibliothek kostenloser Google-Webschriftarten für die Überschriften, Links und den Textkörper Ihrer Landingpage wählen.

Klicken Sie auf eines der Dropdown-Menüs, um Ihre bevorzugten Schriftarten auszuwählen.
Der Abschnitt Farben hat ähnliche Point-and-Click-Einstellungen, bei denen Sie benutzerdefinierte Farben für Kopfzeilen, Text, Links, Schaltflächen und mehr auswählen können.
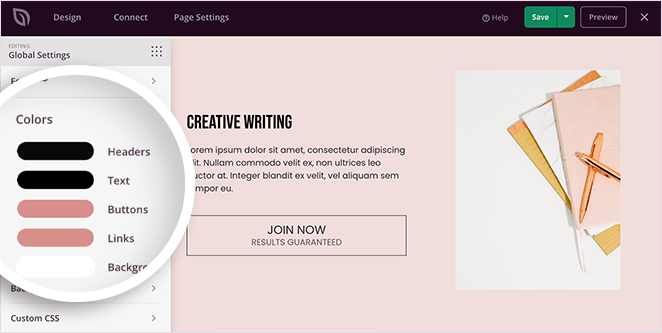
Klicken Sie auf eine beliebige Option und verwenden Sie den Farbwähler, um eine auszuwählen, die zu Ihrem Branding und dem Gesamtdesign Ihrer Seite passt. Dies ändert diese Farben für Ihre gesamte Landingpage.
Wenn Sie mit dem Design Ihrer Landingpage zufrieden sind, klicken Sie auf die Schaltfläche Speichern, um Ihre Einstellungen zu speichern.
5. Überprüfen Sie, ob Ihre Landingpage korrekt funktioniert
Nachdem das Design Ihrer kostenlosen Landingpage steht, sollten Sie sicherstellen, dass alles ordnungsgemäß funktioniert, bevor Sie sie auf Ihrer Website veröffentlichen. Gehen Sie Ihr Design durch und prüfen Sie, ob die Links der CTA-Schaltflächen funktionieren und ob keine Tippfehler oder Grammatikfehler vorhanden sind.
Sie müssen auch sicherstellen, dass Ihre Landingpage auf Mobilgeräten gut aussieht. SeedProd macht dies mit seiner integrierten Mobile-Vorschau-Option einfach.

Klicken Sie auf das mobile Symbol am unteren Bildschirmrand, um Ihre Landingpage auf Mobilgeräten, Tablets und Desktops in der Vorschau anzuzeigen.
Von dort aus können Sie Elemente verschieben, bis Ihre Seite auf allen Bildschirmen gut aussieht. Während globale Stile konsistent bleiben, können Sie auch mobile Anpassungen vornehmen, um das Erlebnis für kleinere Geräte fein abzustimmen.
6. Konfigurieren Sie Ihre Landingpage-Einstellungen
Nachdem Sie überprüft haben, ob Ihre Landingpage korrekt funktioniert und auf Mobilgeräten gut angezeigt wird, ist es an der Zeit, einige Einstellungen zu konfigurieren.
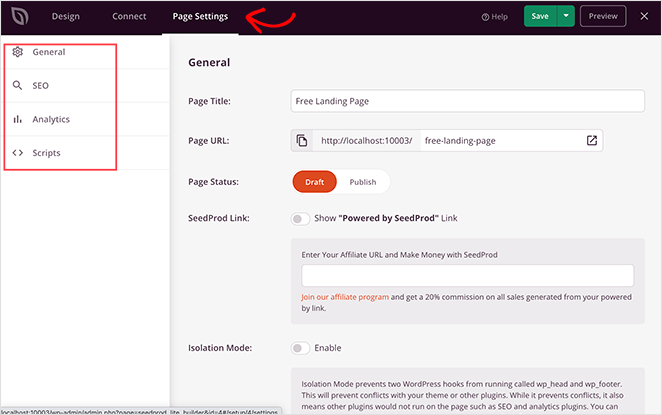
Klicken Sie auf die Registerkarte Seiteneinstellungen oben auf Ihrem Bildschirm, um die verschiedenen Seiteneinstellungen von SeedProd anzuzeigen, darunter:
- Allgemeine Einstellungen: Ändern Sie den Namen und die URL Ihrer kostenlosen Landingpage und legen Sie die Seite als Entwurf oder veröffentlicht fest.
- SEO: Richten Sie den SEO-Titel, die Meta-Beschreibung und mehr Ihrer Seite mit dem WordPress-Plugin All in One SEO ein.
- Analytics: Überwachen Sie die Leistung Ihrer Landingpage mit MonsterInsights, dem besten Google Analytics-Plugin für WordPress.
- Skripte: Fügen Sie benutzerdefinierte Tracking-Skripte zu Ihrer Landingpage hinzu, z. B. Ihren Facebook-Tracking-Pixel.
Wenn Sie mit der Bearbeitung Ihrer Seiteneinstellungen fertig sind, denken Sie daran, auf die Schaltfläche Speichern zu klicken.
7. Veröffentlichen Sie Ihre Landingpage mit WordPress
Nachdem Sie Ihrer kostenlosen Landingpage den letzten Schliff gegeben haben, ist es an der Zeit, sie auf Ihrer WordPress-Website zu veröffentlichen.
Klicken Sie dazu auf den Pfeil nach unten neben der grünen Schaltfläche Speichern oben rechts auf Ihrem Bildschirm und dann auf Veröffentlichen.
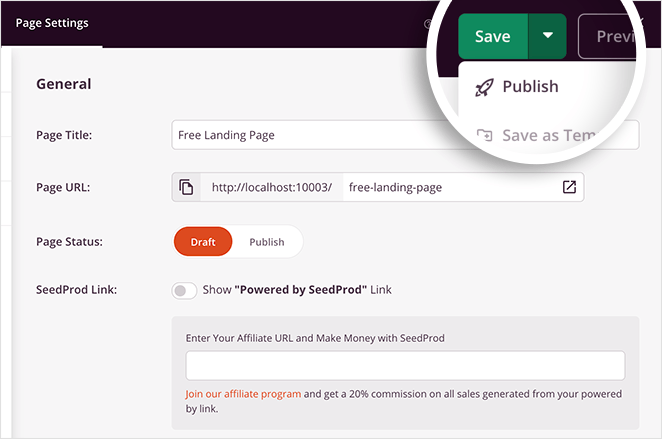
Anschließend sehen Sie ein Popup, das bestätigt, dass Ihre Seite live ist.
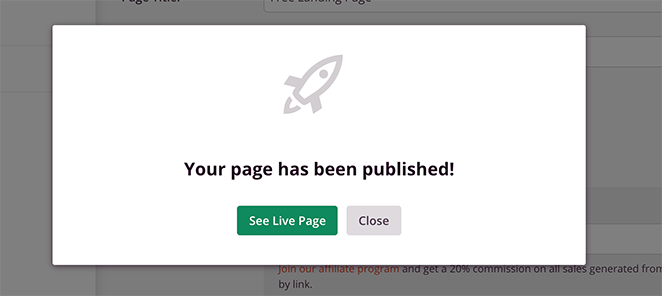
Klicken Sie auf die Schaltfläche Live-Seite anzeigen, um Ihre kostenlose Landingpage in der Vorschau anzuzeigen.

Was macht eine gute WordPress-Landingpage aus?
Bevor Sie mit der Erstellung Ihrer Landingpage in WordPress beginnen, sollten Sie einige Dinge beachten, darunter:
- Definieren Sie ein klares Ziel: Sie sollten genau wissen, was Ihre Landingpage erreichen soll, und dieses Ziel über Ihr gesamtes Design hinweg beibehalten.
- Verwenden Sie eine klare visuelle Struktur: Entscheiden Sie, welche Seitenelemente am wichtigsten sind, und heben Sie sie hervor, um Besucher zum Handeln zu bewegen.
- Schreiben Sie eine starke Handlungsaufforderung (CTA): Sagen Sie den Besuchern genau, was sie tun sollen, und machen Sie es ihnen leicht, diese Aktion auszuführen.
- Verwenden Sie ein attraktives Design: Halten Sie Ihr Layout sauber und ansprechend und platzieren Sie die wichtigsten Inhalte „above the fold“, damit sie ohne Scrollen sichtbar sind.
- Schreiben Sie prägnante Texte: Verwenden Sie kurze, klare Sätze, die Leser dazu anregen, weiter nach unten auf der Seite zu lesen.
- Fügen Sie hochwertige Bilder hinzu: Verwenden Sie Bilder, die Ihre Kernbotschaft unterstützen, und vermeiden Sie generische Stockfotos.
- Konzentrieren Sie sich auf das Wertversprechen: Erklären Sie klar, wie Ihr Angebot dem Besucher hilft und warum es sich lohnt, auf Ihre Handlungsaufforderung zu klicken.
Eine gut erstellte Landingpage konvertiert typischerweise zu 2-5 %. Sehen Sie, was Sie in unserem Leitfaden zur Conversion-Rate von Landingpages anstreben sollten.
Was tun nach der Veröffentlichung Ihrer Landingpage
Herzlichen Glückwunsch! Sie haben Ihre kostenlose Landingpage in WordPress erstellt.
Aber Ihre Arbeit ist noch nicht getan. Hier ist, was Sie als Nächstes tun sollten:
Bewerben Sie Ihre Landingpage
Traffic auf Ihre neue Landingpage zu lenken ist entscheidend. Hier sind ein paar einfache Möglichkeiten, sie zu bewerben:
- Teilen Sie sie in sozialen Medien: Erzählen Sie Ihren Freunden und Followern von Ihrer neuen Landingpage. Teilen Sie den Link auf Facebook, Twitter, Instagram und allen anderen von Ihnen genutzten Social-Media-Plattformen.
- Fügen Sie sie Ihrer E-Mail-Signatur hinzu: Fügen Sie einen Link zu Ihrer Landingpage in Ihre E-Mail-Signatur ein, damit jeder, dem Sie eine E-Mail senden, sie leicht finden kann.
- Veranstalten Sie einen Wettbewerb oder ein Gewinnspiel: Ein Wettbewerb kann eine unterhaltsame Möglichkeit sein, die Leute für Ihre Landingpage und Ihr Angebot zu begeistern.
Analysieren Sie Ihre Ergebnisse
Sobald Sie Traffic erhalten, ist es wichtig zu verfolgen, wie Ihre Landingpage abschneidet.
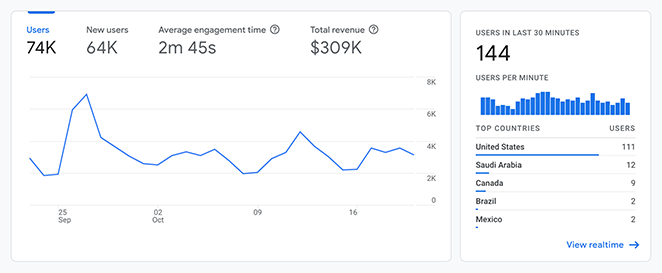
Sie können ein kostenloses Tool wie Google Analytics verwenden, um Besucher, Sitzungsdauer und Aktionen auf Ihrer Seite zu verfolgen. Diese Informationen helfen Ihnen zu verstehen, was funktioniert und was nicht.
Eine einfache Anleitung zur Einrichtung finden Sie in unserem Tutorial unter Google Analytics zu WordPress hinzufügen.
A/B-Tests zur Verbesserung
A/B-Tests bedeuten, zwei leicht unterschiedliche Versionen Ihrer Landingpage zu erstellen und zu sehen, welche besser abschneidet.
Beachten Sie, dass A/B-Tests ein leistungsstarkes Werkzeug sind, das normalerweise in Premium-Plugins zur Konversionsoptimierung zu finden ist.
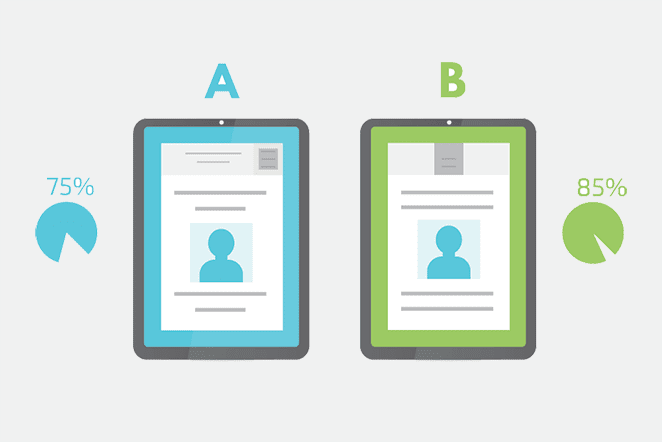
Sie könnten zum Beispiel verschiedene Überschriften, Bilder oder Call-to-Action-Schaltflächen testen. Dies hilft Ihnen, Ihre Landingpage für maximale Konversionen zu optimieren.
Sehen Sie sich unseren Leitfaden zu A/B-Tests für Landingpages an, um loszulegen.
Indem Sie diese Schritte befolgen, können Sie sicherstellen, dass Ihre kostenlose Landingpage für Sie hart arbeitet und Ihnen hilft, Ihre Ziele zu erreichen.
Kostenlose WordPress-Landingpage-Alternativen
Nachdem Sie nun wissen, wie Sie mit SeedProd eine kostenlose Landingpage erstellen können, fragen Sie sich vielleicht, wie sie sich im Vergleich zu anderen kostenlosen Optionen schlägt. WordPress bietet verschiedene Möglichkeiten, Landingpages zu erstellen, aber nicht alle sind gleich einfach oder effektiv.
Vergleichen wir SeedProd mit Elementor und dem integrierten Block-Editor, damit Sie sehen können, welches Tool Ihren Bedürfnissen am besten entspricht.
| Plugin / Werkzeug | Benutzerfreundlichkeit | Kostenlose Vorlagen | Einschränkungen |
|---|---|---|---|
| SeedProd (Kostenlos) | Anfängerfreundliches Drag & Drop | Über 16 kostenlose Vorlagen | Erweiterte Blöcke & Integrationen erfordern Pro |
| Elementor (Kostenlos) | Flexibler, aber schwerfälliger | Dutzende von Starter-Vorlagen | Einige Funktionen (Formulare, Marketing-Blöcke) sind für Pro gesperrt |
| WordPress Block-Editor (Gutenberg) | Bereits in WordPress integriert | Grundlegende Seitenlayouts | Kein echter Landingpage-Modus (zeigt immer noch Theme-Header/Footer an) |
In meinen GTmetrix-Tests lud SeedProd in 556 ms im Vergleich zu Elementors 1.882 ms, was mehr als 3x schneller ist. Dieser Geschwindigkeitsunterschied ist wichtig, wenn Ihre Landingpage bezahlten Traffic erhält.
Basierend auf dem Vergleich ist SeedProd die direkteste Lösung für die Erstellung ablenkungsfreier Landingpages mit vorgefertigten Vorlagen. Elementor bietet mehr Designflexibilität, während der Standard-Block-Editor für die grundlegende Seitenerstellung geeignet ist, aber wichtige, spezifische Landingpage-Funktionen fehlen.
Sollten Sie WordPress oder ein separates Landingpage-Tool verwenden?
Wenn Sie bereits auf WordPress sind, gibt es keinen Grund, ein separates Tool wie Wix oder HubSpot für Landingpages hinzuzufügen. SeedProd funktioniert innerhalb Ihrer bestehenden Website, sodass Ihre Seite Ihre Domain, Ihre Google Analytics-Verfolgung und Ihre bestehende SEO-Arbeit teilt.
Ich habe gesehen, wie Leute eine Wix-Landingpage eingerichtet haben, um Leads zu erfassen, und sich dann wunderten, warum ihre Analysen von ihrer Hauptseite getrennt schienen. Externe Tools erstellen eigenständige Seiten, die Ihrer WordPress-Website überhaupt nicht zugutekommen.
Ich nutze SeedProd auf meiner eigenen Website aus genau diesem Grund. Jeder Besucher landet auf einer Seite, die Teil meiner Domain ist, was zu derselben Google Analytics-Property und demselben SEO-Fußabdruck beiträgt.
Fragen zu kostenlosen WordPress-Landingpages
Kann KI mir eine Landingpage erstellen?
SeedProd generiert kein vollständiges Seitenlayout aus einer Eingabeaufforderung. Es enthält jedoch KI-Tools zum Schreiben von Landingpage-Texten und zum Generieren von Bildern. Sie erhalten also keine vollständige Seite mit einem Klick, aber die KI-Text- und Bildtools helfen Ihnen, Ihre Inhalte schneller zu erstellen, sobald Sie eine Vorlage ausgewählt haben.
Was ist das beste kostenlose Landingpage-Plugin für WordPress?
Das beste kostenlose Landingpage-Plugin für WordPress ist SeedProd. Es enthält über 16 kostenlose Vorlagen, einen Drag-and-Drop-Editor und veröffentlicht Seiten, die unabhängig von Ihrem Theme funktionieren, ohne dass Code erforderlich ist.
Kann ich eine Landingpage in WordPress erstellen, ohne für ein Theme zu bezahlen?
Ja. SeedProd erstellt Landingpages, die unabhängig von Ihrem WordPress-Theme funktionieren. Selbst die kostenlose Version ermöglicht es Ihnen, vollständig benutzerdefinierte Seiten zu erstellen und zu veröffentlichen, ohne ein separates Theme installieren oder kaufen zu müssen.
Funktionieren kostenlose WordPress-Landingpages auf Mobilgeräten?
Absolut. Die meisten kostenlosen Builder wie SeedProd enthalten mobil-responsive Vorlagen und eine Live-Vorschau für Mobilgeräte, sodass Sie das Layout für alle Geräte optimieren können.
Wie verbinde ich eine kostenlose Landingpage mit meiner E-Mail-Liste?
Direkte E-Mail-Integrationen sind bei den meisten Landingpage-Buildern ein Premium-Feature. Sie können Ihre E-Mail-Liste jedoch immer noch kostenlos verbinden, indem Sie ein Formular-Plugin wie WPForms verwenden. Erstellen Sie Ihr Anmeldeformular und fügen Sie es mit dem WPForms-Block zu Ihrer Landingpage hinzu.
Ist es besser, ein Landingpage-Plugin oder einfach eine normale WordPress-Seite zu verwenden?
Landingpage-Plugins geben Ihnen mehr Kontrolle und entfernen Ablenkungen wie Header und Footer. Das macht sie besser für die Lead-Generierung und Konversionen.
Bonus: Weitere Landingpages, die Sie erstellen können
In diesem Leitfaden habe ich Ihnen gezeigt, wie Sie kostenlos eine einfache Landingpage erstellen können. Wenn Sie jedoch etwas Spezifischeres wünschen, sehen Sie sich meine Anleitungen zum Erstellen verschiedener Arten von Landingpages in WordPress an:
- Erstellen Sie eine Event-Landingpage
- Erstellen Sie eine Sales-Funnel-Landingpage
- Erstellen Sie eine Umfrage-Landingpage
- Erstellen Sie eine Mitglieder-Landingpage
- Erstellen Sie eine Wartelisten-Landingpage
- Erstellen Sie eine Online-Kurs-Landingpage
- Erstellen Sie eine Affiliate-Marketing-Landingpage
- Erstellen Sie eine Google Ads-Landingpage
- Erstellen Sie eine Podcast-Landingpage
- Erstellen Sie eine Instagram-Landingpage
- Erstellen Sie eine Facebook-Landingpage
- Erstellen Sie eine App-Landingpage
- Erstellen Sie eine Video-Landingpage
- Erstellen Sie eine Buch-Landingpage
Als Nächstes: Erfahren Sie mehr über Landing Pages
Sie wissen jetzt, wie Sie eine kostenlose Landing Page in WordPress erstellen. Das Beste daran: Sie haben es ohne technisches Fachwissen oder Kosten geschafft.
Für einen detaillierteren Überblick über die Premium-Funktionen von SeedProd in Aktion, sehen Sie sich dieses Tutorial an: Erstellen einer Landing Page in WordPress
Oder legen Sie direkt los und...
Starten Sie noch heute mit SeedProd
Wenn Sie mehr über Landing Pages erfahren möchten, werfen Sie einen Blick auf diese Ressourcen für Landing Pages:
- Landingpage vs. Verkaufsseite
- Die besten Formeln für Überschriften von Landing Pages
- Landing Page vs. Microsite
- Beispiele und Best Practices für Landingpage-URLs
- Landingpage vs. Splash Page
- Was ist eine gute Landingpage-Conversion-Rate?
- Anatomie einer Landingpage
Danke fürs Lesen! Wir würden uns freuen, Ihre Gedanken zu hören. Treten Sie also gerne der Konversation auf YouTube, X und Facebook bei, um weitere hilfreiche Ratschläge und Inhalte für das Wachstum Ihres Unternehmens zu erhalten.
Danke fürs Lesen! Wir würden uns freuen, Ihre Gedanken zu hören. Treten Sie also gerne der Unterhaltung auf YouTube, X und Facebook bei, um weitere hilfreiche Ratschläge und Inhalte für das Wachstum Ihres Unternehmens zu erhalten.


