Do you want to add a WooCommerce shopping cart icon in menu bars?
Adding a WooCommerce shopping cart icon in your menu helps shoppers view their cart and checkout faster, especially when it includes a live item count. It’s one of the easiest ways to improve the shopping experience and reduce cart abandonment.
When you’re running an online store, creating the best user experience is crucial. If you’re not meeting shoppers’ needs, they’ll leave your site for a better, more user-friendly alternative.
To make shopping at your store easier, you can add a cart icon to your WooCommerce menu with an item count. That way, shoppers can see their cart contents and check out whenever they want.
This article will show you how to add a WooCommerce shopping cart icon in menus step-by-step.
You’ve probably seen cart icons like that when shopping at Amazon:
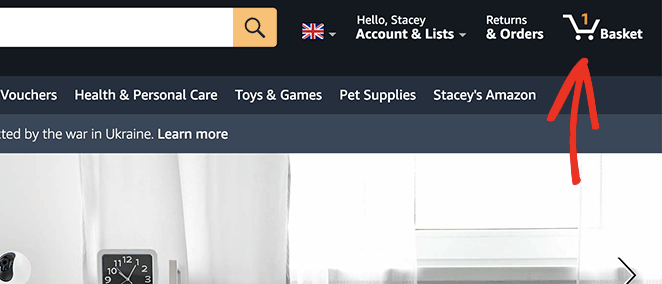
The icon stays in the navigation menu even as you click on different product pages.
Why Add WooCommerce Shopping Cart Icon In Menu?
The key benefit of adding cart count icons to your navigation menu is that it helps shoppers see how many products they add to the cart. Moreover, it gives them an idea of how much things will cost before heading to the checkout page.
Additionally, shopping cart menu icons give users a fast and easy way to reach the cart page. As a result, the checkout process is smoother, making it more likely visitors won’t abandon their shopping carts.
How to Add a WooCommerce Cart Icon in Your WordPress Menu (With Item Count)
WooCommerce doesn’t include a shopping cart icon for menus by default. Instead, you’ll need to either install a WooCommerce plugin or code that functionality by scratch.
If writing code sounds scary, don’t worry. Here are 2 super-easy, code-free ways to add a WooCommerce shopping cart icon to your menu.
Method 1: Add WooCommerce Cart Icon to Menu Using SeedProd (No Code)
The first method involves using a powerful WordPress plugin to customize your WooCommerce store.
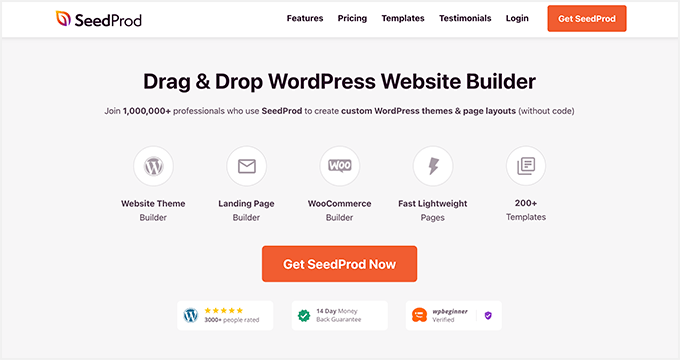
SeedProd is the best website builder for WordPress, with over 1 million users. It lets you create custom WordPress themes, WooCommerce websites, and high-converting landing pages without code.
With over 200+ premade templates, getting started is easy. You can customize any layout with the visual drag-and-drop builder and responsive blocks and sections.
Of particular note are the dedicated WooCommerce blocks. They let you customize every part of your WooCommerce site with just a few clicks.
Follow the steps below to add a WooCommerce shopping cart icon to menus with SeedProd.
Step 1. Install SeedProd Website Builder
First, download a copy of the SeedProd website builder plugin.
Note: there is a free version of SeedProd you can use. However, we’ll use the SeedProd Elite plan for the WooCommerce features we need.
After downloading SeedProd, you’ll need to install and activate the plugin on your WordPress website. You can follow this guide to install a WordPress plugin if you need help.
Next, go to SeedProd » Settings from your WordPress admin menu. That is where you can enter your SeedProd license key and unlock your Pro plugin features.
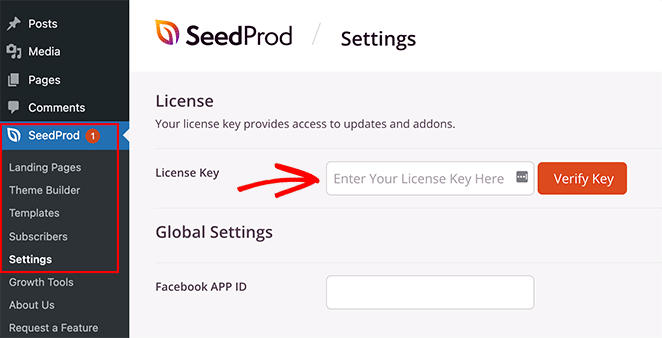
You can find your license key by going to the SeedProd website and logging into your account. From there, copy your license key from the “Downloads” section.
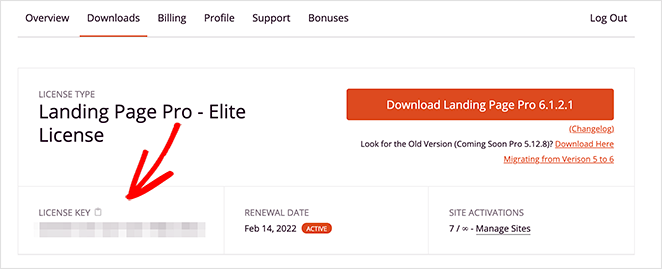
Now paste your key into the text field and click the Verify Key button.
Step 2. Create a New WooCommerce Theme
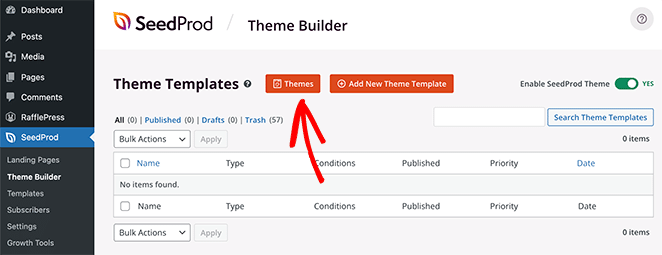
The next step is to go to the SeedProd » Theme Builder page. This is where you can create a new custom theme for your WooCommerce website.
We recommend this option because it will replace your existing WordPress theme with a fast and lightweight theme you can customize easily with drag and drop. It also means you won’t need to create a separate child theme or install extra WordPress plugins.
There are 2 ways to create a theme with SeedProd’s theme builder:
- Pre-built theme: import a ready-made WooCommerce theme that automatically makes all the pages you need for your online store.
- Individual theme parts: build the different parts of your WooCommerce store individually.
We’ll use the pre-built theme method for this guide because it does everything for you automatically. Click the Themes button to see a list of premade WordPress and WooCommerce themes.
Each theme is 100% mobile-friendly and easy to edit with SeedProd’s drag-and-drop page builder.
Hover your mouse over any theme and click the checkmark icon to import it to the theme builder.
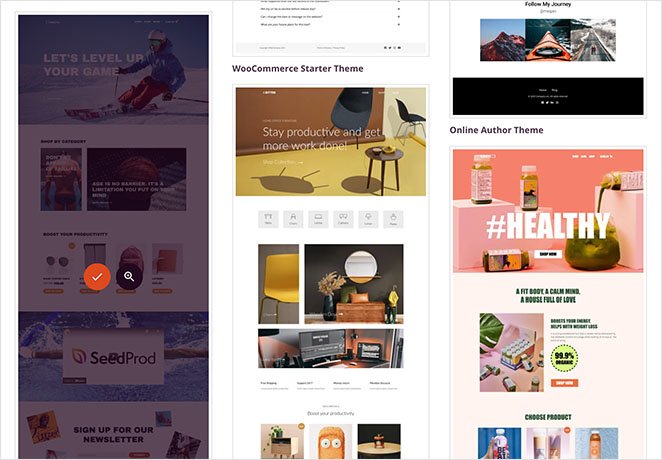
We’ll use the Sportswear Store theme for this tutorial.
After importing your theme, you’ll see all the templates that make up your WooCommerce website design. You can customize each template individually to tailor them to your site’s needs with SeedProd’s page builder.
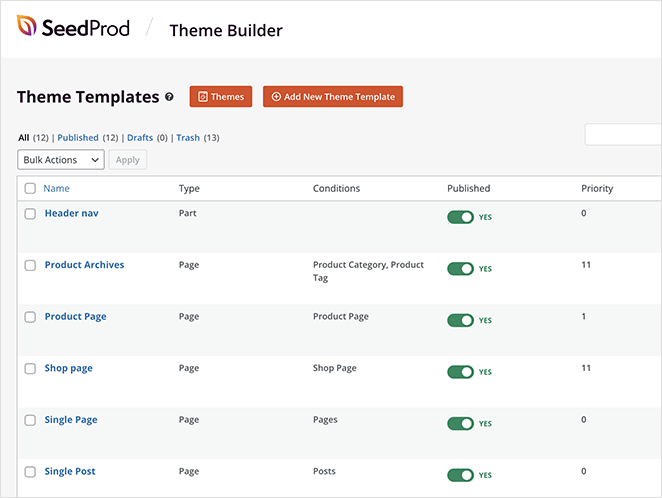
Next, we’ll show you how to customize the “Header nav” template.
Step 3. Customize Your WooCommerce Navigation Menu
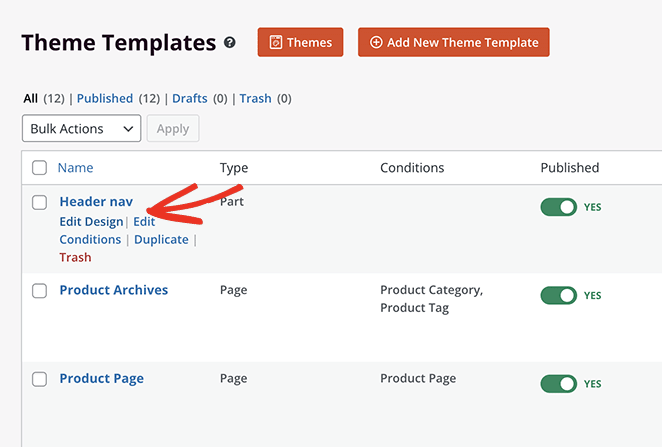
Many of SeedProd’s pre-made themes automatically come with a WooCommerce shopping cart icon in the navigation bar. Let’s open the header navigation template to see how it works.
Find the “Header nav” template in your template list and click the Edit Design link to open it in the visual page builder.
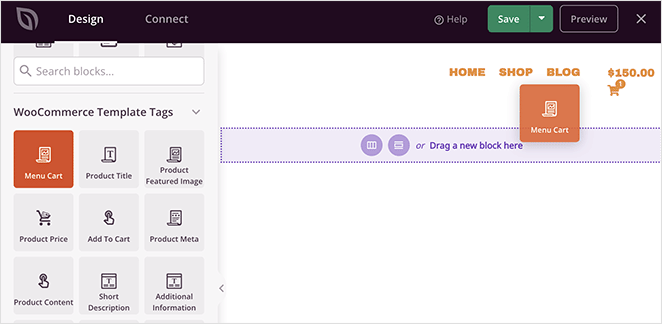
You’ll see your header layout on the right-hand side when you open the page. On the left are blocks and sections you can add to your design.
To add a block to your page, drag it from the left and drop it onto your design.
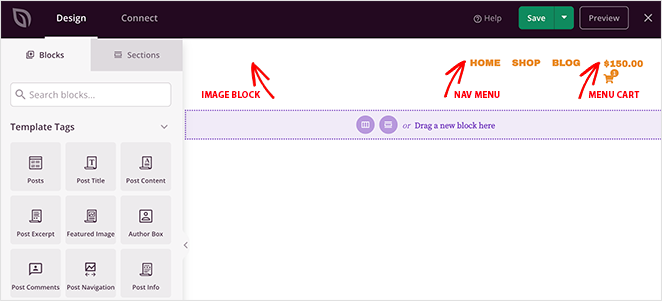
As you can see, there are already 3 blocks in the header:
- Image for the website logo
- WordPress navigation menu
- Menu cart block
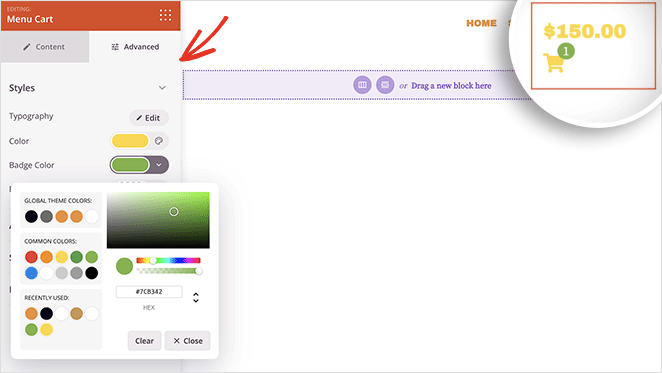
The Menu Cart block displays a cart icon, how many items are in the cart, and the sub-total. You can change the look and functionality in the Menu Cart settings panel on the left.
For instance, you can hide the cart when it’s empty, show or hide the subtotal and change the cart alignment.

You can find more settings by clicking the Advanced tab. For example, you can change the cart and cart badge color, adjust the spacing, and even hide the badge on mobile or desktop devices.
When you’re happy with how your menu cart icon looks, click the green Save button.
Step 4. Customize Your WooCommerce Theme
Now you can customize the other templates that make up your WooCommerce theme. The process is similar to the previous step, but if you need help, here are some step-by-step instructions:
- How to Customize Your WooCommerce Shop Page
- How to Customize WooCommerce Product Category Pages
- How to Display Featured Products in WooCommerce
Step 5. Enable SeedProd WooCommerce Theme
After customizing your WooCommerce theme with SeedProd, you’re ready to make it live on your website.
To do that, go to SeedProd » Theme Builder. Then in the top-right corner, turn the “Enable SeedProd Theme” toggle to the Yes position.

Now you can preview your menu cart icon to see how it looks.

When shoppers click the menu cart icon, they’ll go to the shopping cart page. You can also customize your WooCommerce shopping cart with SeedProd.
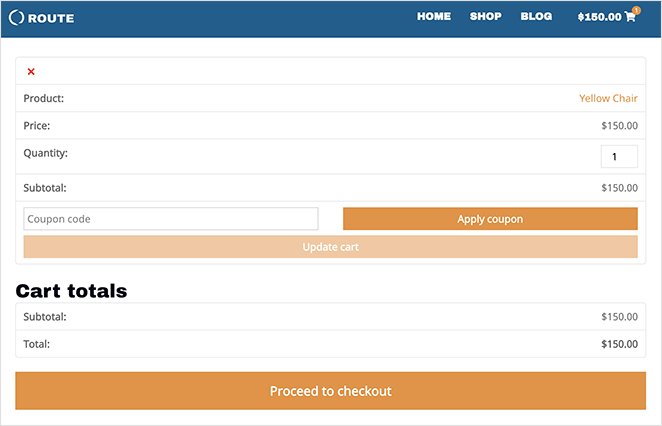
Here’s an example of Amazon’s menu cart that we also made with SeedProd:

Method 2: Add WooCommerce Menu Cart Icon With a Free Plugin
Next is a solution you can use if you don’t wish to change your existing WordPress theme. Instead, you can use a free WooCommerce plugin to add an icon to your wp nav menu items.
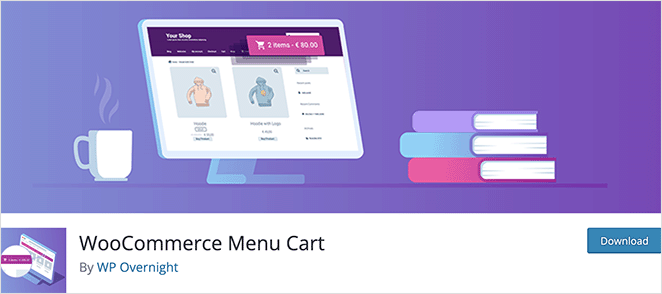
The plugin we will use is called WooCommerce Menu Cart. It works with WooCommerce, Easy Digital Downloads, and many other WordPress eCommerce platforms and takes only a few minutes to set up.
Step 1. Install WooCommerce Menu Cart Plugin
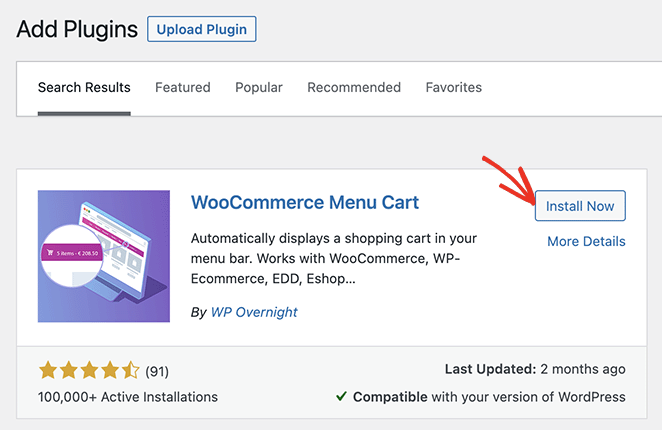
First, go to Plugins » Add New from your WordPress dashboard and type “WooCommerce Menu Cart” into the search box.
Next, click the Install button and click Activate to make the plugin live.
Step 2. Configure WooCommerce Shopping Cart Icon
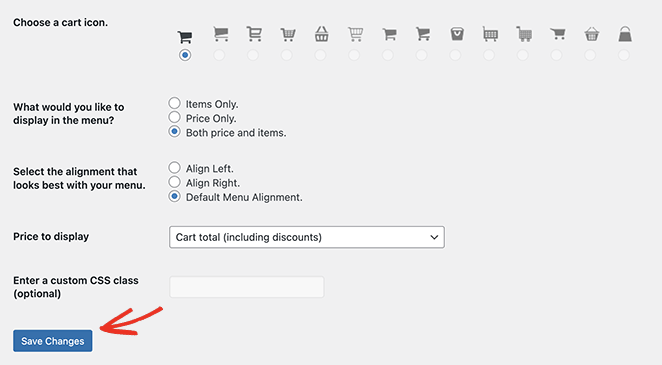
After installing the plugin, go to WooCommerce » Menu Cart Setup from your WordPress admin panel. On this page, you can choose your eCommerce platform, select a menu to show your woo cart icon, choose a cart icon, and more.
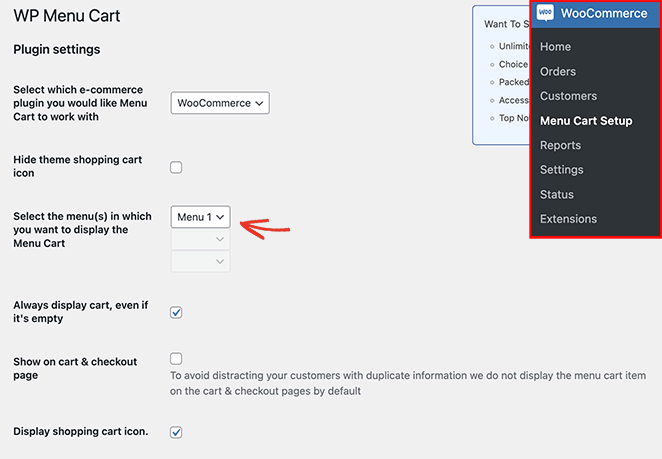
Configure your cart icon settings, then click the Save Changes button.
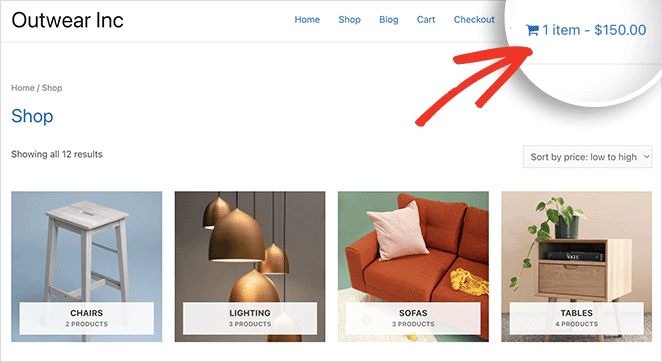
You can now visit your site and see your WooCommerce shopping cart icon menu.
FAQs About WooCommerce Cart Icons in Menus
Adding a WooCommerce shopping cart icon to your menu makes it easier for visitors to check out, and that means more completed sales for you.
Whether you use SeedProd’s drag-and-drop builder or a free plugin, you don’t need code or complicated settings to make it work. Just a few clicks and you’re done.
Next, you might want to check out these guides to keep customizing your WooCommerce store:
- How to Customize the WooCommerce Additional Information Tab
- How to Add View Cart Button in WooCommerce
- How to Change Shop Page Title in WooCommerce
- How to Create a Stunning Product Image Gallery in WooCommerce
- How to Add Star Rating to WooCommerce Product Pages
- How to Display Related Products in WooCommerce
- How to Display Product Categories and Tags in WooCommerce
- How to Get and Display Product Descriptions in WooCommerce
- How to Fix WooCommerce View Cart Not Working
- How to Hide Out of Stock Products in WooCommerce
Thanks for reading! We’d love to hear your thoughts, so please feel free to leave a comment with any questions and feedback.
You can also follow us on YouTube, X (formerly Twitter), and Facebook for more helpful content to grow your business.

