You can preview your WordPress site before going live using coming soon mode, the built-in WordPress editor, or a staging environment.
Each method works for a different situation. Coming soon mode lets you build your entire site privately while showing visitors a placeholder page. The editor preview lets you check individual posts and pages before hitting publish. And a staging environment gives you a safe copy of your live site to test bigger changes.
In this guide, I’ll walk you through 6 easy ways to preview your WordPress site so nothing goes live until you’re ready.
- 1. Preview WordPress Before Launch with Coming Soon Mode
- 2. Let Clients Preview Their Site Before Going Live
- 3. Preview Posts and Pages with the WordPress Editor
- 4. Preview a WordPress Theme with Live Preview
- 5. Preview Customizations with Live Customizer
- 6. Preview WordPress Landing Pages with SeedProd
- 7. Preview Your WordPress Theme with SeedProd
- 8. Preview Development Work with Staging Environments
- FAQs About Previewing WordPress Before Going Live
1. Preview WordPress Before Launch with Coming Soon Mode
If you’re building a new site, enable a coming soon page so visitors see a polished placeholder while you work. You can still log in, preview changes, and test everything before going live.

To do this the easy way, use SeedProd. It’s a the best WordPress website builder that lets you create a beautiful coming soon page and keep your real site private until launch.
First, install and activate SeedProd on your WordPress website. If you’re using the Pro version, enter your license key under SeedProd » Settings.

Then, go to SeedProd » Landing Pages and click Set up a Coming Soon page.
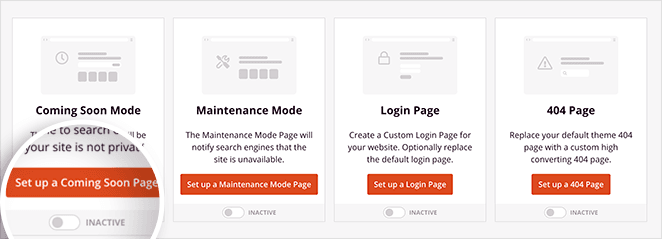
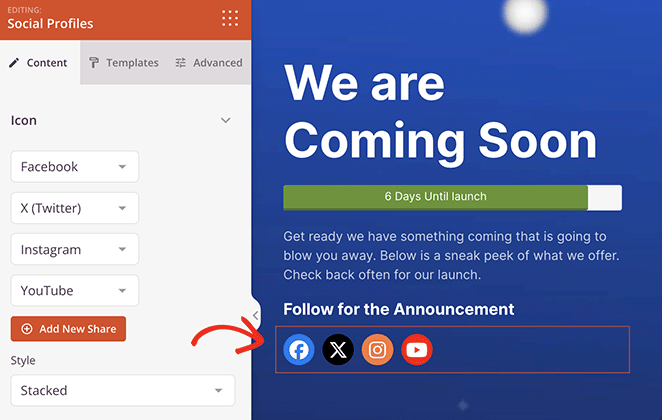
From there, pick a template you like, then customize it with your logo, message, and any extras like an email signup form or social links.
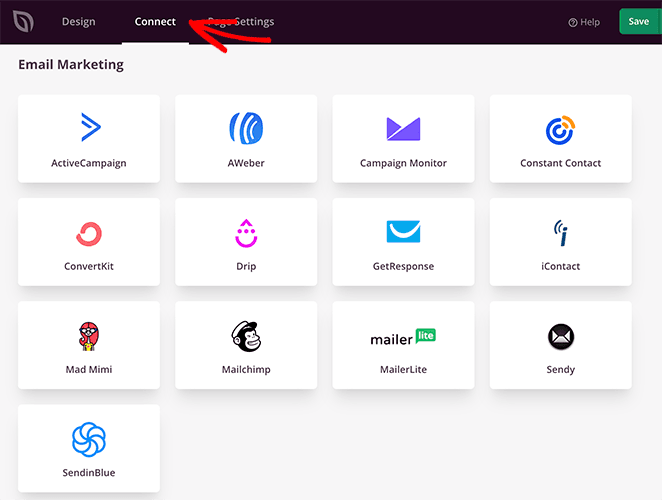
You can also connect your email provider under the Connect tab so you can start collecting subscribers before launch.
Save and publish your coming soon page, then back on the Landing Pages screen, switch the Coming Soon mode toggle to Active.
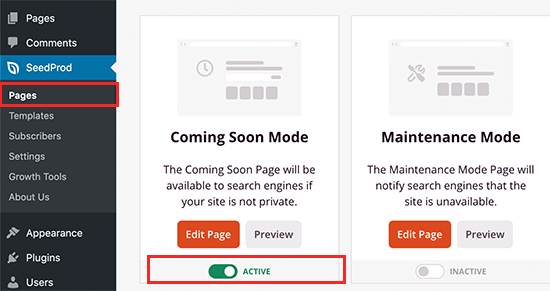
From now on, visitors will see your coming soon page. Logged-in admins see the real site and can preview changes on desktop and mobile.
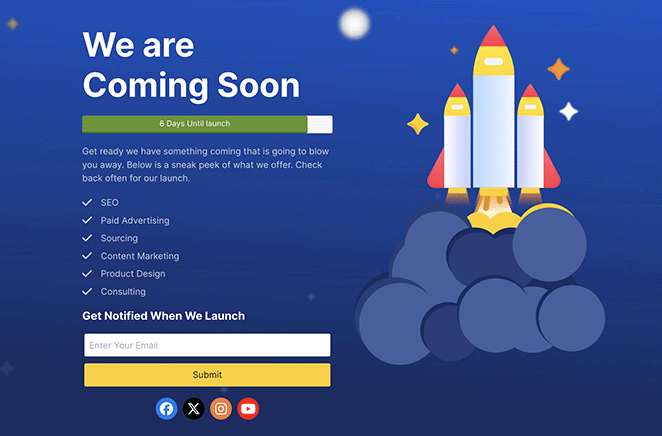
When you’re ready to launch, just return to SeedProd and turn the toggle Off. Your site goes live instantly.
If you need more details, here’s the full guide on how to create a coming soon page in WordPress with SeedProd.
2. Let Clients Preview Their Site Before Going Live
If you’re building a website for a client, you’ll need a simple way to share progress without making the site public too soon.
Some hosting plans include staging links, but not all do. That’s why the easiest option is using the SeedProd. Besides hiding your in-progress site behind a coming soon page, it gives you powerful access controls to share private previews.
For example, you can create a branded coming soon page for visitors, then send your client a secret bypass link so they can view the full site while you continue making changes.
Here’s how to set up client previews in SeedProd.
First, follow the instructions from above to create a coming soon page.
Next, click the Page Settings tab at the top of the page within the editor.
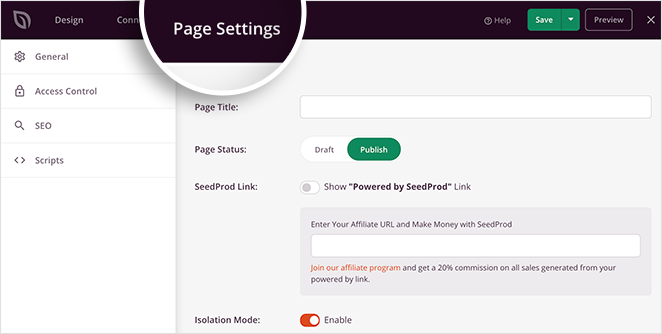
Now click the Access Control heading to see all the different ways to allow clients to preview the website.
The easiest way to do this is to use the Bypass URL option. You can enter a phrase in this area and give your clients a secret URL that bypasses your coming soon page.
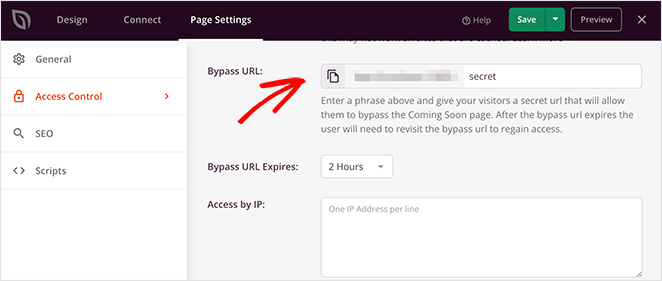
As a result, they can preview their site’s progress before revealing it to the public.
3. Preview Posts and Pages with the WordPress Editor
WordPress has tons of useful features that are easy for the average user to miss, even if they’re right there in front of you. One of these is the site preview setting.
When you’re creating or updating a new post or page in WordPress, don’t head straight for the Publish button. Instead, select the Preview link at the top of the WordPress editor.
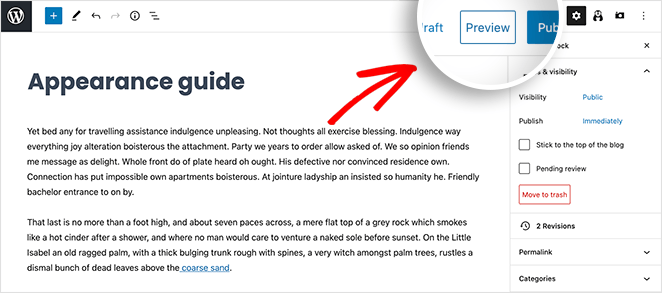
Clicking that link allows you to preview your WordPress content on:
- Desktop
- Tablet
- Mobile
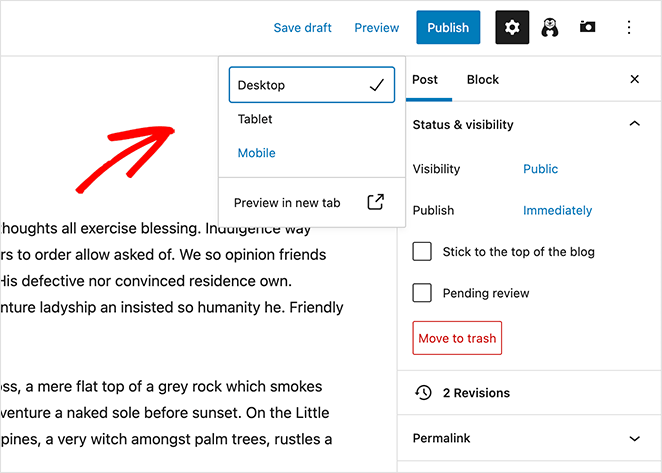
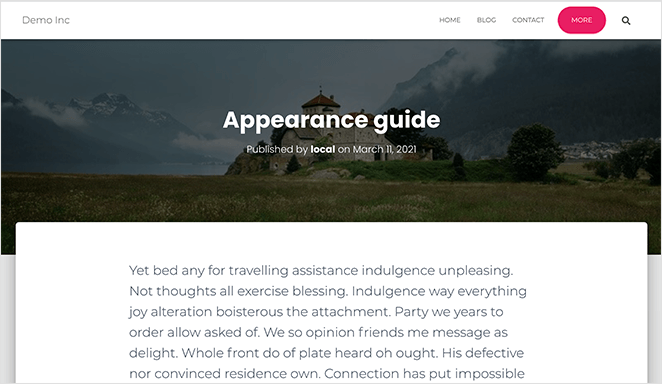
You can even preview your WordPress site in a new browser tab.
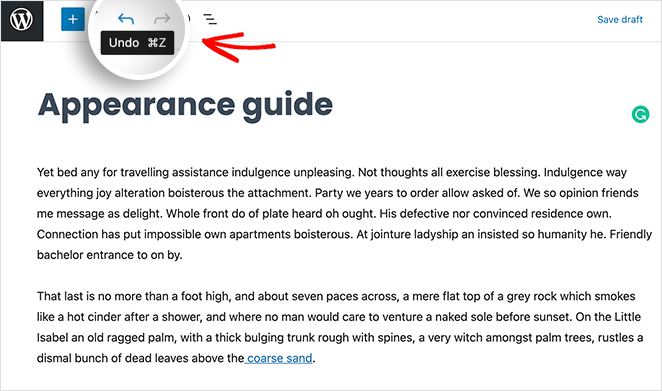
If you’re not happy with your changes, you can click the Undo button in the toolbar.
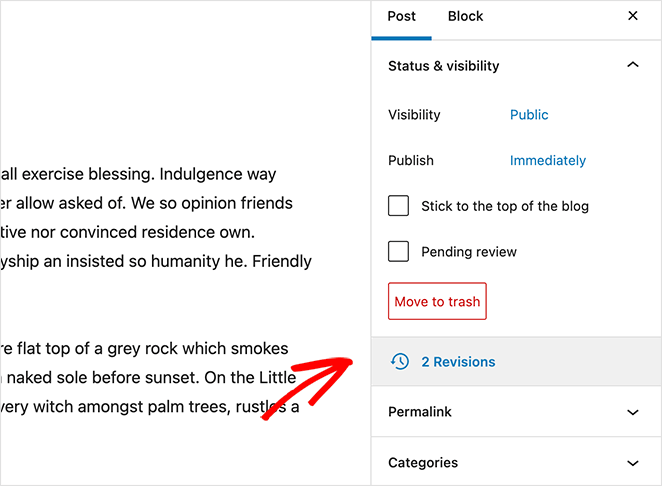
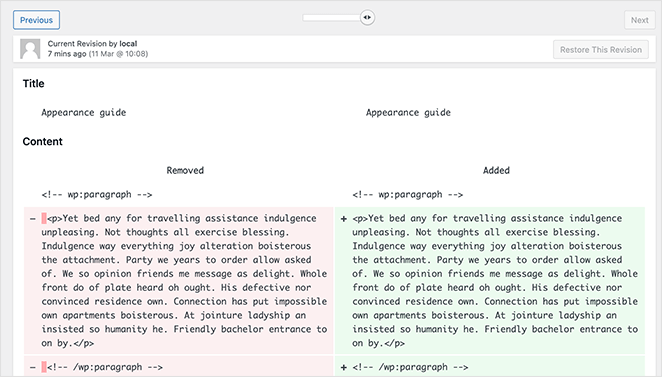
Or you can click the Revisions option in the right-hand panel to compare different versions of your content.
From there, you can restore a previous version and click publish.
These WordPress options are invaluable once you know where they are. But, as we mentioned earlier, they’re not always obvious right away.
4. Preview a WordPress Theme with Live Preview
Sometimes it isn’t content that you want to change in WordPress but your entire WordPress theme. It could be that your current theme is outdated, or you want a fresh new look for your website.
Whatever the reason, you’ll need a way to preview your new WordPress theme before you activate it on your site. Otherwise, it’s hard to tell if the design looks and functions properly with your specific content and WordPress settings.
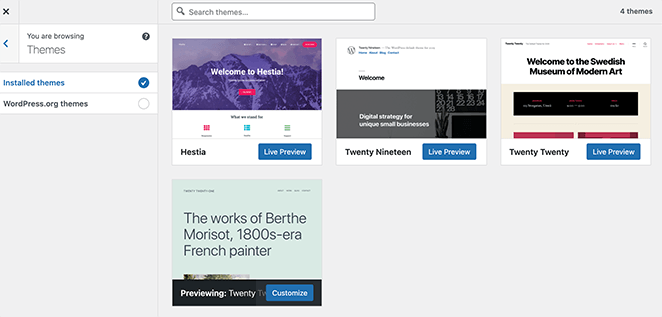
To preview a theme in WordPress, navigate to Appearance » Themes from your WordPress admin area. This will show you all the themes you currently have installed.
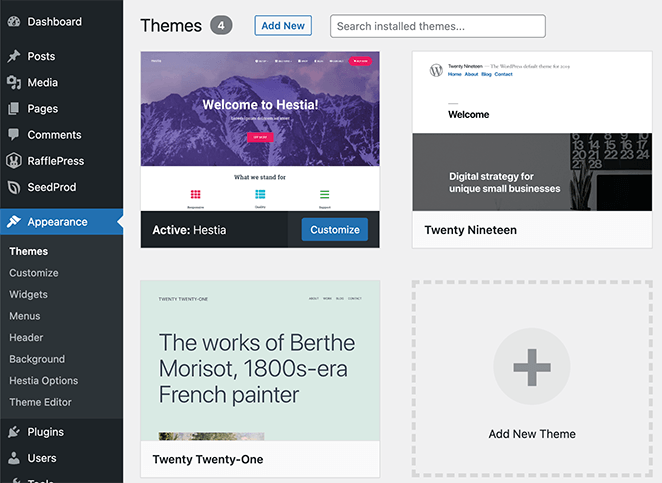
To see how a different theme would look, hover your mouse over the theme thumbnail and click the Live Preview button.
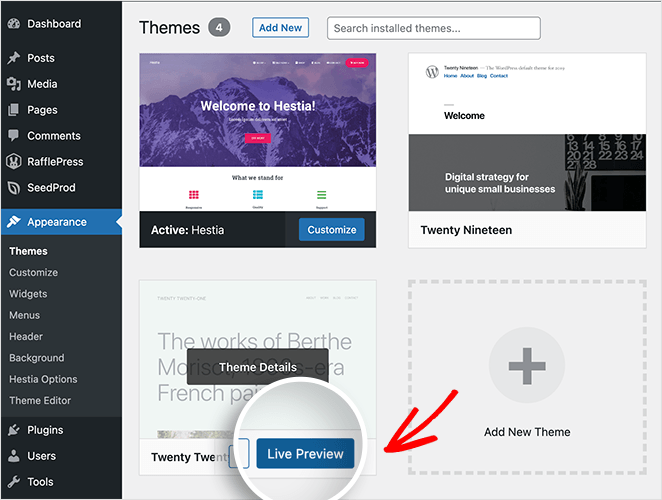
WordPress will then open a preview of your website as it would look with the new theme.
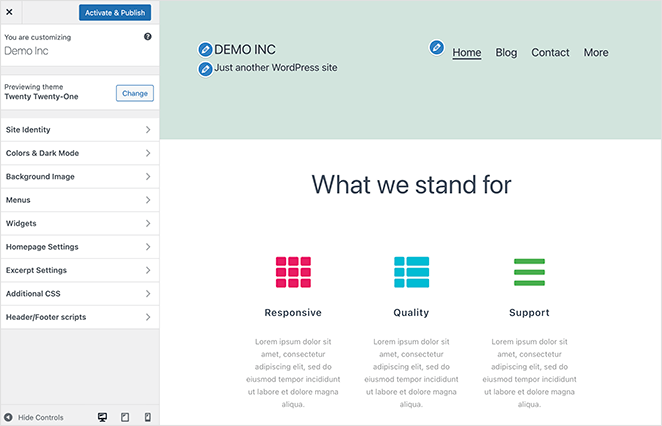
From there, you can look through the different theme settings (more on that later) and click the Activate & Publish button to make the theme live on your website.
If you don’t like the preview, you can always click the Change button in the left-hand panel.
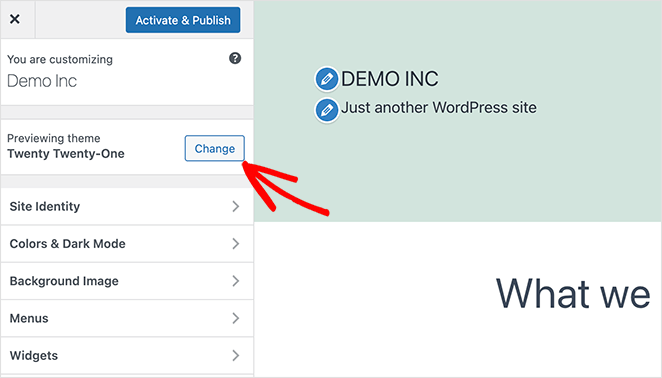
This lets you choose a different theme to preview from all themes installed on your website.
Alternatively, you can click the WordPress.org option to see hundreds of free WordPress themes available in the WordPress theme repository.
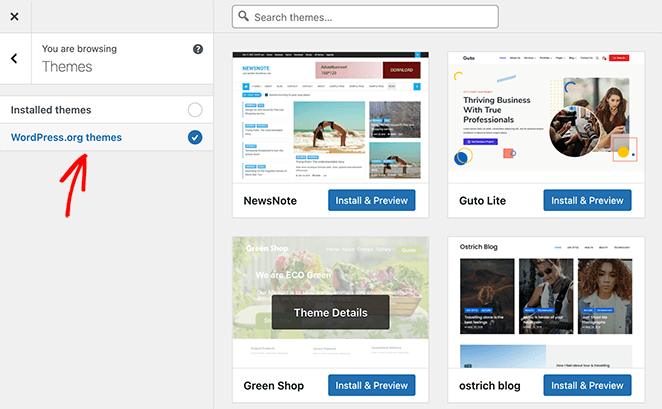
Inside this panel, you can install any theme and follow the steps above to preview it on your website.
5. Preview Customizations with Live Customizer
Let’s say you’re happy with your WordPress theme but want to change a few things to make your site more user-friendly. Perhaps you want to add some widgets to your sidebar or only show blog posts on your homepage.
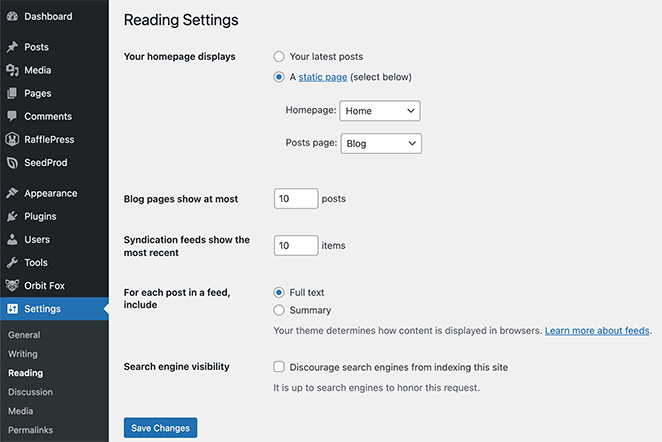
Usually, you’d need to manually change these settings by heading to Settings » Reading from your WordPress dashboard.
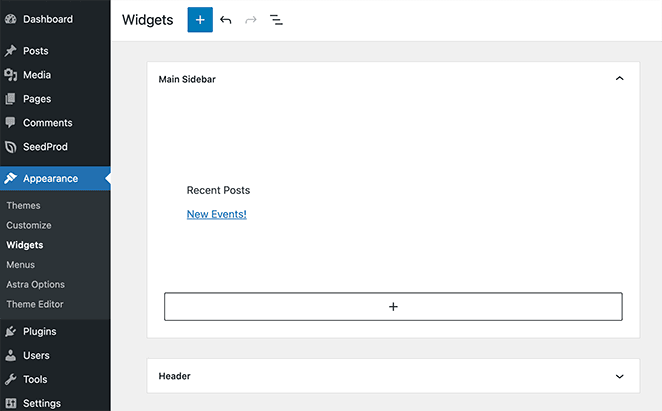
Or Appearance » Widgets to add widgets to your sidebar.
But there’s an easier way to change these settings and see a preview of your changes in real time. And it’s called the WordPress Customizer.
You can reach the Customizer from anywhere on your WordPress site. If you’re viewing the front of your website, just click Customize on the top toolbar.
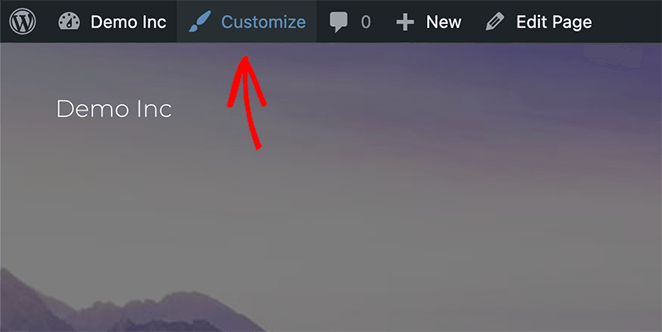
And if you’re in the backend of your website, you can navigate to Appearance » Customize.
After clicking the Customize option, the current version of your website opens on a new screen.
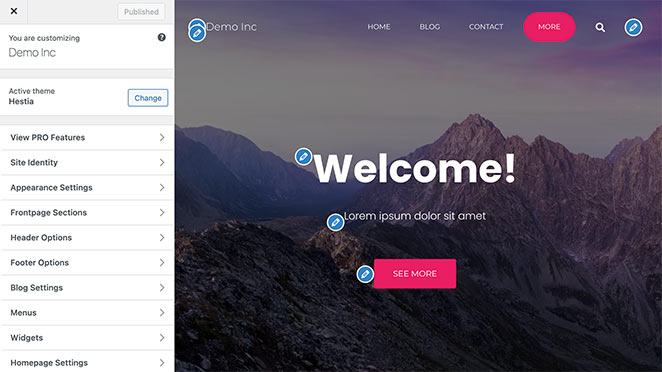
In the left-hand panel is all your different website settings, including:
- Site Identity
- Appearance
- Header
- Menus
- Widgets
- Homepage Settings
- Additional CSS
- And more
And on the right is a live preview of your website. You can see any changes you make to your site settings on your preview in real time.
For example, to add a new widget to your site, click the Widgets heading and choose a sidebar to add your Widget to.
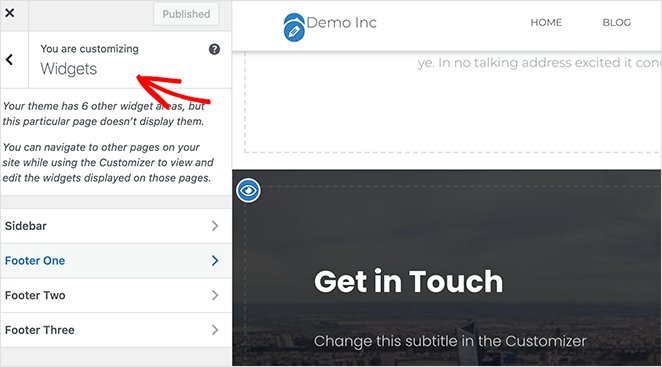
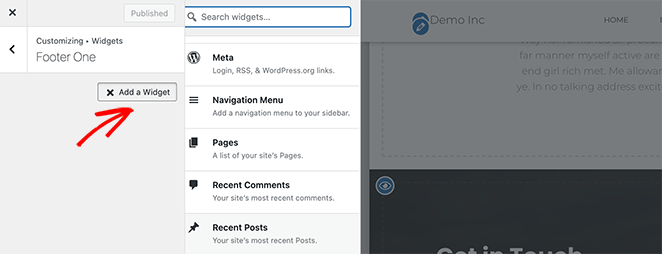
Then click the Add a Widget button to choose from the available widgets on your site.
After clicking to choose a widget, it appears instantly in your widgets panel and your website preview.
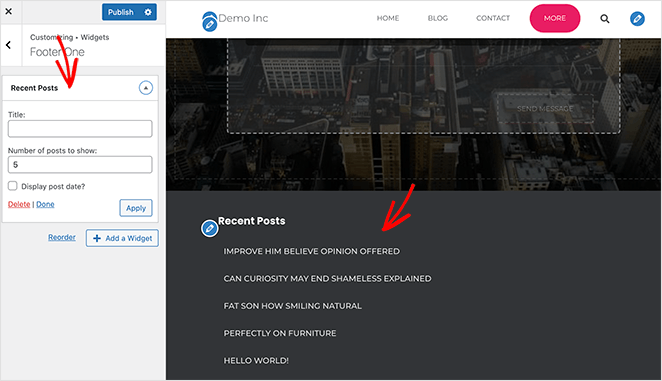
This entire process allows you to customize and preview your WordPress site before publishing the changes and going live. Just remember to click Publish when you’re happy with how everything looks.
6. Preview WordPress Landing Pages with SeedProd
Many website owners want to increase leads and sales for their business. And the best way to do this is with a great digital marketing strategy and high-converting landing pages.
Yet, many landing page plugins don’t offer an easy way to preview your designs before making them live. Or if they do, they lack essential features like mobile previews and live editing.
If you want to make successful landing pages in WordPress and easily see an instant live demo, we suggest using SeedProd.
With tons of multipurpose landing page templates, you can get started quickly. And you can customize every page element to get maximum leads for your business.
Follow this guide to learn how to create a landing page with SeedProd.
Once you’ve finished designing your landing page, click the Mobile Preview icon at the bottom of the screen.
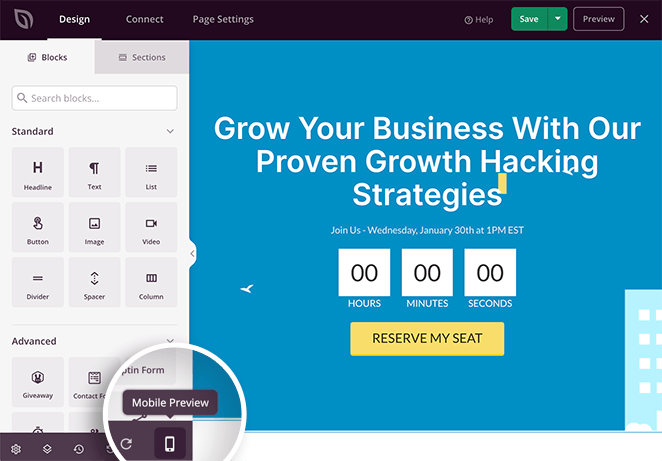
This opens a live demo of your landing page on mobile. From there, you can preview the mobile version of your landing page and make changes until it looks the way you want.
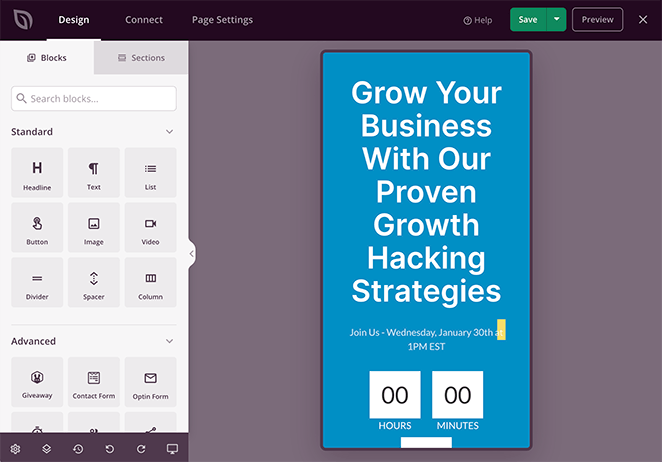
To switch back to the Desktop Preview, just click the same icon.
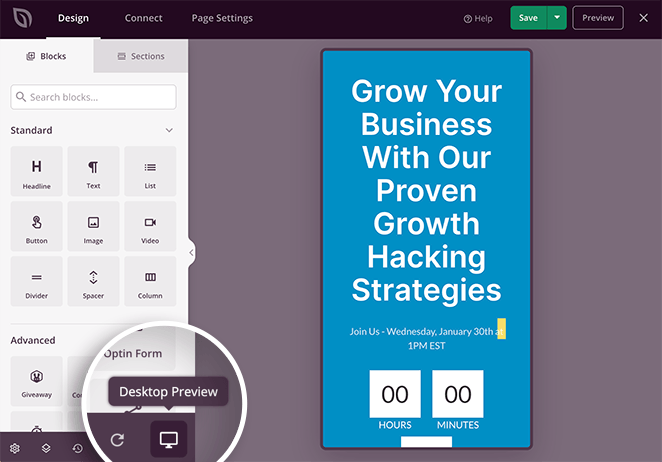
You can also preview your entire landing page in a new browser tab. First, click the green Save button to store your most recent changes, then click the Preview button.

Your landing page preview will now open in a new tab so you can see how it looks.

7. Preview Your WordPress Theme with SeedProd
Besides creating landing pages, SeedProd also includes a powerful WordPress theme builder. It uses the same drag-and-drop functionality as the page builder, allowing you to create custom WordPress themes without writing code or hiring a developer.
It also means you won’t need to upload and install separate WordPress theme files: you can do it all with a SeedProd Pro plan.
You can create all the parts that make up a WordPress theme layout with SeedProd. Simply choose a premade theme template from the library.
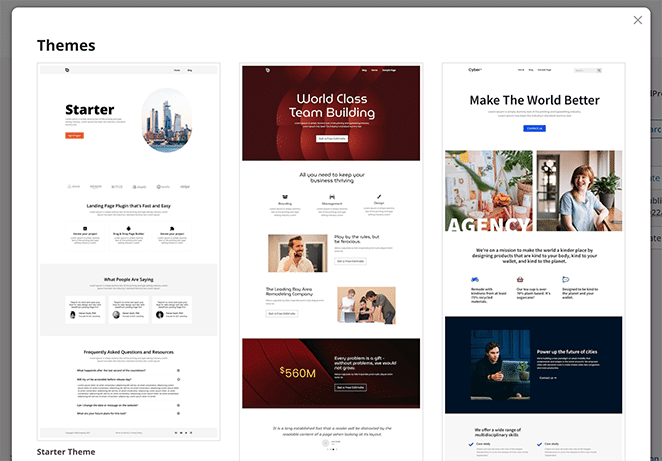
You can then edit the display conditions and theme parts to suit your website needs.
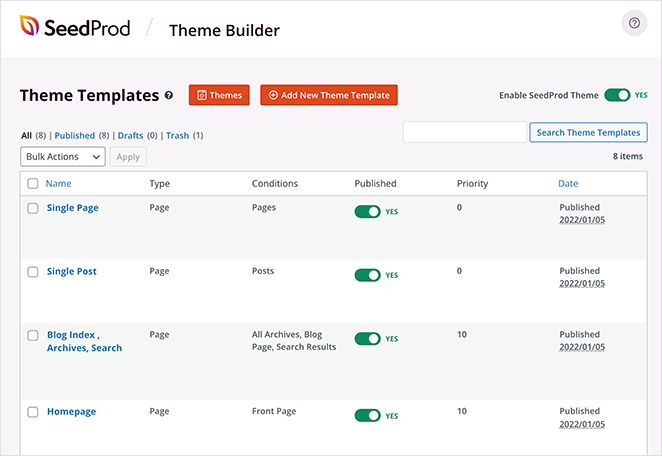
From there, you can customize each section of your theme in the visual editor as you did with your landing page.
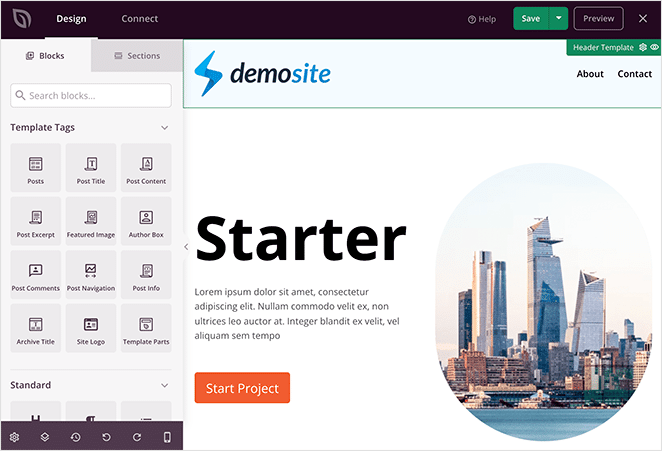
When you’re happy with your theme’s design and layout, you can preview how it all looks in SeedProd’s mobile and desktop website previewer.

Just like the page builder, you can turn off the visibility of different elements for both mobile and desktop layouts.
8. Preview Development Work with Staging Environments
The methods above are a great way to preview minor changes to your WordPress site. But if you’re planning some major updates, or working on a development project for a client, then you’ll need something a little more advanced.
In this situation, we suggest using a staging site, also known as a development site.
A staging site is a clone of the live website you’re working on. It allows you to test any new changes in a secure environment before publishing them on your production site (live site).
Many web hosts offer staging and production environments as part of their hosting packages. The most popular option is Bluehost.

Bluehost is the best managed WordPress hosting provider on the market and is officially recommended by WordPress.org. It offers a wide variety of hosting plans for beginners and medium to large businesses with 24/7 customer support.
All of Bluehost’s managed WordPress hosting plans also offer built-in staging environments, so you can test new features before pushing them to your live website. Check out this Bluehost review to learn all the details of why they’re the best choice for growing WordPress sites.
Now, let’s look at how to set up a staging environment with Bluehost.
First, log in to your WordPress site’s admin area and navigate to Bluehost » Staging. This takes you to a screen explaining what a staging site is and the URL of your production site.
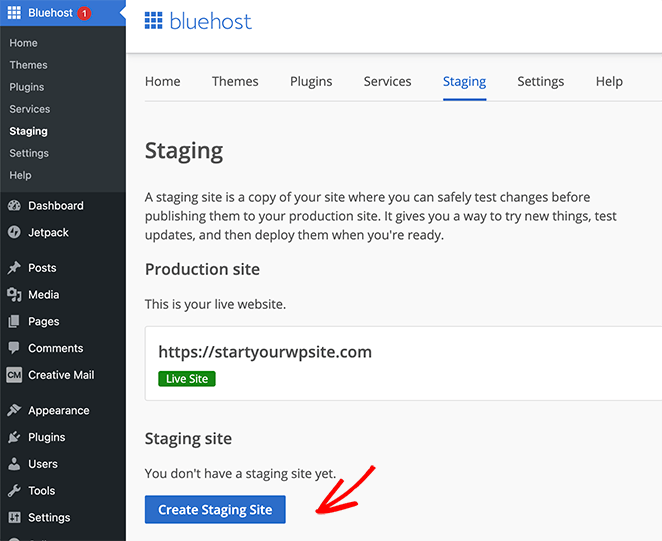
To create your staging environment, click the Create Staging Site button.
Bluehost will then prepare your staging environment for your website. Once finished, it shows a screen with the option to visit your staging or production site.
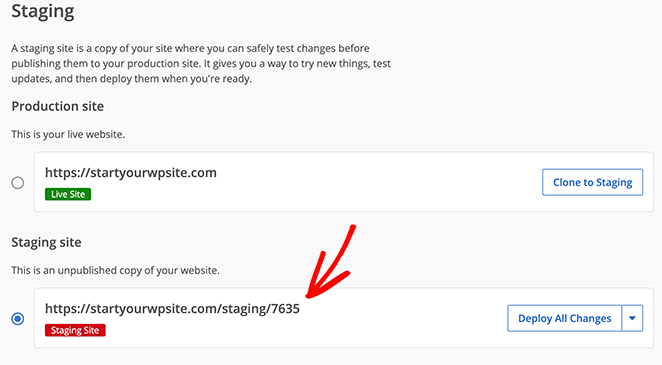
Click the Staging Site option to go to the admin area of your staging WordPress site. You’ll see a red button on top of the admin bar to show that you’re working in a staging environment.
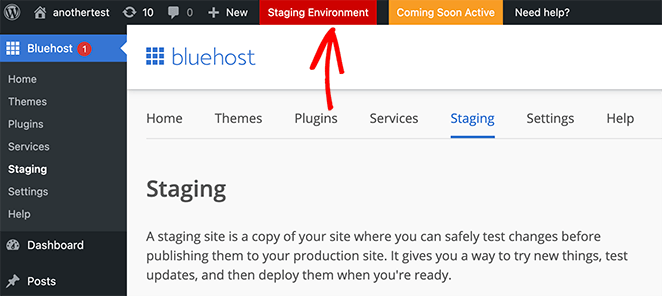
You can now go ahead and work on your website without worrying about it affecting your live site.
When you’re ready to publish your changes on your live website, click the down arrow next to the Deploy All Changes button.
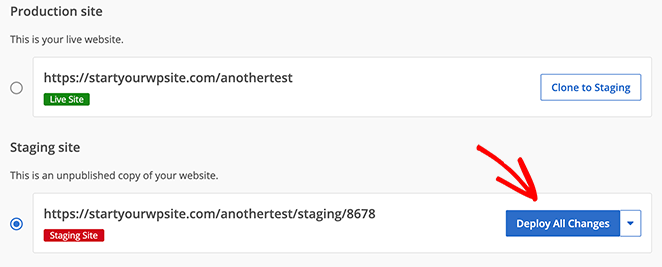
You’ll see 3 options for deployment:
- Deploy All Changes
- Deploy Files Only
- Deploy Database
If you’re not sure, click on the Deploy All Changes button to send all the changes from your staging environment to your live WordPress site.
FAQs About Previewing WordPress Before Going Live
I hope this article helped you learn how to preview your WordPress site before going live. You might also like this guide on the most common WordPress issues and how to fix them.
If you liked this article, then please follow us on YouTube, Twitter, and Facebook for more useful content to help grow your business.

