Looking for an easy way to add Hotspot images to your WordPress website?
Image hotspots are a fantastic way to give visitors more context about a photo or graphic and to make your WordPress site more interactive.
In this article, we’ll show you how to add hotspot images to your website to help engage your website visitors.
What Is an Interactive Image Hotspot?
Hotspot images are static images, photos, or illustrations with clickable areas that reveal a tooltip popup. The tooltip content will give users additional information about a specific aspect of the image.
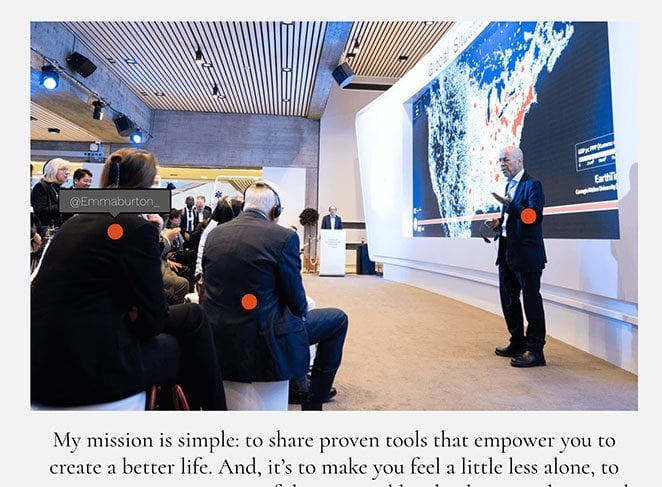
For example, you can use hotspots to identify different products in a photo, label dishes on a menu, or even show the social media handles of different people at an event.
Adding image hotspots to your WordPress site is a great way to make it more interactive. When visitors engage with your image maps, they spend more time on your website, which helps reduce your bounce rate.
Moreover, creating interactive hotspot images can improve user experience, which, in turn, can increase your conversion rates.
Now that you know what image hotspots are, you probably have a few questions. How do you create hotspot images, and what’s the easiest way to add them to your WordPress site?
We’ll show you how to do that next.
How to Add Interactive Hotspot Images to WordPress
There are several ways to add image hotspots to your WordPress site. You can use a WordPress image hotspot plugin, a WordPress theme with hotspot functionality like Divi, or code one yourself with HTML and custom CSS.
The easiest way to add an image map hotspot to your WordPress site is with a page builder plugin like SeedProd.
Why Choose SeedProd?

SeedProd is the best WordPress page builder, with over 1 million users. It lets you create any layout in WordPress, including landing pages, headers, footers, sidebars, and templates, without writing code.
Similar to Elementor’s modules, SeedProd has a block-based interface that lets you drag and drop web design elements into place. This means you can see the changes in real time as you build your custom layout.
Even better, SeedProd has a dedicated Hotspot block that lets you create user-friendly image hotspots with just a few clicks.
Here’s what else you can do with this powerful WordPress plugin:
- Put WordPress in maintenance mode
- Add WordPress widgets inside any page
- Build custom online stores with WooCommerce support
- Show and hide specific elements on desktop and mobile devices
- Create a coming soon page
- Manage new subscribers with the built-in subscriber dashboard
- Make custom WordPress themes from scratch
- And much more
In this guide, we’ll use SeedProd to add image hotspots to WordPress. Follow the steps below to get started.
Step 1. Install and Activate SeedProd
First, head to the SeedProd website and download the plugin. While SeedProd has a free version, we’ll use SeedPod Pro for this tutorial because it includes the Hotspot Image block.
Once you’ve chosen your pricing plan and downloaded the plugin zip file, you’ll need to install and activate it on your WordPress website. You can see this guide on installing a WordPress plugin if you need help with this step.
After adding SeedProd to your WordPress site, navigate to the SeedProd » Settings page and enter your product license key.
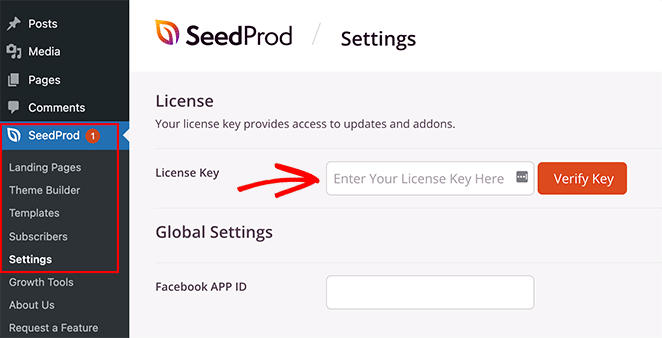
You can find the key in the downloads section of your SeedProd account dashboard.
Once you’ve entered your key, click the Verify Key button to unlock your premium features.
Step 2. Choose a WordPress Theme or Landing Page Template
Now that you’ve confirmed your license settings, you’re ready to start building with SeedProd. To do that, you’ll first need to decide which type of layout you’d like to make.
In SeedProd, you can either create individual landing pages or complete WordPress websites with its theme builder. From there, you can customize them with the same drag-and-drop editor.
For this guide, we’ll make a standalone landing page. However, you can follow this guide on creating a custom WordPress theme if you prefer this approach, then come back to step 3 of this tutorial to learn to add image hotspots.
Since we’re making a landing page layout, let’s head to SeedProd » Landing Pages, then scroll past the landing page modes section and click the Add New Landing Page button.
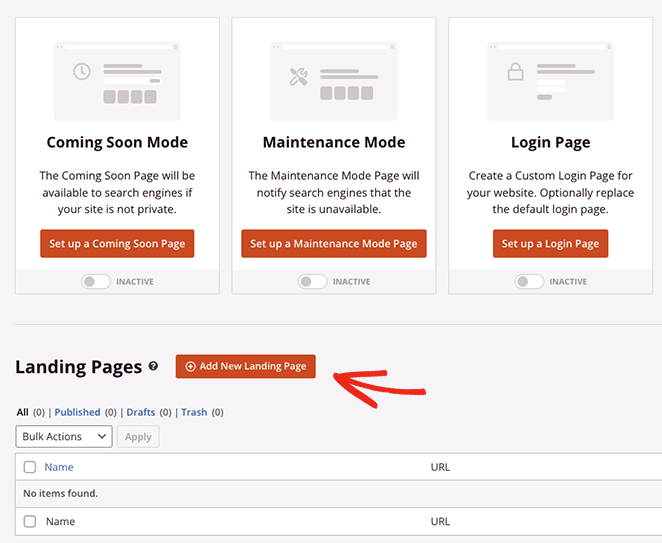
That will take you to the library of premade landing page templates, where you can choose a design that best fits your business needs. Each template is 100% mobile responsive, with designs for various use cases, including fitness, real estate, digital marketing, and more.
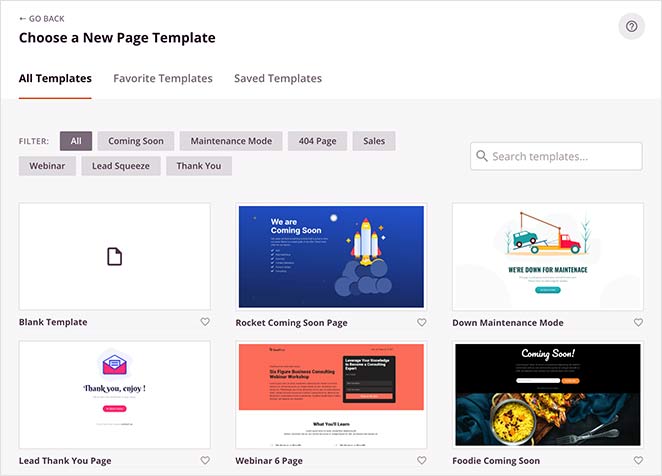
Don’t worry if you can’t find something suitable. You can customize every inch of the template until it looks the way you want. So go ahead and choose a template by hovering over one and clicking the checkmark icon.

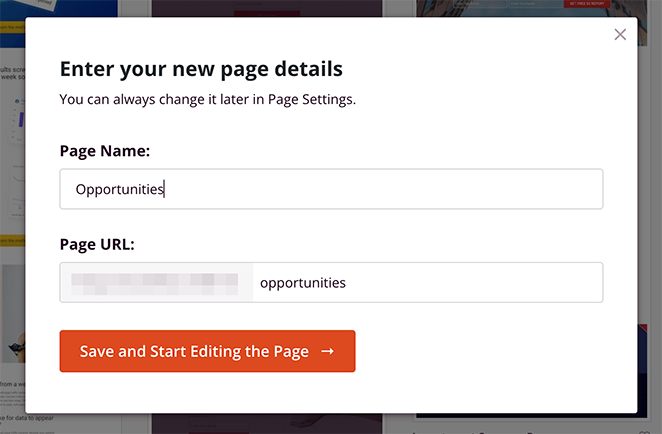
On the next screen, you can give your page a name and URL, then click the Save and Start Editing the Page button to launch it in SeedProd’s visual editor.
Step 3. Add the Hotspot WordPress Block
SeedProd’s page builder is super easy to navigate. You’ll see different sections and blocks in the left-hand panel and a live page preview on the right.
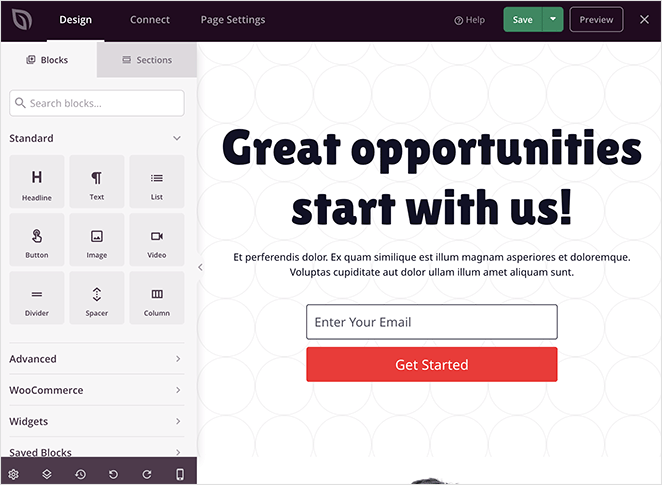
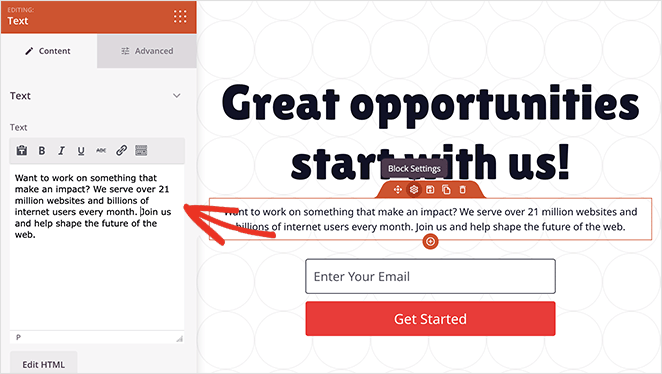
Click anywhere on the preview to change the content of any element. For example, clicking the text block opens a panel where you can type your own welcome message or description.
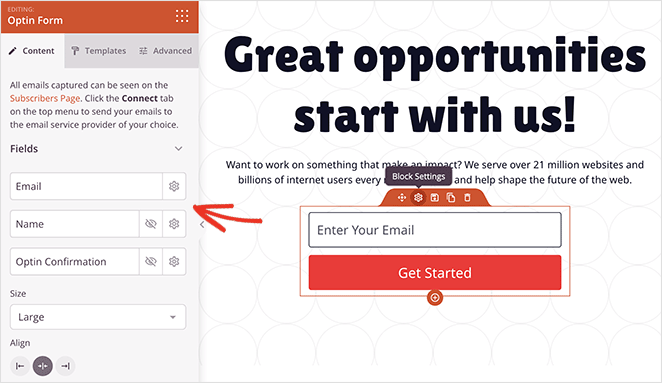
And in the opt-in form block, you can customize your form fields, change the submit button background color, and more.
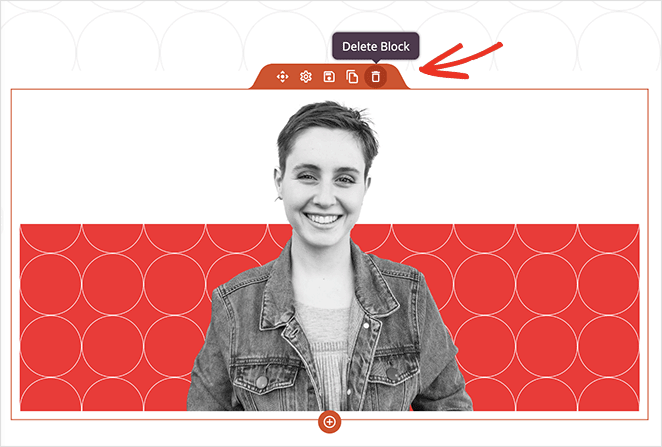
Before adding the image hotspot widget to your page, let’s find the perfect spot, like the first image on the page.
You’ll need to remove this block first to make space for the hotspot image, so hover over it until you see an orange border, then click the trashcan icon to delete it.
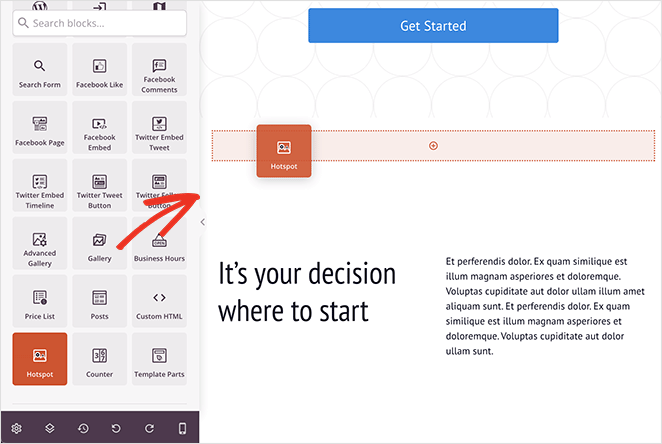
Now, you can find the Hotspot block from the Advanced blocks panel and drag it into the space on your page.
Next, open the block settings and add an image where you’d like to add hotspot icons.
You can either upload a photo from your computer or WordPress media library or choose from thousands of stock images (available in SeedProd plus plans and over).
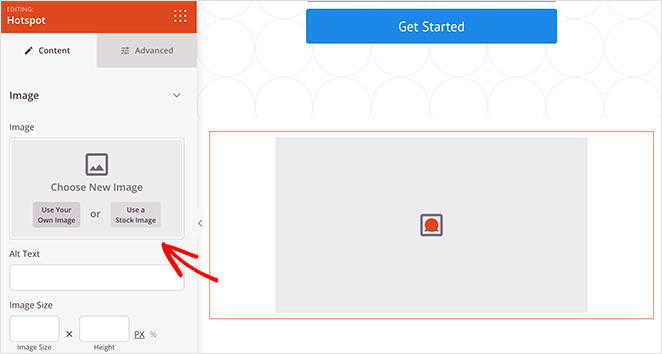
After adding an image, you can create your first hotspot.
Simply expand the hotspot placeholder and enter your hotspot description. This is what will appear when users click or hover over the hotspot icon.
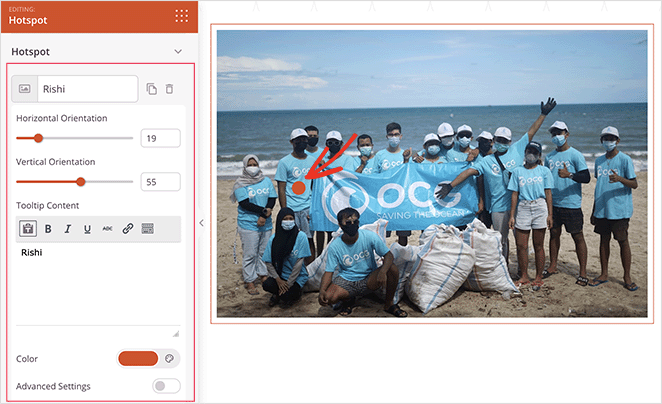
You can change the position of the circular hotspot icon by dragging the vertical and horizontal orientation sliders. Additionally, you can change the icon color and animation to make it stand out more.
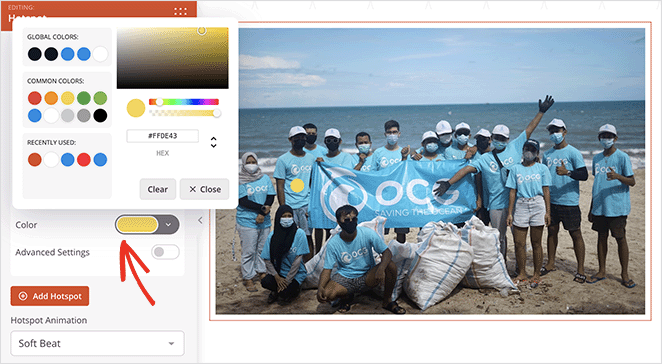
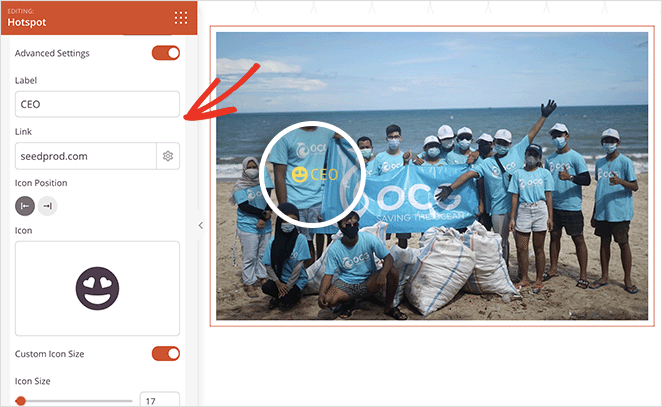
Moreover, toggling the Advanced Settings lets you choose a label, enter a link, and select custom icons and sizes from the Font Awesome library.
To make your hotspots more eye-catching, you can open the Tooltips section and choose trigger and animation settings.
Then, clicking the Advanced tab lets you choose more formatting and styling options, including typography, text colors, spacing, and more.
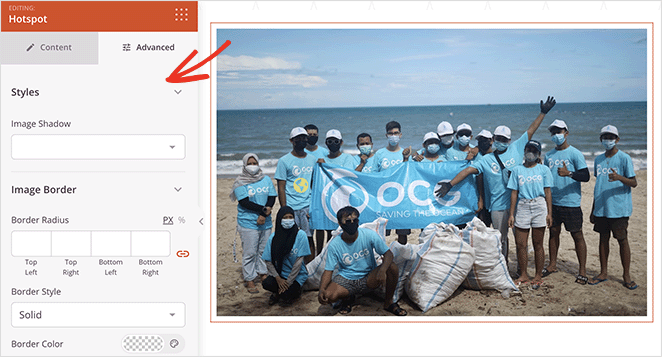
To add more hotspots to your image, repeat this step as often as you like. Just remember to click the Save button to preserve your changes.
Now, continue customizing your page until it looks exactly the way you want.
For example, you can use the Accordion block to add a FAQ section to your page, the Video block to display YouTube or Vimeo videos, the Google Maps block to show your location, and more.
Step 4. Configure Your Settings
Now, let’s look at some settings you can change to boost your landing page performance.
First, you can click the Connect tab at the top of your screen to integrate your page with your preferred email marketing service.
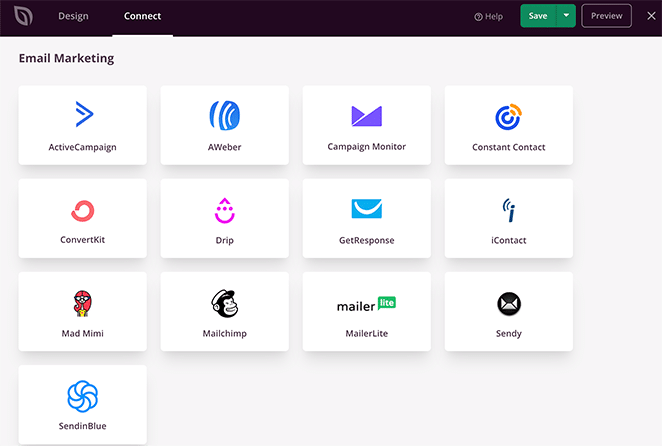
With email integration, the email address of anyone who subscribes via your opt-in form is automatically added to your list.
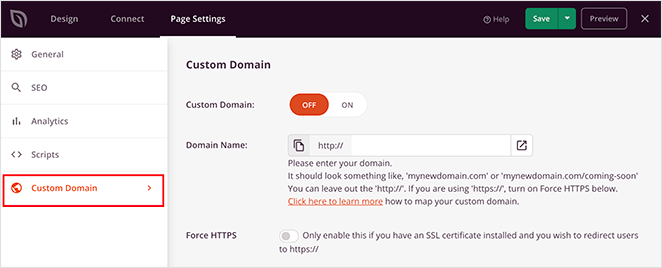
Next, click the Page Settings tab. On this page, you can manage your general, SEO, analytics, and script settings.

For example, you can connect to MonsterInsights, the best Google Analytics plugin to monitor your landing page metrics and performance.
You can also use the Custom Domain setting (Elite plans) to give your page a unique domain name separate from your main website without multiple WordPress installations.
Step 5. Publish Your Hotspot Image in WordPress
After configuring your settings, you’re ready to publish your landing page and make your hotspot image live on your website.
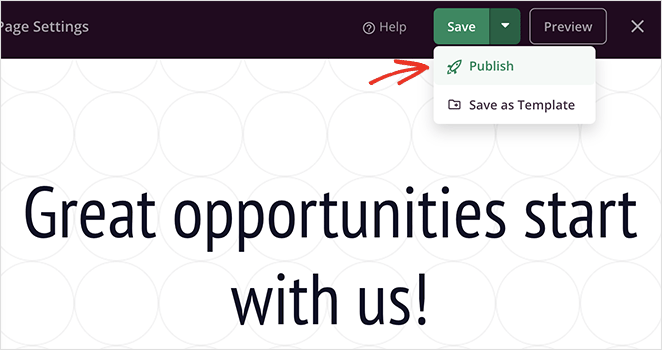
To do that, click the arrow on the Save button and select Publish.
Now, you can view your page to see your image hotspots in action!

And here’s a closer look at the hotspot tooltip:
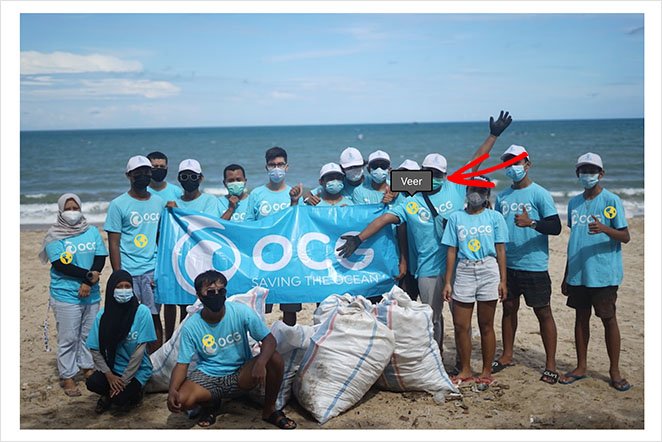
There you have it!
You now know how to add hotspot images to WordPress without using shortcodes, custom CSS, or unnecessary add-ons. Even better, it only takes a few minutes to create interactive image hotspots with SeedProd.
So what are you waiting for?
If you enjoyed this tutorial, you might also like the following WordPress guides:
- How to Add a Button to Your WordPress Header
- How to Create Animated Number Counters in WordPress
- How To Add Before and After Photo Sliders to WordPress
Thanks for reading! We’d love to hear your thoughts, so please feel free to leave a comment with any questions and feedback.
You can also follow us on YouTube, X (formerly Twitter), and Facebook for more helpful content to grow your business.

