

カスタムWordPressテーマを使用すると、既製のテーマの制限に縛られることなく、サイトのデザイン(すべてのレイアウト、色、フォント、テンプレート)を完全に制御できます。コードを書かずに作成する最も簡単な方法は、 SeedProdのようなビジュアルテーマビルダープラグインを使用することです。
このフラストレーションは身をもって知っています。クライアントサイトのためにプレミアムWordPressテーマをカスタマイズしようとして3週間費やしました。色が間違っていました。レイアウトが硬く感じられました。わずかな変更でも、混乱した設定を掘り下げるか、開発者に連絡する必要がありました。
すべてを変えたのはこれです。SeedProdのビジュアルテーマビルダーを使用して、カスタムヘッダー、フッター、ホームページ、ブログテンプレート、会社概要ページ、お問い合わせページを含め、わずか4時間未満で同じ7ページのサイトを再構築しました。コードなしで、すべてのデザイン要素を完全に制御できました。
このガイドでは、まったく同じプロセスを説明します。
カスタムWordPressテーマとは?
カスタムWordPressテーマとは、固定されたレイアウトやスタイルを持つ既製のテンプレートを使用するのではなく、特定のニーズに合わせて構築されたウェブサイトのデザインです。ヘッダーとフッター、ページレイアウト、ブログテンプレート、色、フォント、ボタンなど、すべてを制御します。
カスタムWordPressテーマの主な特徴:
- 完全なデザインコントロール:すべてのページのレイアウト、色、フォントを決定します。
- ニーズに合わせて構築:サイトが実際に必要とする機能のみを含めることで、高速化します。
- コード不要:最新のビジュアルビルダーを使用すると、PHP、CSS、JavaScriptの知識なしで完全にカスタムなテーマを作成できます。
WordPressテーマは、ヘッダーテンプレート、フッターテンプレート、個別投稿テンプレート、ページテンプレート、ブログアーカイブなど、サイトのさまざまな部分を制御するテンプレートファイルで構成されています。ノーコードビルダーを使用すると、コードではなくビジュアルでこれらのテンプレートを編集できます。
カスタムWordPressテーマを作成する方法
カスタムWordPressテーマを作成するには3つの方法があります。適切なアプローチは、技術スキルと投資したい時間によって異なります。
| 方法 | 必要なもの | 構築時間 | 最適 |
|---|---|---|---|
| ノーコードテーマビルダー(例:SeedProd) | コーディング不要。ドラッグ&ドロップインターフェース。 | 2〜4時間 | 初心者、ブロガー、中小企業経営者 |
| WordPressフルサイト編集(FSE) | 基本的なHTML知識。ネイティブのブロックエディターを使用します。 | 4〜8時間 | WordPressブロックエディターに慣れているユーザー |
| カスタムPHP開発 | PHP、HTML、CSS、JavaScriptのスキルが必要です。 | 数日〜数週間 | 完全なカスタムコード制御を必要とする経験豊富な開発者 |
このチュートリアルでは、SeedProdを使用したノーコードテーマビルダーアプローチについて説明します。これは、完全にカスタムなテーマを作成するための最も速い方法であり、プログラミング知識は一切不要です。
ノーコードテーマビルダー対WordPressフルサイト編集
WordPressフルサイト編集(FSE)は、ブロックエディターを使用してテーマをカスタマイズするためのWordPressに組み込まれたシステムです。WordPress 5.9以降で利用可能で、PHPなしでヘッダー、フッター、ページテンプレートを編集できます。ただし、HTMLにある程度の習熟度、ブロックパターンの理解、サイトエディターの操作経験が必要です。
SeedProdのようなノーコードテーマビルダーはWordPressの上に配置され、学習曲線を完全に排除します。視覚的にデザインし、リアルタイムで変更を確認し、ワンクリックで公開できます。コードファイルを編集したり、新しいシステムを学習したりするのではなく、ドラッグアンドドロップで操作します。
2つのアプローチを並べて比較します。
| 特徴 | SeedProdテーマビルダー | Elementor | ディビ | WordPress FSE |
|---|---|---|---|---|
| コーディングが必要 | なし | なし | なし | 基本的なHTML |
| スターターテンプレート | 300以上のテーマキット | 100以上のキット | 200以上のレイアウト | 限定的なブロックテーマ |
| ビジュアルテーマビルダー | はい(フルテーマ) | はい(テーマビルダーアドオン付き) | はい | 部分的(サイトエディター) |
| 開始価格 | 年額39.50ドル(ベーシック) | 年額59ドル | 年額89ドル | 無料(WordPressに組み込まれています) |
| 初心者向け | はい | はい | 中程度 | いいえ |
長年、個人的なプロジェクトでElementorとDiviを使用してきました。どちらも優れたツールです。最もクリーンな初心者体験と最も完全なテーマビルダーワークフローのために、現在私が使用しているアプローチであり、このガイドで説明しているのはSeedProdです。
カスタムWordPressテーマの作成にはいくらかかりますか?
費用は、どの方法を選択するかによって異なります。
- SeedProd Pro: 年間199.50ドルから。テーマビルダー、300以上のテンプレート、すべてのドラッグ&ドロップ機能が含まれます。このチュートリアルで必要なのはこれです。
- WordPress FSE: 無料。WordPressに組み込まれています。学習には時間投資が必要で、既製のテーマキットは含まれていません。
- 開発者に依頼: 通常、カスタムコーディングされたテーマの場合、複雑さによって500ドルから5,000ドル以上かかります。
- プレミアム既製テーマ: 一括払い30ドルから100ドルですが、そのテーマのデザイン上の制約に限定されます。
ほとんどのブロガーや中小企業のオーナーにとって、SeedProd Proプランは最も費用対効果の高い選択肢です。開発者費用なしで完全にカスタムな結果を得られ、いつでも自分でデザインを更新できます。
コードなしでWordPressテーマを構築する方法
私が従う正確なプロセスをご紹介します。テンプレートキットから始めて、一度に1つのテンプレートをカスタマイズして完全なテーマにしていきます。
始める前に必要なもの:
- WordPress.orgウェブサイト(セルフホスト)
- SeedProd Proプラン
- ステージングサイトまたは新規インストール(安全のため推奨)
- 時間: サイト全体で2〜4時間
ステップ0:サイトを安全に準備する
ライブのWordPressサイトを変更する前に、安全な作業環境をセットアップしてください。これにより、間違いが実際の訪問者に影響を与えるのを防ぐことができます。
既存のサイトを再設計している場合は、まず完全なバックアップを作成してください。次に、ステージングコピーで作業します。ゼロから構築している場合は、新しいインストールで直接作業できます。
準備ができたら、プラグインファイルをアップロードして有効化をクリックすることでSeedProdをインストールします。
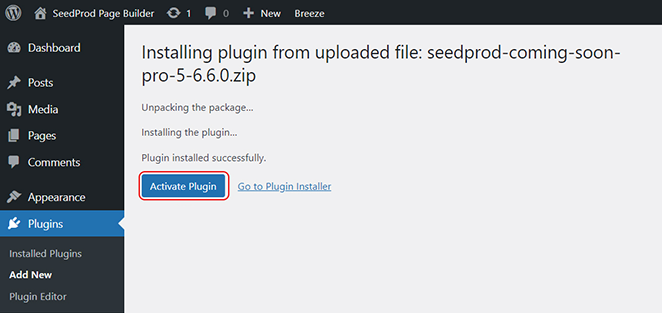
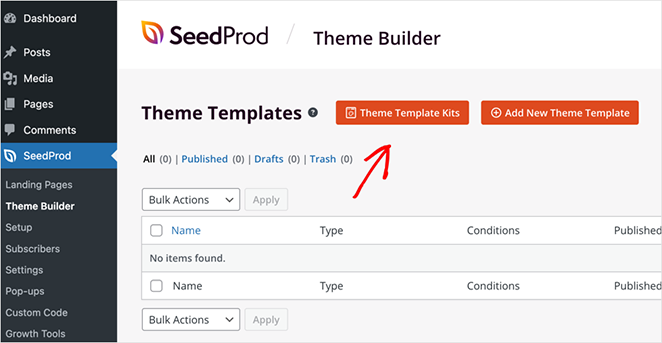
ステップ1:SeedProdをインストールしてテンプレートを選択する
SeedProdを有効にした後、WordPressダッシュボードのSeedProd › Theme Builderに移動し、Theme Template Kitsをクリックします。
SeedProdにはプロがデザインしたテーマテンプレートが非常に多くあり、正直に言うと、私も選択肢が多すぎて迷ってしまいました。
カテゴリでフィルタリングしたり、人気順または新着順に並べ替えたりできます。後ですべてをカスタマイズするので、自分のスタイルに最も近いものを選んでください。
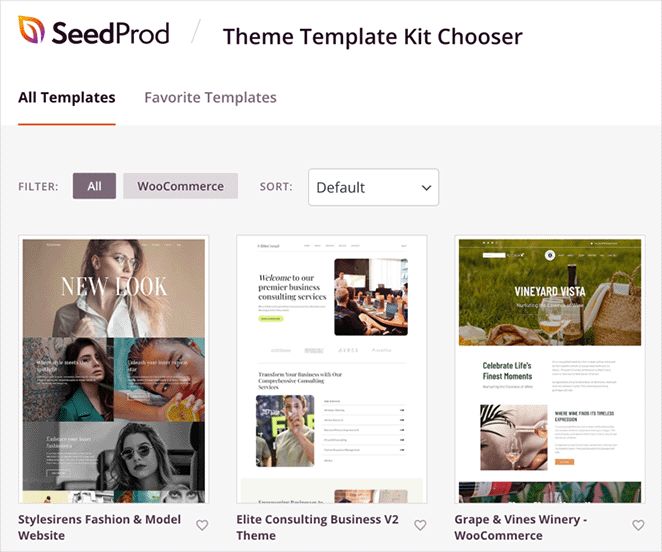
完璧でなくても心配しないでください。次のステップで、あらゆる部分をカスタマイズできます。
最終的にElite Consulting Business Themeを選びました。クリーンでモダンな外観が、私が求めていた雰囲気にぴったりでした。
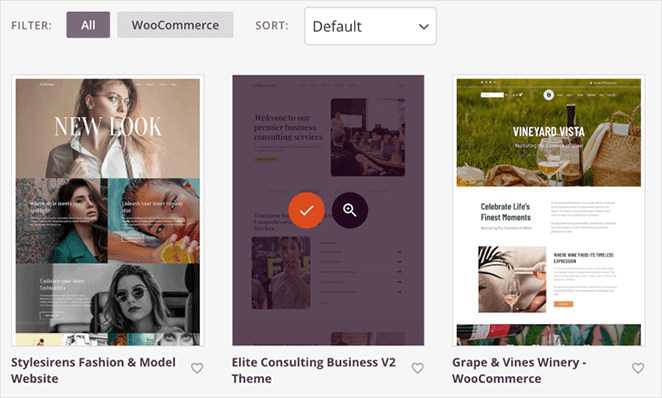
選択したキットをインポートするには、カーソルを合わせてチェックマークアイコンをクリックします。インポートする前にテンプレートをプレビューすることもできます。
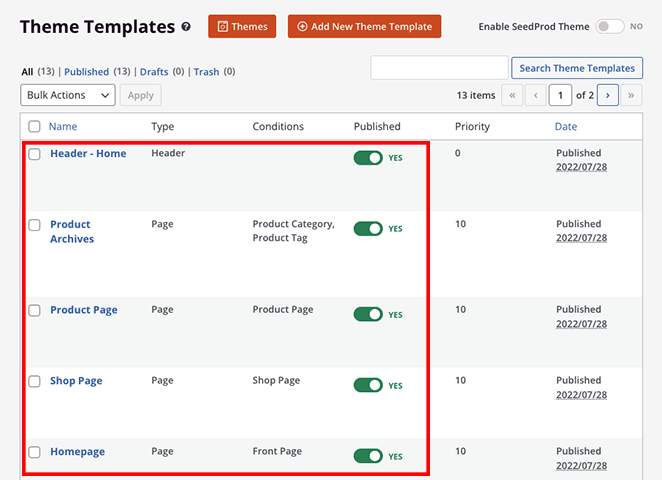
キットを選択した後、WordPressテーマのコンポーネントを構成する個々のテンプレートすべてを表示できます。私のキットには、ホームページ、ヘッダー、フッター、ブログページ、サイドバーが含まれていました。さらに、アワードセクション、サービスページ、価格表などの特定のテーマセクション用のカスタムテンプレートもありました。
おそらく、これらすべてをサイトに必要としないでしょう。必要なものに焦点を当て、不要なテンプレートを削除するか、公開トグルをオフにして、テンプレートがウェブサイトに表示されないようにします。
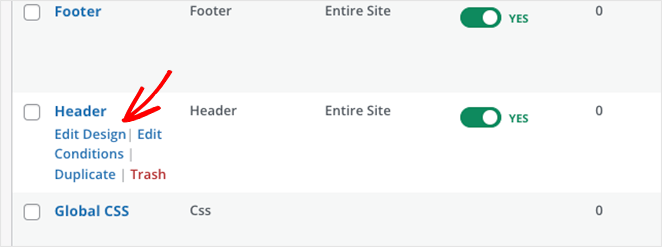
ステップ2:WordPressのヘッダーとフッターをカスタマイズする
テーマの基本的な構成要素が配置されたら、各セクションの編集を開始できます。私のサイトでは、ヘッダーとフッターから始めました。
ヘッダーとフッターはすべてのページに表示されるため、最初にこれらを正しく設定しておく価値があります。テーマビルダーで、ヘッダーテンプレートにカーソルを合わせ、デザインの編集をクリックします。
SeedProd でテーマセクションを編集すると、ビジュアルドラッグアンドドロップビルダーに直接入ります。元のヘッダーテンプレートは 3 列レイアウトでしたが、私の好みには少し忙しすぎました。それを削除し、左側のパネルから 2 列レイアウトブロックをドラッグしました。

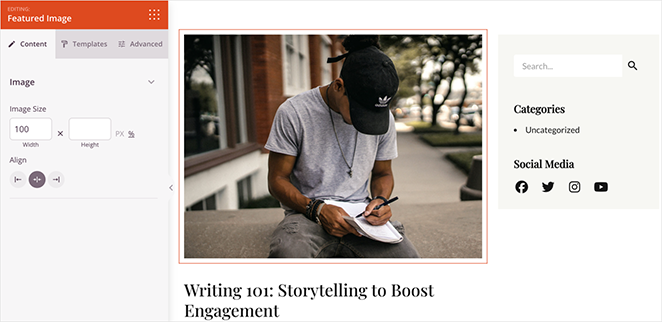
画像ブロックを使用すると、ロゴの追加も簡単です。メディアライブラリから選択し、ポイントアンドクリックコントロールを使用してサイズと配置を調整するだけです。
特定のヘッダー要素に関するガイダンスについては、テーマのヘッダーをカスタマイズするを参照してください。また、一般的なウェブデザインの誤りを確認する良い機会でもあります。これらは、何に注意すべきかがわかれば簡単に回避できます。
ヘッダーに満足したら、変更を保存してフッターテンプレートを開きます。
テンプレートの元のフッターには、必要以上の情報が含まれていたため、不要なブロックを削除して簡略化しました。会社情報とソーシャルメディアのメニュー項目は保持しましたが、よりバランスの取れた外観にするために中央揃えにしました。
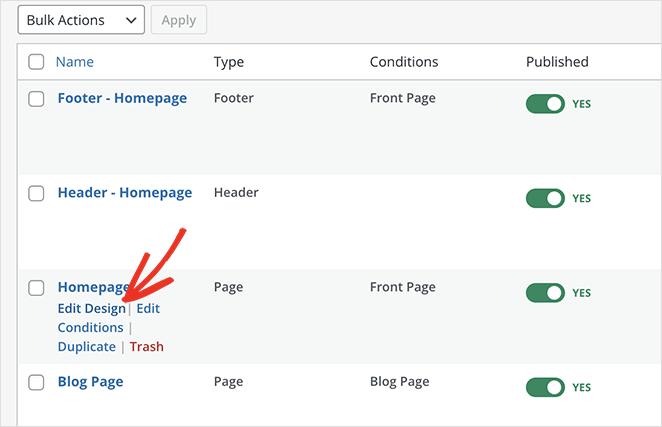
ステップ3:カスタムWordPressホームページを作成する
ホームページはカスタムテーマの中心的なハブとして機能し、ブランドアイデンティティをすぐに確立します。ビジュアルで WordPress テーマを構築する方法を疑問に思ったことがあるなら、この部分でそれがどれほど簡単かがわかります。
テーマビルダーで、ホームページテンプレートの横にあるデザインの編集をクリックします。
ホームページをカスタマイズする際の主な目標は、自分が誰であり、何を提供しているのかを明確に伝えることです。個人的には、Elite Consulting Business テーマのホームページの全体的なレイアウトは気に入っていましたが、さらに簡略化して個人的なタッチを加えたいと思いました。
ヒーローセクションは、印象的な声明を出すのに最適な方法なので、一番上にそのまま残しました。デフォルトの画像は、私のブランドをよりよく反映したものに交換し、見出しと説明を更新しました。
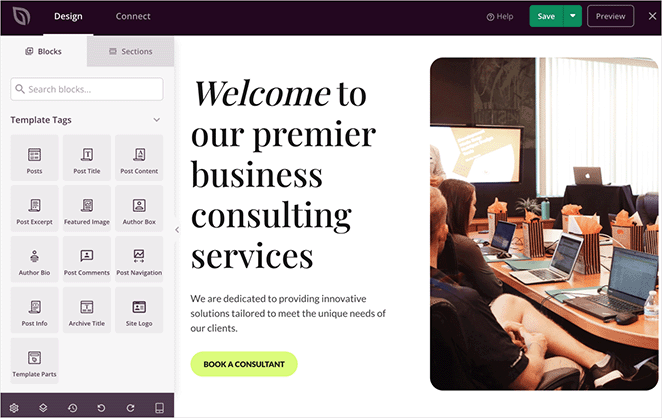
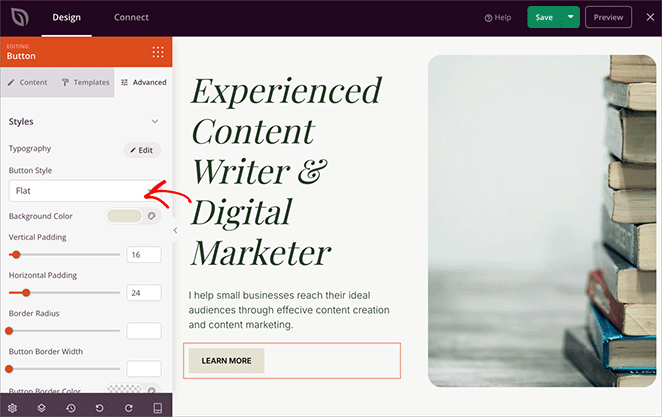
CTA ボタンのスタイルも調整しました。これは、ブロックの詳細設定をクリックすることで行えます。カラーピッカーにアクセスでき、新しい背景色を選択して、ボタンの角を丸めてより柔らかい外観にすることができます。
信頼を築き、経験を示すために、私は次のことを行いました。
- 一緒に仕事をしたブランドのロゴストリップを追加しました
- 主要な統計情報を強調するために数値カウンターを更新しました
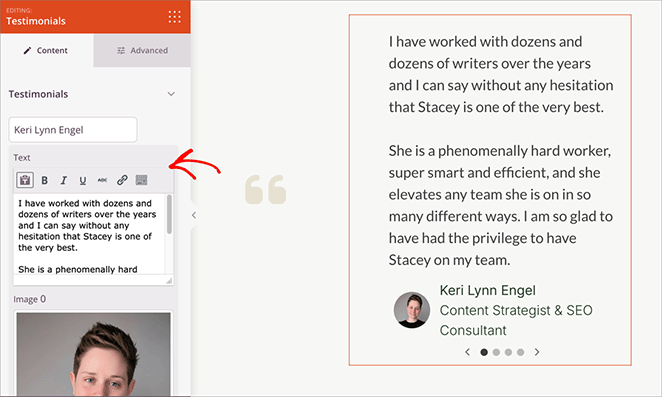
- クライアントの引用を含む証言カルーセルを構築しました
- 画像と見出しブロックを使用したミニライティングポートフォリオを含めました
証言セクションでは、プレースホルダーの引用を実際の顧客からのフィードバックに置き換えます。まだ証言がない場合は、代わりに料金表または機能リストを追加してください。
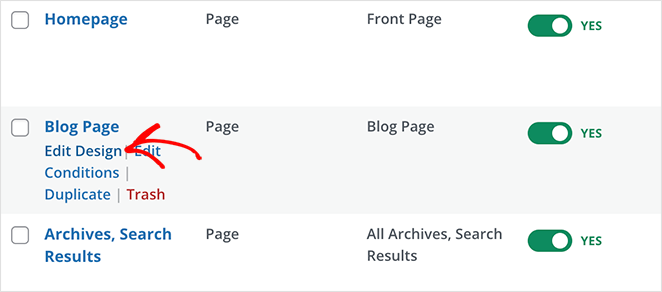
ステップ4:ブログページと個別投稿テンプレートを作成する
ウェブサイトにブログが含まれている場合、この手順は不可欠です。よくデザインされたブログページと単一投稿テンプレートは、読者がコンテンツを簡単に見つけられるようにし、すべての記事がブランドと一貫した外観になるようにします。
ブログページテンプレートは、テーマテンプレートリストの「ブログインデックス、アーカイブ、検索」または「ブログページ」の下に表示されます。デザインの編集をクリックして、ビジュアルビルダーで開きます。
ここでは、ブログ投稿の表示方法を制御できます。注目の画像、抜粋、著者情報などを表示します。また、検索バー、ソーシャル共有ボタン、または読者を他のページに誘導するための行動喚起を追加することもできます。
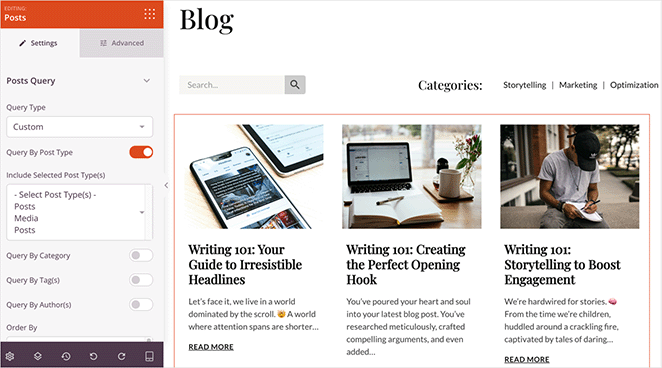
ブログインデックスと同様に、各記事のタイトル、注目の画像、著者情報を表示する方法を制御するために、単一投稿テンプレートを編集します。

SeedProdはテンプレートタグを使用して、投稿からこのデータを自動的に取得し、デザインの一貫性を保ちます。
ステップ5:会社概要ページを作成する
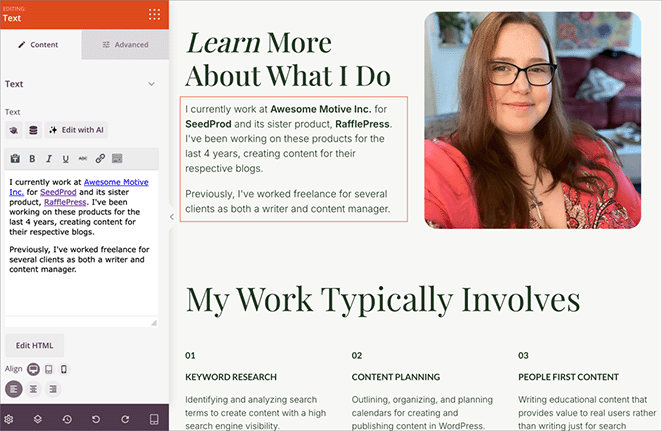
ホームページの次に重要なのが、あらゆる個人ウェブサイトの「会社概要」ページです。潜在的なクライアントや協力者が、サービスを提供する人物を知ることができる場所です。私のページは、本物らしく魅力的で、私が誰であり、何を提供しているのかを明確に伝えるものにしたかったのです。
Elite Consulting Businessテーマには、「会社概要」ページのテンプレートが含まれていました。デザインを編集をクリックして、ビジュアルビルダーで開きます。
元のデザインの最初の2つのセクションは、私の職務経験と提供するサービスに焦点を当てていたため、そのまま残すことにしました。プレースホルダーのコンテンツと画像をご自身のものに置き換えただけです。
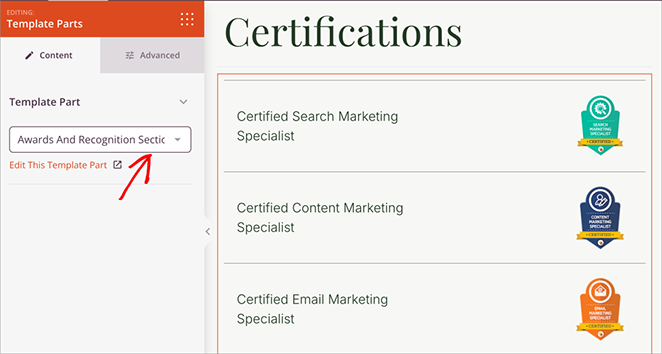
次に、信頼性を高めるために資格を強調表示したいと思いました。ここでSeedProdのテンプレートパーツが役立ちました。テンプレートパーツとは、異なるページに挿入して再利用できる既製のセクションのことです。これは非常に時間を節約できます。
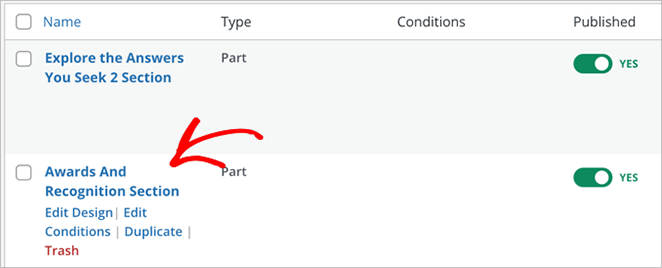
テーマには「受賞歴と表彰」というテンプレートパーツがありました。それを私の資格を含めるように編集し、「会社概要」ページに挿入しただけです。
最後に、より個人的なタッチを加えた最終セクションを作成しました。趣味、住んでいる場所、その他訪問者がより個人的なレベルで私とつながるのに役立つ情報を共有しました。
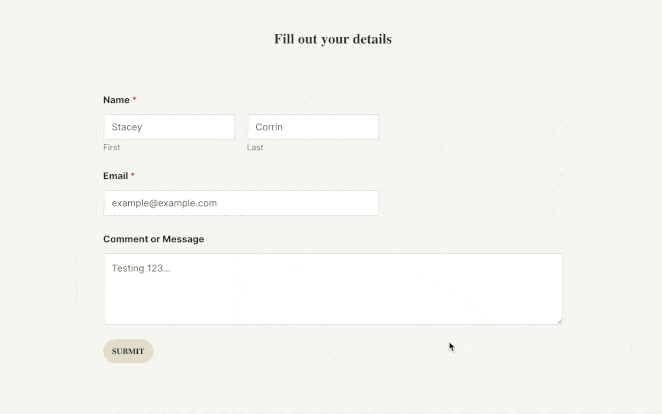
ステップ6:お問い合わせページを設定する
カスタムのお問い合わせページは、ユーザーエンゲージメントを促進するために、クリーンで直接的である必要があります。Elite Consulting Businessテーマには既製の「お問い合わせ」ページが含まれていましたが、少し圧倒される感じがしました。
物事を大幅に簡素化することにしました。デフォルトのコンテンツのほとんどを削除し、SeedProdのお問い合わせフォームブロックに置き換えました。これにより、ショートコードに触れることなく、WPFormsやその他の人気のWordPressフォームビルダープラグインと簡単に統合できます。

WPFormsはSeedProdにバンドルされていませんが、WordPressプラグインディレクトリから無料版をダウンロードできます。基本的なお問い合わせフォームに必要なものがすべて揃っています。まずWPFormsでお問い合わせフォームを作成し、次にSeedProdのブロックを使用して、SeedProdでお問い合わせフォームをページに追加します。
ステップ7:グローバルテーマ設定を調整する
私のウェブサイトは本当にまとまり始めていました。今度は、すべてを洗練されプロフェッショナルに見せるための最終的な仕上げを加える時でした。ここでSeedProdのグローバル設定が登場します。
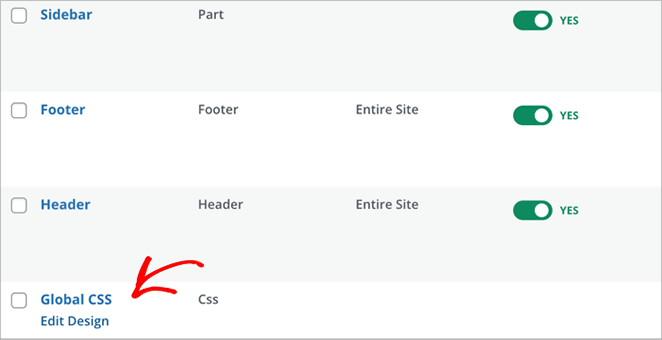
テーマビルダーで、グローバルスタイルテンプレートを見つけて、デザインを編集をクリックします。これは、ウェブサイト全体のルックアンドフィールを制御するためのコマンドセンターです。
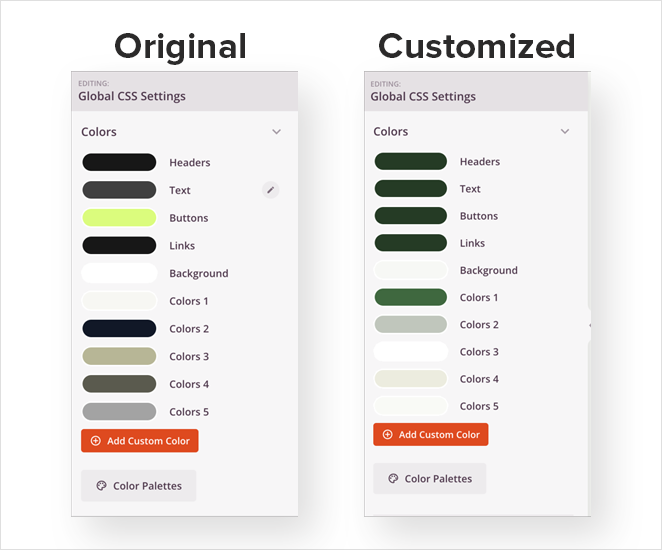
まず、すべてのページで色の整合性を確保します。SeedProdを使用すると、ヘッダーやテキストからボタン、リンク、背景まで、すべてのグローバルカラーを定義できます。ブランドカラーをここに設定すると、すべてのテンプレートに自動的に適用されます。
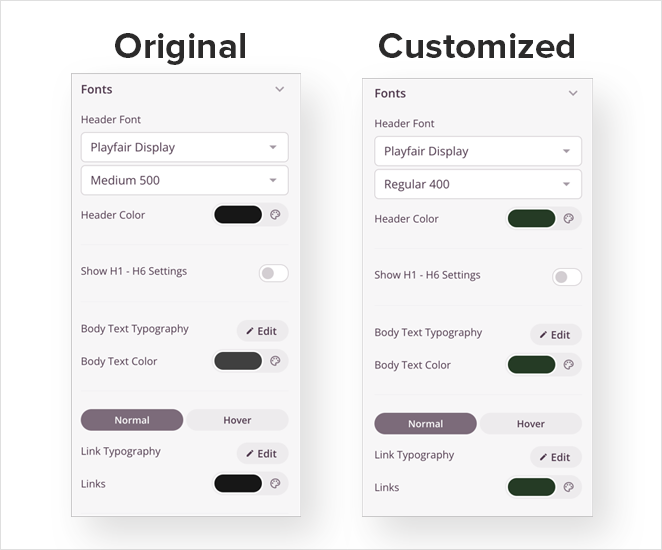
Elite Consulting Businessテーマのデフォルトフォントは気に入っていましたが、見出しやリンクのフォントの太さや色を調整して、ブランドの美学により一致させたいと思いました。見出し用フォント1つ、本文用フォント1つがほとんどのサイトでうまく機能します。
ボタンは アクションを促すために不可欠なので、目立つようにしてください。適切な見た目が見つかるまで、さまざまなフォントスタイル、色、境界線の半径を試してください。

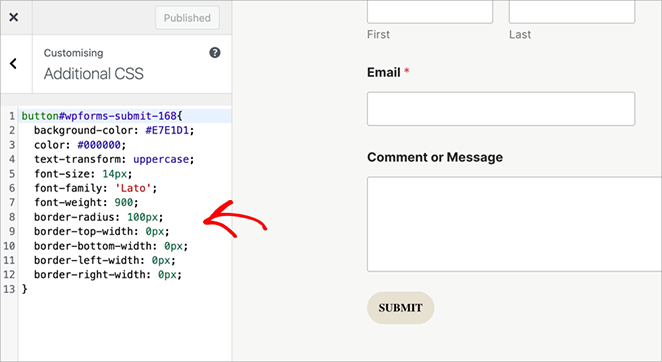
SeedProdには、ビジュアルエディターで処理できない微調整のためのカスタムCSSパネルも用意されています。たとえば、カスタムCSSスニペットを使用して、WPFormsのフォーム送信ボタンを他のボタンのスタイリングと一致させました。ガイダンスについては、 WordPressにカスタムCSSを追加する方法を参照してください。
ステップ8:カスタムWordPressテーマを公開する
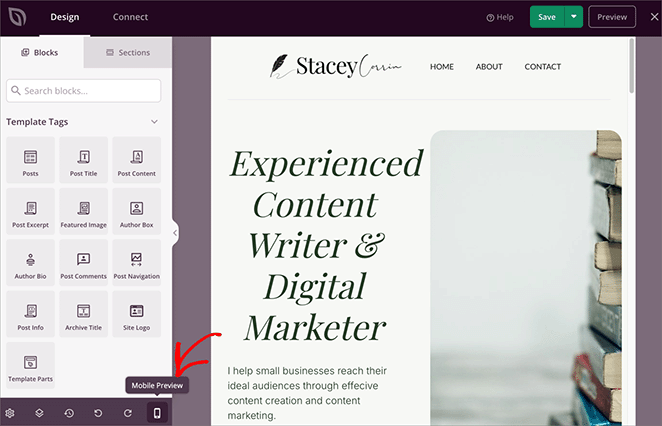
カスタムWordPressテーマのデザインに細心の注意を払った後は、最終チェックをスキップしないでください。組み込みのプレビュー機能を使用して、デスクトップからタブレット、スマートフォンまで、さまざまな画面サイズでどのように表示されるかを再確認してください。人々がどのように表示しても、テーマが素晴らしく見えるようにしたいと考えています。
インタラクティブな要素をテストします。お問い合わせフォームからテストメッセージを送信します。すべてのボタンとメニューリンクをクリックして、正しい場所に誘導されることを確認しました。
最後に、真実の瞬間です。SeedProdテーマビルダーに戻り、深呼吸をして、右上隅にある「SeedProdテーマを有効にする」トグルを見つけます。満足のいくクリックで、「オン」の位置に切り替えます。
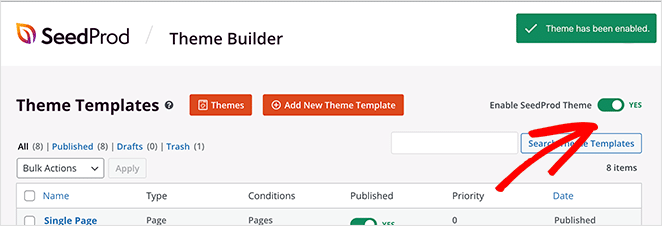
カスタムWordPressテーマが公開されました!これでサイトにアクセスして、実際に動作している様子を確認できます。
カスタムWordPressテーマの作成に関するFAQ
カスタムWordPressテーマを作成するために、PHP、CSS、またはJavaScriptを学ぶ必要がありますか?
いいえ。SeedProdのようなビジュアルテーマビルダーを使用すれば、コーディングスキルは必要ありません。ドラッグアンドドロップコントロールとライブプレビューを使用して、テーマのすべての部分をデザインします。PHP、CSS、JavaScriptは、WordPressのネイティブ開発ツールを使用してスクラッチからテーマを構築する場合にのみ必要です。
カスタムWordPressテーマの作成にはどのくらい時間がかかりますか?
SeedProdを使用すると、完全なカスタムテーマは通常2〜4時間かかります。これには、テンプレートキットの選択、ヘッダーとフッターのカスタマイズ、ホームページの構築、ブログと投稿テンプレートの設定、公開が含まれます。すべてのセクションにカスタムページデザインを持つより複雑なサイトは、より時間がかかります。
テーマビルダーとWordPressフルサイト編集の違いは何ですか?
WordPressフルサイト編集(FSE)は、ブロックエディターを使用してテーマテンプレートを視覚的に編集できる、WordPressに組み込まれた機能です。無料ですが、ブロックパターンと基本的なHTMLに慣れている必要があります。SeedProdのようなテーマビルダーは、より初心者向けのビジュアルエディター、300以上の既製テンプレート、およびより完全なデザインワークフローを提供するプラグインです。ただし、費用がかかります。
コンテンツを失うことなく、現在のテーマからカスタムテーマに切り替えることはできますか?
はい。投稿、ページ、メディアはテーマではなく、WordPressのデータベースに保存されます。テーマを切り替えてもデザインは変わりますが、コンテンツには影響しません。変更を加える前にサイトをバックアップしておくことをお勧めします。
カスタムWordPressテーマの作成にはいくらかかりますか?
SeedProd Proの場合、費用は年間199.50ドルからとなります。WordPressのフルサイト編集は無料ですが、より高度な技術知識が必要です。カスタムコーディングされたテーマを開発者に依頼する場合、複雑さにもよりますが、通常500ドルから5,000ドル以上かかります。
カスタムテーマを作成するにはWordPress.comとWordPress.orgのどちらが必要ですか?
SeedProdのようなプラグインをインストールするにはWordPress.org(セルフホスト型WordPress)が必要です。WordPress.comでは、ほとんどのプランでプラグインのインストールが制限されています。どちらをお持ちかわからない場合は、こちらをご覧ください: WordPress.orgでウェブサイトを作成する方法。
SeedProdで作成したカスタムテーマを販売できますか?
SeedProdのライセンスは、ご自身のサイトでの使用を対象としています。クライアントのサイトを構築するために使用できますが、作成したテーマの商用再配布に関する詳細は、SeedProdの利用規約をご確認ください。
実際のウェブサイトのためのカスタムWordPressテーマの例
何を構築すべきか迷っていますか?ここでは、SeedProdのビジュアルビルダーで作成できる実際のサイトの例を紹介します。それぞれテンプレートキットから始まり、特定のニッチに合わせてカスタマイズされています。
フィットネスの専門家: パーソナルトレーナーのウェブサイトを作成するサービス、お客様の声、予約オプションを紹介します。

教会や非営利団体: 教会のウェブサイトを構築するイベントリスト、説教アーカイブ、寄付ページを含みます。

レストラン: レストランのウェブサイトをデザインするビジュアルメニュー、場所情報、オンライン予約を含みます。

あらゆるWordPressウェブサイトのためのカスタムテーマを作成する
適切なツールがあれば、カスタムWordPressテーマの構築に開発者や数ヶ月の学習は必要ありません。SeedProdのビジュアルテーマビルダーは、300以上の開始テンプレートと、技術的な作業をすべて処理してくれるドラッグ&ドロップエディターを提供します。
始める準備はできましたか? SeedProd Proを入手するそして、上記のステップに従って、今日カスタムテーマを公開しましょう。
その他のWordPressガイドについては、以下をご覧ください:
- WordPressでブログページを作成する方法
- WordPressでページを複製する方法
- ブログ投稿のアイキャッチ画像を作成する方法
- WordPressでママブログを開始する方法
- 旅行ブログを開始して収益を得る方法
お読みいただきありがとうございます!皆様のご意見をお聞かせいただければ幸いです。お気軽に会話にご参加ください YouTube, X および Facebook で、ビジネスを成長させるための役立つアドバイスやコンテンツをさらにご覧ください。


