


TL;DR: How to Add a Button to Your WordPress Header
There are 3 ways to add a button to your WordPress header, from fully visual to CSS-only.
- SeedProd – Drag a Button block into your header template in the visual builder. No code required.
- CSS class method – Assign a CSS class to a menu item in Appearance > Menus and paste a short CSS rule. Works with any classic theme.
- Full Site Editor – Add a Button block inside the Navigation block in WordPress’s built-in site editor. No plugin needed for block themes.
When I first tried to add a button in my WordPress header, I wanted something that stood out, a clear call to action right where people would see it first.
Whether you’re linking to a sign-up page, freebie, or booking form, a button in your WordPress menu can guide visitors exactly where you want them to go. In my testing, adding a button to a WordPress header with SeedProd takes under 5 minutes and doesn’t require touching your theme files.
In this tutorial, I’ll show you how to add a button to your WordPress header 3 different ways, step by step.
Why Add a Button to Your WordPress Header Menu?
Navigation menus on WordPress websites are typically text links that all look similar. As such, each menu item has the same importance, weight, and urgency.
If you were to add a URL to an important order form, or a registration page, it would look the same as the other links in your menu. It won’t stand out or look urgent enough for users to click first.

However, turning that important link into a button in WordPress will instantly make it more noticeable. A button in your WordPress header will improve visitors’ user experience and engagement with your WordPress website.

Despite having button blocks for posts and pages, WordPress doesn’t currently offer menu buttons by default. Fortunately, there are a few ways to add buttons to your menu, and they’re relatively easy to implement.
With that in mind, let’s look at 3 ways to add a button to your WordPress header menu.
SeedProd is the best option if you want visual control and plan to customize your full header layout. The CSS class method works with any classic theme and takes about 3 minutes if you’re comfortable pasting CSS. The WordPress Full Site Editor is built into block themes and requires no extra plugins.
How Do You Add a Button to a WordPress Header with SeedProd?
With SeedProd, you can add a styled call-to-action button to your WordPress header in about 5 minutes by dragging a Button block into your header template, no code required.
We recommend this method first because it offers the most customization options and lets you build your WordPress header menu visually with drag-and-drop.

SeedProd is one of the top landing page and website builders for WordPress. It lets you create flexible, SEO-friendly WordPress themes, landing pages, and complete websites without hiring a developer or adding shortcodes to your site.
SeedProd’s drag-and-drop builder lets you create a custom header, footer, or sidebar, and drop in a button wherever it makes sense.
You can also add countdown timers, opt-in forms, galleries, and before and after sliders to the same header layout.
So follow the steps below to add buttons to your WordPress header with SeedProd.
Step 1. Install and Activate SeedProd
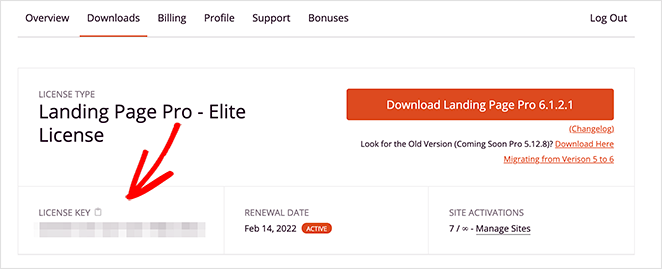
First of all, you’ll need to get a copy of the SeedProd plugin and download it to your computer. We’ll be using SeedProd Pro for this tutorial because it includes the Theme Builder feature.
In your account dashboard, you’ll see a large download button to save the plugin .zip file. It’s also a good idea to copy your license key at this stage because you’ll need it shortly.
After downloading the plugin, head to your WordPress dashboard and upload the plugin files. You can always follow this guide on installing and activating a WordPress plugin if you need help.
Once you’ve done that, head over to the SeedProd » Settings page and paste your license key.
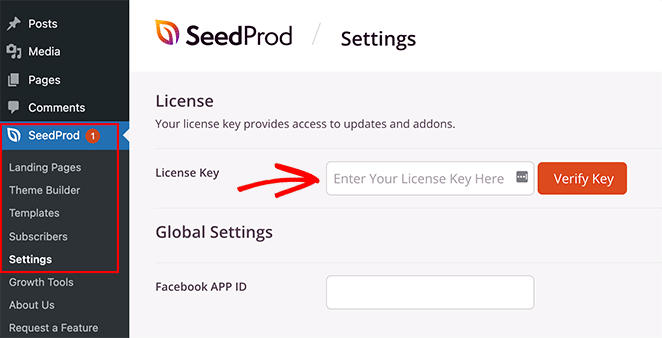
From there, click the Verify Key button to unlock your Pro features.
Step 2. Choose a Premade Template
With your license key active, you can now decide which layout you’d like to make with SeedProd. There are 2 different approaches that you can take, which are as follows:
- WordPress Theme: make a custom WordPress theme to replace your current website design with a custom header template. (no code required).
- Landing Page: create a single page and add a custom header to that page only while keeping your existing theme.
For this guide, we’ll walk you through option 1 because it will replace the navigation menu across your entire website. But if you prefer option 2, you can follow this guide to create a landing page in WordPress, then return to this tutorial from step 4.
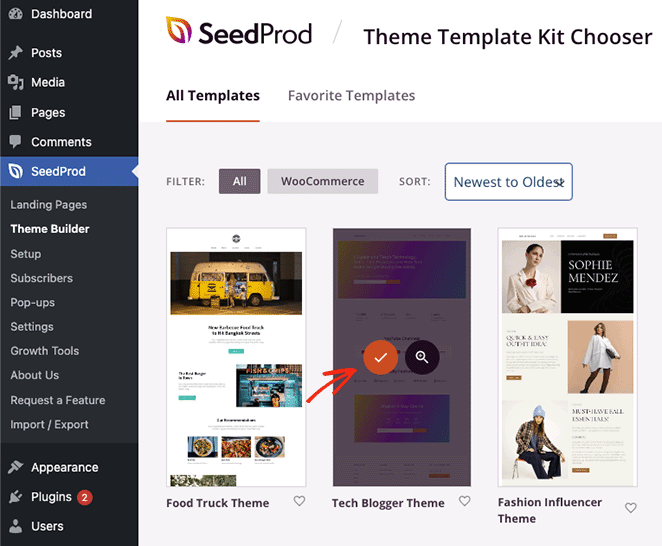
Since we’re choosing the WordPress theme option, you’ll need to go to SeedProd » Theme Builder and click the Themes button.
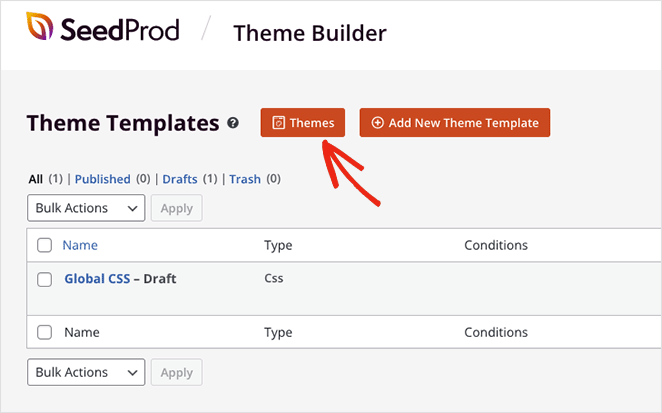
This will bring up a library of pre-made website kits you can import with a single click.
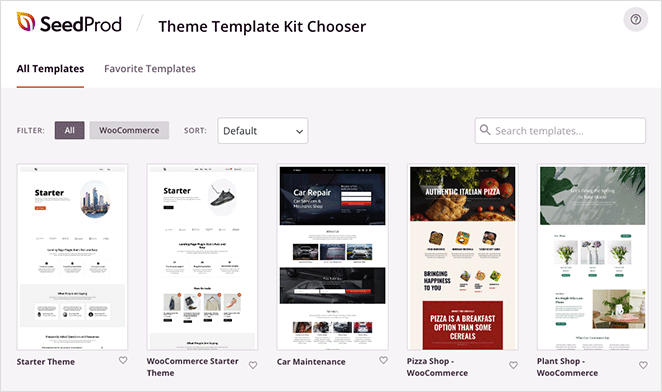
You can filter the templates by WooCommerce, popularity, newest to oldest, and vice versa. When you’ve found a theme you like, go ahead and click the tick icon to launch it.
Once your theme has finished importing, you’ll automatically see a page like this:
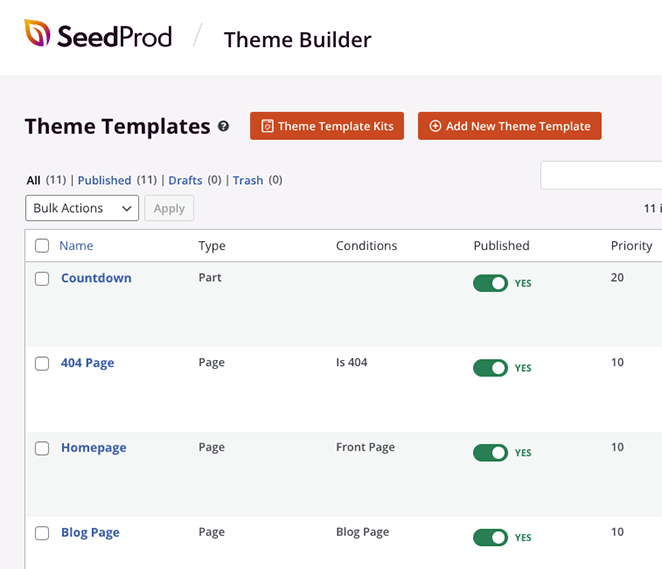
It includes a list of the templates that make up your WordPress theme, and you can edit each with SeedProd’s visual drag-and-drop builder.
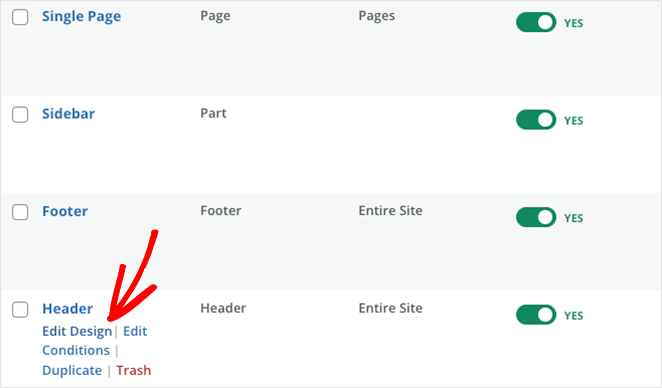
Step 3. Customize Your Header
Since you want to add a button to your header, let’s go ahead and edit the Header template. Scroll down until you find it in the list, then click the Edit Design link.
When you open the header template, you’ll see a 2 column layout like this:
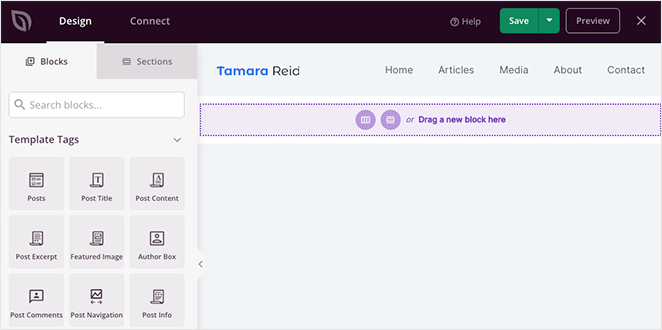
As you can see, there are various WordPress blocks on the left and a preview of your design on the right. You’ll be able to click anywhere on your design to change the content and drag blocks from the left panel to add more features to your page.
When you look at the current header layout, you’ll see a column with an Image block and a column with the WordPress Menu block.

To add a button to the header, you’ll need to add a 3rd column, which we’ll show you how to do now.
First, hover over your header section until it has a purple outline, then click the Duplicate Section icon.
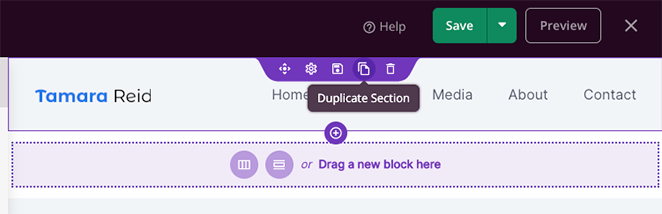
Doing that will add a copy of your header beneath the first.
Next, hover over the column in your first section until it has a blue outline, then click the Trashcan icon to delete it.
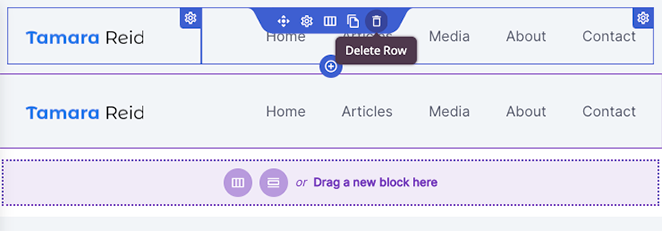
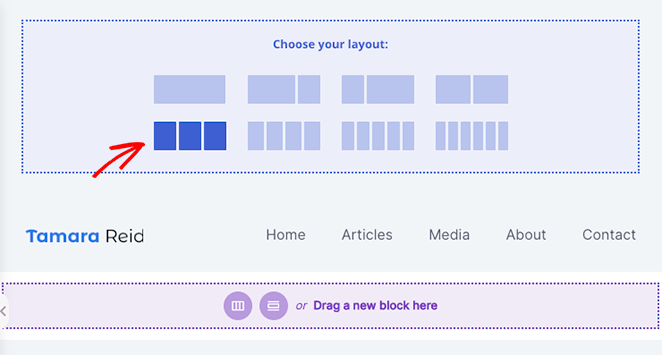
You’ll now have an empty section with the option to choose a new column layout. Go ahead and click the 3-column layout.
Now you can hover over the Move icon on your duplicated section and move the image and nav menu items blocks into your new section.
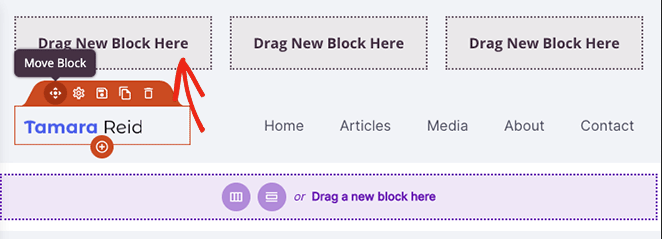
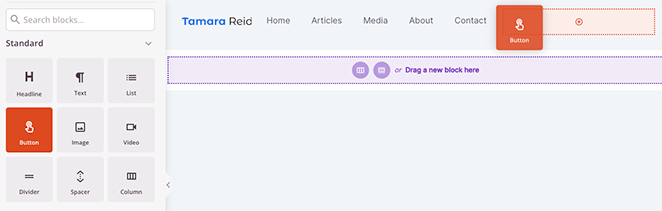
This will leave you with an empty column where you can add a Button block.
Before going to the next step, make sure you delete the old header section by clicking the Trashcan icon.

Now you’re ready to create a button for your WordPress header menu.
Step 4. Add a Button to Your Header
Adding a button to your header with SeedProd is easy. Find the Button block in the left sidebar, and drag it into the empty column in your header area.
Once the button is in place, you can click it to customize the button link text, button sub-text, link, alignment on mobile and desktop, and button size.

You can even add custom icons before and after the button text by choosing from the library of Font Awesome icons.
For even more customization options, click the Advanced settings tab. This is where you can edit the text color and typography, change the background color, add a box shadow, border radius, spacing, custom CSS classes, and even hide the button on specific devices.
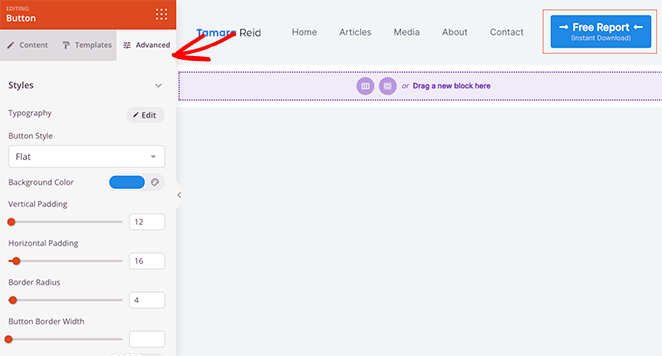
Plus, the Animation option is a fantastic way to make your button stand out more.
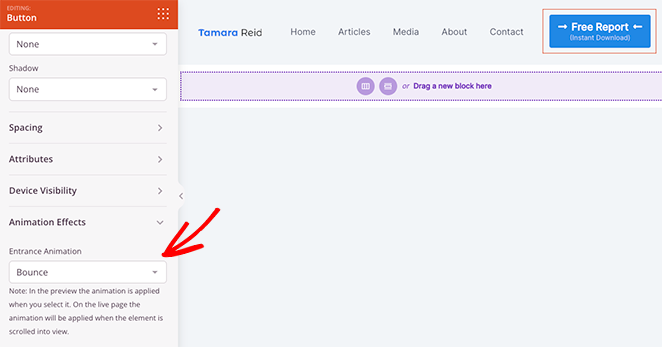
In the Advanced tab, the Hide on Mobile toggle controls whether the button appears in your mobile navigation. By default, it shows on all devices.
When you’re happy with how your menu button looks, make sure you click the Save button.

Now you can continue customizing the rest of your WordPress theme. For instance, you can edit your blog page, single page templates, and sidebar or change your WordPress footer.
Step 5. Publish Your Changes
After customizing the rest of your website, the last step is to make those changes live. To do that, first head back to the SeedProd » Theme Builder page.
Next, find the Enable SeedProd Theme toggle in the top-right corner and turn it to the Yes position.
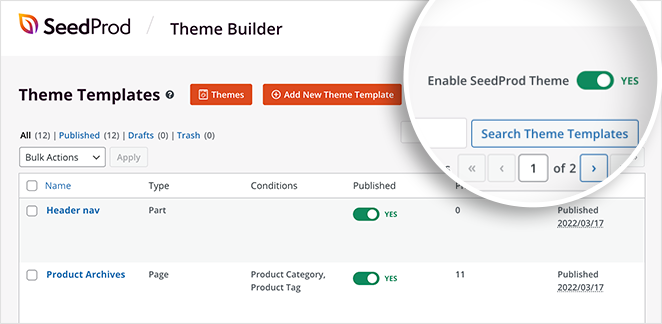
You can now preview your WordPress theme and see your header button in action.

How to Add a WordPress Header Button Using a CSS Class
The CSS class method works with any classic WordPress theme and doesn’t require a plugin. I’ve used this approach when a full visual builder wasn’t needed.
First, go to Appearance » Menus in your WordPress dashboard. Select the menu you want to edit from the dropdown at the top of the screen.

Next, click the Screen Options tab in the top-right corner of the screen. Check the box next to CSS Classes. This adds a new field to each menu item.

Now expand the menu item you want to style as a button. Type a class name in the CSS Classes field. I use header-button, but any name works as long as it has no spaces. Click Save Menu when you’re done.

Now you need to add CSS that turns that class into a button. The easiest way is through WPCode, which lets you add code snippets without editing your theme files directly. Go to Code Snippets » Add Snippet, choose CSS as the snippet type, and paste this:
li.header-button > a {
    display: inline-block !important;
    background-color: #0073aa !important;
    color: #ffffff !important;
    padding: 12px 28px !important;
    border-radius: 4px !important;
    text-decoration: none !important;
    line-height: normal !important;
}
li.header-button > a:hover {
    background-color: #005177 !important;
    color: #ffffff !important;
}

Save and activate the snippet. Your menu item will now display as a styled button in your WordPress header.

Change background-color to match your brand colors. Adjust the padding values to control button size. If you prefer not to install WPCode, the same CSS works in Appearance » Customize » Additional CSS.
Keep in mind this approach only works with classic WordPress themes that use Appearance » Menus. If your site uses a block theme with the Full Site Editor, use the method in the next section.
How Do You Add a WordPress Header Button Without a Plugin?
If your WordPress theme uses the Full Site Editor, you can add a header button without any plugins. This method works with block themes only.
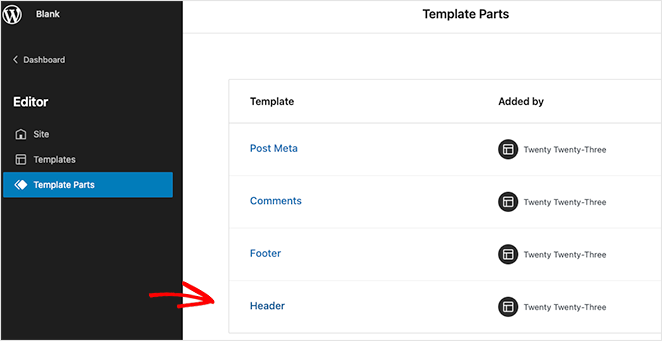
First, go to Appearance » Editor from your WordPress dashboard. This will open the WordPress Full Site Editor, which uses blocks to build your website.
Next, open the sidebar, click the Template Parts heading, and select the Header option on the right-hand side.
Once you’ve done that, you’ll see a visual layout of your WordPress header. Inside the editor, click the Navigation heading.
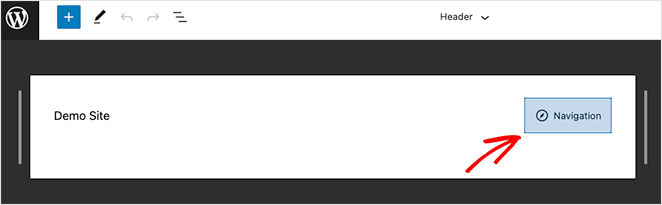
You’ll see the navigation layout settings in the right sidebar, but first, click the (+) plus icon to start adding your menu items.
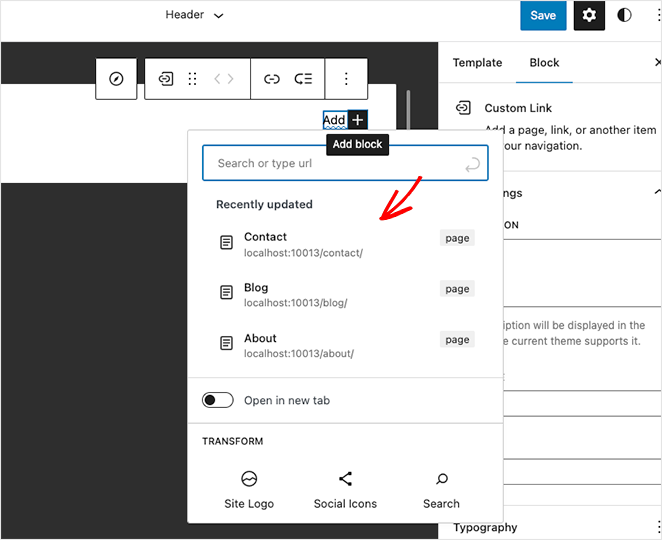
You can click and search for any page to add it to your menu in WordPress.
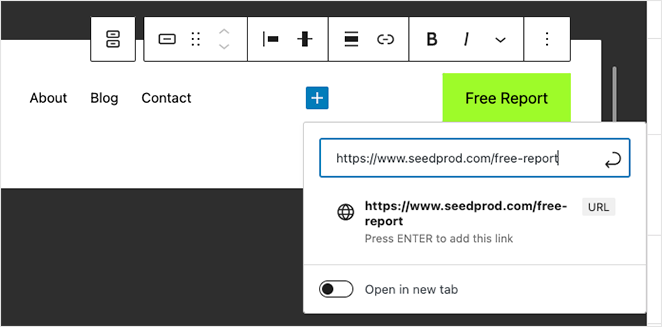
With your menu links in place, click the (+) plus icon again to add a new WordPress block. This time, search for the Button block and add it to your header.
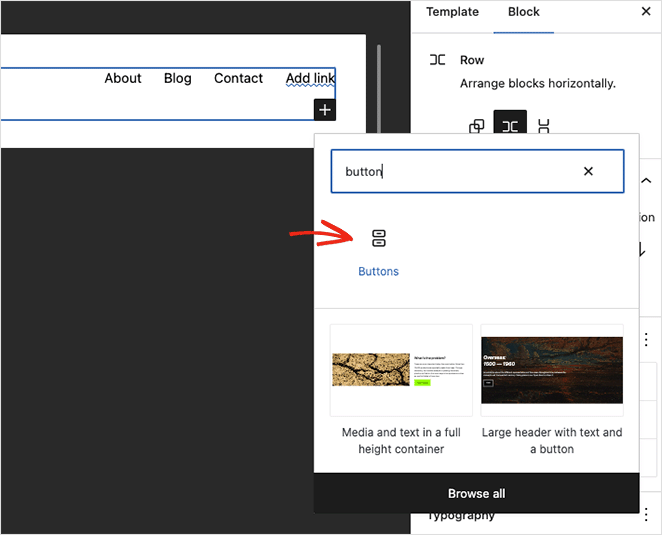
Now enter the button text and click the link icon to add the link you want visitors to click. In our case, we’ll add a link to our free report.
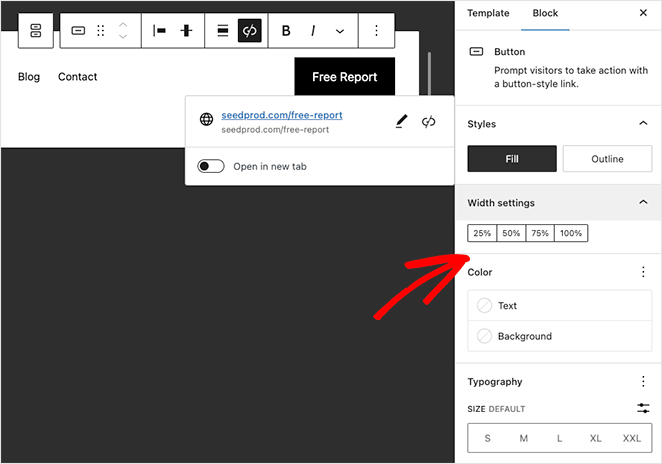
In the block screen options on the right, you can customize your header menu button by changing the following settings:
- Fill or outline button style
- Width percentage
- Text and background color
- Typography size
- Padding
- Border radius
- Additional CSS and class name
- And more.
The button will appear in your header on both desktop and mobile. Within the navigation block, you can also control how it displays when the menu collapses on smaller screens.
When you’ve finished customizing your button, click the Save menu button in the top-right corner.
Now any page that uses the Header template part will show your menu button and navigation links.
If you’re using a theme that doesn’t include functionality for the site editor, you can follow this guide on adding a button to your menu using the older menu customizer.
Personally, I’ve found SeedProd’s drag-and-drop builder to be the simplest way to get it done, especially if you want more control without touching code.
Frequently Asked Questions
How do I add a button to the header in WordPress?
You have three options: use SeedProd to drag a Button block into your header template visually, use the WordPress Full Site Editor to add a Button block inside your Navigation block if you have a block theme, or assign a CSS class to a menu item and style it as a button with a short CSS rule. SeedProd is the fastest option if you want styling control without writing code.
How do I make my header button show on mobile?
In SeedProd, open the Button block settings and go to the Advanced tab. The Hide on Mobile toggle is off by default, which means your button shows on all devices. In the WordPress Full Site Editor, the button inherits the responsive behavior of the Navigation block, so it collapses with your menu on mobile unless you configure it separately.
Can I add multiple buttons to my WordPress header?
Yes. With SeedProd, you can drag multiple Button blocks into your header template and style each one differently. In the Full Site Editor, you can add more than one Button block inside the Navigation block. For the CSS class method, assign different class names to different menu items and style each class separately.
Does adding a header button work with any WordPress theme?
It depends on the method. SeedProd replaces your theme’s header entirely, so it works regardless of your current theme. The CSS class method works with classic themes that use Appearance » Menus. The Full Site Editor method requires a block theme. If you’re unsure which type of theme you have, go to Appearance in your WordPress dashboard. If you see an Editor option, you have a block theme.
I hope you’ve found this tutorial on how to add a button in WordPress header menus helpful. You might also like the following tutorials for customizing your WordPress website:
- How to Add Business Hours to WordPress
- How to Easily Create an Image Lightbox in WordPress
- How to Dim a Background Image in WordPress Without CSS
Thanks for reading! We’d love to hear your thoughts, so please feel free to join the conversation on YouTube, X and Facebook for more helpful advice and content to grow your business.


