My first WordPress author page was just a plain list of posts. It gave visitors no reason to learn more about me or trust what I had to say.
A WordPress author page is like your online business card. It shares your bio, photo, and the articles you have written in one place.
When you customize it, you can build credibility, match your site’s style, and improve SEO. In this guide, I will show you how I create custom author pages in WordPress using SeedProd and other tools so they stand out and connect with readers.
Quick steps to create a custom author page in WordPress:
What Is a WordPress Author Page?
A WordPress author page is a dedicated profile page for each writer on your website. It usually includes the author’s name, photo, bio, and a list of their published posts.
By default, WordPress automatically creates these pages when you add new authors. However, the design and layout are basic, and they often lack extra details that can build trust or help with SEO.
Difference Between Author Page and Author Box
An author page is a standalone profile page with its own URL. It can include detailed information, links, and an archive of all posts written by that author.
An author box is a small section that appears at the end or beginning of a blog post. It usually shows the author’s photo, name, and a short bio but does not provide a full archive of their work.
| Feature | Author Page | Author Box |
|---|---|---|
| Location | Standalone page | Inside individual posts |
| Content | Full bio, photo, contact info, list of posts | Short bio, photo, brief info |
| SEO Benefits | Can rank in search, supports E-E-A-T | Limited, supports on-page context |
| Customization | Highly customizable with builders like SeedProd | Limited to theme or plugin options |
Why Customize Your WordPress Author Page?
A custom author page makes your site look more professional and helps visitors connect with your writers. It also supports SEO by improving how Google understands and ranks your content.
Custom author pages can:
- Showcase expertise — List qualifications, experience, and past publications to prove the author’s skills.
- Build authority — Link to personal blogs, social media profiles, and awards that strengthen credibility.
- Increase trust — Include a detailed bio, headshot, and any relevant disclosures.
- Improve WordPress author page SEO — Add structured data, optimized headings, and internal links to boost rankings.
- Drive more engagement — Display recent posts and popular articles from the author to keep readers exploring your site.
When readers can see who is behind the content, they are more likely to trust it and share it. This can lead to higher engagement, better click-through rates, and stronger search visibility.
How to Create a Custom WordPress Author Page in WordPress
A custom author page lets you control exactly how your profile looks and what information it includes. In this section, I’ll show you the steps I use to design author pages that look professional, match my site’s branding, and improve SEO.
We’ll use SeedProd to create your custom author page. SeedProd is a drag-and-drop WordPress website builder that lets you design themes and page layouts without writing code.

SeedProd is the best WordPress website builder with drag-and-drop. It allows you to create custom WordPress themes and page layouts without writing code.
With SeedProd’s theme builder, you can create unique author pages for every writer on your site. Each page can highlight an author’s experience, expertise, authority, and trustworthiness, which can help boost your rankings in search results.
Step 1. Install and Activate SeedProd
First, you’ll need to install and activate the SeedProd Pro plugin. While SeedProd offers a free version, you’ll need the Pro version to use its custom author page template.
For help, see our documentation on installing SeedProd Pro.
Step 2. Choose a SeedProd Theme Template Kit for Your Author Page Design
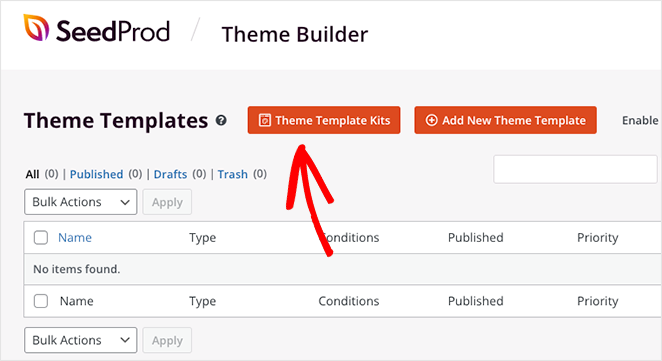
After activating SeedProd, navigate to SeedProd » Theme Builder and click the Theme Template Kits button.
On the following screen, you’ll see a library of pre-made website kits.
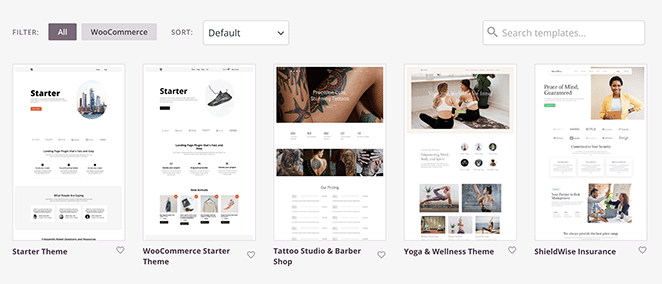
Each kit has everything you need to set up a complete website, including a homepage, about page, and contact page. Depending on the type of kit you choose, it may even have additional pages like a blog page, services page, portfolio, or gallery.
To choose a website theme, hover over it with your mouse and click the checkmark icon.
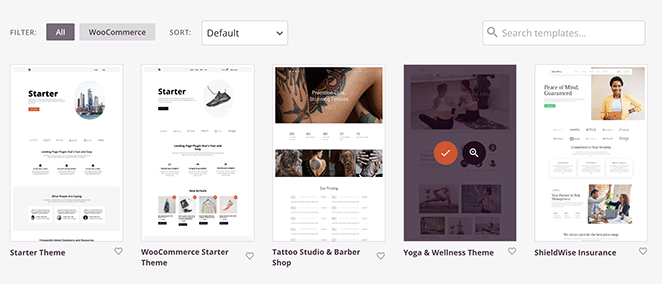
After a few seconds, SeedProd will display the individual theme files included in your design. You can click the “Edit Design” link on these templates to open and customize them in the drag-and-drop page builder.

For complete instructions on customizing your theme, see our guide on how to create a custom WordPress theme using SeedProd.
Step 3. Create a New Author Page Template in WordPress
Once you’ve customized your new theme to suit your business needs, you’re ready to build a custom author page. You can either create the same custom layout for all authors on your site or, as mentioned earlier, make a custom page for each author.
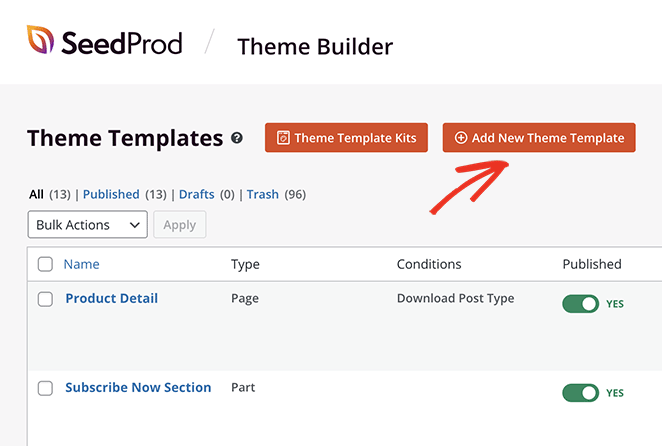
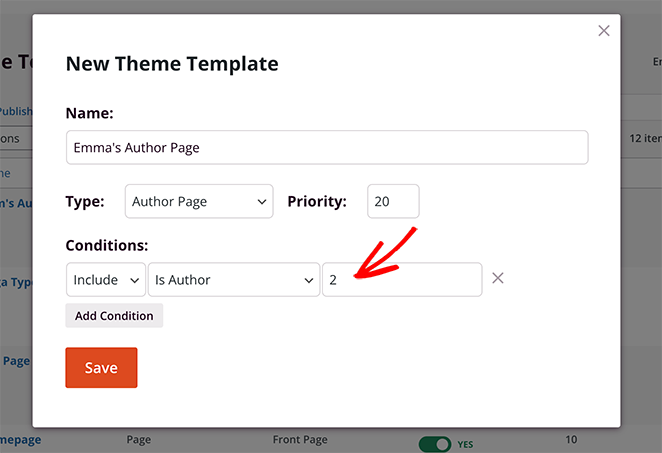
First, go to SeedProd » Theme Builder from your WordPress dashboard and click the Add New Theme Template button.
Under the “Type” dropdown menu, select the Author Page option.
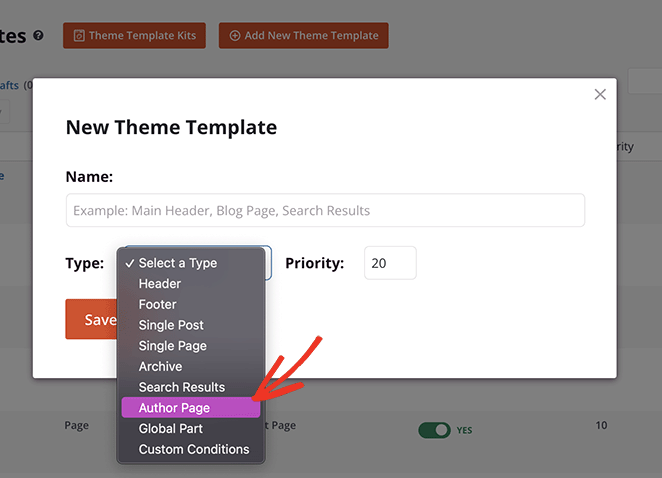
If you want to create the same layout for all authors on your site, you can ignore the blank field that appears. However, if you plan to customize the page for each writer, you’ll need to enter that author’s user ID into this field.
To find a user ID, simply navigate to Users » All Users and hover over the Edit link on a specific user. This will show a URL at the bottom of your page with the user ID and a number directly after it.
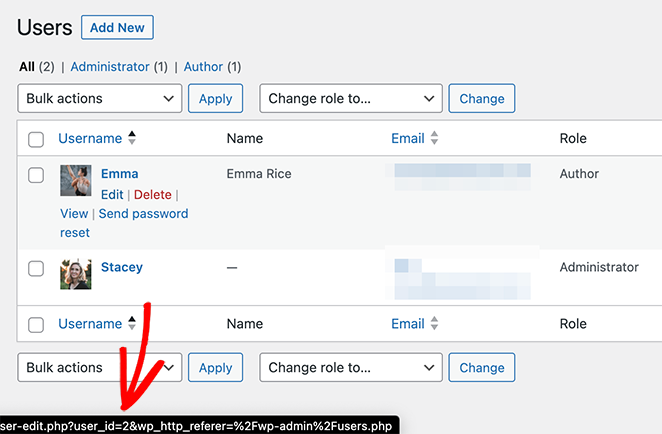
In this example, our User ID is 2, so we’ll add this into the blank field and click Save.
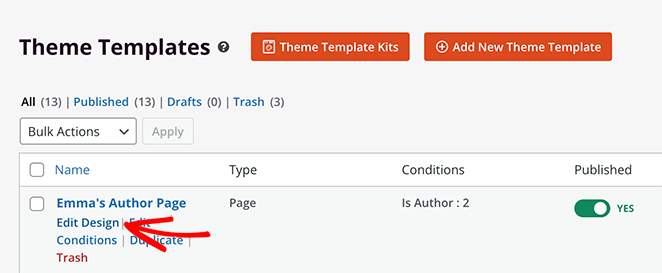
After setting up your author page template, you can start customizing it. To do this, click the Edit Design link.
Step 4. Customize the Author Page Layout, Bio, and Author Archive
When you open the template, you’ll see blocks and sections on the left and a preview of the page on the right. The preview won’t show any content for now because we haven’t added any blocks.
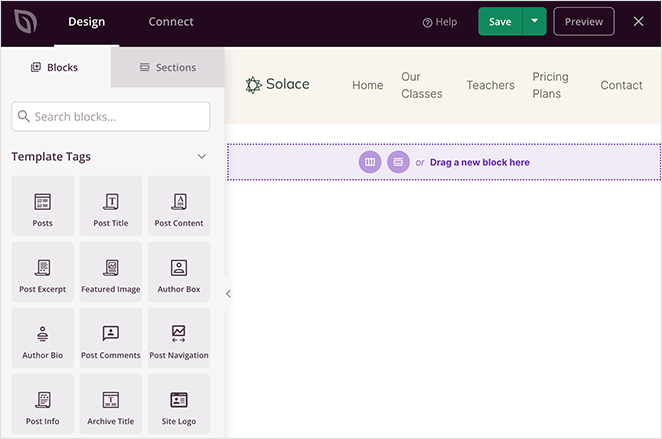
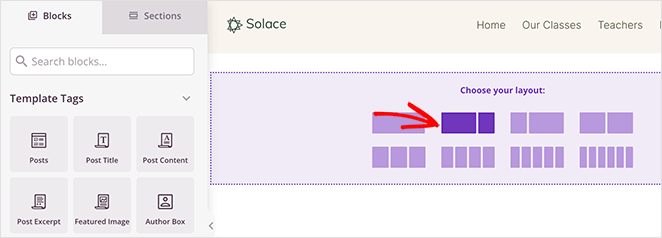
Let’s start by adding a new row by clicking the columns icon.

From there, choose the type of column you want to add to your page.
Now you can start adding content to the page. For example, to show a custom author headline, drag the “Headline” block onto the new row.

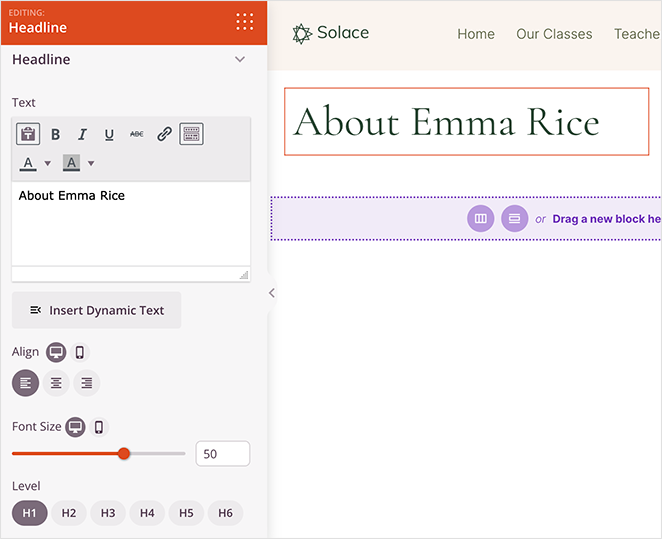
To customize the headline content, simply click it and type in the author’s name. In the same panel, you can adjust the size, alignment, and heading level with a few easy clicks.
Now let’s add some information about your author.
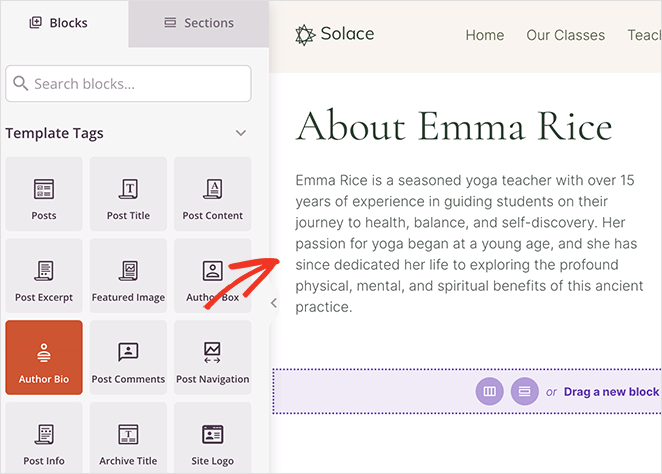
You can do this by dragging the “Author Bio” block onto the page. It will automatically pull the information from the author’s WordPress user profile.
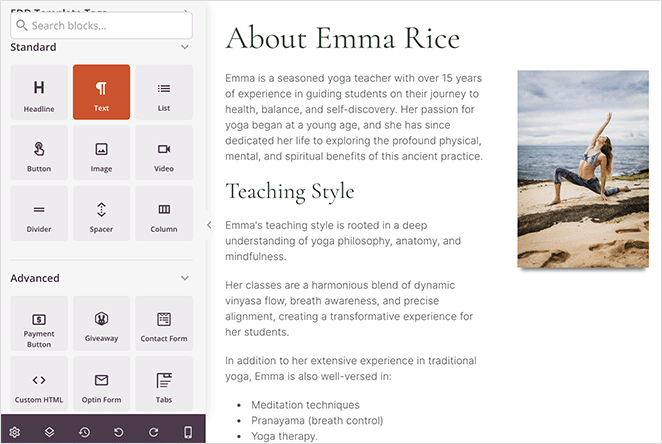
Alternatively, you can use the “Text” and “Image” blocks to add more long-form content, which is excellent for SEO.
An essential part of any author page is the ability to show a writer’s work, otherwise known as the author archive. With SeedProd’s “Posts” block, you can display a grid of posts by any author.
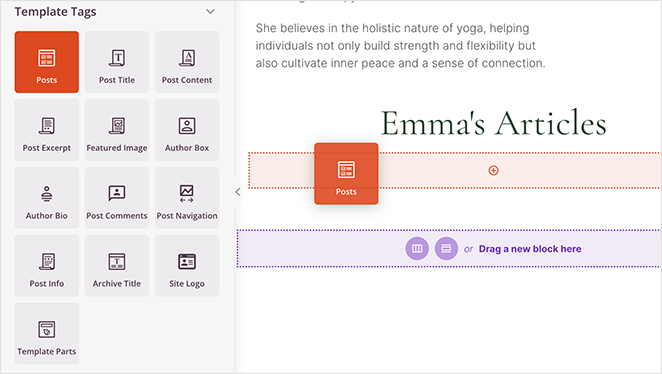
After dragging it onto your page, set the “Query type” to Custom, enable the “Query by Author” toggle, and choose the relevant author from the drop-down box.
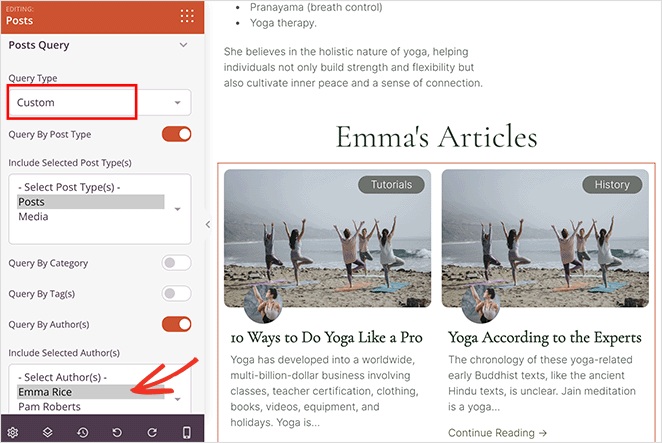
This setting will only show posts from that specific author on the page.
Once you’ve done that, you can go ahead and customize the layout with a different skin, show or hide the featured image, and more.

Social media is another excellent way to demonstrate an author’s expertise and authority. With the “Social Profiles” block, you can show social media icons that link to a writer’s accounts on various social networks.
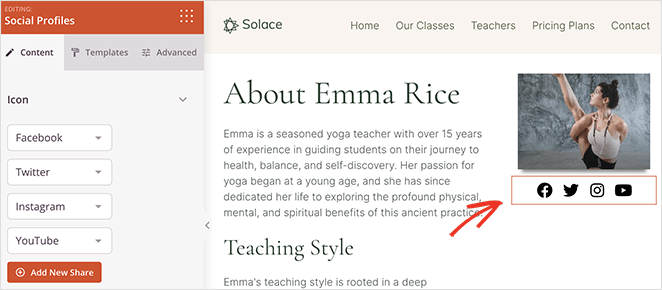
You can even drag over SeedProd’s social media embed blocks, such as the “Twitter Embed Timeline” block, to show an author’s recent tweets.
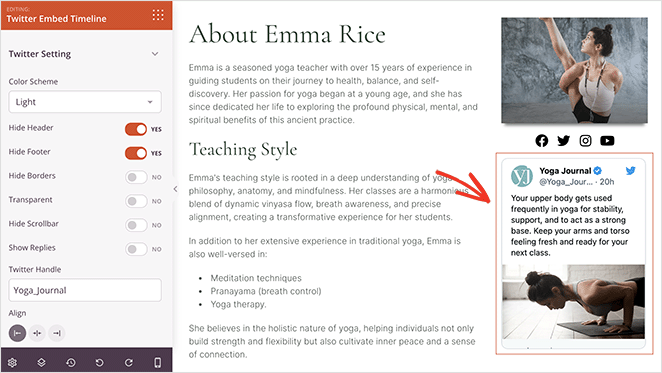
When you’re happy with how your custom author page looks, click the Save button in the top right corner of the screen and exit the page builder.

Step 5. Publish and Activate Your Custom WordPress Author Page
To publish your author page, you’ll need to activate your custom SeedProd theme. You can do this by going to SeedProd » Theme Builder and finding the “Enable SeedProd Theme” toggle.

Click this toggle until it’s in the “Yes” position, and SeedProd will publish your WordPress theme.
Now you can visit your custom author page in WordPress to see how it looks.


Best Free WordPress Author Page Plugin: WP User Manager
Another way to add a custom author profile page is with a free plugin like WP User Manager. It’s simple to set up and comes with built-in profile features, although it’s not as customizable as SeedProd.
How to Set Up a Custom Author Profile Page in WP User Manager
First, install and activate the free WP User Manager plugin. If you need help, you can follow this guide on how to install a WordPress plugin.
After activating the plugin, navigate to User » Settings from your WordPress dashboard. When you visit the “General” settings, you’ll see that the plugin automatically creates different pages for a custom login, custom user registration, forgot password, account, and profile pages.
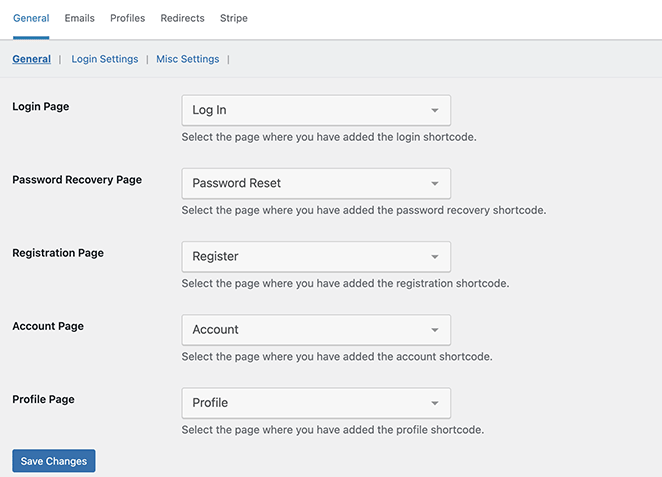
Now click on the Profiles tab to customize the user profile settings.
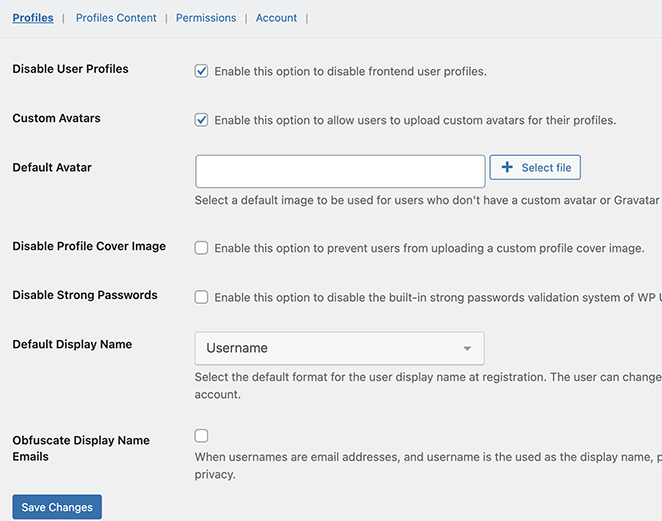
Here you can also allow users to upload custom profile photos or choose a default profile photo for all users. You can turn off several features, such as cover images and front-end user profiles.
In the Profiles Content tab, you can enable displaying user-submitted posts and comments on profile pages.
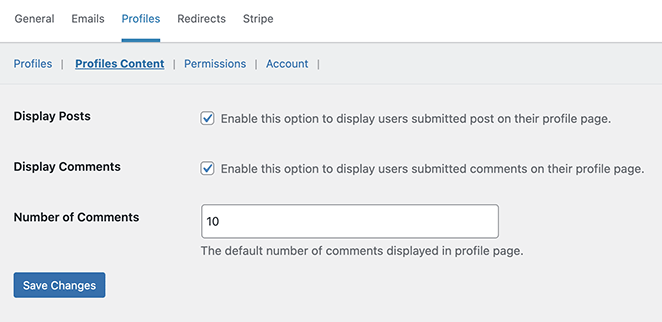
Carefully review the other settings until you’re happy with how the plugin is set up.
Your custom author profile pages are almost ready. Now we need to let users find their profile pages on your website.
To do this, go to Appearance » Widgets and add the “Login Form” widget to a sidebar.
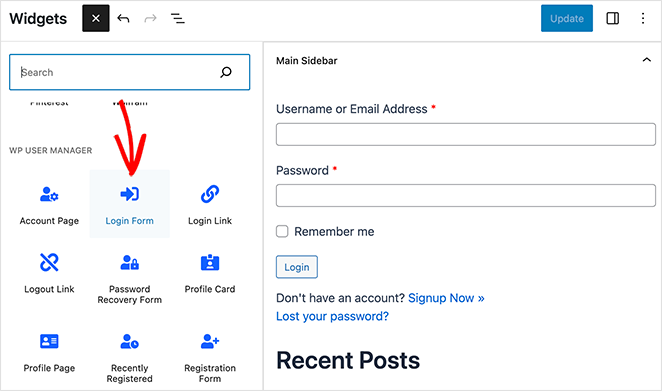
After updating your sidebar, you can visit your website to see the author profile page in action.
As a logged-in user, you’ll see your own information in the sidebar widget. Clicking the “View Profile” link will take you to your author profile page.

On your profile page, the “About” tab will display your name, email, website, and profile description.
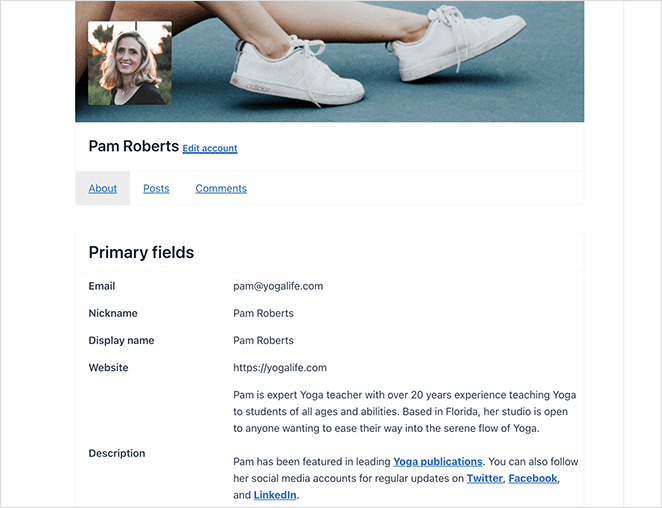
Then, in the “Posts” tab, you’ll see the author archive with your published content and comments.

Best Practices for High-Impact WordPress Author Pages
A high-quality author page can boost your credibility and improve your SEO. Here’s how to make yours stand out:
- Upload a high-resolution headshot that is at least 400×400 pixels so it looks sharp on all devices.
- Write a 150–300 word bio that explains your role, key expertise, and what topics you cover on the site.
- Include a “Featured Articles” section showing 3–6 of your best or most popular posts.
- Add links to professional profiles like LinkedIn, relevant industry sites, or verified social media accounts.
- Use the Author block or Posts block to automatically display your latest articles.
- Enable author schema in your SEO plugin so Google can connect your profile to your content.
- Match the layout to your brand style by using your site’s color palette, typography, and spacing.
FAQs About WordPress Author Pages
Build a Custom WordPress Author Page Today
We hope this guide has helped you learn how to create a custom WordPress author page. With SeedProd, you can tailor every part of an author template to each writer.
It’s fast, beginner-friendly, and doesn’t require any coding experience. So dive in and build SEO-friendly author pages with SeedProd today.
You might also like the following WordPress guides:
- How to Add an Author Box in WordPress (Without a Plugin)
- How to Create an Author Website in WordPress Without Coding
- 8 WordPress Author Bio Plugins Compared
- 23 Best WordPress Blog Plugins for Easy Blog Management
- How to Add a Custom Sidebar in WordPress (No Coding)
Thanks for reading! We’d love to hear your thoughts, so please feel free to join the conversation on YouTube, X and Facebook for more helpful advice and content to grow your business.

