

Whenever I finish setting up a new website, the next thing I do is connect its social channels. An audience doesn’t build itself, and a site that ignores Facebook leaves the easiest follows on the table.
Having your site and your Facebook page in two separate worlds means you’re missing out on easy engagement and followers.
That’s why I’m going to show you my three most reliable ways to add a Facebook page to WordPress. I’ll also show you how to add a Facebook Like button, so visitors can follow your page in one click without leaving your site.
TL;DR: How to Add a Facebook Page to WordPress
You can connect your Facebook page to WordPress in a few minutes, no code required. Here are the ways I recommend, plus how to add a Like button so visitors can follow you in one click.
- SeedProd (easiest) – Drag the Facebook Page block onto any page and paste your page URL.
- Facebook Page Plugin – Generate Facebook’s embed code and drop it into a Custom HTML block.
- Smash Balloon – Show a live, auto-updating Facebook feed with a free plugin.
- Facebook Like button – Add a one-click Like button with SeedProd’s Facebook Like block or Facebook’s own code.
Why Add Your Facebook Page to WordPress?
If you’re running a local business or community page, your visitors are already on Facebook every day. Adding your Facebook Page directly to your site means they can like or follow without leaving, and that frictionless moment is where most social growth actually happens.
It also keeps your brand visible in two places at once, so new visitors who find you through Google can connect with you on social in the same session. For a local business, that combination of search visibility and social connection is hard to beat.
Next, I’ll walk you through how to add it step by step.
Method 1: Adding Your Facebook Page to WordPress Using SeedProd
If you’re building a new page from scratch, like a dedicated social landing page or a Facebook hub for your brand, SeedProd is the best option. Its drag-and-drop editor includes a built-in Facebook Page block, so you can embed your page and customize the full layout without writing any code.

SeedProd is the best WordPress page builder and website builder with drag-and-drop. It lets you create custom page layouts without the hassle of coding them from scratch.
With its Facebook Page block, you can embed any Facebook Page in WordPress with just a few clicks. It also has handy blocks that let you embed a Facebook Like button, Facebook comments, and Facebook posts.
Here are the steps on how to add a Facebook Page to WordPress using SeedProd.
Step 1. Install and Activate SeedProd
First, you’ll need to download the SeedProd plugin and install it on your WordPress site.
For this guide, we’re using SeedProd Pro for its advanced customization features.
If you need help, you can see our documentation on how to install SeedProd and activate your license.
SeedProd offers 2 ways to customize your WordPress site. You can either create a standalone landing page or create a custom WordPress theme using its Theme Builder feature.
For this guide, we’ll use the landing page builder functionality.
Step 2. Choose a Landing Page Template
To create a new landing page, navigate to ‘Landing Pages’ from your WordPress dashboard and click the ‘Add New Landing Page’ button.
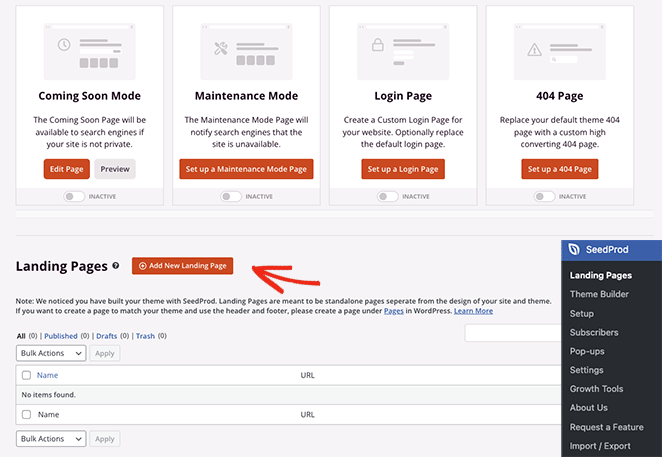
From there, you’ll see hundreds of pre-made landing page templates you can use as a starting point for your design. Each template is 100% mobile-responsive, ensuring your design looks great on mobile devices like smartphones and tablets.
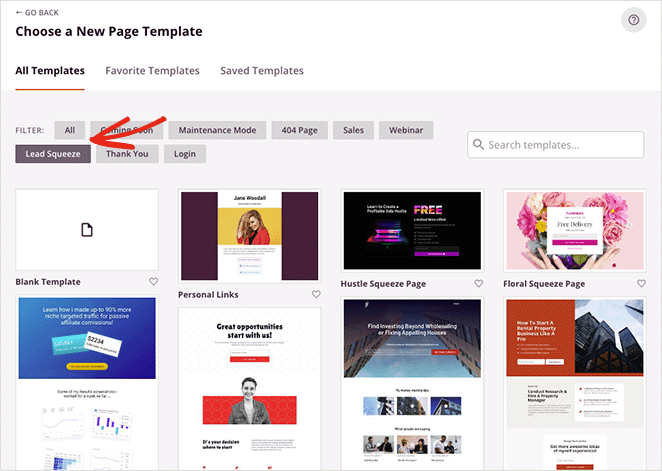
You can filter the templates by clicking the tabs at the top or use the search box to find a design for a specific niche. Once you find one you like, hover over it and click the checkmark icon.
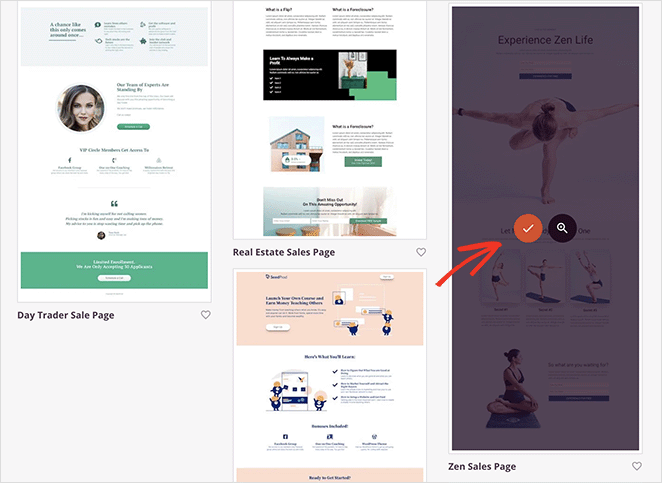
Next, enter a name for your page and click the ‘Save and Start Editing the Page’ button.
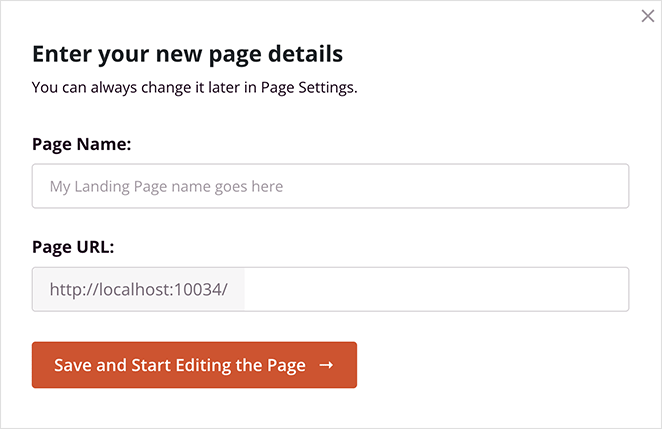
Now, the template will open in SeedProd’s visual editor, where you can start customizing its layout and content without code.
Step 3. Add The Facebook Page Block
SeedProd’s drag-and-drop editor is easy to navigate.
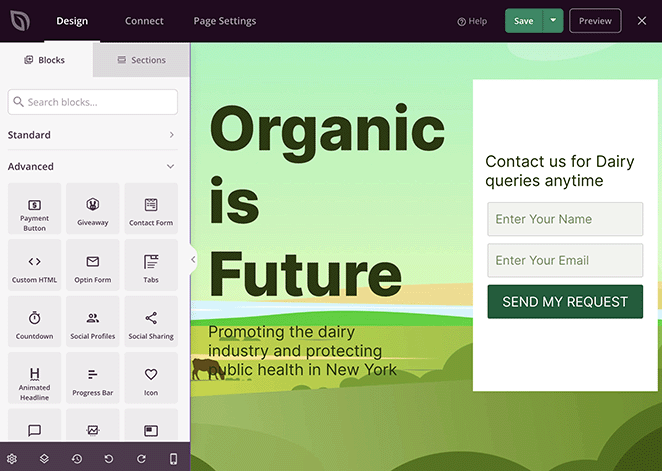
You’ll see a live preview on the right and blocks, sections, and settings on the left. You can drag content elements from the blocks panel onto the preview and edit their settings with a few clicks.
Here’s how to add the Facebook Page block to your landing page:
From the ‘Advanced Blocks’ panel, scroll down until you see the Facebook Page block. To add it to your page, drag it from the left and drop it onto your preview.
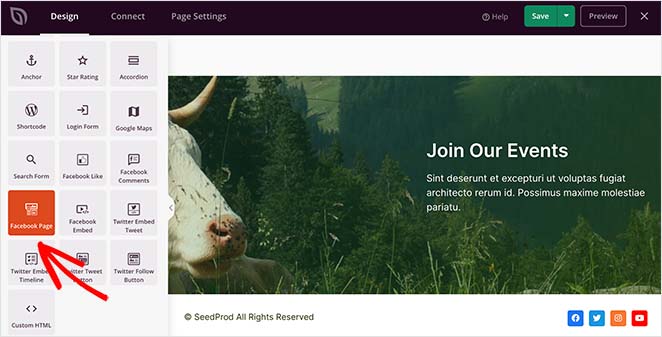
Now, you can click the block to see its customization options and add your Facebook Page URL.
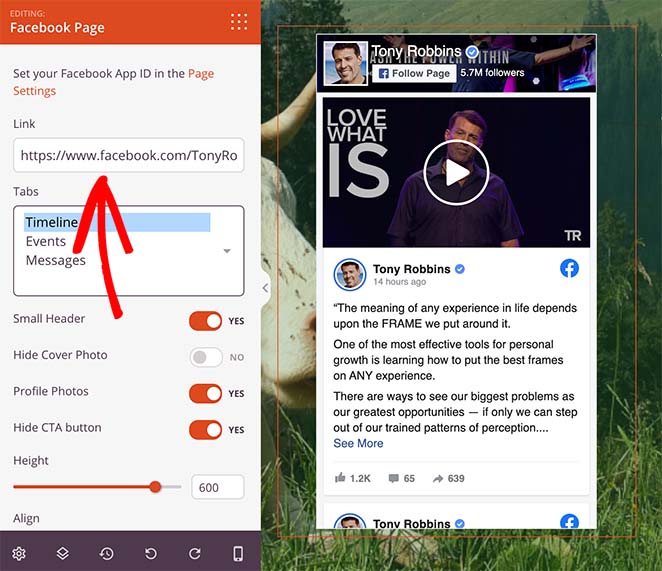
If your page doesn’t show up, you’ll need to click the “Page Settings” link and enter your Facebook App ID information.
How to Get a Facebook App ID
The App ID is the one part of this that feels fiddly, but you only set it up once.
Here’s how:
- Go to developers.facebook.com/apps and log in with your Facebook account.
- Click ‘Create App’ and select the ‘Consumer’ app type when prompted.
- Fill in your app name and contact email, then complete the setup wizard.
- Once the app is created, your App ID appears at the top of the app dashboard. Copy it and paste it into SeedProd’s Page Settings field.
Additional Facebook Page block settings include the ability to:
- Enable a small header
- Hide your cover photo
- Show profile photos
- Hide the CTA button
- Change the Facebook widget height
- Adjust the widget alignment
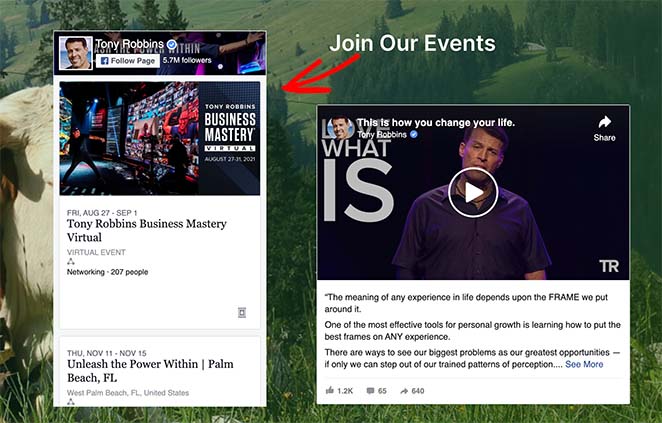
You can even display different types of Facebook feeds, including a timeline, events, and messages.
The great thing about this block is it automatically includes Like and Share buttons so users can easily share your social media content on other platforms.
Step 4. Customize Your WordPress Page
Once your Facebook Page feed is in place, you can continue customizing the rest of your landing page.
Some ideas include:
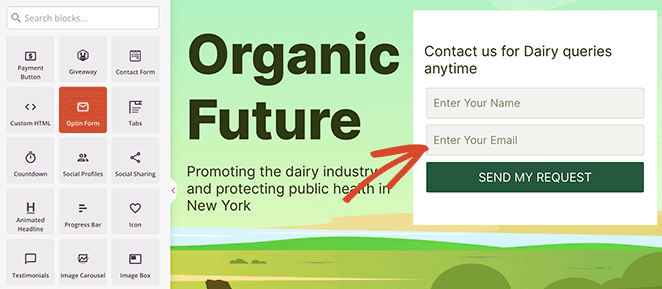
- Adding an opt-in form to collect email addresses
- Including testimonials from happy customers to boost trust
- Adding a button to join your Facebook Group

- Embedding a welcome video to engage first-time visitors
For a full walkthrough on customizing your landing page, see our step-by-step guide on how to create a landing page in WordPress.
Step 5. Save Your Changes
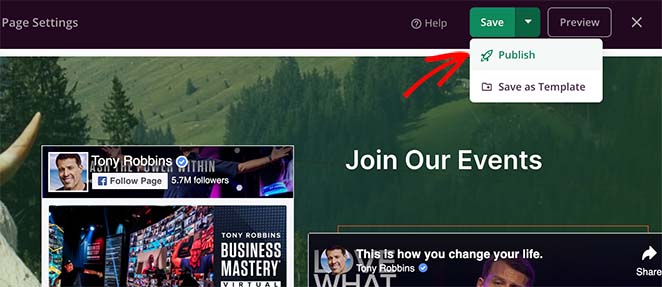
When you’re happy with your page, click the ‘Save’ and ‘Publish’ button in the top-right corner of your screen.
Now, you can visit the page to see how it looks.
Method 2: Adding Facebook Page to WordPress Without a Plugin
The second method uses Facebook’s own Page Plugin, so there’s no page builder involved.
This method is also relatively easy but doesn’t offer the same level of customization as you get with a WordPress page builder. It also involves copying and pasting code snippets onto your site.
Step 1. Get the Facebook Page Plugin
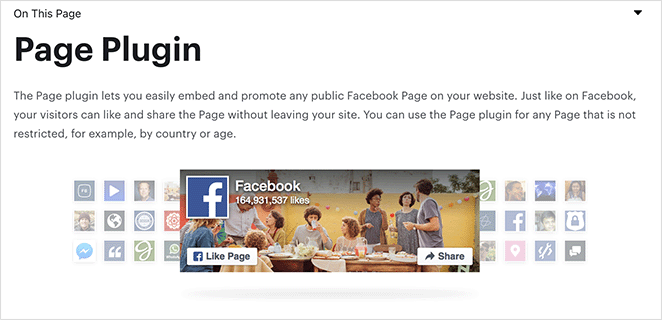
To start, visit the Facebook Page Plugin website. This is where you’ll enter details about your page and generate a code to embed on your website.
Step 2. Configure the Facebook Page Plugin
On the plugin page, you’ll see a form where you can enter details about your Facebook Page.
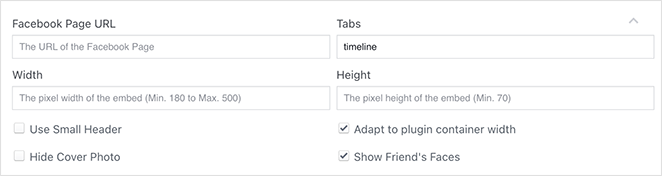
You can paste your Facebook Page URL, enter a custom width and height for the plugin, hide the cover photo, and more.
Step 3. Generate Your Facebook Page Embed Code
After filling in the necessary details, click the ‘Get Code’ button.

Facebook will now generate a JavaScript and iFrame code to paste onto your webpage. In the popup window, choose the iFrame option and copy the embed code.
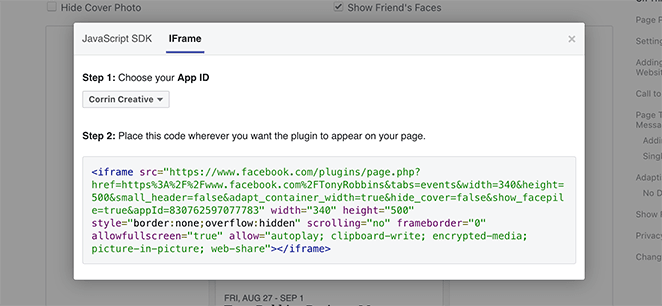
Step 4. Add the Facebook Page Embed Code to WordPress
Now, it’s time to add this code to your WordPress blog. Many sites display their Facebook account page in a new post or sidebar widget, so let’s look at how to do that.
Head to the ‘Appearance’ tab in your WordPress admin and select ‘Widgets’.
Next, click the plus icon to add a new WordPress block and find the Custom HTML or Text widget. Add this widget to the area where you’d like your FB page to appear.
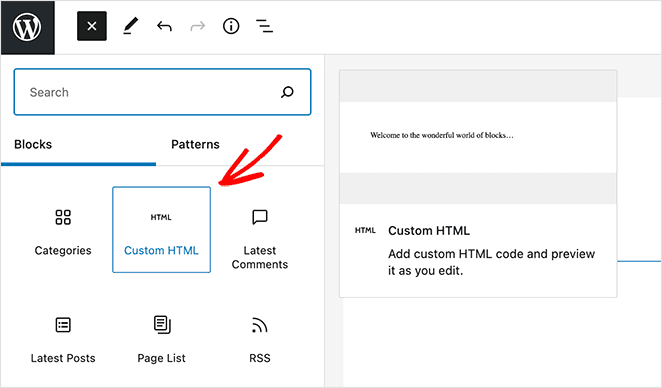
Finally, copy the HTML code generated by Facebook and paste it into the widget area.
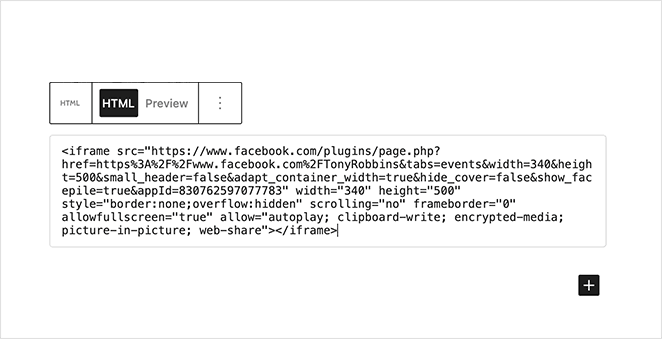
Now go ahead and click the ‘Save’ button to apply the changes. With that, your Facebook Page should now appear in your WordPress sidebar.
To add it to a page or post instead, open the page in the block editor, click the ‘+’ button to add a new block, search for ‘Custom HTML’, and paste the embed code there. Publish the page and your Facebook feed will appear right where you placed it.
Not showing up? First, check that your Facebook Page is published and the URL you entered is correct. If a security or caching plugin is blocking external scripts, try temporarily disabling it to test.
Facebook’s JavaScript embed can sometimes be blocked, so switch to the iFrame code from Step 3 if that happens. Also make sure the domain you’re embedding on matches the domain registered in your Facebook App settings.
Method 3: Add a Facebook Feed to WordPress with a Plugin
If you want a dynamic, styled feed that updates automatically as you post on Facebook, the best option is Smash Balloon’s Custom Facebook Feed plugin. It’s the most popular solution for this use case and works on any existing page, post, or sidebar.

With its Facebook Feed plugin, you can show a filterable gallery of your Facebook posts without writing any code. Here’s how to set it up.
Step 1. Install the Custom Facebook Feed Plugin
In your WordPress dashboard, go to Plugins » Add New and search for ‘Custom Facebook Feed by Smash Balloon’. Install and activate the free version.
Once active, you’ll see a new ‘Facebook Feed’ menu item in your dashboard.
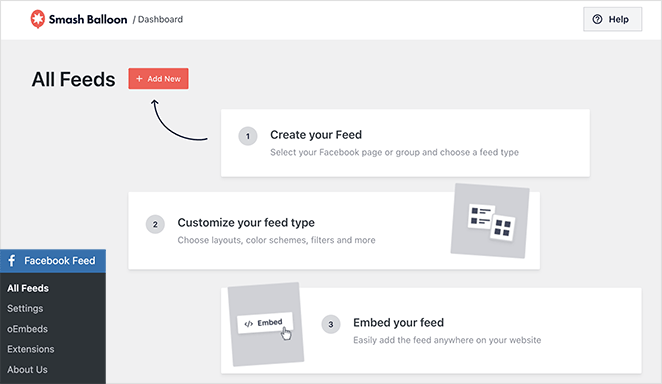
Step 2. Connect Your Facebook Account
Click Facebook Feed » Add New to start the setup wizard. You’ll be prompted to connect your Facebook account.
Click ‘Connect to Facebook’, log in if needed, and grant the plugin permission to access your pages.
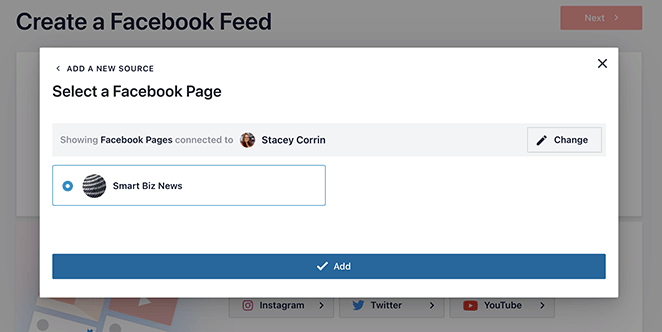
The plugin only requests read access, so it can display your posts without the ability to post on your behalf.
Step 3. Select Your Facebook Page
After connecting, you’ll see a list of Facebook Pages you manage. Select the page you want to display and click ‘Next’.
The wizard will then let you choose a feed type: Timeline, Photos, Events, or Videos. You can preview what it will look like on your site.
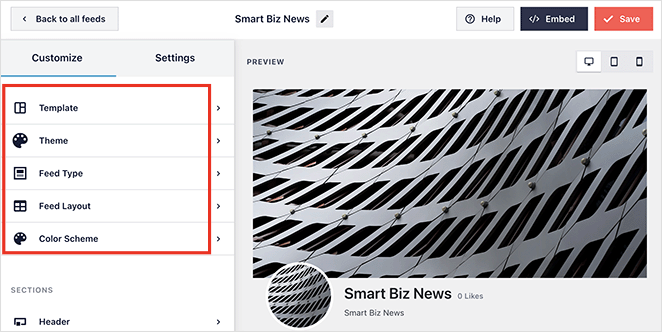
Step 4. Copy the Shortcode or Add the Block
Once your feed is configured, Smash Balloon gives you a shortcode like [custom-facebook-feed]. You can also use the dedicated ‘Facebook Feed’ block if you’re using the WordPress block editor.
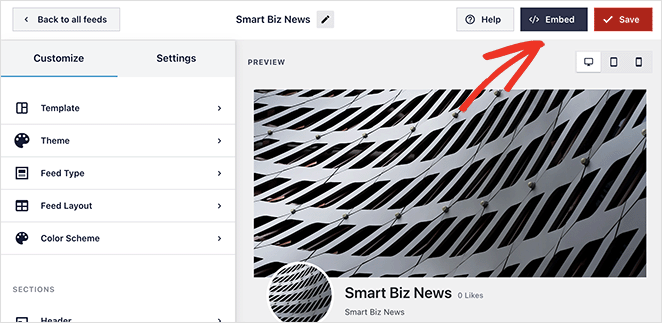
Save the feed and note the shortcode or block name. You’ll use it in the next step to place the feed on your site.
Step 5. Place the Feed on Your Page
Open the page or post where you want the feed to appear. If you’re using the block editor, click the ‘+’ button, search for ‘Facebook Feed’, and select your feed from the dropdown. If you’re using a shortcode, add a ‘Shortcode’ block and paste it in.
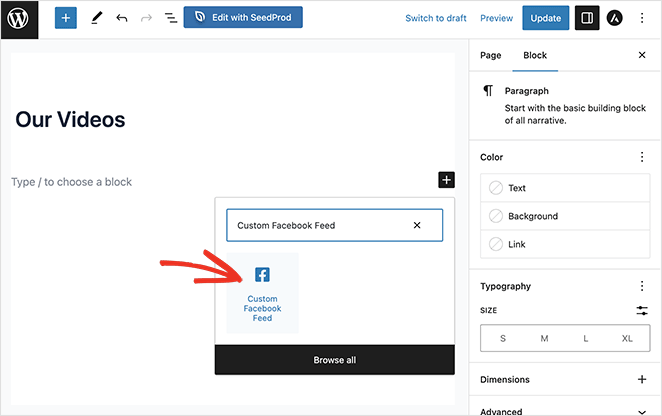
To add the feed to your sidebar, go to Appearance » Widgets, add a ‘Shortcode’ widget, paste in the shortcode, and save. Publish the page and your live Facebook feed will appear right where you placed it.

How to Add a Facebook Like Button in WordPress
Embedding your page is one thing. Giving visitors a one-click way to follow it is another, and that’s what a Facebook Like button does.
On the blogs I’ve run, a Like button was the lowest-friction way to turn a reader into a follower. Commenting and sharing ask for effort, but a Like is one click, and it grows your page quietly in the background.
WordPress has no built-in Like button, so I’ll show you two ways to add one. The no-code route uses SeedProd. The manual route uses Facebook’s own code.
Add a Facebook Like Button With SeedProd (No Code)
If you followed Method 1, you already have SeedProd installed and a page open in the builder. Adding a Like button takes only a few more clicks.
Alongside the Facebook Page block, SeedProd’s Facebook blocks let you embed your page, individual posts, comments, and a standalone Like button.

To add the button, drag the Facebook Like block from the ‘Advanced Blocks’ panel onto your page.
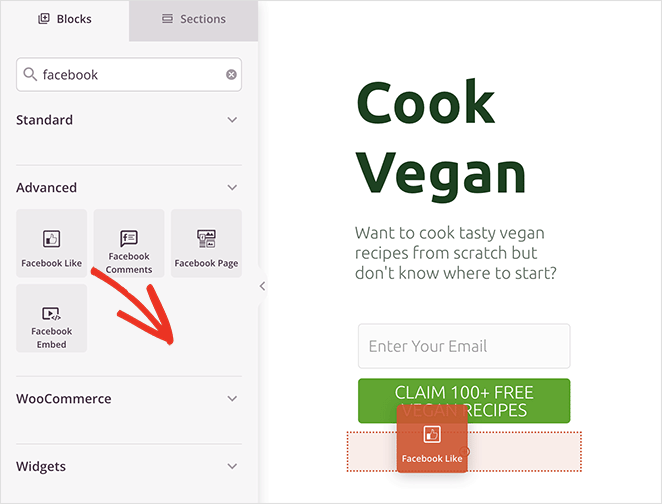
Click the block to open its settings, where you can shape exactly how the button looks. You can set the layout to standard, button, button count, or box count.
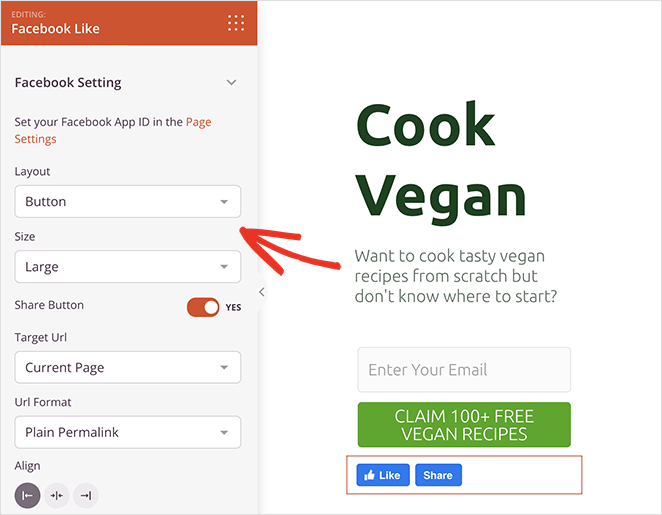
From the same panel, you can choose a small or large size and toggle a Facebook Share button on or off next to it.
You can also point the button at your current page or a custom URL, switch the URL format between plain and pretty permalinks, and align the button left, right, or centre.
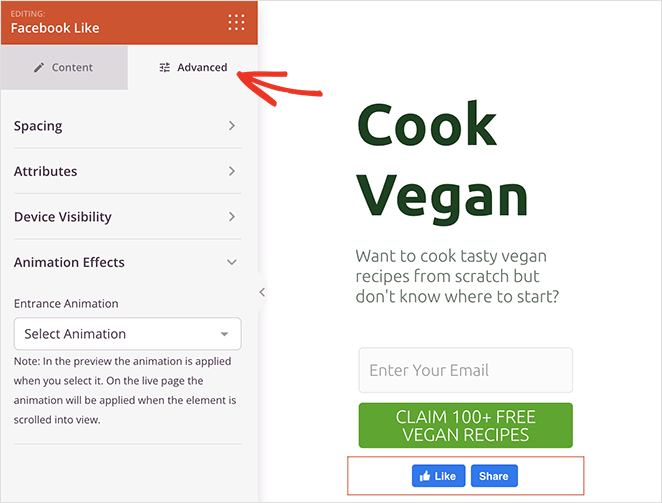
In the ‘Advanced’ settings tab, you can fine-tune the button’s spacing, animate it, and control its visibility on mobile and desktop, all without writing any code.
Note: For the button to render correctly, add your Facebook App ID under SeedProd » Settings. You can grab that ID from your app dashboard at developers.facebook.com, the same place covered in the App ID steps above.
When you’re happy with the button, click the dropdown arrow on the ‘Save’ button and select ‘Publish’.

Now you can visit your page and see the Facebook Like button in action.
Add a Facebook Like Button Manually With Code
If you’d rather not use a plugin, you can paste Facebook’s own Like button code into WordPress. It takes a few extra steps, so I only recommend it if you’re comfortable editing code.
To make it safer, we’ll use the WPCode plugin. It lets you manage code snippets without editing your theme files directly, so a theme update can’t wipe them out.
First, go to the Like Button page on the Meta for Developers website and scroll down to the ‘Like Button Configurator’.
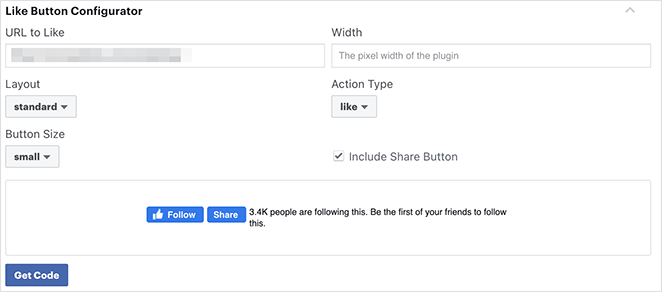
Enter your Facebook Page URL in the ‘URL to Like’ field, then adjust the layout and size until the preview looks right. When you’re happy, click ‘Get Code’.
You’ll see a popup with two tabs, JavaScript SDK and iFrame, and two code snippets. Click the JavaScript option.
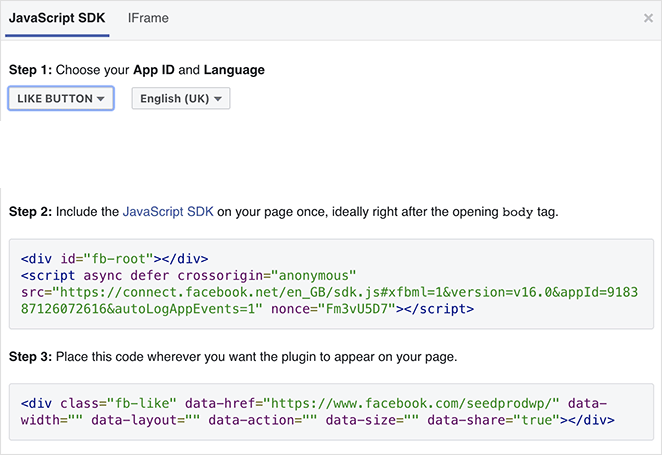
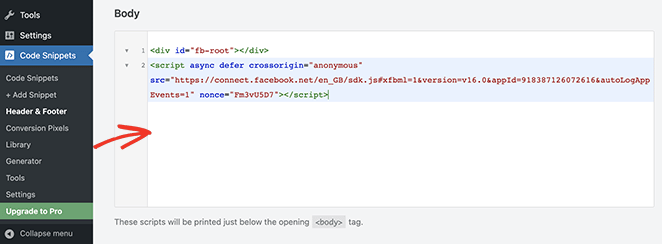
Now install and activate the WPCode plugin. Then go to Code Snippets » Header & Footer in your dashboard.
Copy the first snippet from Facebook, paste it into the ‘Body’ section, and click ‘Save Changes’.
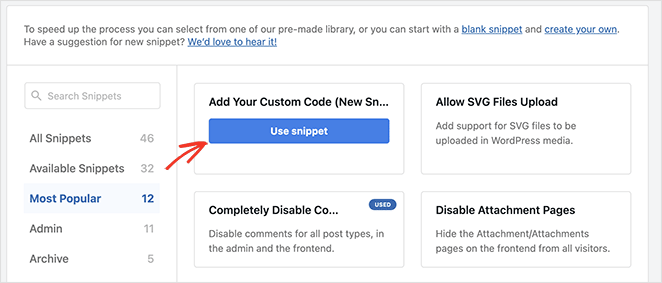
Next, you’ll add the second snippet, which actually displays the button. Go to Code Snippets » + Add Snippet and choose ‘Add Your Custom Code (New Snippet)’, then click ‘Use snippet’.
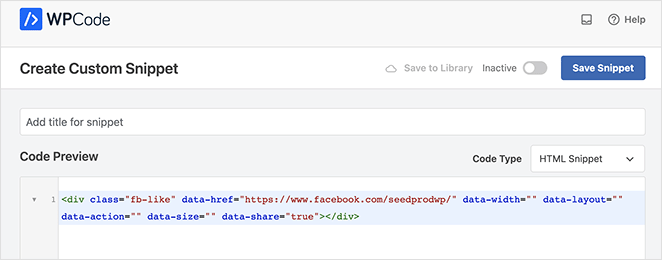
Give the snippet a name, paste the second Facebook snippet into the ‘Code Preview’ box, and set the ‘Code Type’ to ‘HTML Snippet’.
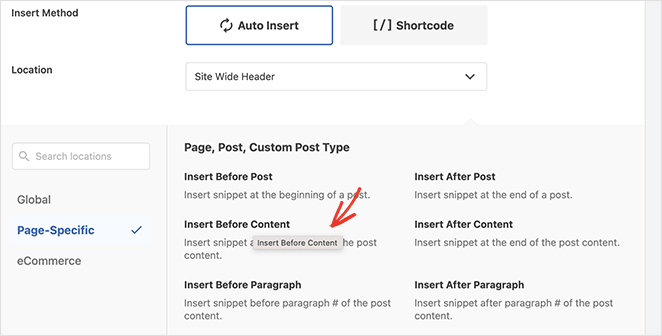
Scroll down to the ‘Insertion’ section to choose where the button appears. To show it above your posts, open the ‘Location’ dropdown and pick ‘Insert Before Content’ under ‘Page-Specific’.
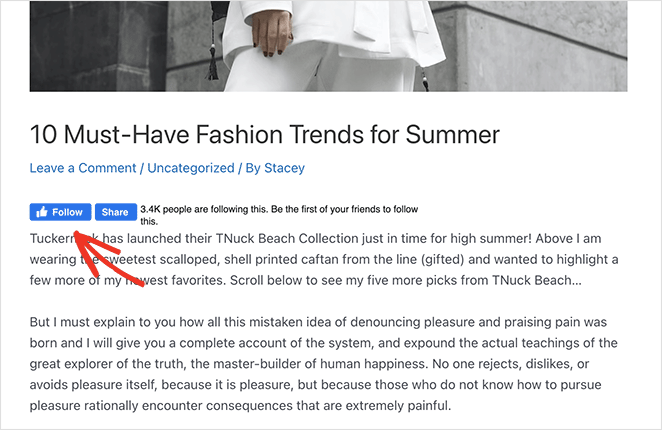
Finally, click ‘Save Snippet’ and switch the toggle from Inactive to ‘Active’. Visit any blog post and your Facebook Like button will appear before the content.
FAQs About Adding a Facebook Page to WordPress
What’s the easiest way to show my Facebook Page in WordPress?
If you’re already using a page builder like SeedProd, its Facebook Page block is the fastest way. Otherwise, paste your Page URL into the Facebook Page Plugin tool, copy the code, and add it to a Custom HTML block or widget.
How do I add my Facebook Page to the WordPress sidebar or footer?
Go to Appearance » Widgets, add a Custom HTML block to your sidebar or footer, paste your Facebook Page embed code, and save.
Why isn’t my Facebook Page embed showing?
Check that your Page is published, the URL is correct, and no security plugin or theme setting is blocking scripts. If it still doesn’t appear, try using the iFrame code from Facebook instead of JavaScript.
Will adding a Facebook Page to WordPress slow down my site?
It can, because Facebook’s scripts load from outside your site. To keep things fast, place the embed lower on the page, limit the number of tabs you show, and use caching.
Is a Facebook Like button the same as a Share button?
Not quite. The Like button adds your page to someone’s Facebook likes, while a Share button publishes your page to their timeline. With SeedProd’s Facebook Like block, you can show both together.
Where should I place a Facebook Like button?
I usually put it at the bottom of a landing page or right under a blog post title. Both spots tend to get more clicks than the sidebar.
Next, Discover More Ways to Customize Your WordPress Site
We hope this guide has helped you learn how to add a Facebook Page to WordPress. There are so many other ways to customize your WordPress site with SeedProd that we couldn’t possibly list them all in one post.
So here are some of our top WordPress customization guides:
- How to Customize WordPress Menu Styles in 3 Easy Ways
- How to Create a Custom WordPress Author Page (2 Easy Ways)
- How to Create Personalized Landing Pages to Boost Conversions
- How to Embed Facebook Videos in WordPress (3 Easy Ways)
- How to Create Animated Particle.js Backgrounds in WordPress
Thanks for reading! We’d love to hear your thoughts, so please feel free to join the conversation on YouTube, X and Facebook for more helpful advice and content to grow your business.