Want to know how to use AI to generate images? With today’s AI tools, you can instantly create custom visuals for blog posts, landing pages, and WordPress designs with no stock photos or design skills needed.
In this guide, I’ll show you step-by-step how AI image generation works, the best tools you can use, and how to add AI-generated images directly to your WordPress site.
Table of Contents
How Does AI Generate Images?
AI image generators use machine learning models trained on millions of images. When you type a text prompt, the AI predicts what the image should look like and creates a brand new picture from scratch. This process is called “text-to-image generation.”
The more detailed your prompt, the better the results. For example, instead of typing “dog,” write “a golden retriever puppy sitting in a field of sunflowers with warm evening sunlight.”
Why Use AI to Generate Images in WordPress?
AI tools make it simple to create unique, high-quality images without stock photos or design skills. Just describe what you want, and AI generates it in seconds.
Here’s why AI-generated images are worth using on your WordPress site:
- Save time: no more hours spent searching stock libraries
- Unique visuals: stand out with one-of-a-kind images
- Match your content: create images that fit your blog posts or products perfectly
- Cut costs: reduce the need for paid stock photos or designers
- Faster workflow: generate a set of images for each post in minutes
For busy bloggers and business owners, AI images make your content look professional while saving time and money.
What AI Image Generation Tools are Available?
Today, several powerful AI image-generation tools are available. Here’s an overview of the tools available for WordPress websites.
Online AI Image Creation Tools Online
Tools like DALL.E, Midjourney, and Stable Diffusion use text descriptions to create images.
These tools are still under development. But they’re already great at generating realistic or fantastical art for your website.
WordPress AI Image Generation plugins
AI WordPress plugins bring the power of DALL.E and similar tools to your WordPress editor. They allow you to describe an image with text, and the plugin generates unique visuals based on your prompt.
These plugins are a time-saver for bloggers and web designers, helping you create images for content without needing design skills. Some top WordPress AI plugins include AI Engine, Imajinn, and AI Power.
WordPress Page Builder Plugins with AI
AI page builders are website creation tools that include AI for generating images.
This streamlines your workflow by allowing you to create high-quality images directly within the builder rather than using a separate graphic design program. Some popular options include SeedProd, Divi AI, and Elementor AI.
How to Use AI to Generate Images in WordPress
Below, I’ll walk you through how to use AI to generate images from start to finish. I’ll cover using a page builder, a WordPress plugin, and a popular AI image generation tool.
Use SeedProd to Generate AI Images in WordPress

| Pricing: Starts at $39.50/year |
| Free Plan / Trial: Free version available |
| Standout Features: |
| 🔹 Drag-and-drop builder 🔹 AI image assistant inside the editor 🔹 Theme builder + landing pages |
| Rating: A |
| Best For: WordPress users who want to design pages and generate images in one place |
SeedProd is the best drag-and-drop WordPress website builder. It makes creating custom WordPress themes and page layouts easy without coding.
With SeedProd’s AI assistant, you can easily generate images for your website in a few clicks. You can learn more about what SeedProd AI is in this overview.
First, install and activate the SeedProd plugin. For help, please see our guide on installing the SeedProd plugin.
After installation, you can use SeedProd to:
Then, you can use AI to customize your design with original images.
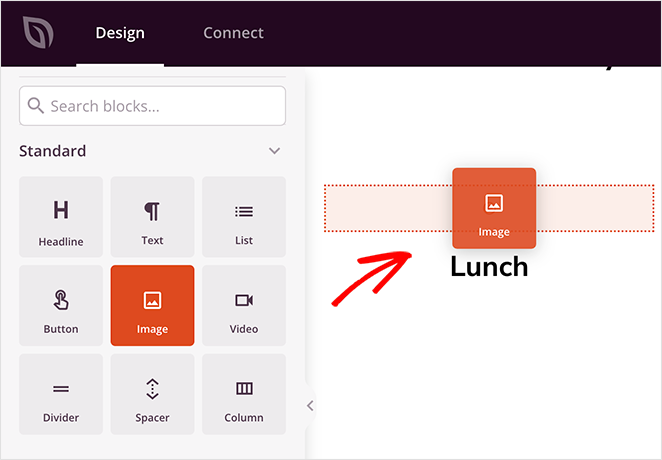
To do this, edit the page to see the drag-and-drop builder. Then, drag an Image block onto the live preview.
After selecting the Image block, look at the content settings panel on the left-hand side. Here, you’ll see a button labeled ‘Add with AI.’
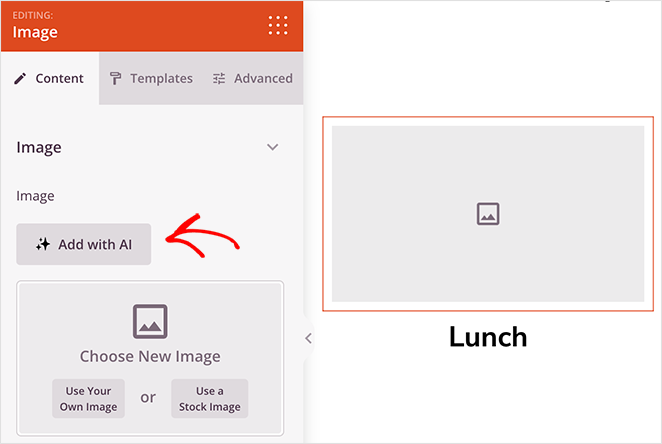
Click the button to open the image prompt panel. This is where you can describe the image you want for your website. Alternatively, click one of the suggested prompts and use it as a starting point for your own.
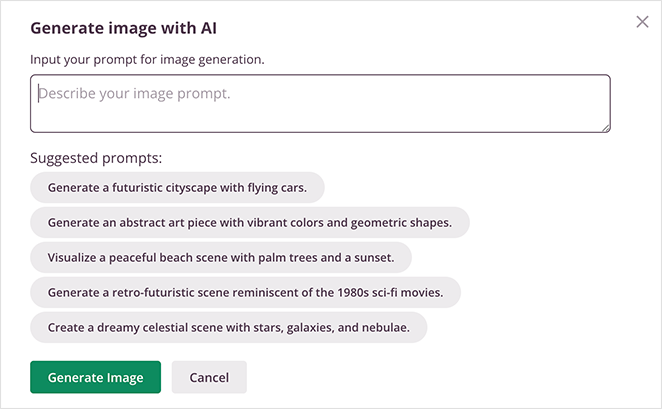
Then, click the Generate Image button.
Typically, it takes a few seconds to generate an image. When it’s complete, you’ll see a preview and can click Insert to add it to your WordPress page.
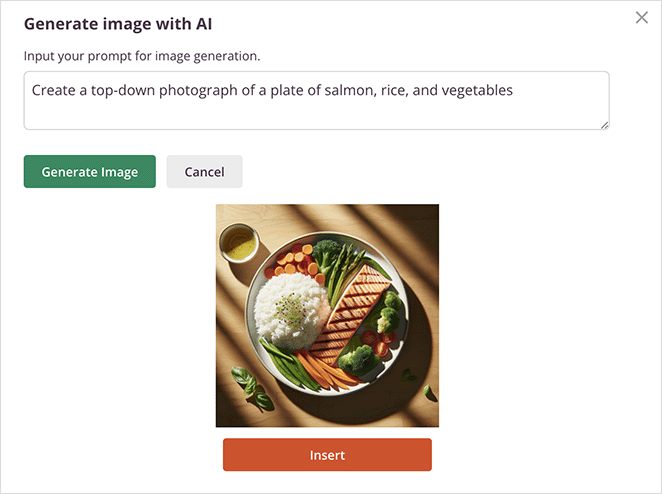
You can also generate several versions of the same image in SeedProd. To do this, click the generated picture and select ‘Edit with AI’ in the block settings.
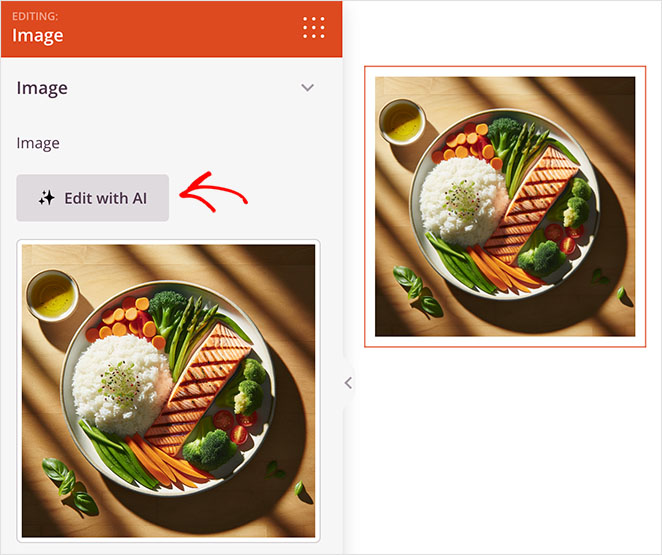
Now, you’ll see options to create ‘Variations’ or ‘Edit Image’.
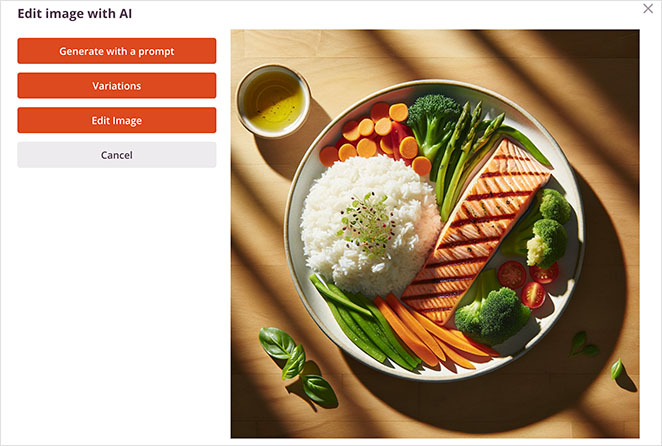
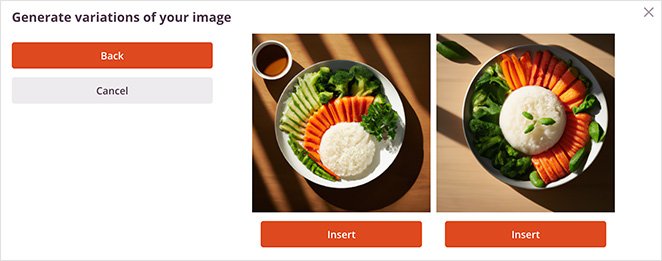
Clicking Variations tells the AI to generate multiple versions of the same image.
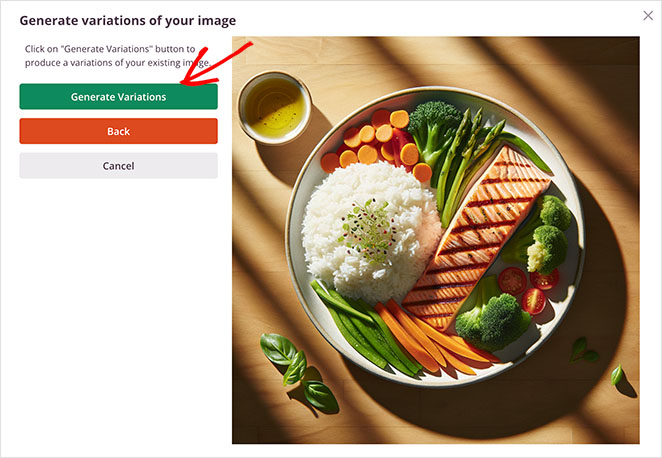
It’s a great way to keep the same theme but get different angles and perspectives.
The Edit Image option lets you use a brush tool to alter the image directly. Select the area you want to change, then alter your original prompt to describe the change you want.
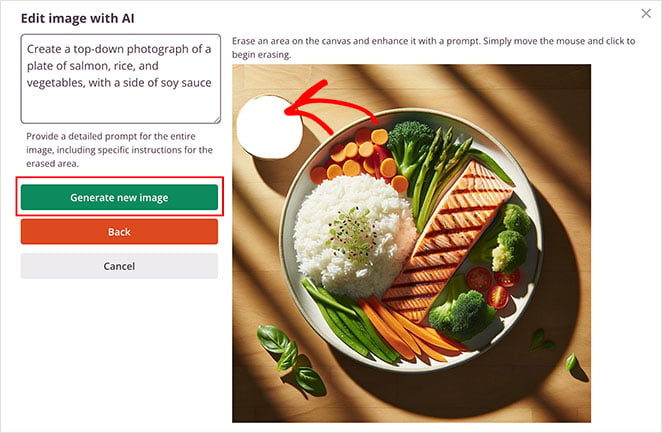
Then, click the Generate New Image button.
After a few seconds, you’ll see a new image with two variations of your described changes. From there, click Insert to add your favorite choice to your page.
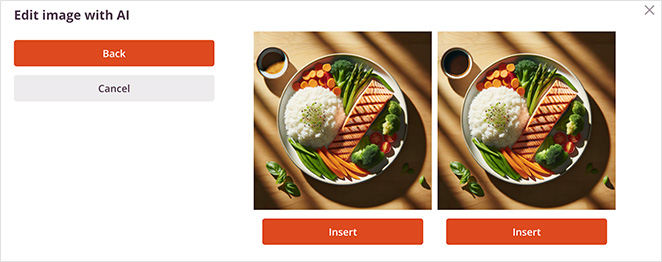
Remember to save and publish your changes when you’re happy with the final result.
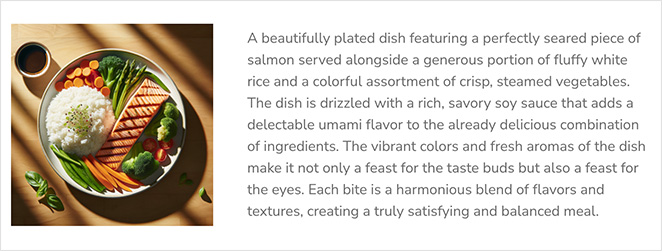
Here’s an image of a simple meal I generated for a restaurant website:
Generate AI Images in WordPress with AI Engine
| Pricing: Free + Pro add-ons |
| Free Plan / Trial: Free version available |
| Standout Features: |
| 🔹 Text-to-image with prompt templates 🔹 Alt text and filename generation 🔹 Media Library integration |
| Rating: B+ |
| Best For: Users who want flexible AI tools inside the WP dashboard |
You can also use WordPress AI plugins to generate high-quality images for your website. For this method, I’ll use AI Engine, a WordPress plugin with various AI features, including AI text and image generation.
First, install and activate AI Engine on your WordPress website. For help, please see this guide on how to install a WordPress plugin.
Next, go to Meow Apps » AI Engine from your WordPress dashboard, and click the Settings tab.
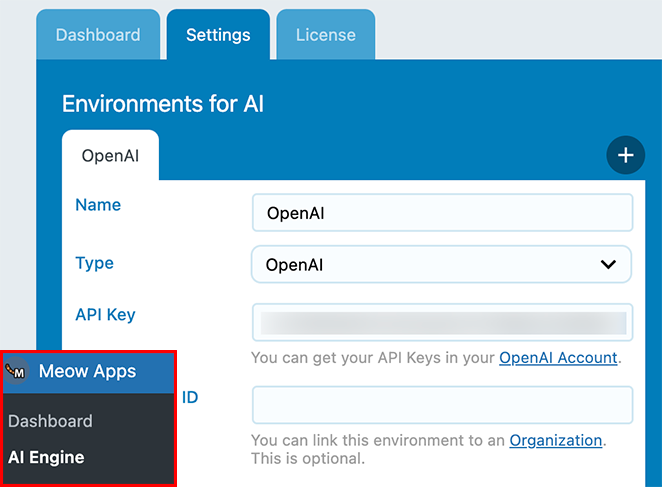
If you don’t already have one, you’ll need to create an OpenAI API key. To do this, head to your OpenAI account, and click API Keys.
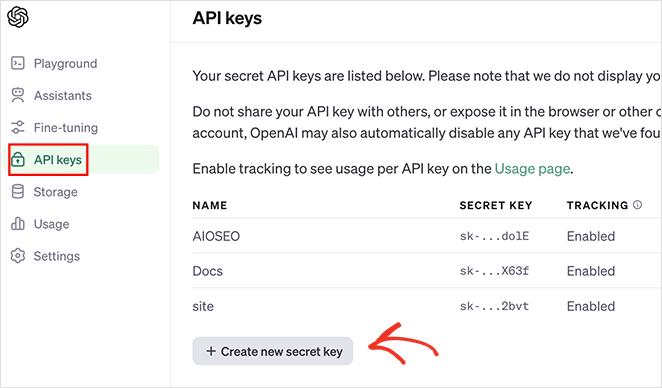
Next, click ‘Create new secret key.’ Now, enter a name for the key, set your permissions, and click the Generate Key button.
Copy the key and return your website.
Now, find the ‘Environments for AI’ panel and paste your API key. The plugin will save your key automatically.
You’ll see an Images option in the top right corner on the same screen. Click it to start creating images with AI.
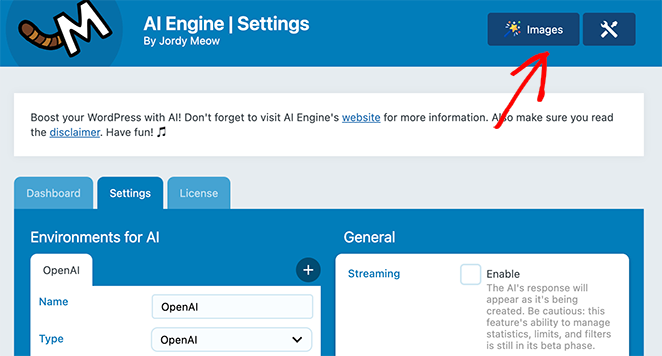
The image generator has several premade prompt templates you can use. Alternatively, you can write your own image prompt in the text box.
Write your prompt, select the number of images you want, then click Generate.
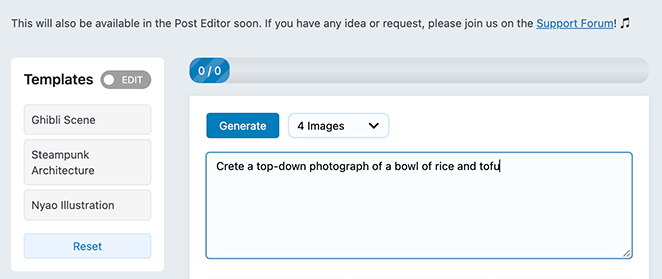
After a few seconds, you’ll see several variations of your image prompt.

Choose an image you like best to see a larger version. AI engine automatically generates editable alt text, captions, and file names for you.
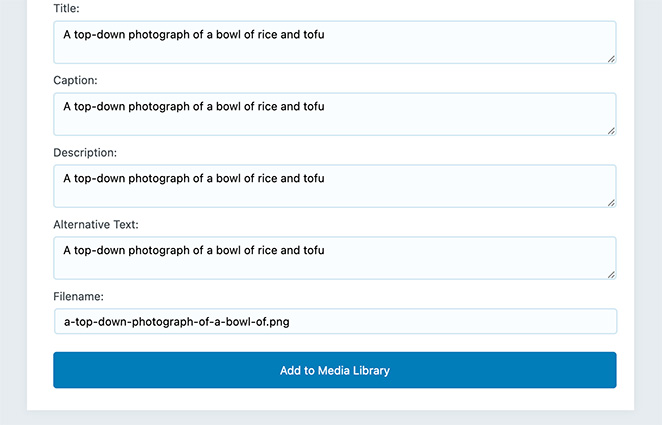
Once you’re happy with the image, click the Add to Media Library option.
You can now use the image anywhere on your WordPress site. To use it in a post, create a new post and add the image block.
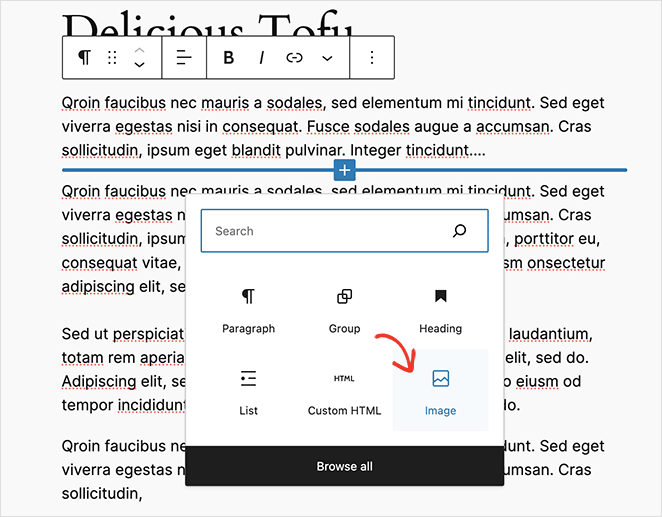
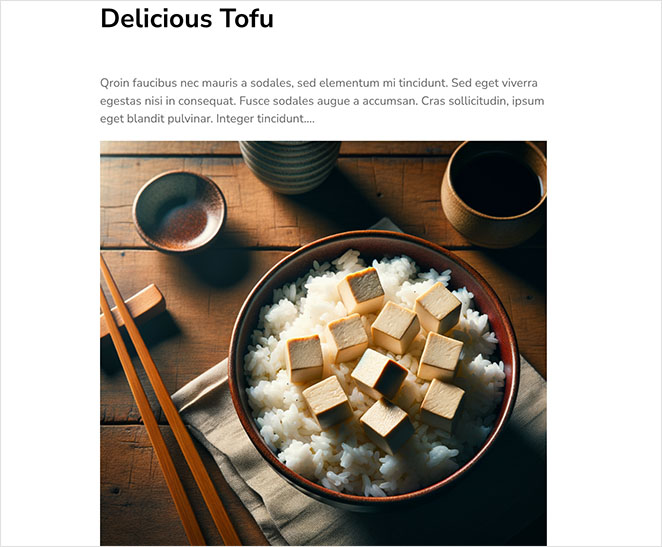
From there, select the AI-generated image from your WordPress Media library. After publishing your changes, you’ll see the image live on your website.
Here’s how my final image looks:
Use Microsoft Copilot to Generate AI Images for WordPress
| Pricing: Free (Microsoft account) |
| Free Plan / Trial: Yes |
| Standout Features: |
| 🔹 Web-based text-to-image 🔹 Quick style refinements 🔹 Easy download and upload to WordPress |
| Rating: B |
| Best For: Anyone who wants fast AI images without installing a plugin |
If you don’t want to use a WordPress plugin, you can use web-based tools to generate images with AI.
One of my favorite tools for this is Microsoft Copilot’s chatbot. Based on a large language model, it can search the internet, answer questions, write content, and create images.
Copilot currently uses the DALL.E 3 model to generate images. All you’ll need to get started is a Microsoft account.
First, go to the Microsoft Copilot website and log into your account.
Next, type your image prompt into the chat box.

The AI will generate 4 versions of the image for you.

Then, click the version you like best to see a larger version.
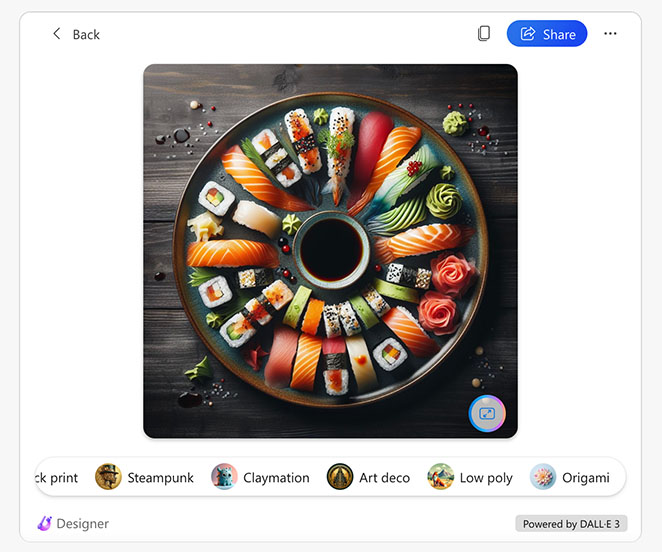
On this screen are options to refine your image further. You can make certain elements pop or blur or add a new style to the image.
In this example, I applied the watercolor effect:
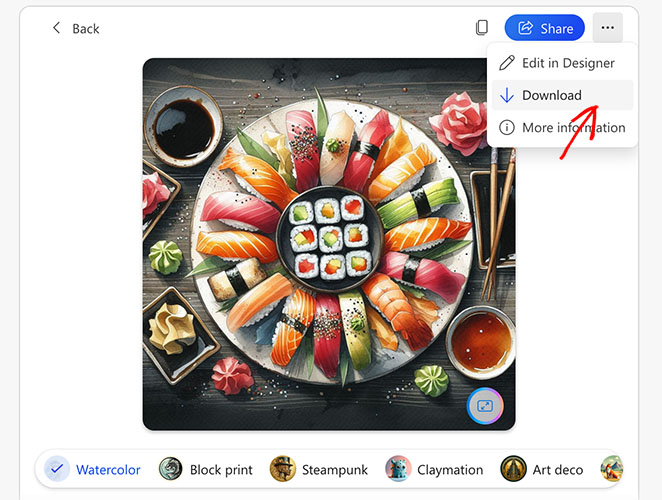
To save the image to your computer, click the 3 dots menu and select Download.
Now, you can upload the image to your WordPress media library and add it to any post using the steps I detailed in the last method.
Best Practices for Writing AI Prompts
AI tools only work as well as the prompts you give them. A good prompt saves time, while a vague one creates extra editing work. Here are some simple practices I follow when writing prompts for AI image generators:
- Be specific: Instead of “make a website photo,” say “modern homepage screenshot with clean white background and bold headline.”
- Add style cues: Mention design style (minimalist, retro, playful) so results match your brand.
- Include context: If the image is for a blog post, say so — “featured image for a WordPress tutorial.”
- Use simple language: Short, clear words work better than long descriptions.
- Test variations: Run 2–3 slightly different prompts and pick the best output.
Think of prompts like giving directions: the clearer you are, the closer the AI will get to what you need.
FAQs About Using AI to Generate Images
Start Using AI to Create WordPress Images
I hope this guide helped you learn how to use AI to generate images in WordPress.
You may also find the following AI guides helpful:
- Best AI WordPress Builders (+ Content Tools)
- How to Build a WordPress Website with AI
- How to Create an AI Landing Page in WordPress Step-by-Step
- Best ChatGPT WordPress Plugins for Productivity
- How to Use AI for SEO to Increase Your Rankings
Thanks for reading! We’d love to hear your thoughts, so please feel free to join the conversation on YouTube, X and Facebook for more helpful advice and content to grow your business.

