


Resumen: Cómo cambiar tu tema de WordPress de forma segura
Sigue estos pasos para cambiar de tema sin perder tu contenido, menús o código personalizado.
- Haz una copia de seguridad de tu sitio: Crea una copia de seguridad completa antes de tocar nada.
- Guarda tu código personalizado: Copia cualquier CSS, scripts de seguimiento y fragmentos de functions.php a un archivo de texto.
- Anota tus menús y widgets: Haz una captura de pantalla de tu encabezado, pie de página, barras laterales y diseño de la página de inicio.
- Previsualiza primero: Usa la Vista Previa en Vivo, el plugin Theme Switcha o un sitio de staging para probar antes de activar.
- Comprueba después de activar: Verifica que los menús, widgets, códigos de seguimiento y diseños de página estén intactos.
- Monitoriza GSC: Vigila Google Search Console durante 4-6 semanas para detectar errores de rastreo o cambios en las Core Web Vitals.
He cambiado temas de WordPress muchas veces y he roto cosas en el proceso. Es fácil perder tu barra lateral, estropear tu diseño u olvidar ese fragmento de código personalizado que hace que todo funcione.
Por eso, cambiar de tema sin perder contenido se reduce a la preparación y las pruebas, no a la adivinación.
En esta guía, te explicaré los pasos exactos que sigo para cambiar de tema de forma segura. Ya sea que estés activando un nuevo tema de WordPress.org o creando un tema personalizado con SeedProd (un creador de sitios web de arrastrar y soltar para WordPress), sabrás qué hacer antes, durante y después del cambio.
- ¿Qué cambia al cambiar los temas de WordPress?
- ¿Cambiar tu tema de WordPress afectará tu SEO?
- ¿Qué debo hacer antes de cambiar mi tema de WordPress?
- Método 1. Previsualiza tu nuevo tema antes de activarlo
- Método 2. Cambiar el tema de WordPress con el plugin Theme Switcha
- Método 3. Cambiar el tema de WordPress con un entorno de staging
- Método 4. Cambiar el tema de WordPress en el sitio web en vivo
- Método 5. Cambiar el tema de WordPress vía FTP
- ¿Qué debo comprobar después de cambiar mi tema de WordPress?
- ¿Quieres evitar las molestias de cambiar de tema por completo?
- Preguntas frecuentes sobre cómo cambiar tu tema de WordPress
¿Qué cambia al cambiar los temas de WordPress?
No perderás tus publicaciones, páginas o imágenes al cambiar de tema. WordPress almacena tu contenido en la base de datos, por lo que tu tema controla principalmente el diseño y la estructura.
Lo que suele cambiar es la estructura y el estilo de tu sitio, como menús, widgets y plantillas. Por eso la lista de verificación a continuación es importante.
| Qué se mantiene seguro | Qué puede cambiar |
|---|---|
| Publicaciones, páginas y medios | Menús y ubicaciones de menús |
| Comentarios | Widgets y barras laterales |
| Usuarios y roles | Diseño de la página de inicio |
| Configuración de plugins | Código de tema personalizado (CSS, fragmentos de functions.php) |
| Pedidos y productos de WooCommerce | Scripts de seguimiento en archivos de tema |
| Todo el contenido de la base de datos | Plantillas de página específicas del tema |
Cuidado con los constructores de páginas y los shortcodes:
Si tu tema actual incluye un constructor de páginas integrado (común en temas premium de ThemeForest), o si ves etiquetas de [shortcode] entre corchetes en tus páginas, copia ese contenido a un archivo de texto plano antes de cambiar. El nuevo tema no renderizará esos shortcodes y podrías perder el contenido visible de la página.
Un complemento de fragmentos de código es un lugar más seguro para cualquier código corto que desee conservar.
¿Cambiar tu tema de WordPress afectará tu SEO?
Sí, puede hacerlo, pero principalmente a través de la velocidad del sitio, la capacidad de respuesta móvil y los datos estructurados, no a través de la pérdida de contenido.
He visto sitios perder posiciones después de cambiar de tema, y casi nunca se trata del contenido. Por lo general, son una de estas tres cosas:
- Cambios en la velocidad de la página: Un tema más pesado agrega más CSS y JavaScript, lo que ralentiza sus páginas. Un tema más ligero puede mejorar su tiempo de carga. Ejecute una prueba de velocidad antes y después con una herramienta como GTmetrix o Google PageSpeed Insights.
- Datos estructurados y esquema: Si su tema anterior incluía marcado de esquema integrado (común en temas centrados en SEO), al cambiar a otro tema se eliminan esos datos estructurados. Deberá volver a agregarlos a través de AIOSEO o un complemento de esquema.
- Cambio en las métricas principales de la web: El nuevo código del tema puede cambiar sus puntuaciones de Largest Contentful Paint, Cumulative Layout Shift e Interaction to Next Paint. Estos afectan cómo Google clasifica sus páginas.
Es por eso que la lista de verificación a continuación incluye un paso de prueba de velocidad y monitoreo de GSC después del cambio.
¿Qué debo hacer antes de cambiar mi tema de WordPress?
Antes de activar un nuevo tema, complete esta lista de verificación. Evita los problemas más comunes posteriores al cambio, como menús faltantes, diseños rotos y códigos de seguimiento perdidos.
Solo necesitas hacer esto una vez. Después de eso, puedes previsualizar y cambiar de tema con mucho menos riesgo.
- Crea una copia de seguridad completa del sitio para que puedas restaurar todo si algo sale mal.
- Guarde cualquier código personalizado agregado a su tema, incluidos los scripts de seguimiento y los fragmentos de functions.php. Para CSS personalizado: cópielo en un archivo de texto, luego, después de cambiar, vaya a Apariencia » Personalizar » CSS adicional (temas clásicos) o Apariencia » Editor » Estilos (temas de bloques) y péguelo allí. El CSS guardado en CSS adicional se almacena en la base de datos y sobrevive a los cambios de tema futuros.
- Anota la estructura actual de tus menús y qué menú está asignado a cada ubicación.
- Comprueba la configuración de tu página de inicio y blog en Ajustes » Lectura.
- Haz capturas de pantalla de tu encabezado, pie de página, barras laterales y diseño de la página de inicio como referencia.
- Comprueba los tiempos de carga actuales de tu página para poder comparar el rendimiento después del cambio.
- Si cambia a un tema de bloques (Edición completa del sitio), tenga en cuenta que los widgets de su barra lateral no se transferirán. Reconstruirá la navegación y el diseño utilizando el Editor del sitio en su lugar.
- Si su sitio utiliza WooCommerce, verifique que su nuevo tema sea compatible con WooCommerce. Pruebe específicamente la página del producto, el carrito y las páginas de pago en un entorno de prueba antes de publicarlo.
- Utiliza un sitio de staging o activa el modo de mantenimiento para ocultar los cambios a los visitantes.
Una vez que hayas completado esta lista de verificación, estarás listo para previsualizar tu nuevo tema y comenzar el cambio.
Método 1. Previsualiza tu nuevo tema antes de activarlo
Una vez completada la lista de verificación previa al cambio, previsualiza tu nuevo tema para comprobar los diseños, menús y widgets antes de publicarlo.
Si está utilizando un tema clásico de WordPress
Ve a Apariencia » Temas en tu panel de WordPress.
Pasa el ratón sobre el tema que deseas probar y haz clic en Vista previa en vivo. Esto abre el tema en el Personalizador de WordPress.
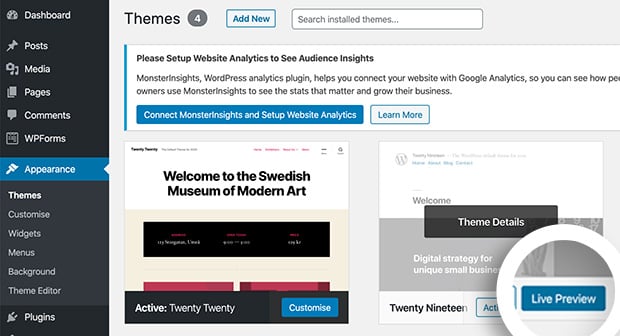
Navega por tu página de inicio y algunas páginas clave. Comprueba los menús, las barras laterales y los diseños de las páginas.
Si está utilizando un tema de bloques (Edición completa del sitio)
Los temas de bloques utilizan el Editor del sitio, no el Personalizador. Después de activar el tema, vaya a Apariencia » Editor para revisar sus plantillas, navegación y diseño.
En un tema de bloques, las plantillas y las partes de plantilla reemplazan a los widgets y las barras laterales tradicionales. Para previsualizar un tema de bloques antes de comprometerse, instálelo y verifique Apariencia » Editor para ver cómo su contenido se mapea a la nueva estructura de plantilla.
Si algo parece faltar, generalmente significa que el nuevo tema utiliza plantillas diferentes y el contenido necesita ser reubicado en el Editor del sitio.
Método 2. Cambiar el tema de WordPress con el plugin Theme Switcha
Utilice este método si desea previsualizar un tema rápidamente sin configurar un entorno de prueba completo.
Otra opción para previsualizar y probar tu tema de WordPress antes de publicarlo es usar el Plugin Theme Switcha. Esto te permite previsualizar tu nuevo tema sin publicar los cambios.
Primero, descarga, instala y activa el plugin gratuito. Luego ve a Ajustes » Theme Switcha desde la barra lateral izquierda de tu panel de administración.
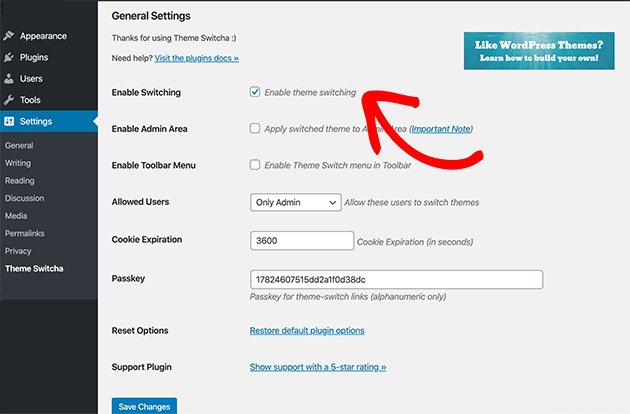
En la página de ajustes generales, selecciona la opción Habilitar cambio de tema. Luego desplázate hasta la parte inferior de la página y haz clic en Guardar cambios.
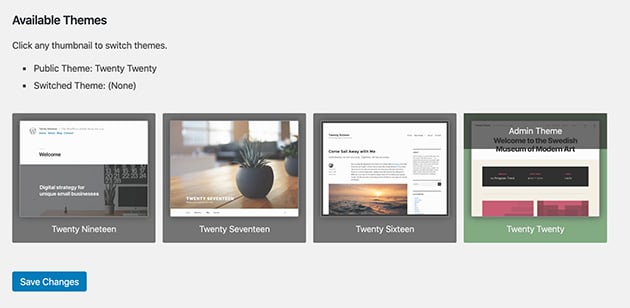
En la parte inferior de la página, el plugin ahora mostrará todos tus temas instalados. Haz clic en tu nuevo tema para previsualizarlo en una nueva pestaña del navegador.
Método 3. Cambiar el tema de WordPress con un entorno de staging
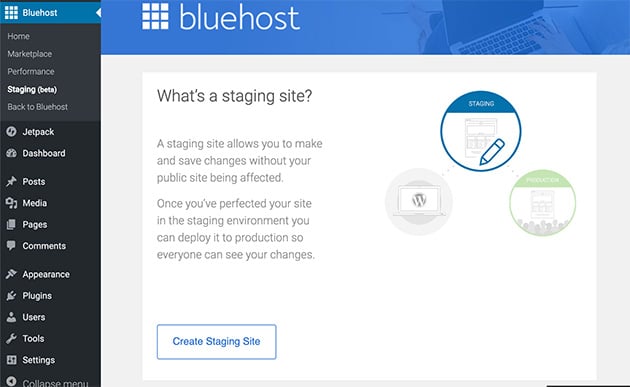
La mayoría de las empresas de alojamiento WordPress gestionado ofrecen un entorno de ensayo donde puedes probar los cambios en una copia completa de tu sitio antes de publicarlo. Yo uso el ensayo para cualquier cambio de tema en un sitio con tráfico en vivo, porque es la opción más segura cuando tienes tiempo para configurarlo.
Aquí tienes un ejemplo de cómo crear un entorno de ensayo utilizando Bluehost. Desde tu panel de administración, selecciona Bluehost » Staging. Esto te mostrará una página que te pregunta si deseas copiar tu sitio de producción (en vivo) a un sitio de ensayo.
Haz clic en Crear sitio de ensayo para comenzar a hacer la clonación.
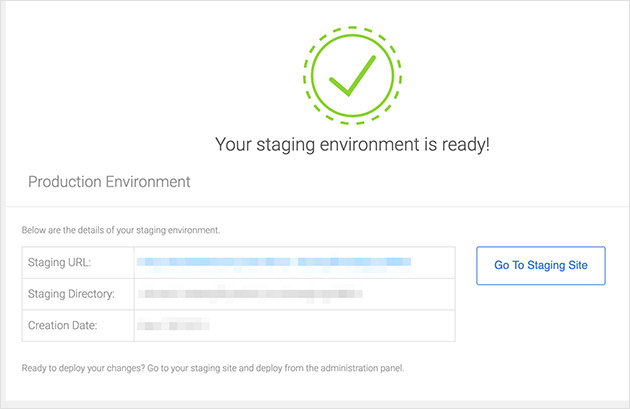
Después de un corto tiempo, verás una página con un mensaje de éxito que te indica que tu entorno de ensayo está listo para trabajar.
Haz clic en Ir al sitio de ensayo para ir a esta versión de tu sitio web.
Ahora puedes probar que tu tema funciona correctamente sin que ningún cambio afecte la versión original de tu sitio.
La interfaz de ensayo varía según el proveedor. Consulta la documentación de tu proveedor para ver la opción equivalente si no usas Bluehost.
Nota: Algunos planes de alojamiento no ofrecen sitios de ensayo a menos que utilices un plan avanzado.
Método 4. Cambiar el tema de WordPress en el sitio web en vivo
Ahora que has probado tu nuevo tema, estás listo para publicarlo. Primero, necesitas agregar los nuevos archivos del tema a tu sitio.
Ve a Apariencia » Temas y haz clic en Añadir nuevo. Sube el archivo zip de tu tema y haz clic en Instalar.
Una vez instalado, pasa el cursor del ratón sobre el tema elegido. Luego haz clic en el botón Activar.
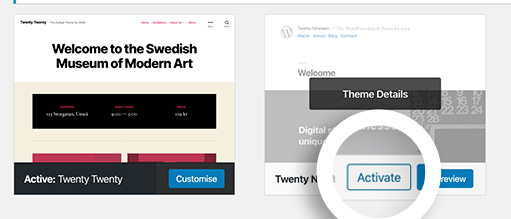
Si vas a tu página de inicio, verás tu nuevo tema de WordPress en acción.
Para publicar tu nuevo tema desde un entorno de ensayo, sigue estos pasos.
Ve a Bluehost » Staging Site y desplázate hacia abajo en la página desde tu entorno de staging. Verás 3 opciones para copiar tu sitio de prueba a tu sitio original y en vivo.
- Desplegar solo archivos.
- Desplegar archivos y base de datos.
- Desplegar solo base de datos.
En la mayoría de los casos, deberías elegir la opción Desplegar Archivos y Base de Datos, ya que incluirá cualquier cambio en tu sitio.
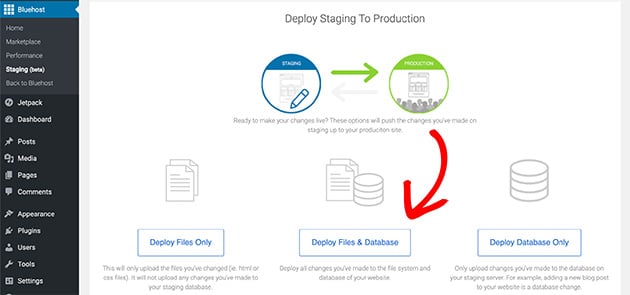
Puede tardar uno o dos minutos en copiarse la información. Verás un mensaje de éxito cuando el proceso se complete.
Después de hacer eso, navega de vuelta a tu sitio principal (producción), donde tu nuevo tema estará en acción.
Algunas personas prefieren usar un método más antiguo para cambiar su tema de WordPress usando el Protocolo de Transferencia de Archivos (cliente FTP) para subir archivos a WordPress. Otras prefieren configurar temas a través del cPanel de su hosting de WordPress.
Consulta esta guía para principiantes sobre el uso de FTP para aprender a subir temas a tu hosting web con FTP.
Método 5. Cambiar el tema de WordPress vía FTP
Advertencia: Este método es para usuarios avanzados. Asegúrate de tener una copia de seguridad completa de tu sitio antes de continuar.
Si no puedes acceder a tu panel de WordPress, puedes instalar un tema manualmente. Puedes usar un cliente FTP como FileZilla para esto.
Primero, conéctate a tu cuenta de hosting usando FTP. Navega a la carpeta /wp-content/themes/.
A continuación, descomprime la carpeta de tu tema en tu ordenador. Sube la carpeta completa descomprimida al directorio de temas en tu servidor.
Esto instala los archivos del tema de forma segura. Si te quedaste bloqueado fuera de tu sitio, ahora puedes renombrar la carpeta de tu tema antiguo para forzar a WordPress a cambiar a un tema predeterminado. Luego puedes iniciar sesión y activar el nuevo que acabas de subir.
¿Qué debo comprobar después de cambiar mi tema de WordPress?
Después de cambiar de tema, tómate unos minutos para comprobar que todo funciona como esperabas. La mayoría de los problemas son pequeños y fáciles de solucionar si los detectas a tiempo.
- Comprueba tus páginas, entradas, menús y formularios para asegurarte de que no falte nada ni esté desalineado.
- Ve a Apariencia » Widgets. Cualquier widget de tu tema anterior estará en un área de “Widgets inactivos” en la parte inferior. Arrástralos a las nuevas áreas de widgets proporcionadas por tu nuevo tema.
- Prueba tu sitio en varios navegadores diferentes para confirmar que el diseño se ve consistente.
- Vuelve a añadir cualquier código de seguimiento o fragmento personalizado que hayas guardado antes del cambio.
- Desactiva el modo de mantenimiento para que los visitantes puedan ver tu sitio actualizado.
- Prueba los tiempos de carga de tu página y compáralos con los de tu tema anterior.
- Monitoriza Google Search Console durante las próximas 4-6 semanas. Busca nuevos errores de rastreo, cambios en Core Web Vitals o caídas en las impresiones orgánicas. La mayoría del impacto SEO relacionado con el tema aparece en 2-3 semanas.
¿Quieres evitar las molestias de cambiar de tema por completo?
Si has seguido estos pasos, tu nuevo tema debería estar activo y funcionando. Pero si todo este proceso te ha parecido más trabajo de lo que debería, hay otra opción que merece la pena conocer.
Muchos cambios de tema ocurren porque alguien quiere un diseño de sitio completamente diferente: un aspecto nuevo sin tener que buscar en los mercados de temas, probar la compatibilidad y preocuparse por la pérdida de shortcodes.
SeedProd es un creador de sitios web de arrastrar y soltar para WordPress que te permite crear un tema personalizado directamente, sin el mercado de temas. En lugar de buscar un tema que se parezca a lo que quieres y luego luchar para personalizarlo, empiezas con uno de los más de 200 kits de sitios web preconstruidos y lo ajustas visualmente.

No hay riesgo de shortcodes porque estás construyendo con los bloques de SeedProd. No hay pruebas de compatibilidad porque SeedProd reemplaza por completo la capa del tema. Yo lo uso en mis propios sitios porque es la forma más rápida de obtener un resultado profesional sin tocar código.
Si eso suena a lo que realmente querías de un cambio de tema, consulta los planes de SeedProd para empezar.
Preguntas frecuentes sobre cómo cambiar tu tema de WordPress
¿Cambiar mi tema de WordPress afectará a mis rankings SEO?
Puede hacerlo, pero el riesgo es manejable. Los principales riesgos de SEO son los cambios en la velocidad de la página (un tema más pesado ralentiza tu sitio), la pérdida de datos estructurados o marcado schema incorporado en tu tema anterior y los cambios en Core Web Vitals por el nuevo código del tema. Tu contenido, URLs y títulos meta se almacenan en WordPress y permanecen intactos. Realiza una prueba de velocidad antes y después, y monitoriza Google Search Console durante 4-6 semanas después del cambio.
¿Qué le sucede al contenido del constructor de páginas y a los shortcodes cuando cambio de tema?
Si tu tema actual incluye un constructor de páginas integrado, o si tus páginas contienen etiquetas [shortcode], el nuevo tema no renderizará esos shortcodes y verás contenido roto o faltante. Copia todas las páginas dependientes de shortcodes a un archivo de texto plano antes de cambiar. Después de cambiar, reconstruye esas páginas utilizando bloques estándar de WordPress o un plugin de constructor de páginas independiente que no esté vinculado al tema.
¿Qué les sucede a mis widgets cuando cambio de tema de WordPress?
Tus widgets no desaparecen, se mueven a un área de “Widgets inactivos” en Apariencia » Widgets. Tu nuevo tema puede tener áreas de widgets diferentes, por lo que los widgets no se pueden mapear automáticamente. Ve a Apariencia » Widgets, desplázate hasta la parte inferior para encontrar la sección Widgets inactivos y arrastra cada widget a las áreas de widgets del nuevo tema. Los temas de bloques no utilizan widgets tradicionales en absoluto. En su lugar, administrarás la navegación y el contenido de la barra lateral en el Editor del sitio.
¿Puedo volver a mi tema anterior si algo sale mal?
Sí, siempre que no hayas eliminado los archivos de tu tema anterior. Ve a Apariencia » Temas y activa tu tema anterior. Cualquier contenido almacenado en WordPress (publicaciones, páginas, imágenes) permanecerá intacto. Sin embargo, la configuración específica del tema, las ubicaciones de los widgets y el CSS personalizado guardado en el panel de opciones de tu tema anterior deberán ser reconfigurados. Por eso, hacer capturas de pantalla de tu diseño antes de cambiar es parte de la lista de verificación previa al cambio.
¿Cómo conservo mi CSS personalizado cuando cambio de tema?
Antes de cambiar, copia tu CSS personalizado a un archivo de texto. Después de cambiar, ve a Apariencia » Personalizar » CSS adicional (para temas clásicos) y pégalo allí. El CSS en CSS adicional se almacena en la base de datos de WordPress, no en los archivos del tema, por lo que sobrevive a futuros cambios de tema. Para temas de bloques, ve a Apariencia » Editor » Estilos para agregar CSS personalizado. Si usaste el panel de CSS incorporado de tu tema anterior, ese CSS no se transferirá automáticamente.
Cambiar de tema es sencillo cuando sigues la lista de verificación antes de empezar. Haz una copia de seguridad primero, prueba en staging si puedes y dale a tu sitio un par de semanas en Google Search Console para confirmar que nada ha cambiado.
Si quieres saltarte la búsqueda de temas por completo, SeedProd te permite crear un tema personalizado de WordPress desde cero sin tocar código.
¡Gracias por leer! Nos encantaría conocer tu opinión, así que únete a la conversación en YouTube, X y Facebook para obtener más consejos y contenido útil para hacer crecer tu negocio.
Para más guías útiles de WordPress, consulta estas publicaciones a continuación:
- Cómo agregar o quitar espacio entre bloques en WordPress
- Cómo agregar una barra lateral diferente para diferentes páginas en WordPress
- Cómo añadir CSS personalizado en WordPress (Fácil para principiantes)
- Cómo añadir una sombra paralela en WordPress: 4 maneras fáciles
Si disfrutaste de este artículo, recuerda seguirnos en Facebook y Twitter para más guías útiles de WordPress.


