Do you want to create a custom checkout page for your WooCommerce store?
Imagine losing 7 out of every 10 potential sales just because customers get stuck at the checkout. That’s what happens to many online stores, and it’s often because their checkout pages are confusing or hard to use.
But don’t worry – there’s a simple fix. By making your WooCommerce checkout page better, you can turn more of those almost-sales into real money in your pocket. It’s like smoothing out the bumps in the road so more customers can easily cross the finish line.
In this guide, I’ll show you exactly how to improve your checkout page, step by step. And the best part? You don’t need to know any complicated computer code to do it. I’ll make it easy for you to create a checkout page that helps, not hinders, your customers.
How to Customize WooCommerce Checkout Page:
Why You Should Customize the WooCommerce Checkout Page
The checkout page is the last thing customers see before completing their purchase. It can mean the difference between converting or abandoning your store altogether.
That’s why it’s essential to ensure your WooCommerce checkout page is designed well and functions in a way that encourages conversions.
The default WooCommerce checkout page is a great place for smaller stores to start. It has everything you need to start an online store.
But as your business grows, you’ll soon find you can provide a better experience by:
- Including your custom branding
- Adding custom fields to your checkout form
- Changing the page design and layout
- Directly linking products to your checkout page
- Changing your input field labels and button text
- Upselling other products or services
Whether you want to redesign your entire WooCommerce checkout page or make some minor edits, there’s one thing to keep in mind. It should be easy!
Luckily, the solution below makes customizing the WooCommerce checkout page effortless.
So passen Sie Ihre WooCommerce-Kassenseite an
If you don’t have the time to learn how to code or the budget to hire a developer, customizing your checkout page might seem near impossible.
But the truth is, it isn’t with the right tools at hand.
In the tutorial below, we’ll show you how to customize your WooCommerce checkout page with SeedProd.

SeedProd is the best WordPress landing page builder with drag-and-drop functionality. It allows you to build and customize any page in WordPress visually.
This means you can use the drag-and-drop page editor to create custom pages and see the results in real-time. It removes the need to code your page manually, which is excellent news for people with limited design and technical skills.
SeedProd comes with hundreds of professionally designed landing page templates to get started quickly. You can then customize each template in the visual editor using flexible page blocks like:
- Optin forms and login forms
- Bilder und Videos
- Text and headings
- Social media profile and sharing buttons
- Custom contact forms with 3rd-party plugins like WPForms
- RafflePress Werbegeschenke
- Testimonials und Sternebewertungen
- Countdown-Timer und Fortschrittsbalken
- Navigation menus and accordions
- Und mehr.
SeedProd also has landing page blocks dedicated to WooCommerce stores, including add-to-cart buttons, checkout, shopping cart, and flexible product grids. This means you can easily create versatile product, cart, and checkout pages for your eCommerce store without hiring a developer.
With that in mind, let’s look at how to customize the WooCommerce checkout page with SeedProd.
1. Installieren und Aktivieren von SeedProd
The first step is to get started with SeedProd and download the plugin to your computer. To access SeedProd’s WooCommerce integration features, you’ll need at least a SeedProd Pro Plan.
Nachdem Sie SeedProd heruntergeladen haben, müssen Sie das Plugin auf Ihrer WordPress-Website installieren und aktivieren. Sie können diese Schritte zur Installation eines WordPress-Plugins befolgen, wenn Sie Hilfe benötigen.
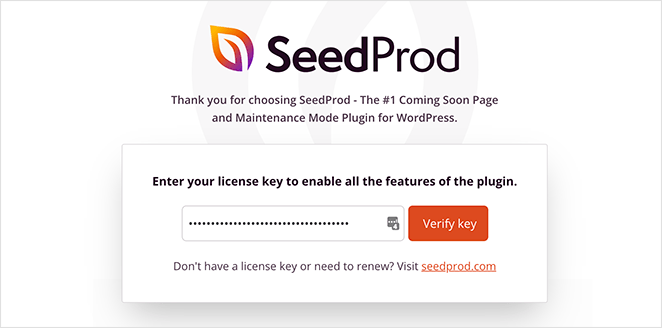
After activating the plugin, you’ll see a welcome screen.
Auf dem Bildschirm werden Sie aufgefordert, Ihren SeedProd-Lizenzschlüssel einzugeben. Sie können Ihren Schlüssel finden, indem Sie sich bei Ihrem SeedProd-Konto anmelden und auf den Link Lizenzschlüssel, Details und Downloads anzeigen klicken.

From there, you can copy your key to save it to your clipboard. After, paste the key into the license key field and click the Verify Key button.
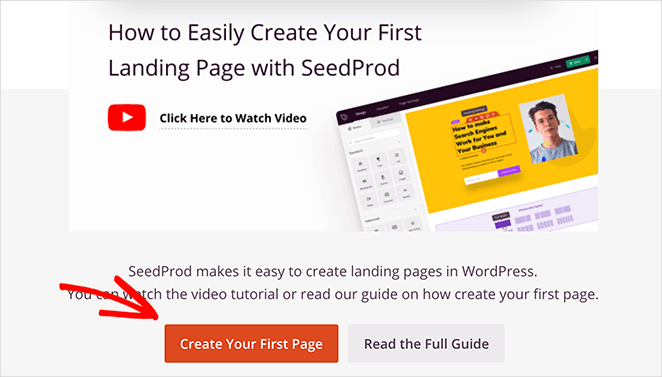
Now scroll a short way down the page and click the Create Your First Page button.
Dies führt Sie zum Landing Page Dashboard von SeedProd. Oben auf der Seite finden Sie 4 verschiedene Seitenmodi:
- Demnächst verfügbar
- Wartungsmodus
- 404
- Anmeldung
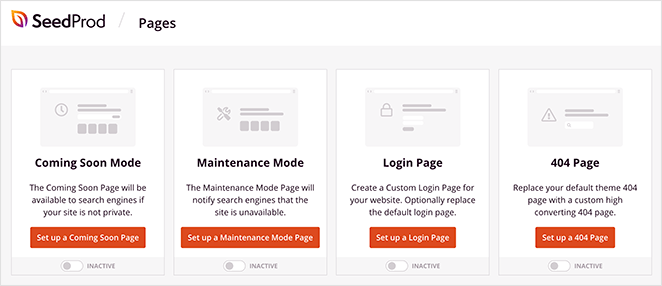
Each page mode allows you to enable specific landing pages with a single click.
For instance, you can enable Coming Soon mode to add a coming soon page telling people about your new store. Or you can enable 404 Page mode to add a custom 404 error page to your site.
Under that section is where you’ll see a list of any other pages you create with SeedProd. Since we haven’t made one yet, click the Create New Landing Page button to get started.

2. Erstellen Sie eine neue Landing Page
Nachdem Sie auf die Schaltfläche zum Erstellen einer neuen Landing Page geklickt haben, sehen Sie die Bibliothek der Landing Page-Vorlagen von SeedProd.
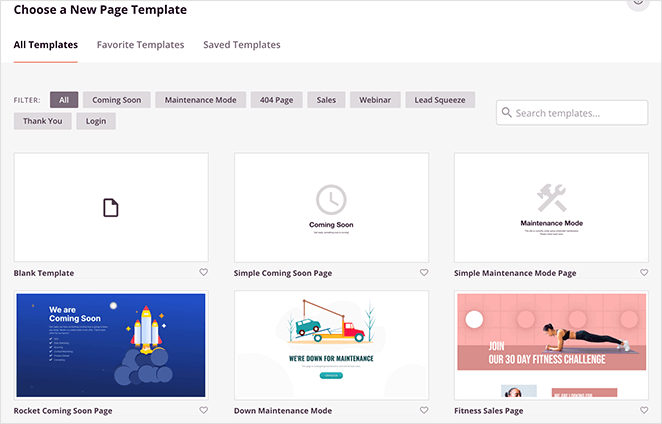
Sie können die Vorlagen nach Ziel oder Branche filtern, indem Sie auf die Registerkarten am oberen Rand klicken.
Each template is multifunctional. As such, you can use any design and customize it in the drag-and-drop editor to look any way you like.
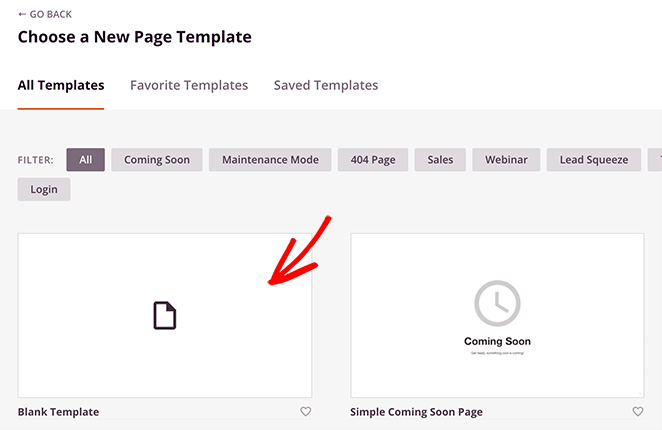
For this guide, we’ll show you how to create and customize your WooCommerce checkout page from scratch using the Blank Template. This will give you an excellent overview of how easy it is to use SeedProd.
Fahren Sie also mit der Maus über die Miniaturansicht der leeren Vorlage und klicken Sie auf das Häkchen.
Als nächstes erscheint ein Popup-Fenster, in dem Sie aufgefordert werden, einen Namen und eine URL für Ihre Seite einzugeben. Sie können diese Einstellung später ändern, also geben Sie der Seite einen Namen, der Ihnen gefällt.
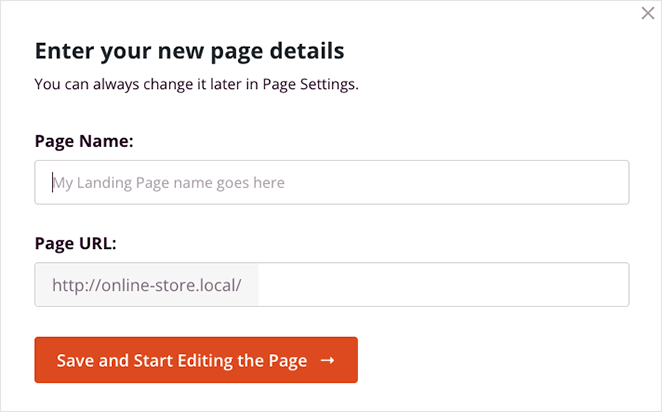
Klicken Sie nun auf die Schaltfläche Speichern und mit der Bearbeitung der Seite beginnen, um Ihre Seite zu starten.
Auf dem folgenden Bildschirm sehen Sie den Landing Page Editor von SeedProd.
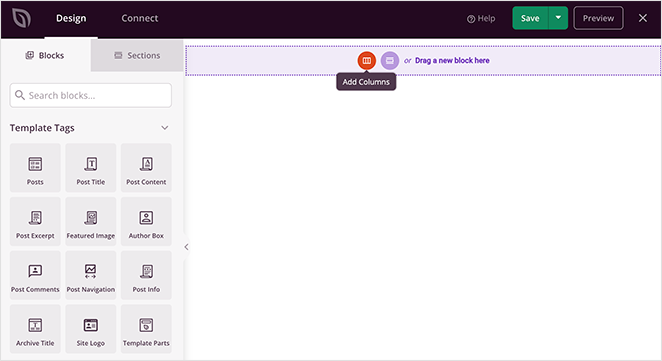
Es hat ein einfaches 2-Panel-Layout:
- Linker Bereich: Seitenblöcke und Abschnitte zum Erstellen und Anpassen Ihrer Seite
- Rechter Bereich: Vorschau darauf, wie Ihre Landing Page in Echtzeit aussieht
Adding content to your page is as simple as dragging a block from the left and dropping it into place on the right. We’ll show you how to do this in the next step.
3. Add the Checkout Block to Your Page
Before you start customizing your WooCommerce checkout page, let’s set up a basic checkout page structure.
In the right-hand panel, choose a page layout by clicking any of the column options.
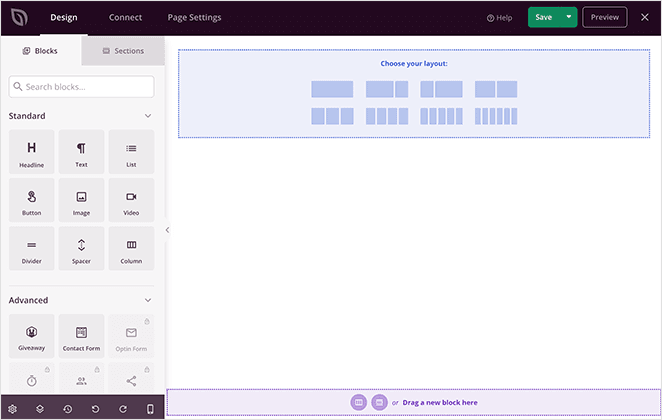
As you can see below, it adds a simple framework to your page. This is where any page elements you add will sit.
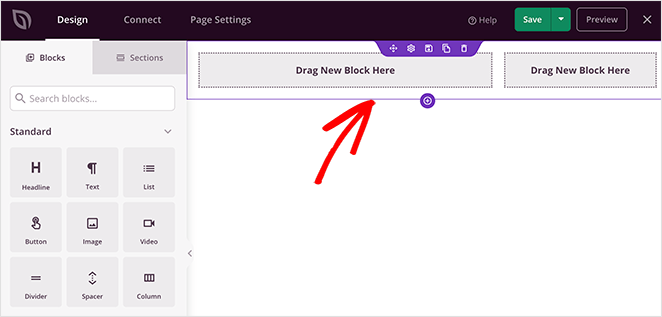
Als Nächstes müssen Sie Ihre WooCommerce-Kasse zu Ihrer Seite hinzufügen. Scrollen Sie im linken Bereich nach unten zum Abschnitt WooCommerce. Klicken Sie dann auf den Checkout-Block und ziehen Sie ihn in eine der Spalten, die Sie zuvor erstellt haben.
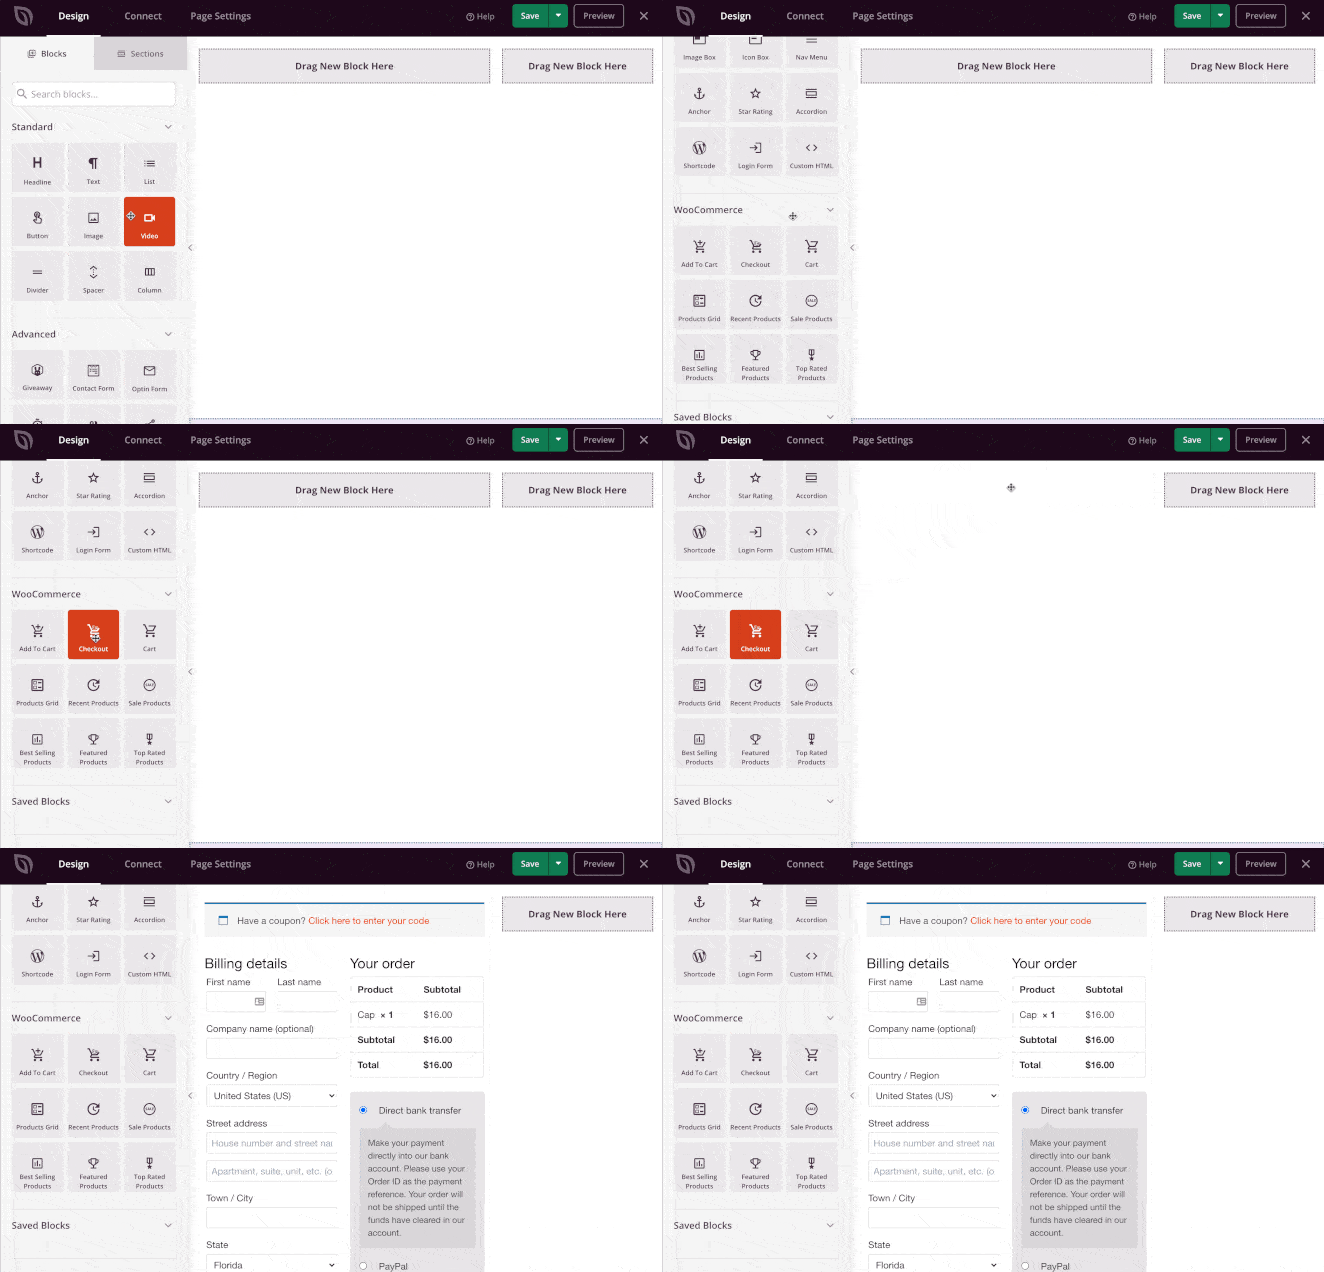
You should now see your WooCommerce checkout form right inside your landing page design. When you click your checkout form, you’ll see the form Style settings in the left-hand panel.
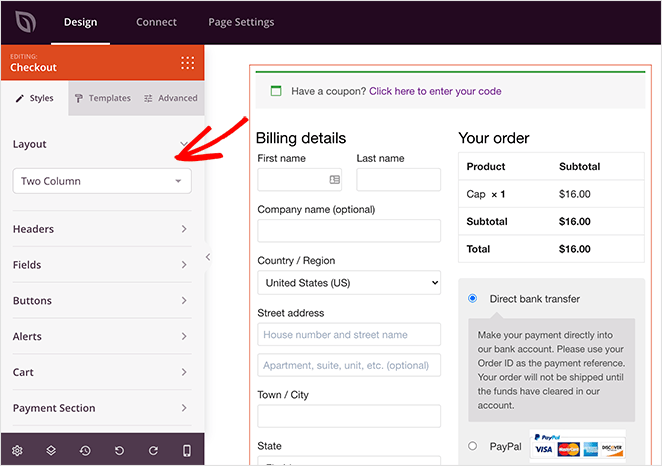
In this area, you can customize your WooCommerce checkout form by:
- Das Layout 1 oder 2 spaltig gestalten
- Changing the header fonts and colors
- Editing the checkout fields fonts, colors, spacing, and borders
- Ändern von Stil, Schriftart und Farbe der Schaltfläche "Kasse".
- Hinzufügen einer benutzerdefinierten Warnfarbe
- Ändern von Text, Farben, Rahmen und Schriftarten des Warenkorbs
- Hinzufügen von benutzerdefinierten Schriftarten und Farben zum Abschnitt Zahlungsdetails
Now click the Templates tab, and you’ll see a variety of custom styles for your checkout fields. Click any style to add it to your checkout form instantly.
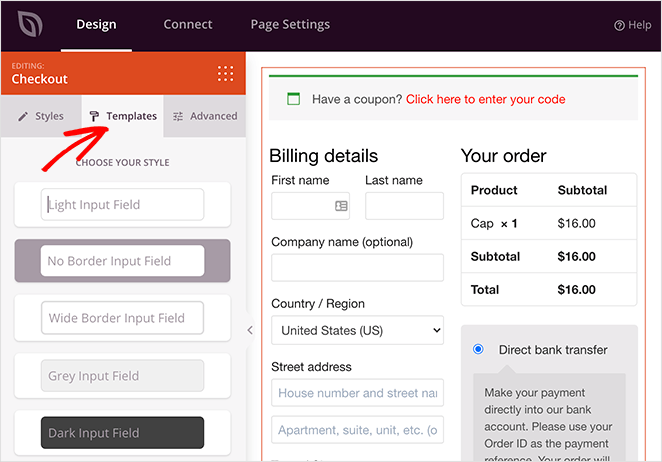
Before moving on, click the green Save button in the top-right corner of your screen to save your progress.
4. Customize Your Checkout Page Design
With your landing page now looking more like it should, let’s look at some other ways to customize your WooCommerce checkout page.
Adding a Header to your WooCommerce Checkout Page
To help customers find their way around, it’s good practice to add a header to your checkout page. SeedProd offers an easy way to do this with Sections.
Klicken Sie neben dem Blockbedienfeld auf die Registerkarte Abschnitte. Hier werden mehrere vorgefertigte Layouts angezeigt, die Sie mit einem einzigen Klick zu Ihrer Seite hinzufügen können.
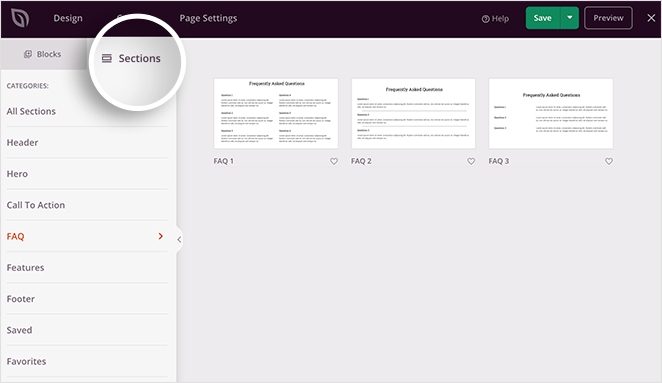
Wenn Sie zum Beispiel auf den Abschnitt Kopfzeilen klicken, werden 3 verschiedene vorgefertigte Kopfzeilen angezeigt. Wählen Sie ein Design, das Ihnen gefällt, und klicken Sie auf das Plus-Symbol, um es in Ihr Design zu importieren.
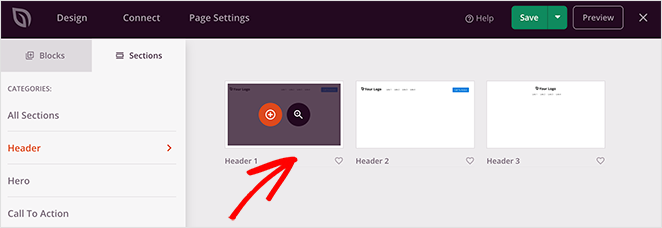
By default, any new section is added to the bottom of your page. To move it to your header area, hover your mouse over it and click the move section icon. Then drag the entire section to the top of the page.
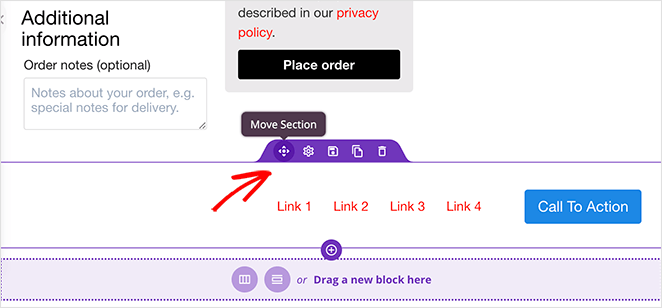
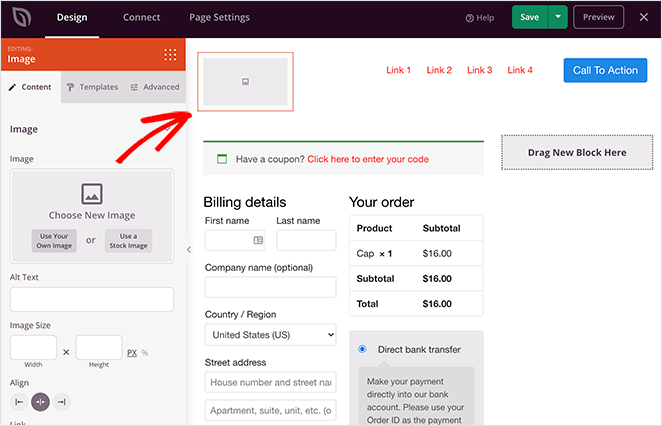
Danach können Sie auf ein beliebiges Element in Ihrem Kopfzeilenbereich klicken, um die Anpassungsoptionen im linken Bereich anzuzeigen. Wenn Sie z. B. auf den Bildblock im Kopfzeilenbereich klicken, können Sie ein neues Bild hochladen, das Sie als Logo verwenden möchten.
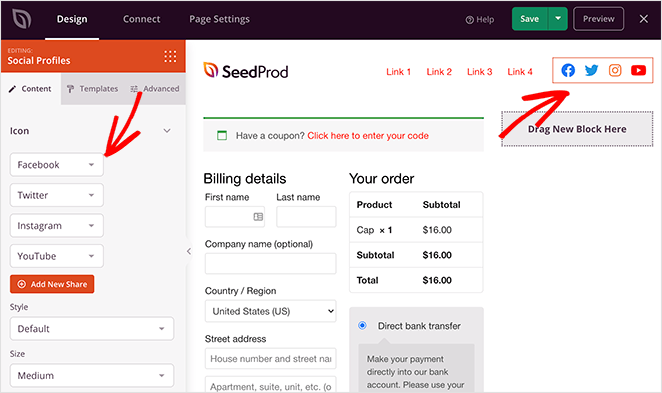
Sie können sogar den Schaltflächenblock in Ihrer Kopfzeile löschen und durch die Symbole Ihrer sozialen Profile ersetzen.
Adding Suggested Products to your WooCommerce Checkout Page
With SeedProd’s powerful WooCommerce integration, it’s easy to cross-sell and promote your products and services from any landing page. The range of product grid blocks allow you to show:
- Neueste Produkte
- Verkauf Produkte
- Meistverkaufte Produkte
- Ausgewählte Produkte
- Am besten bewertete Produkte
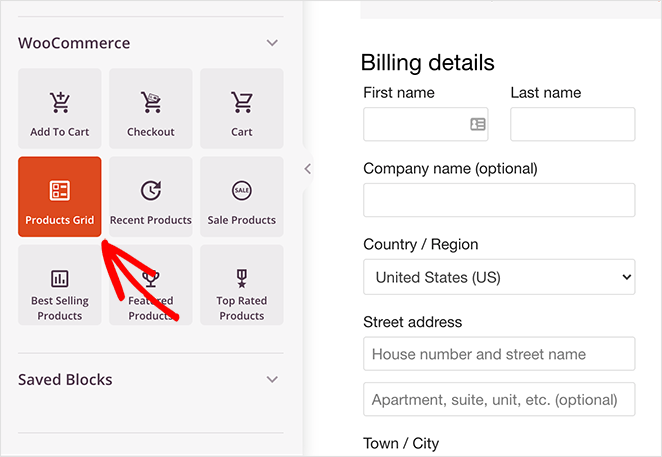
Just select the Products Grid block and drag it into place on your page. You can then click the block to see the settings in the left-hand panel.
In this panel, you can choose how many columns of products to display and add pagination to your product grid. You can also filter which products visitors see by choosing a query type from the drop-down menu.
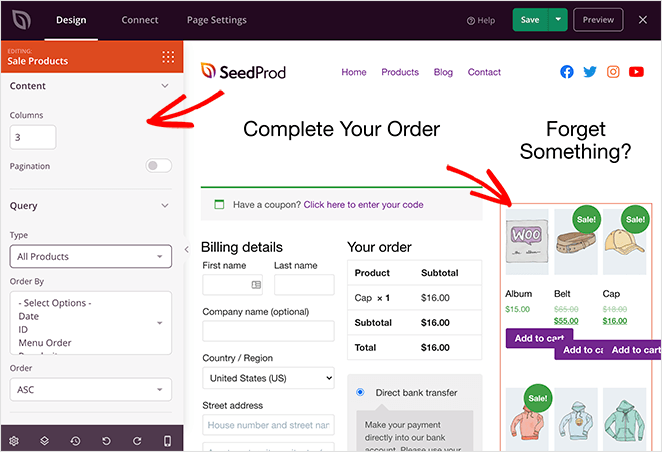
Danach können Sie die Reihenfolge der Produkte festlegen:
- Datum
- ID
- Menü Bestellung
- Popularität
- Zufällig
- Bewertung
- Titel
Sie können auch wählen, ob sie in aufsteigender oder absteigender Reihenfolge angezeigt werden sollen.
Adding Testimonials to Your Checkout Page
Testimonials and star ratings are another great way to add trust and credibility to your checkout page. If potential customers see that people positively review your products, they’re more likely to complete the checkout process instead of abandoning their shopping cart.
To add customer testimonials to your WooCommerce checkout page, drag the Testimonial block from the left panel and drop it into place on your page. Then, you can click the block to see the settings and add your customer testimonials.
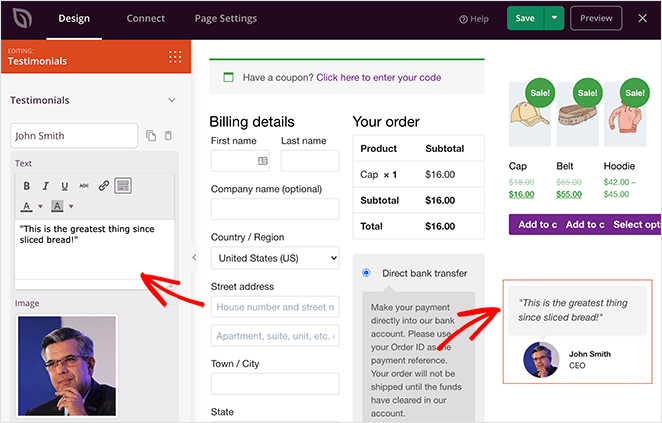
Sie können so viele Zeugnisse einfügen, wie Sie möchten, und sie sogar als gleitendes Zeugniskarussell anzeigen.
Globale Anpassungseinstellungen
Die globalen Anpassungseinstellungen von SeedProd ermöglichen es Ihnen, das allgemeine Aussehen Ihrer WooCommerce-Kassenseite zu ändern.
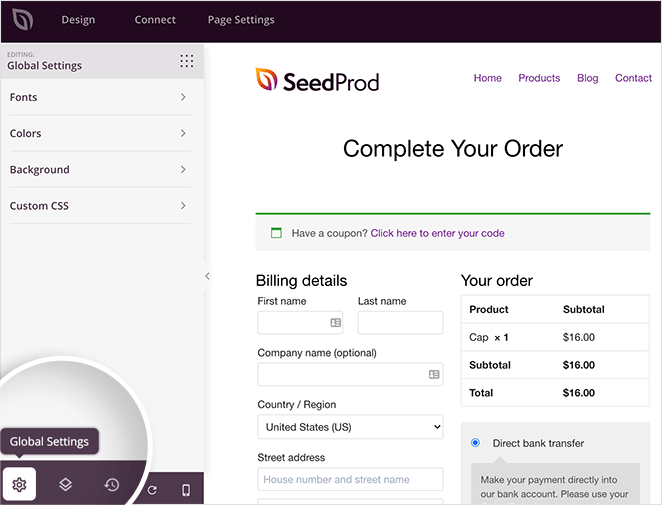
Click the gear icon in the bottom-left corner of your screen. This shows a panel of Global Settings for fonts, colors, background, and custom CSS.
Schriftarten
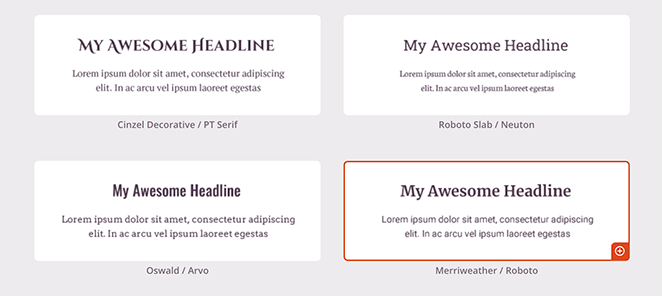
Expanding the Font heading lets you change your header and body fonts and weights. It’s as easy as picking a Google font from the drop-down menu.
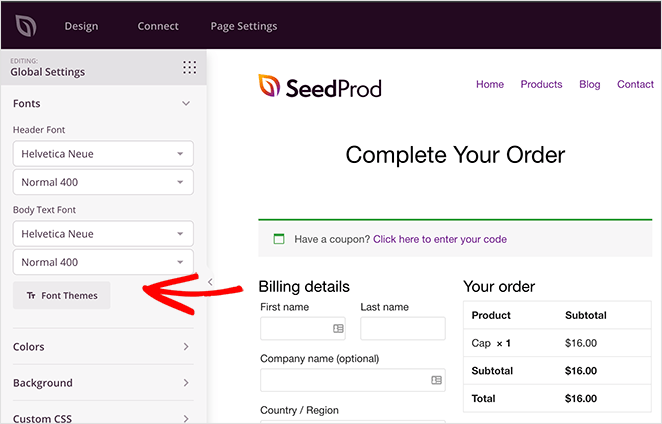
Or you can click the Font Themes button to see examples of different font pairings. From there, it’s just a click to apply them to your page.
Farben
Der Bereich Farben ist ähnlich aufgebaut. Klicken Sie auf eine beliebige Farbe, um ein Farbtropfenwerkzeug anzuzeigen und einzelne Farben für Überschriften, Text, Schaltflächen und mehr auszuwählen.
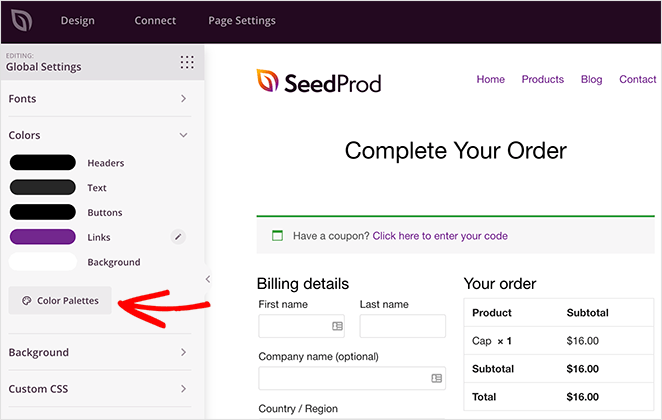
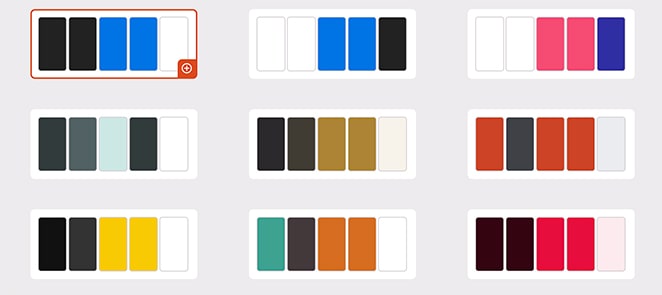
Sie können auch auf die Schaltfläche Farbpaletten klicken, um aus mehr als 20 vorgefertigten Farbschemata zu wählen.
Hintergrund
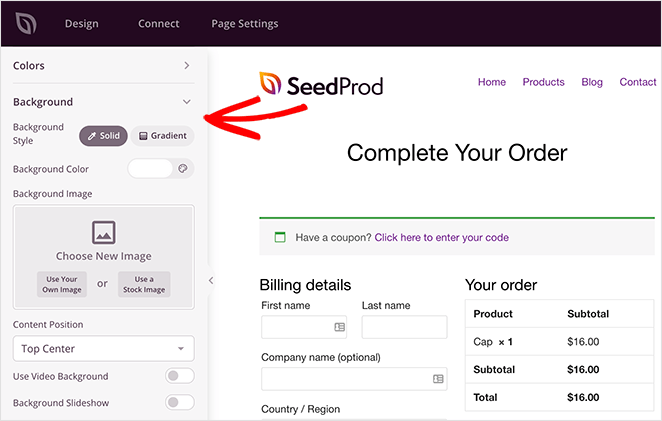
Im Bereich Hintergrund können Sie die Hintergrundfarbe, den Farbverlauf und das Bild ändern. Sie können sogar einen Videohintergrund oder eine Diashow über die gesamte Breite hinzufügen.
Benutzerdefiniertes CSS
And finally, in the Custom CSS section, you can add custom code to customize the WooCommerce checkout page even more.
Wenn Sie mit dem Aussehen zufrieden sind, klicken Sie auf die Schaltfläche Speichern.
5. Configure Your Checkout Page Settings
Nachdem Sie Ihre Anpassungen vorgenommen haben, sehen wir uns nun einige andere Einstellungen an, die Sie auf Ihrer Kassenseite ändern können.
Connecting Your Email List
Der erste Punkt sind die E-Mail-Marketing-Einstellungen. Mit SeedProd können Sie Ihre Landing Page ganz einfach mit Ihrer E-Mail-Liste verbinden.
Klicken Sie oben auf dem Bildschirm auf Verbinden, und Sie sehen eine breite Palette beliebter E-Mail-Marketingdienste. Wenn Sie also Nutzer auf Ihrer Bestellseite auffordern möchten, Ihren Newsletter zu abonnieren, verwenden Sie dieses Panel, um Ihren E-Mail-Marketingdienst zu verknüpfen.
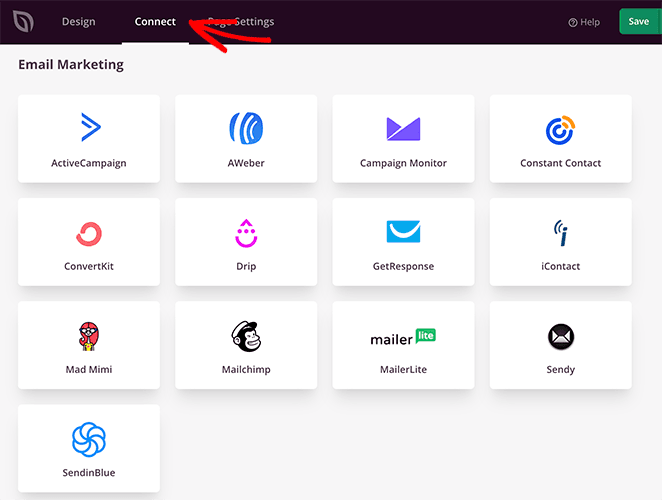
Wählen Sie einfach Ihren bevorzugten Anbieter und folgen Sie den Schritten in unserer Dokumentation zur E-Mail-Integration, um die Einrichtung vorzunehmen.
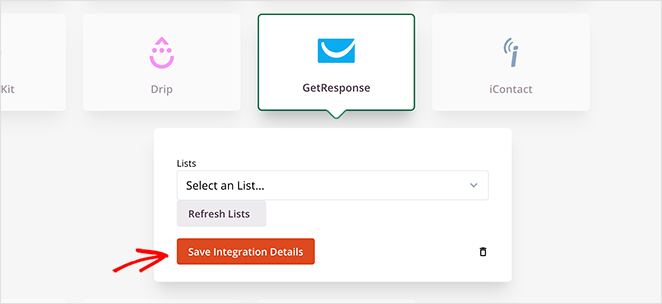
Auf demselben Bildschirm können Sie Ihre Checkout-Seite über Zapier mit Tausenden von Apps verknüpfen, die Leistung Ihrer Website mit Google Analytics überwachen und sie mit Recaptcha vor Spam schützen.
Configuring Your Page Settings
After connecting your email list, click the Page Settings tab to see other settings you can configure in SeedProd. There are typically 5 sections on the settings page, but this depends on the type of page you build and your SeedProd plan.
Allgemeine Einstellungen

In den allgemeinen Einstellungen können Sie den Namen und die URL für die WooCommerce-Kassenseite ändern. Sie können auch zwischen veröffentlicht und Entwurf wechseln.
If you want to avoid any plugin conflicts and speed up your page, you can enable Isolation Mode. This stops specific header and footer scripts from running and interfering with your performance.
SEO and Analytics
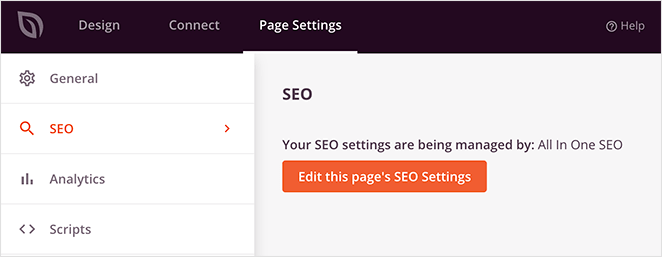
Under the SEO tab, you can use a WordPress SEO plugin to configure your landing page title tag, meta description, etc. One of the best plugins for this is All In One SEO.
The same is true for the Analytics tab. Here you can connect your favorite Google Analytics plugin and monitor your landing page performance. Why not try MonsterInsights for Google Analytics?
If you want more details, you can always check out our MonsterInsights review.
Skripte
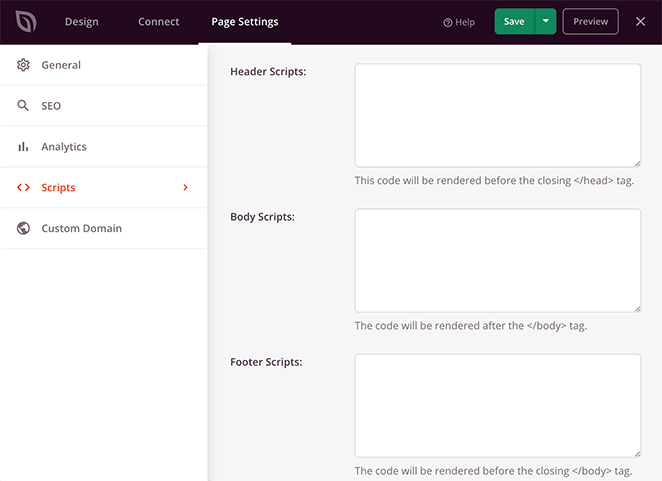
In the Scripts area, you can add code to your page header, body, and footer. This could be anything like your tracking cookies, Facebook tracking pixel, or even your analytics script.
Benutzerdefinierter Bereich
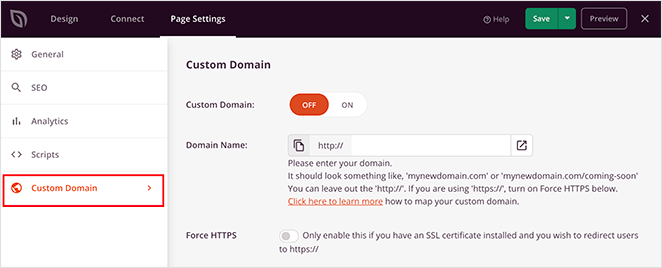
If you’re a user of SeedProd’s Pro Plan, you can give any landing page a custom domain that isn’t connected to your existing website.
Wenn Sie z. B. eine neue Website einrichten möchten und diese noch nicht eingerichtet haben, können Sie in SeedProd eine "Demnächst"-Seite auf Ihrer bestehenden Website erstellen und diese auf Ihre neue Website verweisen.
Mit dieser Taktik können Sie neue Abonnenten für die Liste Ihrer zukünftigen Website gewinnen, ohne eine neue WordPress-Installation vornehmen zu müssen.
Nachdem Sie Ihre Einstellungen konfiguriert haben, speichern Sie Ihre Änderungen und klicken Sie zurück auf die Registerkarte Design.
6. Publish Your Custom Checkout Page
Before you make your checkout page live, it’s a good idea to test it on mobile devices. If your checkout page isn’t mobile-responsive, it won’t look and perform as well on smaller touch screens like tablets and smartphones.
It could even cause users to abandon their shopping carts out of frustration.
The good news is, SeedProd has a built-in mobile preview option so that you can check your page is mobile-friendly. Just click the mobile icon at the bottom of your screen.
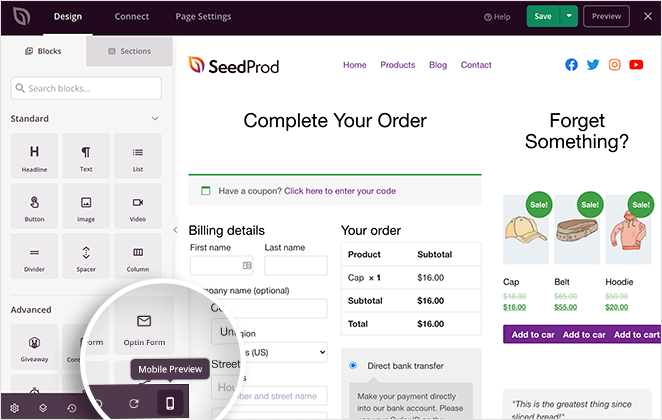
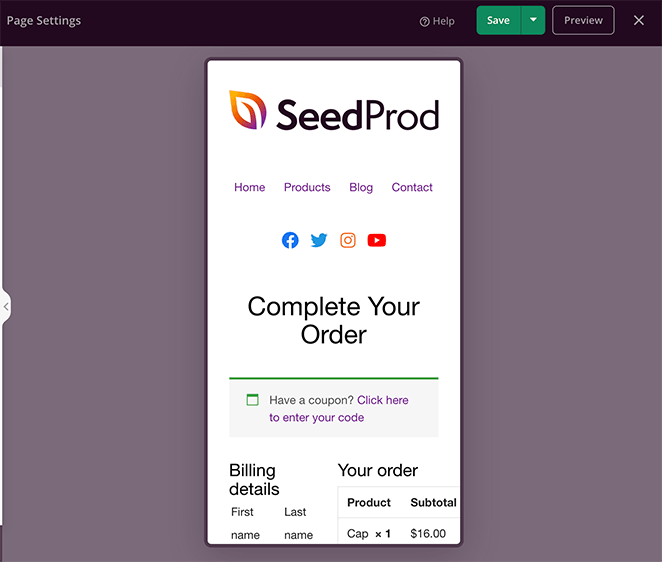
Jetzt können Sie sehen, wie Ihre Kassenseite auf dem Handy aussieht und alles ändern, was nicht richtig aussieht oder funktioniert.
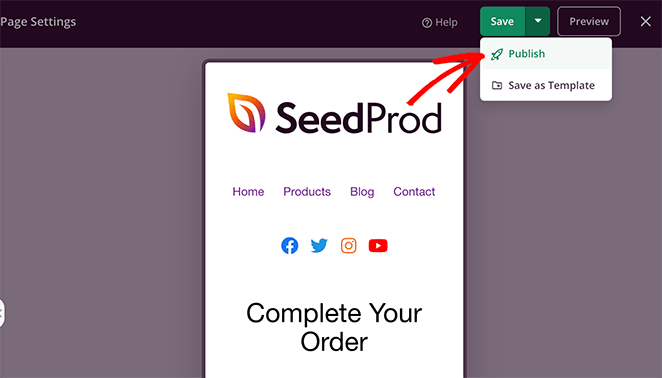
Wenn alles gut aussieht, ist es Zeit für die Veröffentlichung. Klicken Sie auf den Abwärtspfeil neben der grünen Schaltfläche Speichern und dann auf Veröffentlichen.
Now you can visit the page to see it in action.
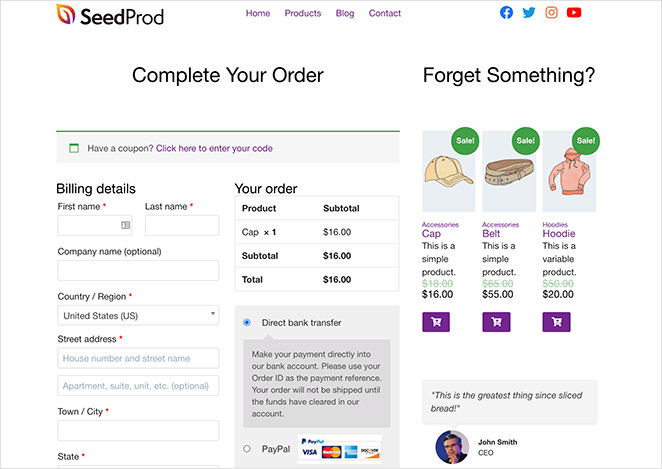
Tolle Arbeit! Sie haben jetzt eine großartige angepasste WooCommerce-Kassenseite!
7. Assign Your Checkout Page in WooCommerce
There’s 1 one more step until your new checkout page is ready to take orders. You need to set it as your default checkout page in WooCommerce.
To do that, navigate to WooCommerce » Settings and click on the Advanced tab. Next, go to the Checkout page heading, and choose the page you just page from the drop-down menu.
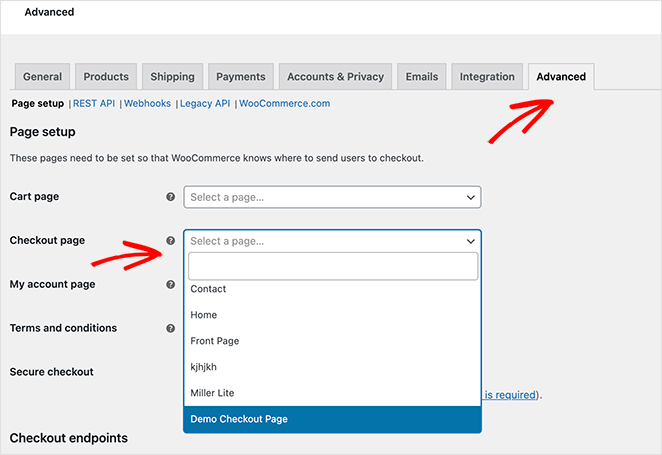
Denken Sie daran, auf die Schaltfläche Änderungen speichern zu klicken, um Ihre Einstellungen zu speichern.
Und das war's!
You now know how to customize the WooCommerce checkout page with SeedProd’s landing page builder. SeedProd’s WooCommerce integration makes controlling the design of your online store super easy.
Das Plugin ist nicht nur schnell und überflüssig, sondern auch so einfach zu bedienen, dass selbst Anfänger einen individuellen Shop erstellen können, ohne einen Entwickler einstellen zu müssen.
Warum probieren Sie es also nicht selbst aus?
While you’re here, you might also find the following WooCommerce guides helpful:
- How to Customize the WooCommerce Additional Information Tab
- Wie man den View Cart Button in WooCommerce hinzufügt
- Wie man den Titel der Shop-Seite in WooCommerce ändert
- Wie man eine beeindruckende Produktbildgalerie in WooCommerce erstellt
- Wie man Stern-Bewertung zu WooCommerce Produkt-Seiten hinzufügen
- How to Display Related Products in WooCommerce
- Anzeige von Produktkategorien und Tags in WooCommerce
- Wie man Produktbeschreibungen in WooCommerce erhält und anzeigt
- How to Display Featured Products in WooCommerce
- Wie WooCommerce View Cart nicht funktioniert zu beheben
- So passen Sie Ihre WooCommerce Add-to-Cart-Schaltfläche an
- Hinzufügen eines WooCommerce-Einkaufswagen-Symbols in Menüs
- Anpassen von Produktkategorieseiten in WooCommerce
- Wie man eine neue Produkte WooCommerce Abschnitt zu WordPress hinzufügen
Vielen Dank fürs Lesen! Wir würden uns freuen, Ihre Meinung zu hören. Bitte hinterlassen Sie einen Kommentar mit Ihren Fragen und Ihrem Feedback.
Sie können uns auch auf YouTube, X (früher Twitter) und Facebook folgen, um weitere hilfreiche Inhalte für Ihr Unternehmen zu erhalten.

