Do you want to create a custom checkout page for your WooCommerce store?
Imagine losing 7 out of every 10 potential sales just because customers get stuck at the checkout. That’s what happens to many online stores, and it’s often because their checkout pages are confusing or hard to use.
But don’t worry – there’s a simple fix. By making your WooCommerce checkout page better, you can turn more of those almost-sales into real money in your pocket. It’s like smoothing out the bumps in the road so more customers can easily cross the finish line.
In this guide, I’ll show you exactly how to improve your checkout page, step by step. And the best part? You don’t need to know any complicated computer code to do it. I’ll make it easy for you to create a checkout page that helps, not hinders, your customers.
How to Customize WooCommerce Checkout Page:
Why You Should Customize the WooCommerce Checkout Page
The checkout page is the last thing customers see before completing their purchase. It can mean the difference between converting or abandoning your store altogether.
That’s why it’s essential to ensure your WooCommerce checkout page is designed well and functions in a way that encourages conversions.
The default WooCommerce checkout page is a great place for smaller stores to start. It has everything you need to start an online store.
But as your business grows, you’ll soon find you can provide a better experience by:
- Including your custom branding
- Adding custom fields to your checkout form
- Changing the page design and layout
- Directly linking products to your checkout page
- Changing your input field labels and button text
- Upselling other products or services
Whether you want to redesign your entire WooCommerce checkout page or make some minor edits, there’s one thing to keep in mind. It should be easy!
Luckily, the solution below makes customizing the WooCommerce checkout page effortless.
WooCommerceのチェックアウトページをカスタマイズする方法
If you don’t have the time to learn how to code or the budget to hire a developer, customizing your checkout page might seem near impossible.
But the truth is, it isn’t with the right tools at hand.
In the tutorial below, we’ll show you how to customize your WooCommerce checkout page with SeedProd.

SeedProd is the best WordPress landing page builder with drag-and-drop functionality. It allows you to build and customize any page in WordPress visually.
This means you can use the drag-and-drop page editor to create custom pages and see the results in real-time. It removes the need to code your page manually, which is excellent news for people with limited design and technical skills.
SeedProd comes with hundreds of professionally designed landing page templates to get started quickly. You can then customize each template in the visual editor using flexible page blocks like:
- Optin forms and login forms
- 画像とビデオ
- Text and headings
- Social media profile and sharing buttons
- Custom contact forms with 3rd-party plugins like WPForms
- RafflePress giveaways
- Testimonials and star ratings
- カウントダウン・タイマーとプログレス・バー
- Navigation menus and accordions
- そしてもっと。
SeedProd also has landing page blocks dedicated to WooCommerce stores, including add-to-cart buttons, checkout, shopping cart, and flexible product grids. This means you can easily create versatile product, cart, and checkout pages for your eCommerce store without hiring a developer.
With that in mind, let’s look at how to customize the WooCommerce checkout page with SeedProd.
1.SeedProdのインストールとアクティベーション
The first step is to get started with SeedProd and download the plugin to your computer. To access SeedProd’s WooCommerce integration features, you’ll need at least a SeedProd Pro Plan.
After downloading SeedProd, you need to install and activate the plugin on your WordPress website. You can follow these steps to install a WordPress plugin if you need help.
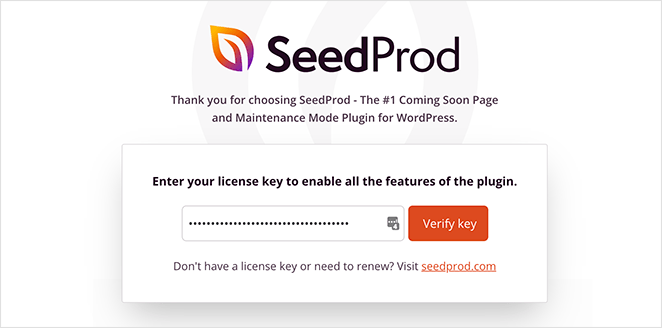
After activating the plugin, you’ll see a welcome screen.
The screen asks you to enter your SeedProd License key. You can find your key by logging into your SeedProd account and clicking the View License Key, Details, and Downloads link.

From there, you can copy your key to save it to your clipboard. After, paste the key into the license key field and click the Verify Key button.
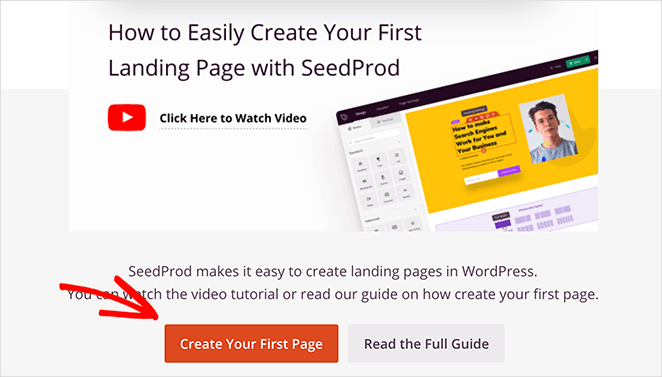
Now scroll a short way down the page and click the Create Your First Page button.
This takes you to SeedProd’s landing page dashboard. At the top of the page are 4 different page modes:
- 近日公開
- メンテナンス・モード
- 404
- ログイン
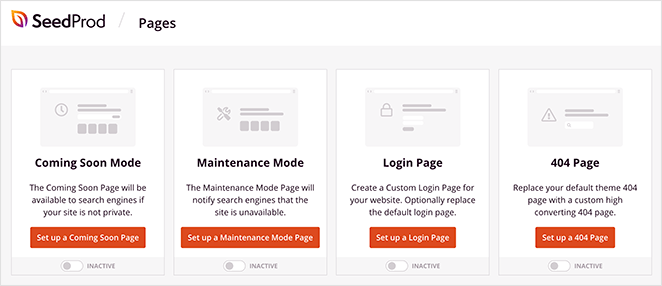
Each page mode allows you to enable specific landing pages with a single click.
For instance, you can enable Coming Soon mode to add a coming soon page telling people about your new store. Or you can enable 404 Page mode to add a custom 404 error page to your site.
Under that section is where you’ll see a list of any other pages you create with SeedProd. Since we haven’t made one yet, click the Create New Landing Page button to get started.

2.新しいランディングページを作成する
After clicking the button to create a new landing page, you’ll see SeedProd’s landing page templates library.
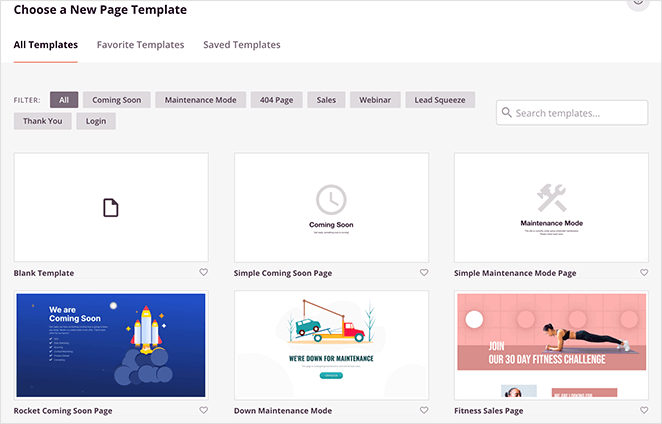
You can filter the templates by goal or industry by clicking the tabs along the top.
Each template is multifunctional. As such, you can use any design and customize it in the drag-and-drop editor to look any way you like.
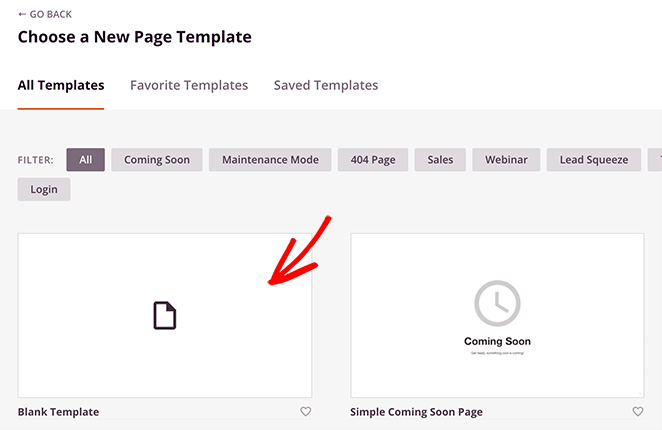
For this guide, we’ll show you how to create and customize your WooCommerce checkout page from scratch using the Blank Template. This will give you an excellent overview of how easy it is to use SeedProd.
So hover your mouse over the Blank Template thumbnail and click the tick icon.
Next, a popup appears asking you to enter a name and URL for your page. You can change this setting later, so name it anything you like.
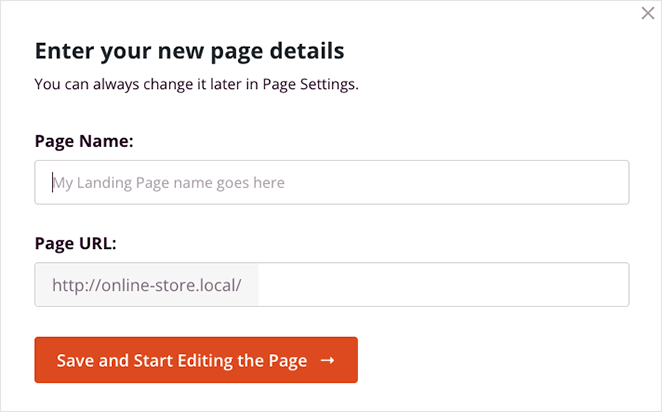
Now click the Save and Start Editing the Page button to launch your page.
On the following screen, you’ll see SeedProd’s landing page editor.
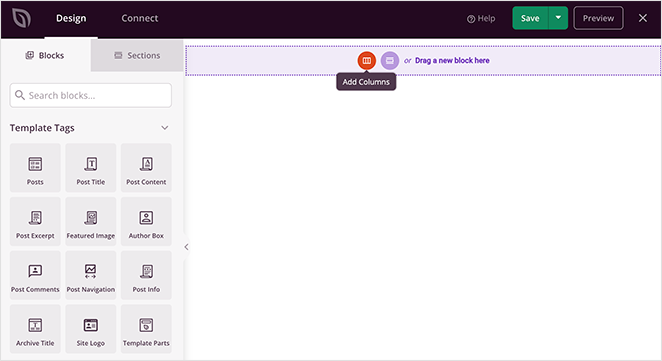
It has a simple 2-panel layout:
- 左のパネル:ページを構築しカスタマイズするためのページブロックとセクション
- 右のパネル:ランディングページのリアルタイムプレビュー
Adding content to your page is as simple as dragging a block from the left and dropping it into place on the right. We’ll show you how to do this in the next step.
3. Add the Checkout Block to Your Page
Before you start customizing your WooCommerce checkout page, let’s set up a basic checkout page structure.
In the right-hand panel, choose a page layout by clicking any of the column options.
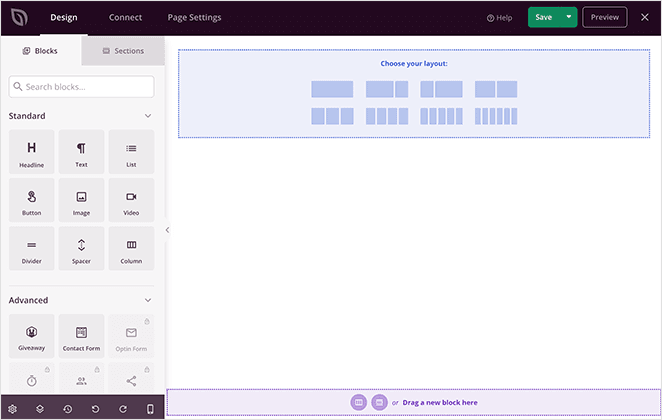
As you can see below, it adds a simple framework to your page. This is where any page elements you add will sit.
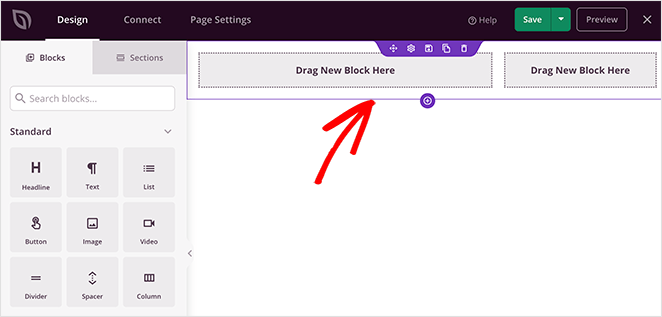
Next, you need to add your WooCommerce checkout to your page. In the left-hand panel, scroll down to the WooCommerce section. Then click the Checkout block and drag it into one of the columns you made previously.
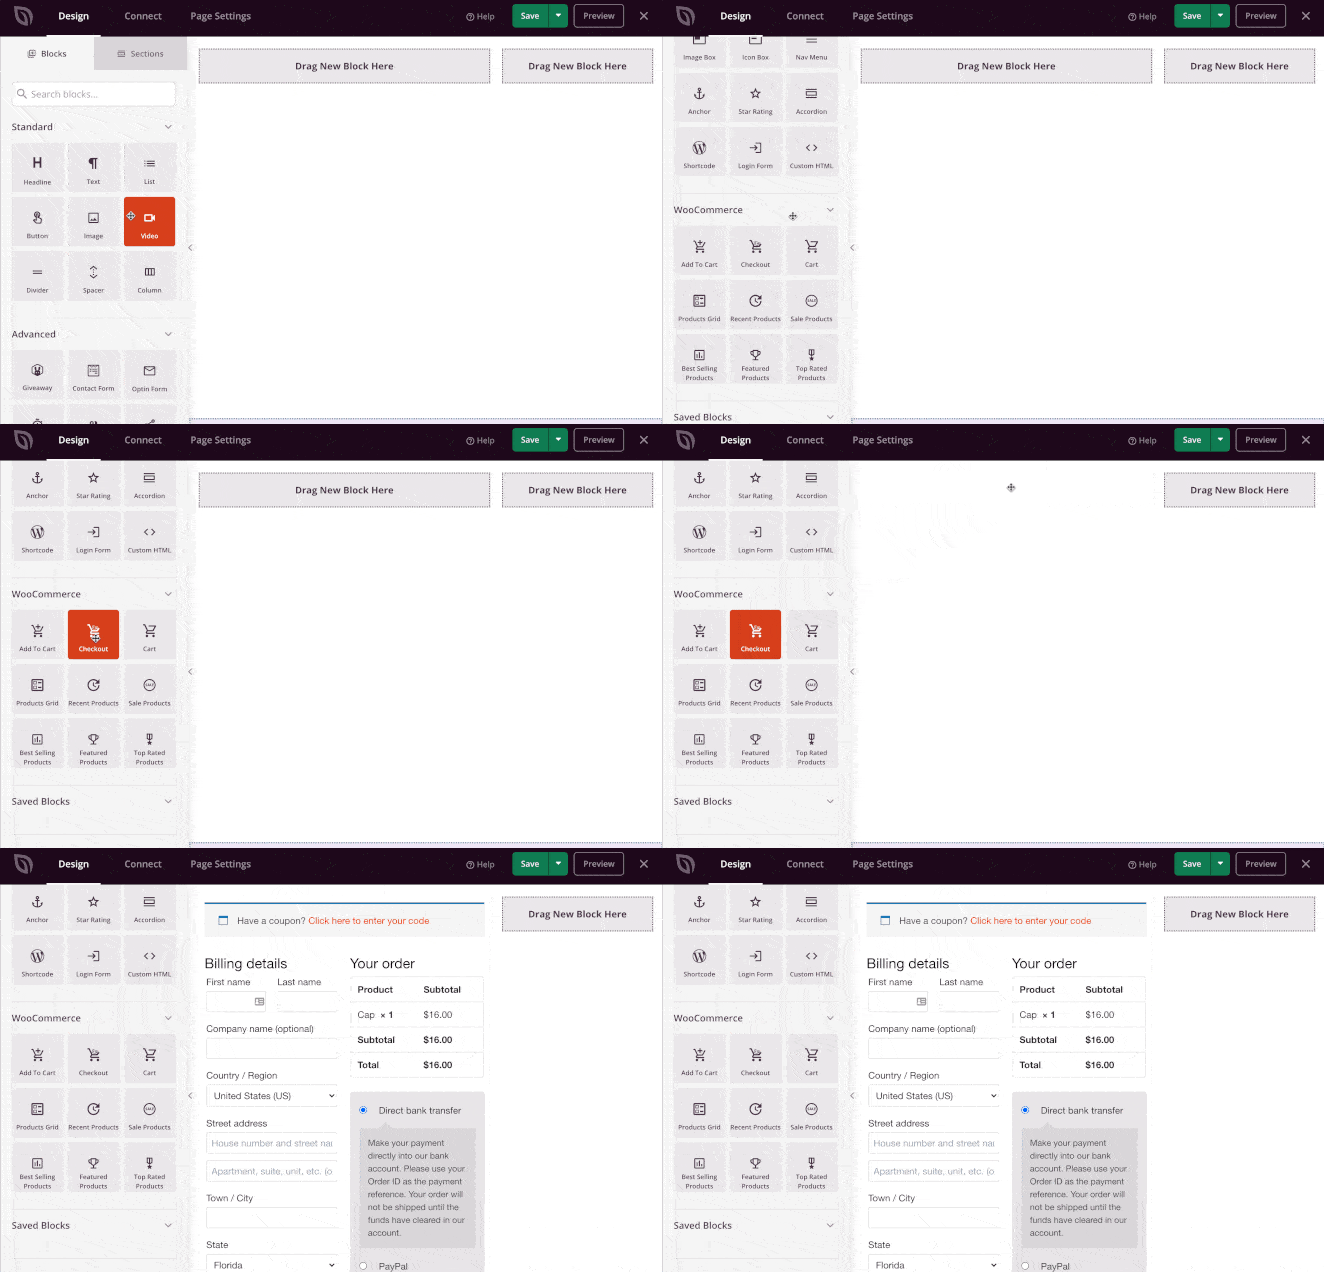
You should now see your WooCommerce checkout form right inside your landing page design. When you click your checkout form, you’ll see the form Style settings in the left-hand panel.
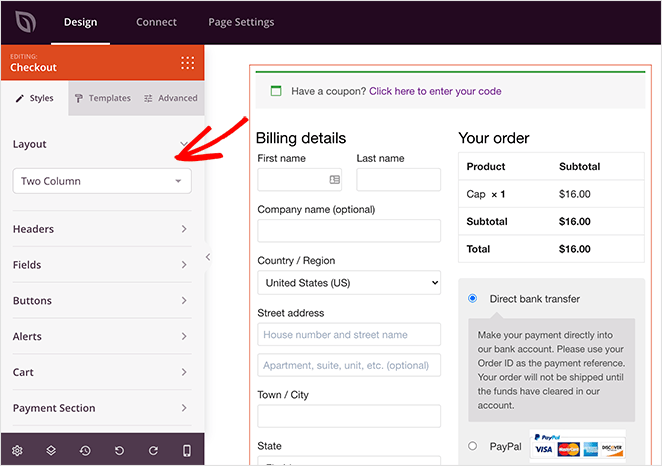
In this area, you can customize your WooCommerce checkout form by:
- Making the layout 1 or 2 columns
- Changing the header fonts and colors
- Editing the checkout fields fonts, colors, spacing, and borders
- Changing the checkout button style, font, and color
- Adding a custom alert color
- Changing the cart text, colors, borders, and fonts
- Adding custom fonts and colors to the payment details section
Now click the Templates tab, and you’ll see a variety of custom styles for your checkout fields. Click any style to add it to your checkout form instantly.
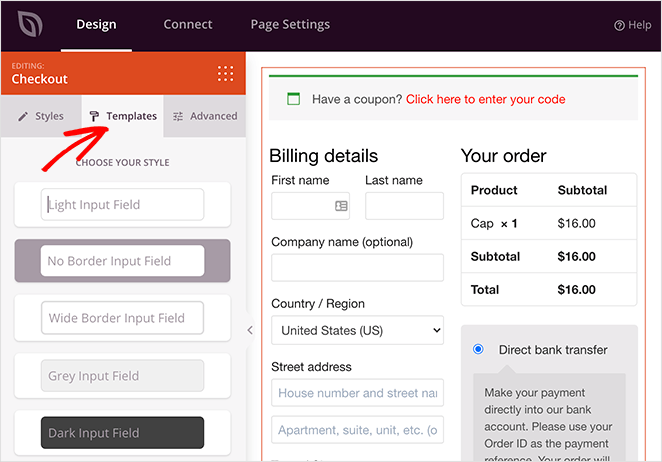
Before moving on, click the green Save button in the top-right corner of your screen to save your progress.
4. Customize Your Checkout Page Design
With your landing page now looking more like it should, let’s look at some other ways to customize your WooCommerce checkout page.
Adding a Header to your WooCommerce Checkout Page
To help customers find their way around, it’s good practice to add a header to your checkout page. SeedProd offers an easy way to do this with Sections.
Next to the blocks panel, click the Sections tab. This shows several premade layouts you can add to your page with a single click.
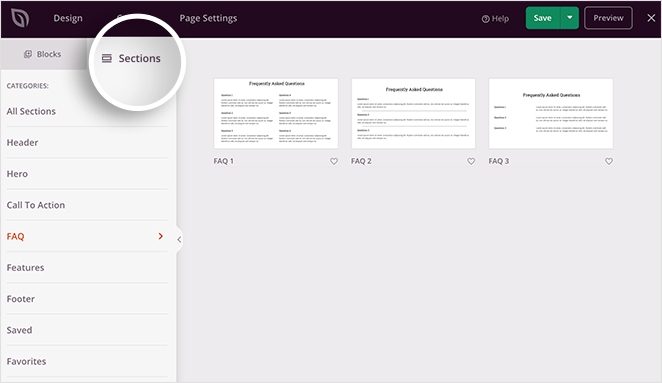
For instance, clicking the Headers section shows 3 different premade header styles. Choose a design you like and click the plus icon to import it onto your design.
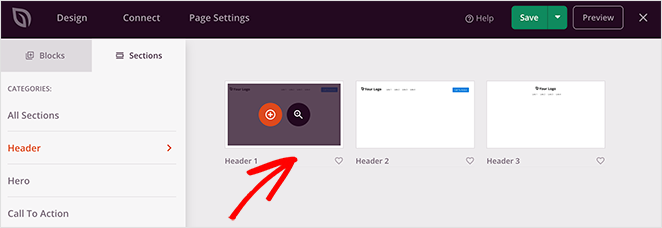
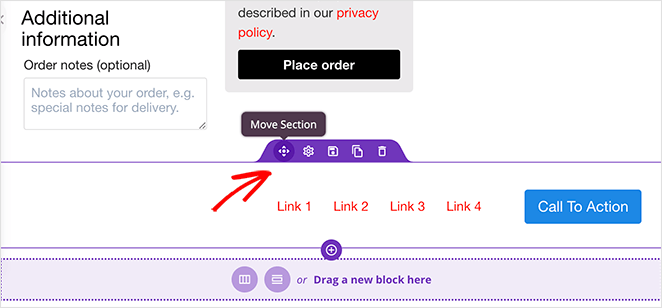
By default, any new section is added to the bottom of your page. To move it to your header area, hover your mouse over it and click the move section icon. Then drag the entire section to the top of the page.
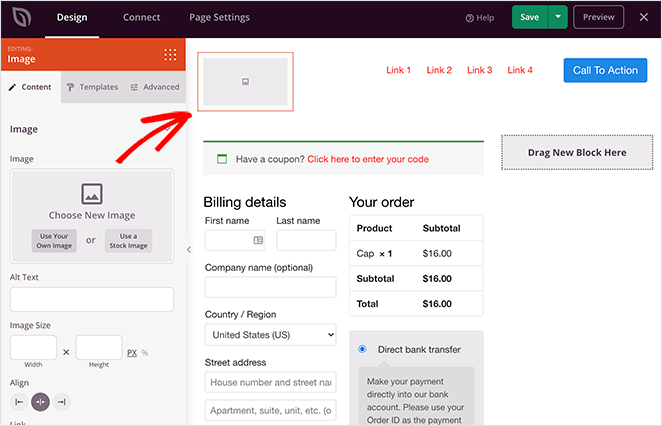
After, you can click any element inside your header section to see the customization options in the left panel. For instance, clicking the image block inside the header section lets you upload a new image to use as your logo.
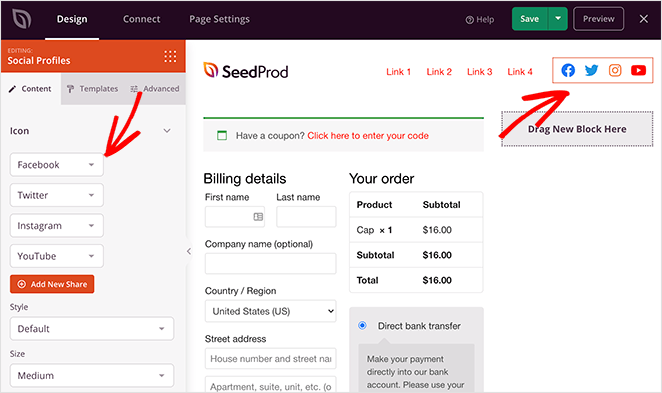
You can even delete the button block in your header and replace it with your social profile icons.
Adding Suggested Products to your WooCommerce Checkout Page
With SeedProd’s powerful WooCommerce integration, it’s easy to cross-sell and promote your products and services from any landing page. The range of product grid blocks allow you to show:
- 最近の製品
- セール商品
- ベストセラー商品
- 注目商品
- トップクラスの製品
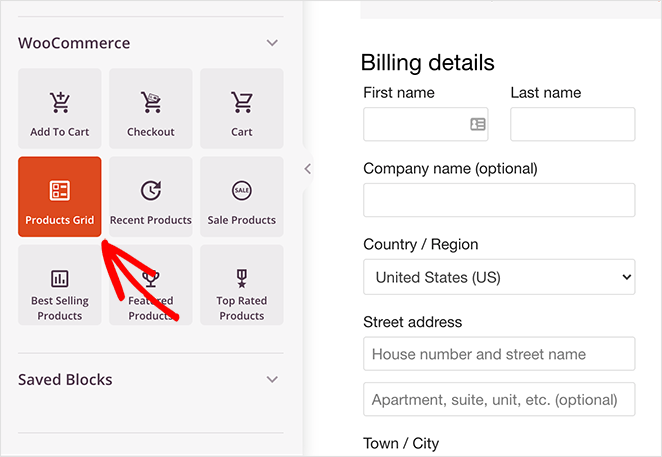
Just select the Products Grid block and drag it into place on your page. You can then click the block to see the settings in the left-hand panel.
In this panel, you can choose how many columns of products to display and add pagination to your product grid. You can also filter which products visitors see by choosing a query type from the drop-down menu.
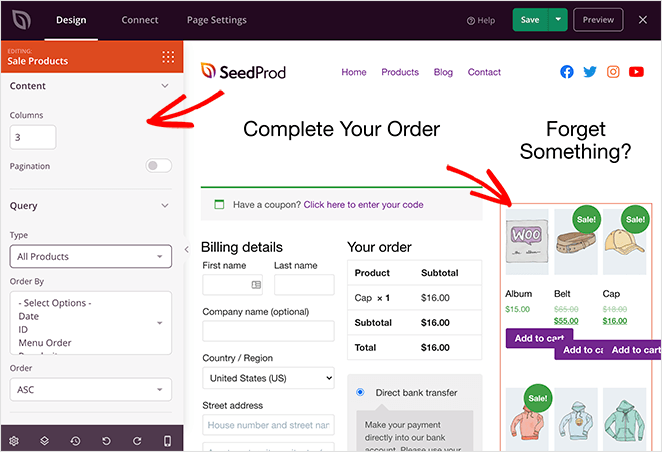
After, you can set the product order by:
- 日付
- 身分証明書
- メニューオーダー
- 人気
- Random
- 評価
- タイトル
You can also choose to show them in ascending or descending order.
Adding Testimonials to Your Checkout Page
Testimonials and star ratings are another great way to add trust and credibility to your checkout page. If potential customers see that people positively review your products, they’re more likely to complete the checkout process instead of abandoning their shopping cart.
To add customer testimonials to your WooCommerce checkout page, drag the Testimonial block from the left panel and drop it into place on your page. Then, you can click the block to see the settings and add your customer testimonials.
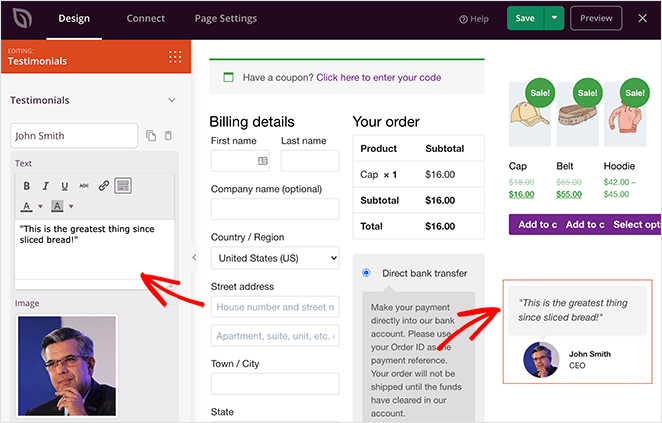
You can include as many testimonials as you like and even show it as a sliding testimonial carousel.
グローバル・カスタマイズ設定
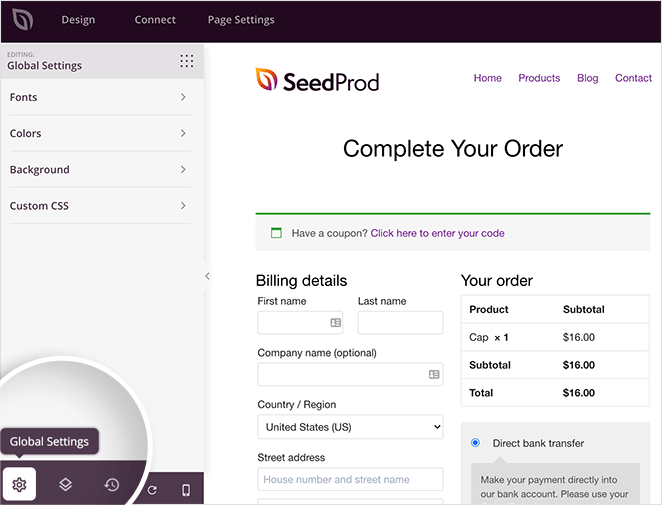
SeedProd’s global customization settings allow you to change the overall look of your WooCommerce checkout page.
Click the gear icon in the bottom-left corner of your screen. This shows a panel of Global Settings for fonts, colors, background, and custom CSS.
フォント
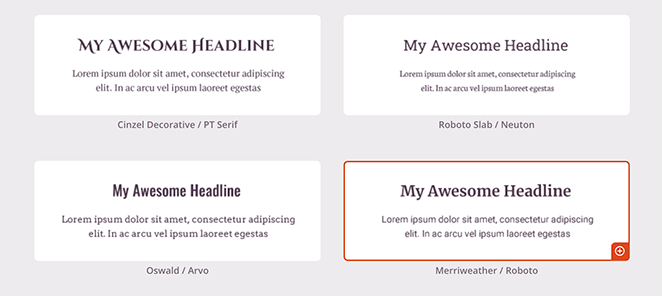
Expanding the Font heading lets you change your header and body fonts and weights. It’s as easy as picking a Google font from the drop-down menu.
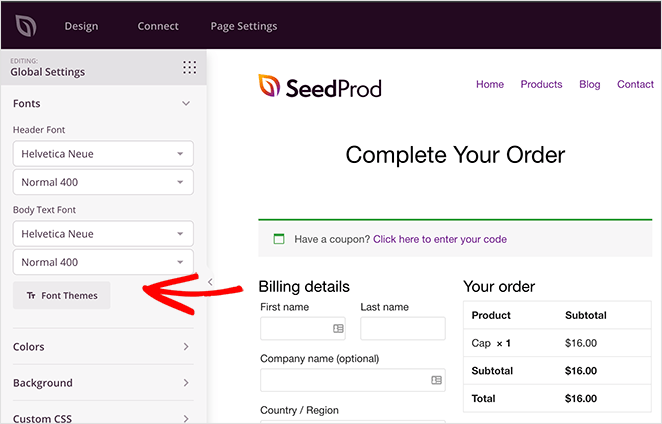
Or you can click the Font Themes button to see examples of different font pairings. From there, it’s just a click to apply them to your page.
カラー
The Colours section is similar. Click any color to see a color dropper tool and select individual colors for headings, text, buttons, and more.
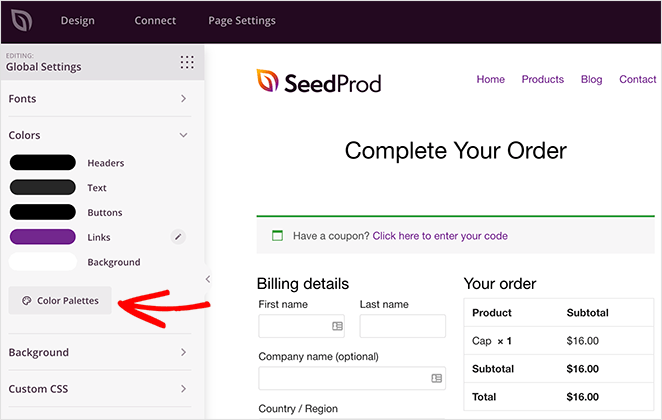
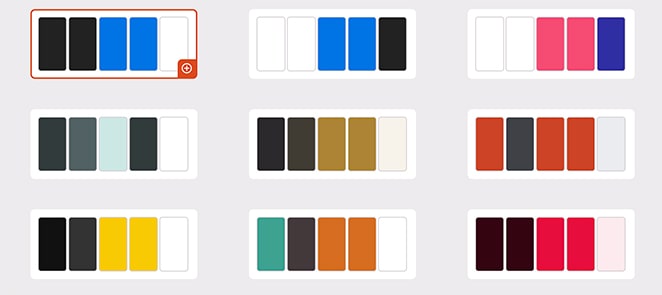
Or you can click the Color Palettes button to choose from over 20+ pre-designed color schemes.
背景
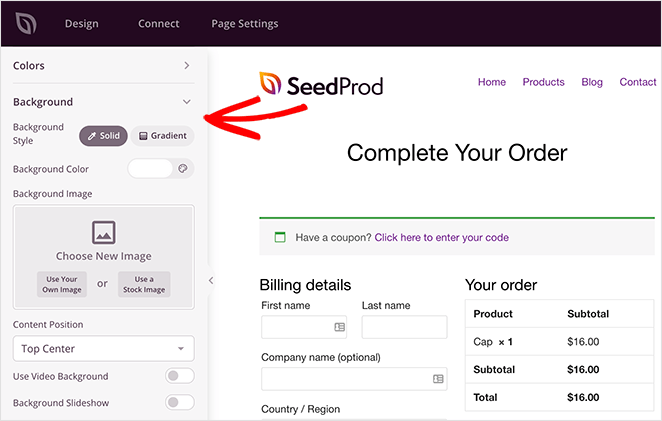
In the Background section, you can change your background color, gradient, and image. You can even add a video background or full-width slideshow.
カスタムCSS
And finally, in the Custom CSS section, you can add custom code to customize the WooCommerce checkout page even more.
When you’re happy with how everything looks, click the Save button.
5. Configure Your Checkout Page Settings
With your customizations in place, let’s look at a few other settings you can change on your checkout page.
Connecting Your Email List
First are the email marketing settings. SeedProd allows you to connect your landing page to your email list easily.
Click Connect at the top of the screen, and you’ll see a wide range of popular email marketing services. So if you want to ask users to subscribe to your newsletter on your checkout page, you use this panel to link your email marketing service.
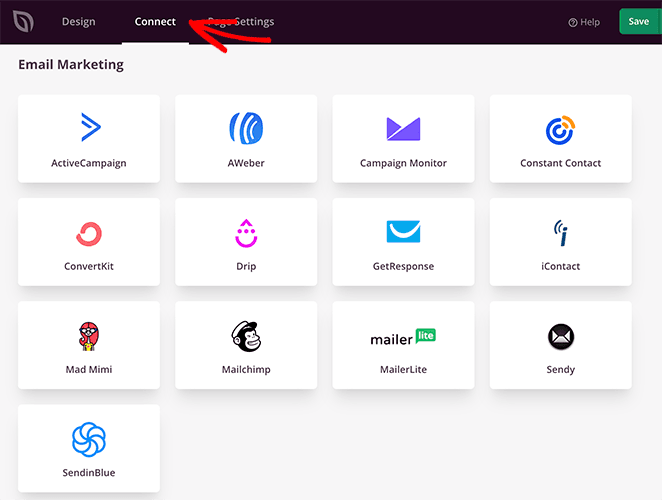
お好きなプロバイダーを選択し、Eメール統合ドキュメントの手順に従ってセットアップしてください。
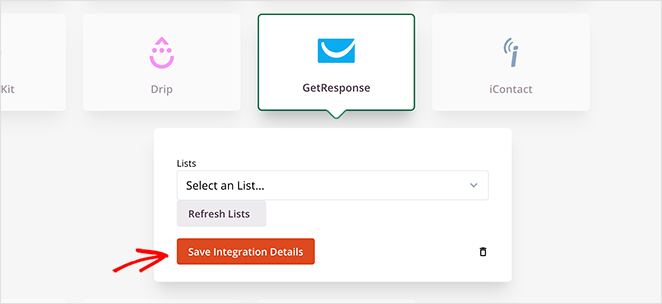
On the same screen, you can link your checkout page to thousands of apps via Zapier, monitor your site performance with Google Analytics, and protect it from spam with Recaptcha.
Configuring Your Page Settings
After connecting your email list, click the Page Settings tab to see other settings you can configure in SeedProd. There are typically 5 sections on the settings page, but this depends on the type of page you build and your SeedProd plan.
一般設定

The General settings allow you to change the name and URL for the WooCommerce checkout page. You can also switch between published and draft.
If you want to avoid any plugin conflicts and speed up your page, you can enable Isolation Mode. This stops specific header and footer scripts from running and interfering with your performance.
SEO and Analytics
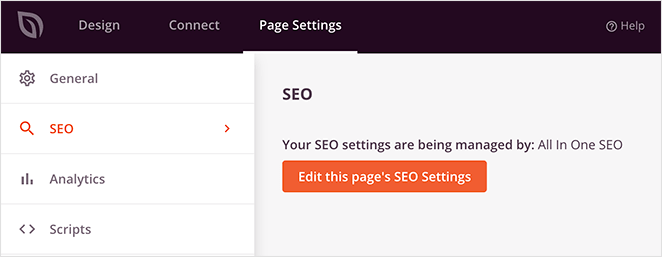
Under the SEO tab, you can use a WordPress SEO plugin to configure your landing page title tag, meta description, etc. One of the best plugins for this is All In One SEO.
The same is true for the Analytics tab. Here you can connect your favorite Google Analytics plugin and monitor your landing page performance. Why not try MonsterInsights for Google Analytics?
If you want more details, you can always check out our MonsterInsights review.
スクリプト
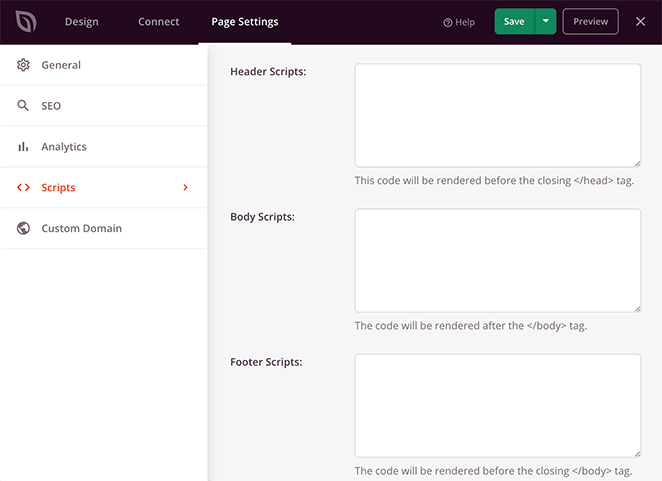
In the Scripts area, you can add code to your page header, body, and footer. This could be anything like your tracking cookies, Facebook tracking pixel, or even your analytics script.
カスタムドメイン
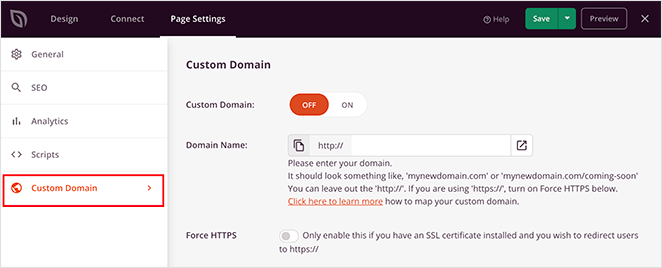
If you’re a user of SeedProd’s Pro Plan, you can give any landing page a custom domain that isn’t connected to your existing website.
For example, if you want to launch a new website and haven’t set it up, you can create a coming soon page in SeedProd on your existing website and point it to your new site.
この戦術を使えば、WordPressを新たにインストールすることなく、将来のウェブサイトのリストに新しい購読者を誘導することができる。
設定後、変更を保存し、デザインタブに戻ります。
6. Publish Your Custom Checkout Page
Before you make your checkout page live, it’s a good idea to test it on mobile devices. If your checkout page isn’t mobile-responsive, it won’t look and perform as well on smaller touch screens like tablets and smartphones.
It could even cause users to abandon their shopping carts out of frustration.
The good news is, SeedProd has a built-in mobile preview option so that you can check your page is mobile-friendly. Just click the mobile icon at the bottom of your screen.
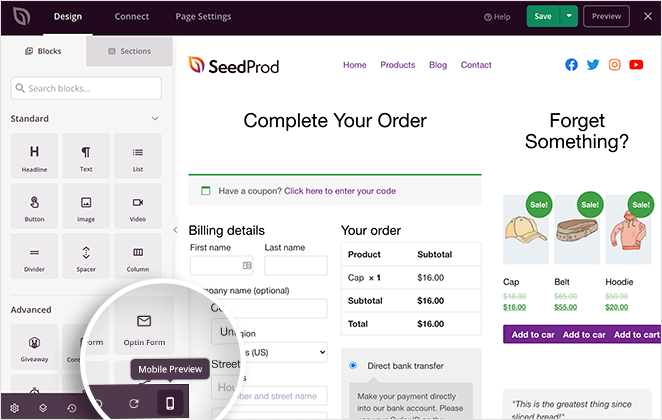
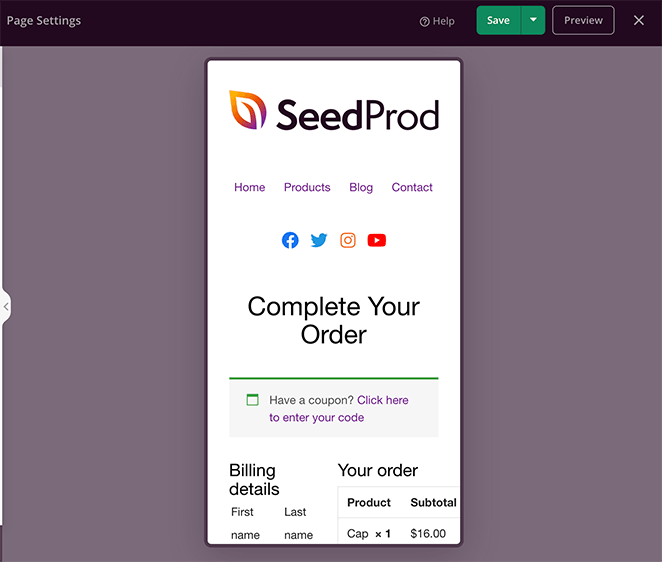
Now you can see how your checkout page looks on mobile and change anything that doesn’t look or work correctly.
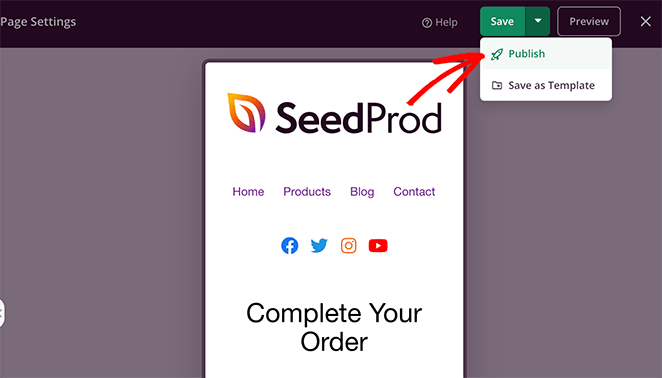
When everything looks great, it’s time to publish. Click the down arrow next to the green Save button and click Publish.
Now you can visit the page to see it in action.
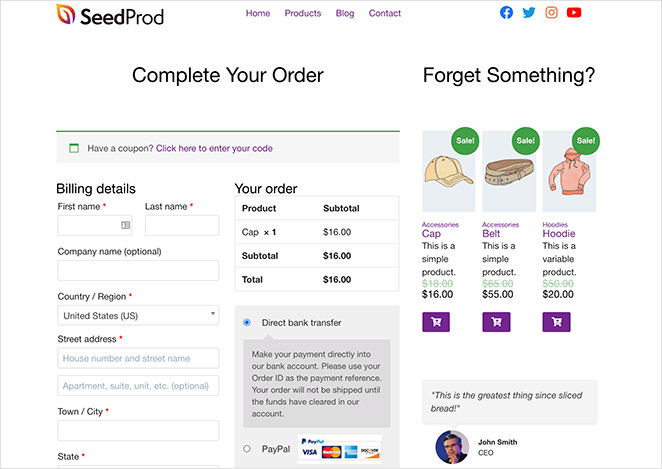
Great work! You now have an awesome customized WooCommerce checkout page!
7. Assign Your Checkout Page in WooCommerce
There’s 1 one more step until your new checkout page is ready to take orders. You need to set it as your default checkout page in WooCommerce.
To do that, navigate to WooCommerce » Settings and click on the Advanced tab. Next, go to the Checkout page heading, and choose the page you just page from the drop-down menu.
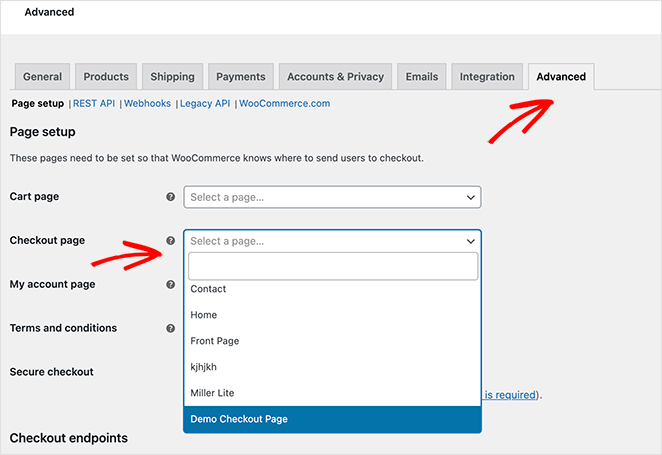
Remember to click the Save Changes button to store your settings.
それで終わりだ!
You now know how to customize the WooCommerce checkout page with SeedProd’s landing page builder. SeedProd’s WooCommerce integration makes controlling the design of your online store super easy.
Not only is the plugin fast and bloat-free, but it’s also so easy to use that even beginners can create a customized store without hiring a developer.
だから、自分で試してみてはどうだろう?
While you’re here, you might also find the following WooCommerce guides helpful:
- How to Customize the WooCommerce Additional Information Tab
- How to Add View Cart Button in WooCommerce
- WooCommerceでショップページのタイトルを変更する方法
- WooCommerceで美しい商品画像ギャラリーを作成する方法
- How to Add Star Rating to WooCommerce Product Pages
- How to Display Related Products in WooCommerce
- WooCommerceで商品カテゴリーとタグを表示する方法
- WooCommerceで商品説明を取得して表示する方法
- How to Display Featured Products in WooCommerce
- WooCommerceのカートが表示されない場合の対処法
- WooCommerceのカート追加ボタンをカスタマイズする方法
- メニューにWooCommerceショッピングカートのアイコンを追加する方法
- WooCommerceで商品カテゴリーページをカスタマイズする方法
- How to Add a New Products WooCommerce Section to WordPress
お読みいただきありがとうございました!ご質問やご意見がありましたら、お気軽にコメントをお寄せください。
また、YouTube、X(旧Twitter)、Facebookでも、ビジネスの発展に役立つコンテンツを配信しています。

