For a long time, I let WooCommerce handle related products on its own. I’d set up a few upsells or cross-sells and moved on. But I started noticing how often customers left without exploring anything else, especially when the suggestions didn’t match what they were really looking for.
I began testing different ways to display related products. I moved them higher on the page, added them to the cart, and used SeedProd to design layouts that actually made sense. Those small changes led to more clicks and bigger orders.
In this guide, I’ll show you how to display WooCommerce related products using both the built-in tools and a drag-and-drop visual builder, based on what’s worked best for me.
Quick Summary: How to Show Related Products in WooCommerce
- Set up linked products in WooCommerce
Use the default product editor to add upsells and cross-sells to individual items. - Display related products without using a plugin
Let WooCommerce automatically show suggestions based on product categories and tags. - Customize related product layouts with SeedProd
Use a drag-and-drop builder to control where and how related items appear across your store. - Add product recommendations to your cart or checkout page
Encourage last-minute purchases right before checkout using SeedProd blocks. - Show upsell offers on single product pages
Swap out WooCommerce’s defaults with a cleaner, higher-converting layout.
| 特徴 | Default WooCommerce | SeedProd Builder |
|---|---|---|
| Setup Difficulty | Moderate (product-by-product) | Easy (drag and drop) |
| Design Control | 限定 | Full visual control |
| Placement Options | Product page only | Product, cart, or anywhere |
| Custom Layouts | Not supported | Fully customizable |
| Upsells & Cross-Sells | はい | はい |
| Mobile Preview | いいえ | はい |
| Plugin Required? | いいえ | Yes (SeedProd) |
That said, let’s look at how to display related products in WooCommerce.
How to Set Up Related Products in WooCommerce (No Plugin Needed)
If you don’t want to change your WooCommerce theme or add a related products plugin to your site, store owners can display related products using the default WooCommerce settings.
This method doesn’t offer many customization options, but it provides an easy way to upsell and cross-sell products to increase the average order value of store sales.
Step 1. Add Linked Products in the WooCommerce Editor
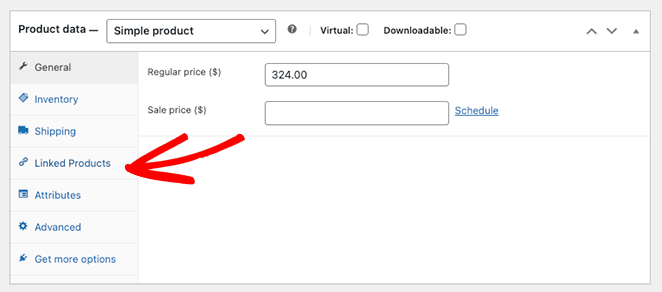
First, go to Products » All Products from your WordPress admin and edit any WooCommerce product. Inside the product options, scroll down to the Product Data section and find the Linked Products tab.
Step 2. Choose Upsells and Cross-Sells for Each Product
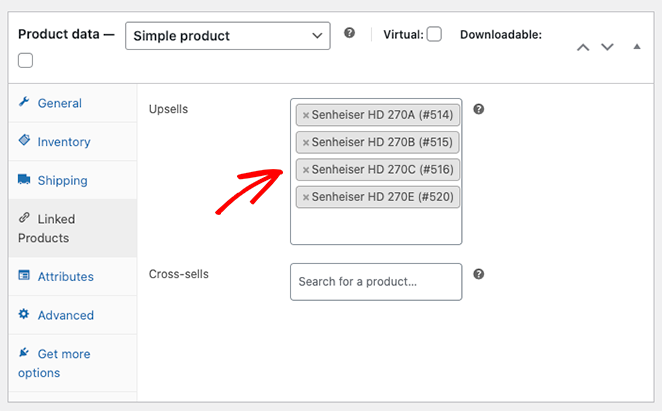
The Linked Products section has 2 different options: Upsells and Cross-Sells.
Remember, upsells are items similar to the original product but with a higher price tag. Cross-sells are similar products that shoppers may want to buy in addition to the main product.
Start typing product names into the field you wish to use and click the correct items when they appear.
Step 3. Preview Related Products on the Product Page
After adding cross-sells or upsells to your WooCommerce products, scroll up the page and click the Preview Changes button.
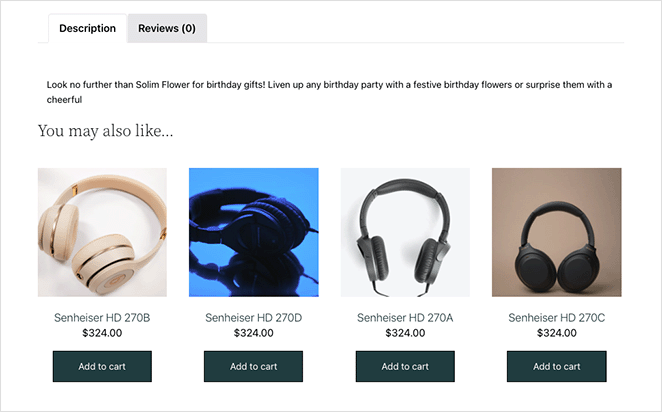
You’ll see the related products under your current product description.
How to Customize WooCommerce Related Products With SeedProd
Now, let’s look at how to show custom related product recommendations with SeedProd.
SeedProd one of the best drag-and-drop website and page builder for WordPress. It lets you create and customize any part of your WordPress site visually and without code.
You can also use SeedProd to customize your WooCommerce store. With full WooCommerce website templates and powerful WordPress blocks, you can tailor your online store to your specific design needs without hiring a developer.
For example, you can create custom product category pages, configure product feature descriptions, and even add a menu cart to your store’s navigation.
This method will replace your current WooCommerce theme with a custom design.
It doesn’t require code, shortcodes, child themes, add-ons, or recommended product plugins. You won’t even need to edit your functions.php file. Instead, you can customize everything visually with zero fuss.
So follow the steps below to easily add new recommended products to WooCommerce with SeedProd’s Theme Builder.
Step 1. Install and Activate SeedProd With WooCommerce Support
To get started with this method, you’ll need to get the Elite version of SeedProd.
It comes with full WooCommerce support and all the blocks and sections you’ll need to customize, cross-sell, and upsell products on your store.
After choosing your plan and creating your account, head to the Downloads tab of your SeedProd account and download the plugin.
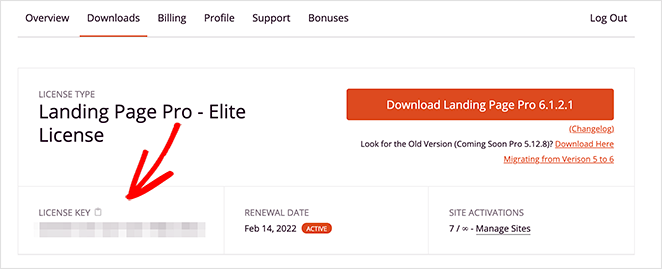
While you’re there, copy your product license key, as you’ll need that shortly.
Now go to your WordPress website and upload the SeedProd .zip file to your store. If you need help with this, you can follow these instructions on installing and activating a WordPress plugin.
Once the plugin is active, navigate to SeedProd » Settings, and paste the license key you copied a few moments ago into the available field.
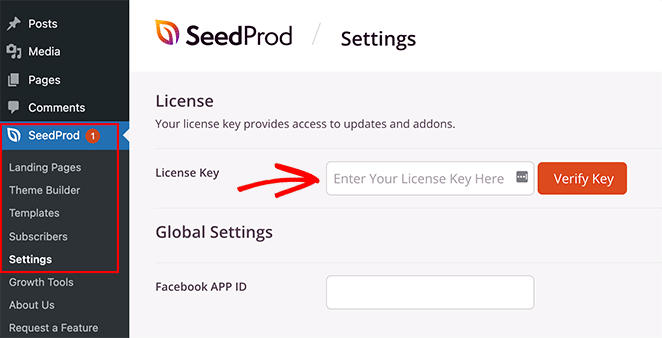
Click the Verify Key button, and you’re ready to start customizing your WooCommerce site.
Step 2. Choose a WooCommerce Template Kit in SeedProd
Next, go to SeedProd » Theme Builder from your WordPress dashboard. This is where you’ll be able to customize every part of your WooCommerce theme, but first, you’ll need to choose a template.
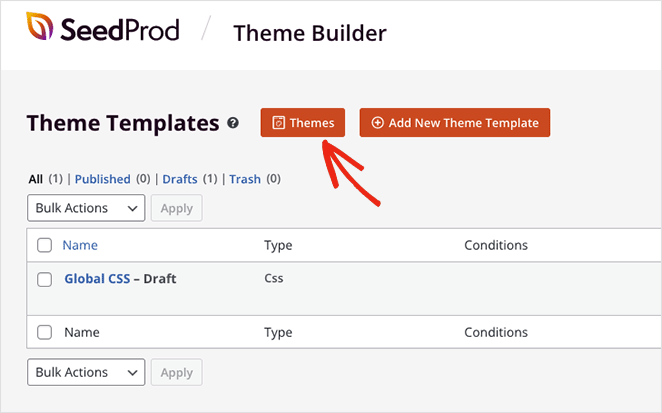
To choose a template, click the Themes button.
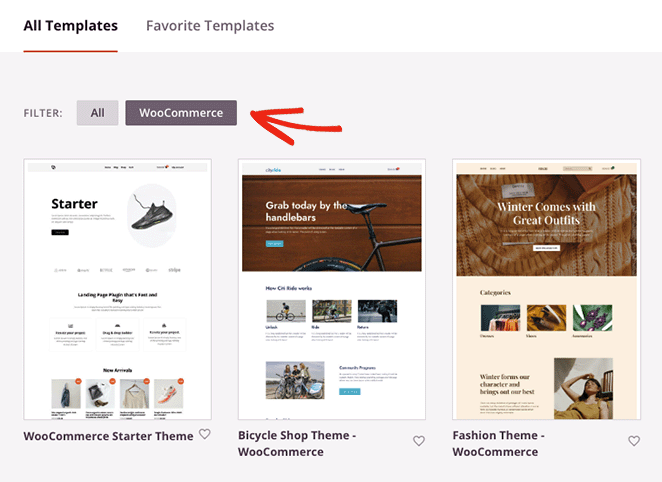
You can also select the WooCommerce filter to see only WooCommerce template kits.
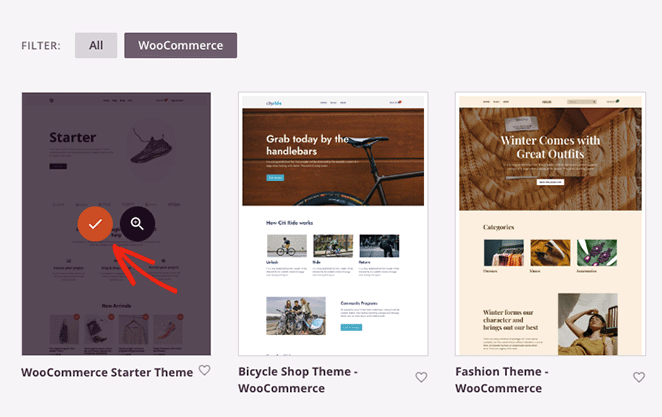
Once you find a kit you like, hover over it and click the checkmark icon.
SeedProd will import the whole kit to your WordPress site, including product pages, shopping carts, checkouts, product archives, and shop pages. You can see all of these template parts in the Theme Builder dashboard.
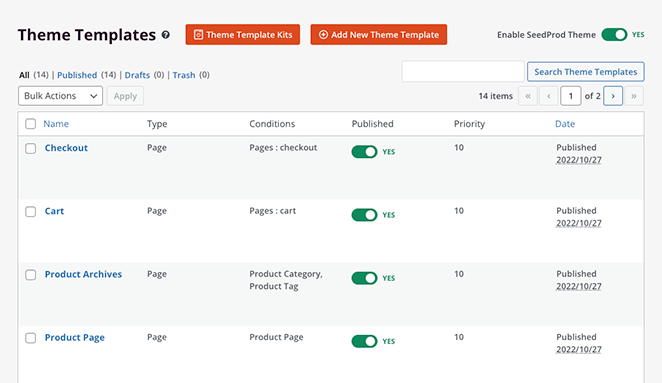
You’ll also find that SeedProd automatically creates content pages like any about, contact, and service pages from the template demo. You can find those pages in the default WordPress pages menu, where you can click to edit them with SeedProd’s drag-and-drop builder.
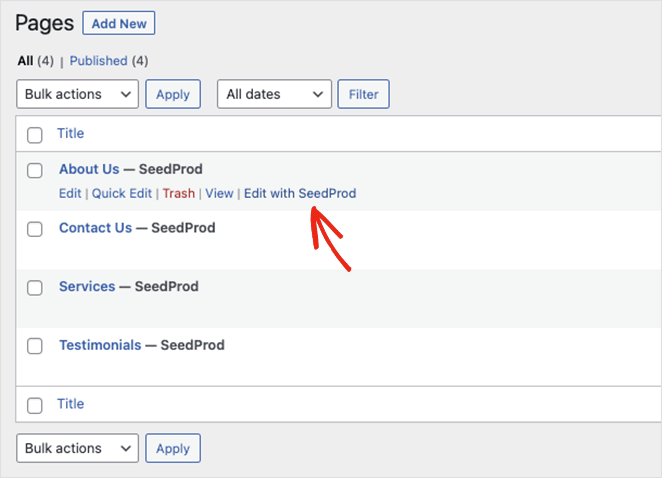
After installing your template, you’re ready to start adding related products to your store. Let’s start by showing related products on the cart page.
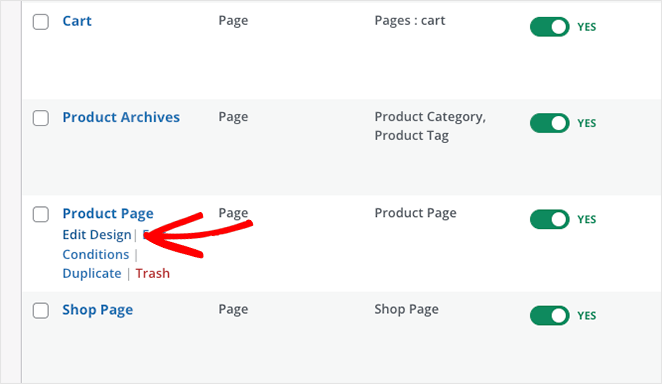
To edit your cart page, ensure you’re in the Theme Builder dashboard, find the Cart template, hover over it, and click the Edit Design link.
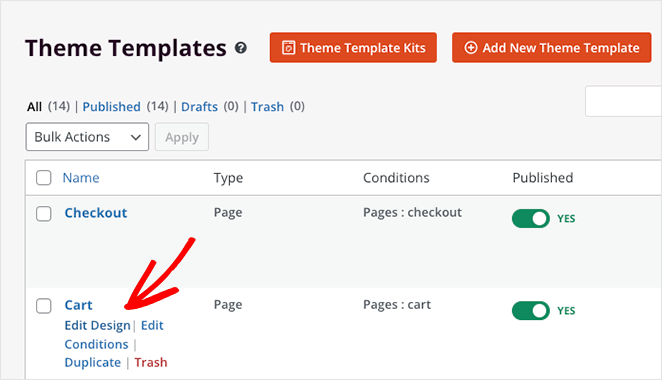
Your shopping cart page will now open in SeedProd’s visual editor.
Step 3. Add Related Products to Your Cart Page Layout
When your cart page opens, you’ll see it has a 2-column layout with WordPress blocks and sections on the left and a live preview on the right.
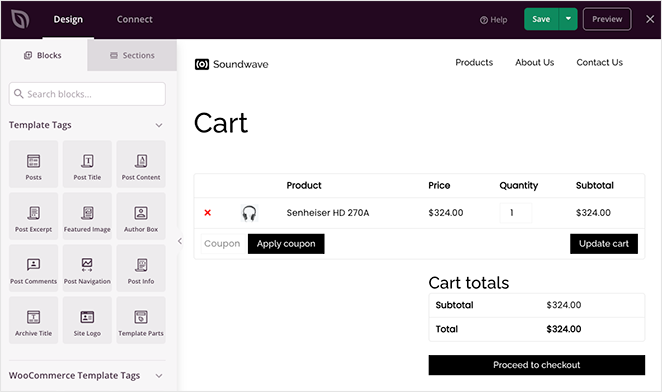
Clicking anywhere on the preview lets you customize that block’s settings and styling options with a few clicks. For example, the Cart block settings let you change the typography, button styles, field colors, and more.
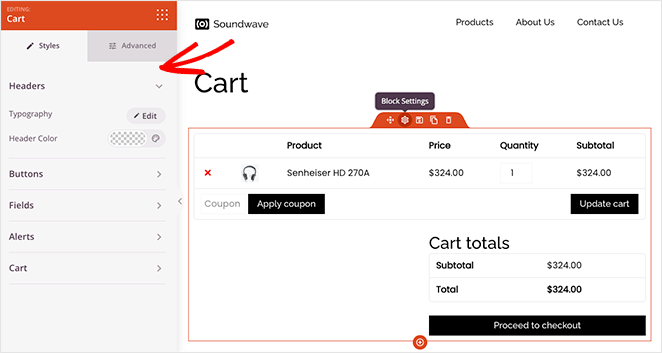
Adding related products to your cart page is super easy with SeedProd.
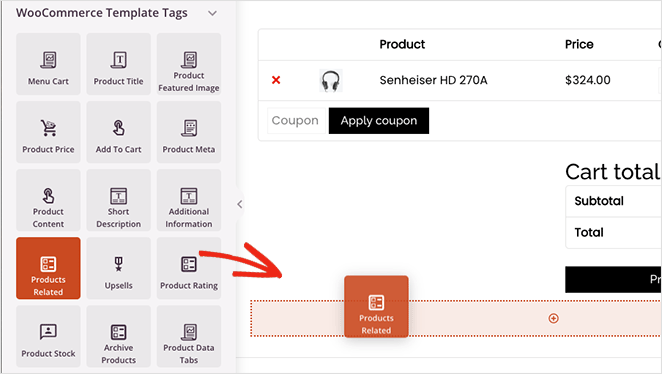
Scroll to the WooCommerce Template Tags heading in the left sidebar and find the Products Related block. Now click and drag the block into place on your page preview.
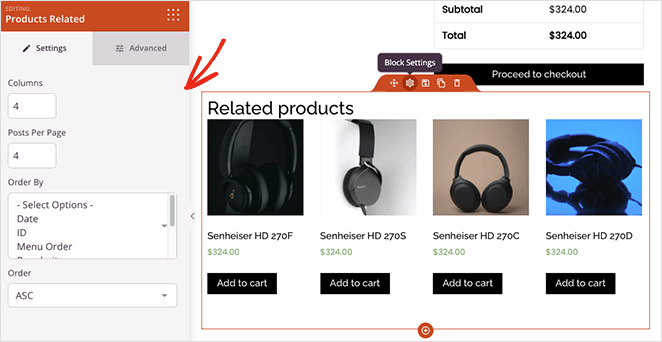
Inside the block settings, you can adjust the columns and change the number of related products. You can also order specific products by choosing an option in the drop-down menu:
- 日付
- Product ID
- メニューオーダー
- 人気
- Random
- 評価
- タイトル
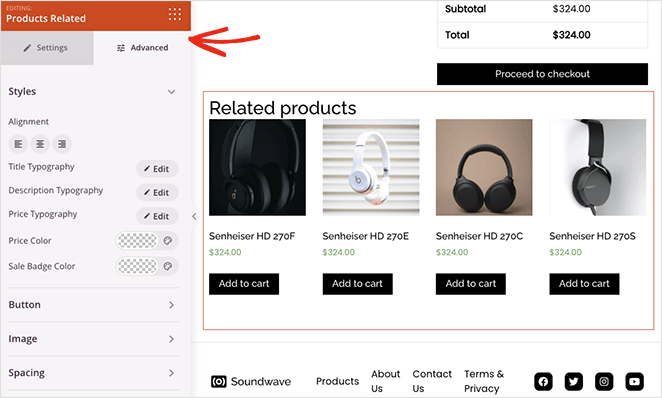
In the Advanced settings tab, you can adjust the styling of your related products block. For instance, you can change the typography, colors, buttons, image shadows, and more.
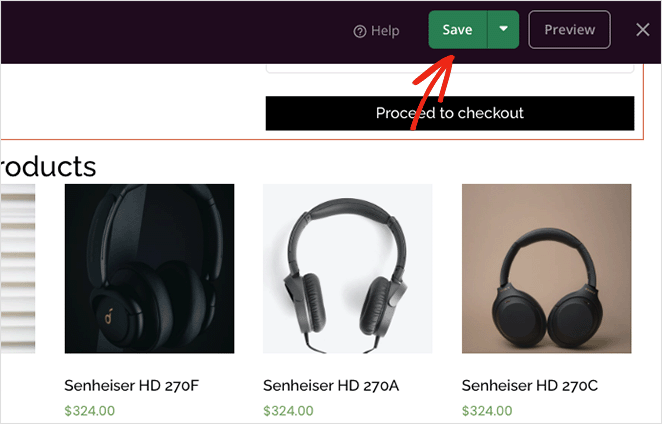
When you’re happy with how everything looks, click the Save button in the top-right corner of your screen.
Now let’s look at how to up-sell products in WooCommerce with SeedProd.
Step 4. Show Upsell Offers on Single Product Pages
If you want to up-sell WooCommerce products, you can use SeedProd’s Upsell block. But first, you’ll need to link products in your WooCommerce product settings by following the steps in Method 1.
SeedProd’s Upsell block only works on single product page templates, so you’ll need to head back to the Theme Builder dashboard and edit your Product Page template.
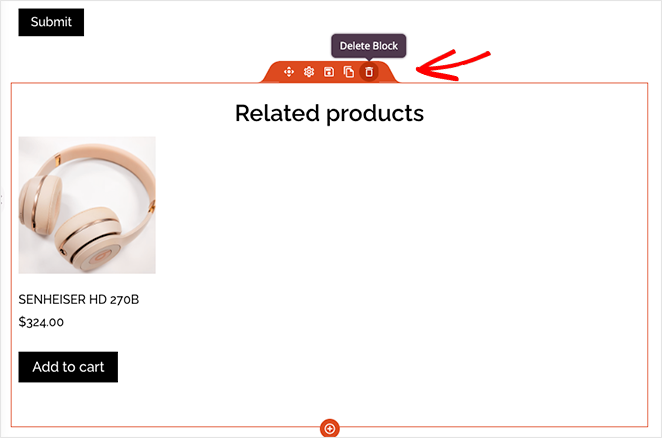
The template we’re using already features product recommendations. So let’s remove related products by clicking the trashcan icon.
Next, find the Upsell block in the WooCommerce Template Tags section and drag it onto your page.
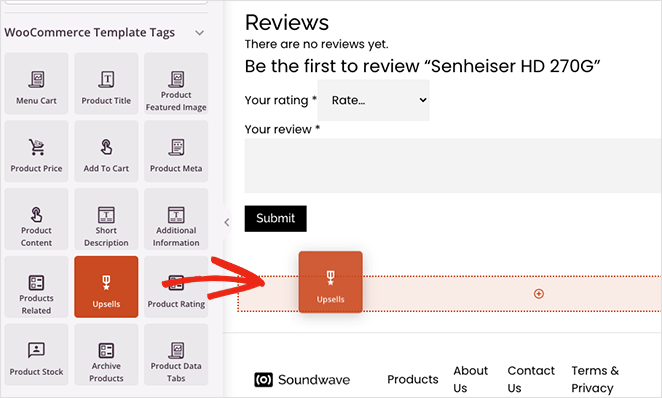
You won’t see a live preview of this block, but you can customize it like the related products block.
Continue customizing your WooCommerce site until you’re happy it looks the way you want. And don’t forget to click the Save button to save your changes regularly.
Step 5. Publish Your Theme and Make It Live
When you’re ready to make your changes live on your website, go to the Theme Builder page and find the Enable SeedProd Theme toggle. Turn it to the “Yes” position, and your changes will be published.

Now you can preview your individual product pages and cart pages to see similar product recommendations.
Here is an example of the cart page:
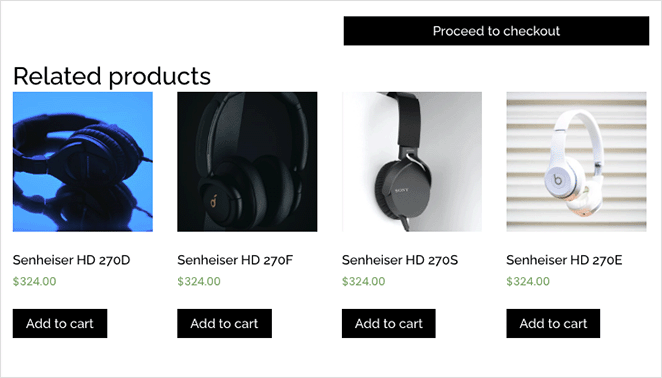
And here are the upsell examples on the product page:
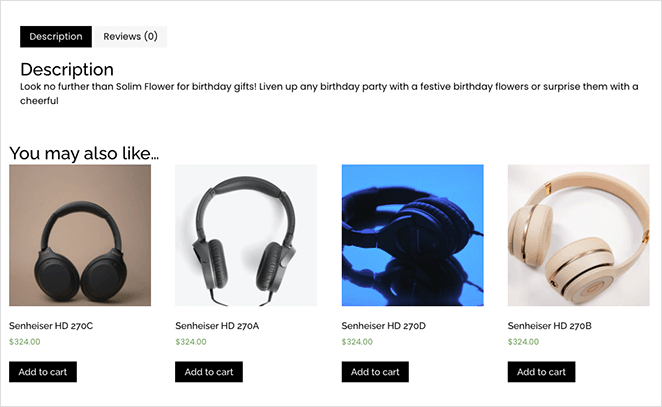
If you want to hide related products, simply remove the new section from your page.
そうだ!
Frequently Asked Questions About Related Products in WooCommerce
Showing related products in WooCommerce isn’t just about filling space on the page. It’s a simple way to help shoppers find more of what they want, and it can quietly boost your revenue in the process.
If you’re happy with the default setup, WooCommerce gives you what you need to get started. But if you want more control over how things look and where they appear, SeedProd makes it easy to customize everything without writing a single line of code.
You might also like these other WooCommerce tutorials and tips:
- Best WooCommerce Plugins for Your Store
- How to Add Custom Add to Cart Buttons in WooCommerce
- How to Make a WooCommerce Thank You Page (Easily)
- How to Customize the WooCommerce Additional Information Tab
- How to Add View Cart Button in WooCommerce
- WooCommerceでショップページのタイトルを変更する方法
- WooCommerceで美しい商品画像ギャラリーを作成する方法
- How to Add Star Rating to WooCommerce Product Pages
- WooCommerceで商品説明を取得して表示する方法
- How to Display Featured Products in WooCommerce
- How to Hide Out of Stock Products in WooCommerce
お読みいただきありがとうございました!ご質問やご意見がありましたら、お気軽にコメントをお寄せください。
また、YouTube、X(旧Twitter)、Facebookでも、ビジネスの発展に役立つコンテンツを配信しています。

