

Trust badges in WooCommerce are small icons that tell shoppers your store is safe and reliable. They show that payments are secure, personal data is protected, and your business can be trusted.
The easiest way to do this without code is by using a drag-and-drop builder like SeedProd. It lets you add and place trust badge images exactly where you want them on your checkout page.
In this guide, you’ll learn how to add trust badges to your WooCommerce store and place them where they have the biggest impact on sales.
Why Trust Badges Matter in WooCommerce
Trust badges increase conversions by reducing any hesitation or worry customers might feel when it’s time to pay. In my experience working with dozens of ecommerce stores, I’ve seen that first impressions are critical. When someone visits for the first time, they’re looking for signs you can be trusted.
A few small badges instantly show that your site is secure, your payments are verified, and your brand stands behind its promises. Here are the most common types I recommend:
| Badge Type | Purpose |
|---|---|
| Secure Checkout / SSL Badges | Prove your site uses encryption to protect customer data. |
| Payment Processor Logos | Recognizable options like PayPal, Stripe, Visa, or Mastercard add credibility. |
| Money-Back Guarantee | Reassures customers that shopping with you is risk-free. |
| Free Shipping / Satisfaction Guarantee | Builds goodwill and confidence before the purchase. |
According to the Baymard Institute, the average documented online shopping cart abandonment rate is around 70.2%, and security concerns are a major factor. Adding familiar trust badges near your checkout button helps ease those worries and turn hesitant visitors into paying customers.
How to Add Trust Badges to WooCommerce Using SeedProd
SeedProd is a drag-and-drop WordPress website builder plugin that lets you create custom WooCommerce pages, including checkout pages, without writing any code. With it, you can add trust badges to your checkout page in just a few minutes.

Here’s how to get started.
Step 1: Install and Activate SeedProd
First, visit the SeedProd website and get the Elite plan, which includes WooCommerce support.
Once you’ve purchased your plan, download the plugin from your SeedProd account area. Then follow this step-by-step guide in our documentation: How to Install the SeedProd Plugin. You can install it by going to Plugins » Add New » Upload Plugin in your WordPress dashboard and selecting the downloaded file.
After installation, activate the plugin and enter your license key under SeedProd » Settings to unlock the WooCommerce blocks.

Step 2: Create a Custom Checkout Page
Go to SeedProd » Pages and click Add New Landing Page.
When prompted, enter your page name, for example, “Checkout”, then click Next: Choose Template.

Select the Blank template for full control over your layout, and click the checkmark icon to import it.

This opens the SeedProd drag-and-drop builder, where you can design your checkout visually without code. You can add sections, columns, and WooCommerce blocks to match your store’s branding and layout style.

To start with, I have added a headline block, and a two column layout, which forms the basic structure of my page.
Tip: A clean, simple design helps customers focus on completing their orders.
Step 3: Add the WooCommerce Checkout Block
In the SeedProd builder, open the WooCommerce section from the left sidebar.
Drag the Checkout block onto your layout where you want the form to appear. You can place it in a single-column or two-column section depending on your design preference.

Once added, the block will automatically display your store’s checkout fields. You can use the settings panel on the left to adjust fonts, colors, buttons, and spacing to match your branding.

For extra credibility, you can also add a Testimonials block or Star Rating block above or below the checkout form to show customer feedback and boost trust. For a walkthrough on how to do this, see our guide on how to add testimonials to WordPress.
Tip: Preview your design regularly using the desktop and mobile icons at the bottom to ensure your checkout looks great on every device.
Step 4: Add Trust Badges Using the Image Block
Next, it’s time to add your trust badges. In the left sidebar, search for the Image block and drag it below or beside your checkout section.

Click the image area and upload your trust badge graphic. This could be an SSL Secure badge, payment provider logo (PayPal, Stripe, Visa, Mastercard), or a Money-Back Guarantee icon. You can typically download these logos directly from your payment provider’s website or find free icons on trusted stock image sites.
Once uploaded, you can adjust the alignment, size, and spacing in the settings panel.
Keep your badge images lightweight — ideally under 100 KB each — so they don’t slow down your checkout page. You can use tools like TinyPNG to compress them before uploading.
Optionally, add a short reassurance line beneath your badges, such as:
“Your information is 100% secure — safe checkout guaranteed.”
Step 5: Optimize Placement for Maximum Trust
Where you place your trust badges can make a big difference in how effective they are. The goal is to position them where customers need reassurance most, right before completing their order.
Here are a few high-performing placements to try:
- Directly below the payment section
- Beside the Place Order button
- In a footer or small secondary column on your checkout page
After placing your badges, use the mobile preview option at the bottom of the builder to check how they appear on smaller screens. Make sure badges are still clear and evenly spaced on mobile devices.
Step 6: Publish and Assign Your Page to WooCommerce
When you’re happy with your design, click the Save button in the top-right corner of the SeedProd builder, then select Publish.

Next, you’ll need to assign this new page as your store’s official checkout page in WooCommerce.
Go to WooCommerce » Settings » Advanced, and under the Checkout Page dropdown, select the page you just created with SeedProd.

Click Save Changes at the bottom of the screen to confirm. Your custom SeedProd checkout page will now replace the default WooCommerce checkout.

Tip: Test your new checkout page by placing a test order. Make sure all payment methods, form fields, and trust badges display correctly on desktop and mobile.
Alternative Ways to Add Trust Badges in WooCommerce
While SeedProd offers total design control, several alternative plugins provide faster, more focused methods for adding trust badges to your WooCommerce checkout. Here are three popular options worth considering.
Method 1: Add Trust Badges with WPCode (Free Option)
WPCode is a WordPress plugin that allows you to safely add custom code snippets to your site without editing theme files. It’s a simple way to add trust badge snippets to your checkout.
Install and activate the WPCode plugin, then go to Code Snippets » + Add Snippet. Choose the Custom Code option and paste your trust badge HTML or image code.

Under the Insertion settings, choose to insert your snippet before or after the checkout form. Save and activate your snippet to see your badges live on the page.
- Pros: Lightweight and free.
- Cons: Requires basic HTML familiarity.
Method 2: Add Trust Badges with Merchant by aThemes
Merchant by aThemes is a WooCommerce toolkit that includes a dedicated module for adding trust badges with minimal setup, making it a quick, no-code option.
Install and activate Merchant, then go to Merchant » Modules and enable the Trust Badges module.
You can choose from pre-designed badges or upload your own. Customize their size, border, and message, for example, “Secure Checkout Guaranteed”, then save your settings to apply them site-wide.
- Pros: No coding required, quick setup.
- Cons: Limited design flexibility.
Method 3: Build a Checkout with Built-In Badges Using FunnelKit
FunnelKit is an advanced sales funnel builder for WooCommerce that offers pre-built checkout templates with trust badges included.
Go to FunnelKit » Store Checkout and click Create Store Checkout. Choose a pre-built template (for example, “Hific”) that includes built-in trust badges.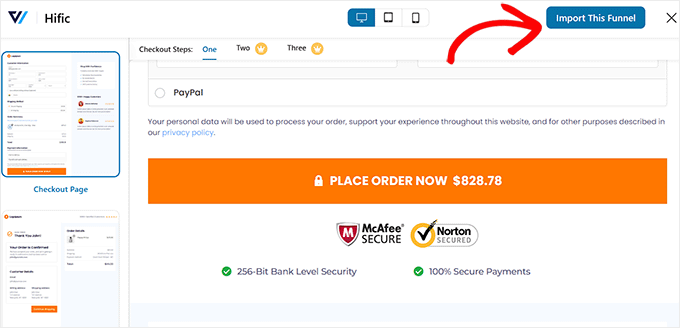
Edit your layout, customize the design, and publish your funnel. You’ll need the Pro plan to access the best templates and advanced checkout features.
- Pros: Complete checkout redesign with conversion tools
- Cons: Premium pricing for advanced templates.
When to Choose Each Option
- SeedProd: Best all-around visual builder for complete checkout customization.
- WPCode: Great for developers or anyone comfortable pasting snippets.
- Merchant: Ideal for quick, plug-and-play badge placement.
- FunnelKit: Best for marketers rebuilding their entire checkout funnel.
For step-by-step instructions, see our guide on how to create a high-converting checkout page in WordPress.
FAQs About Adding Trust Badges to WooCommerce
Adding trust badges to your WooCommerce checkout is one of the fastest ways to boost customer confidence and reduce cart abandonment. With a tool like SeedProd, you can design a professional checkout page that builds instant trust and guides shoppers smoothly through their purchase, all without writing code.
Ready to stop losing sales?
For more online store tips, see our other WooCommerce guides:
- How to Set Up an Online Store in WordPress
- How to Easily Hide Out of Stock Products in WooCommerce
- How to Customize the WooCommerce Additional Information Tab
- How to Add View Cart Button in WooCommerce the Easy Way
- How to Change Shop Page Title in WooCommerce
Thanks for reading! We’d love to hear your thoughts, so please feel free to join the conversation on YouTube, X and Facebook for more helpful advice and content to grow your business.


