

TL;DR: How I Add Custom Fields to a WordPress Registration Form With WPForms
The default WordPress registration form collects a username and email. That’s it. Here’s how to add custom fields using WPForms so you capture phone numbers, company names, social profiles, and more, with no extra plugin needed.
- Activate the Addon: Install WPForms Pro and activate the User Registration Addon from WPForms » Addons.
- Create the Form: Go to WPForms » Add New, name it, and choose the User Registration Form template.
- Add Custom Fields: In the WPForms form builder, drag in any extra fields you need (e.g. Single Line Text for “Phone Number”) and drag them into your form.
- Map the Fields: In WPForms Settings » User Registration, map each form field to the correct user meta key.
- Set Confirmations: Choose a message, page redirect, or URL redirect for after users submit.
- Publish: Add the WPForms block to a new WordPress page and publish.
The default WordPress registration form asks for a username and email. That’s it. If you run a membership site, a WooCommerce store, or any kind of community, you’re flying blind on who just signed up.
You can’t ask for a phone number, company name, or social profile link. You can’t segment your list. You can’t personalize anything. It’s a two-field form trying to do a full onboarding job.
In this guide, I’ll walk you through how to add custom fields to your WordPress user registration form using WPForms. No coding needed.
- What Are Custom Fields in WordPress Registration Forms?
- How to Add Custom Fields to a WordPress Registration Form (Step by Step)
- Step 1: Build a WordPress User Registration Form With a Plugin
- Step 2: Map Custom Fields to WordPress User Meta
- Step 3: Configure the Remaining Registration Settings
- Step 4: Set Up User Registration Notifications in WordPress
- Step 5: Add a Confirmation Message for Your Registration Form
- Step 6: Publish Your WordPress Registration Form With Custom Fields
- What to Do With Your Registration Data
- How to Add Custom Fields to a WooCommerce Registration Form
What Are Custom Fields in WordPress Registration Forms?
Custom fields in WordPress registration forms are extra input fields you can add to collect more information from new users during sign-up.
By default, WordPress only asks for a username and email address. With custom fields, you can request additional information such as phone numbers, company names, job titles, or social media profiles.
Adding these fields gives you better user profiles and helps you personalize your site experience or marketing campaigns. For site owners running a WordPress membership site, this data is essential from day one.
How to Add Custom Fields to a WordPress Registration Form (Step by Step)
Here’s how to build one.

| Pricing: Starts at $49.50/year |
| Free Plan / Trial: Free Lite version available |
| Standout Features: |
| 🔹 Drag-and-drop form builder 🔹 User Registration Addon for custom fields 🔹 Pre-built templates for registration forms |
| Best For: Beginners who want no-code WordPress registration forms |
For this tutorial, I’ll be using WPForms — it has a dedicated User Registration Addon that maps custom fields directly to WordPress user profiles, so you don’t have to write any PHP.
WPForms is a drag-and-drop WordPress form builder with over 6 million active installs. I use it on the SeedProd site and it’s the form builder I reach for first when I need a registration form that syncs with user profiles.
Why not check out this in-depth WPForms review for the full details?
Important: You’ll need WPForms Pro or higher — the User Registration Addon isn’t available on the free Lite version or the Basic plan. Go ahead and get your copy of WPForms here. Then when you’ve downloaded the plugin, you can learn how to install a WordPress plugin here.
When you’ve downloaded and installed WPForms, move on to Step 1.
Step 1: Build a WordPress User Registration Form With a Plugin
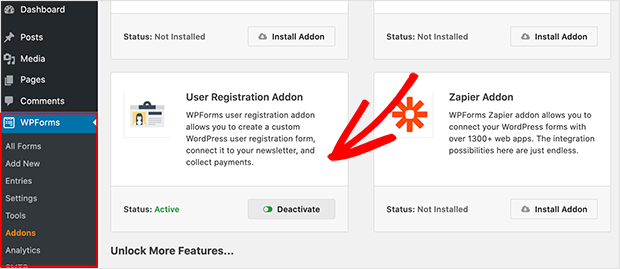
WPForms’ User Registration Addon is what connects your form fields to WordPress user accounts. Activate it first before building the form.
To begin, head to WPForms » Addons from your WordPress admin. Then locate the User Registration Addon and click Activate.
Next, go to WPForms » Add New to create a new form.
Then on the setup screen, give your form a name and choose the User Registration Form template.
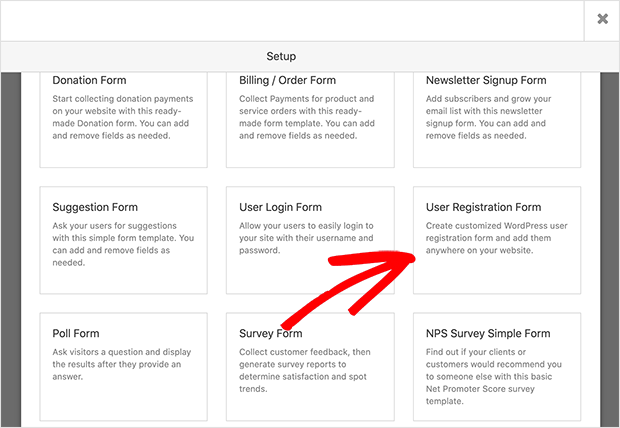
Upon clicking the template, WPForms creates a default user registration form, which you can go on to customize.
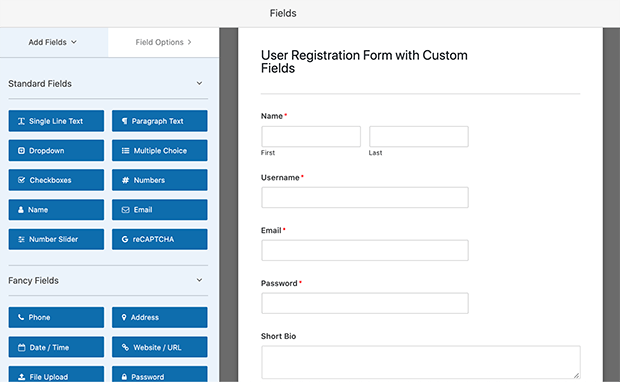
You can rearrange the fields on your form by dragging elements to a different position. Adding new form fields is as simple as dragging them from the left-hand panel and dropping them on the right-hand panel.
Step 2: Map Custom Fields to WordPress User Meta
WPForms handles custom field mapping natively. You don’t need any extra plugin to store custom data on user profiles.
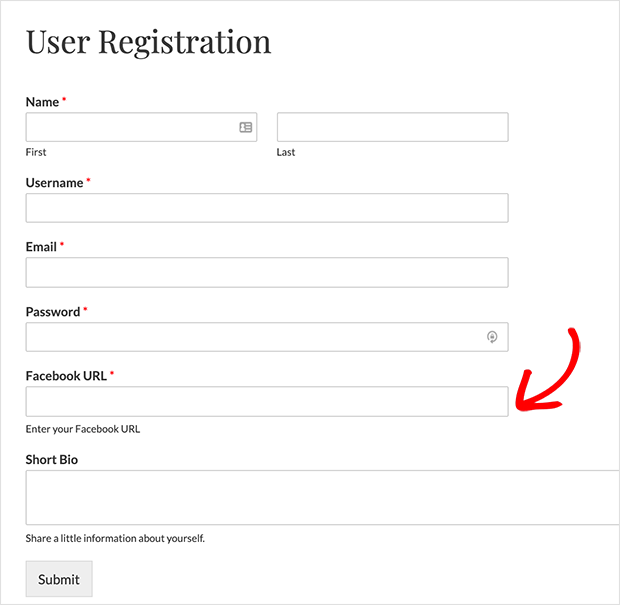
First, make sure your custom fields are already on the form. In the form builder, drag any extra fields you need from the left panel onto your form. For example, drag in a Single Line Text field and label it “Phone Number.”
While you’re in the field settings, you can also add placeholder text and help text to guide users. Placeholder text shows as light gray text inside the field before they type. Help text appears as a small note below the field label. Both reduce abandoned registrations because users know exactly what to enter.
To make any custom field required, toggle the Required switch in the field settings panel. Required fields show a red asterisk on your form and prevent submission if left blank.
Now click the Settings tab and go to User Registration. This is where you tell WPForms where to store each field’s data.
Scroll down to the Custom User Meta Fields section. You’ll see a text input for the meta key and a dropdown to select the matching form field.
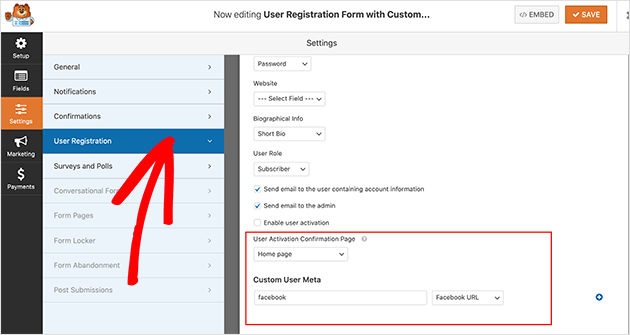
Enter your meta key in the text input (for example, phone_number), then select the matching form field from the dropdown. For this example, choose your Phone Number field.
To add another mapping, click the blue + button and repeat the process. You can add as many custom meta fields as you need.
You might also like to add a checkbox asking users to opt into your email list. This is an excellent way to grow your email list from the moment someone registers.
When you’re done, click Save. WPForms will store each submitted value directly as WordPress user meta, visible under Users » All Users in your admin.
Step 3: Configure the Remaining Registration Settings
While you’re still in Settings » User Registration, take a moment to configure the rest of the registration options.
At the top of the page, use the field mapping dropdowns to match your standard form fields (name, username, password, email) to the correct WordPress profile fields. Below that, set the default user role for anyone who registers through this form.
You can also enable email notifications for new registrations and choose a confirmation redirect to send users to a thank-you page or login screen after they submit. Click Save when you’re done.
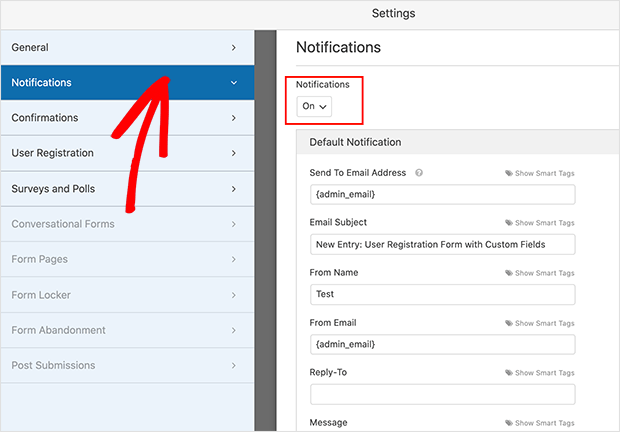
Step 4: Set Up User Registration Notifications in WordPress
By default, WPForms sends you an email notification whenever someone registers. For help configuring the full notifications page, see the WPForms documentation on form notifications.
Step 5: Add a Confirmation Message for Your Registration Form
We’ll look at setting up messages that users will see when they submit a user registration form for this step.
This is helpful if you need users to confirm their account to complete the registration process, as you can show a message thanking them for registering and to watch out for your validation email.
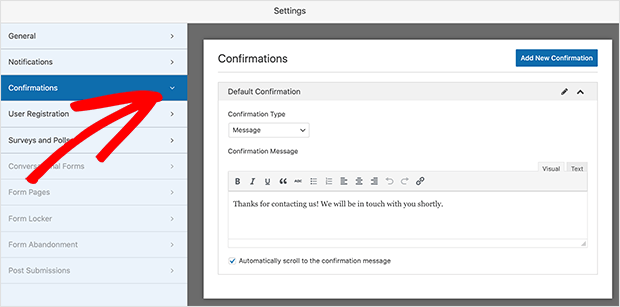
There are 3 confirmation types in WPForms:
- Message – This is the default confirmation. When users complete your form, a message appears, letting them know it went through successfully.
- Show Page – This confirmation type sends users to a specific web page on your site thanking them for registering. For instance, you can show your login page immediately after they register.
- Go to URL (Redirect) – This option is used when you want to send customers to a different website.
When you’ve chosen your confirmation message type, click Save and move on to publishing your form.
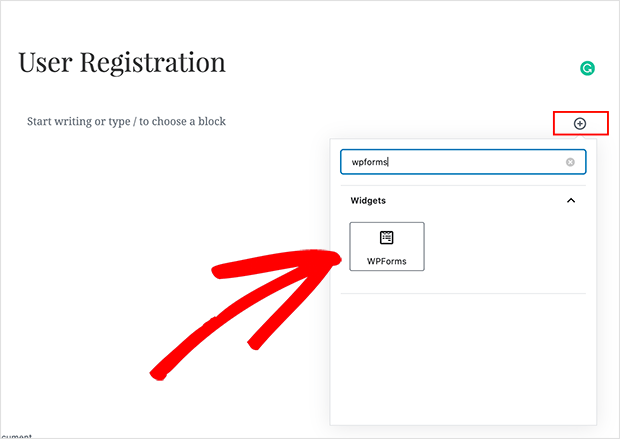
Step 6: Publish Your WordPress Registration Form With Custom Fields
WPForms makes it easy to add your registration form to any post, page, or sidebar. Let’s publish it on a WordPress page.
Go to Pages » Add New to create a new page. In the WordPress editor, click the Plus (+) icon, search for “WPForms,” and click the WPForms block to add it.
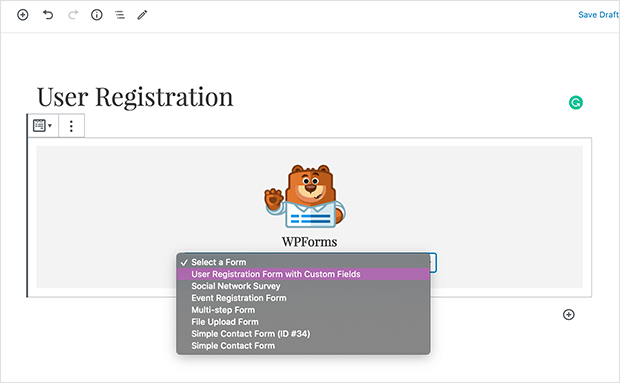
Choose your user registration form from the dropdown box and it’s added to your page to preview.
Before you publish, I always recommend enabling WPForms’ built-in spam protection. Go to the form’s Settings » Spam Protection and Security and turn on the honeypot anti-spam field or connect reCAPTCHA. A public registration form attracts bots fast.
When you’re happy, click Publish to launch your form.
What to Do With Your Registration Data
Once your form is live, you have user data sitting in WordPress. Here’s how to put it to work:
- View entries in WPForms: Go to WPForms » Entries to see every registration submission with all custom field data.
- Connect to your email platform: WPForms integrates natively with Mailchimp, ConvertKit, ActiveCampaign, and other providers. Map your custom fields to tags or list segments so registrants get the right emails from day one.
- See data on user profiles: Fields mapped through the User Registration Addon appear directly on user profiles under Users » All Users. Admins can view and edit the data from there.
How to Add Custom Fields to a WooCommerce Registration Form
If you run a WooCommerce store, you can collect custom fields at registration and checkout using the same WPForms setup.
WPForms integrates with WooCommerce natively on Pro and Elite plans. The User Registration Addon works on WooCommerce checkout and registration pages. This means the same custom fields you built in Steps 1-3 can show up when a customer creates an account during checkout.
To enable it, go to WPForms » Settings » Integrations and connect your WooCommerce store. From there, you can map your registration form fields to WooCommerce customer data so the information is stored on both the WP user profile and the WooCommerce order record.
This is especially useful if you want to collect company names or VAT numbers at checkout, or ask B2B customers for their industry so you can segment post-purchase emails. For more on customizing the checkout experience, see our guide to customizing the WooCommerce checkout page.
Note: This tutorial uses WPForms for the registration form. If you’re using a different registration plugin such as Ultimate Member, you can add custom fields from within that plugin’s own field manager. The WPForms setup covered here isn’t required.
FAQs About Adding Custom Fields to WordPress Registration Forms
How do I add custom fields to a WooCommerce registration form?
WPForms Pro integrates with WooCommerce through the User Registration Addon. After connecting WooCommerce in WPForms » Settings » Integrations, you can map your custom fields to the WooCommerce checkout registration flow. Custom fields added via WPForms’ Custom User Meta Fields section are saved as WordPress user meta, which WooCommerce reads from the same user profile. No extra plugin needed.
How do I make a custom registration field required in WordPress?
In WPForms, click any field in the form builder to open its settings panel. Toggle the Required switch to on. Required fields show a red asterisk on your form and block submission if left blank. Users must fill them in before they can register.
Can I add a custom registration form to a specific page in WordPress?
Yes. WPForms lets you embed your registration form on any WordPress page, post, or widget area using the WPForms block in the block editor, or the shortcode in classic editor. Create a dedicated registration page, add the block, select your form from the dropdown, and publish.
What happens to the data collected in custom registration fields?
Data from custom fields is stored in two places. WPForms saves a copy as a form entry (viewable under WPForms » Entries). If you’ve used the User Registration Addon and mapped the fields correctly, the data also saves to the WordPress user profile as user meta. Admins can view and edit this data from Users » All Users.
How do I add placeholder text or help text to registration form fields?
Click any field in the WPForms builder to open its settings. The Placeholder Text field adds light gray hint text inside the input. The Description field adds a small note below the label. Both appear on the live form and help users understand exactly what to enter, which reduces incomplete registrations.
Start Building Your Custom Registration Form Today
You now have a WordPress user registration form that collects the data you actually need. That’s the difference between a list of email addresses and a list of real people you can segment, email, and convert.
If you’re interested in learning what else you can do with WPForms, have a look at our other WordPress form tutorials here:
- How to Create a WordPress Form With File Upload
- How to Create a Typeform-Style Form
- How to Create a Contact Form in WordPress
- How to Create an Online Order Form in WordPress
- How to Create a Multi-Step Form in WordPress
And if you’d like, follow us on Facebook and Twitter for more helpful tips and tutorials.
Thanks for reading! We’d love to hear your thoughts, so please feel free to join the conversation on YouTube, X and Facebook for more helpful advice and content to grow your business.


